
Create a Glowing Power Button
In the following tutorial you will learn how to create a glowing power button in Graphic for Mac.
For starters you will learn how to setup a simple grid, how to create the main shapes and how to easily center them. Using basic vector shape building techniques and some stroke tricks, you will learn how to create that power symbol. Taking full advantage of the Effects pane, you will learn how to add complex shading and highlights for your shapes.
Finally, you will learn how to add a bit of color to your final button using vibrant colors along with the Outer Glow effect.
Step 1
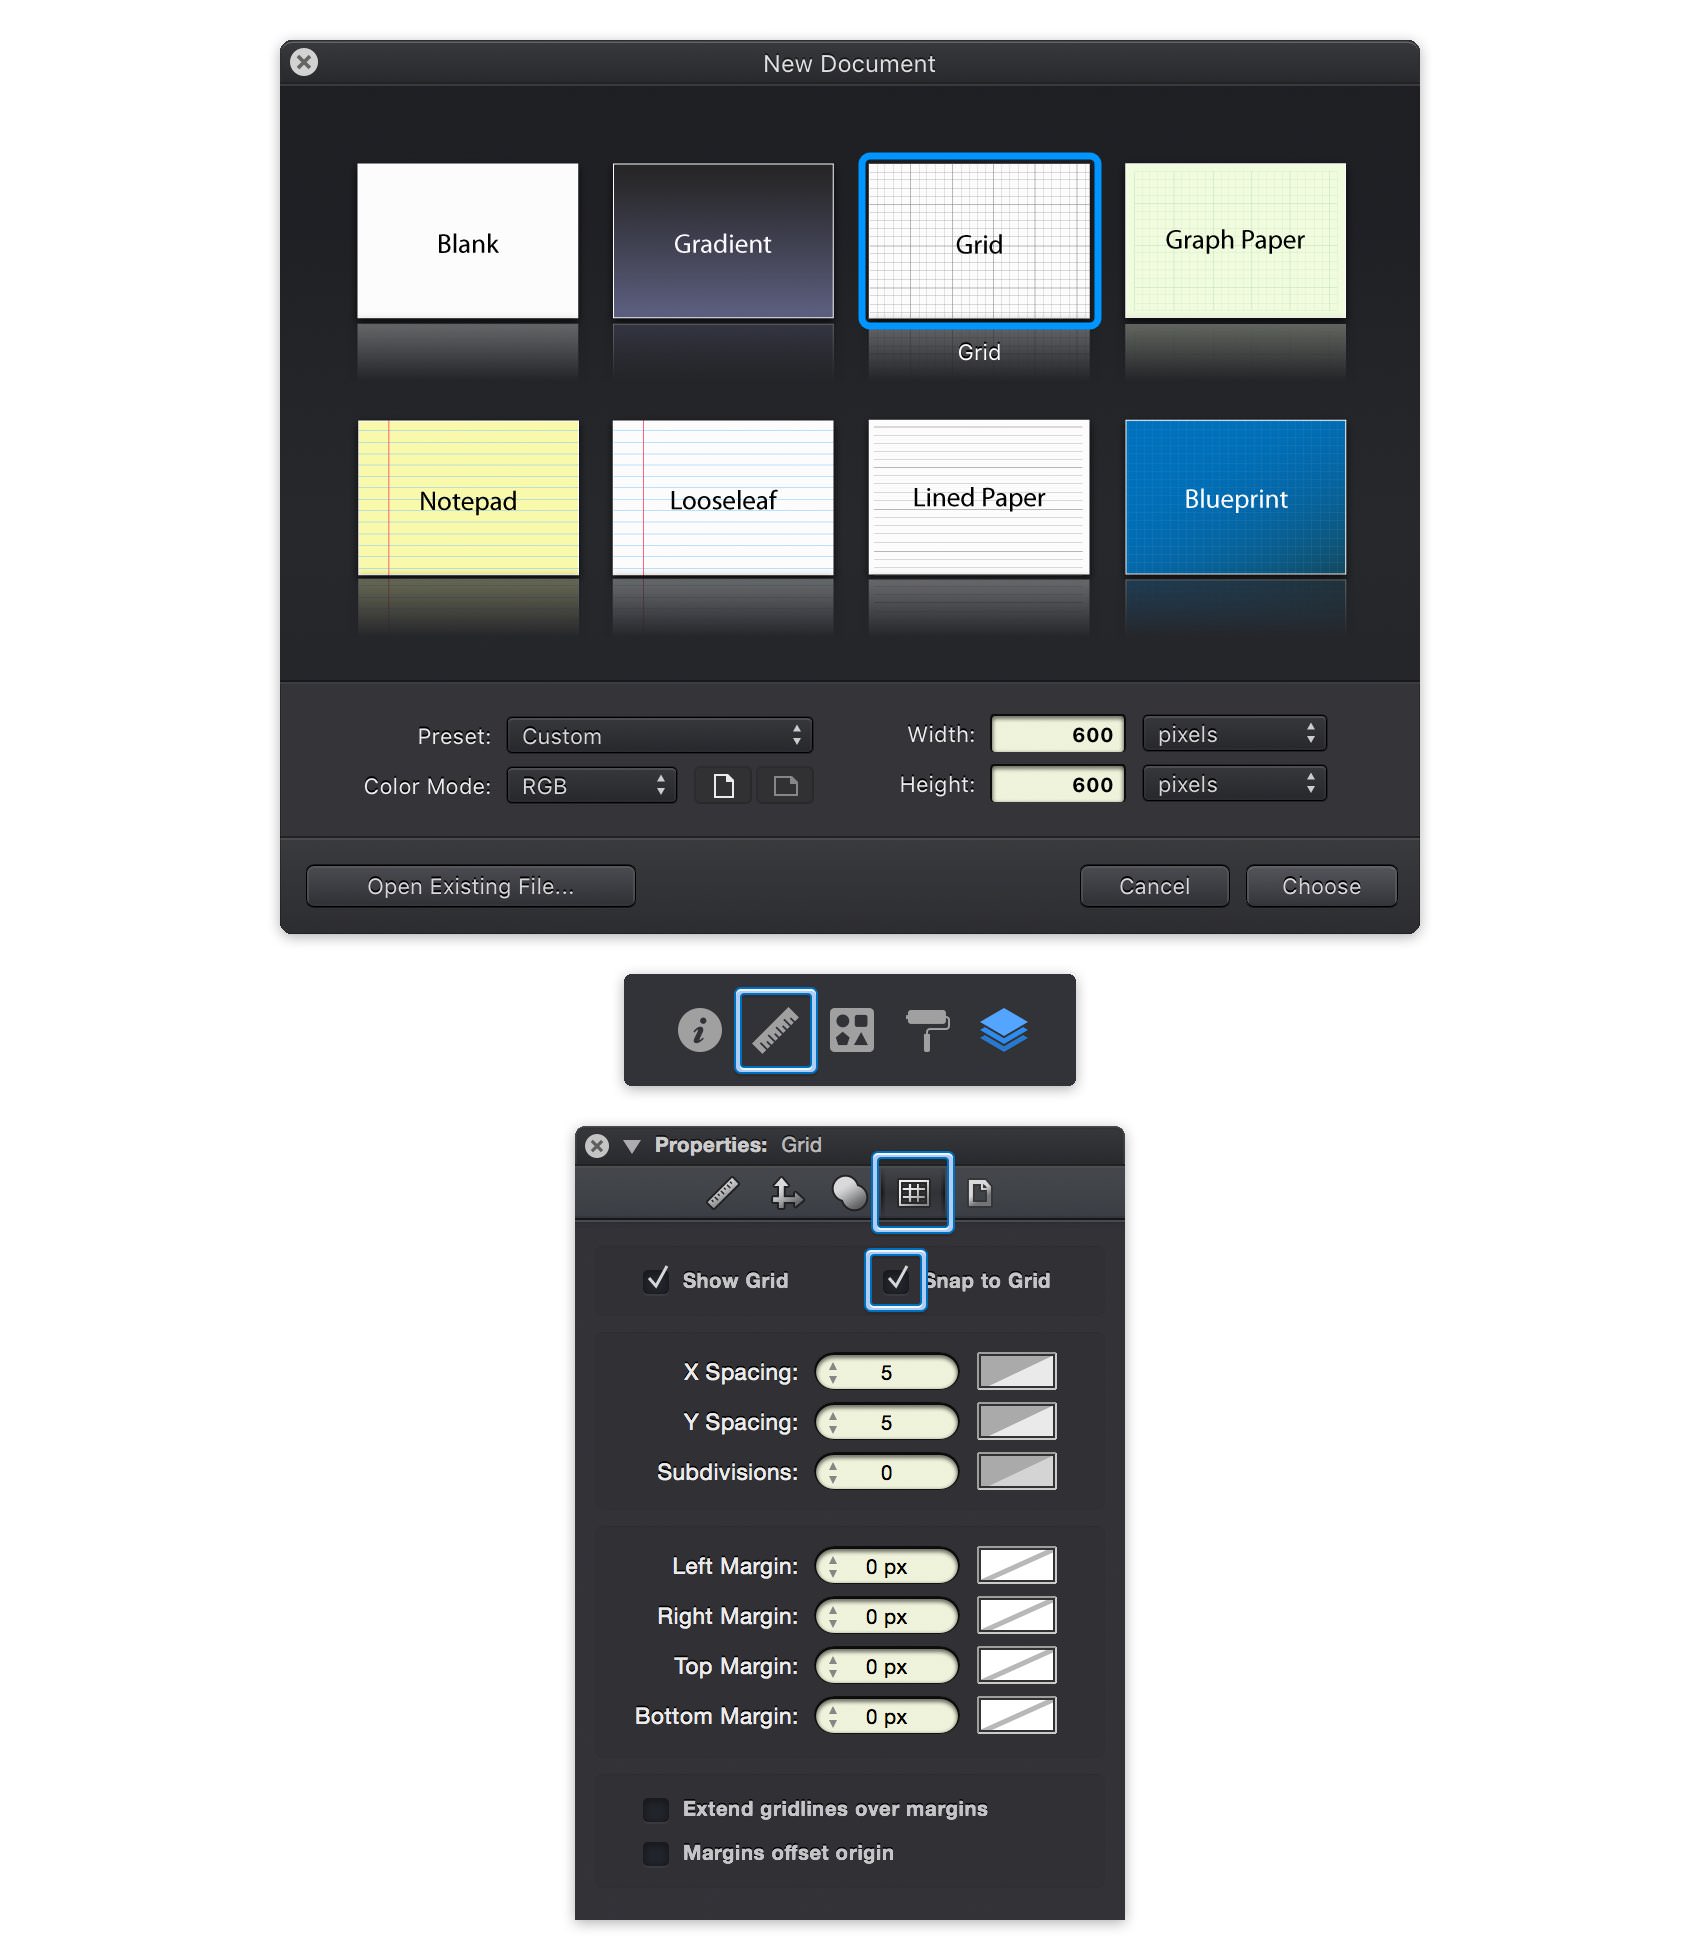
Go to File > New (Command + N) to bring up the New Document window. Select the Grid document style, set the document units to pixels, and set the document dimensions to 600 pixels wide by 600 pixels high.
Next, we'll set up the document grid. Switch to the Grid pane in the Properties panel. If the Properties panel is not currently visible, you can easily open it using the ruler icon that lies above the Layers panel. Change the grid X Spacing and Y Spacing to 5, set the Subdivisions to 0 and enable Snap to Grid (Command + Shift + ').
Keep in mind that you can quickly enable or disable the grid and the Snap to Grid feature using the Command + ' and Command + Shift + ' keyboard shortcuts.
Step 2
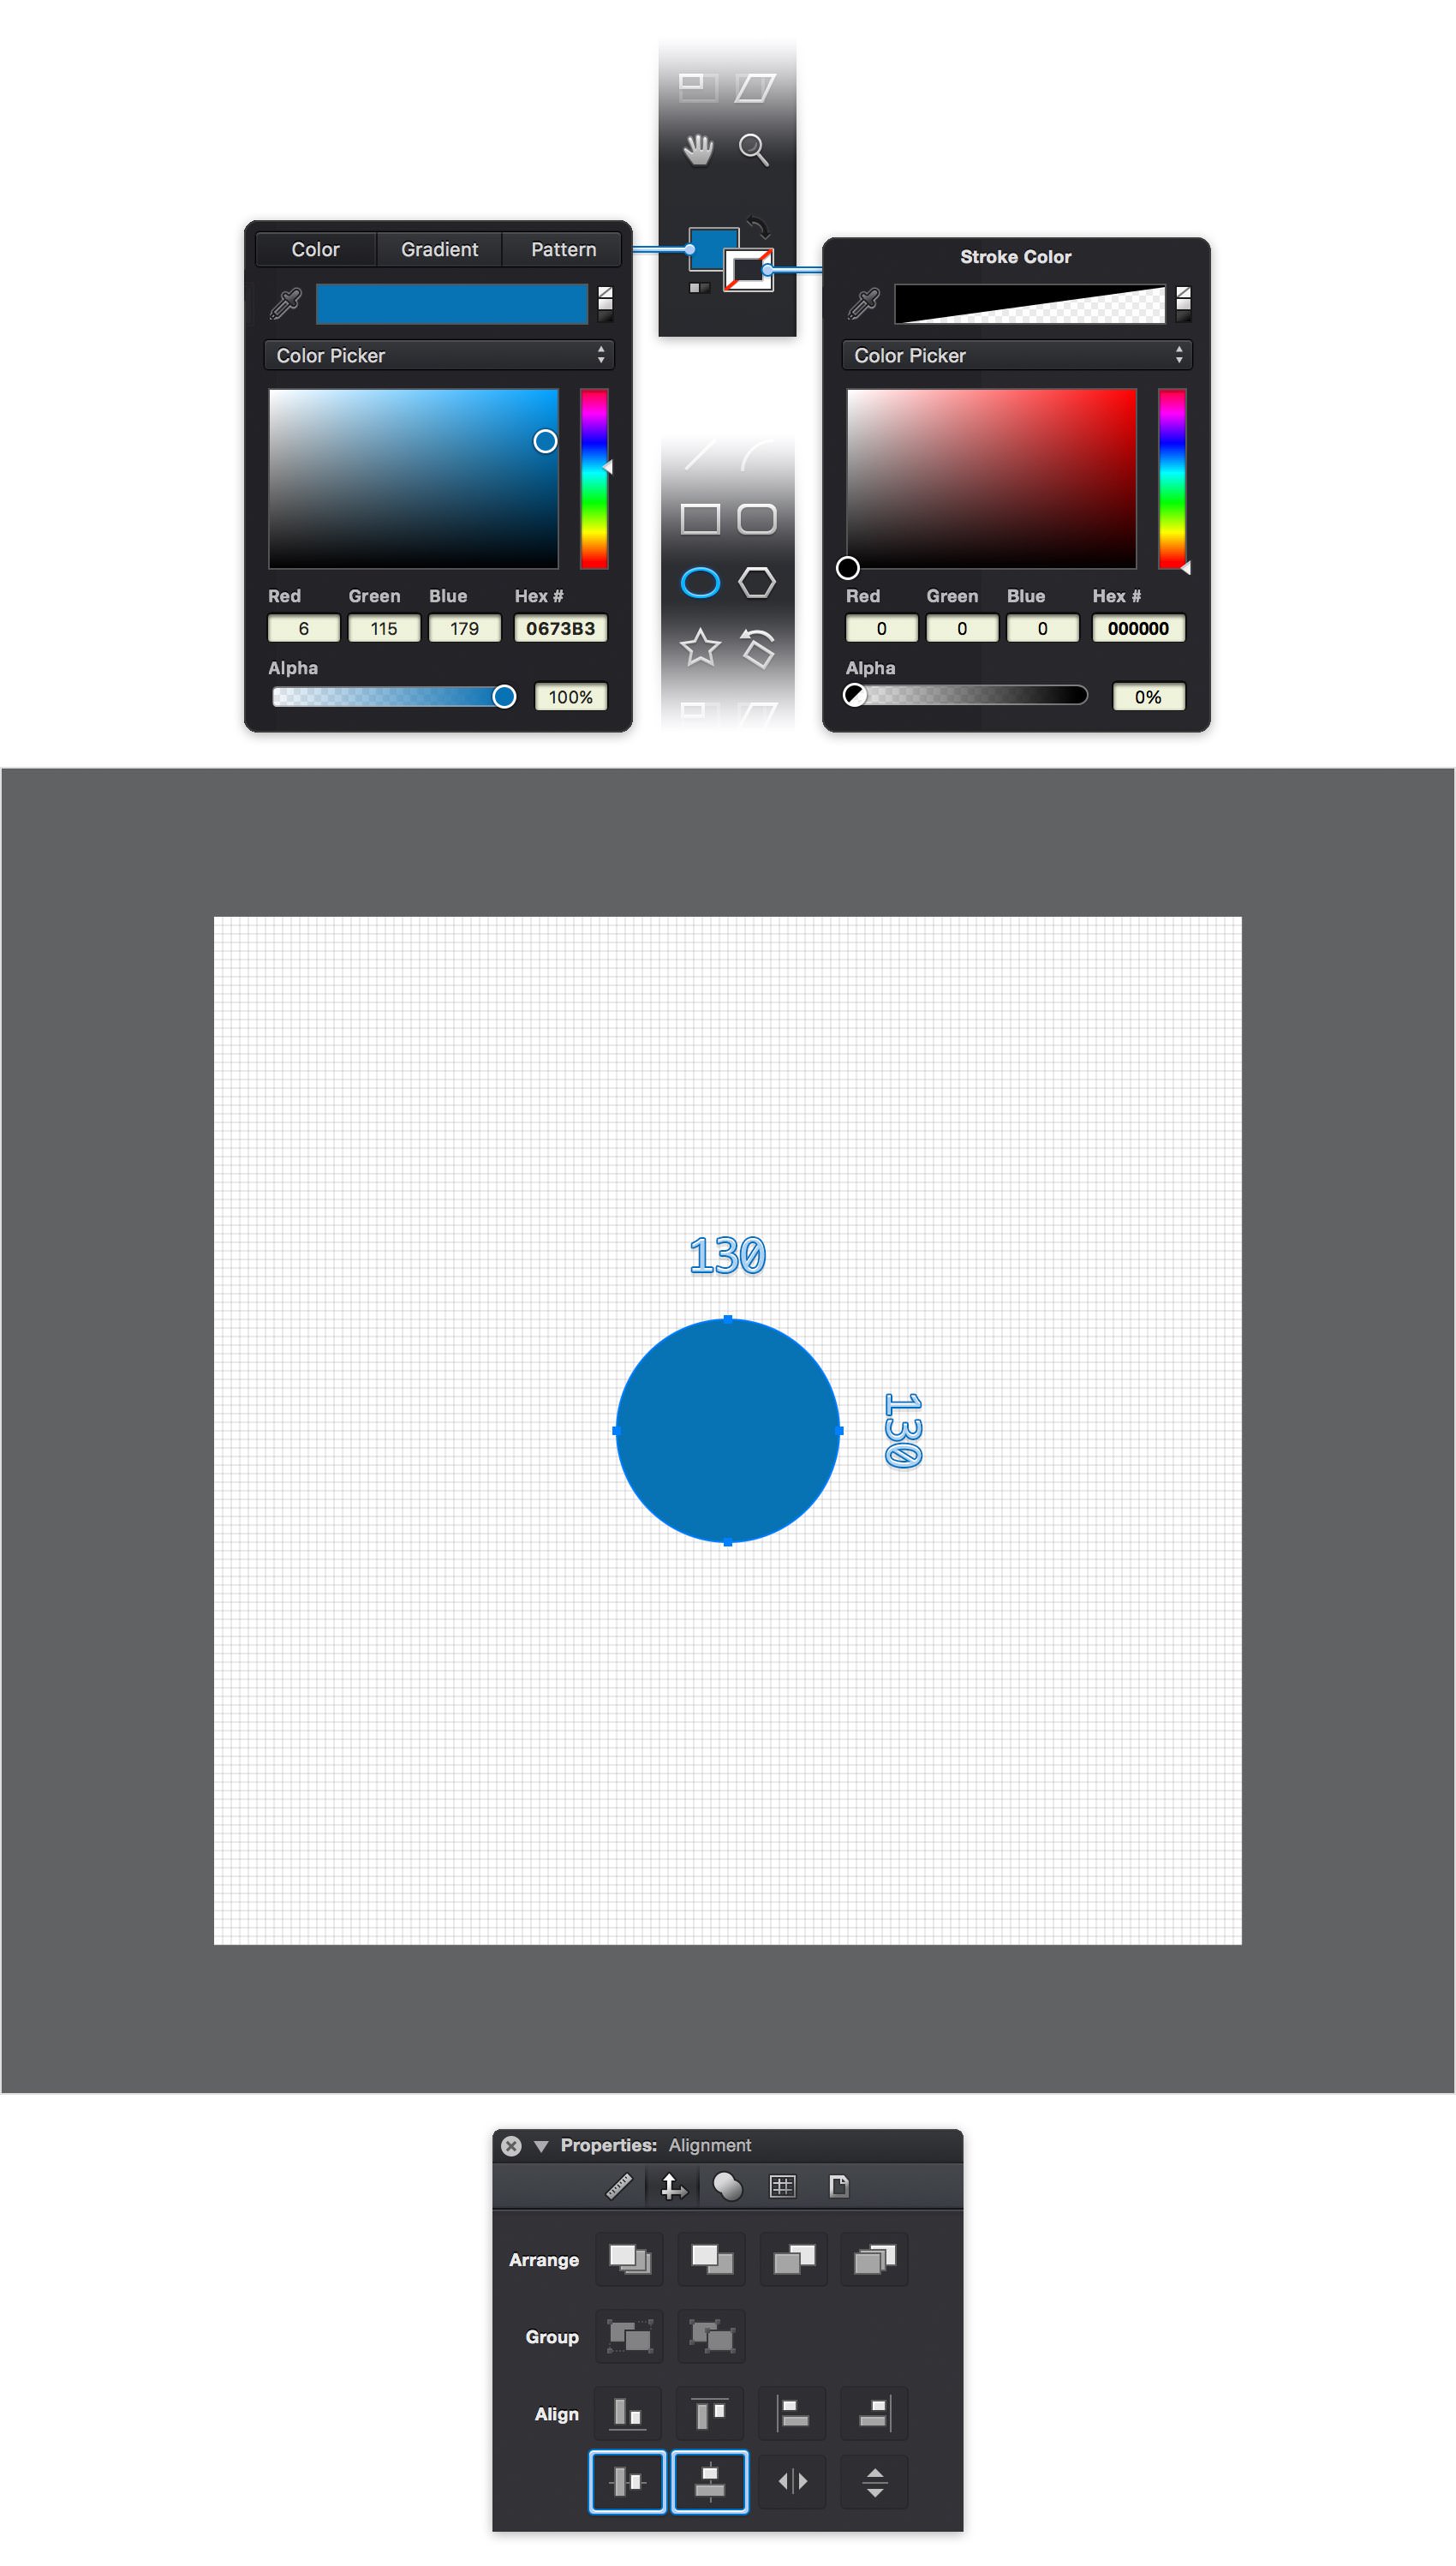
Focus on the Toolbar and notice that by default the fill color is set to white while the stroke color is set to black. Click the Fill color well and set it to R=6 G=115 B=179 and then click the Stroke color well. Drag the Alpha slider to 0% and this will make your stroke invisible.
Pick the Ellipse Tool (O), move to your canvas and create a 130 px circle- the grid and the Snap to Grid feature will ease your work.
Make sure that your shape stays selected, go to the Alignment pane from the Properties panel and click the Horizontal Centers and Vertical Centers buttons to bring your circle in the center of the canvas.
Step 3
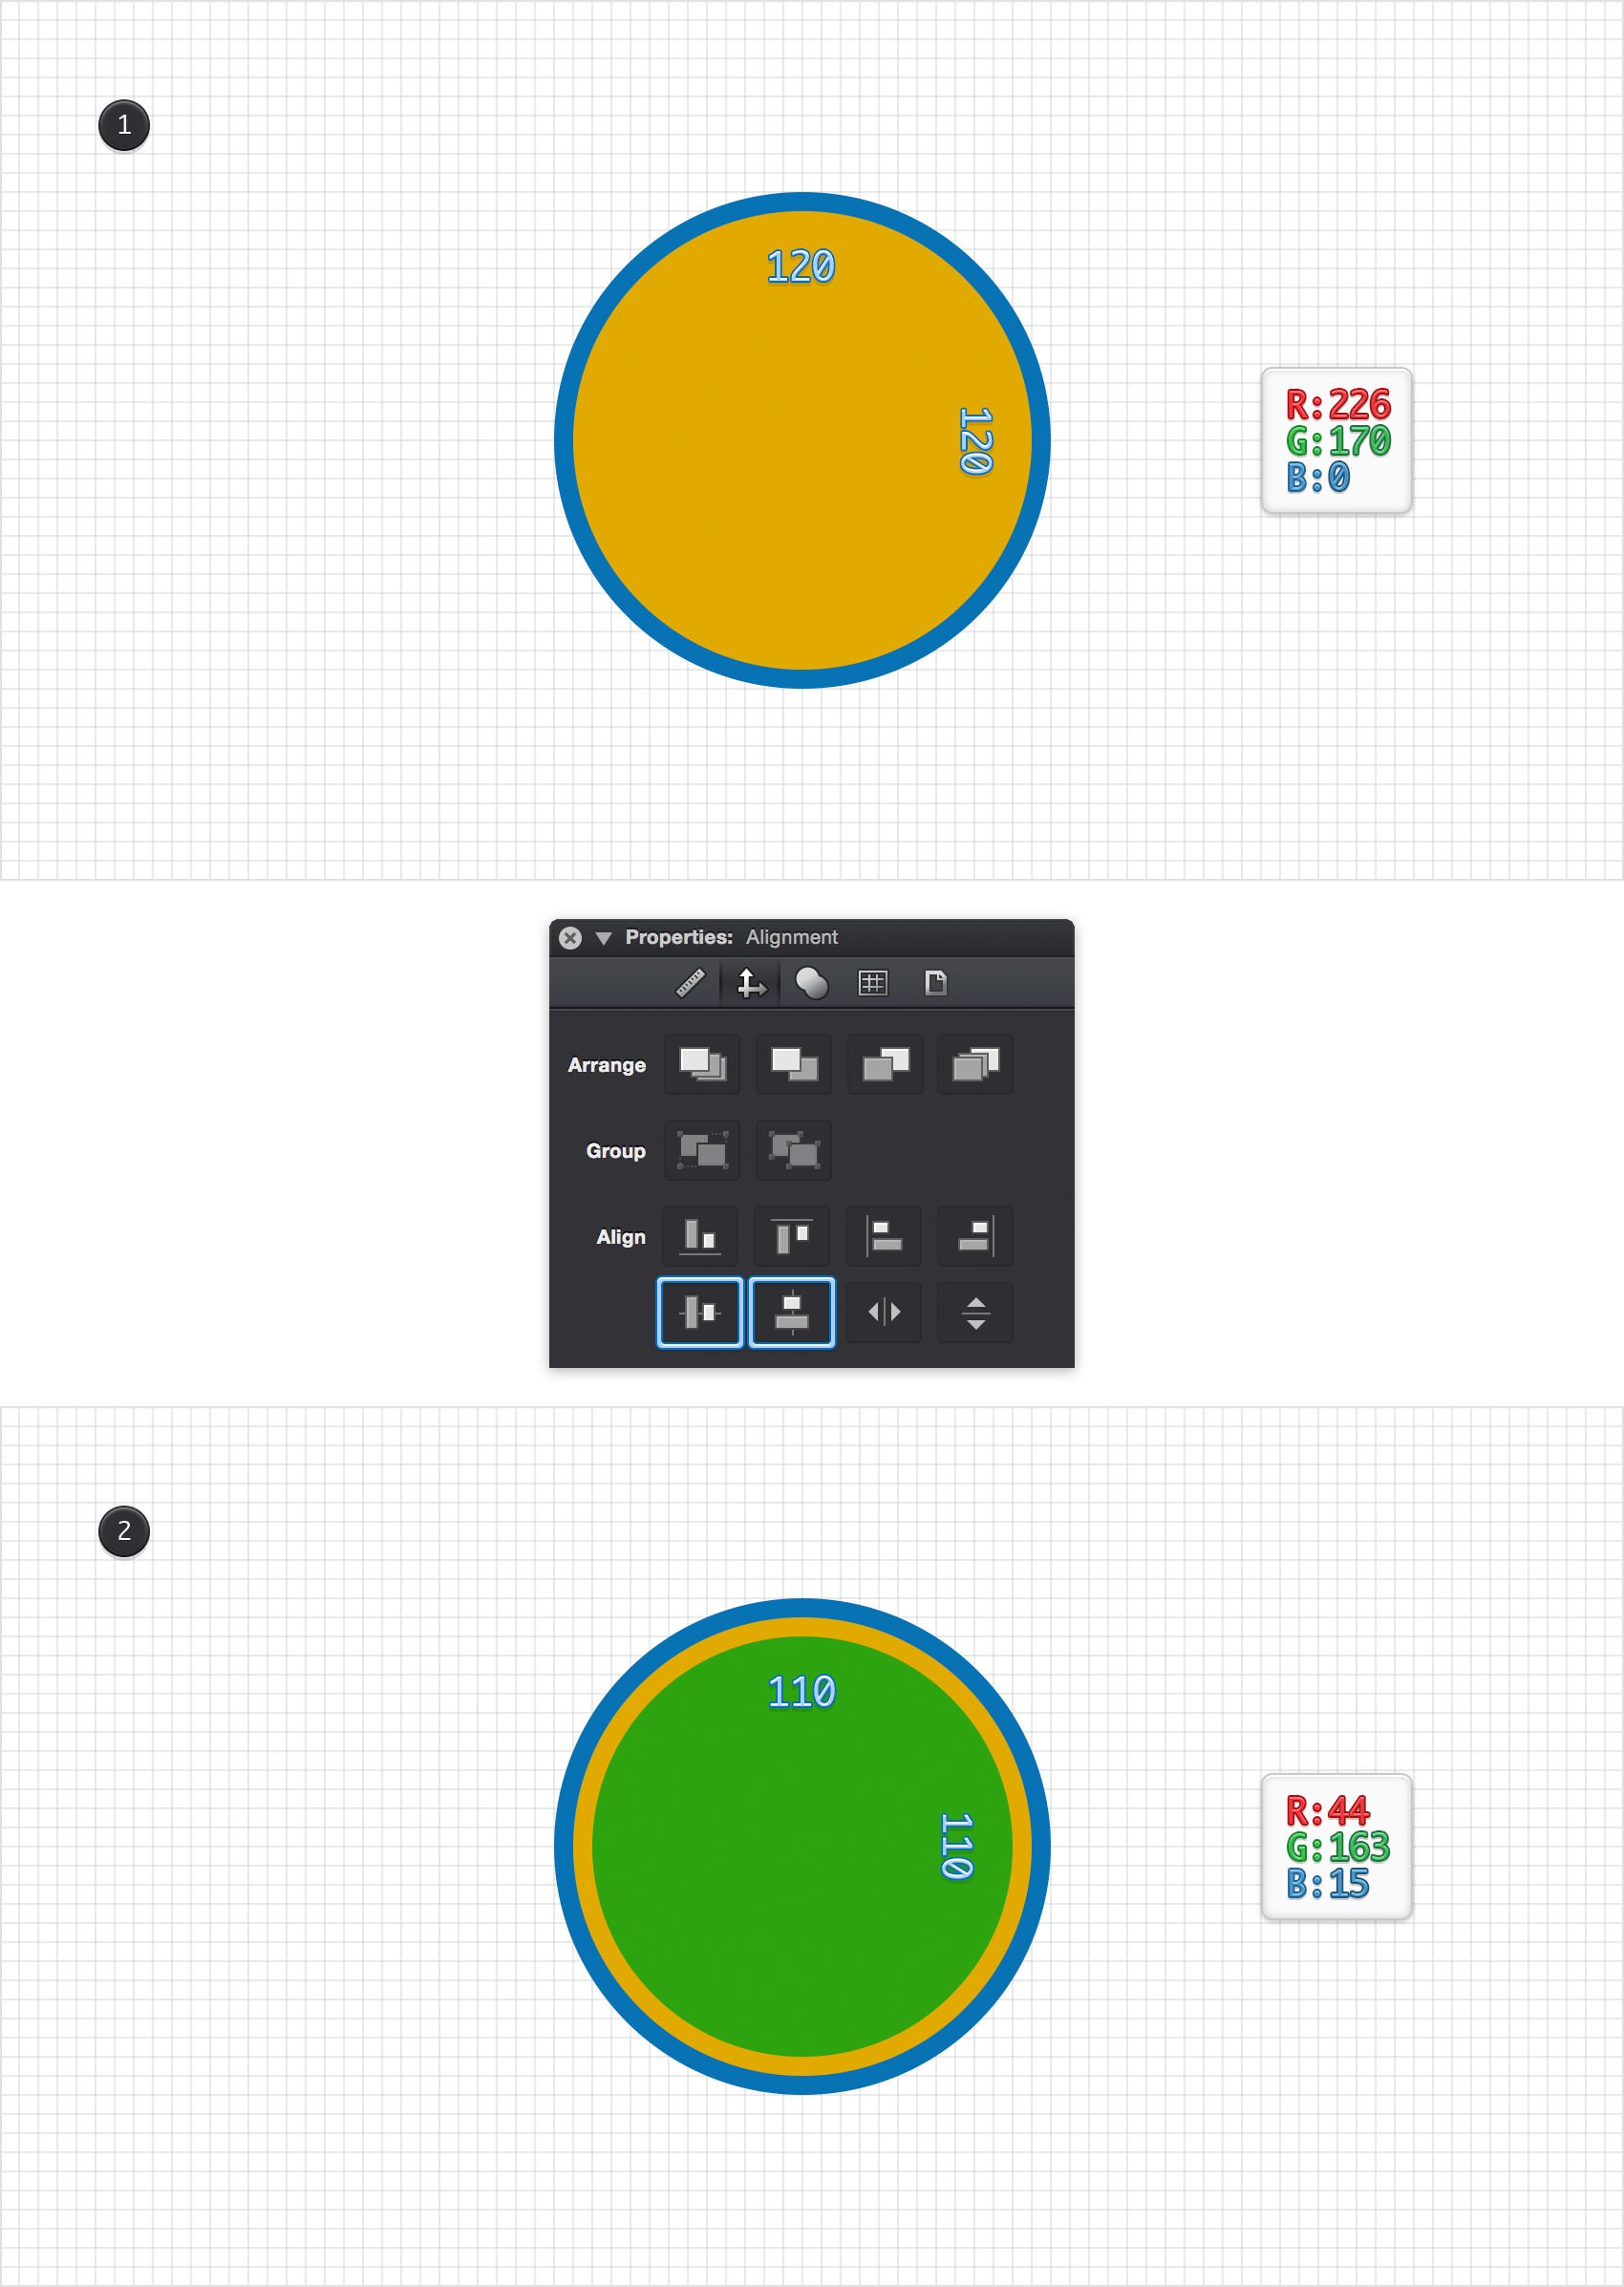
Focus on your Toolbar, set the Fill color to R=226 G=170 B=0 and make sure that the Ellipse Tool (O) is still active. Create a 120 px circle and center it using the same Horizontal Centers and Vertical Centers buttons from the Alignment pane.
Return to your Toolbar and set the Fill color to R=44 G=163 B=15. Create a 110 px circle and center it.
Step 4
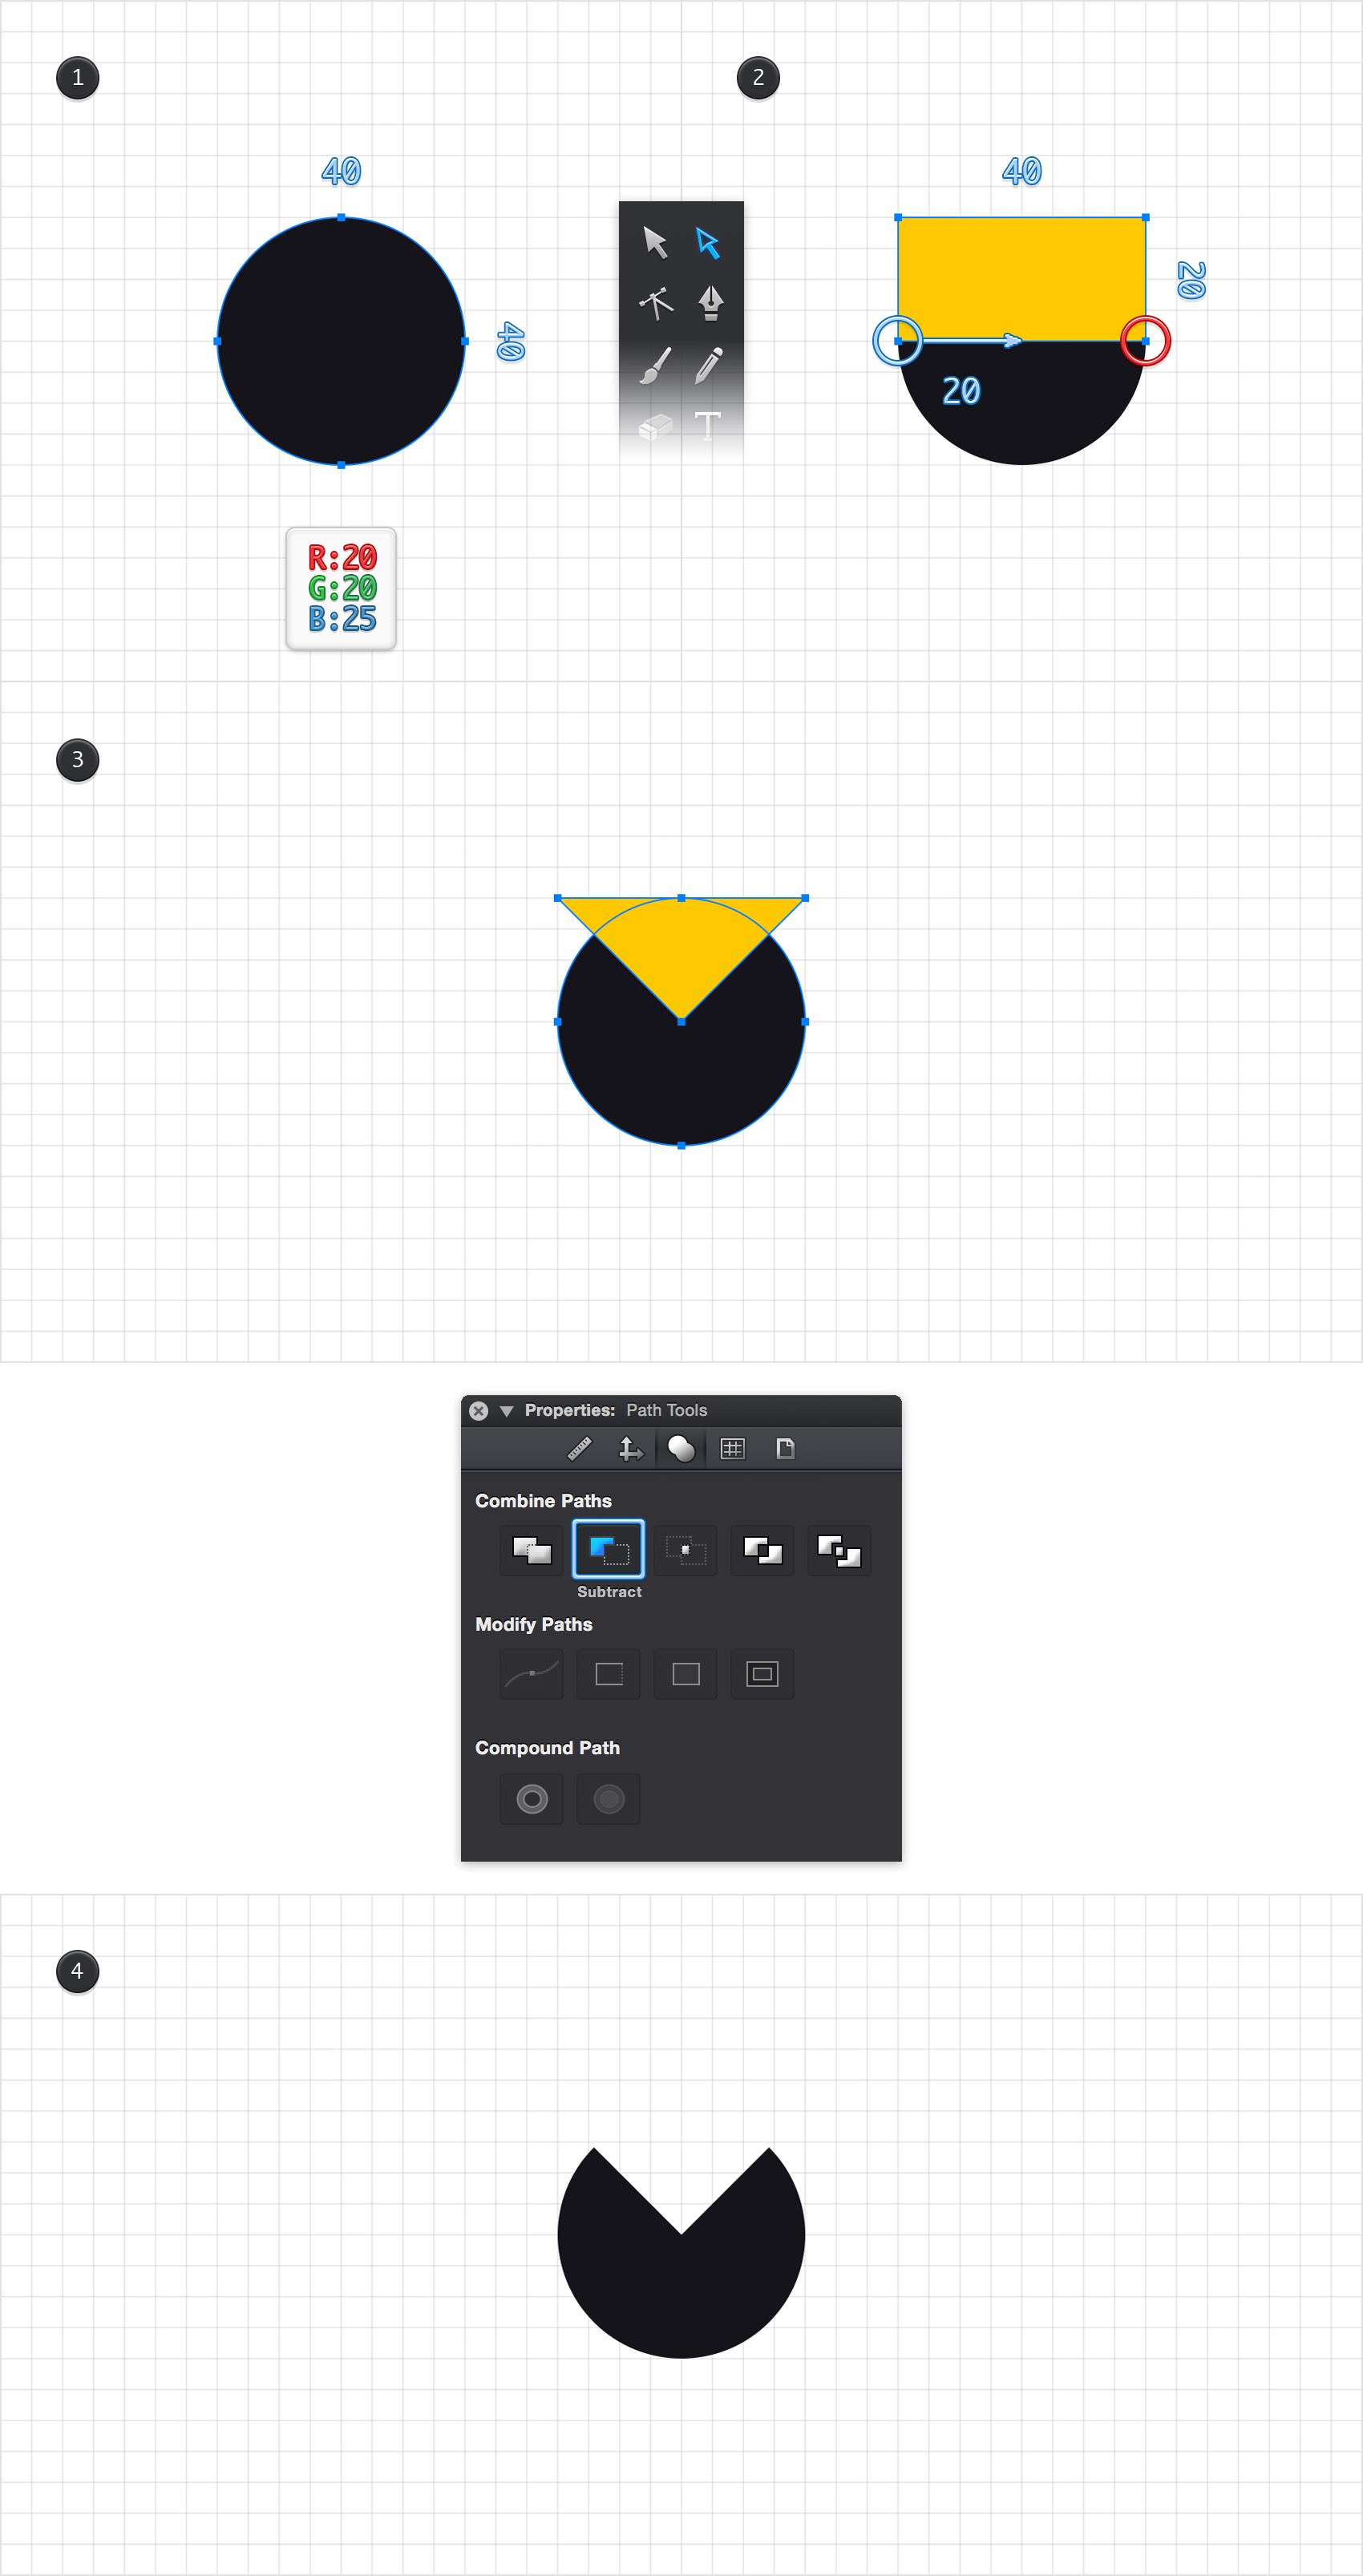
Set the Fill color to R=20 G=20 B=25, make sure that the Ellipse Tool (O) is still active and create a 40 px circle. Replace the existing Fill color with a random yellow and switch to the Rectangle Tool (M). Create a 40 x 20 px shape and place it exactly as shown in the second image.
Focus on the bottom side of your yellow rectangle and pick the Path Selection Tool (A). First, select the right anchor point and remove it using the Delete key. Next, select the other anchor point and drag it 20 px to the right. Switch to the Move Tool (V), select both shapes made in this step and go to the Path Tools pane from the Properties panel. Simply click that Subtract button and your shape will look like in the fourth image.
Step 5
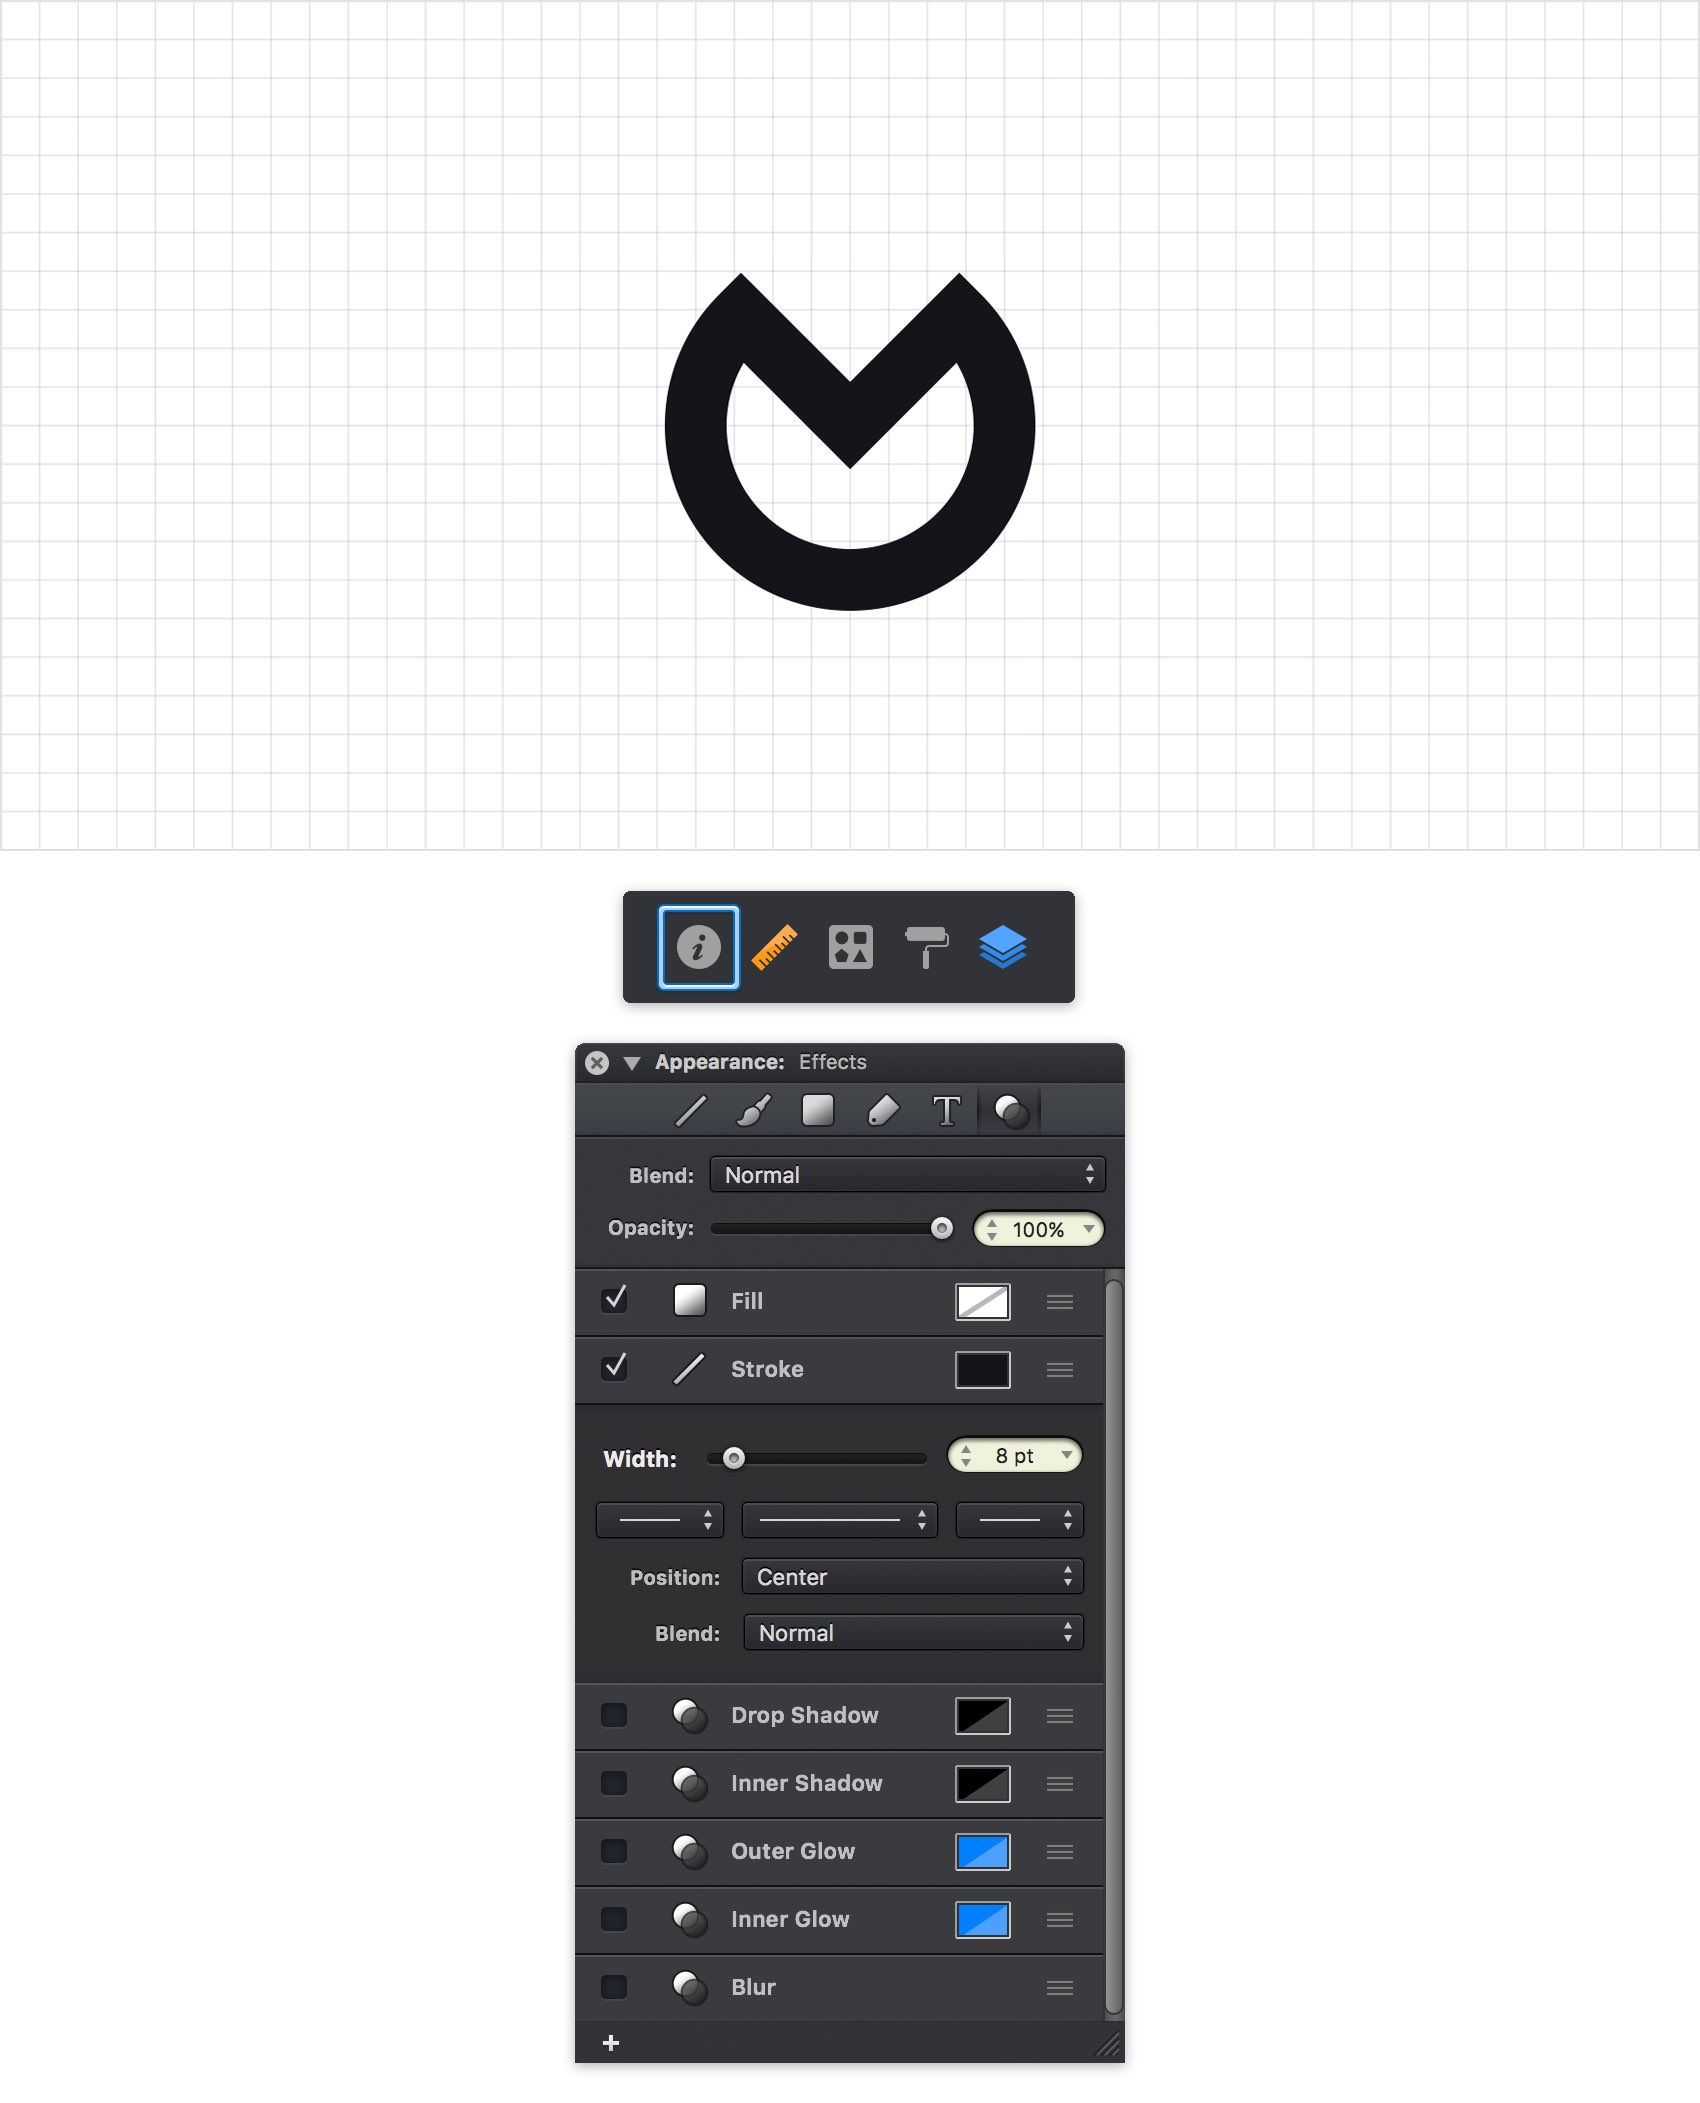
Make sure that your dark shape is still selected and hit Shift + X to quickly transfer the color properties from Fill to Stroke.
Focus above the Layers panel and click the leftmost icon to open the Appearance panel. Move to the Effects pane, select that Stroke and drag the Width slider to 8 pt.
Step 6
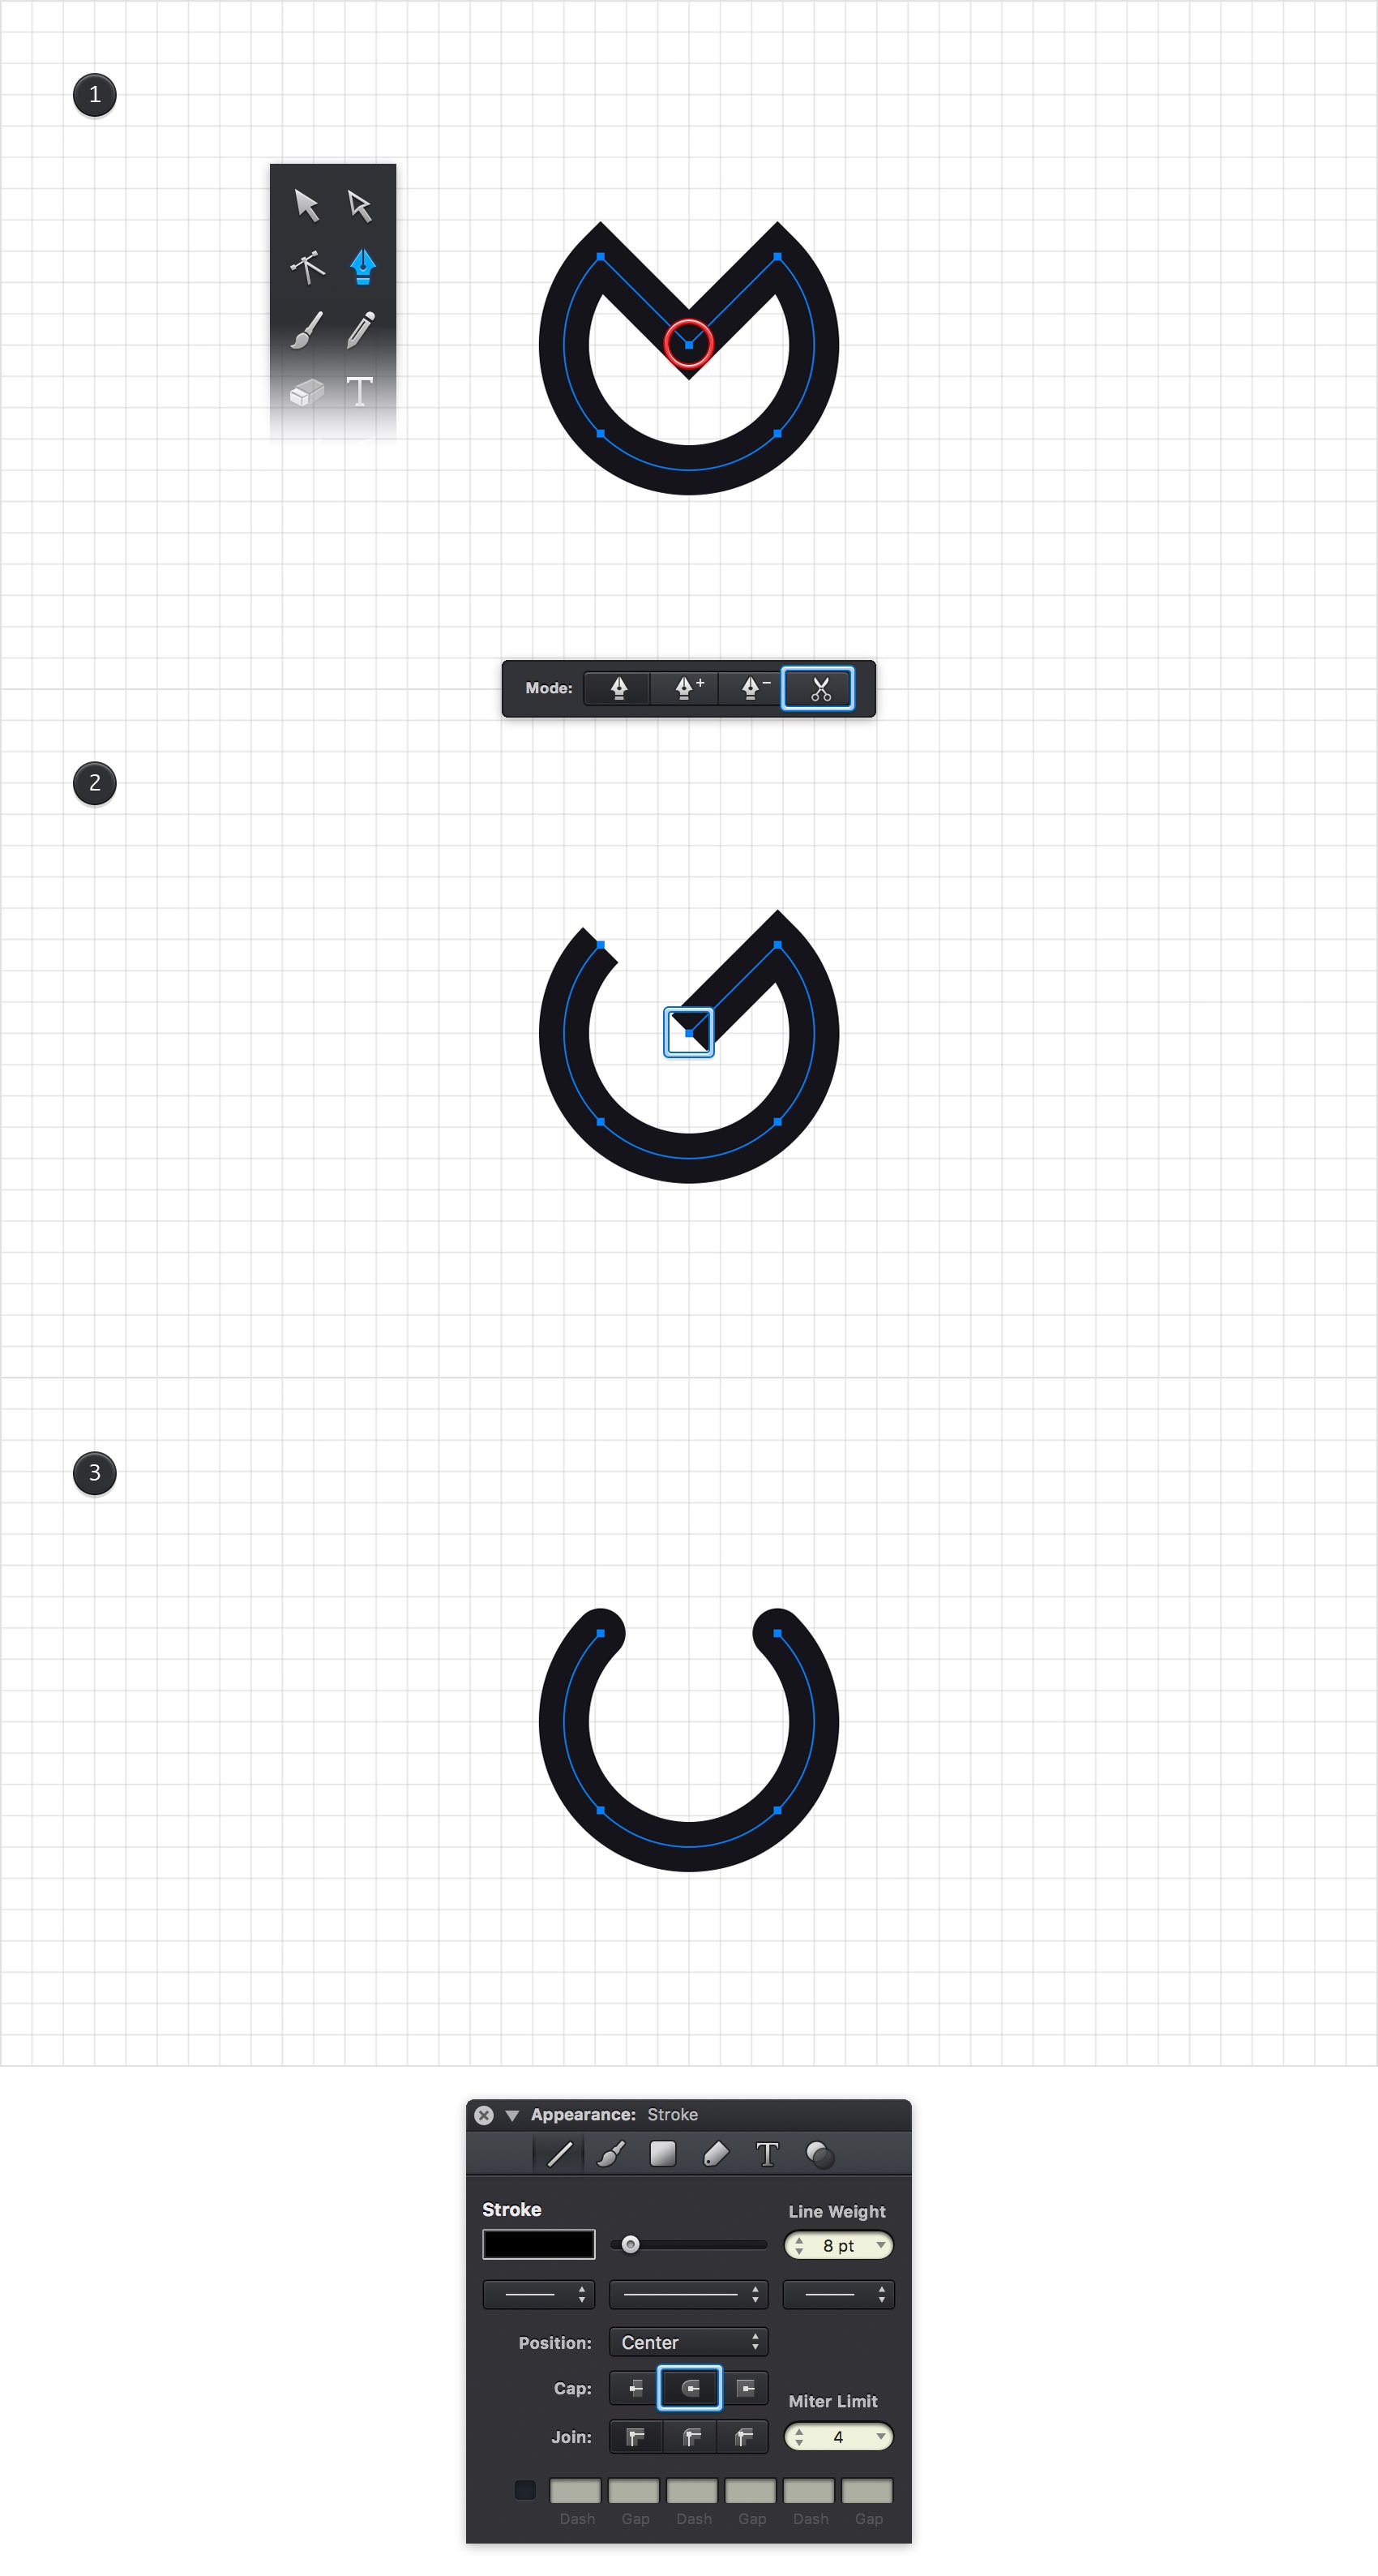
Make sure that your dark path is still selected and pick the Pen Tool (P). Focus on the Tool Options bar and activate the Cut Paths mode. Move to your canvas and click the anchor point highlighted in the first image to cut your selected path.
Switch to the Path Selection Tool, select the oblique path highligthed in the second image and remove it using the Delete key. Using the same tool, select the anchor point highlighted in the third image and get rid of this using that same Delete (or Backspace) key.
Select the remaining path, focus on the Stroke pane from the Appearance panel and check the Round Cap button. In the end things should look like in the fourth image.
Step 7
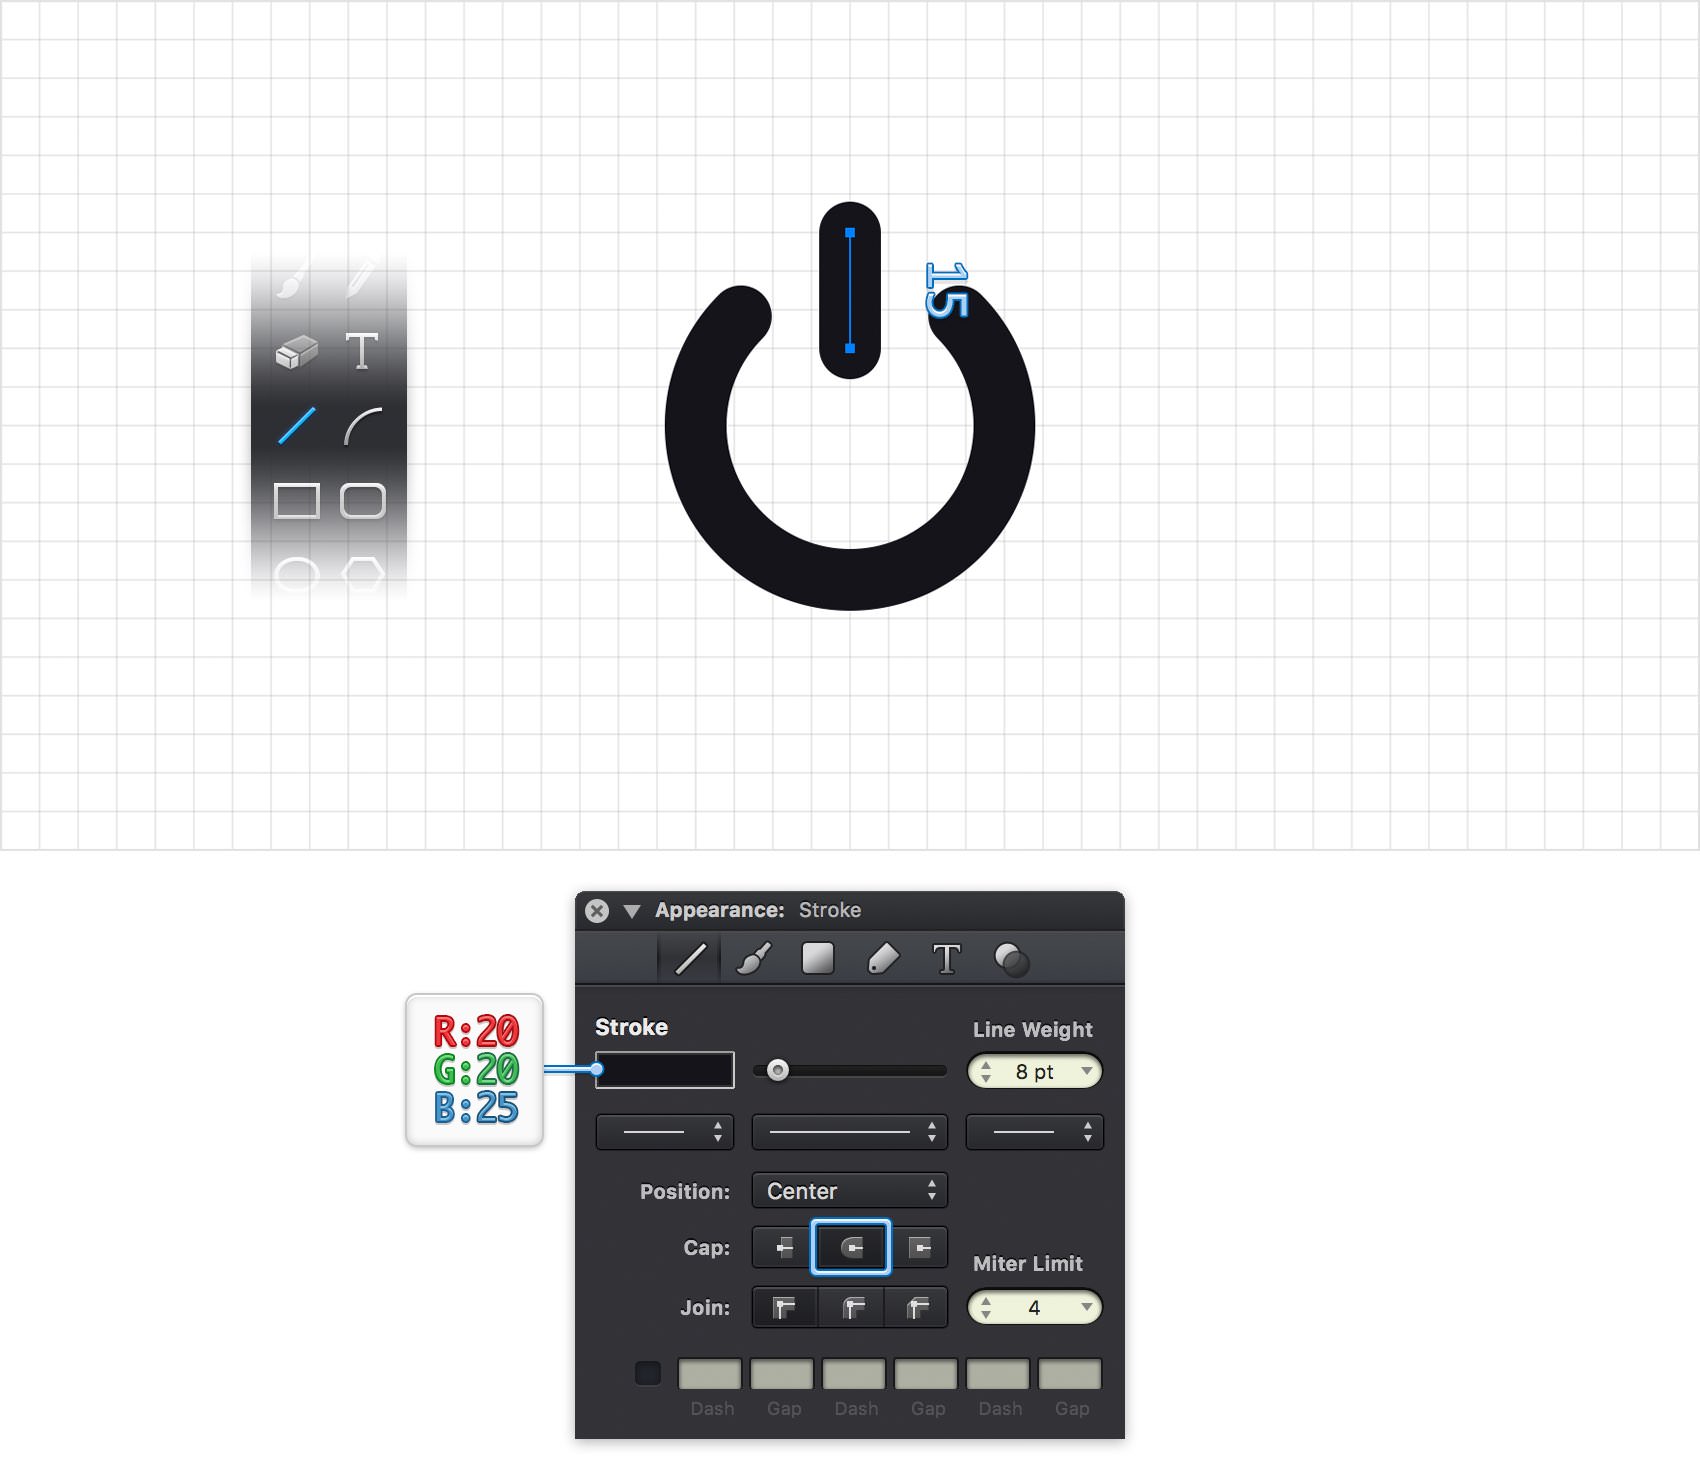
Using the Pen Tool (P) or the Line Tool (L), create a 15 px, vertical path and place it as shown in the following image. Make sure that it stays selected and focus on the Stroke pane from the Appearance pane. Make sure that the Stroke color is set to R=20 G=20 B=25, drag the Line Height slider to 8 pt and don't forge to check that Round Cap button.
Step 8
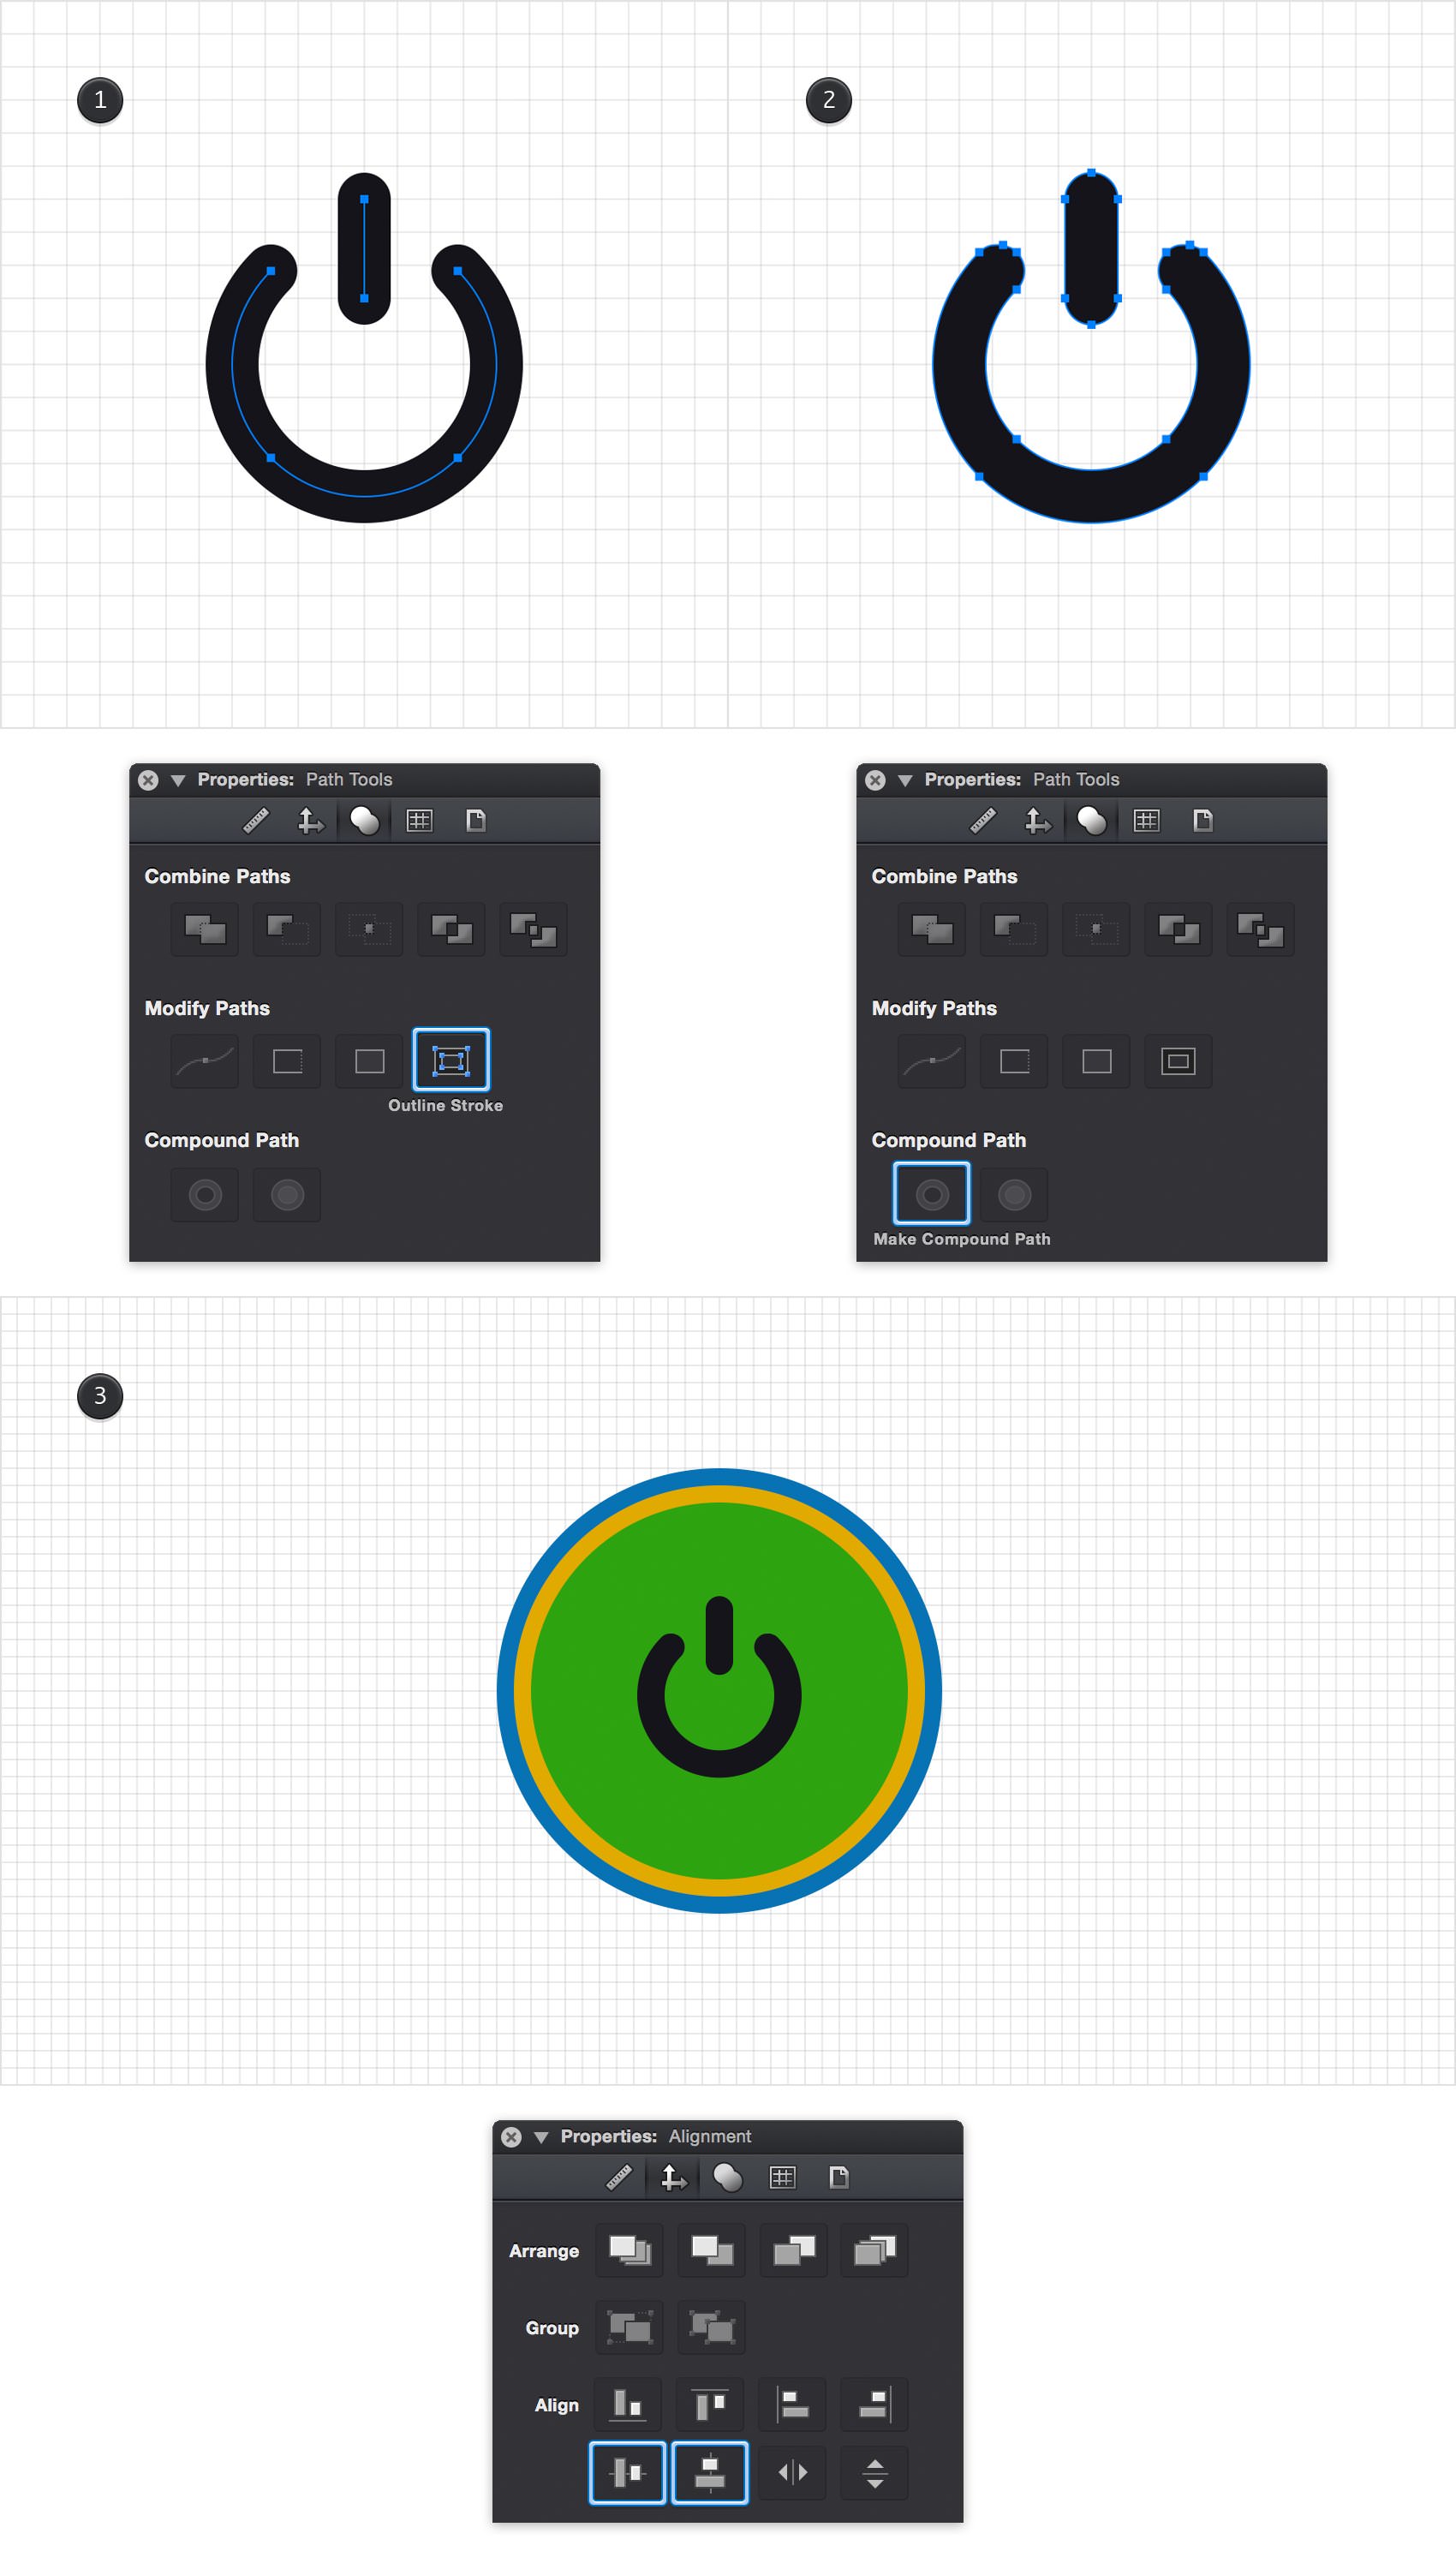
Reselect both paths that make up your power symbol and focus on the Path Tools pane from the Properties panel. First, click the Outline Stroke button and then click the Make Compound Path button. Make sure that this new compound path is selected and center it.
Step 9
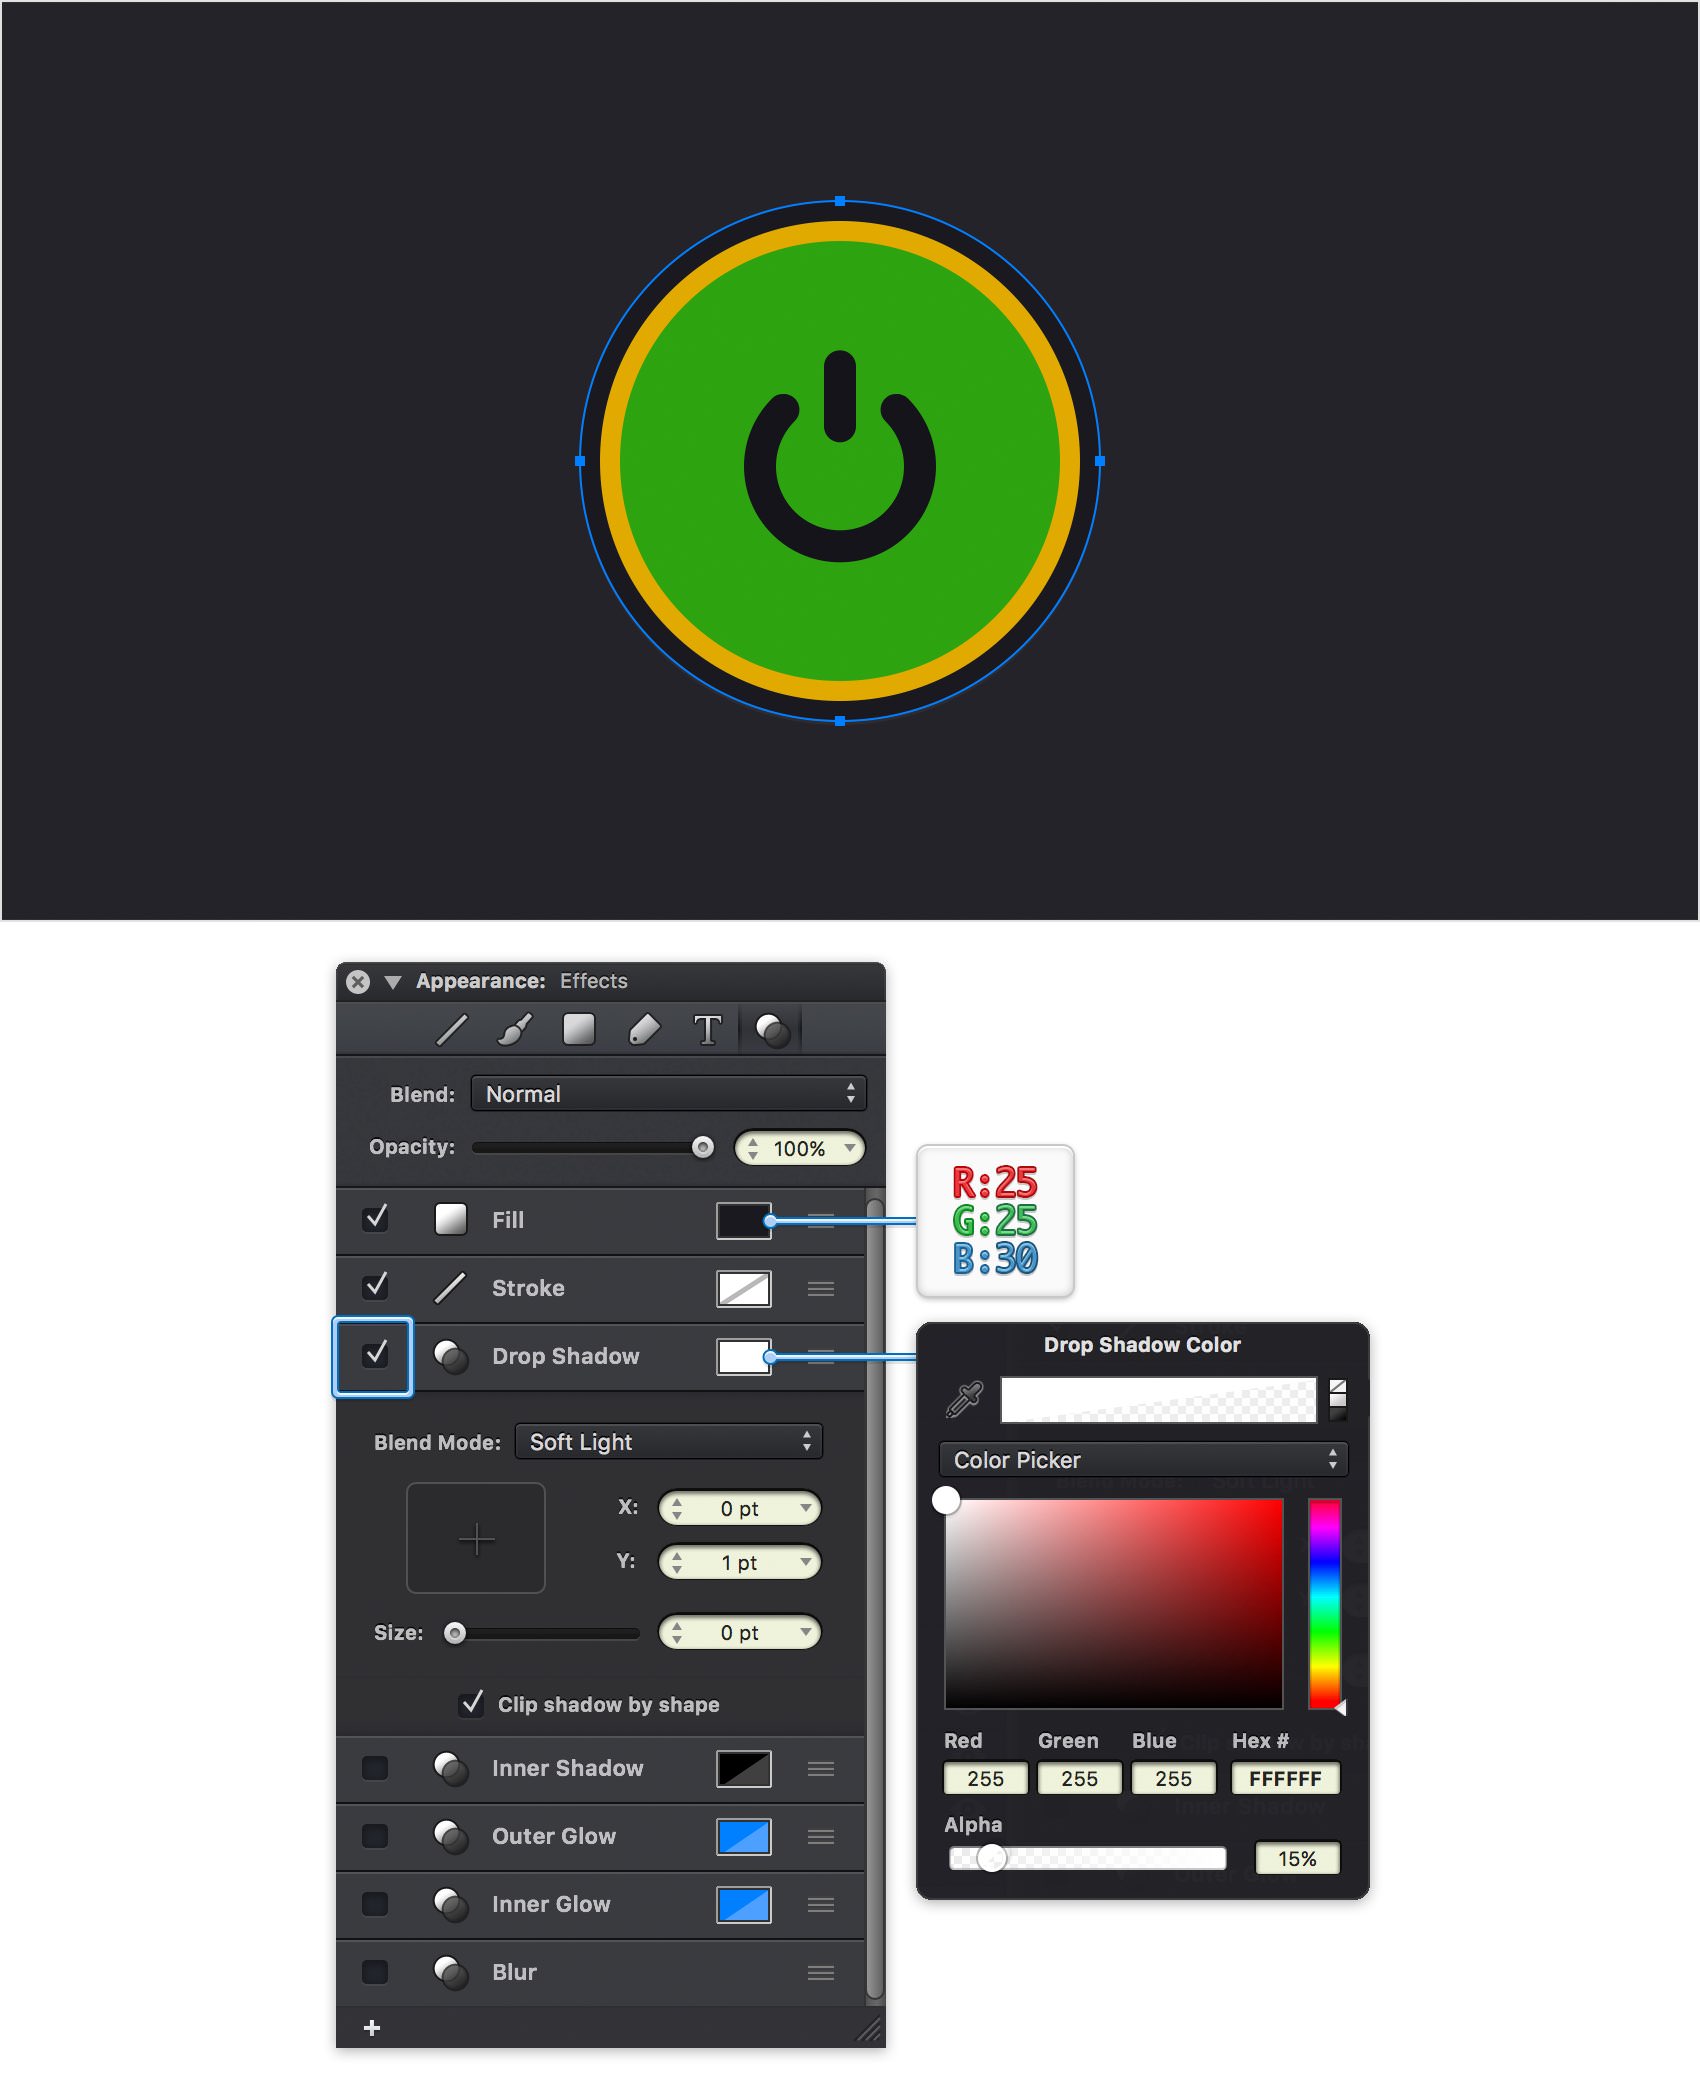
Select your blue circle and focus on the Effects pane from the Appearance panel. First, tap the Fill color well and replace the existing color with R=25 G=25 B=30.
Next, check the box that stands for the existing Drop Shadow effect to activate it and then select it. Enter 1 in the Y box and 0 in the other two boxes, set the Blend Mode to Soft Light and then click the color well that stands for this effect. Replace the existing color with white (R=255 G=255 B=255) and drag the Alpha slider to 15%.
Step 10
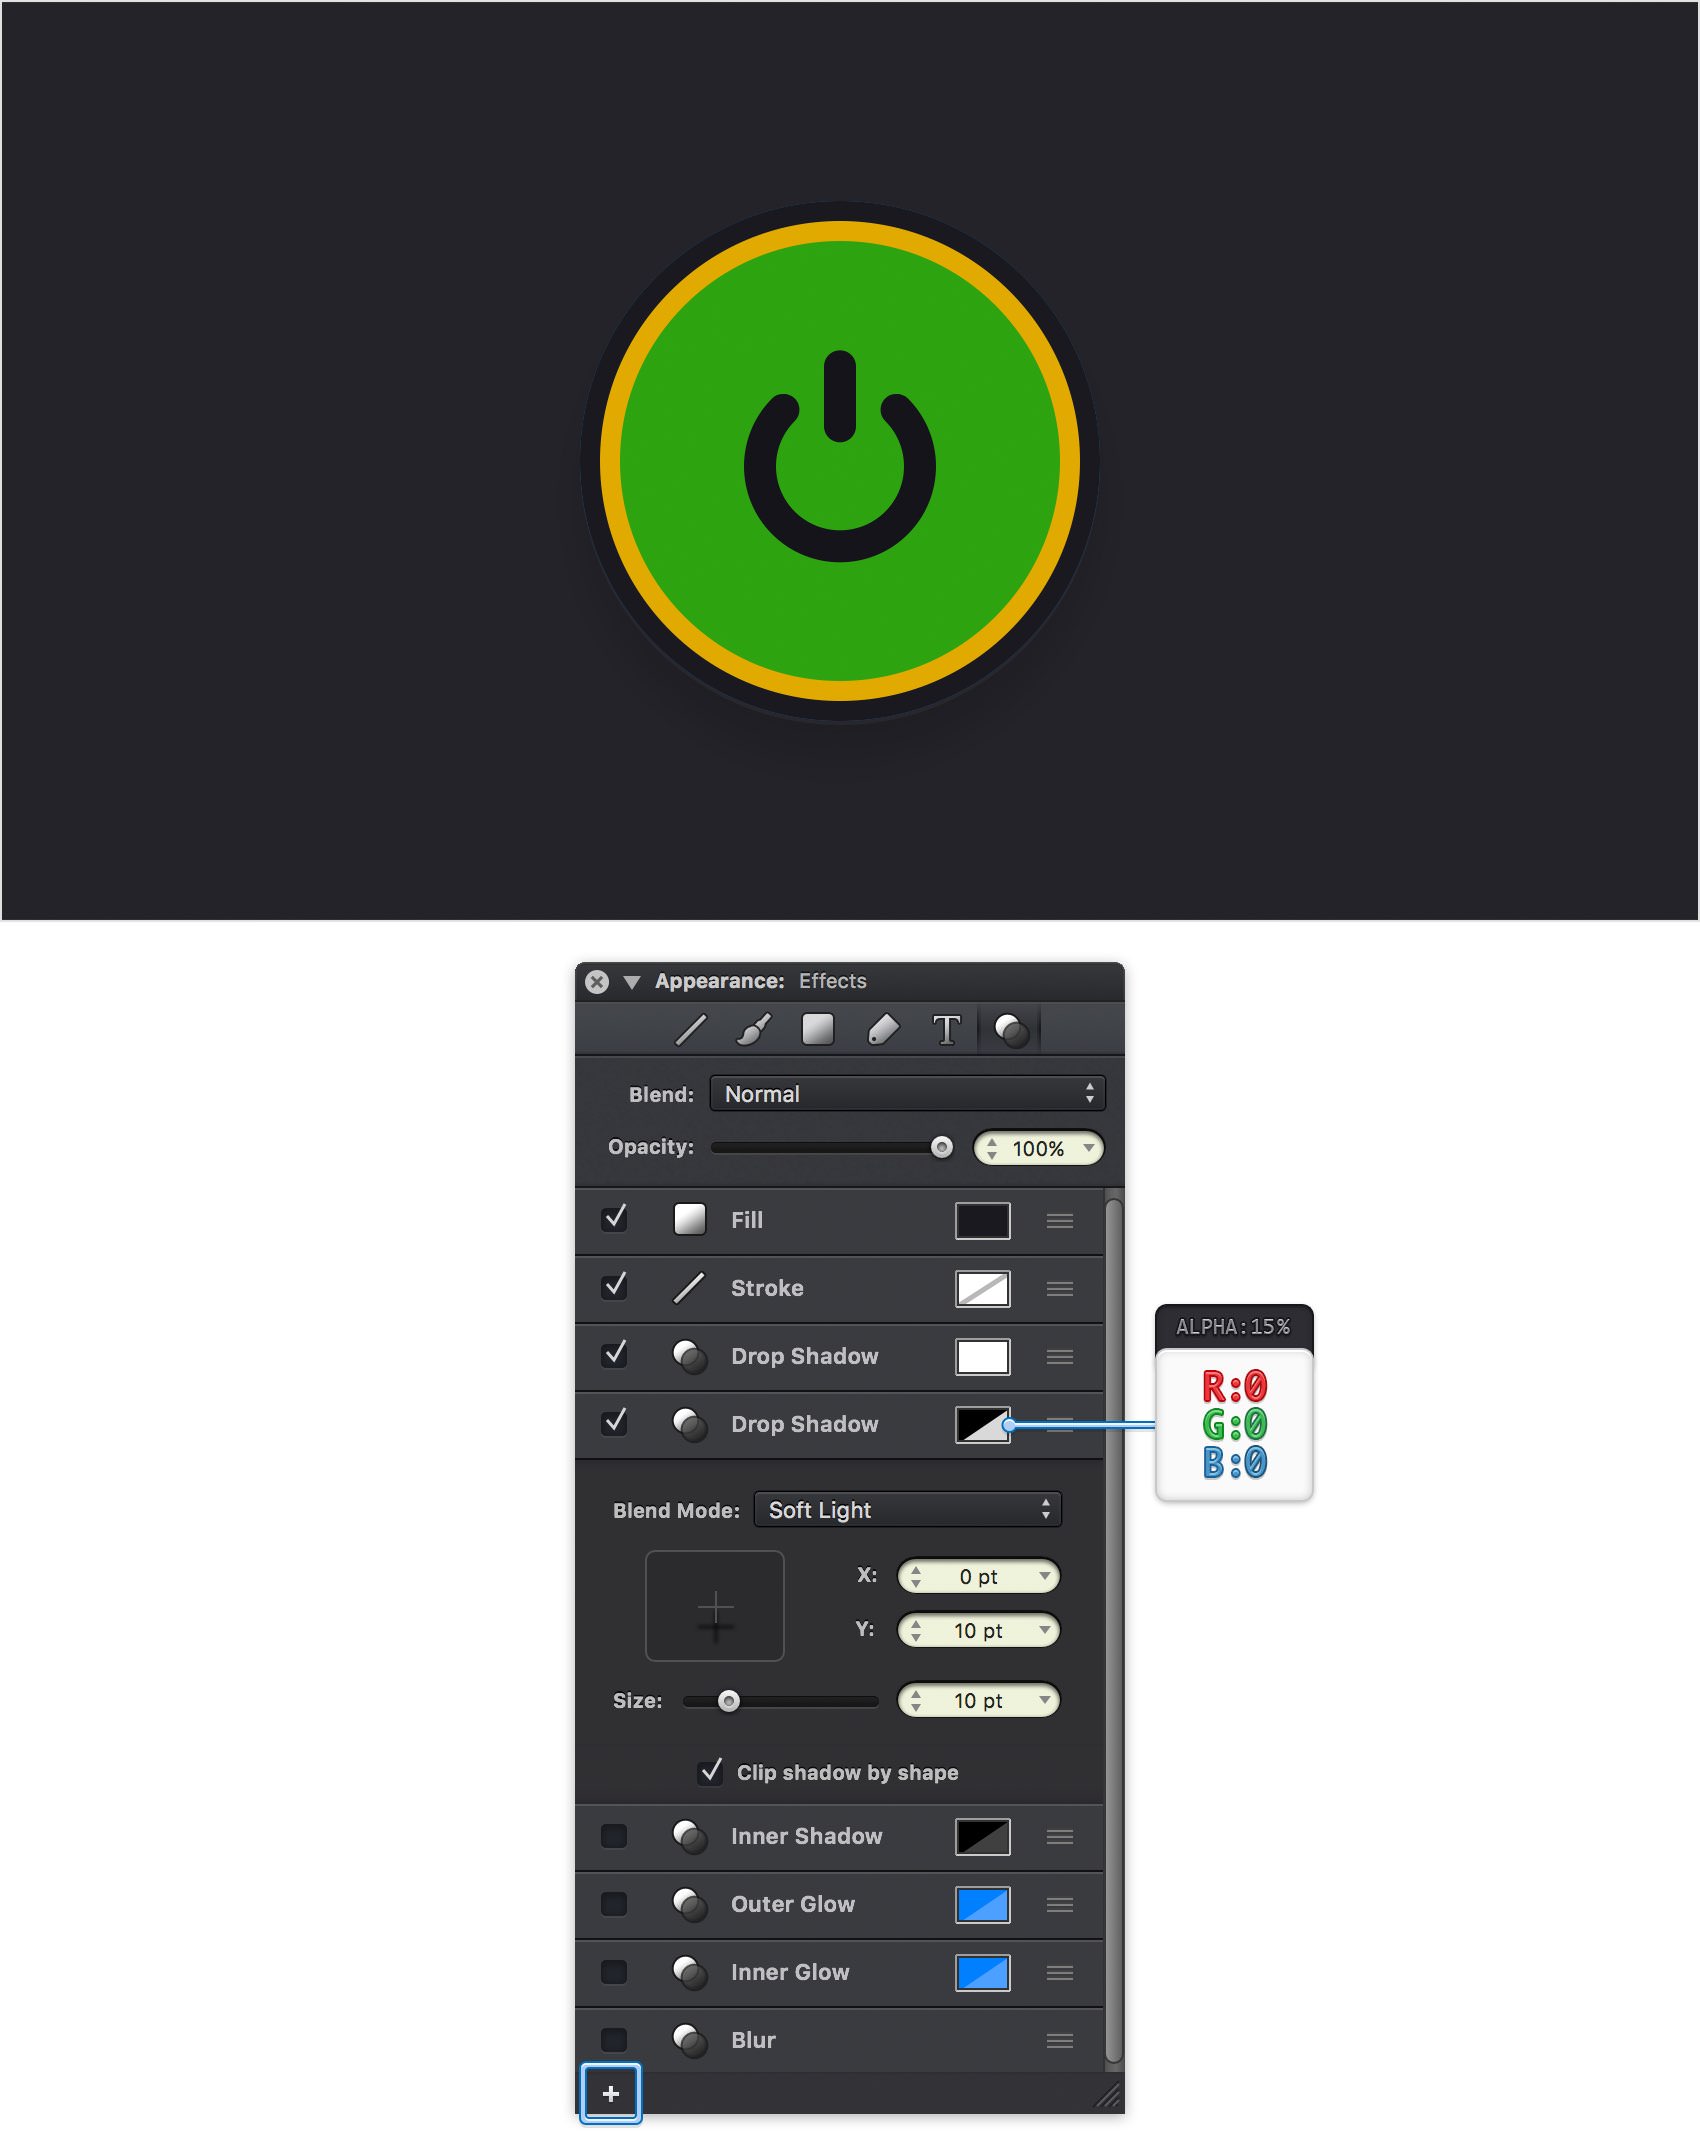
Make sure that your 130 px circle stays selected and keep focusing on the Effects pane from the Appearance panel. Add a second Drop Shadow using the plus button from the bottom, left corner of the panel and then enter the attributes shown below.
Step 11
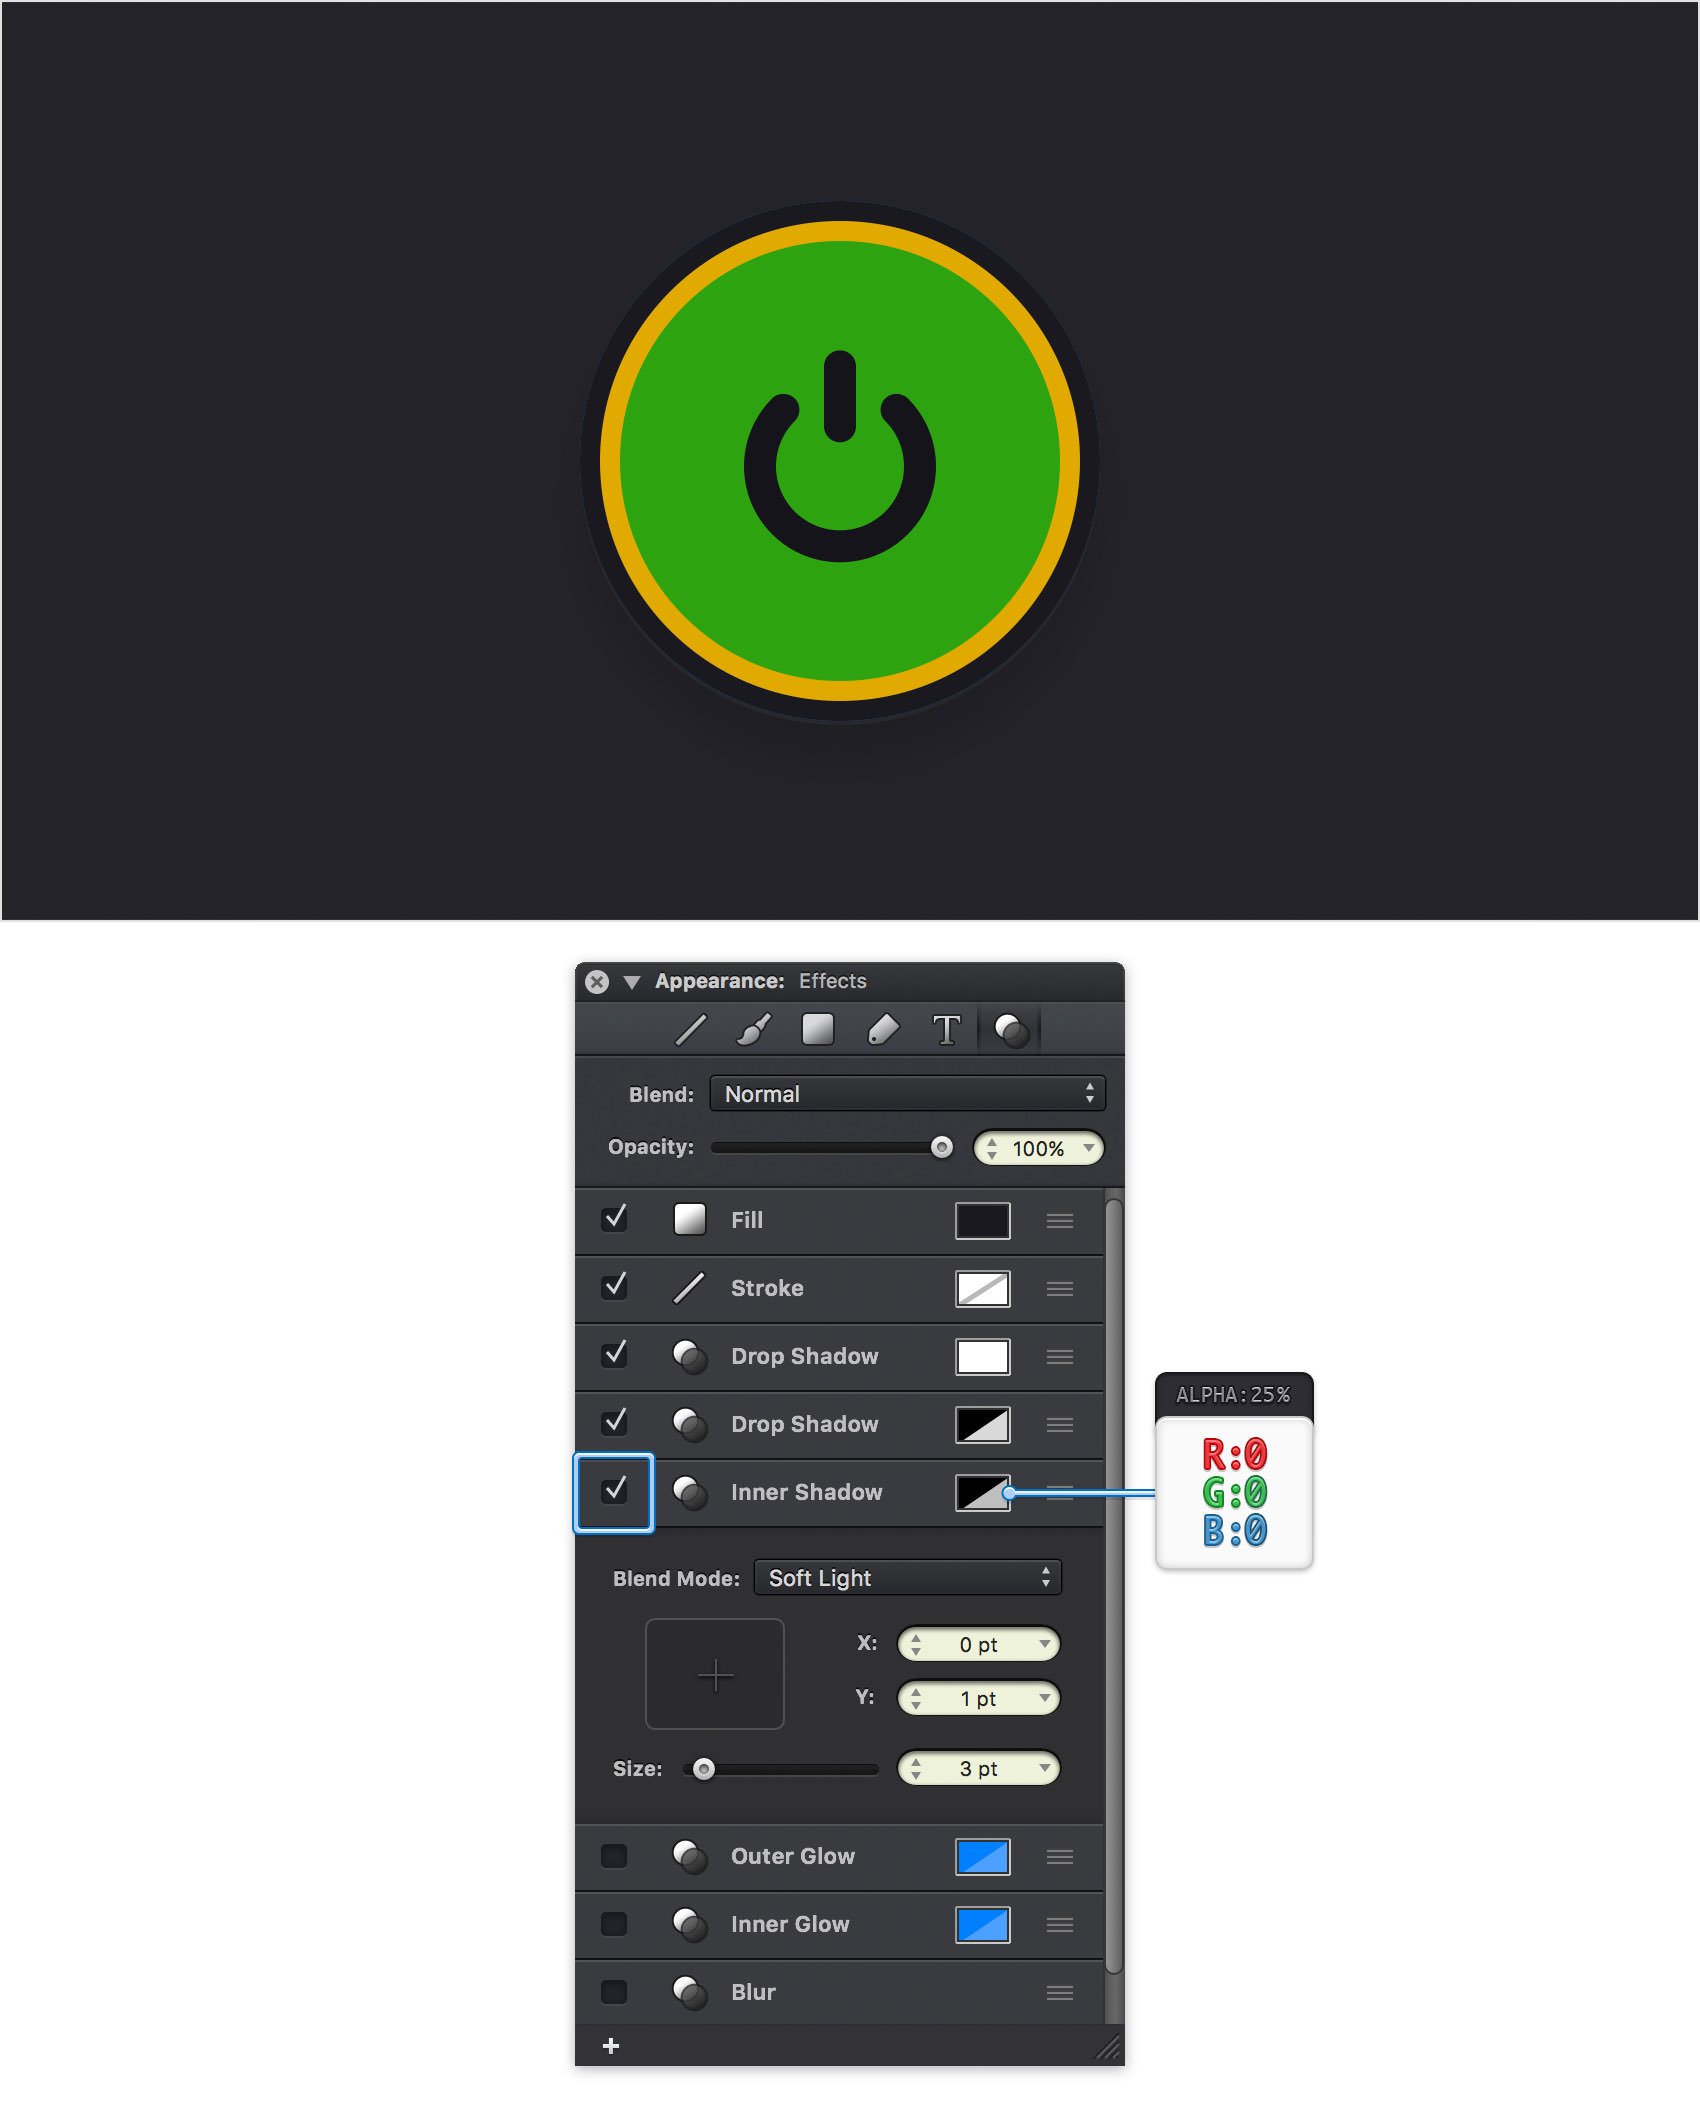
Make sure that your 130 px circle is still selected and keep focusing on the Effects pane from the Appearance panel. Activate the existing Inner Shadow effect and enter the attributes shown in the following image.
Step 12
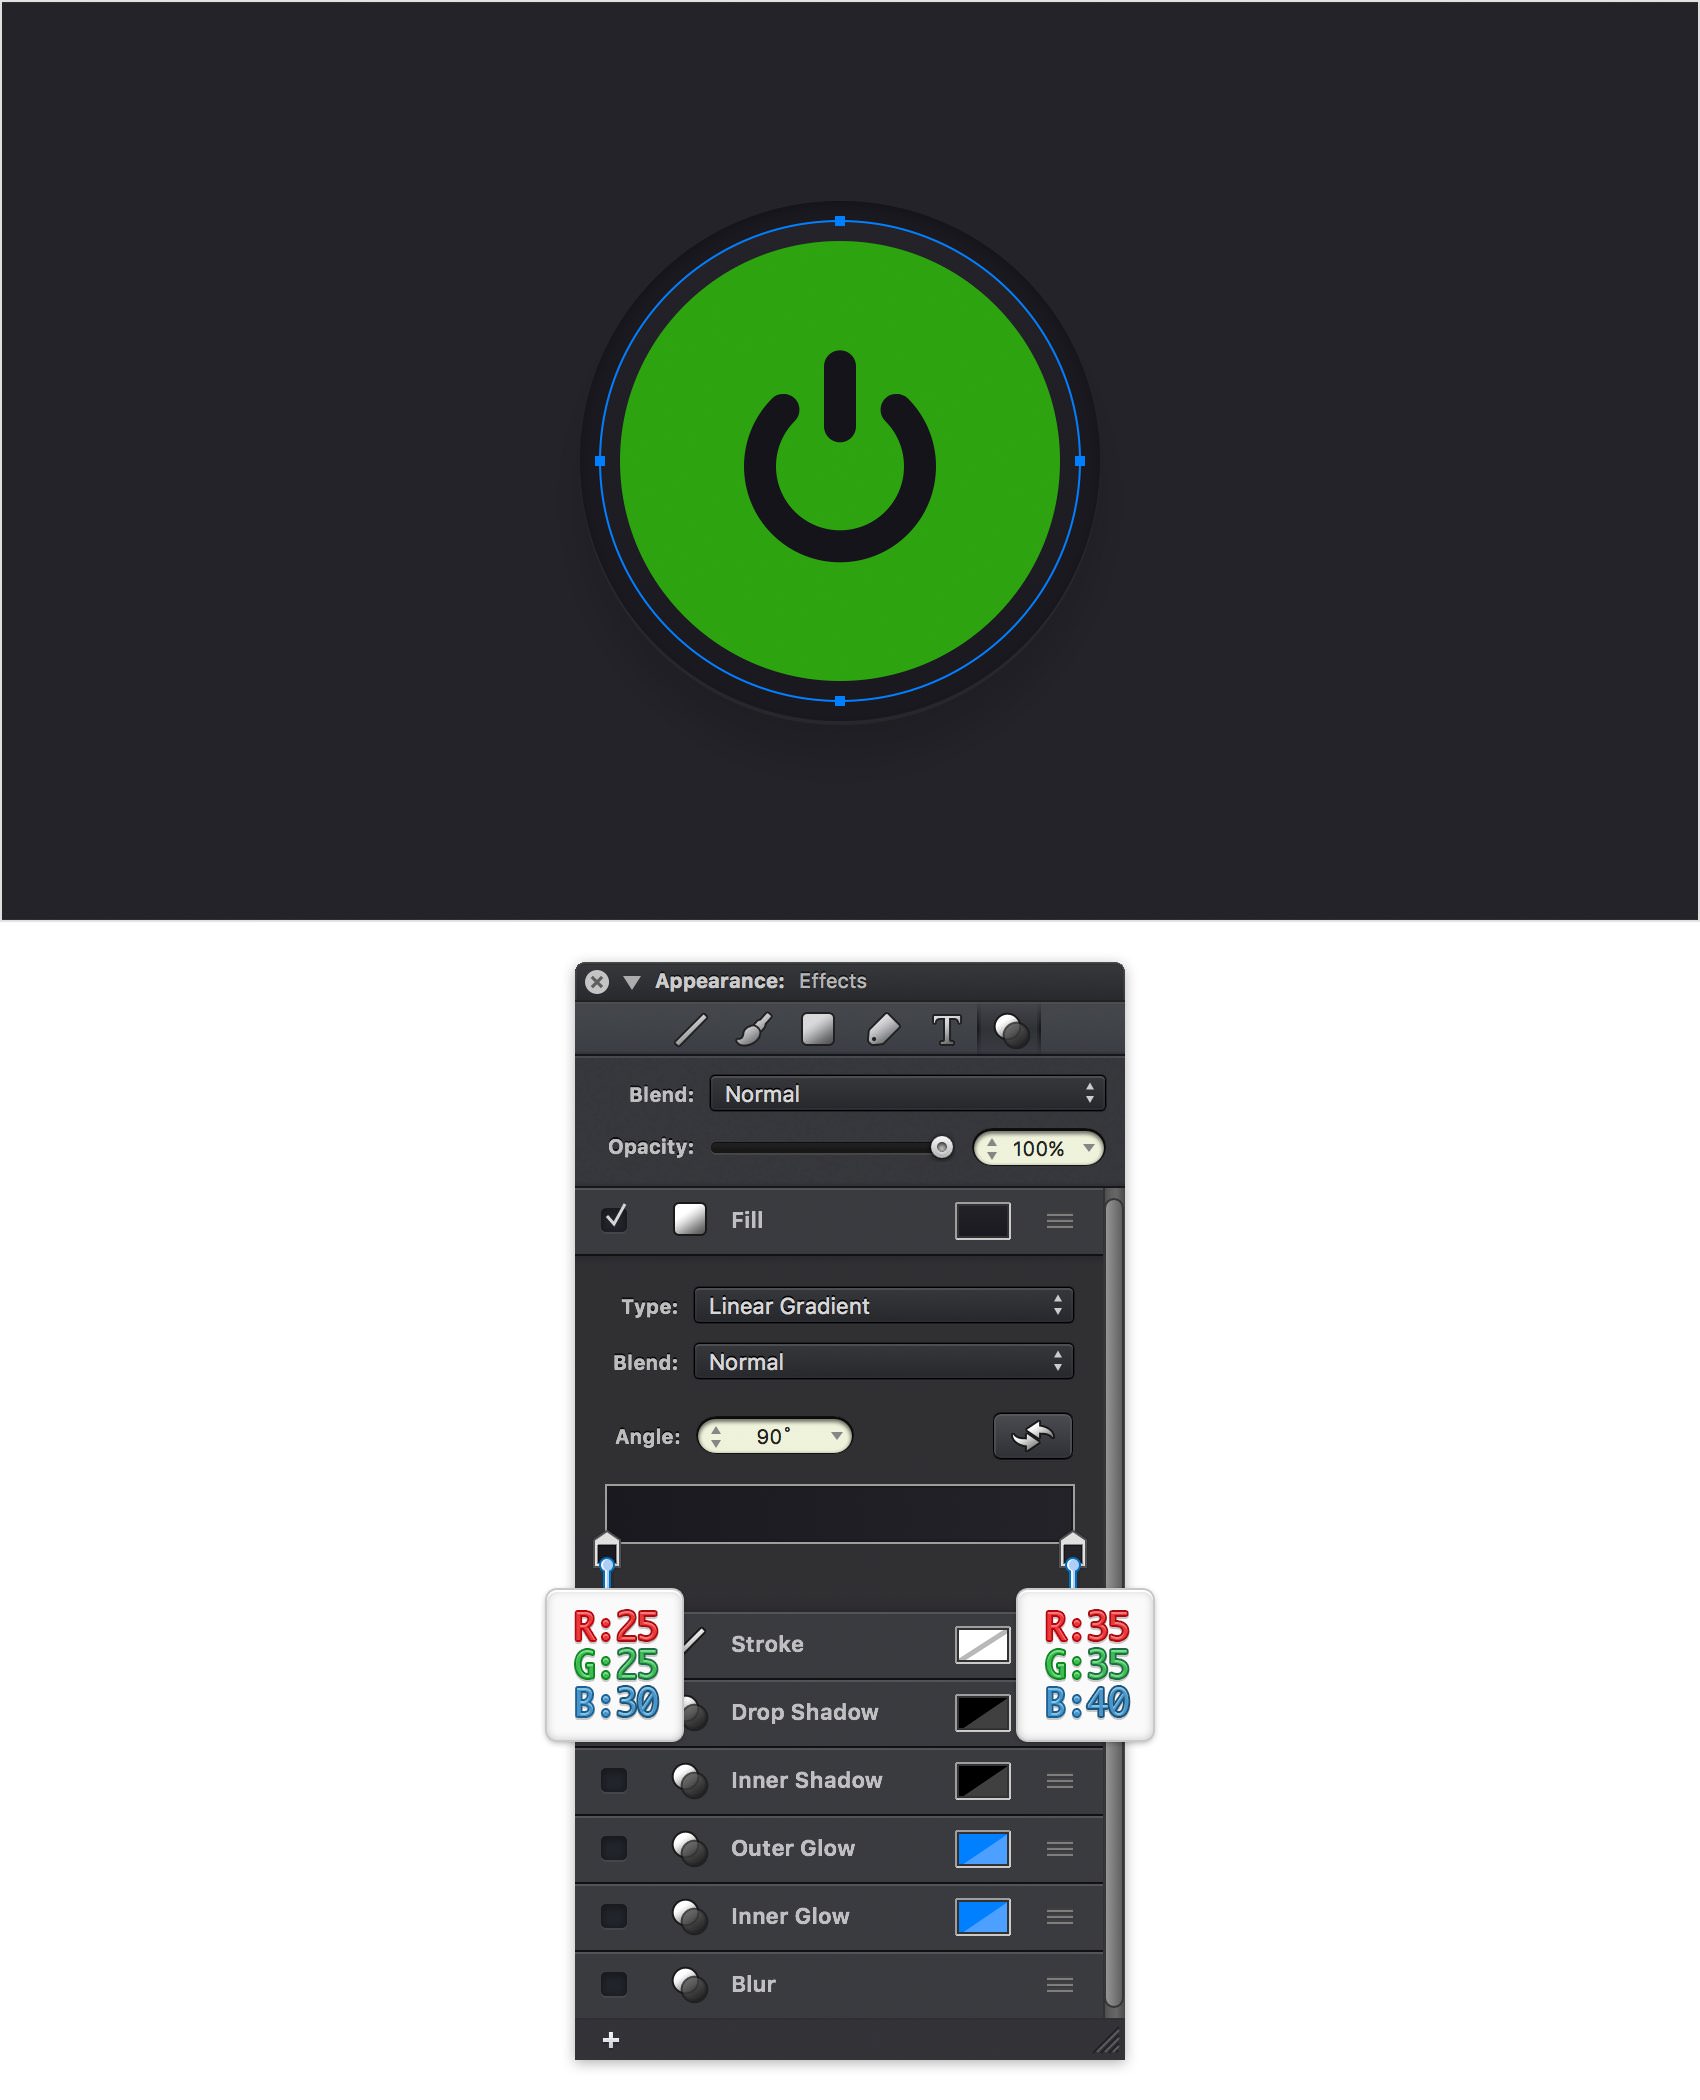
Select your yellow circle, focus on the Effects pane and select the existing Fill. Select Linear Gradient from the Type drop-down menu, set the Angle to 90 degrees and then move to the gradient sliders. Select the left one and set its color to R=25 G=25 B=30 and then select the right one and set its color to R=35 G=35 B=40.
Step 13
Make sure that your 120 px circle stays selected and keep focusing on the Effects pane. Activate the existing Inner Shadow effect and enter the attributes shown below.
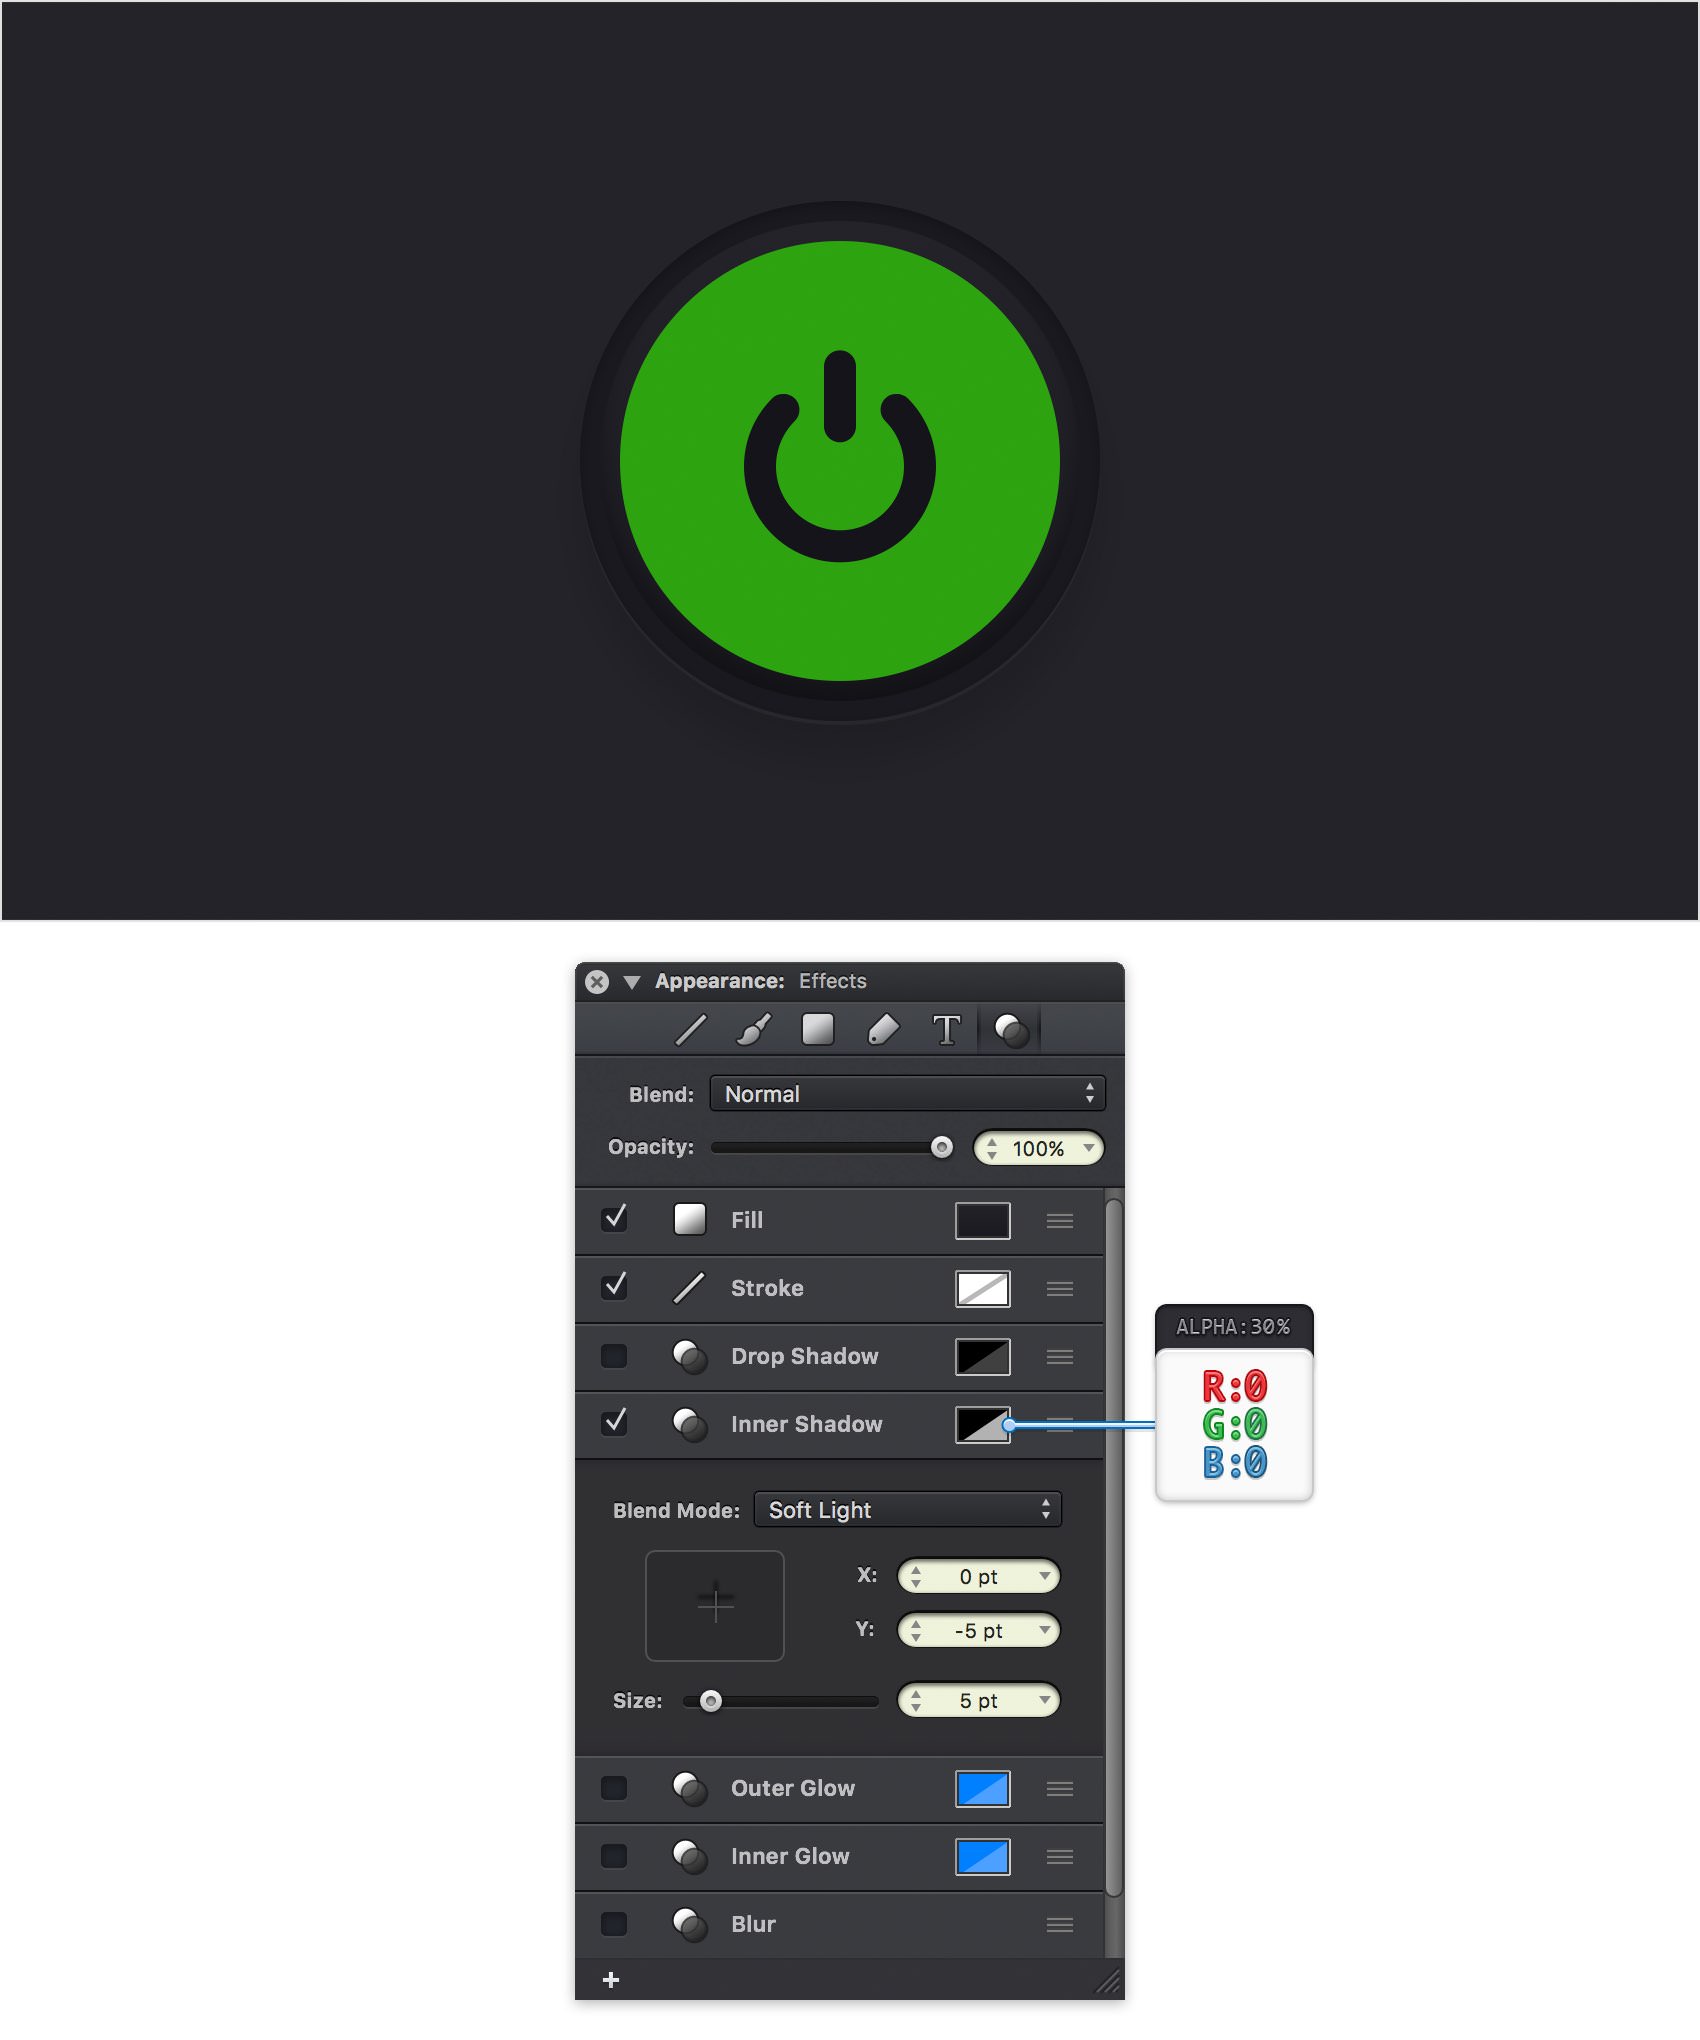
Step 14
Make sure that your 120 px circle is still selected and keep focusing on the Effects pane. Add a second Inner Shadow effect using that same plus button and enter the attributes shown below.
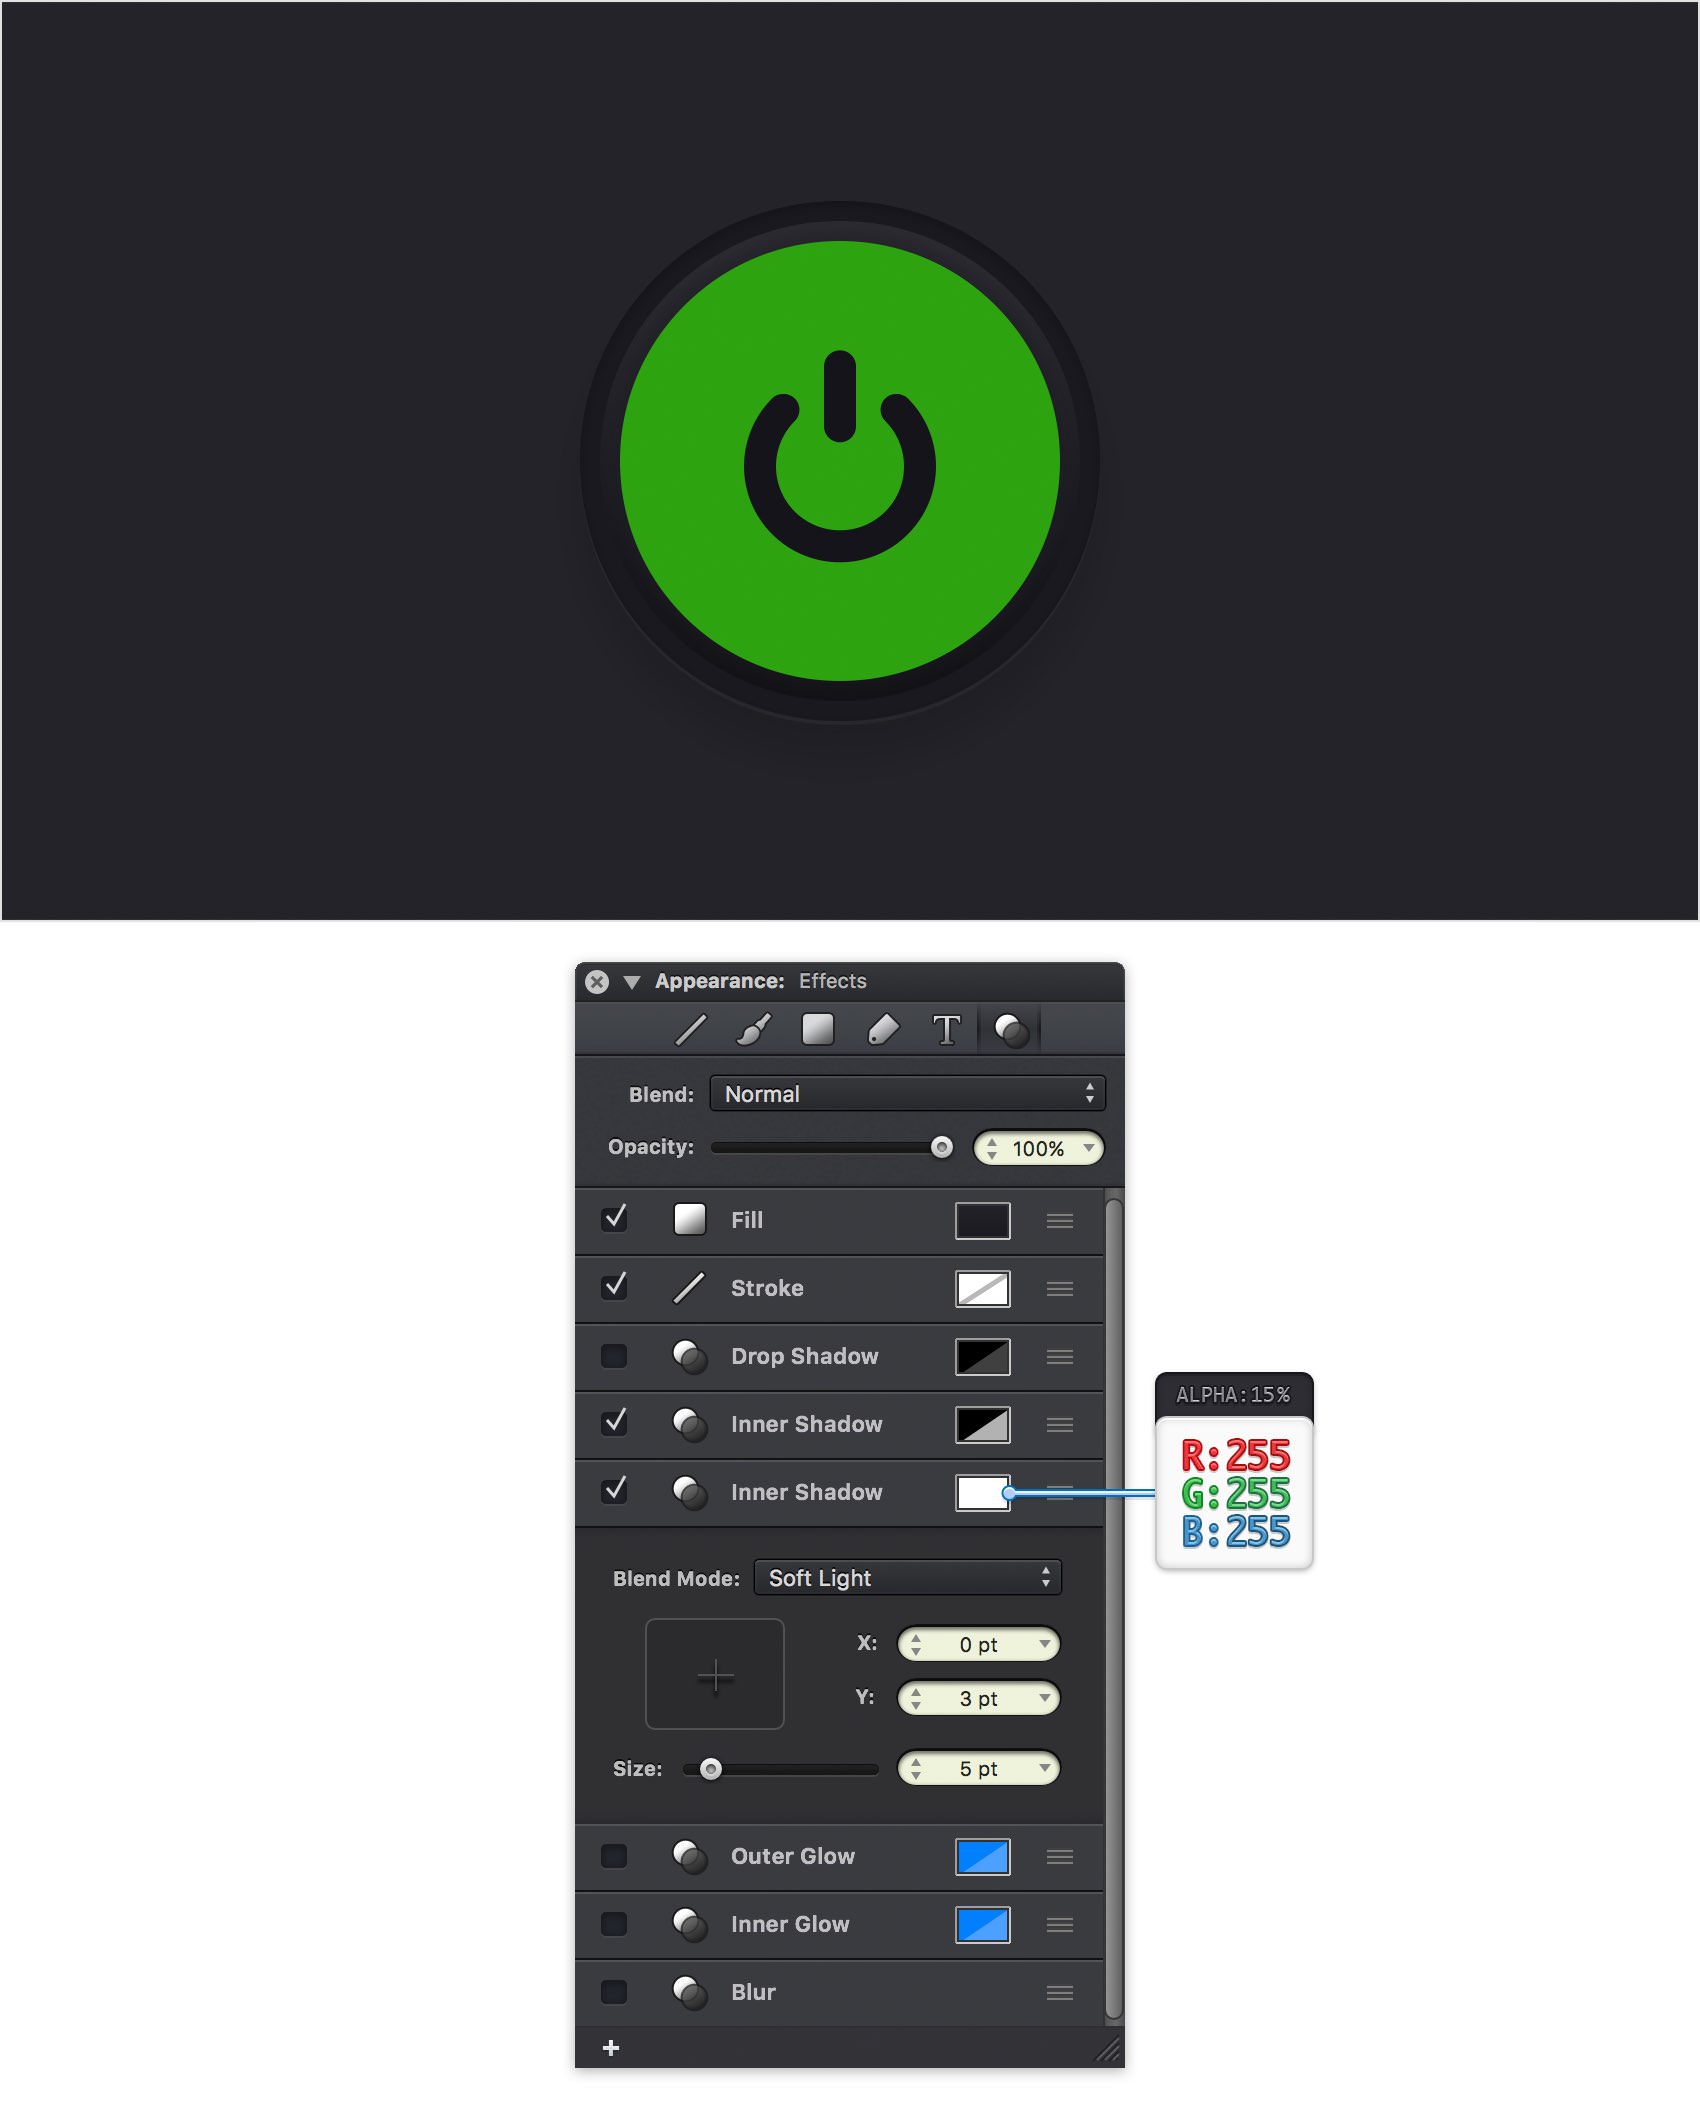
Step 15
Make sure that your 120 px circle is still selected and keep focusing on the Effects pane. Add a third Inner Shadow effect and enter the attributes shown in the following image.
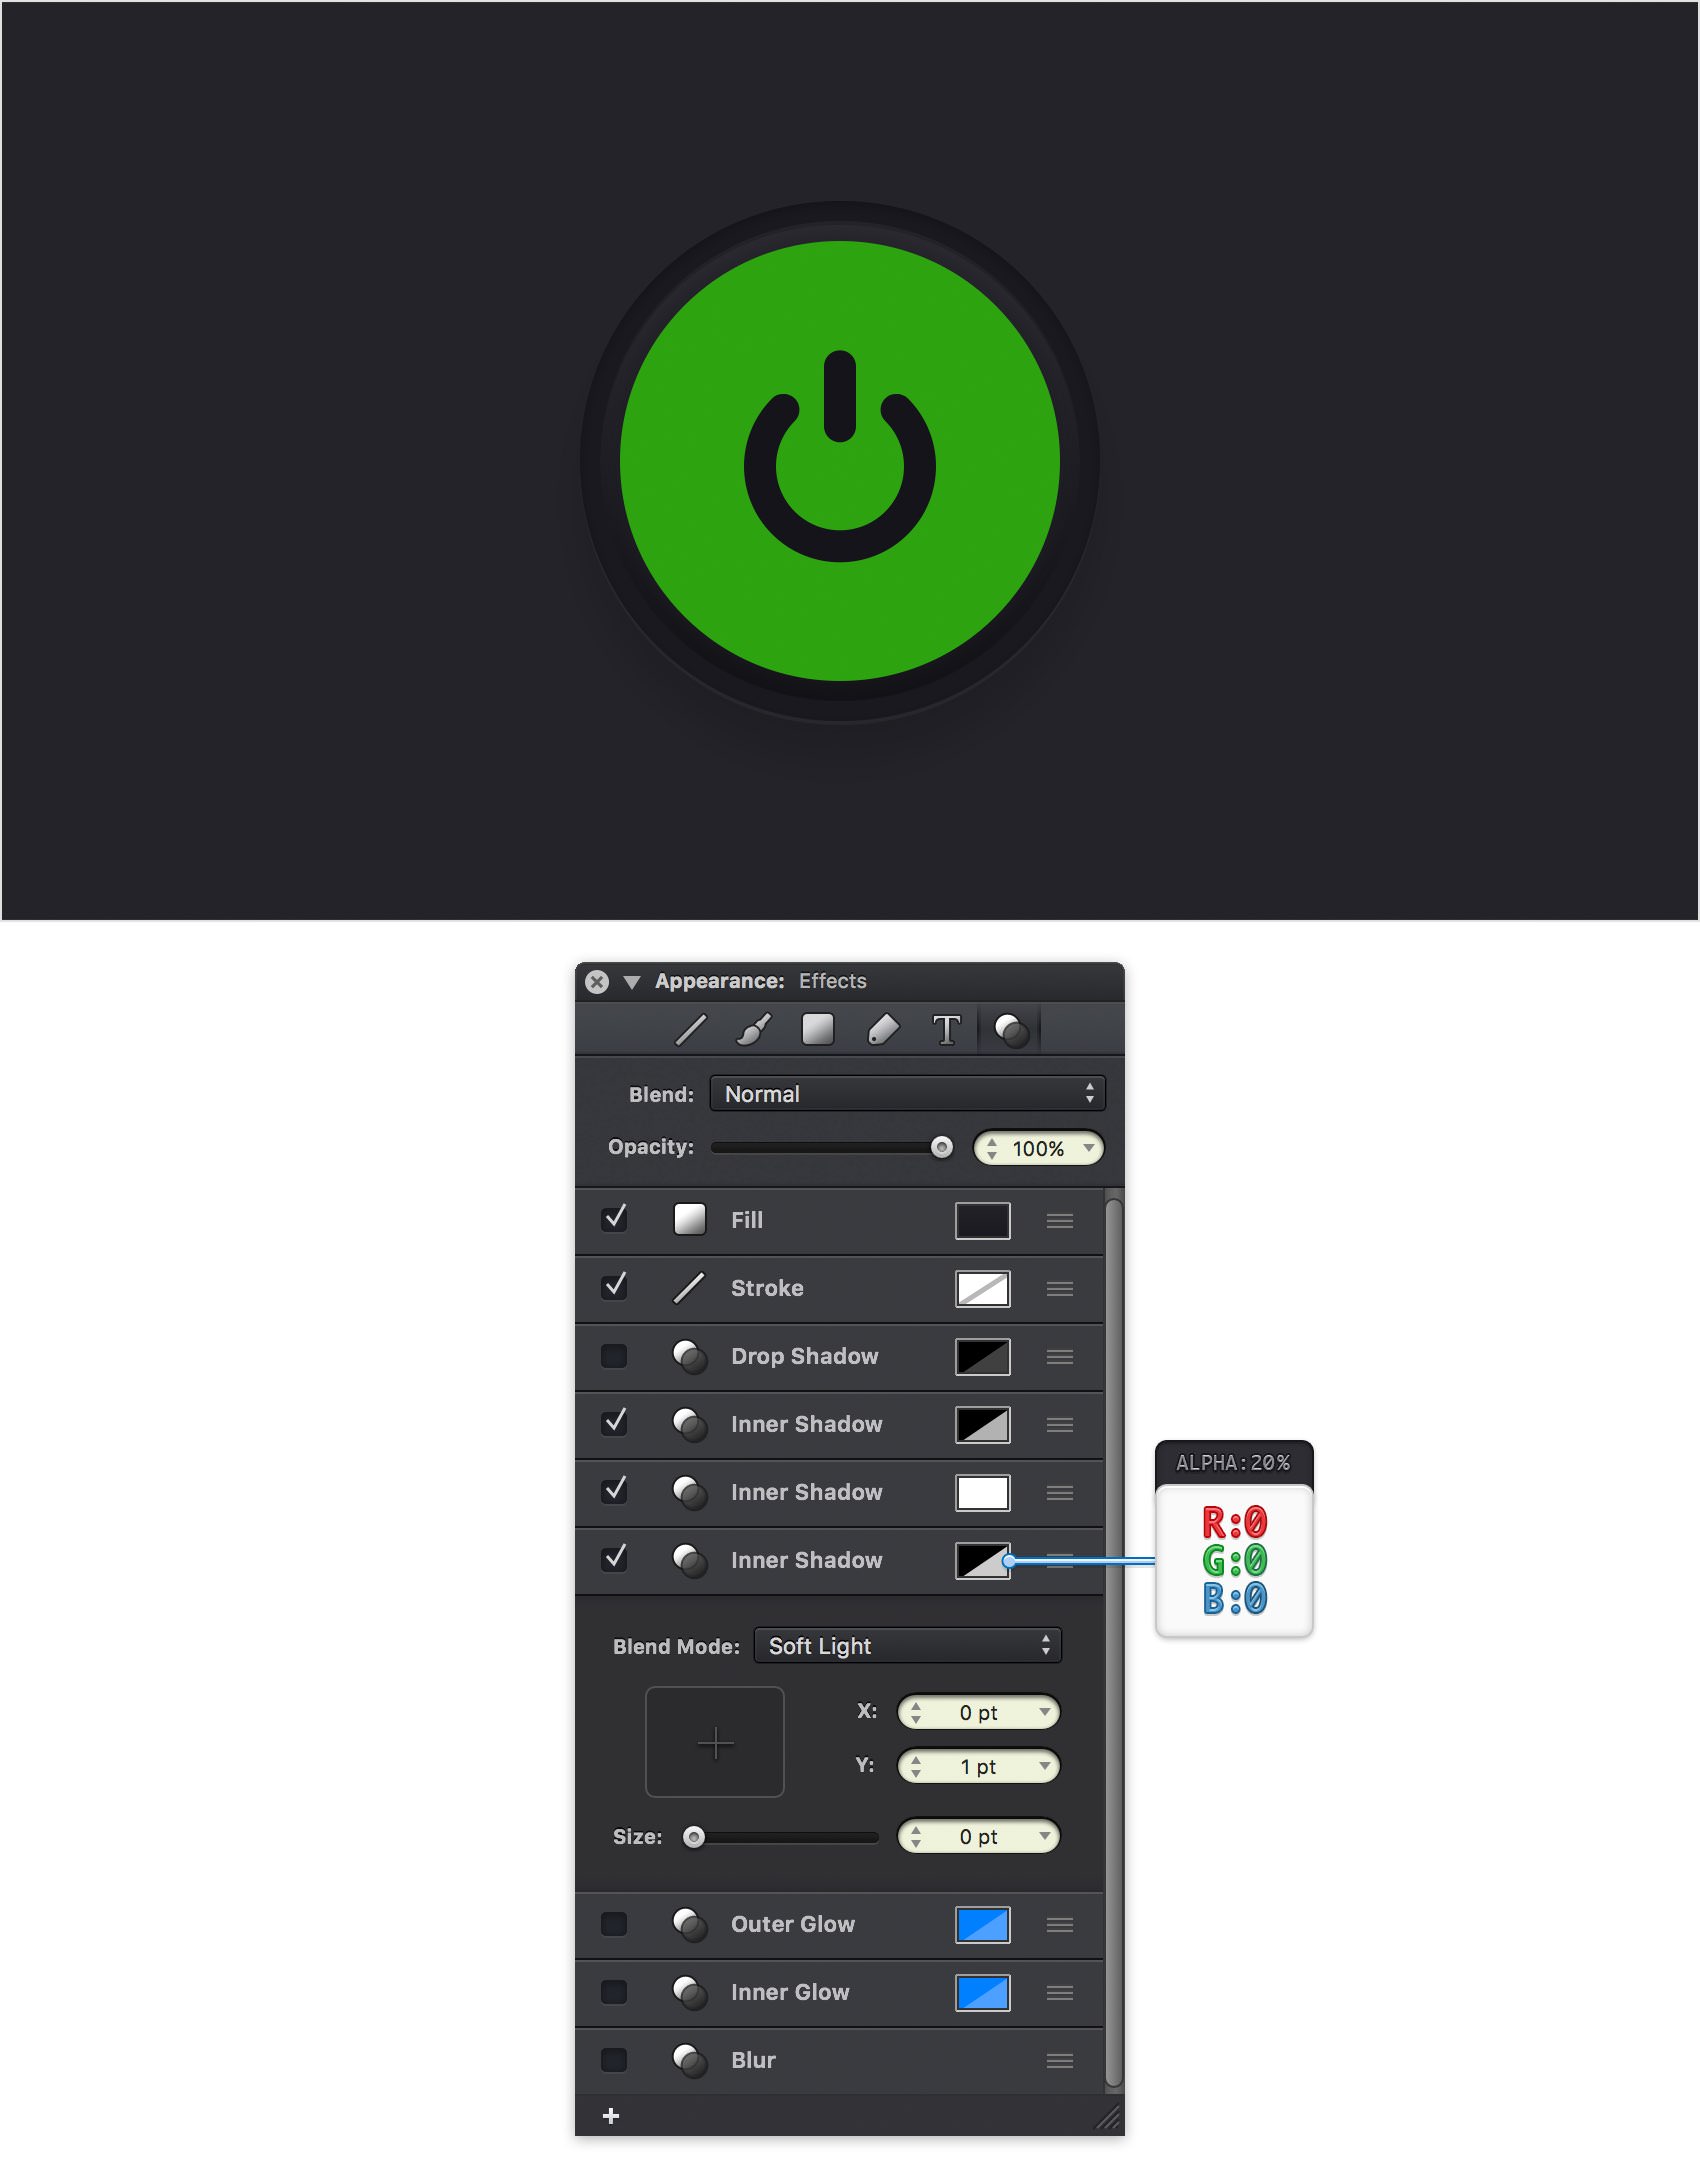
Step 16
Make sure that your 120 px circle is still selected and keep focusing on the Effects pane. Activate the existing Drop Shadow effect and enter the attributes shown below.
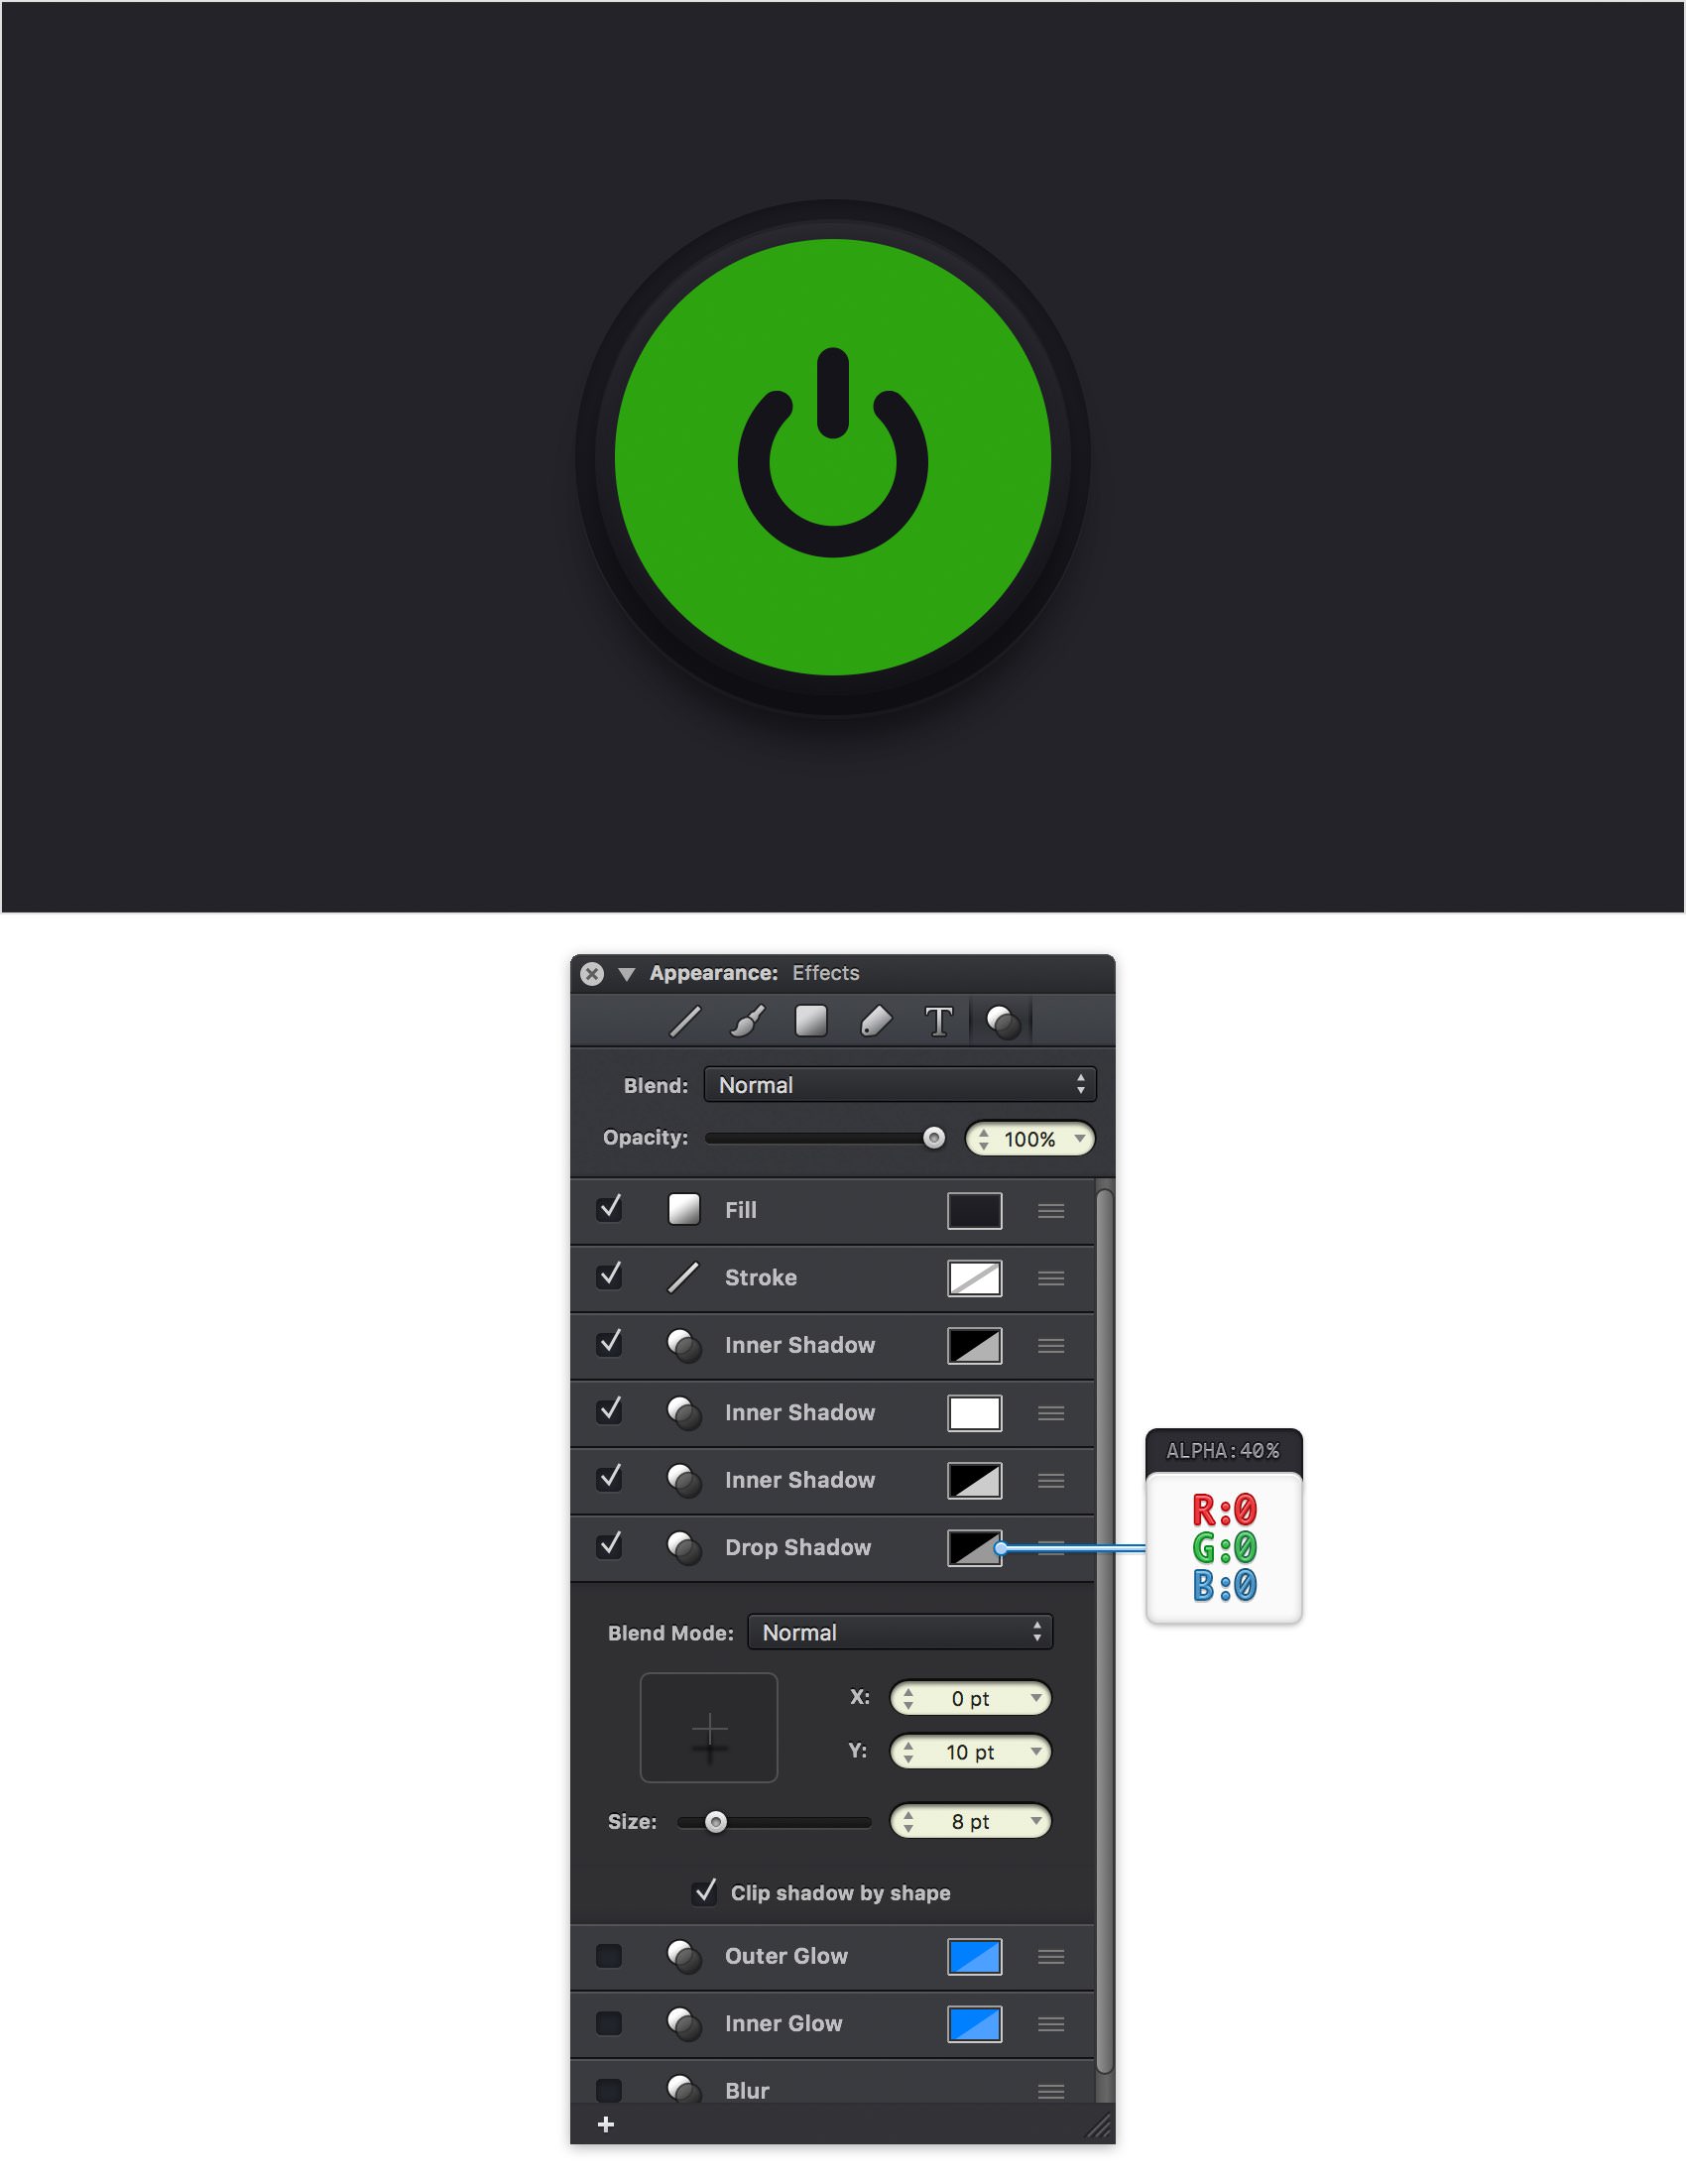
Step 17
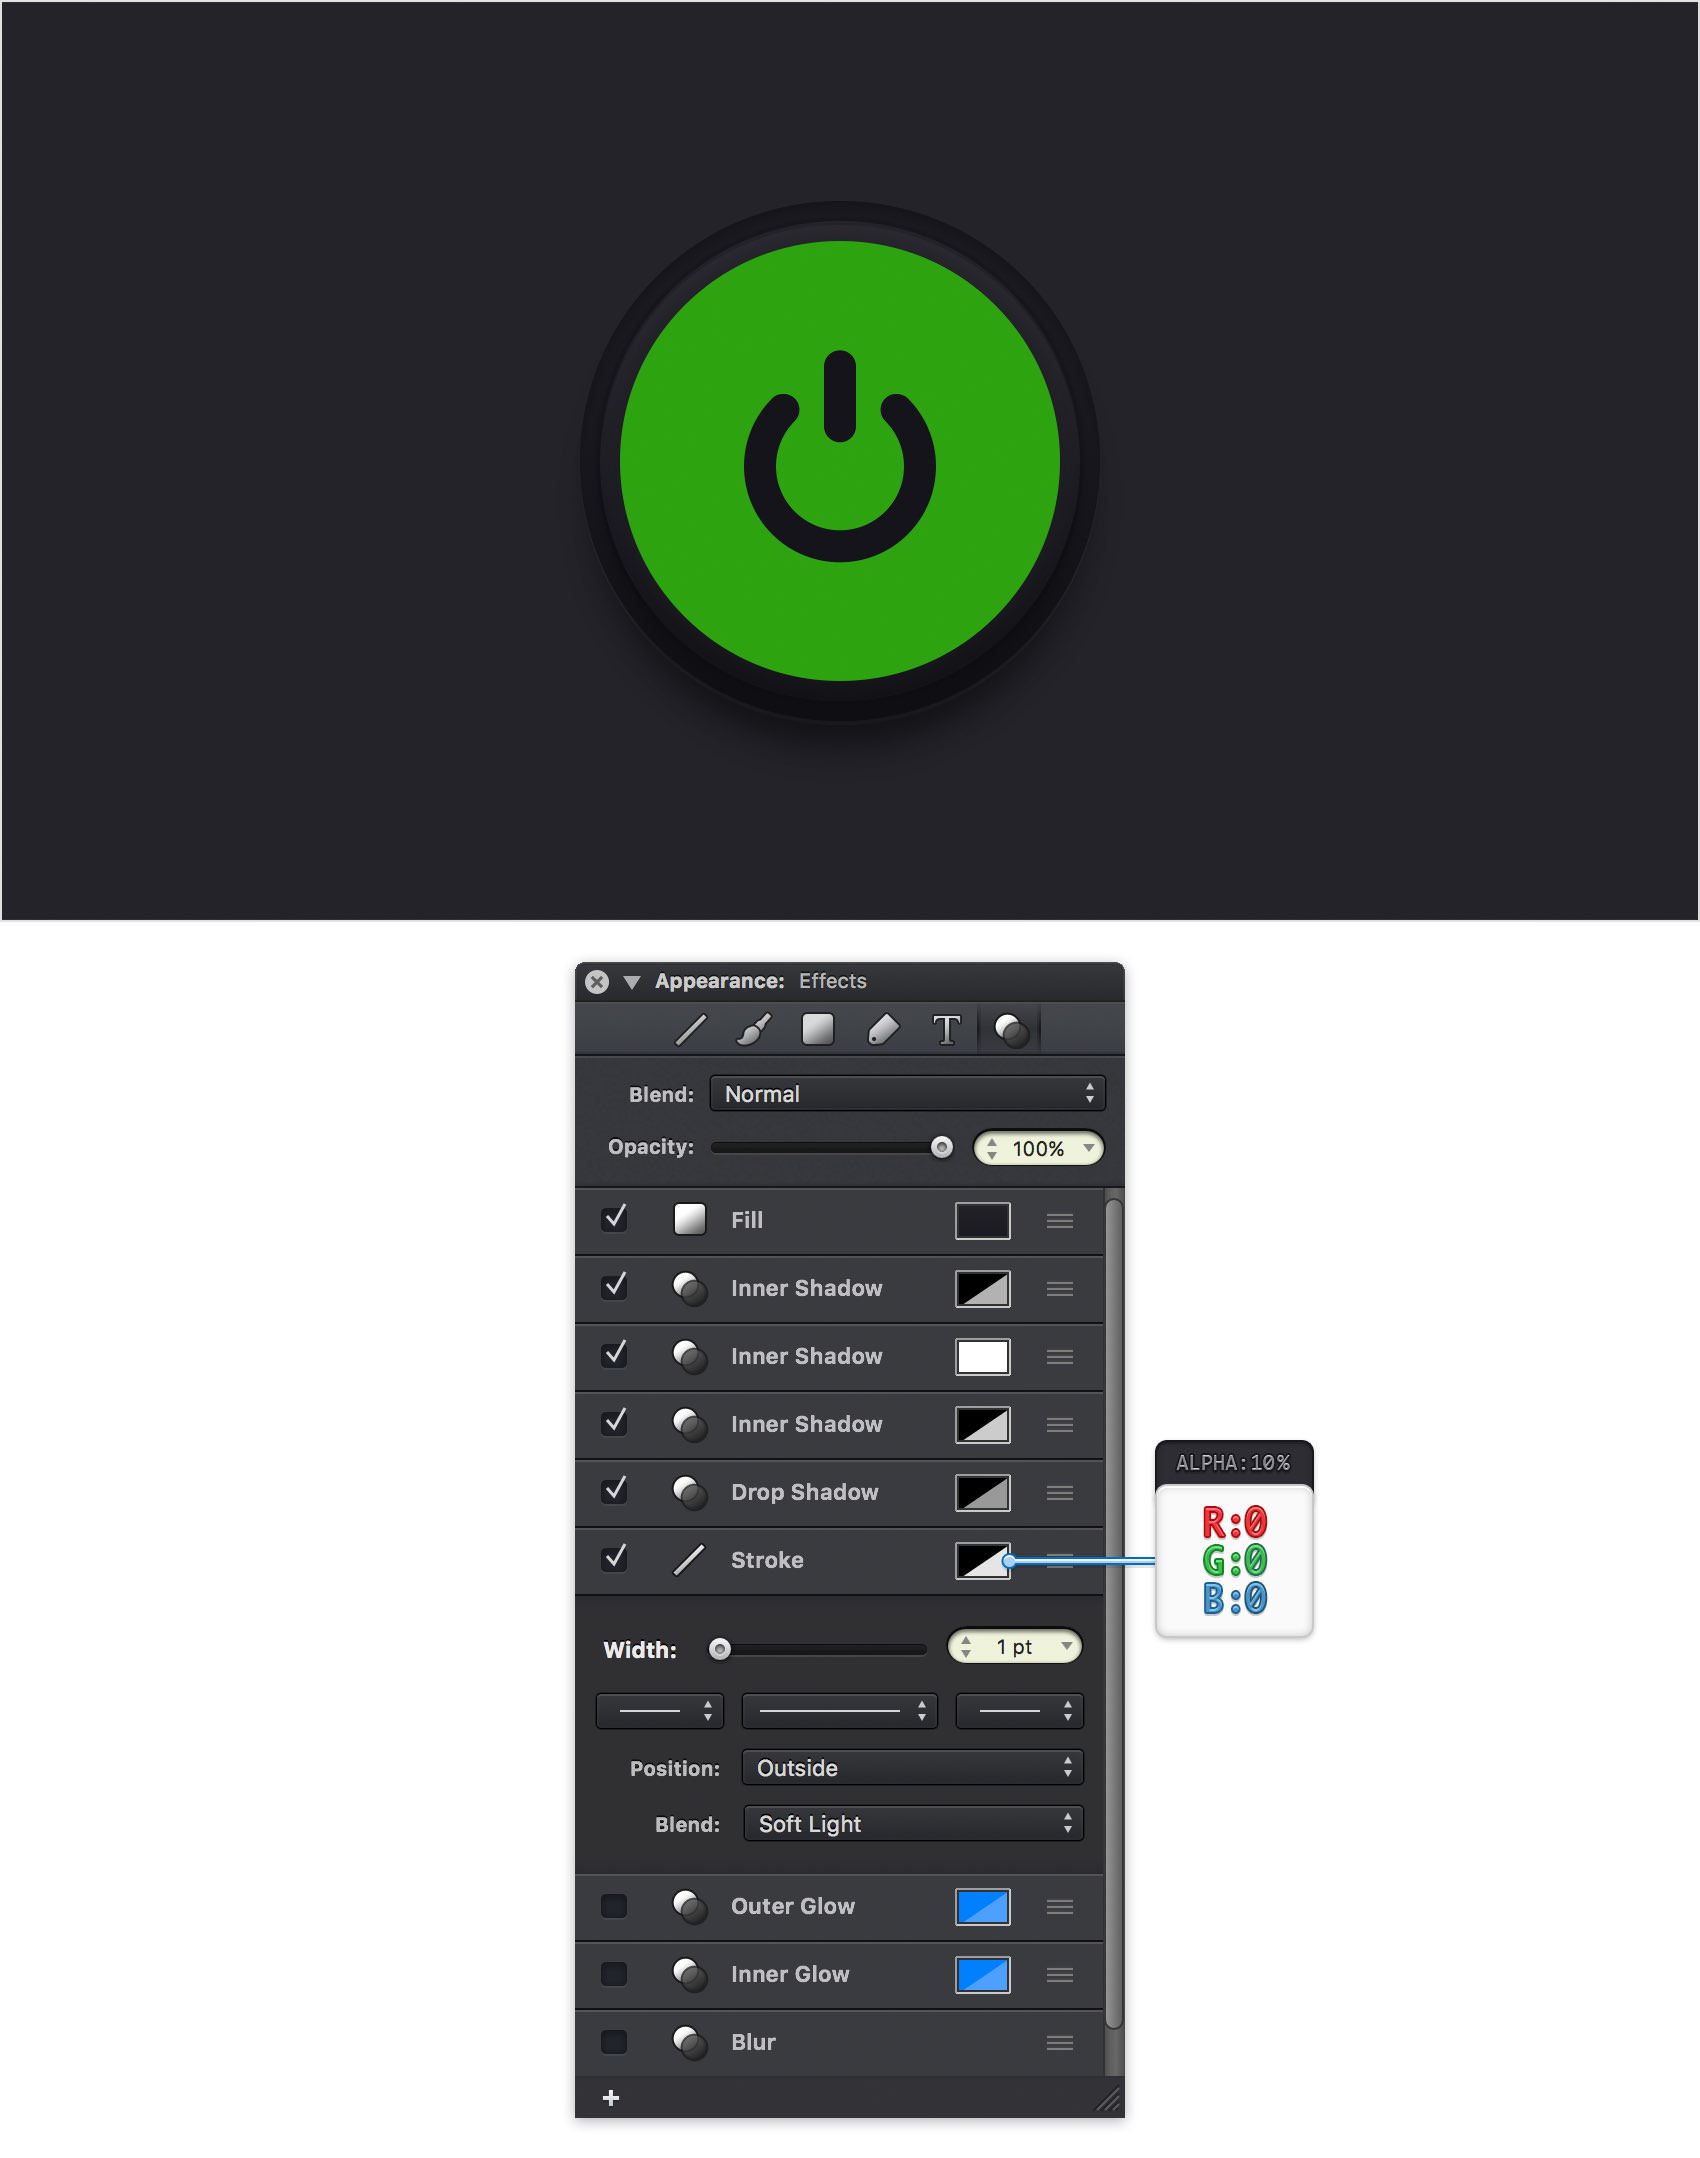
Make sure that your 120 px circle is still selected and keep focusing on the Effects pane. Move the Stroke below those active effects and then select it. Drag the Width slider to 1 pt, set the Position to Outside and the Blend to Soft Light and then click the color well that stands for this Stroke. Be sure that the color is set to black (R=0 G=0 B=0) and drag the Alpha slider to 10%.
Step 18
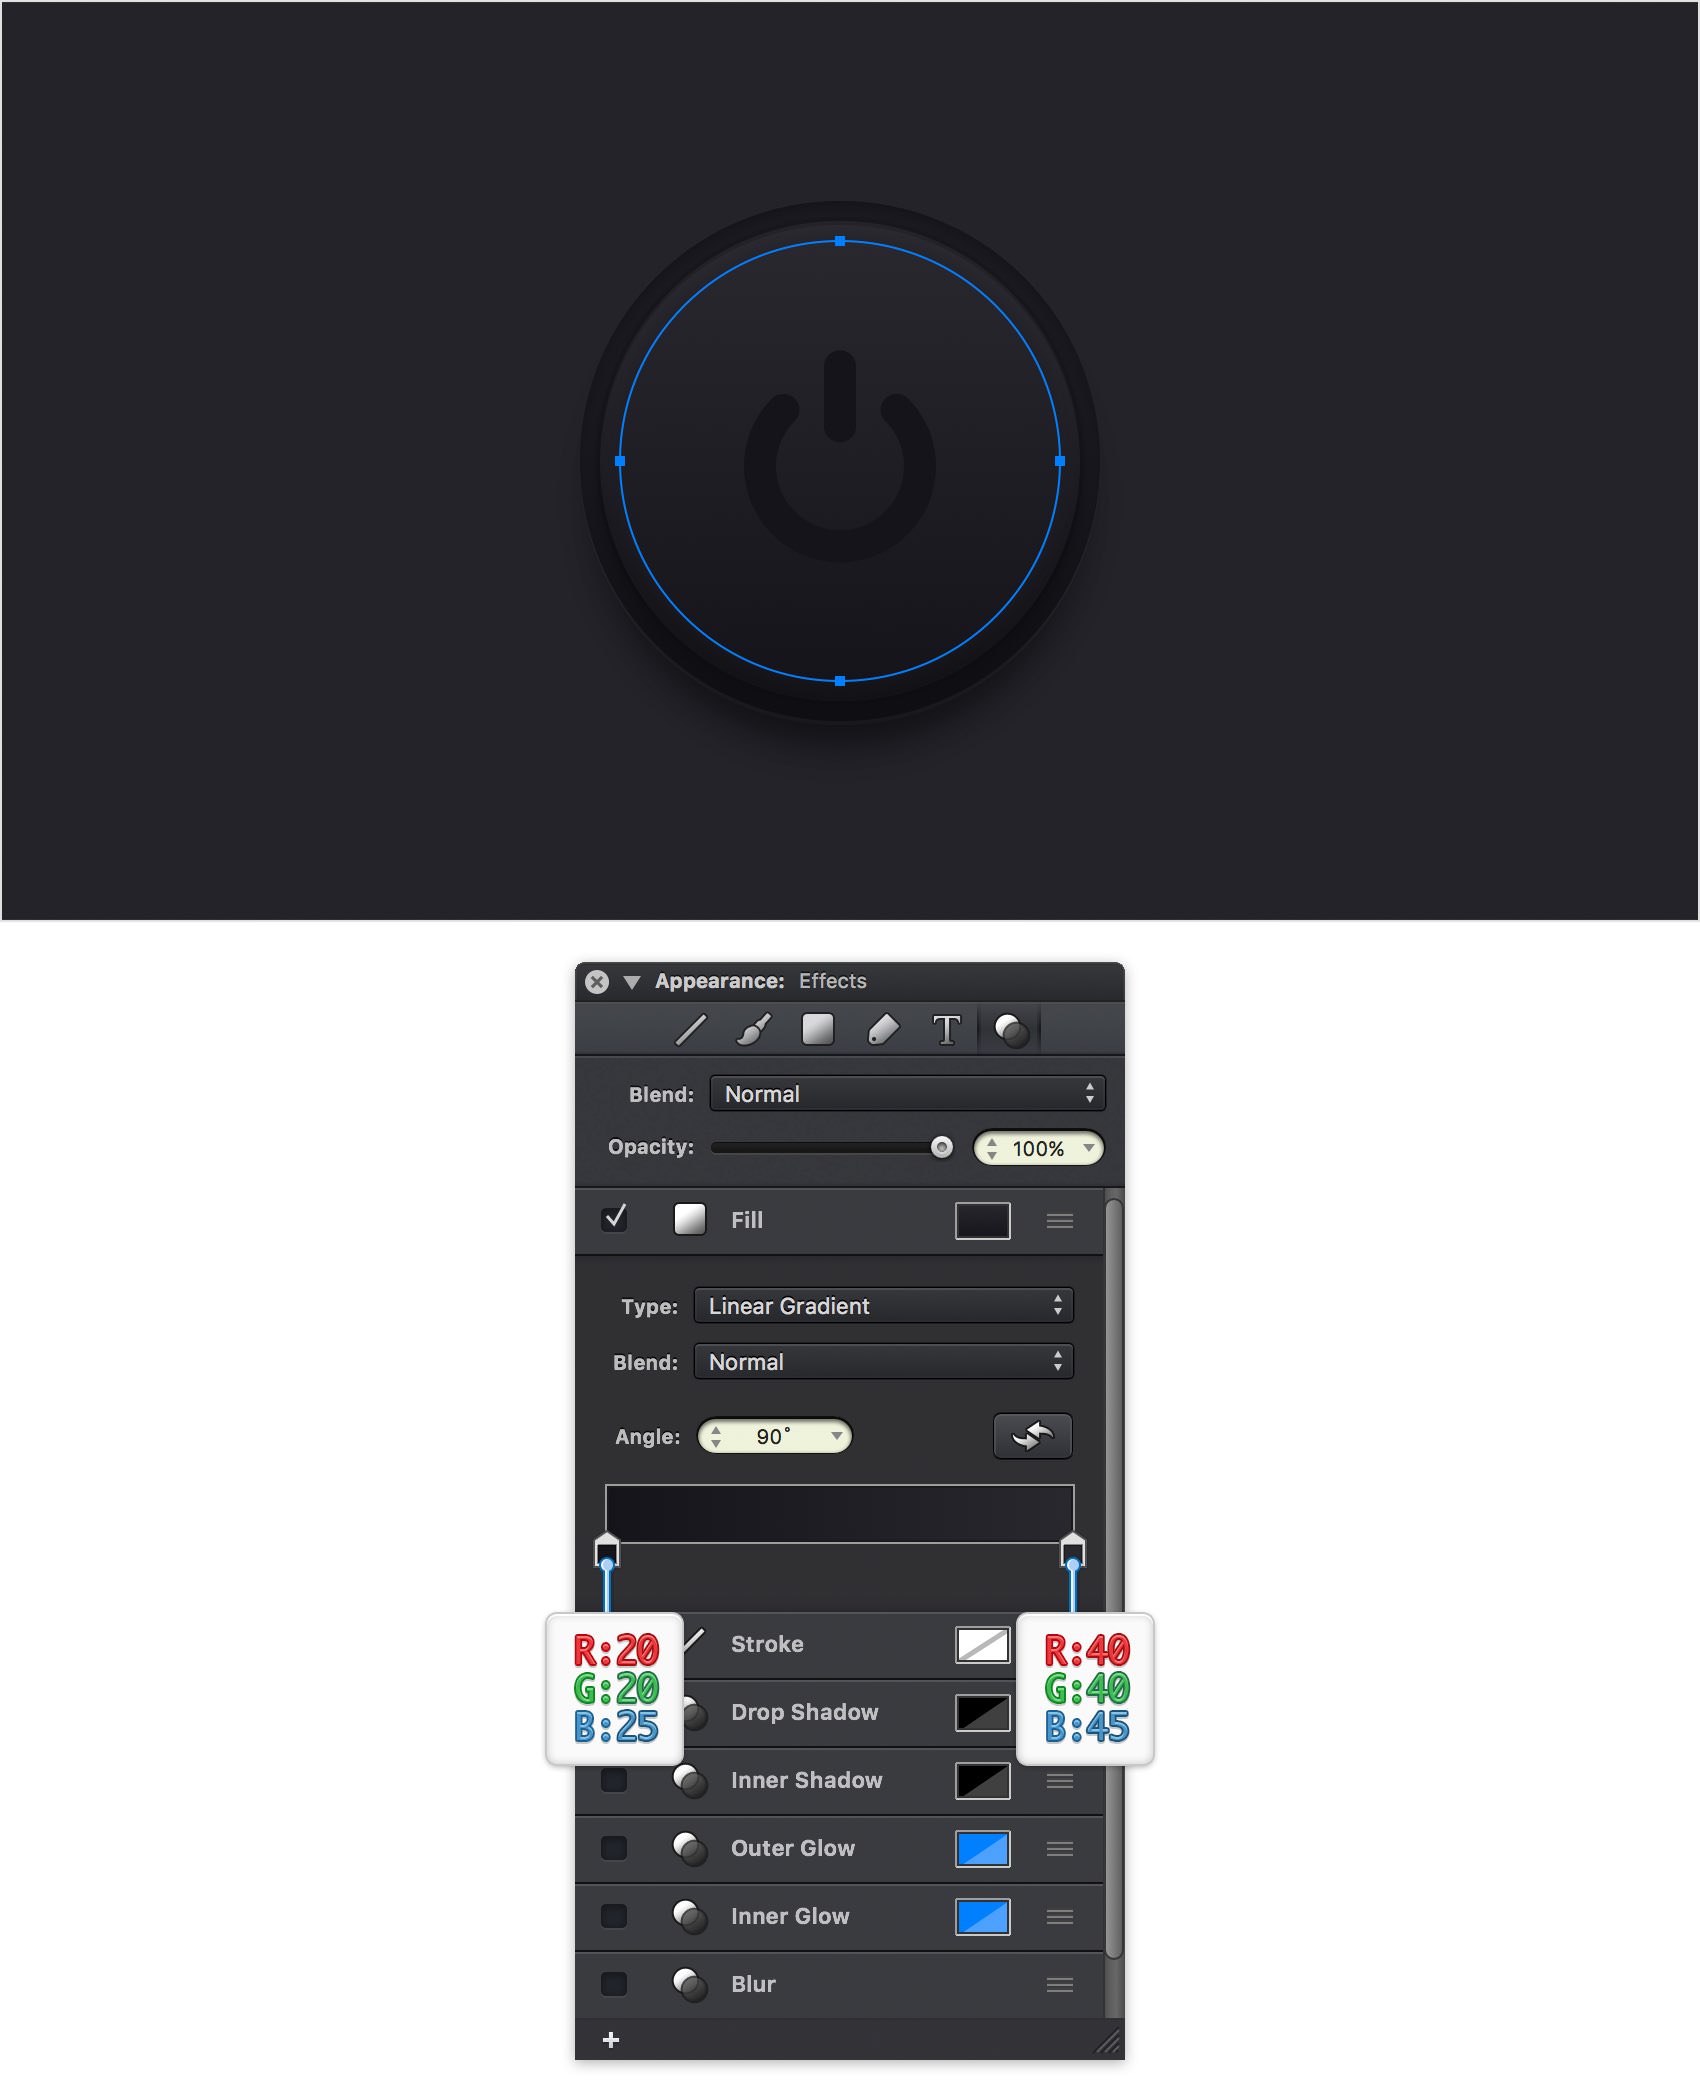
Select your green circle and focus on the Effects pane. Select the Fill and replace the existing color with the linear gradient shown below.
Step 19
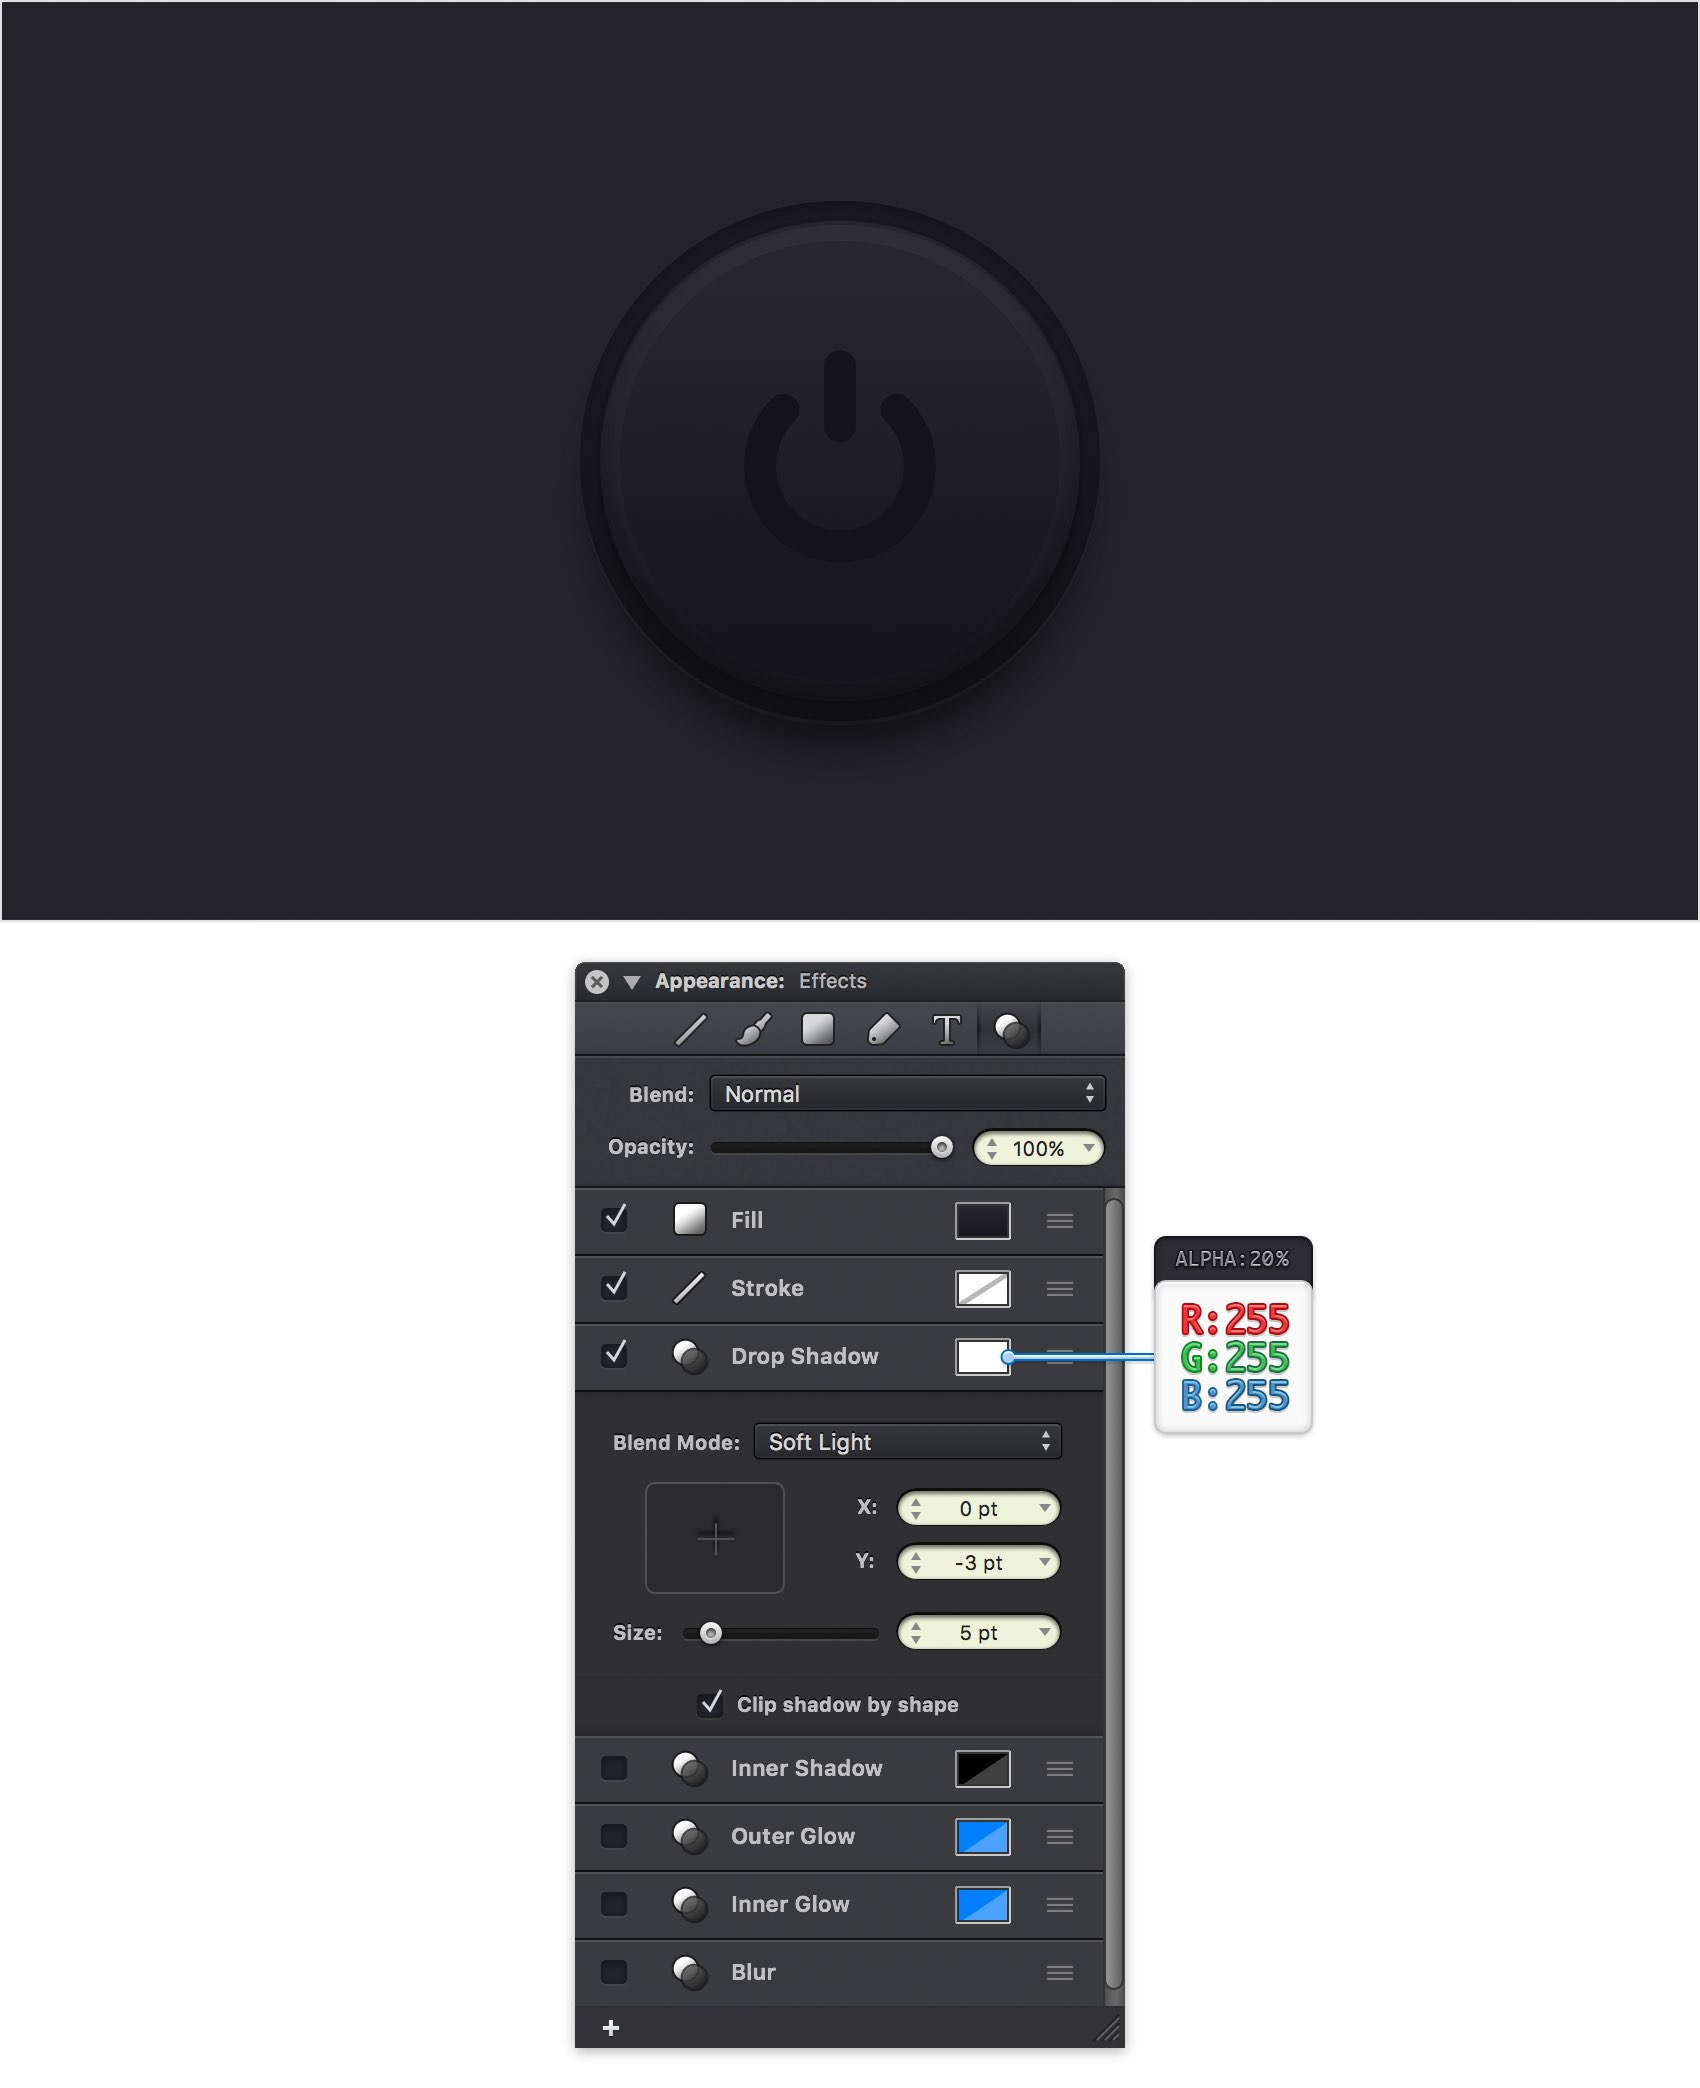
Make sure that your 110 px circle stays selected and keep focusing on the Effects pane. Activate the existing Drop Shadow effect and enter the attributes shown below.
Step 20
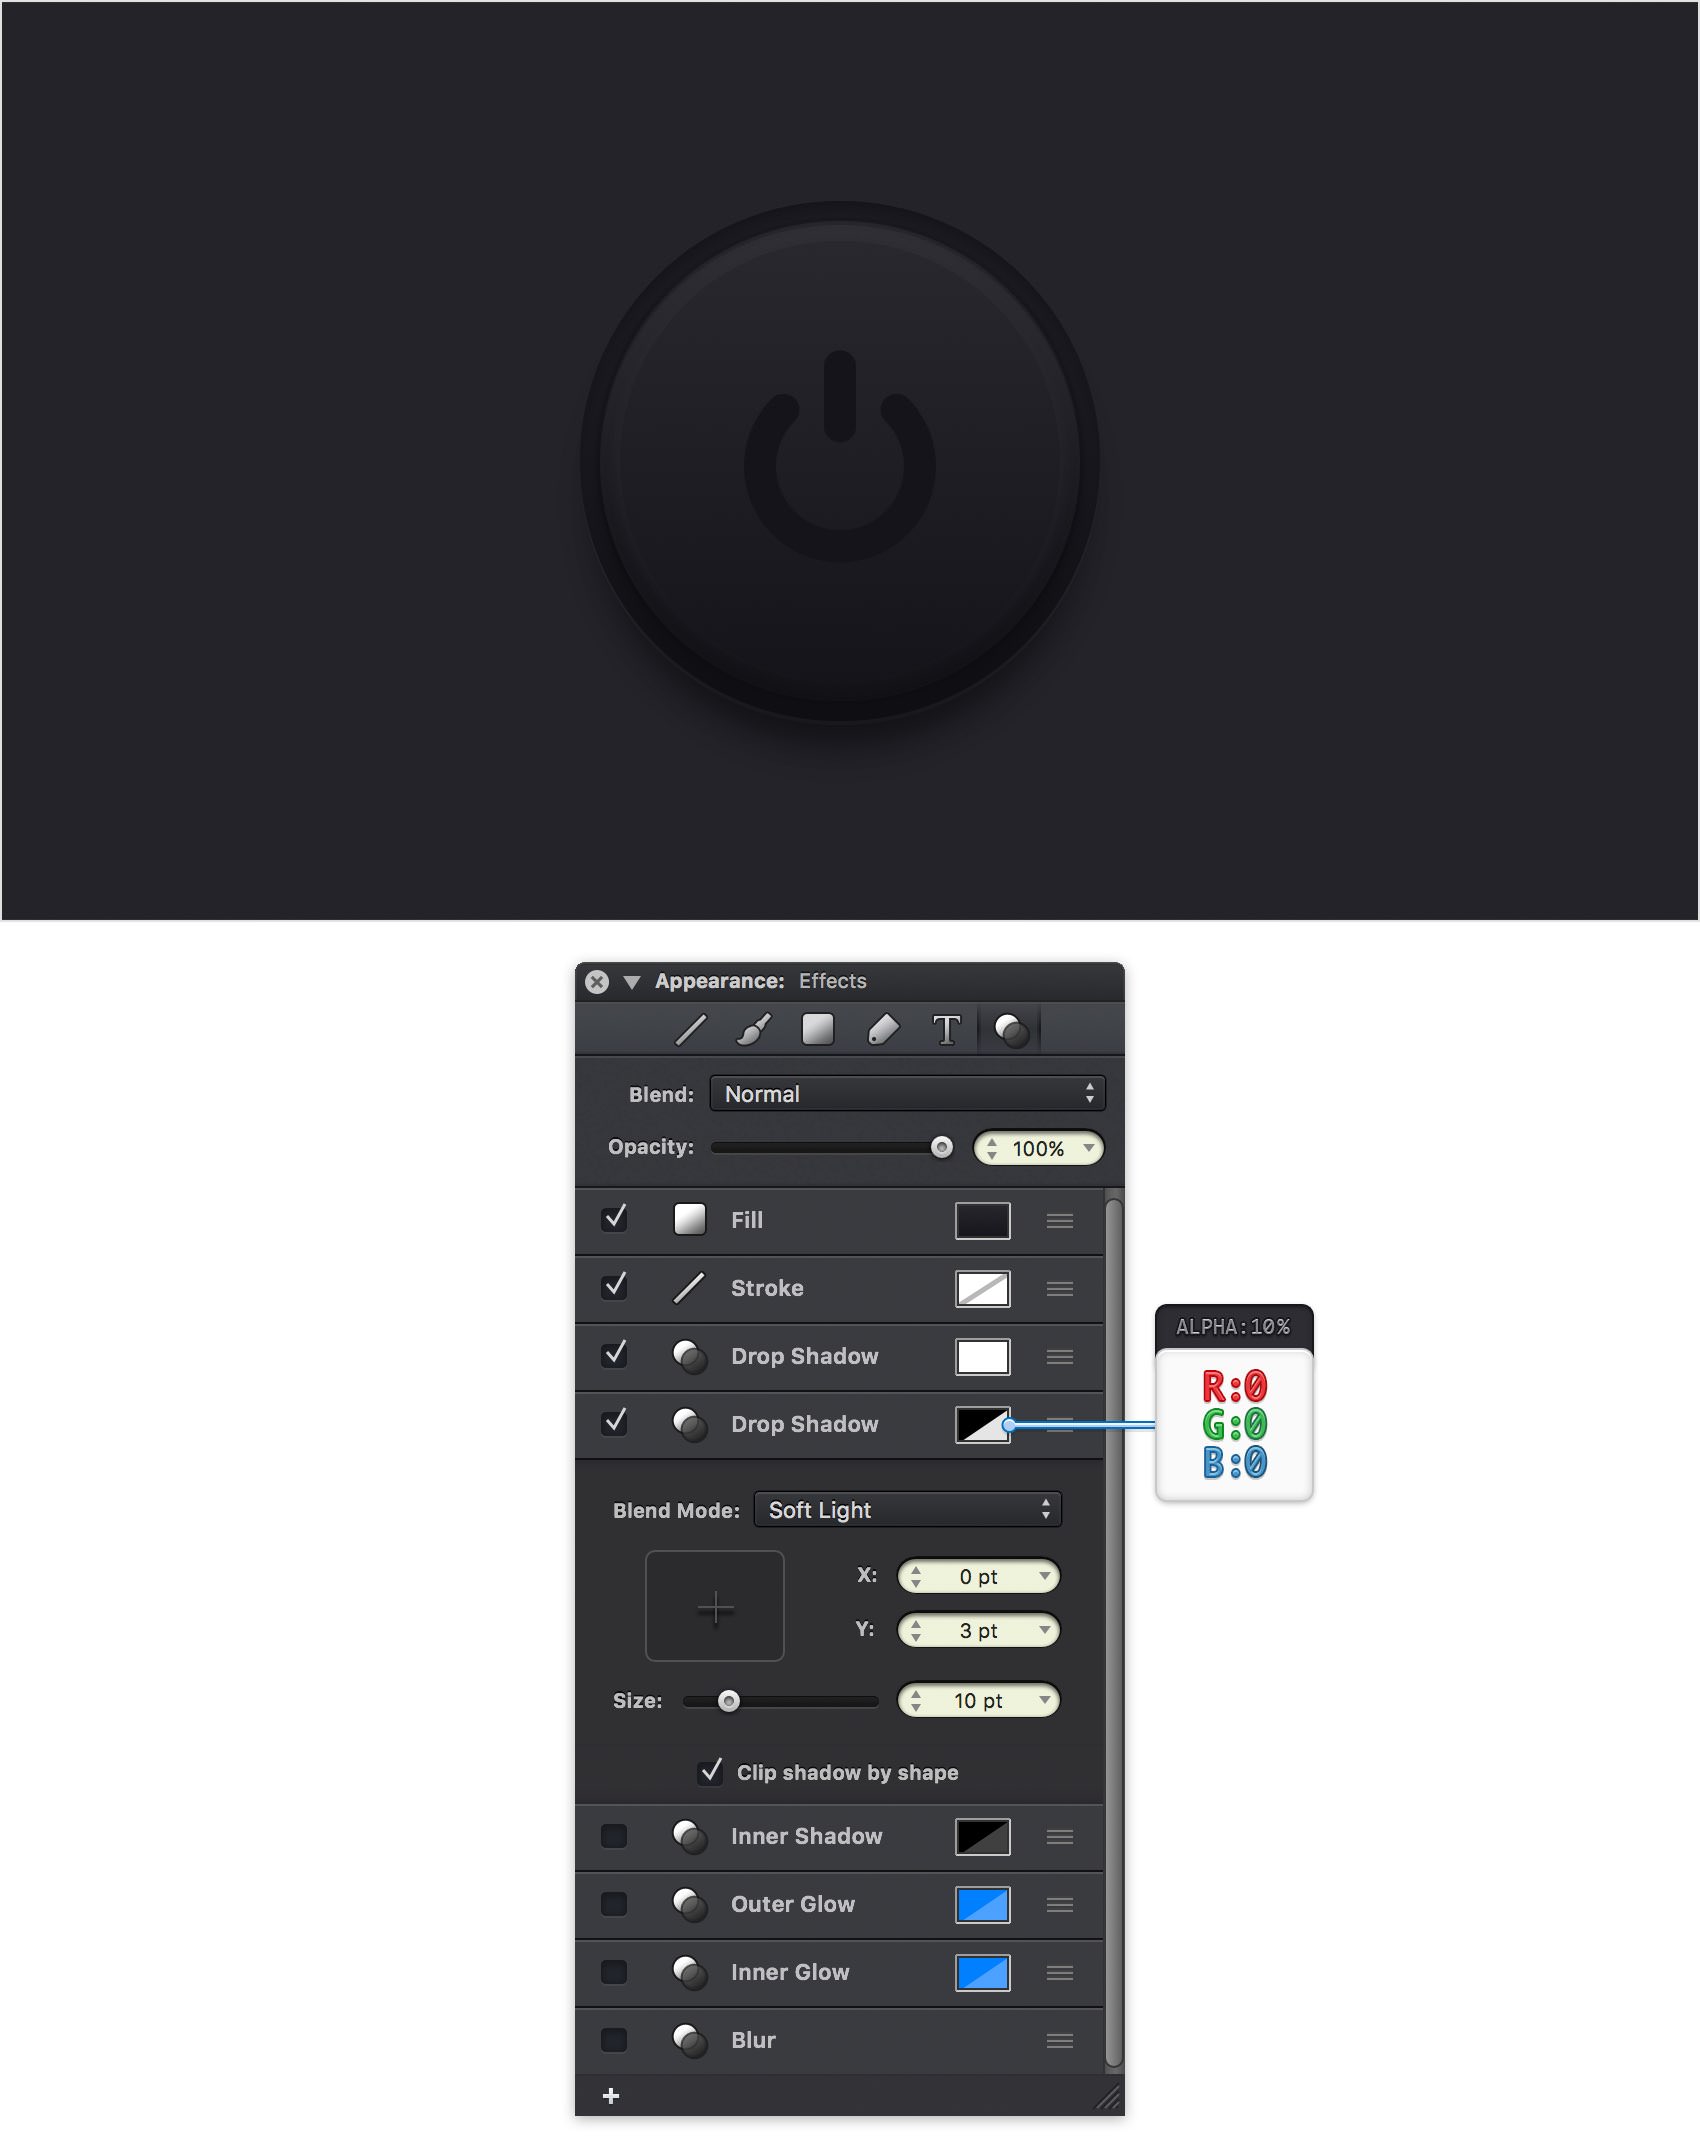
Make sure that your 110 px circle is still selected and keep focusing on the Effects pane. Add a second Drop Shadow effect and enter the attributes shown below.
Step 21
Make sure that your 110 px circle is still selected and keep focusing on the Effects pane. Add a third Drop Shadow effect and enter the attributes shown below.
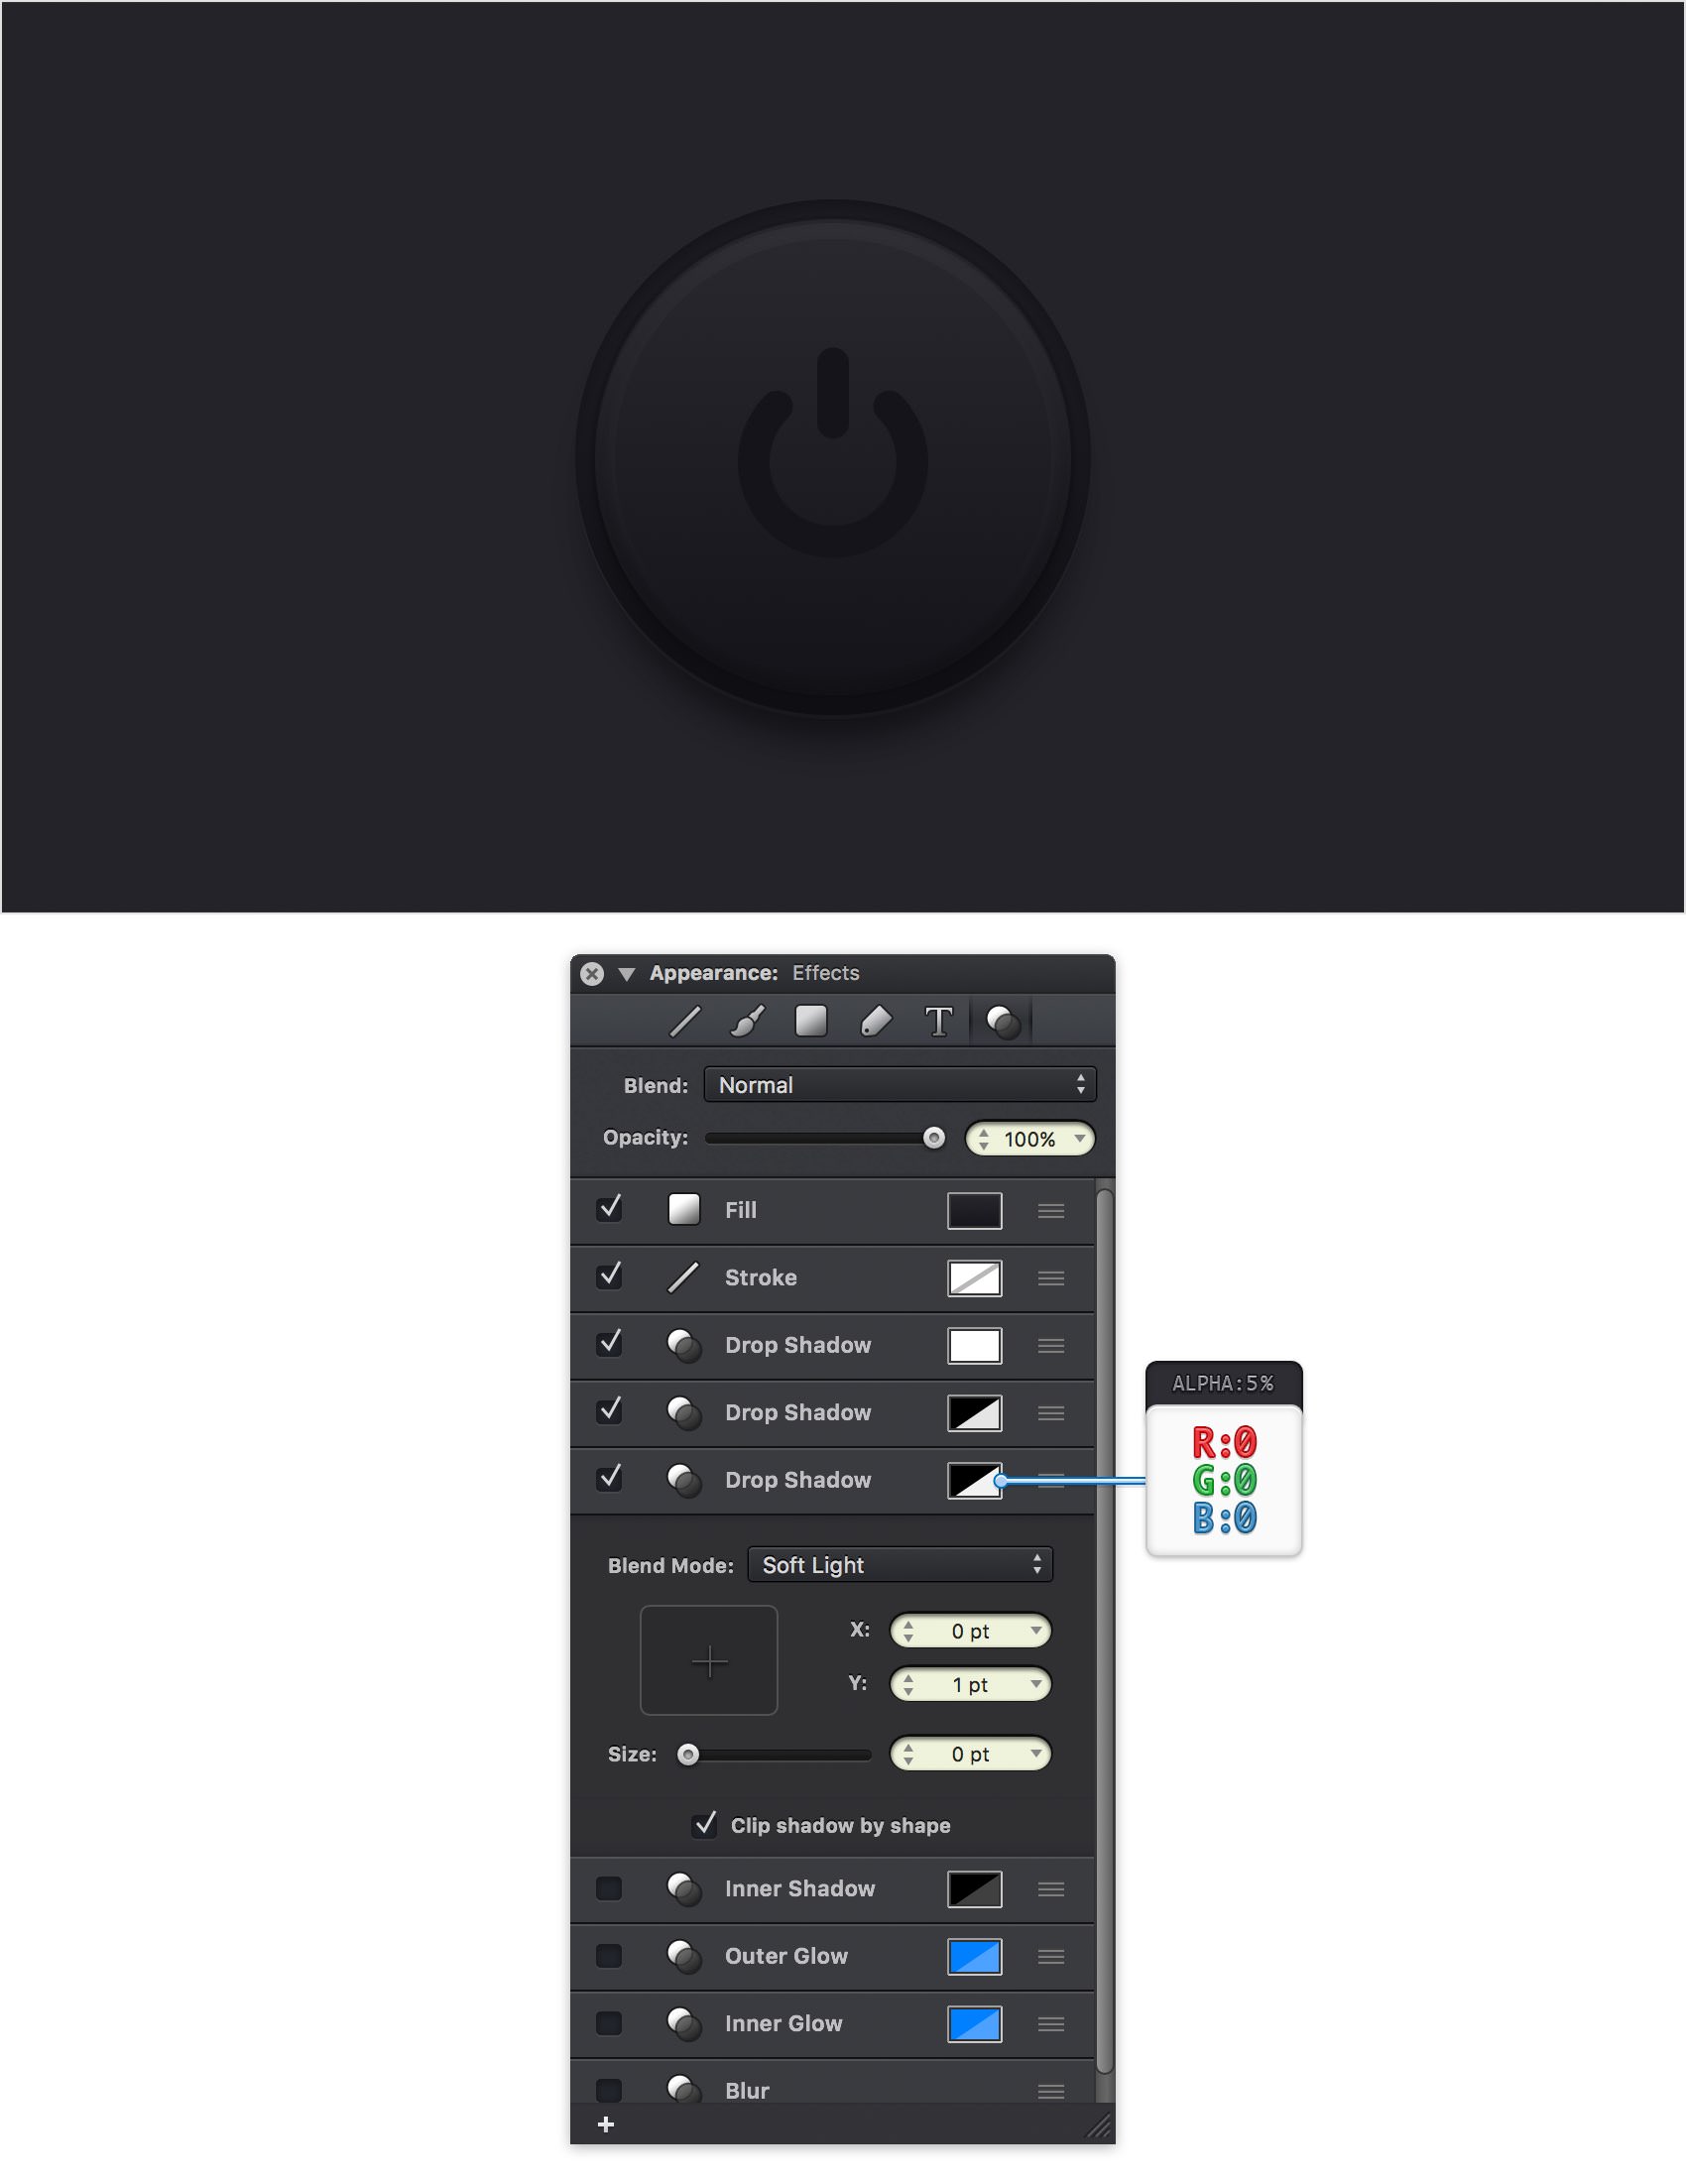
Step 22
Make sure that your 110 px circle is still selected and keep focusing on the Effects pane. Activate the existing Inner Shadow effect and enter the attributes shown below.
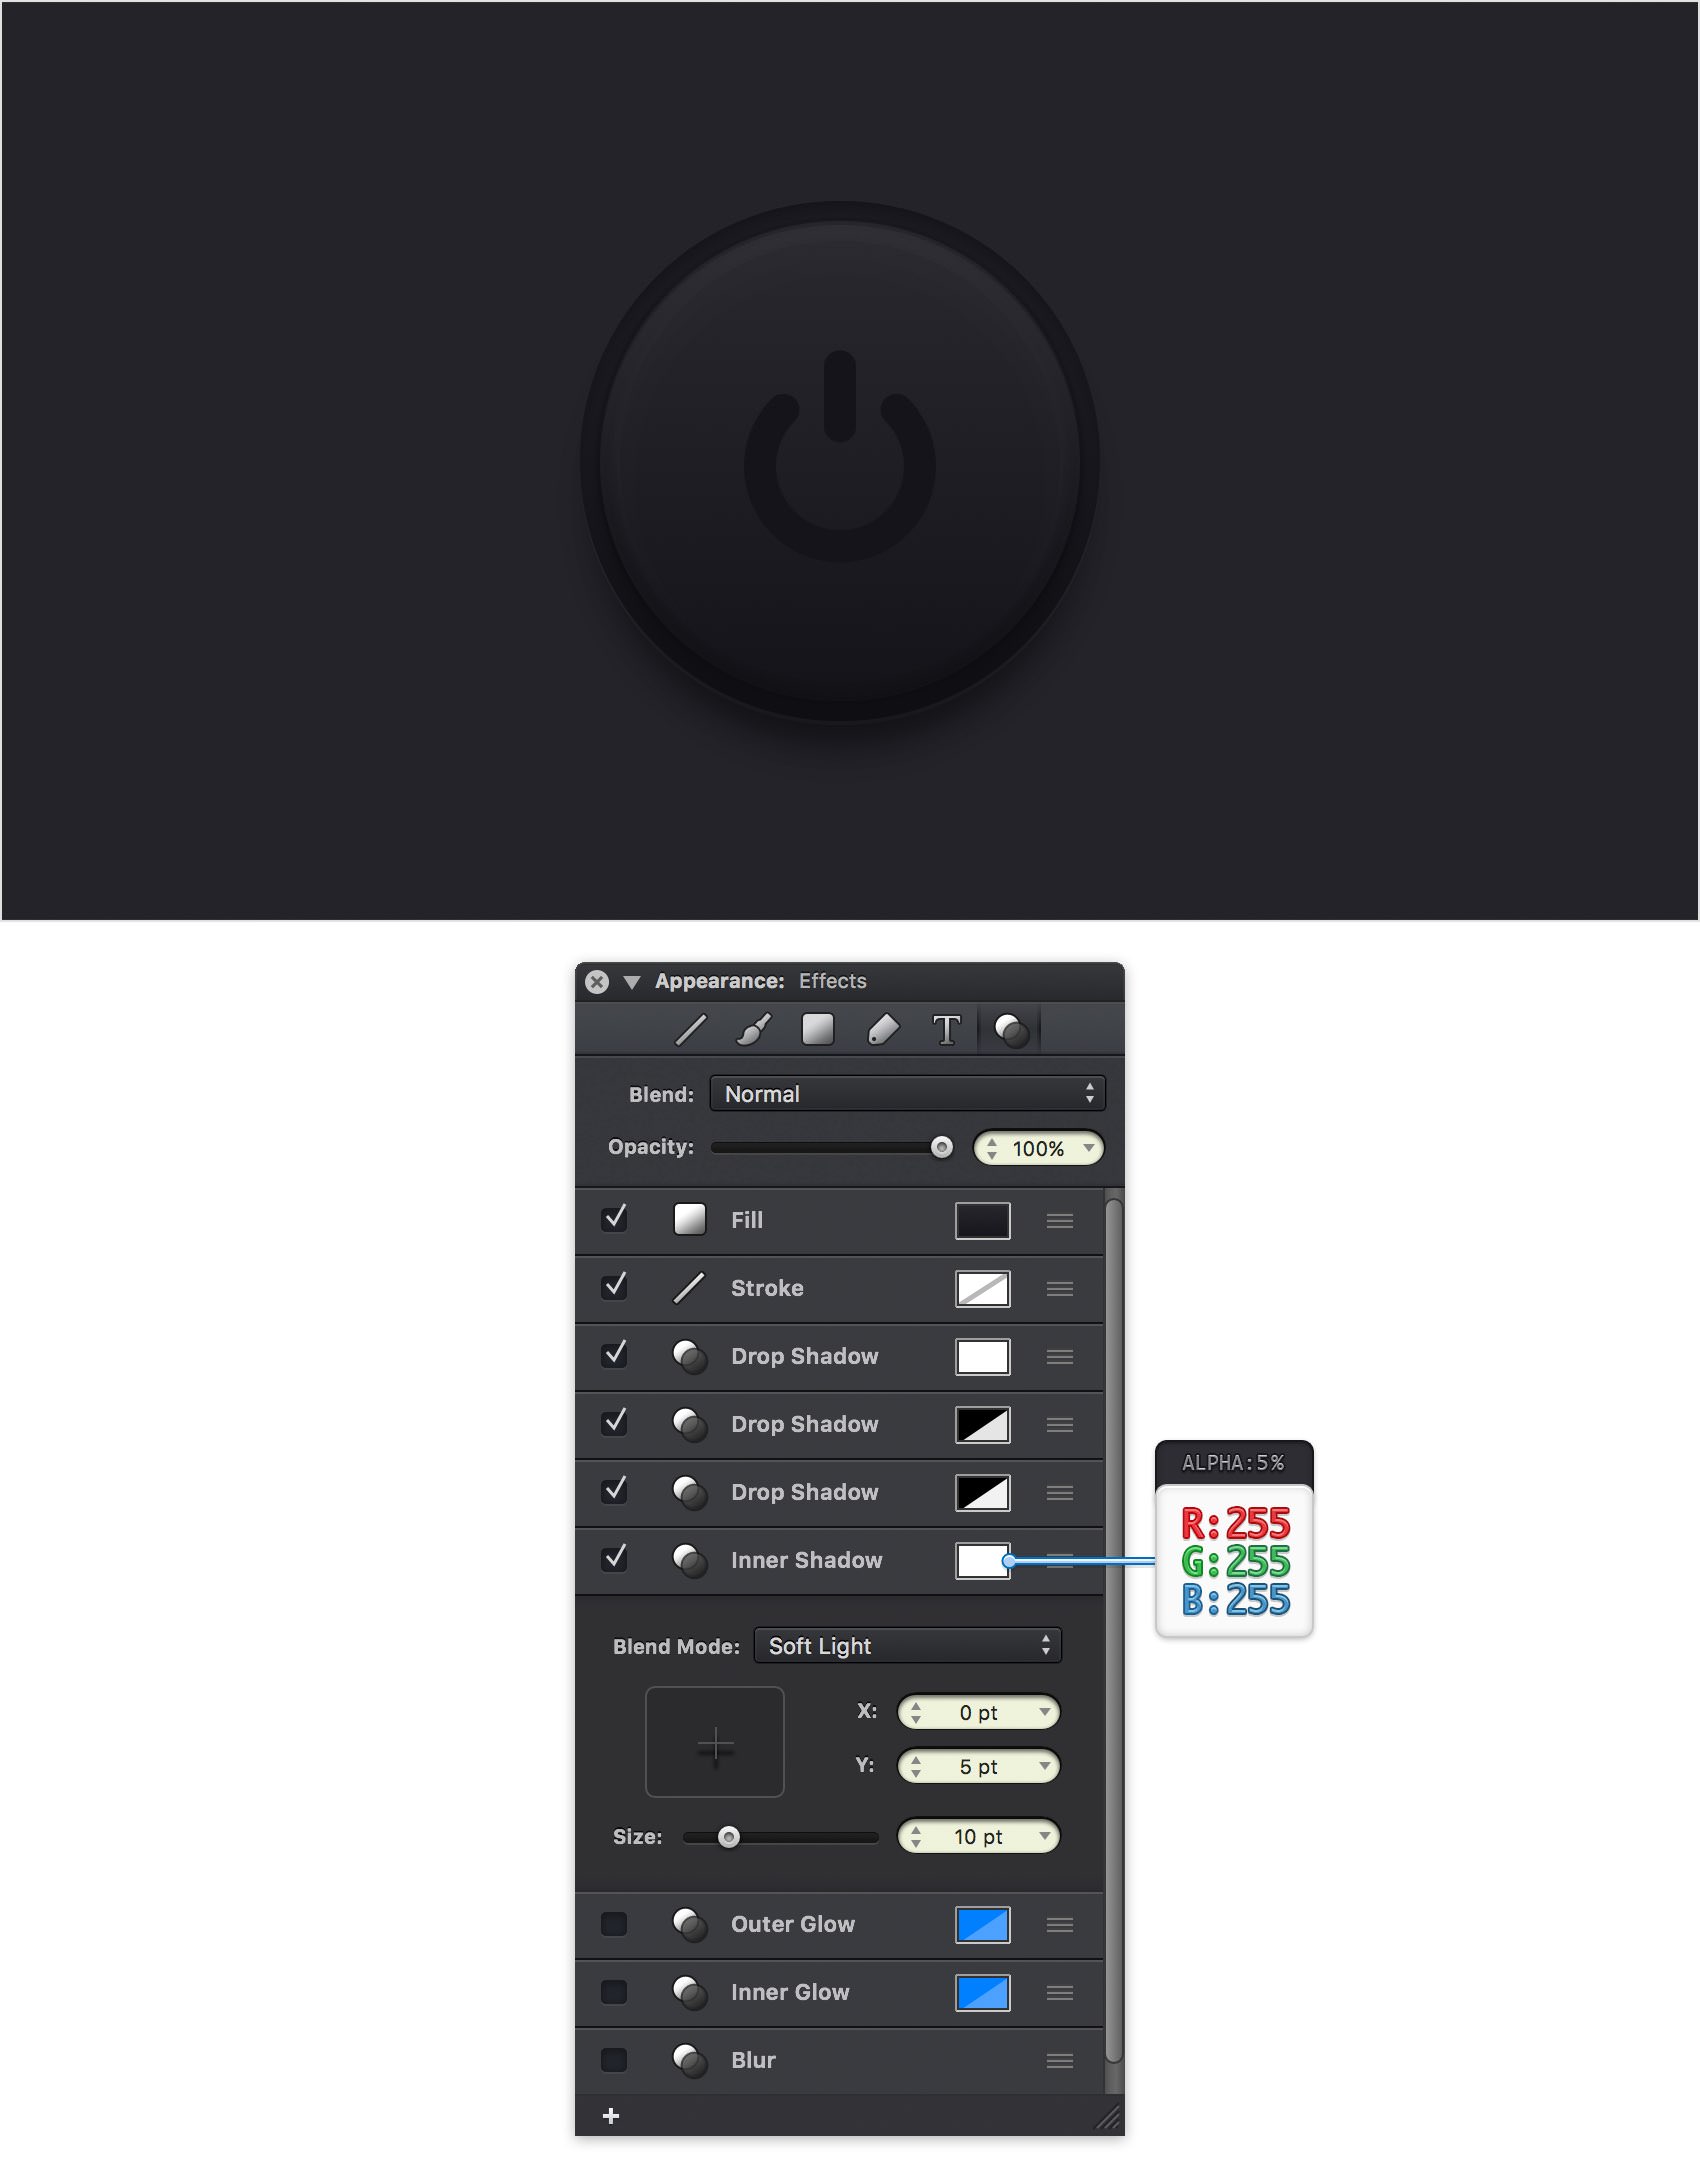
Step 23
Select your power symbol shape and focus on the Effects pane. Select the existing Stroke and enter the attributes shown below.
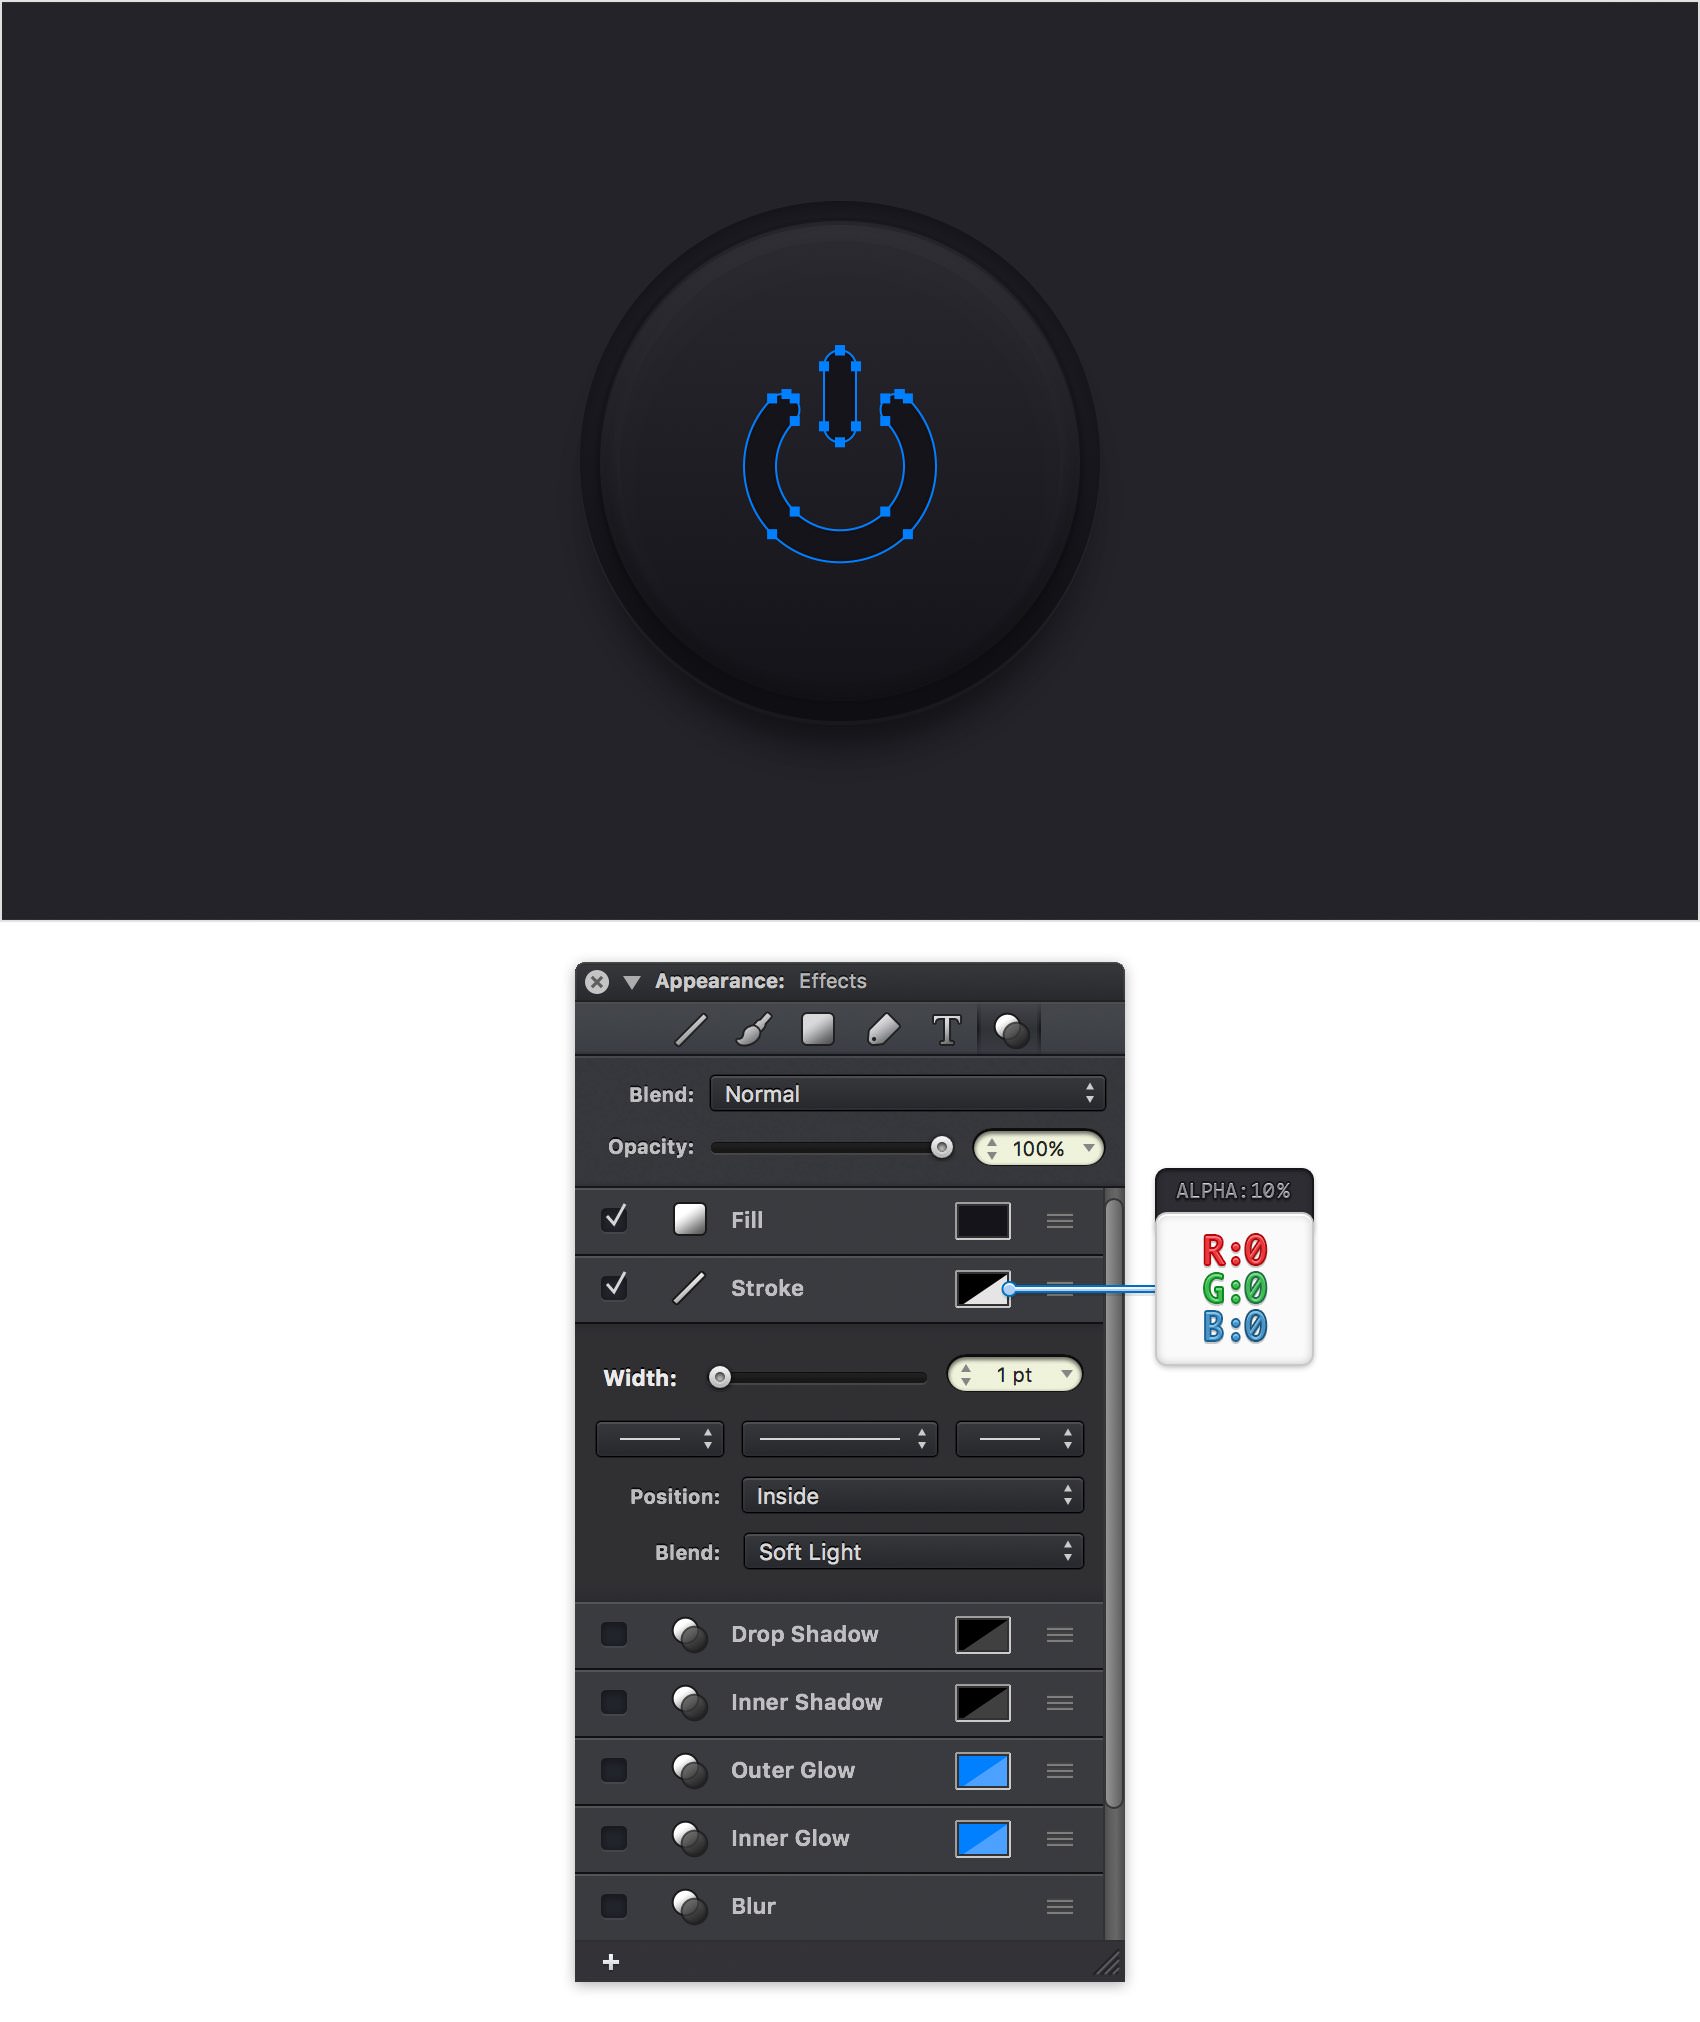
Step 24
Make sure that your power symbol shape stays selected and keep focusing on the Effects pane. Activate that Inner Glow effect and enter the attributes shown below.
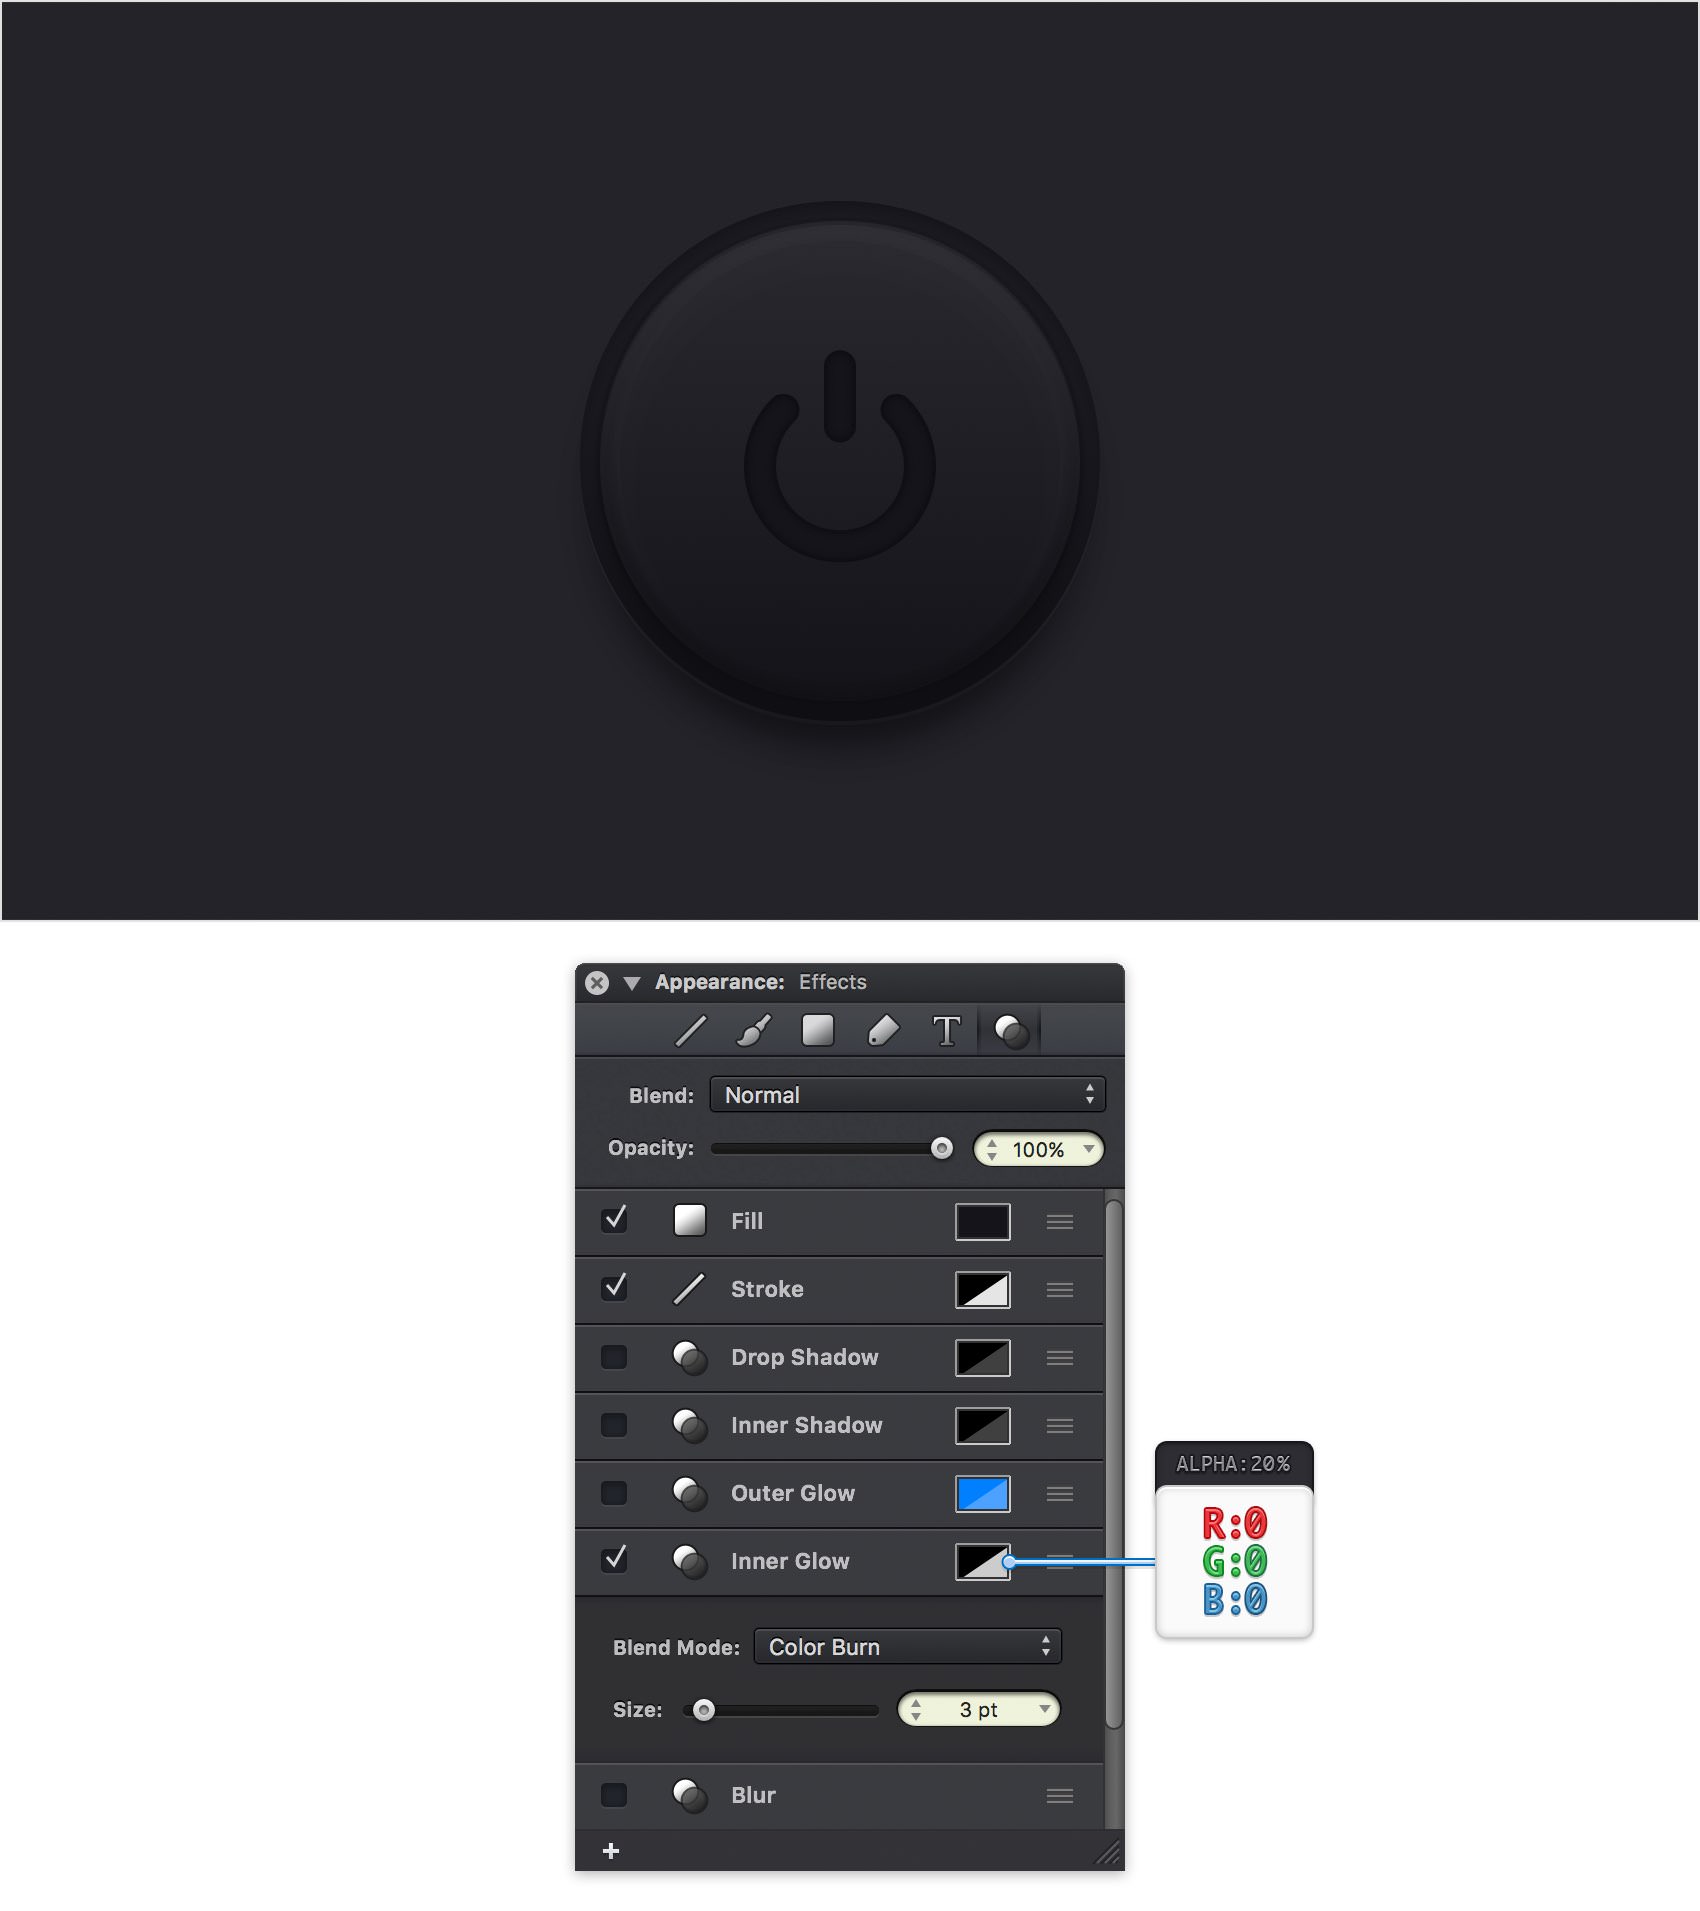
Step 25
Make sure that your power symbol shape is still selected and keep focusing on the Effects pane. Activate that Inner Shadow effect and enter the attributes shown below.
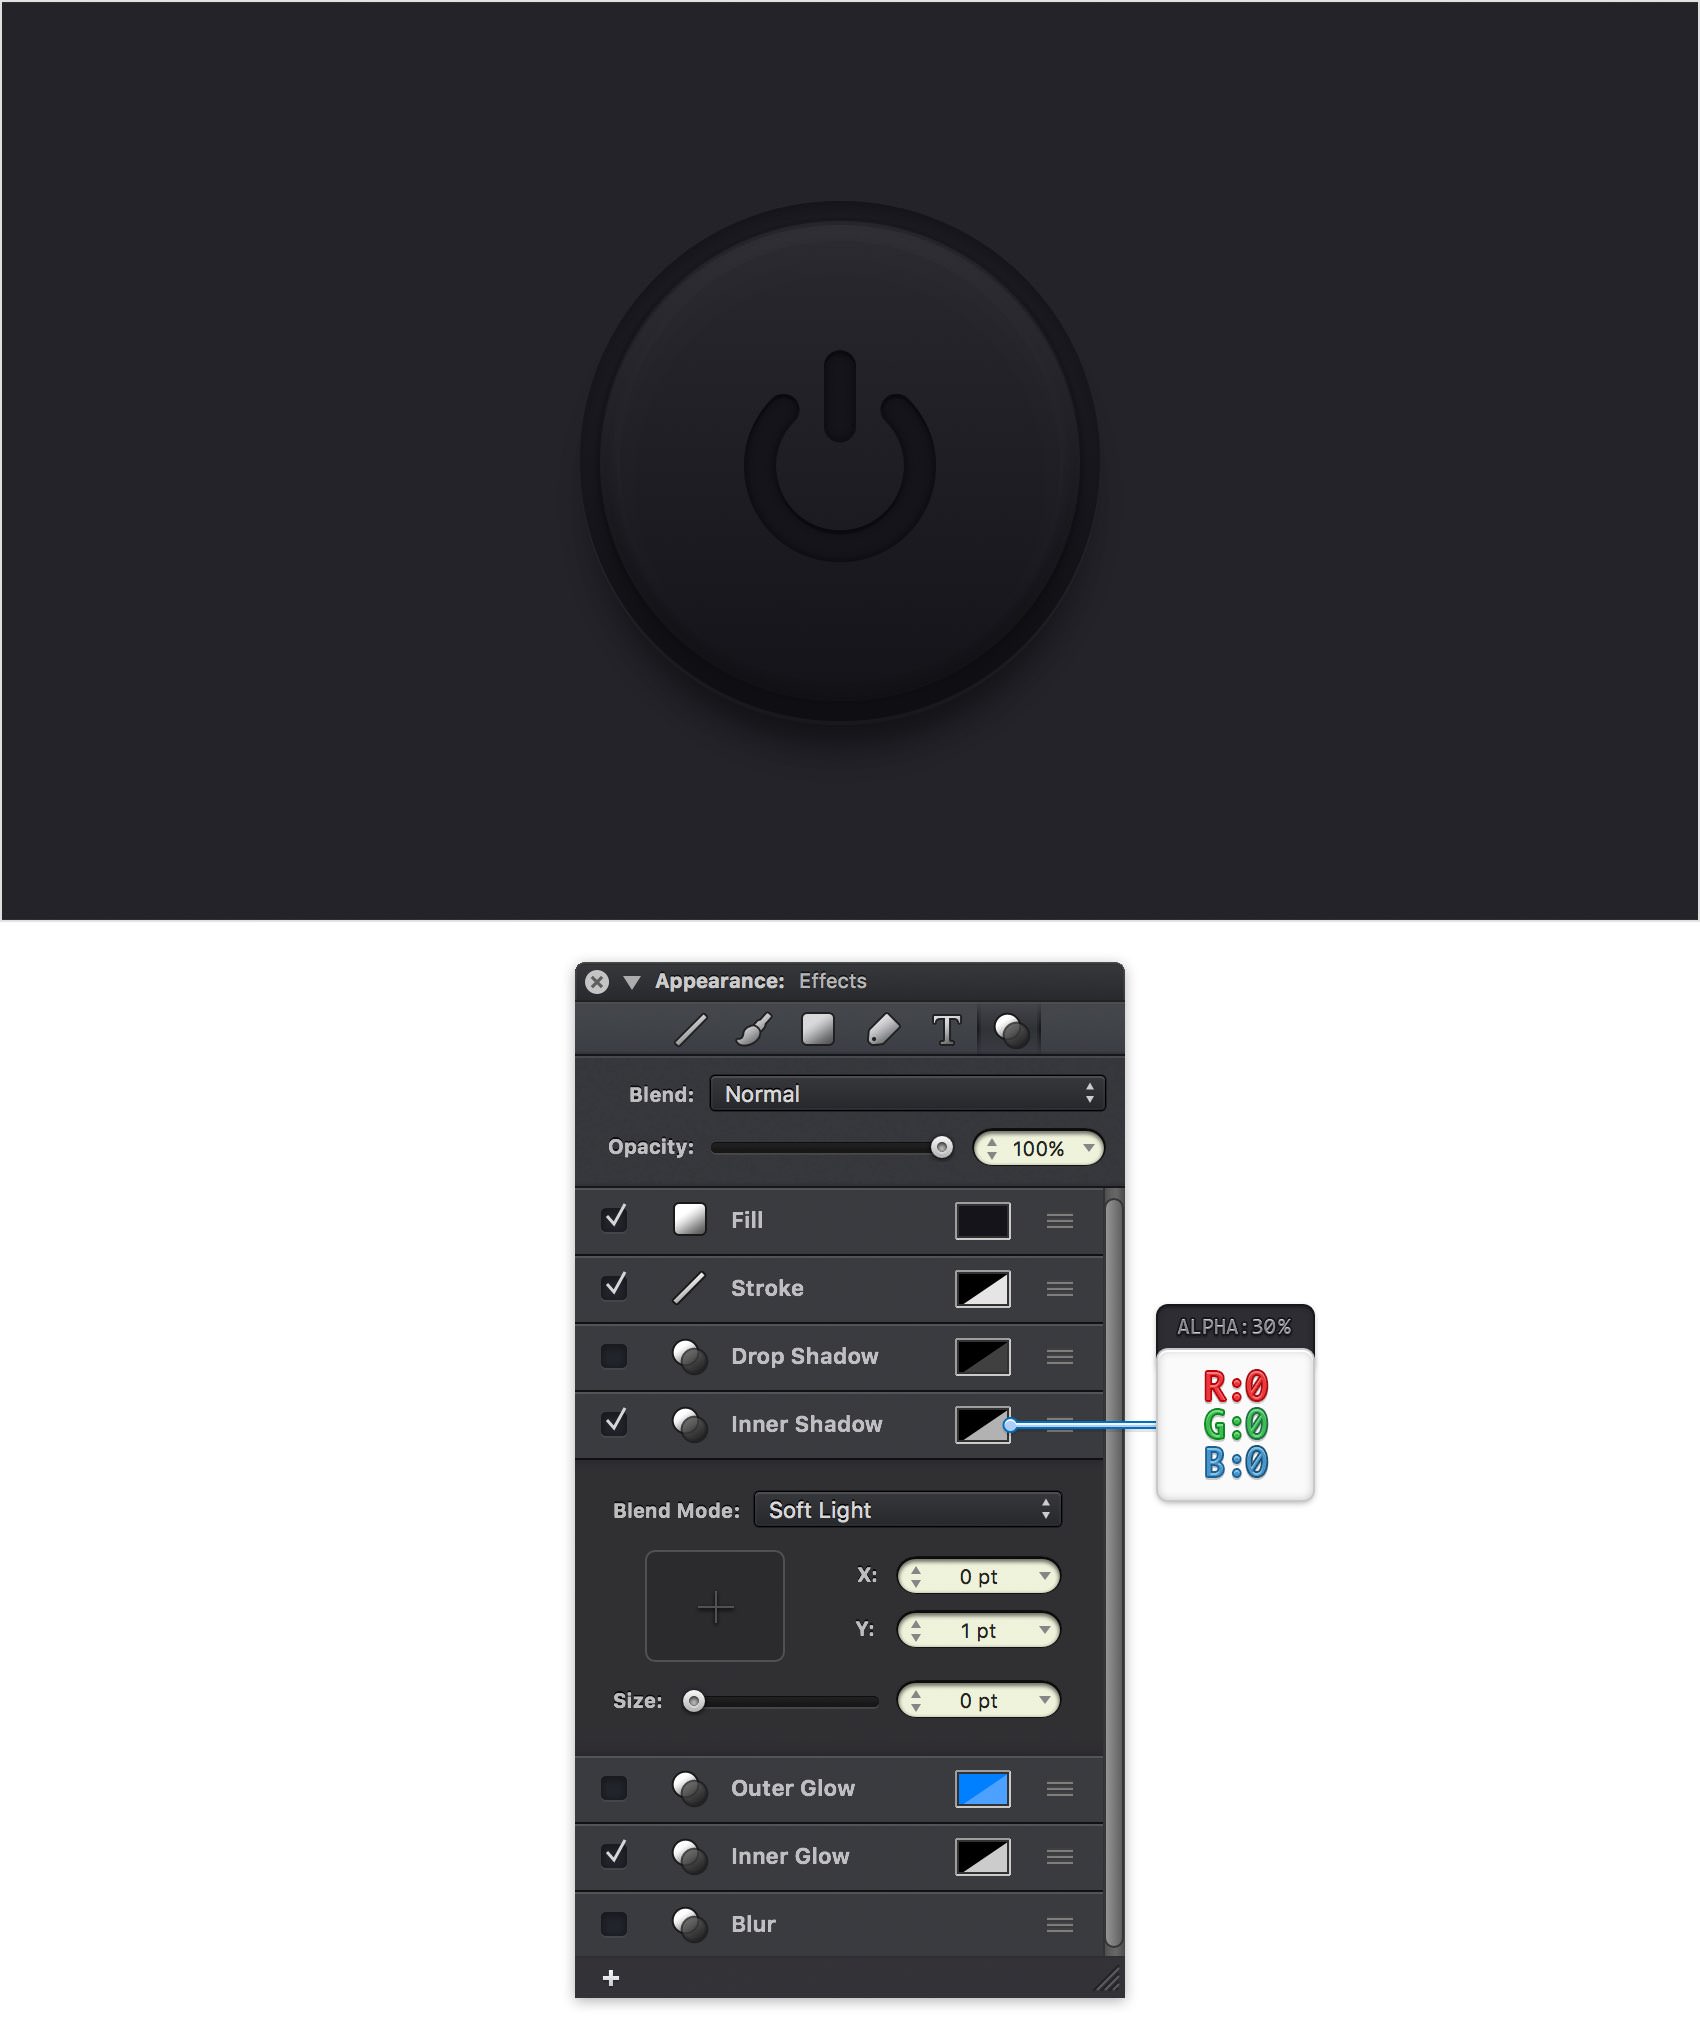
Step 26
Make sure that your power symbol shape is still selected and keep focusing on the Effects pane. Activate that Drop Shadow effect and enter the attributes shown below. This will be the off version of your button.
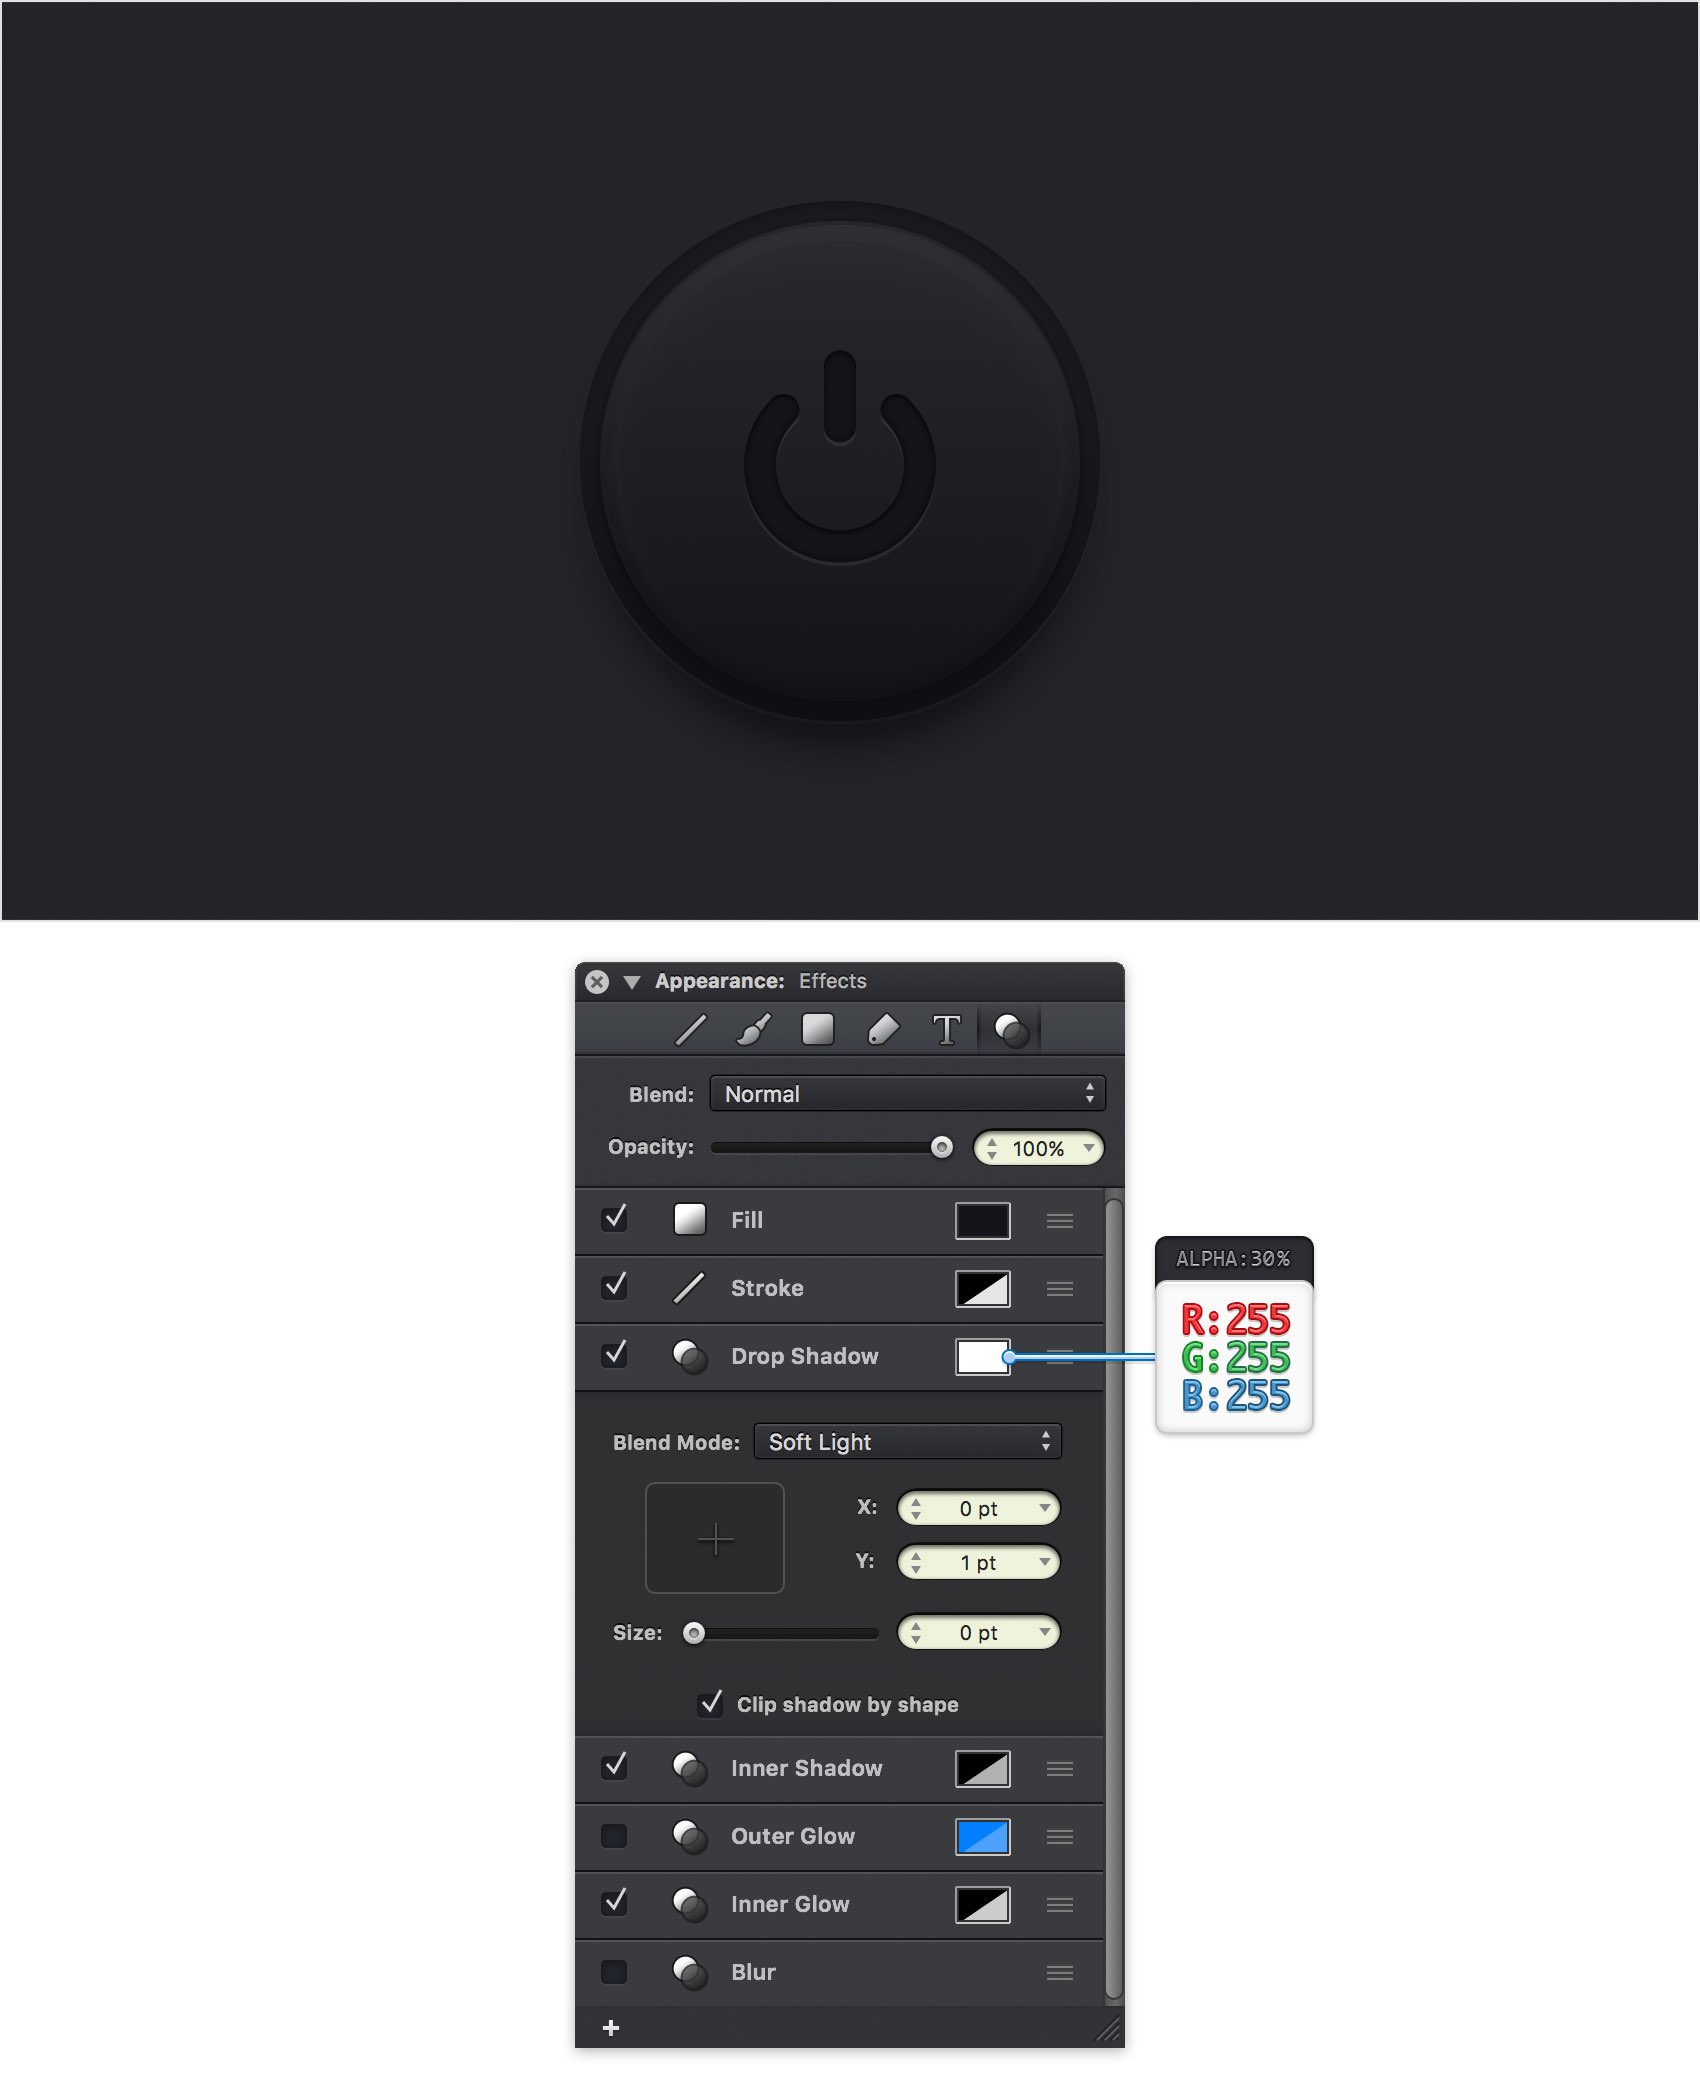
Step 27
For the on version of the button you will have to make some changes to that power symbol shape. Make sure that it's selected and focus on the Effects pane.
First, select the Fill and replace the existing color with R=1 G=174 B=14 and then click the color well that stands for the Inner Glow effect and drag the Alpha slider to 100%.
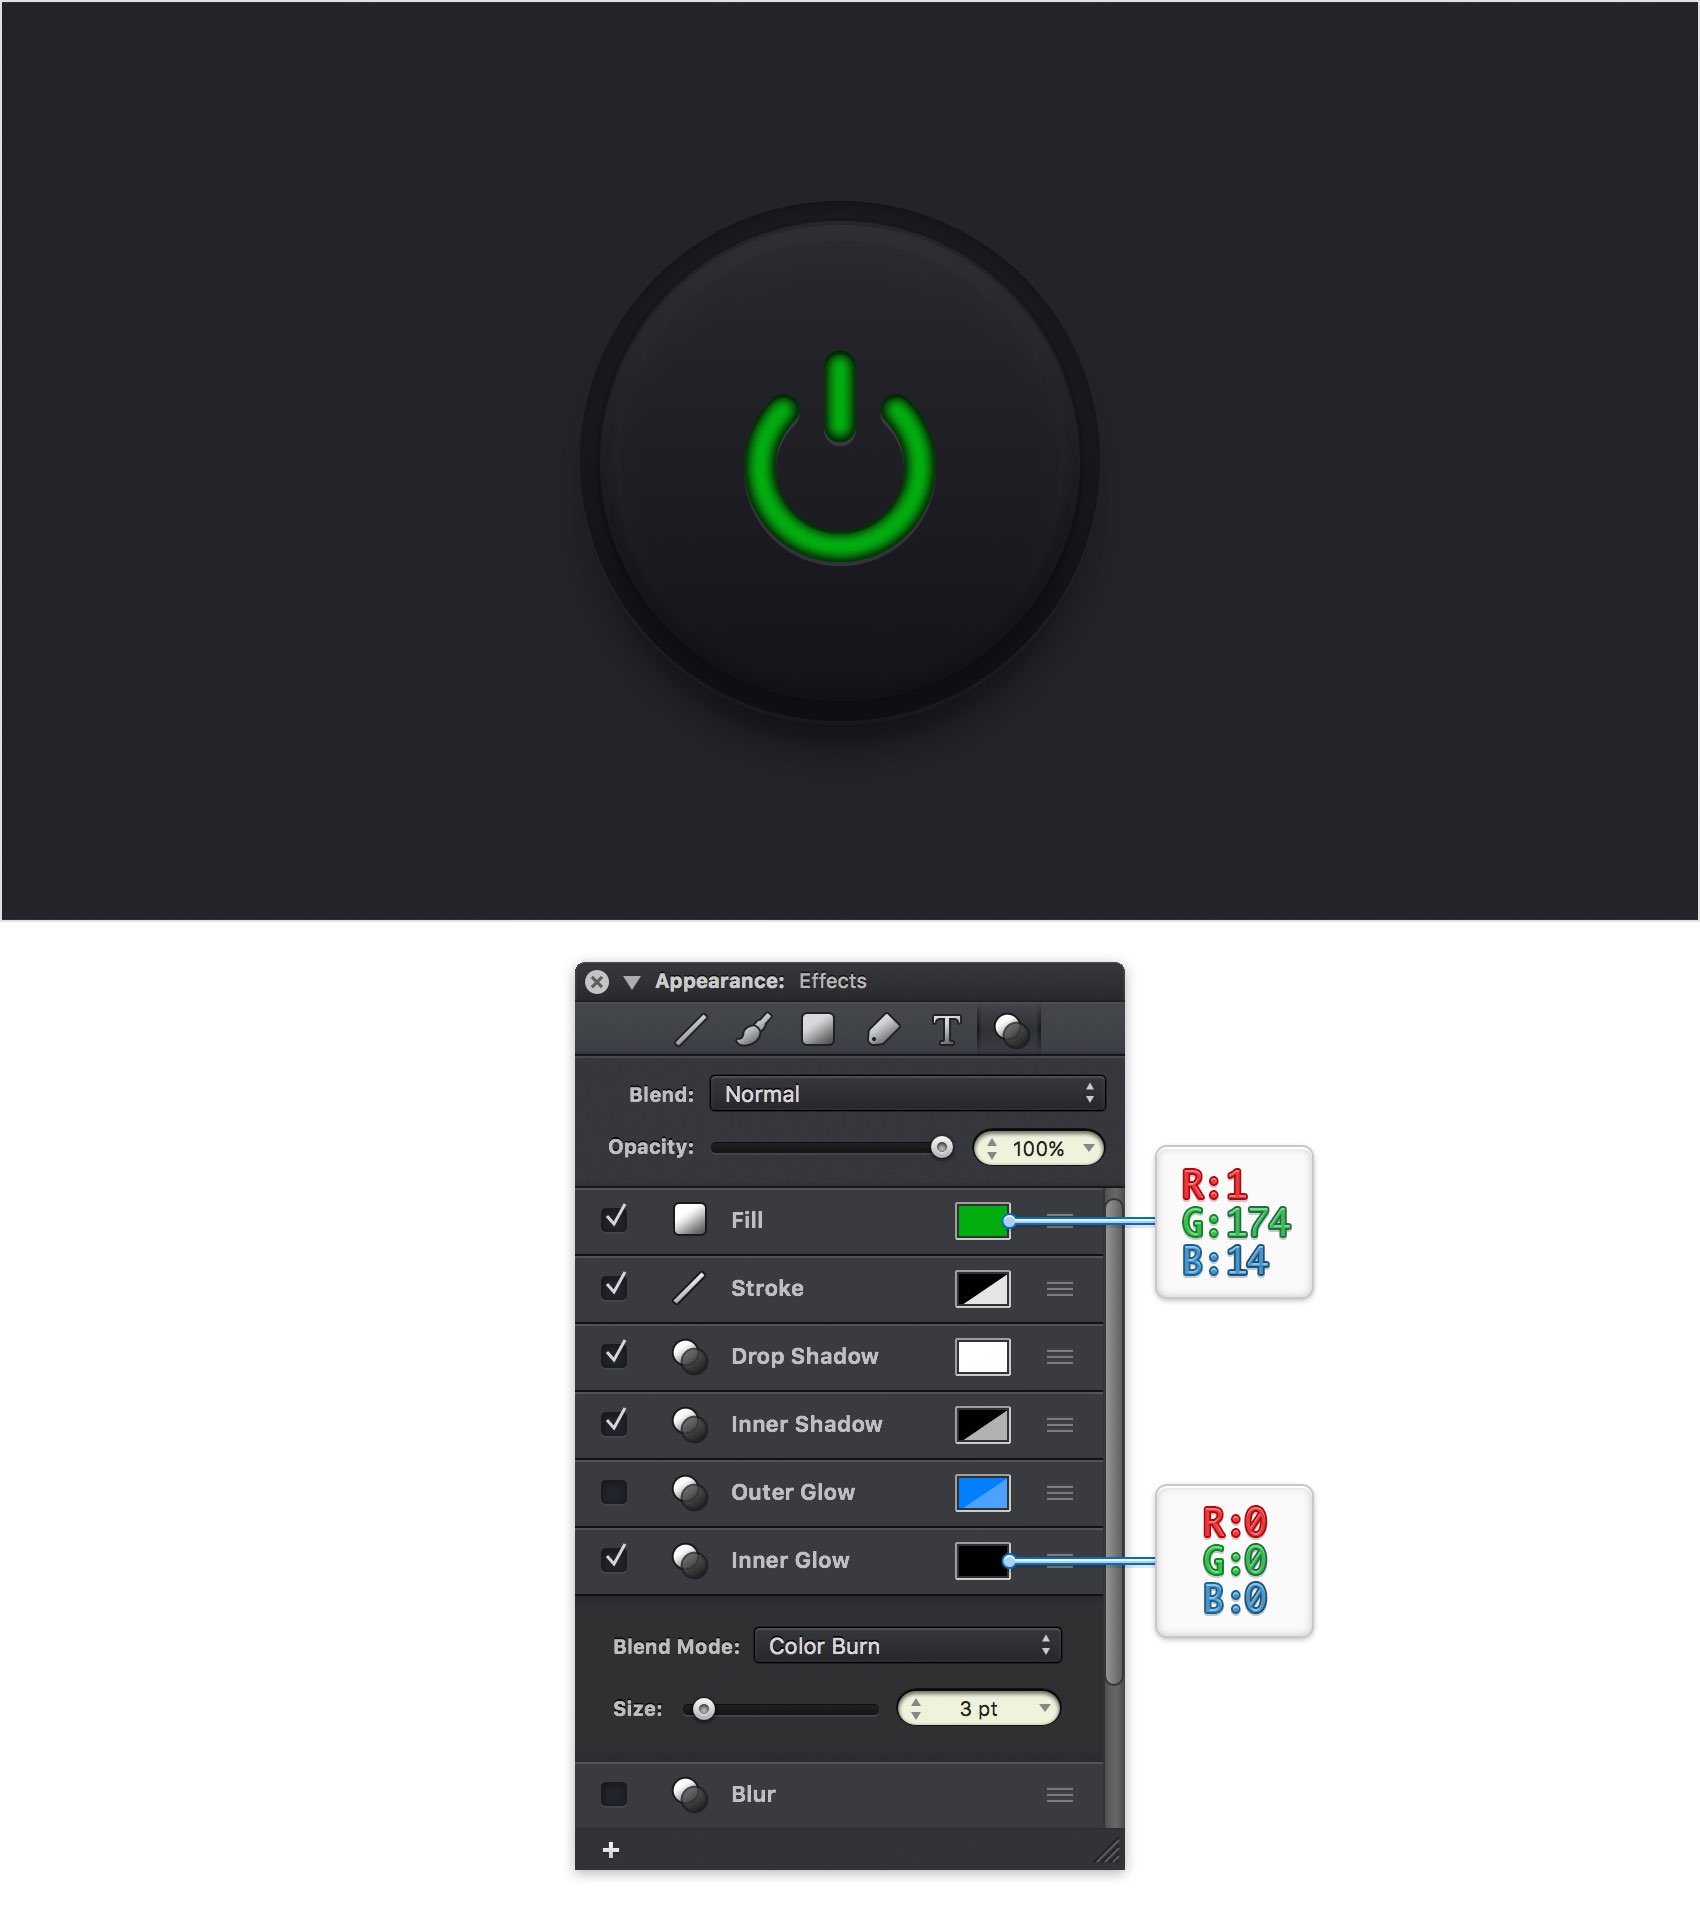
Step 28
Make sure that your power symbol shape is still selected and keep focusing on the Effects pane. Activate the Outer Glow effect and enter the attributes shown below.
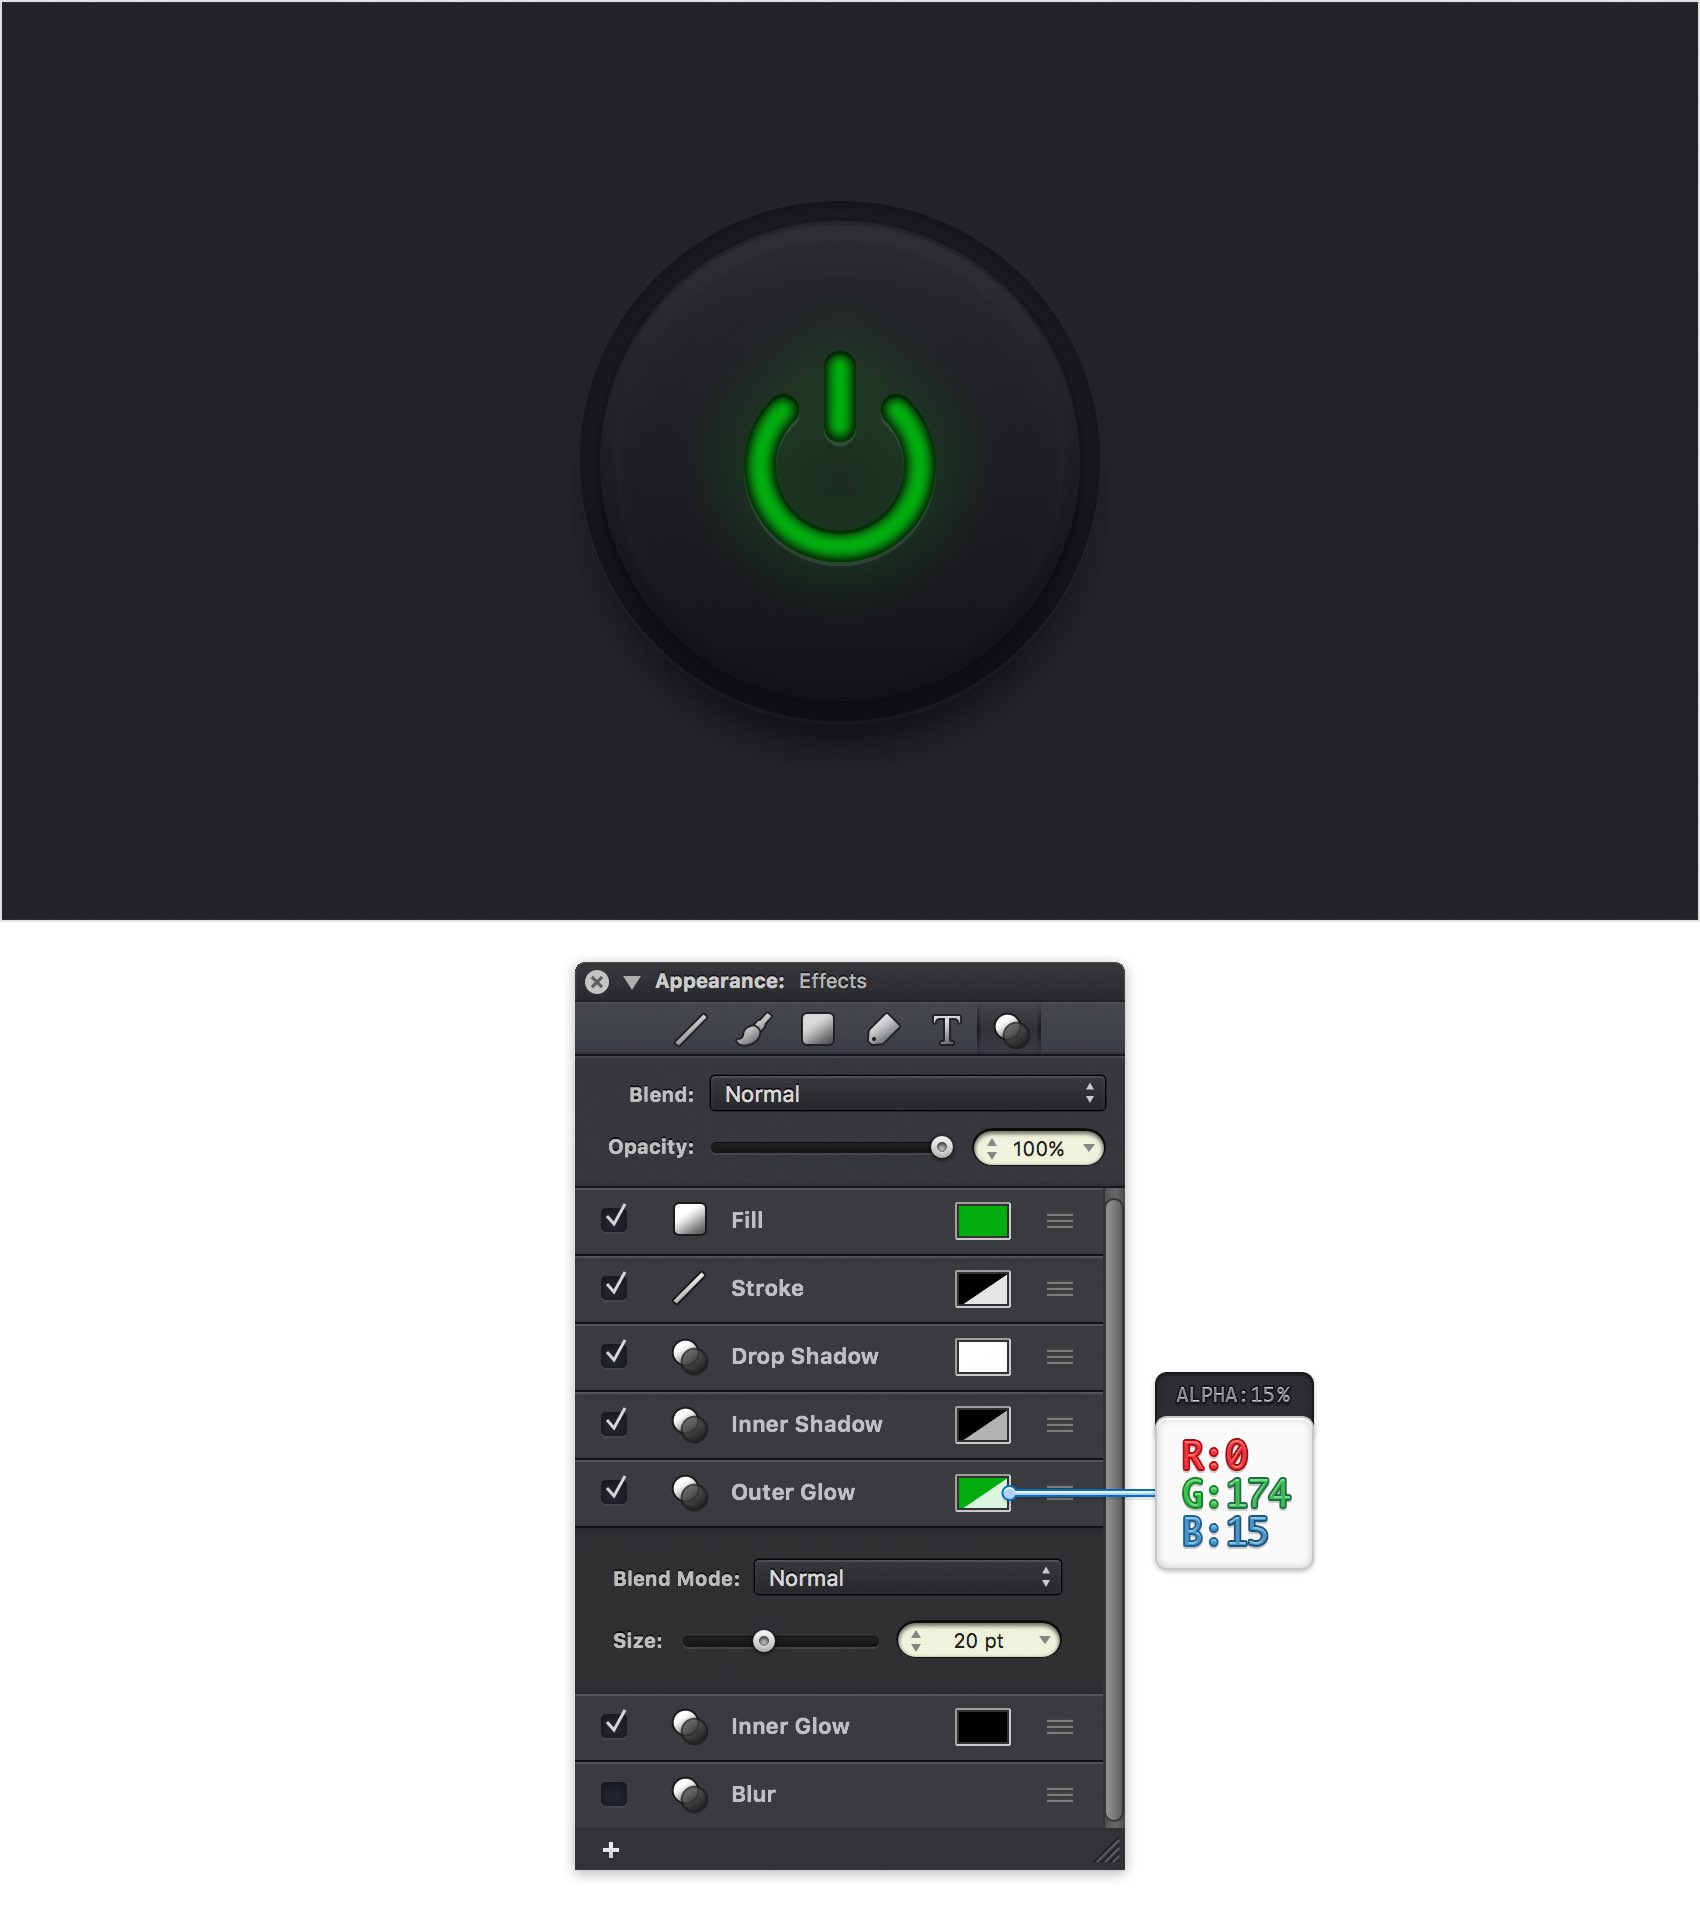
Step 29
Finally, you can replace the green with one of the colors shown in the following images.
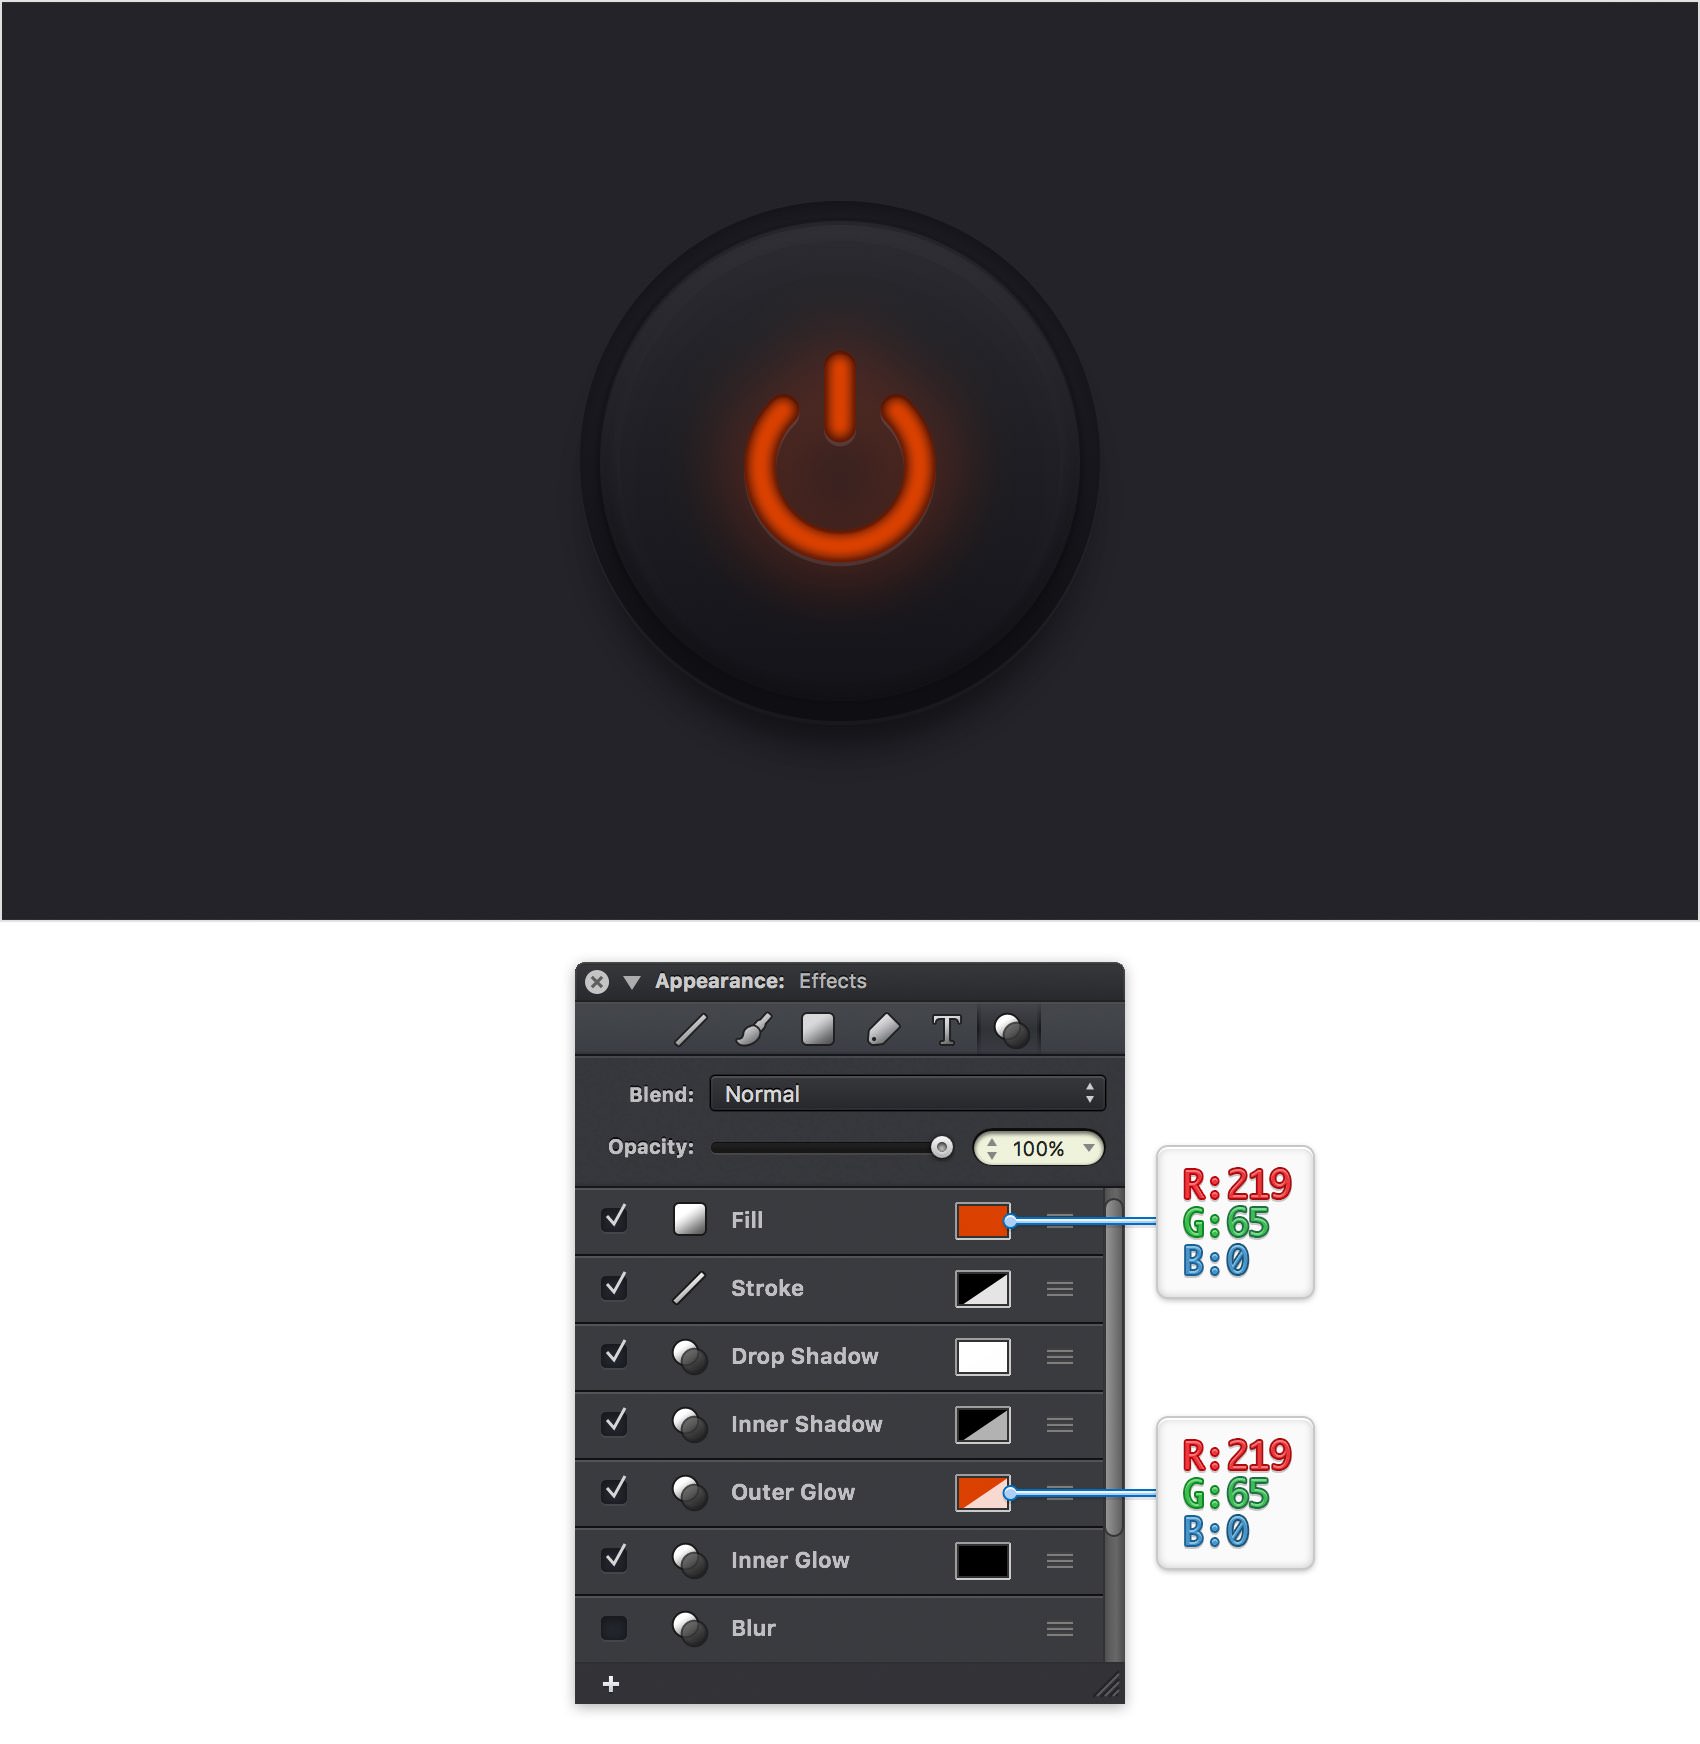
Feel free to try different colors or to adjust the effects applied to the power symbol shape as you prefer.
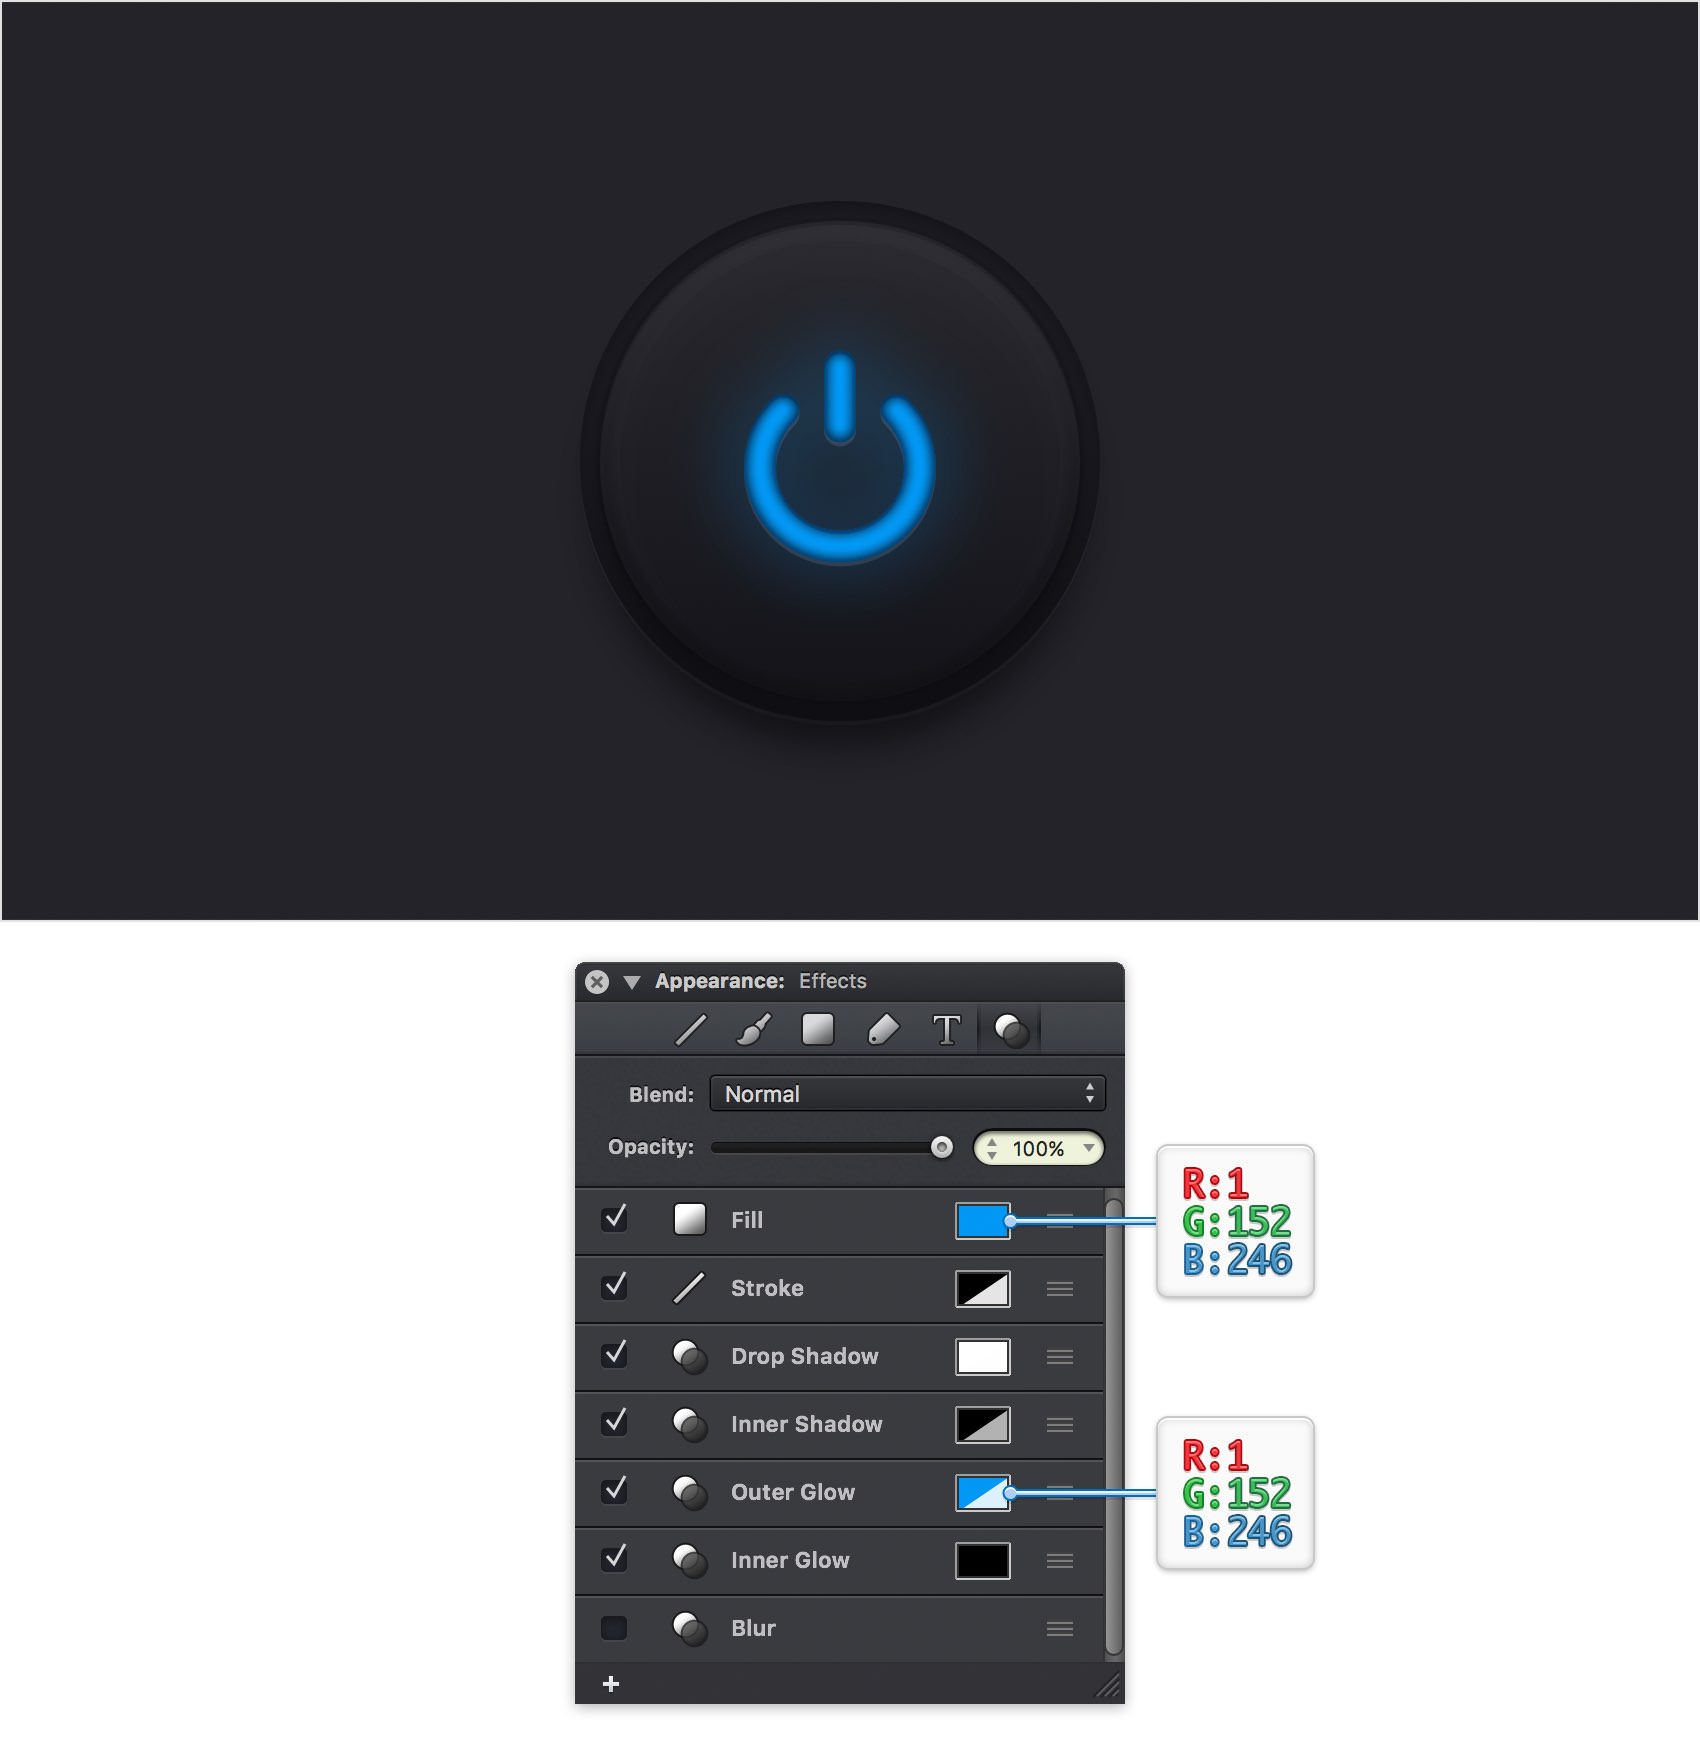
Finished Design
Congratulations, you've finished the tutorial!
Hope you've enjoyed learning some of the techniques and processes presented in these steps. As always, feel free to adjust the final design and make it your own.

Download Graphic File:
powerbutton.idraw 


