


Create a Vertical Infographic
In the following tutorial you will learn how to create a Four Steps Vertical Infographic in Picta Graphic for iPad.
For starters, you will learn how to set up a simple grid and how to create a set of pixel-perfect shapes. Using basic vector shape building techniques and some basic Effects attributes, you will learn to create the concentric white circles.
Taking full advantage of the Layers panel, you will learn how to easily multiply and adjust content from your document. Moving on, you will learn how to create four line icons.
Finally, you will learn how to add a bunch of text and a simple background for your final design.
Step 1
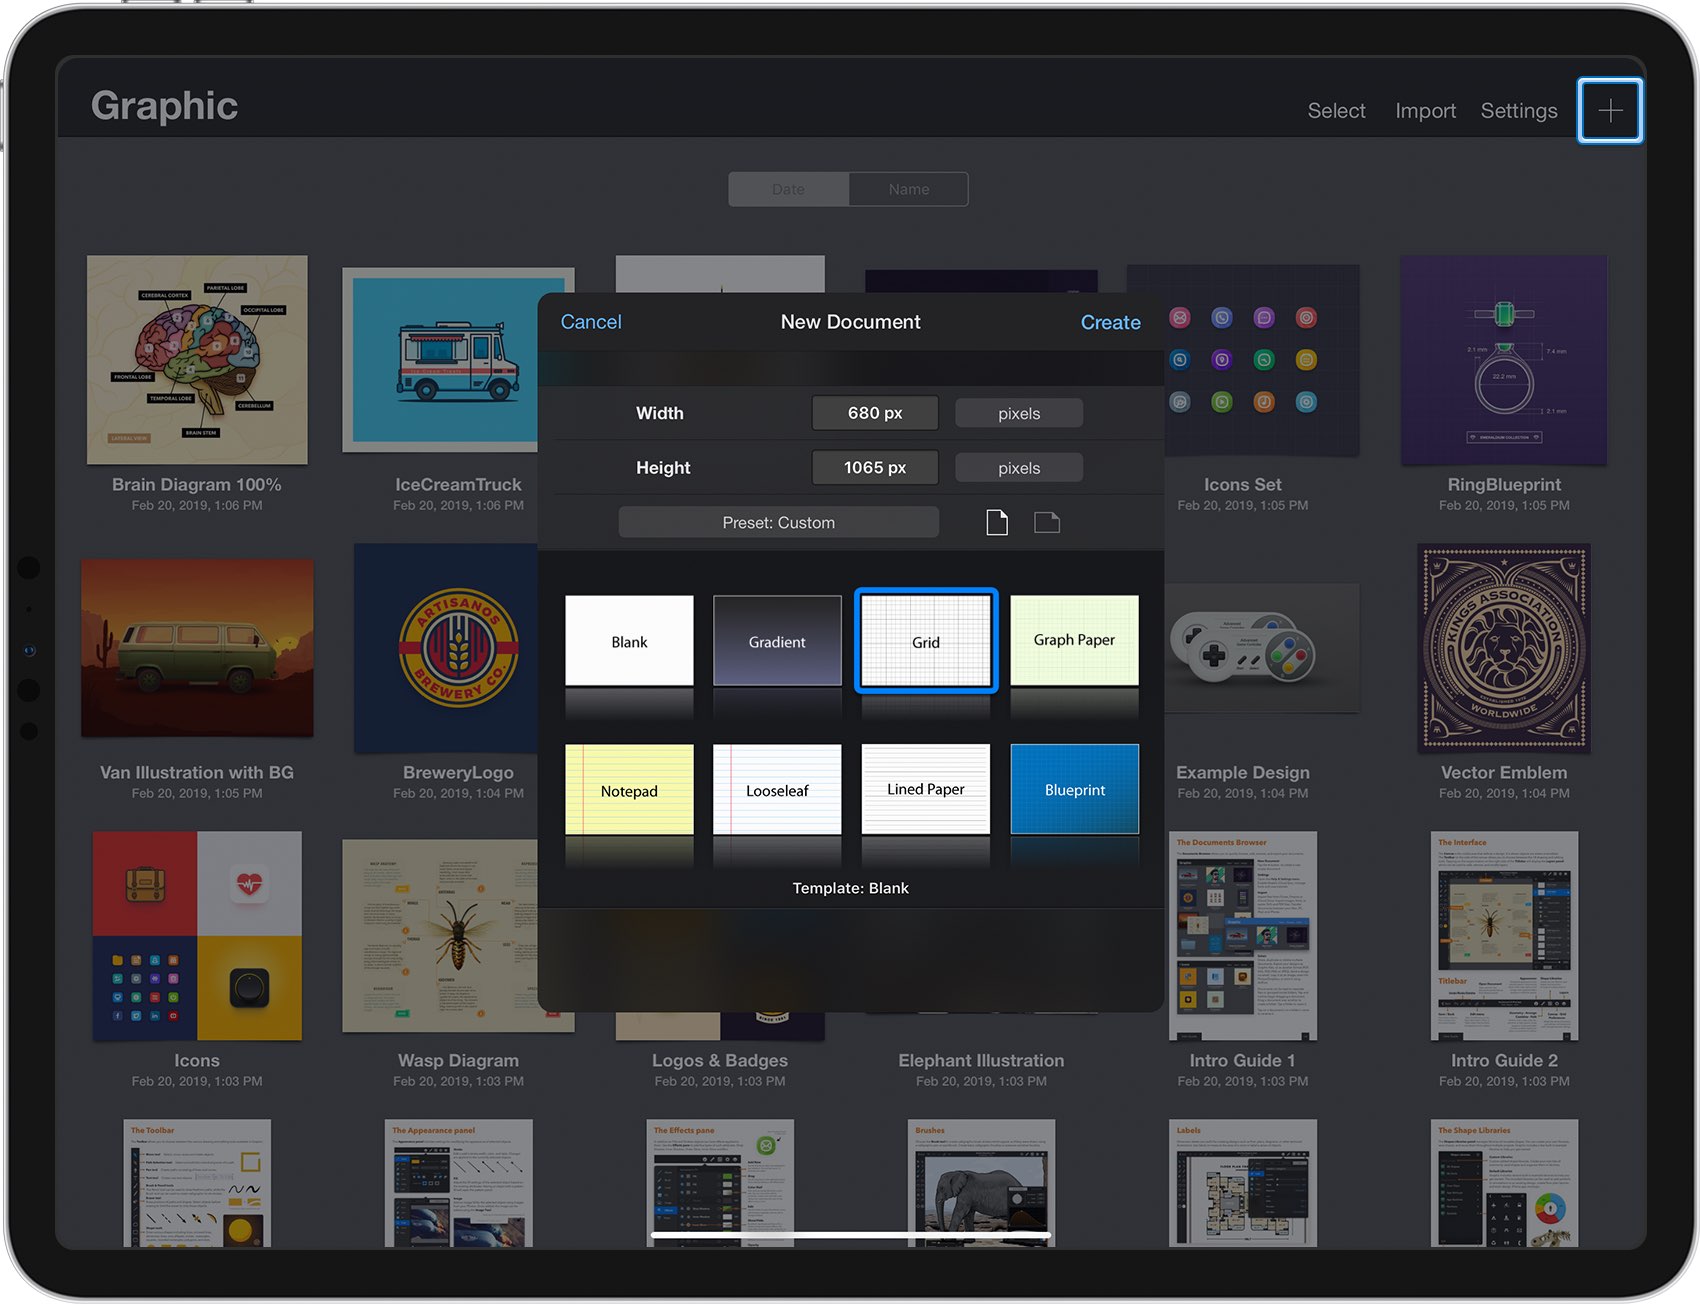
From the Documents Browser, tap the plus button at the top-right corner of the Titlebar and choose the Grid document style.
Select Pixels for the base units, set the Width to 680 px and the Height to 1065 px, and then tap the Create button.
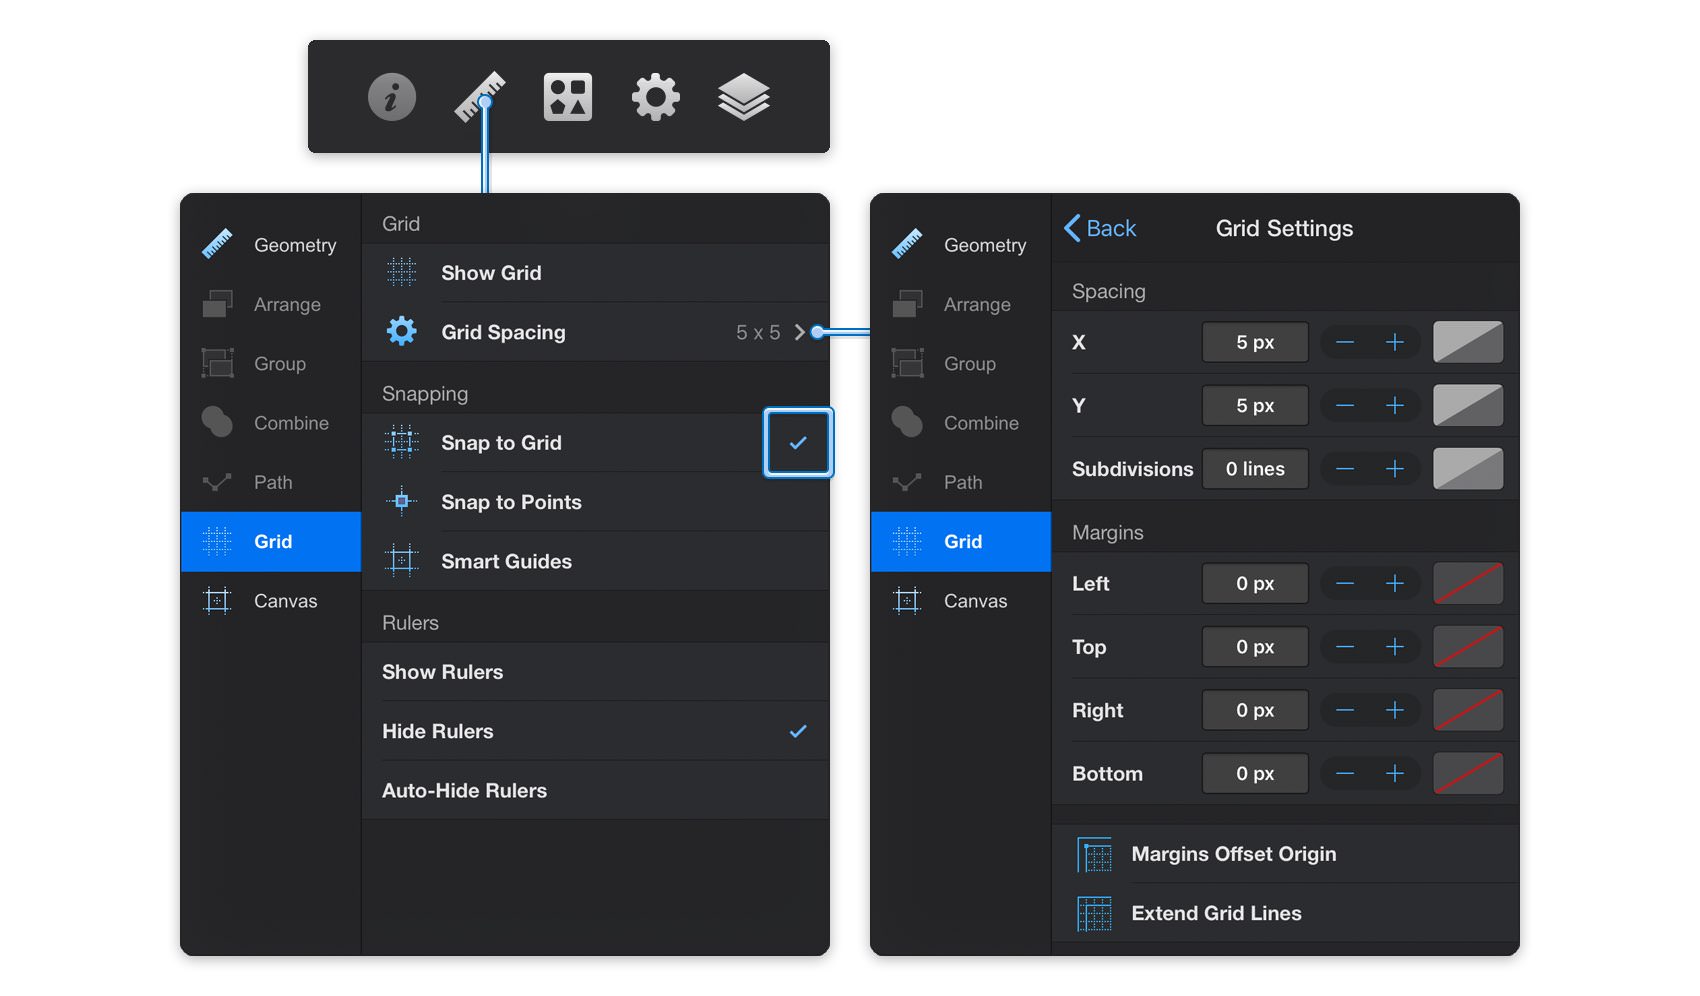
Next, we'll set up the document grid. Focus on the right side of the Titlebar and tap the ruler icon to open the Properties panel and go to the Grid pane.
Make sure that the Snap to Grid feature is enabled and keep in mind that this is where you should come whenever you wish to enable or disable the grid or the Snap to Grid. Finally, open that Grid Spacing pane, enter 5 px in both Spacing boxes and 0 lines in the Subdivisions box.
Step 2
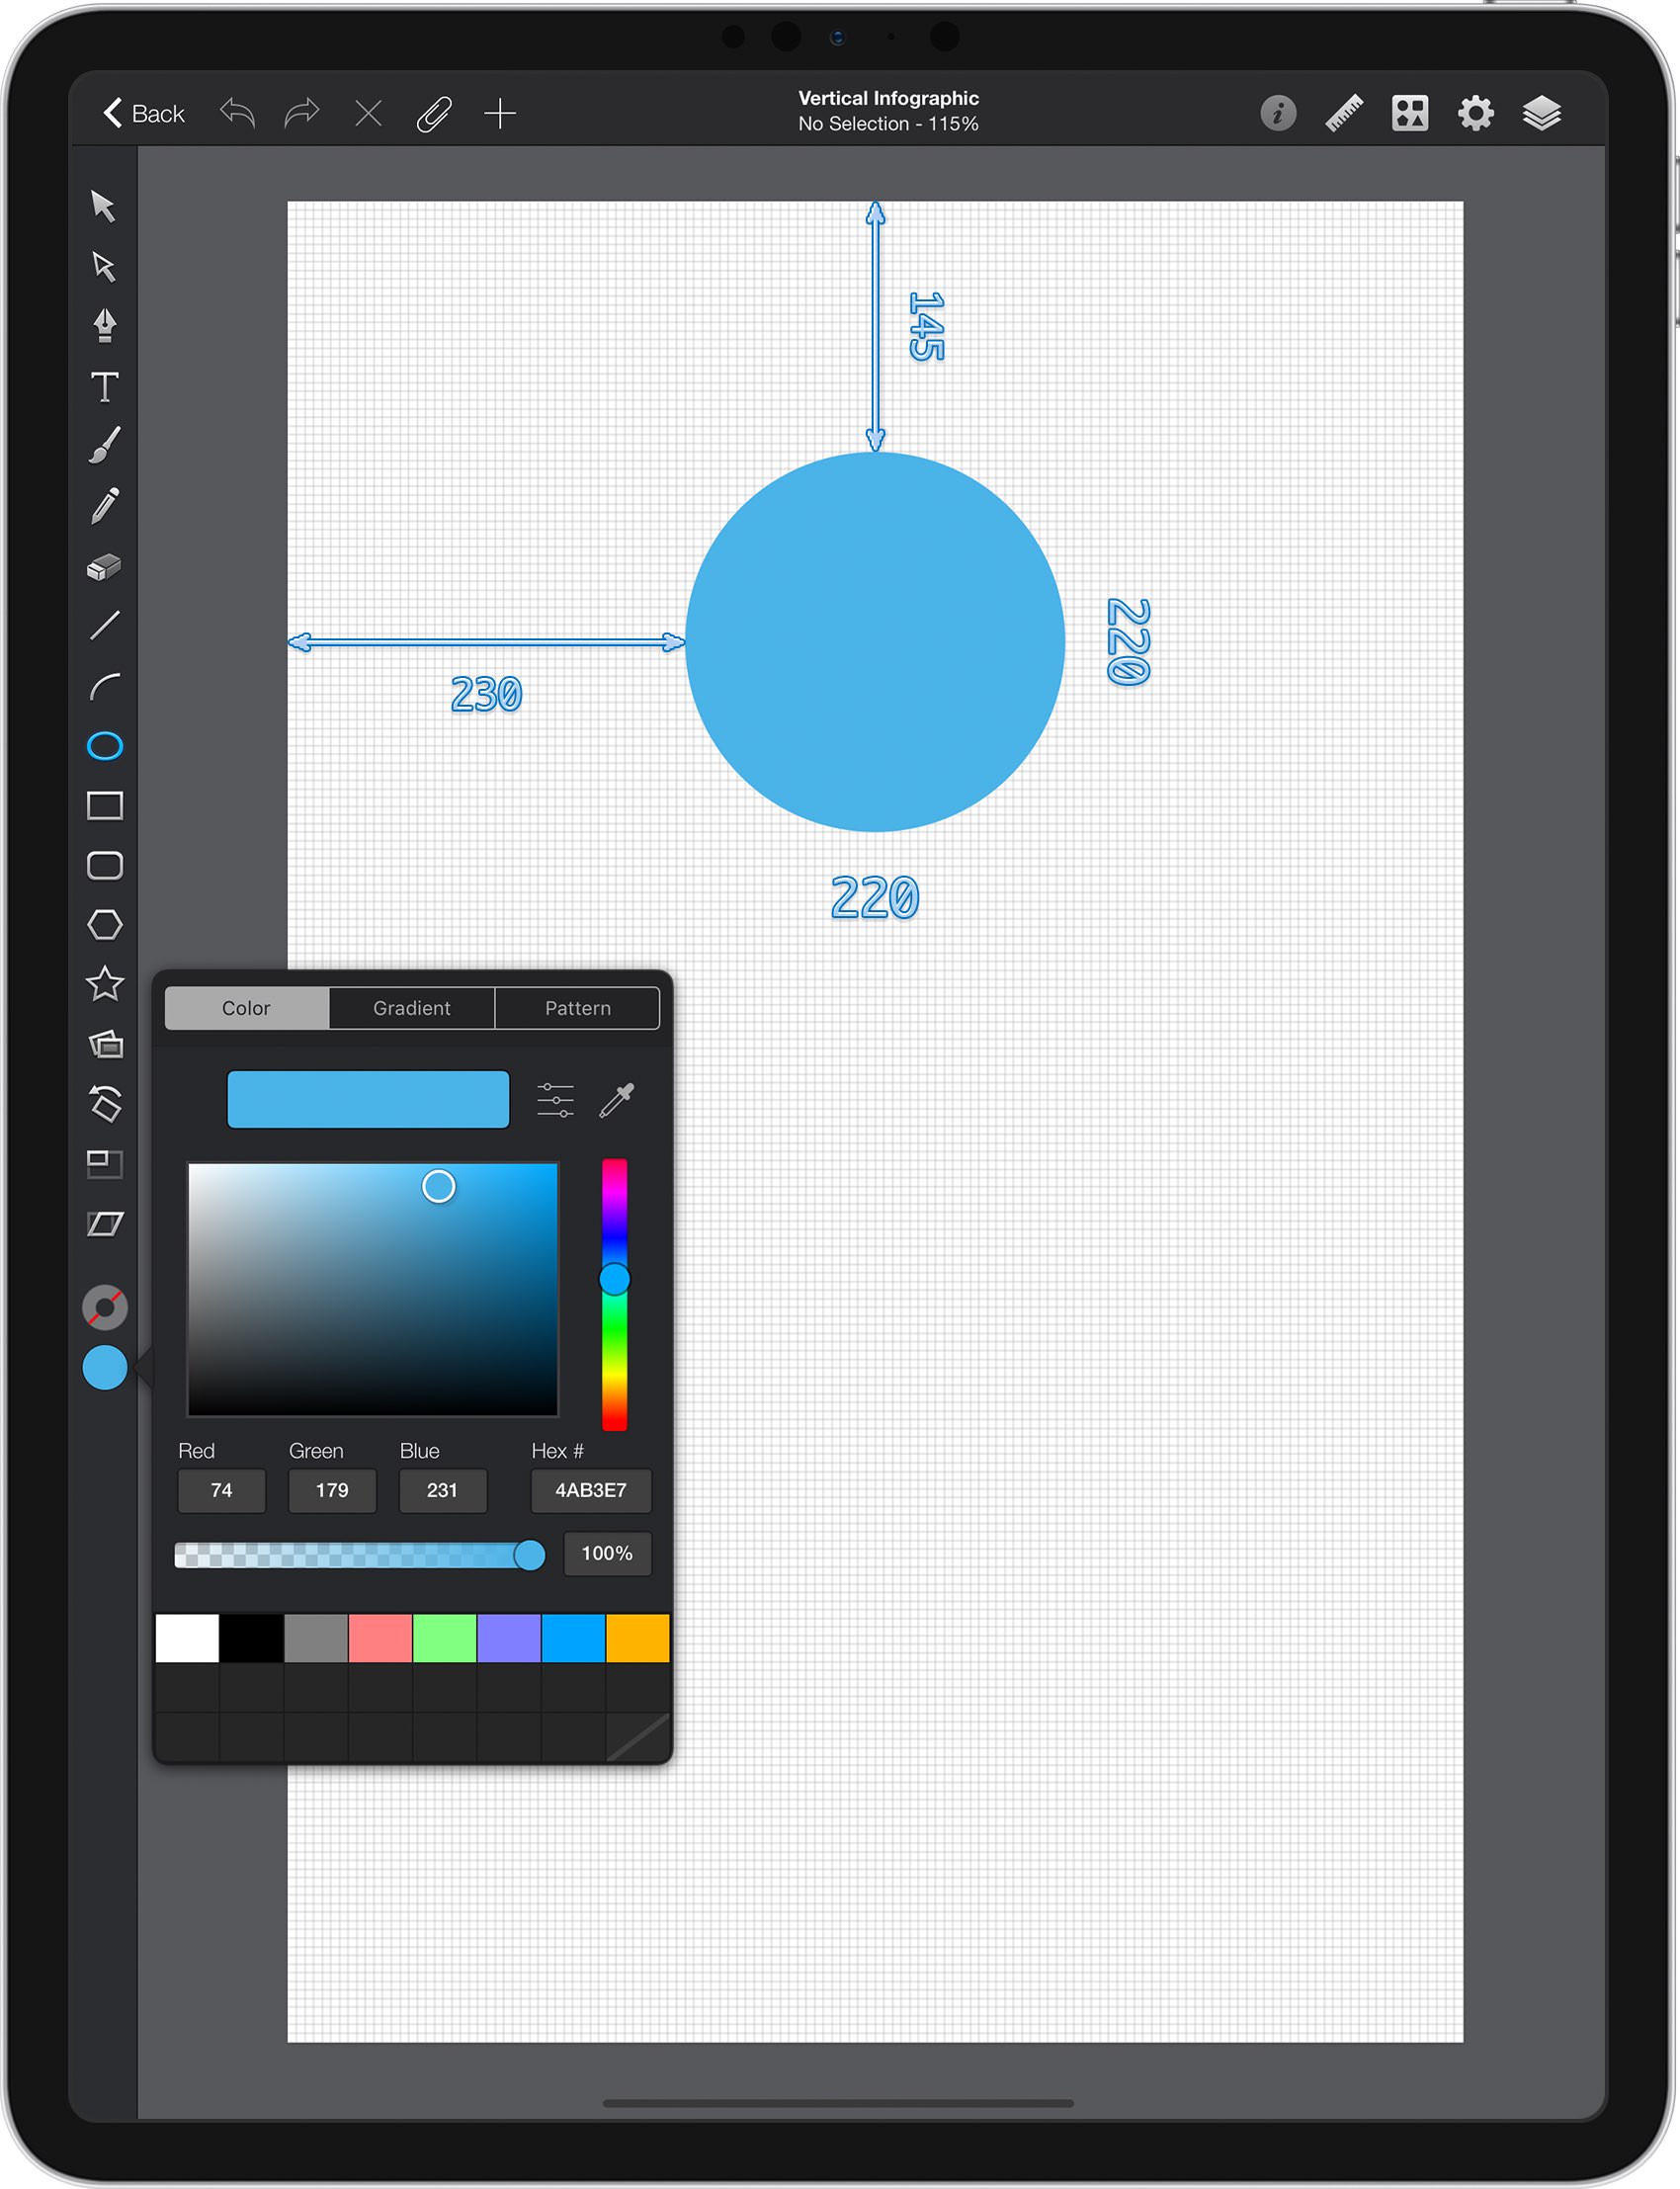
Focus on the Toolbar and tap the Line color well. Drag the Alpha slider to 0% to make your line invisible. Tap the Fill color well and replace the existing color with R=74 G=179 B=232.
Pick the Ellipse Tool, focus on your canvas and create a 220 px circle. Tap and drag, and then tap and hold with a second finger to easily create a circle. Using the Move Tool, select your shape and place it exactly as shown in the following image (X: 340 px Y: 255 px).
Step 3
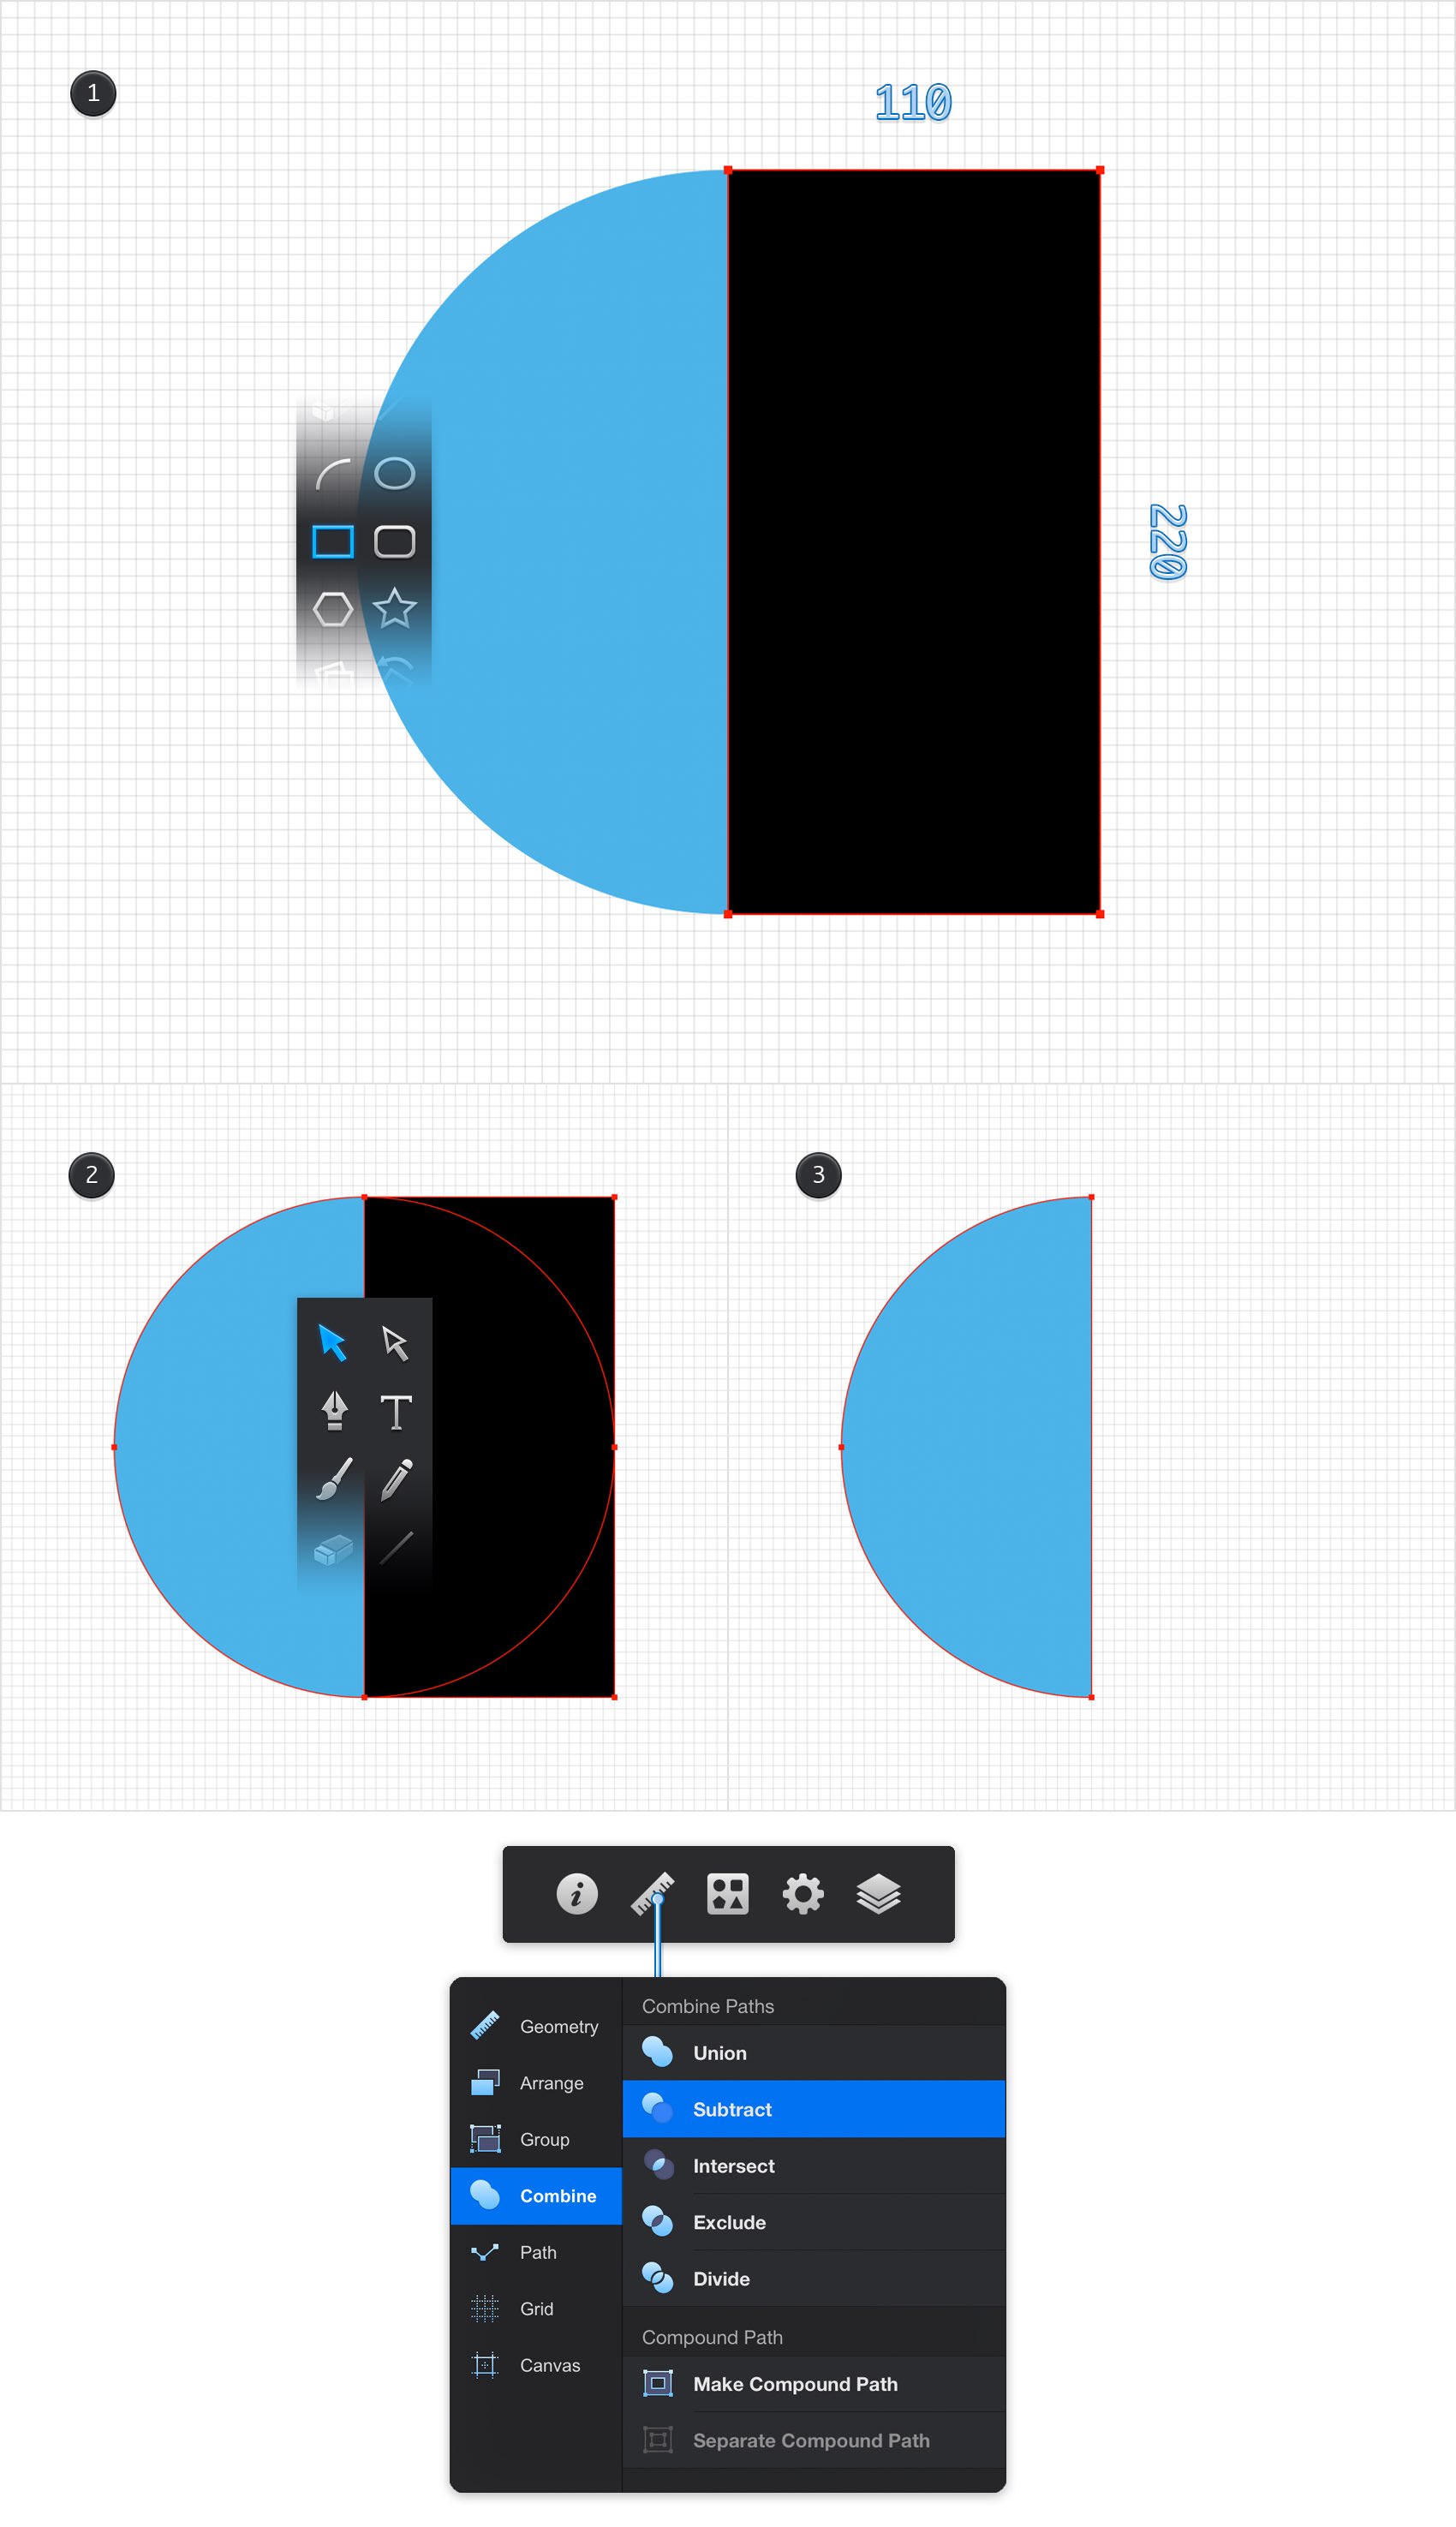
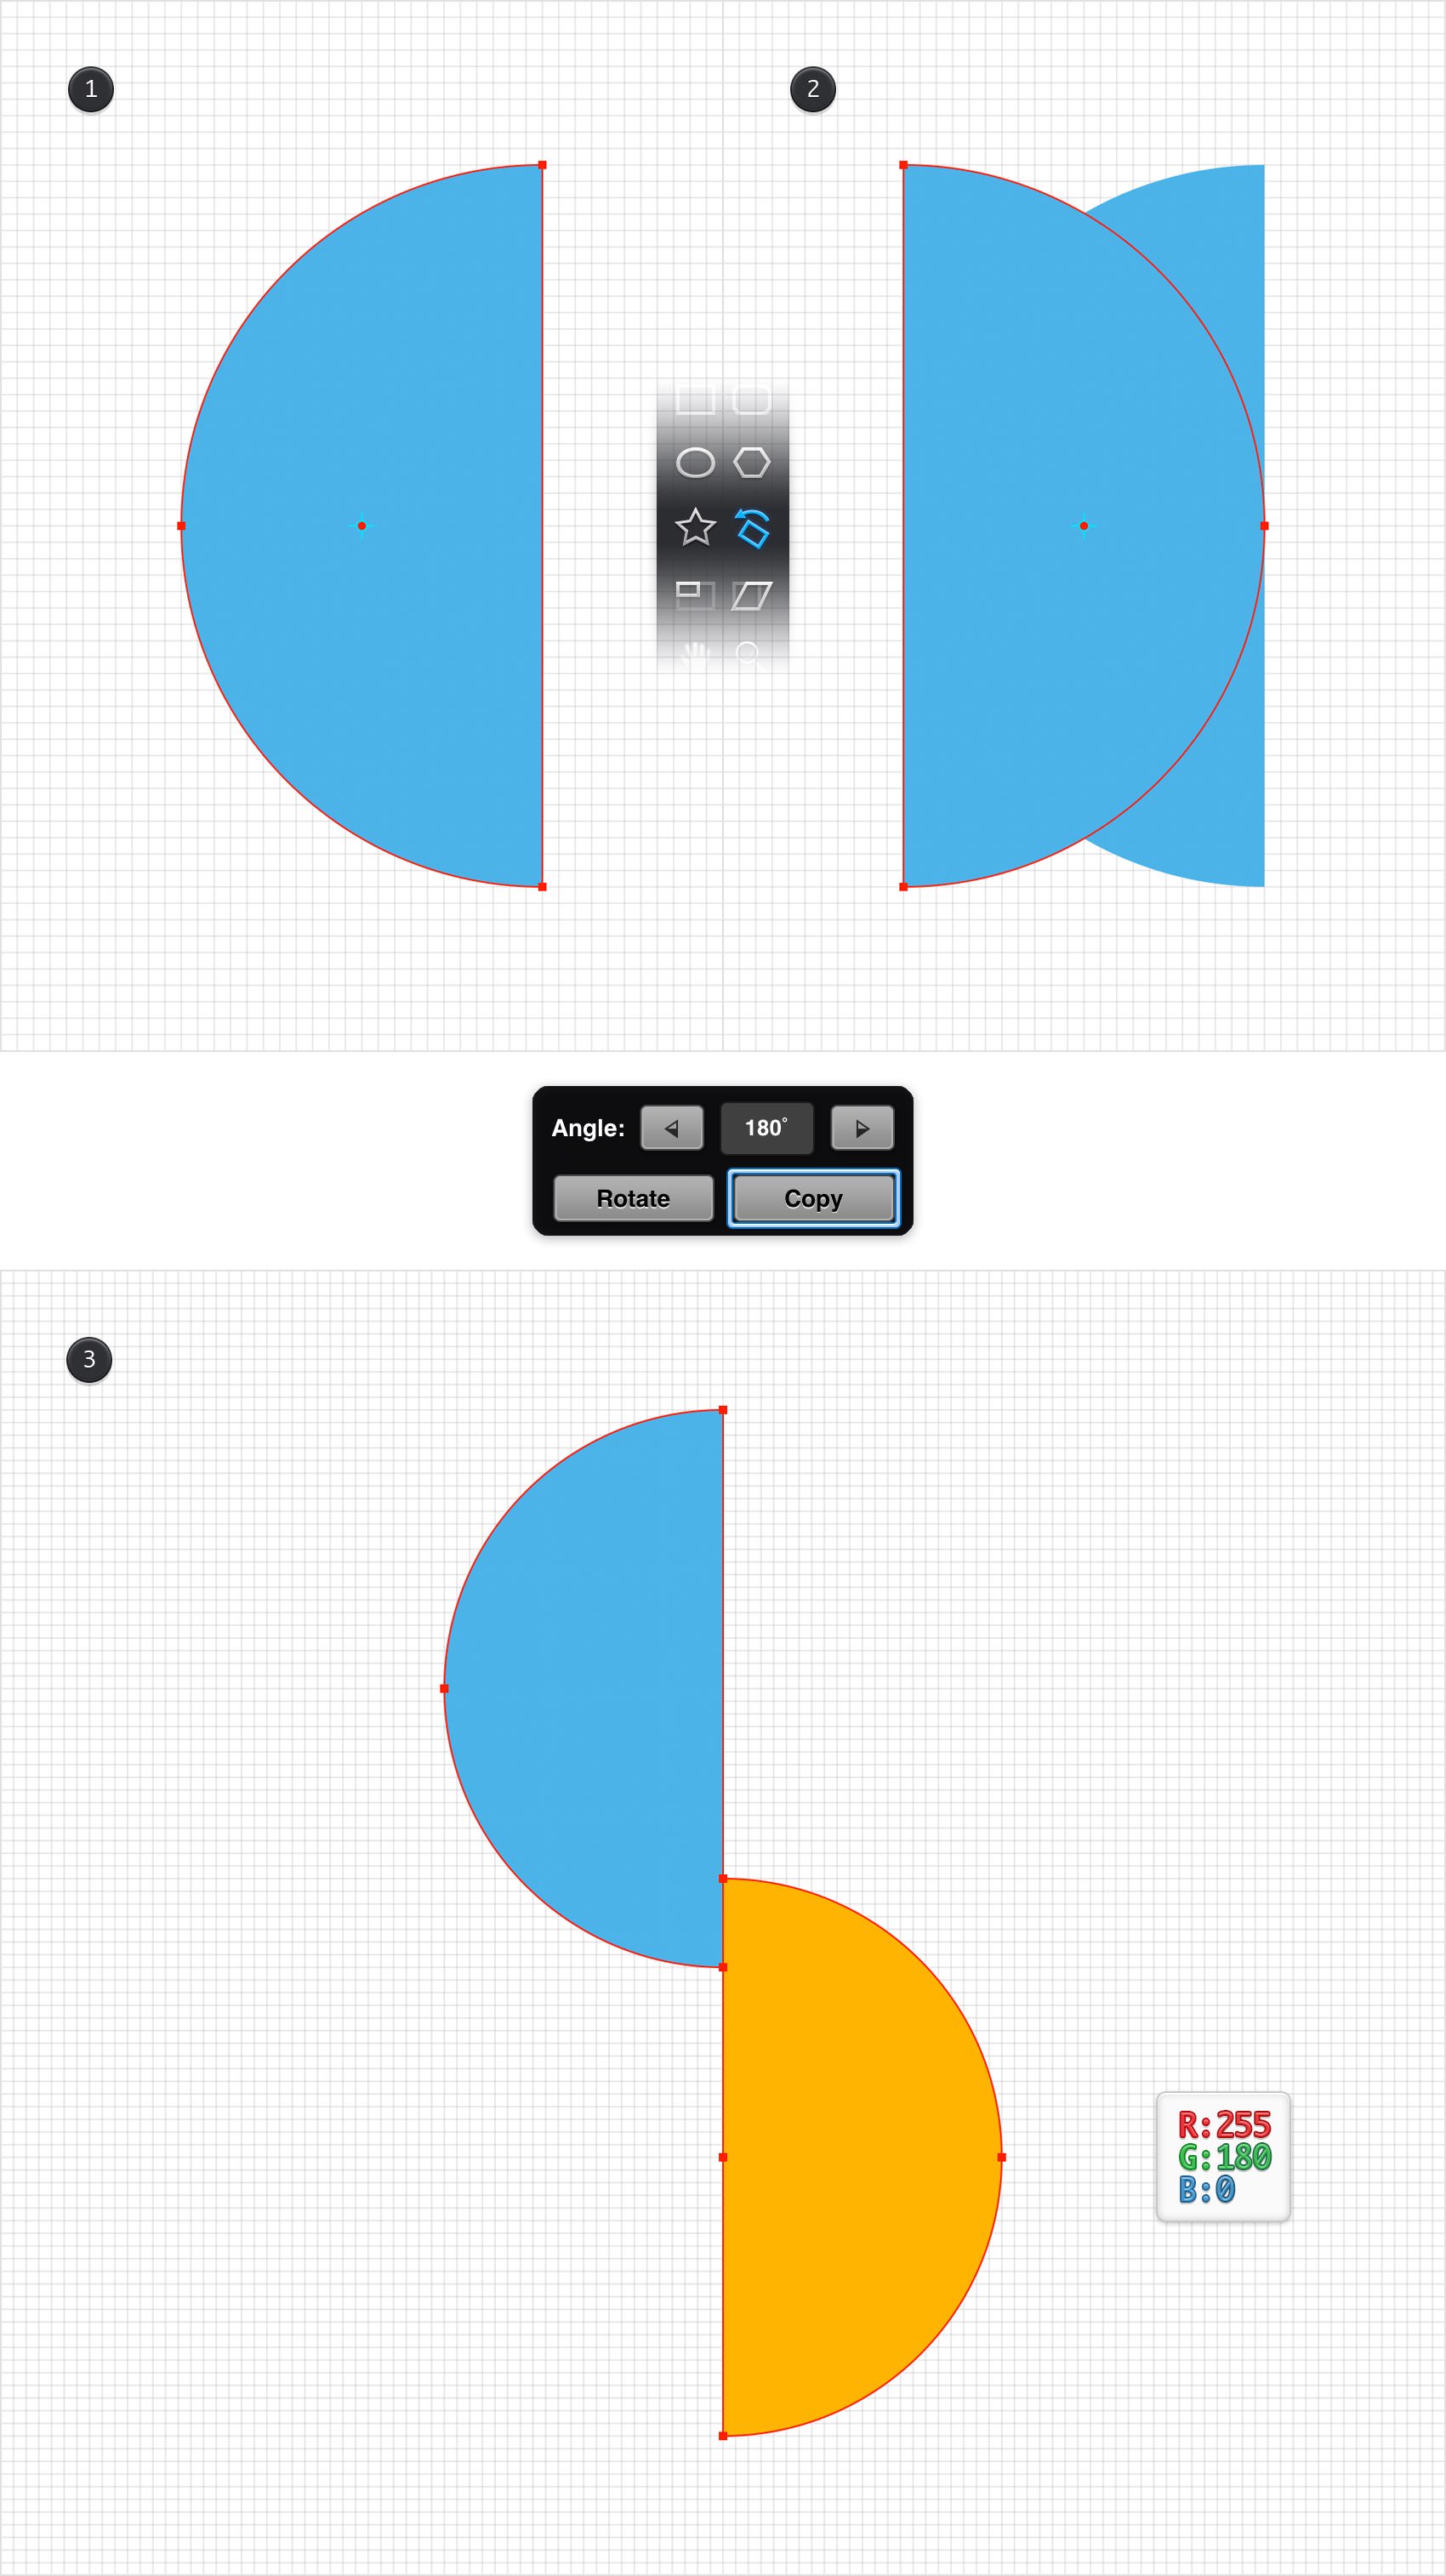
Focus on your Toolbar and replace the existing Fill color with black (R=0 G=0 B=0). Using the Rectangle Tool, create a 110 x 220 px shape and place it as shown in the first image.
Pick the Move Tool and select both shapes. Focus on the right side of your Titlebar and tap the ruler icon. Move to the Combine pane and tap the Subtract command.
Step 4
Make sure that your shape is still selected, pick the Rotate Tool and focus on the Tool Options pane. Set the Angle to 180 degrees and tap the Copy button. This will create a copy of your selected shape and rotate it 180 degrees.
Select this newly made shape, replace the existing Fill color with R=255 G=180 B=0, and then place it exactly as shown in the third image (X: 395 px Y: 440 px).
Step 5
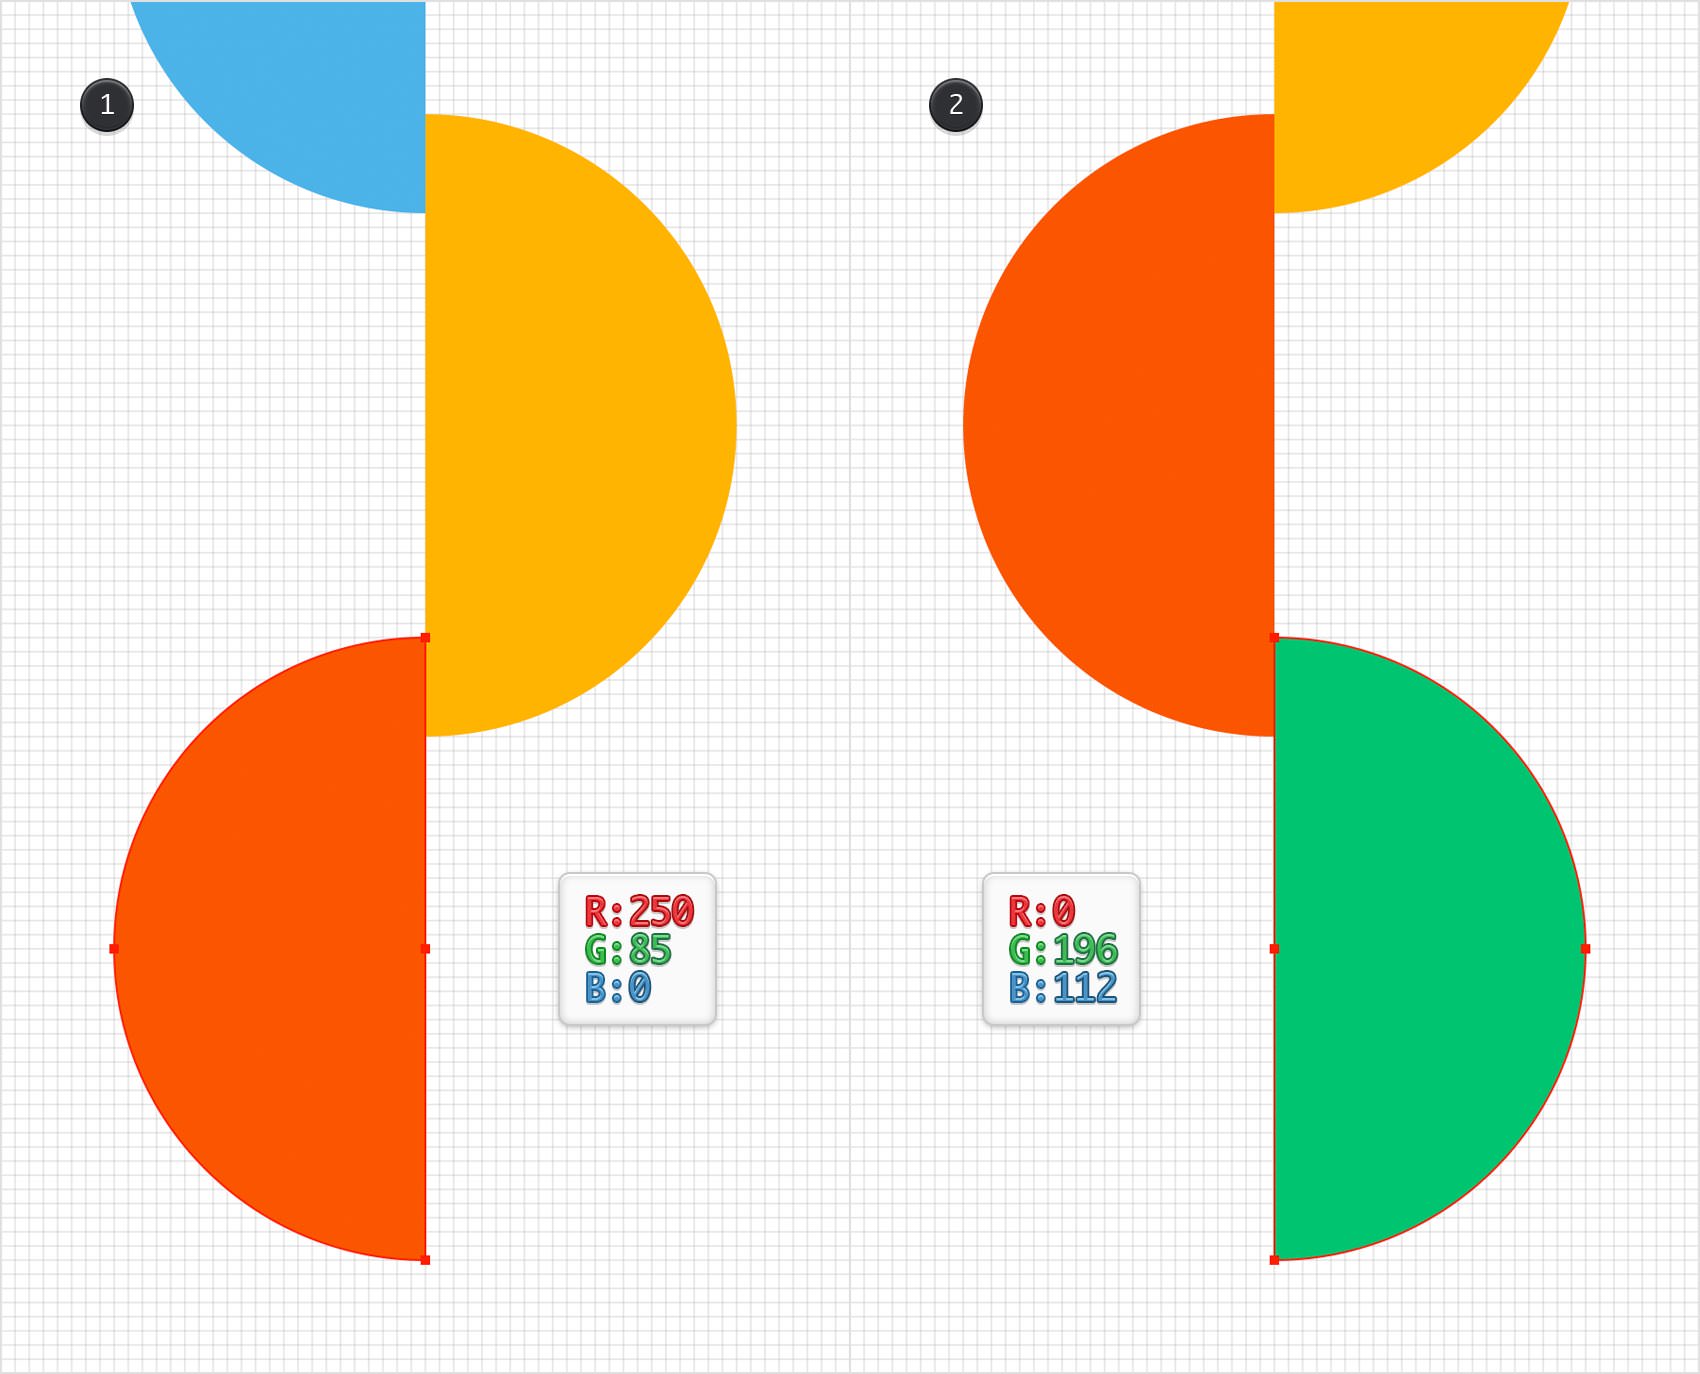
Select your blue shape, focus on the left side of the Titlebar and tap that paperclip icon to open the Edit pane. Use the Copy and Paste commands to easily duplicate your selection. Select this copy, place it as shown in the first image (X: 285 px Y: 625 px) and replace the existing Fill color with R=250 G=85 B=0.
Duplicate your yellow shape. Select the copy, place it as shown in the second image (X: 395 px Y: 810 px) and replace the existing Fill color with R=0 G=196 B=112.
Step 6
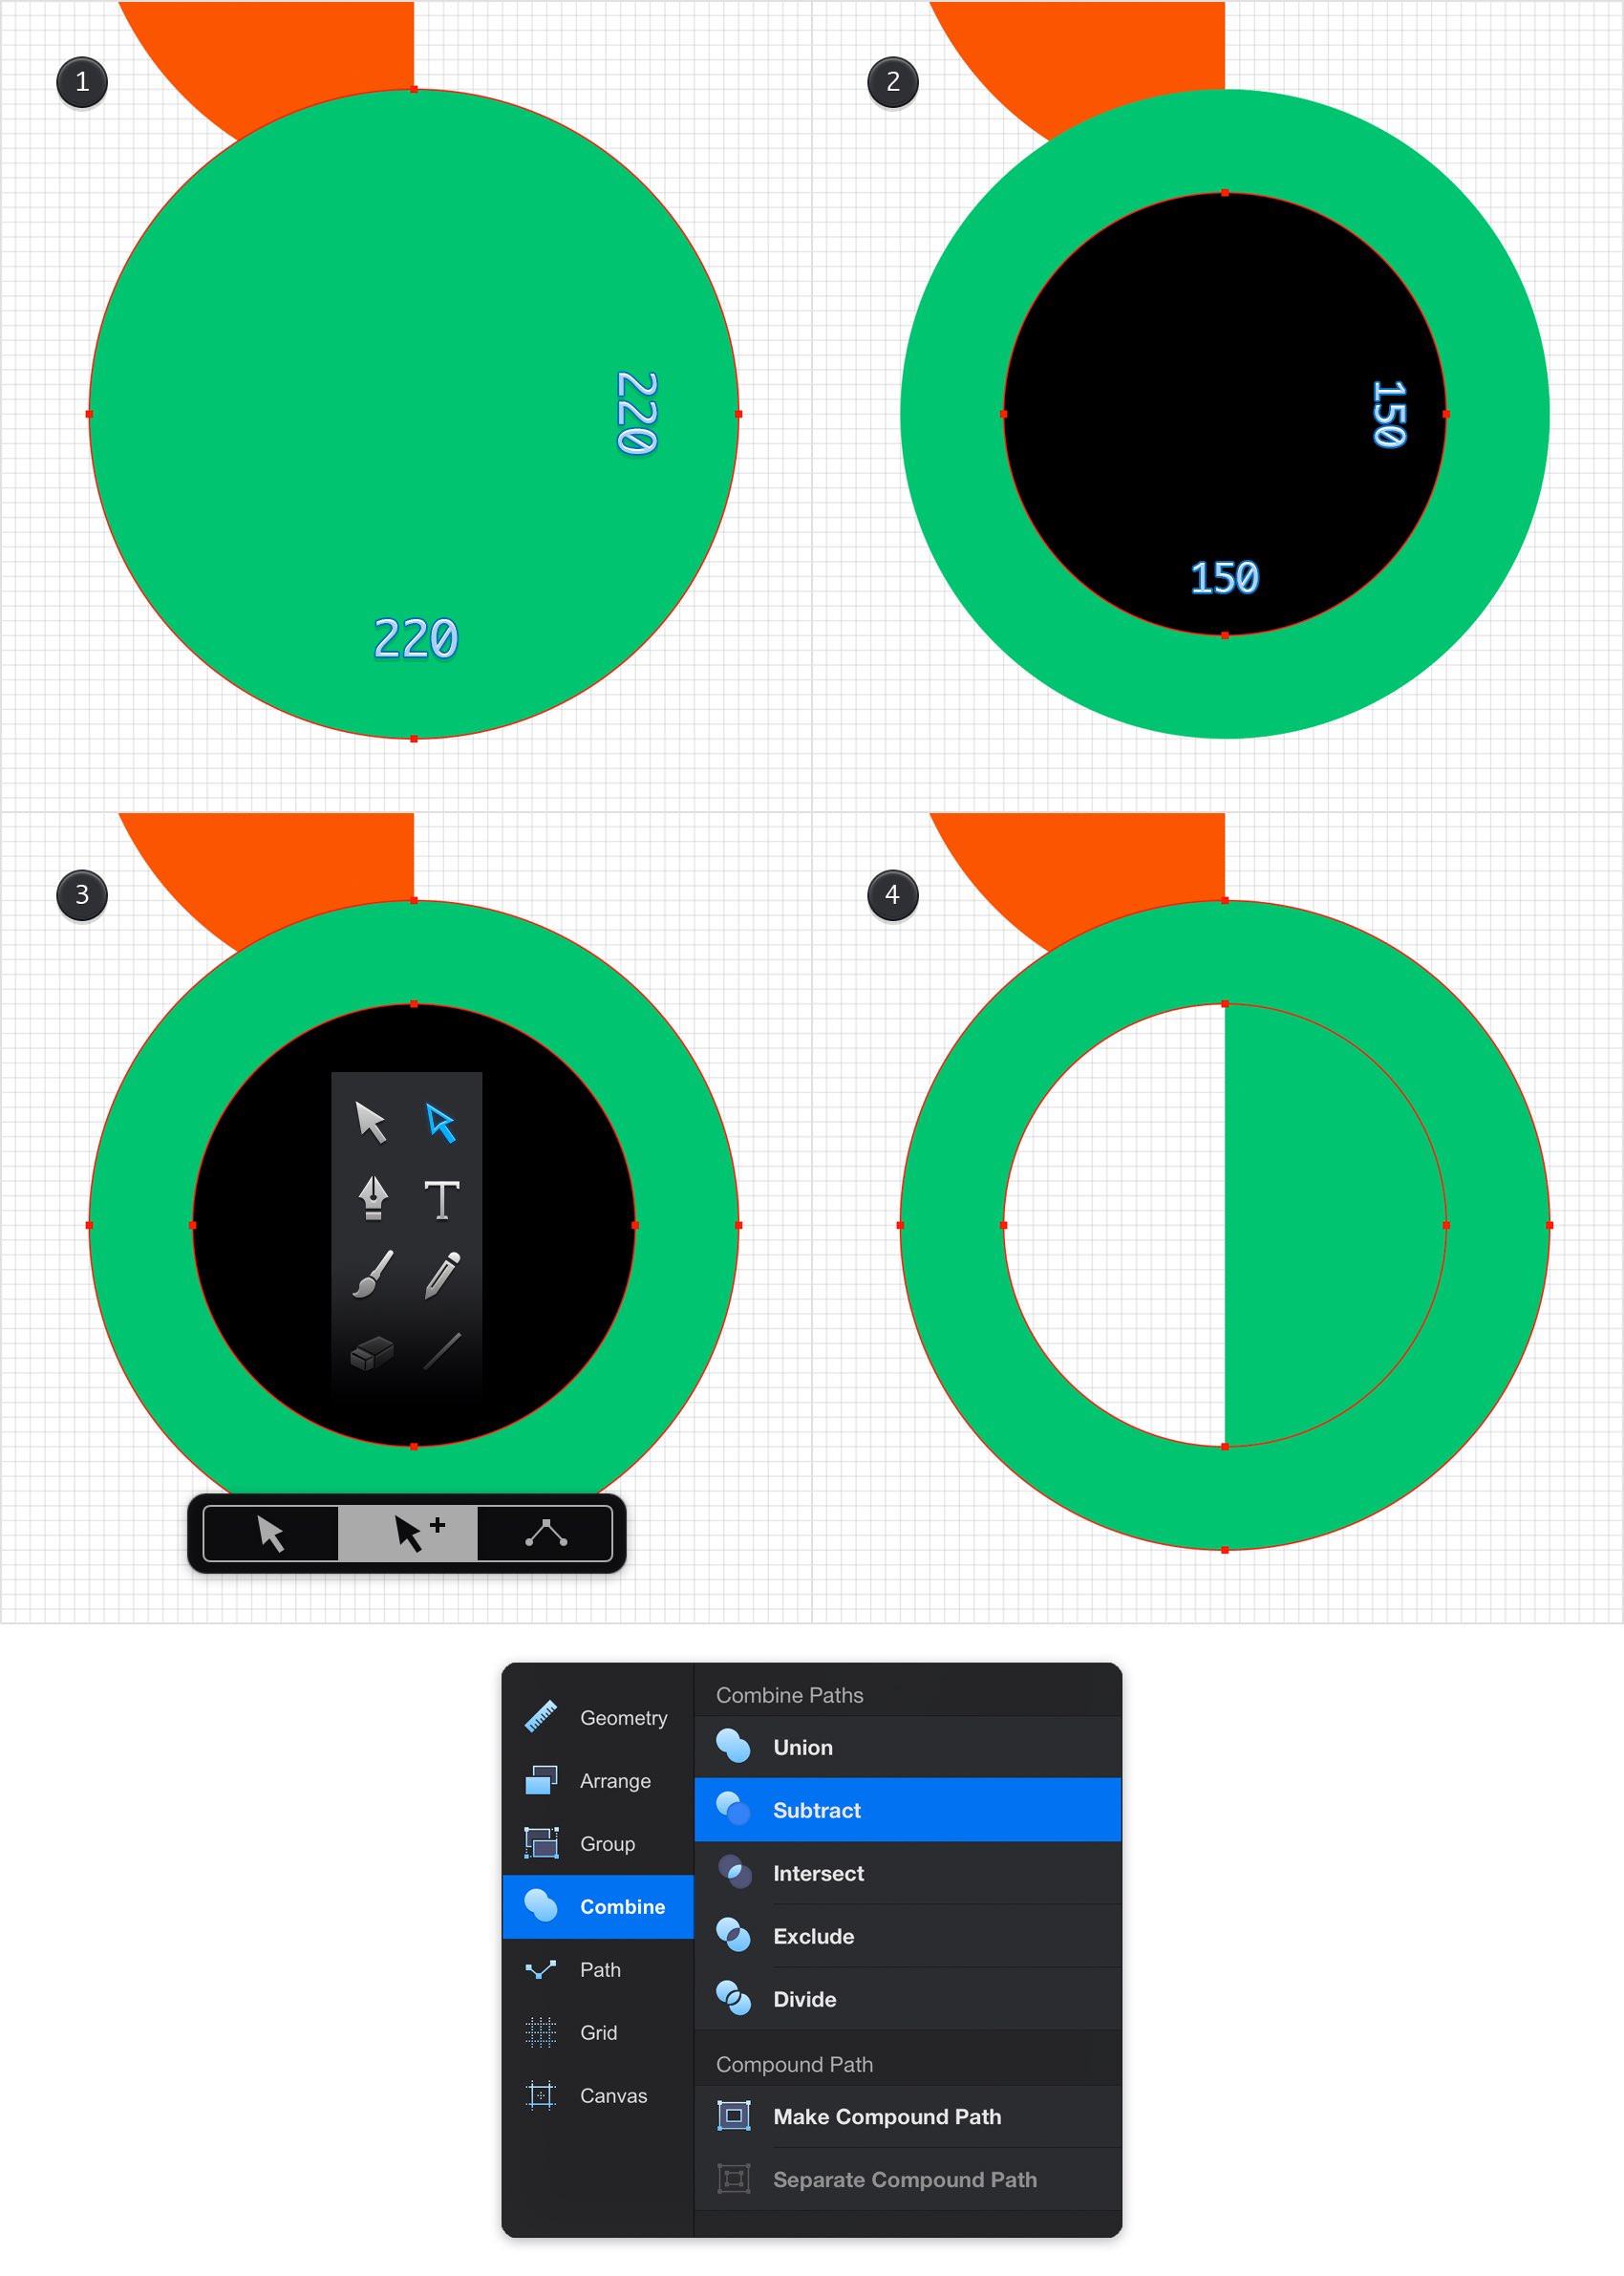
Focus on your green half circle. Pick the Ellipse Tool and create a 220 px circle. Fill this new shape with R=0 G=196 B=112 and place it as shown in the first image. Using the same tool, create a 150 px circle, fill it with black and place it as shown in the second image.
Pick the Path Selection Tool, activate the Add to Selection mode and select both shapes made in this step. Go to the Combine pane and tap that same Subtract command. In the end, your shape should look like in the fourth image.
Step 7
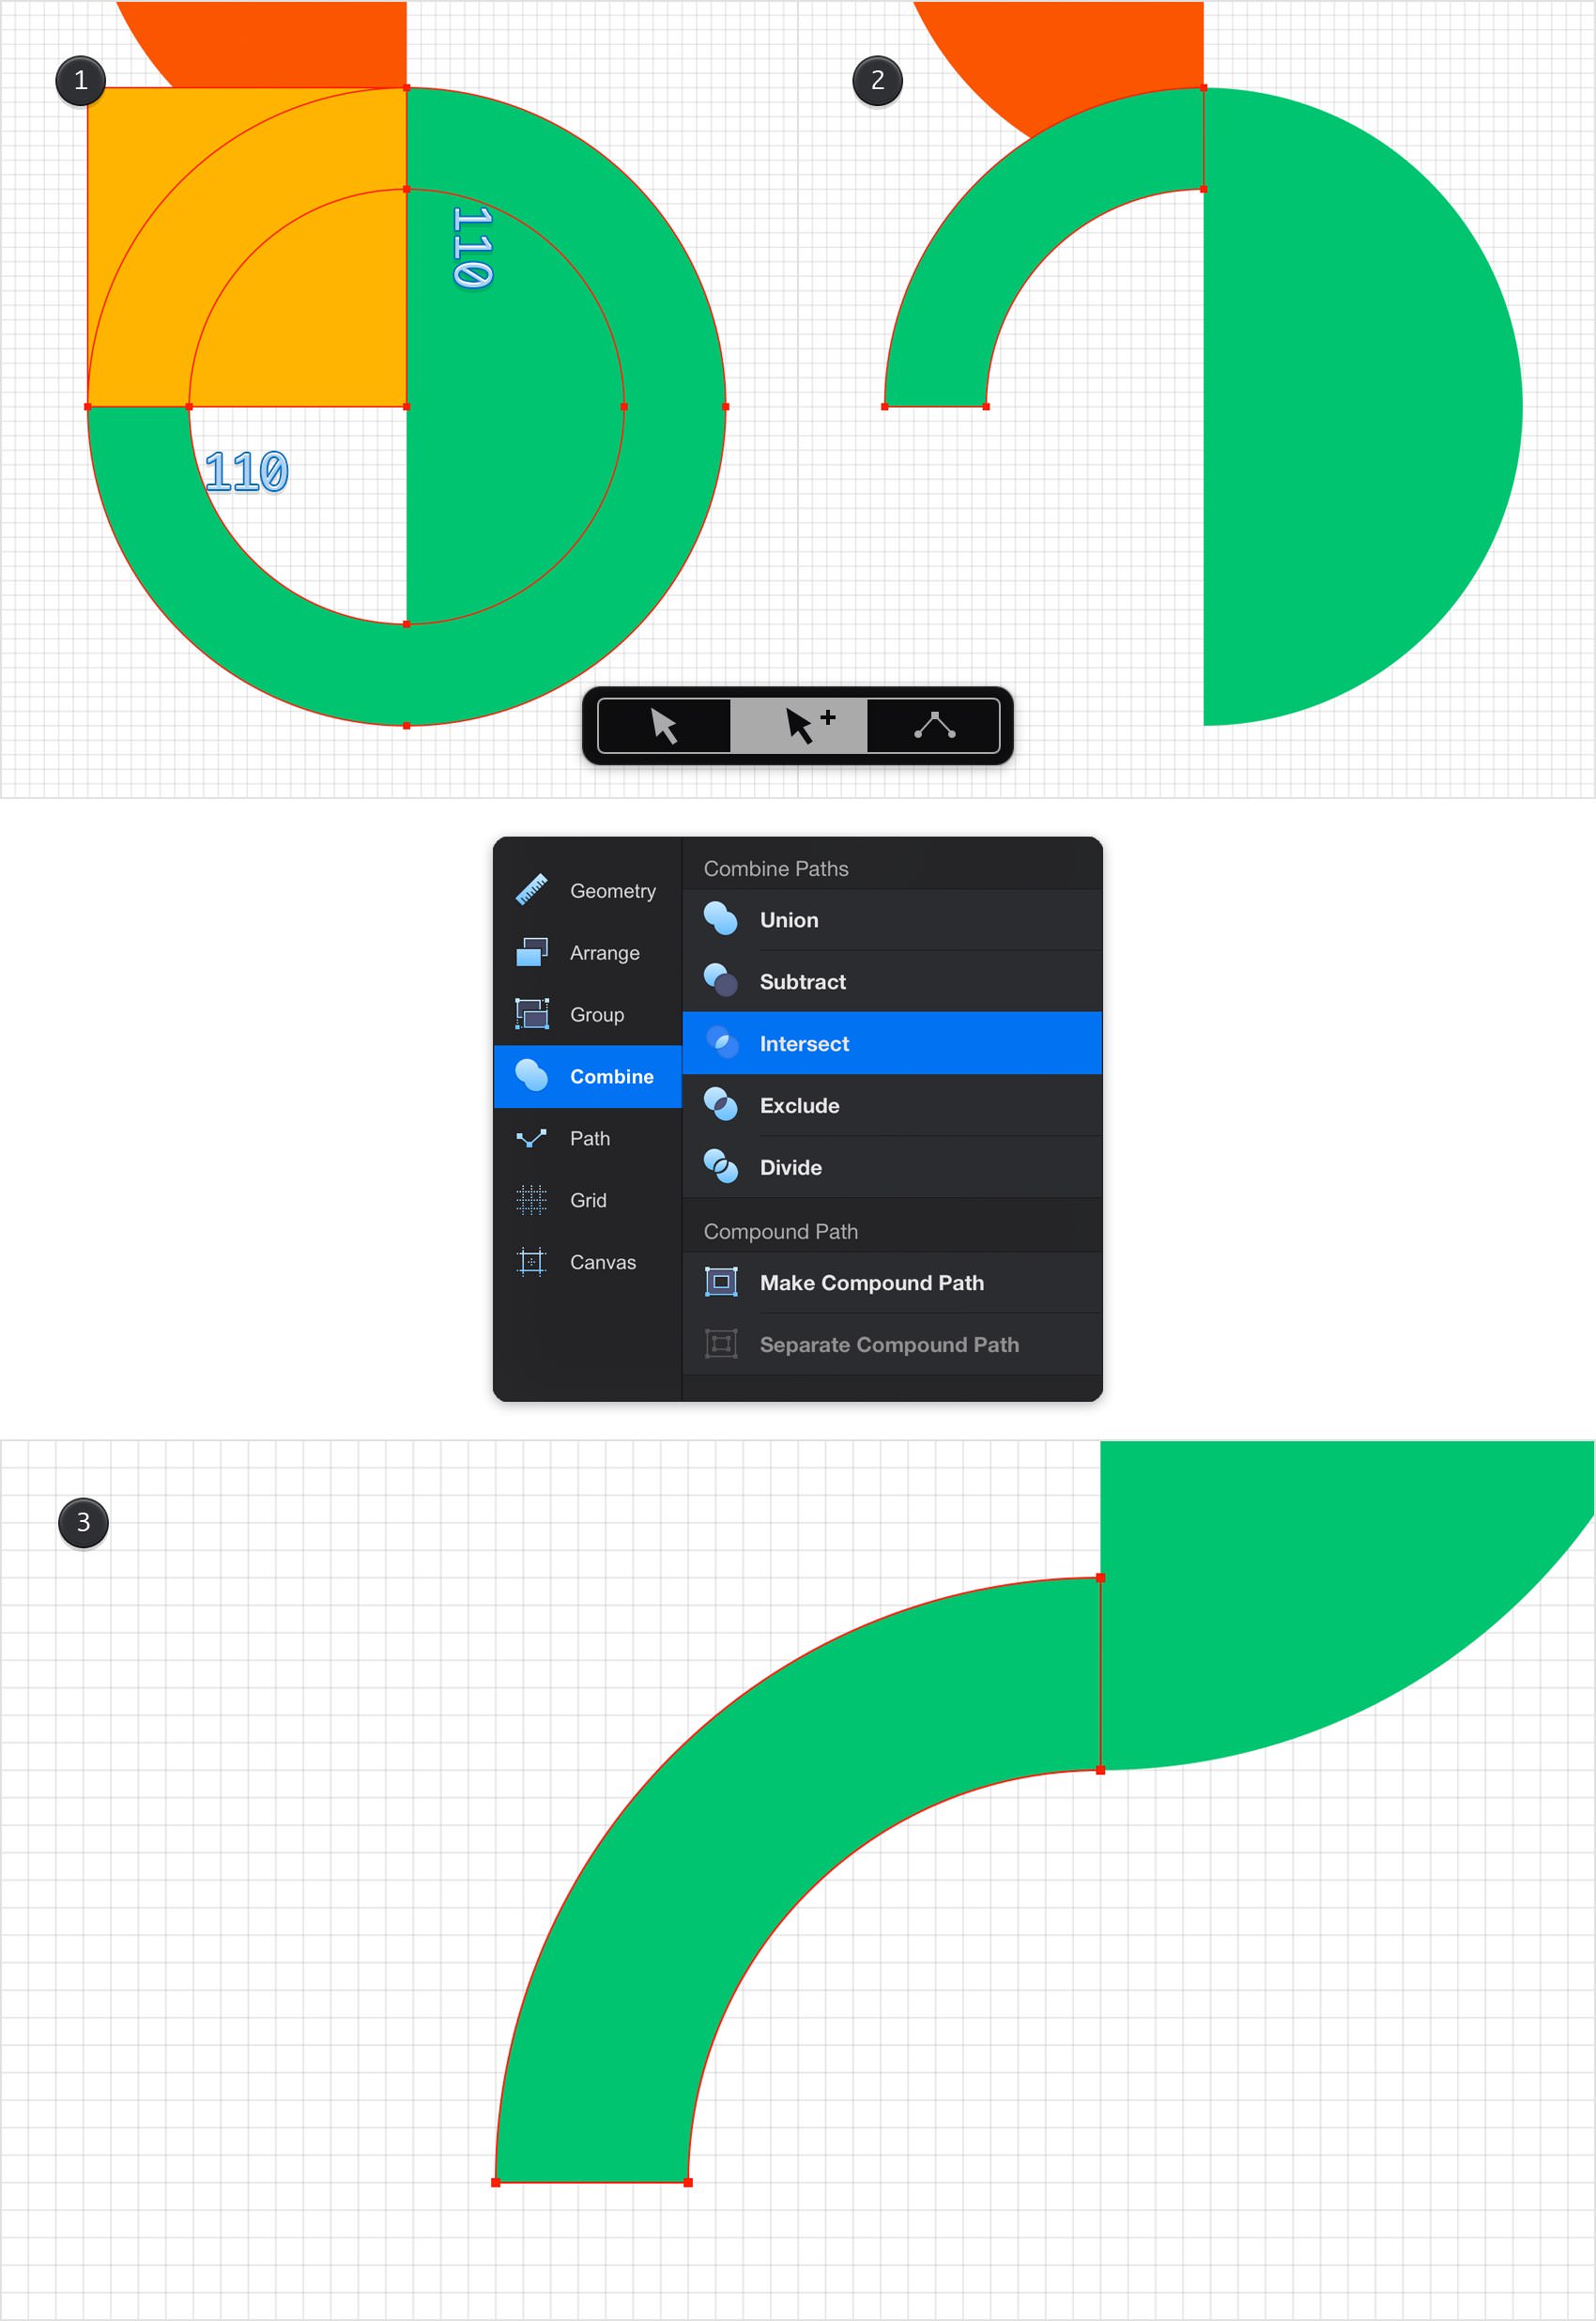
Pick the Rectangle Tool, create a 110 px square and place it as shown in the first image. Select this new shape along with the one made in the previous step and tap the Intersect command from the Combine pane. Using the Move Tool, place the resulting shape as shown in the third image.
Step 8
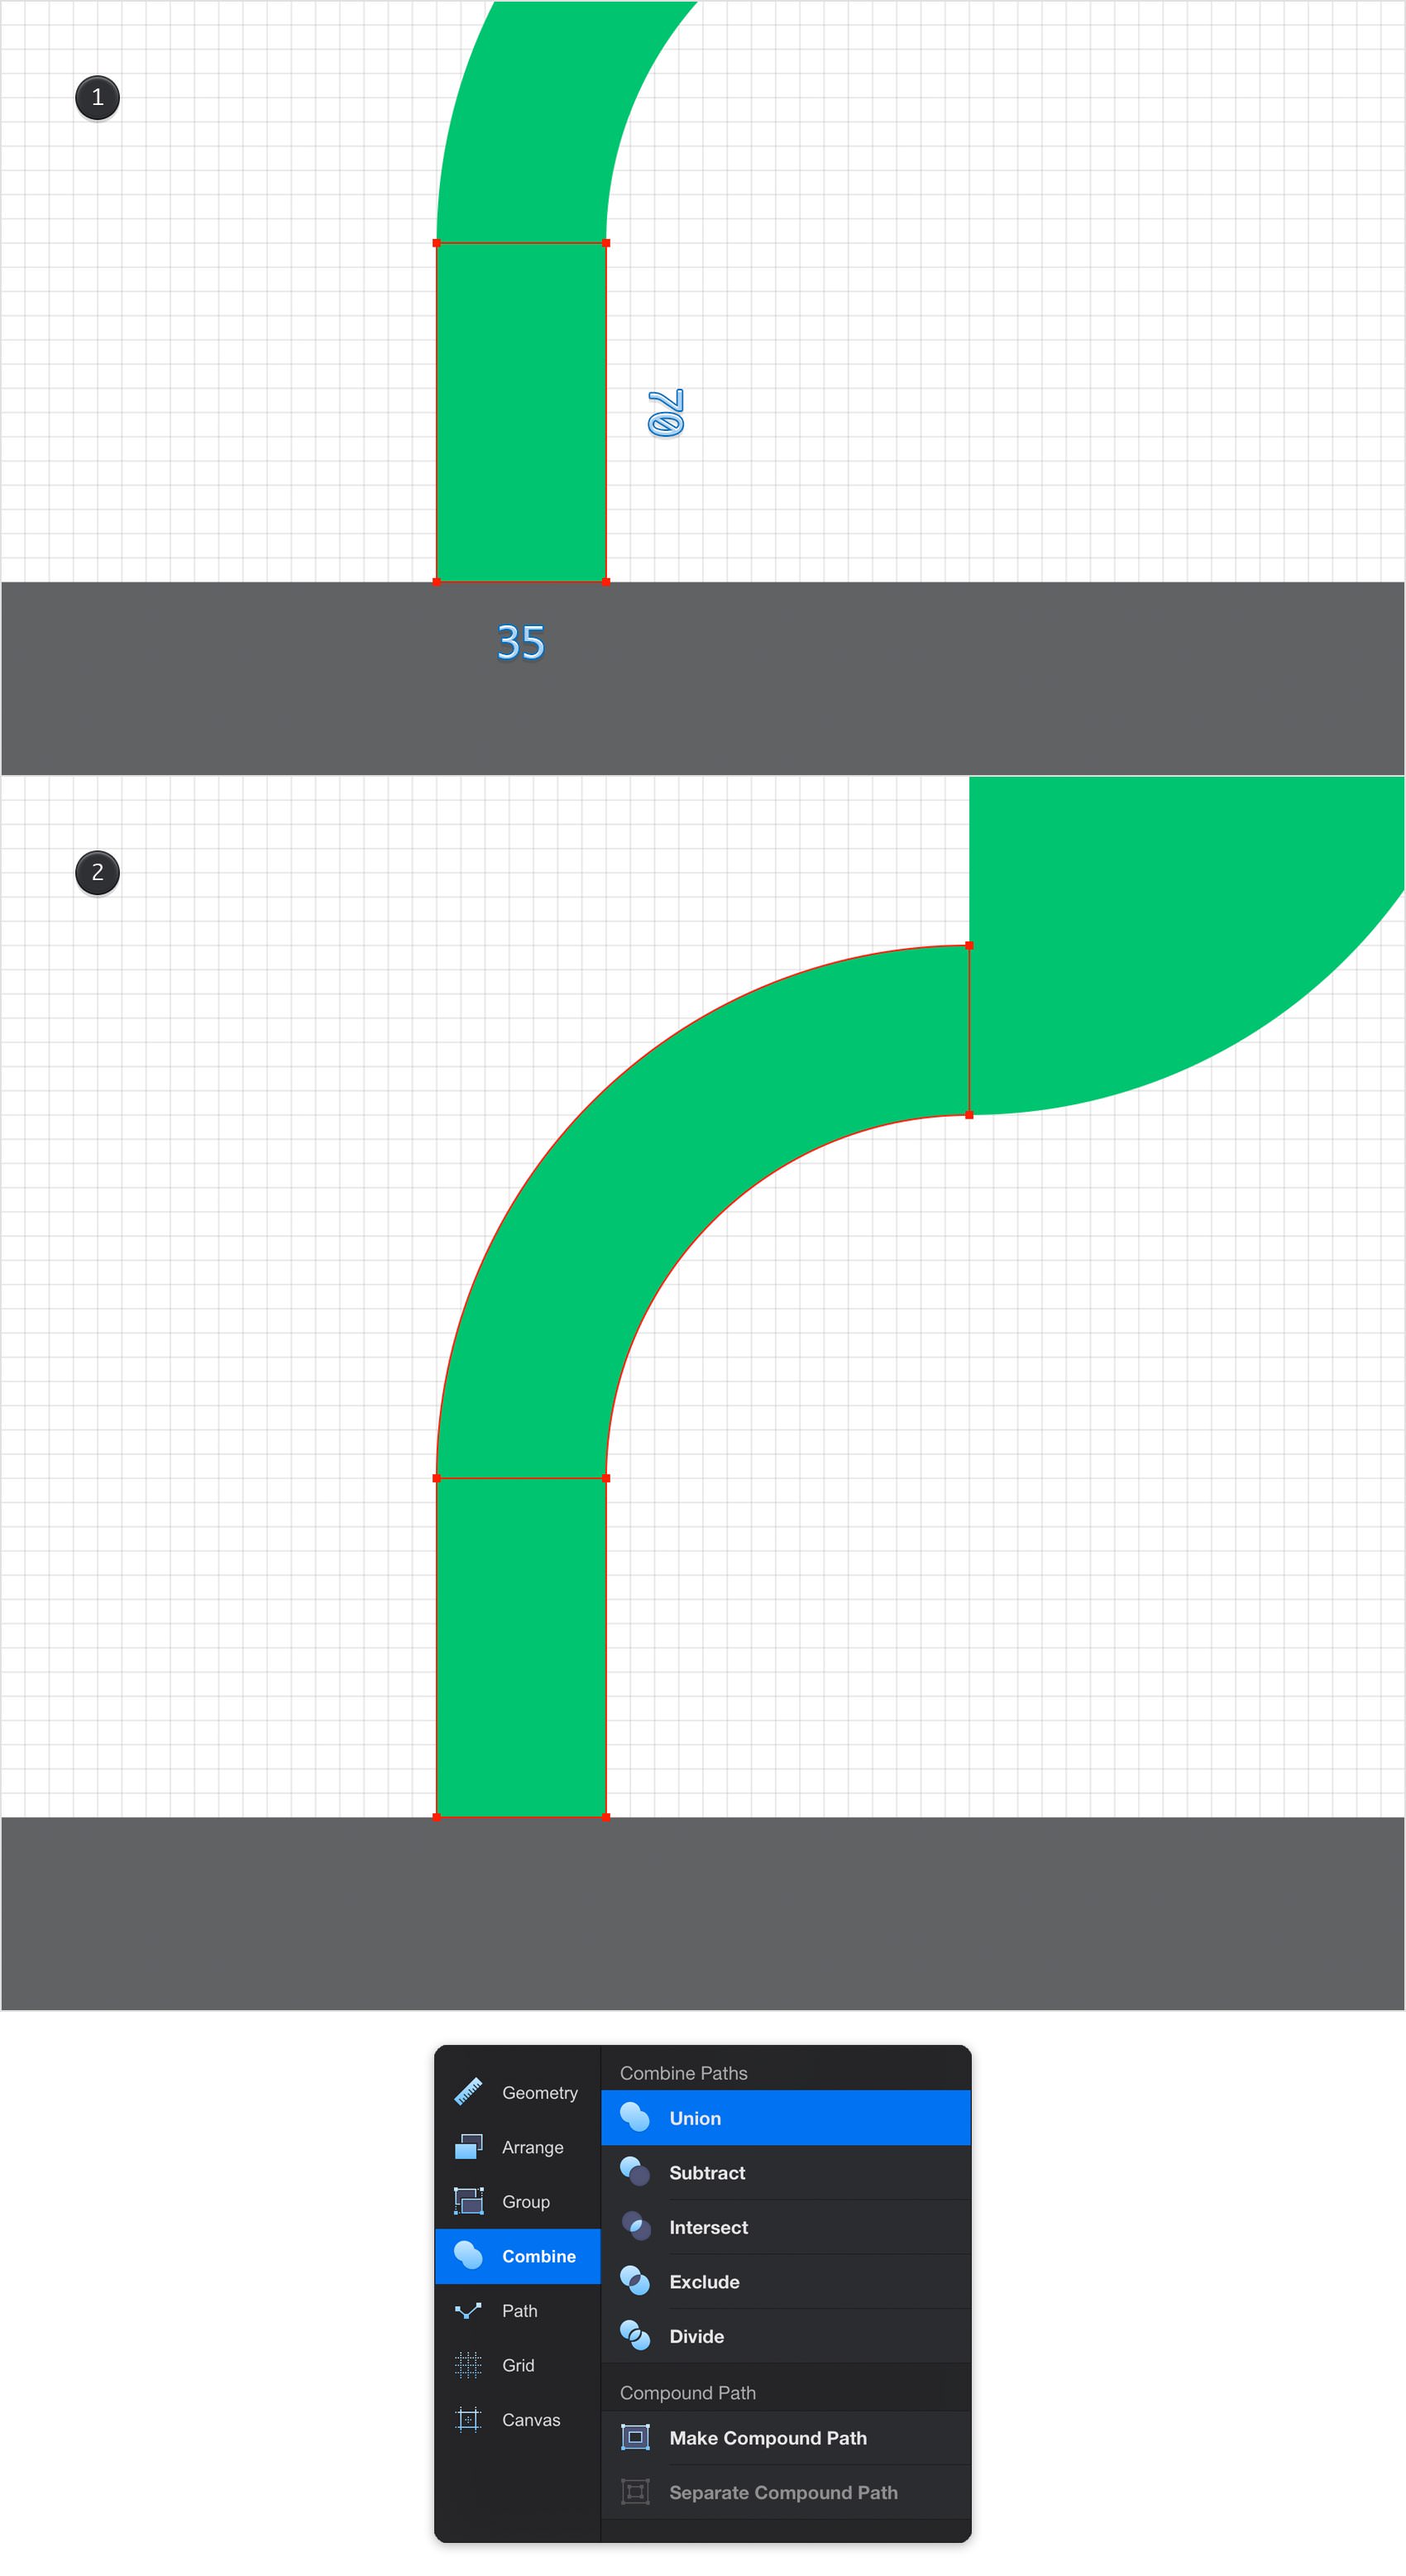
Pick the Rectangle Tool and create a 35 x 70 px shape. Fill this new shape with R=0 G=196 B=112 and place it as shown in the first image.
Using the Move Tool, select the two shapes highlighted in the second image and tap the Union command from the Combine pane.
Step 9
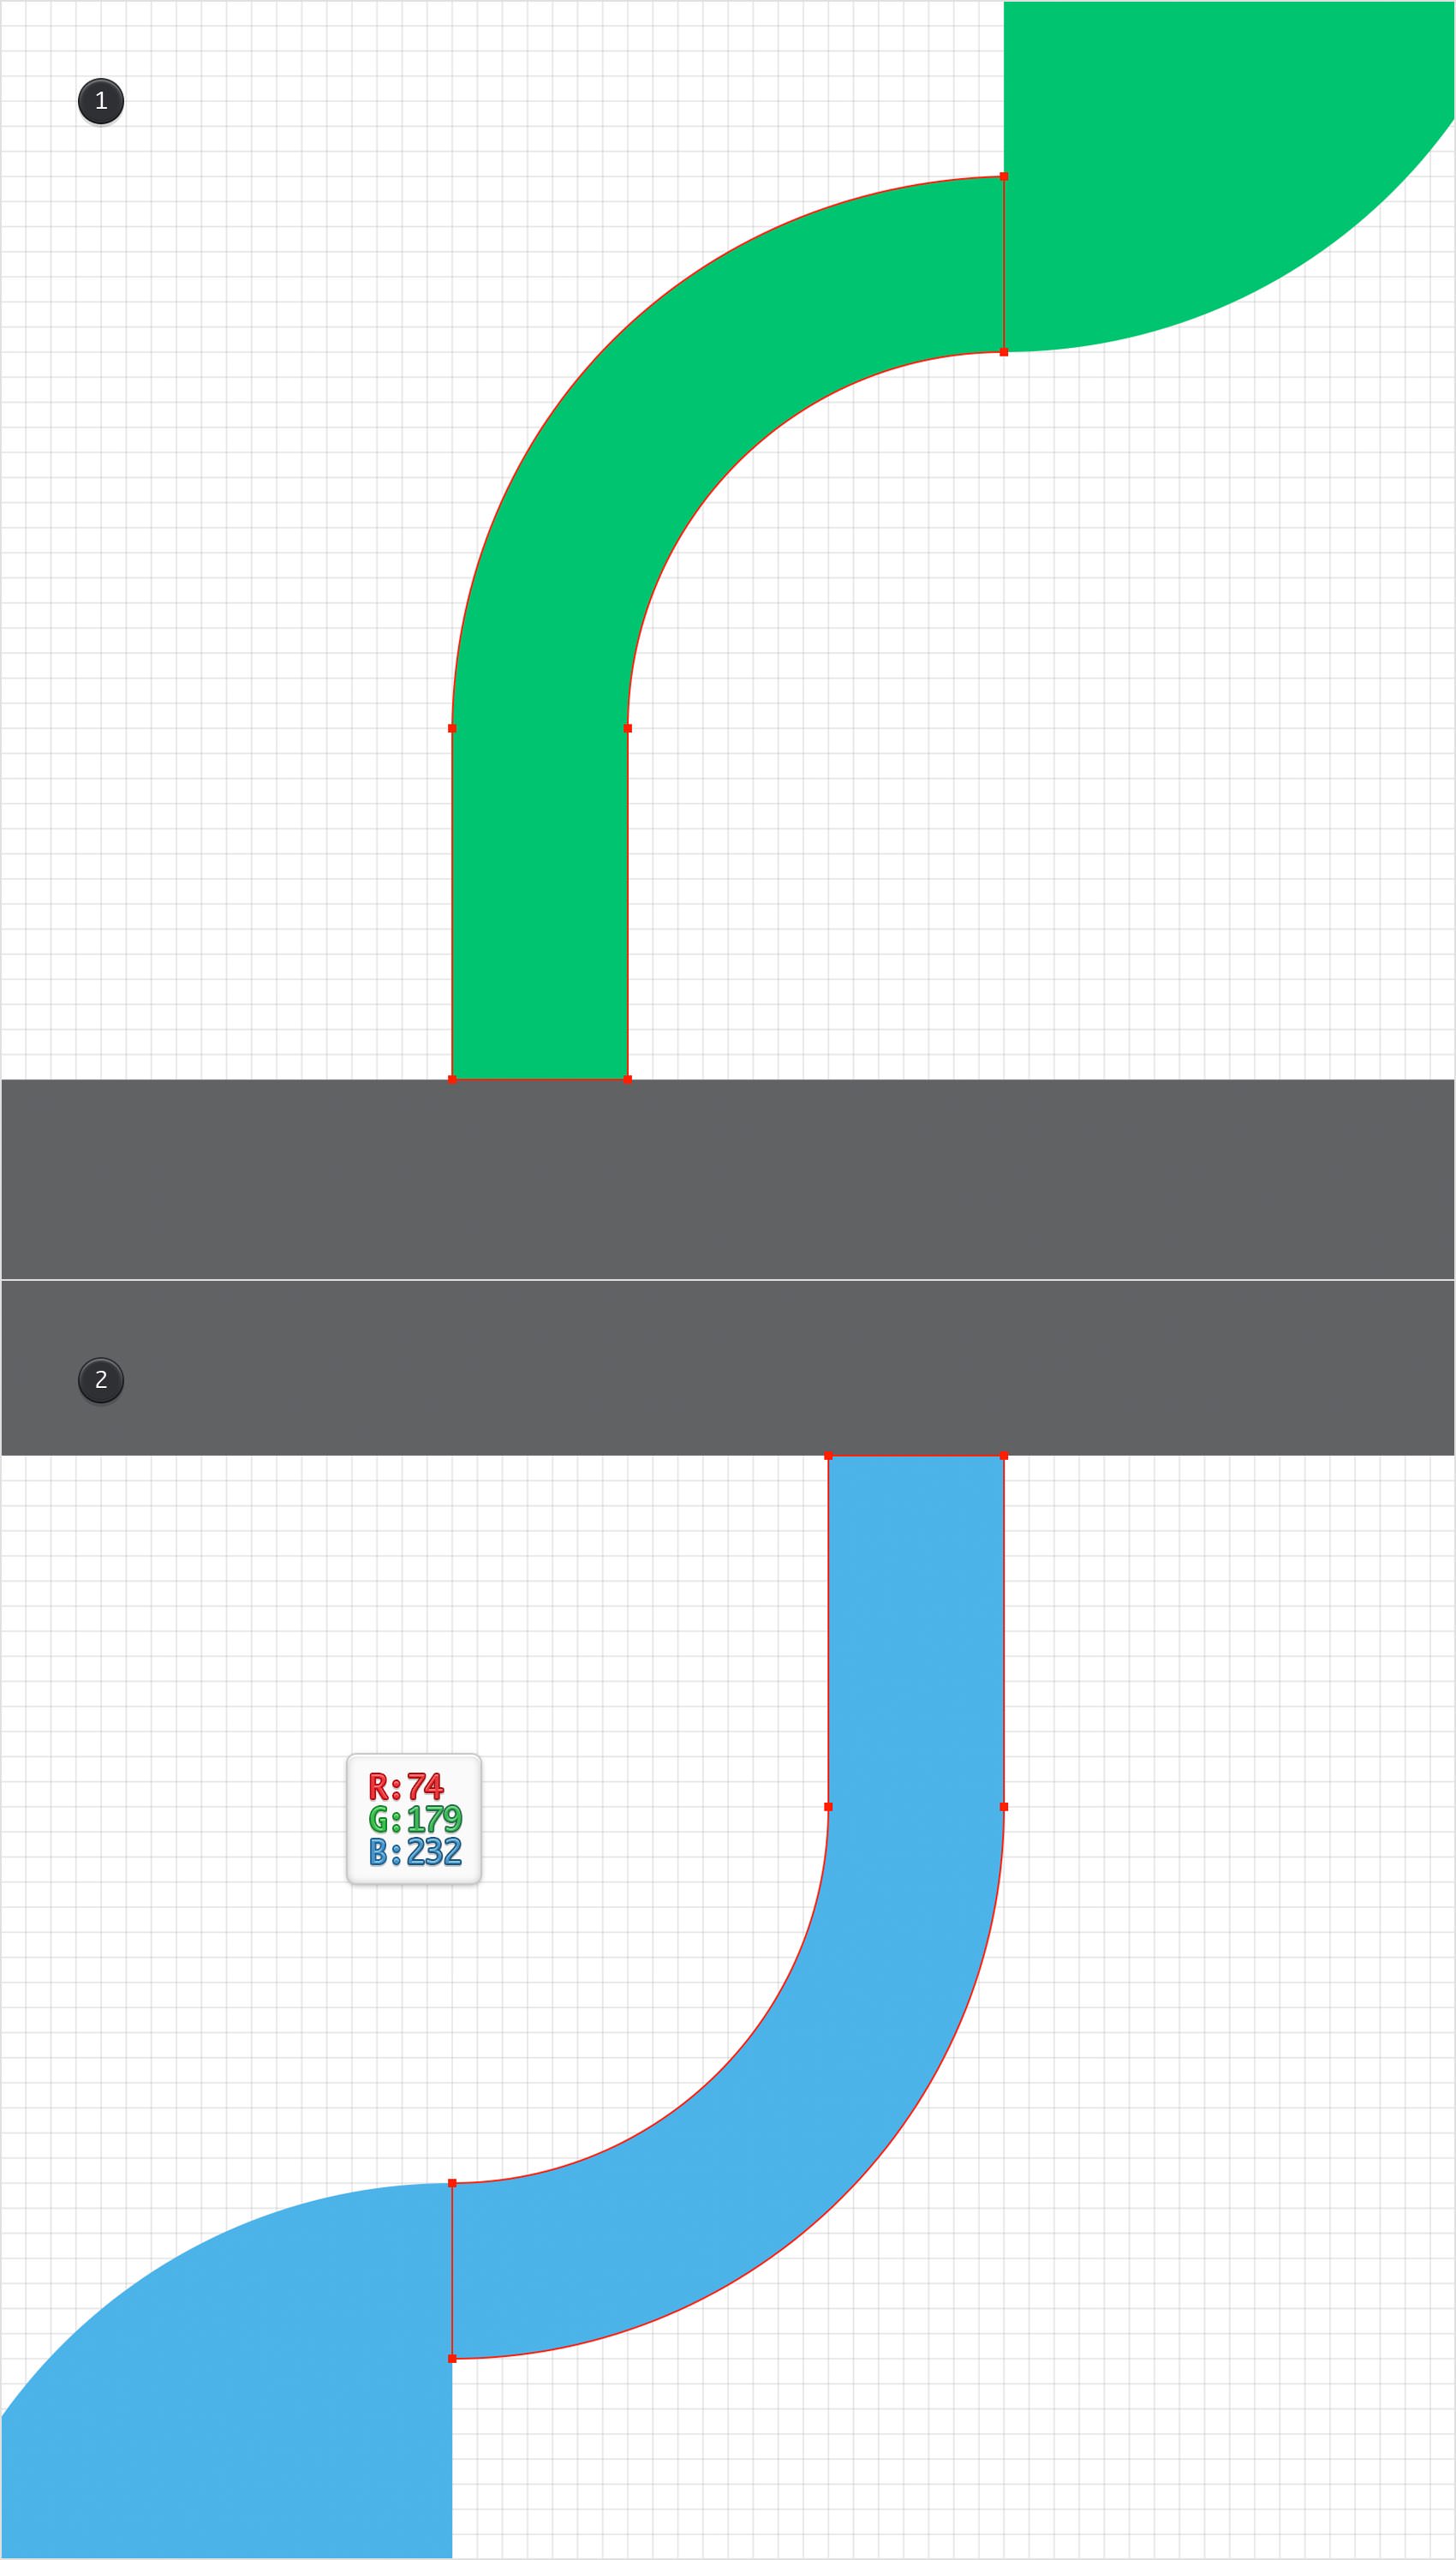
Duplicate the shape highlighted in the first image using the same Copy and Paste commands from that Edit pane. Select the copy and replace the existing Fill color with R=74 G=179 B=232. Rotate this shape 180 degrees and place it as shown in the second image.
Step 10
Focus on the right side of your Tithelar and tap the rightmost icon to open the Layers panel. Double-tap the name of the existing layer and rename it "Path". Use that plus button from the top of the panel to add a second layer. Rename it "Step 1" and make sure that it stays selected, as the new shapes you are about to create will go here.
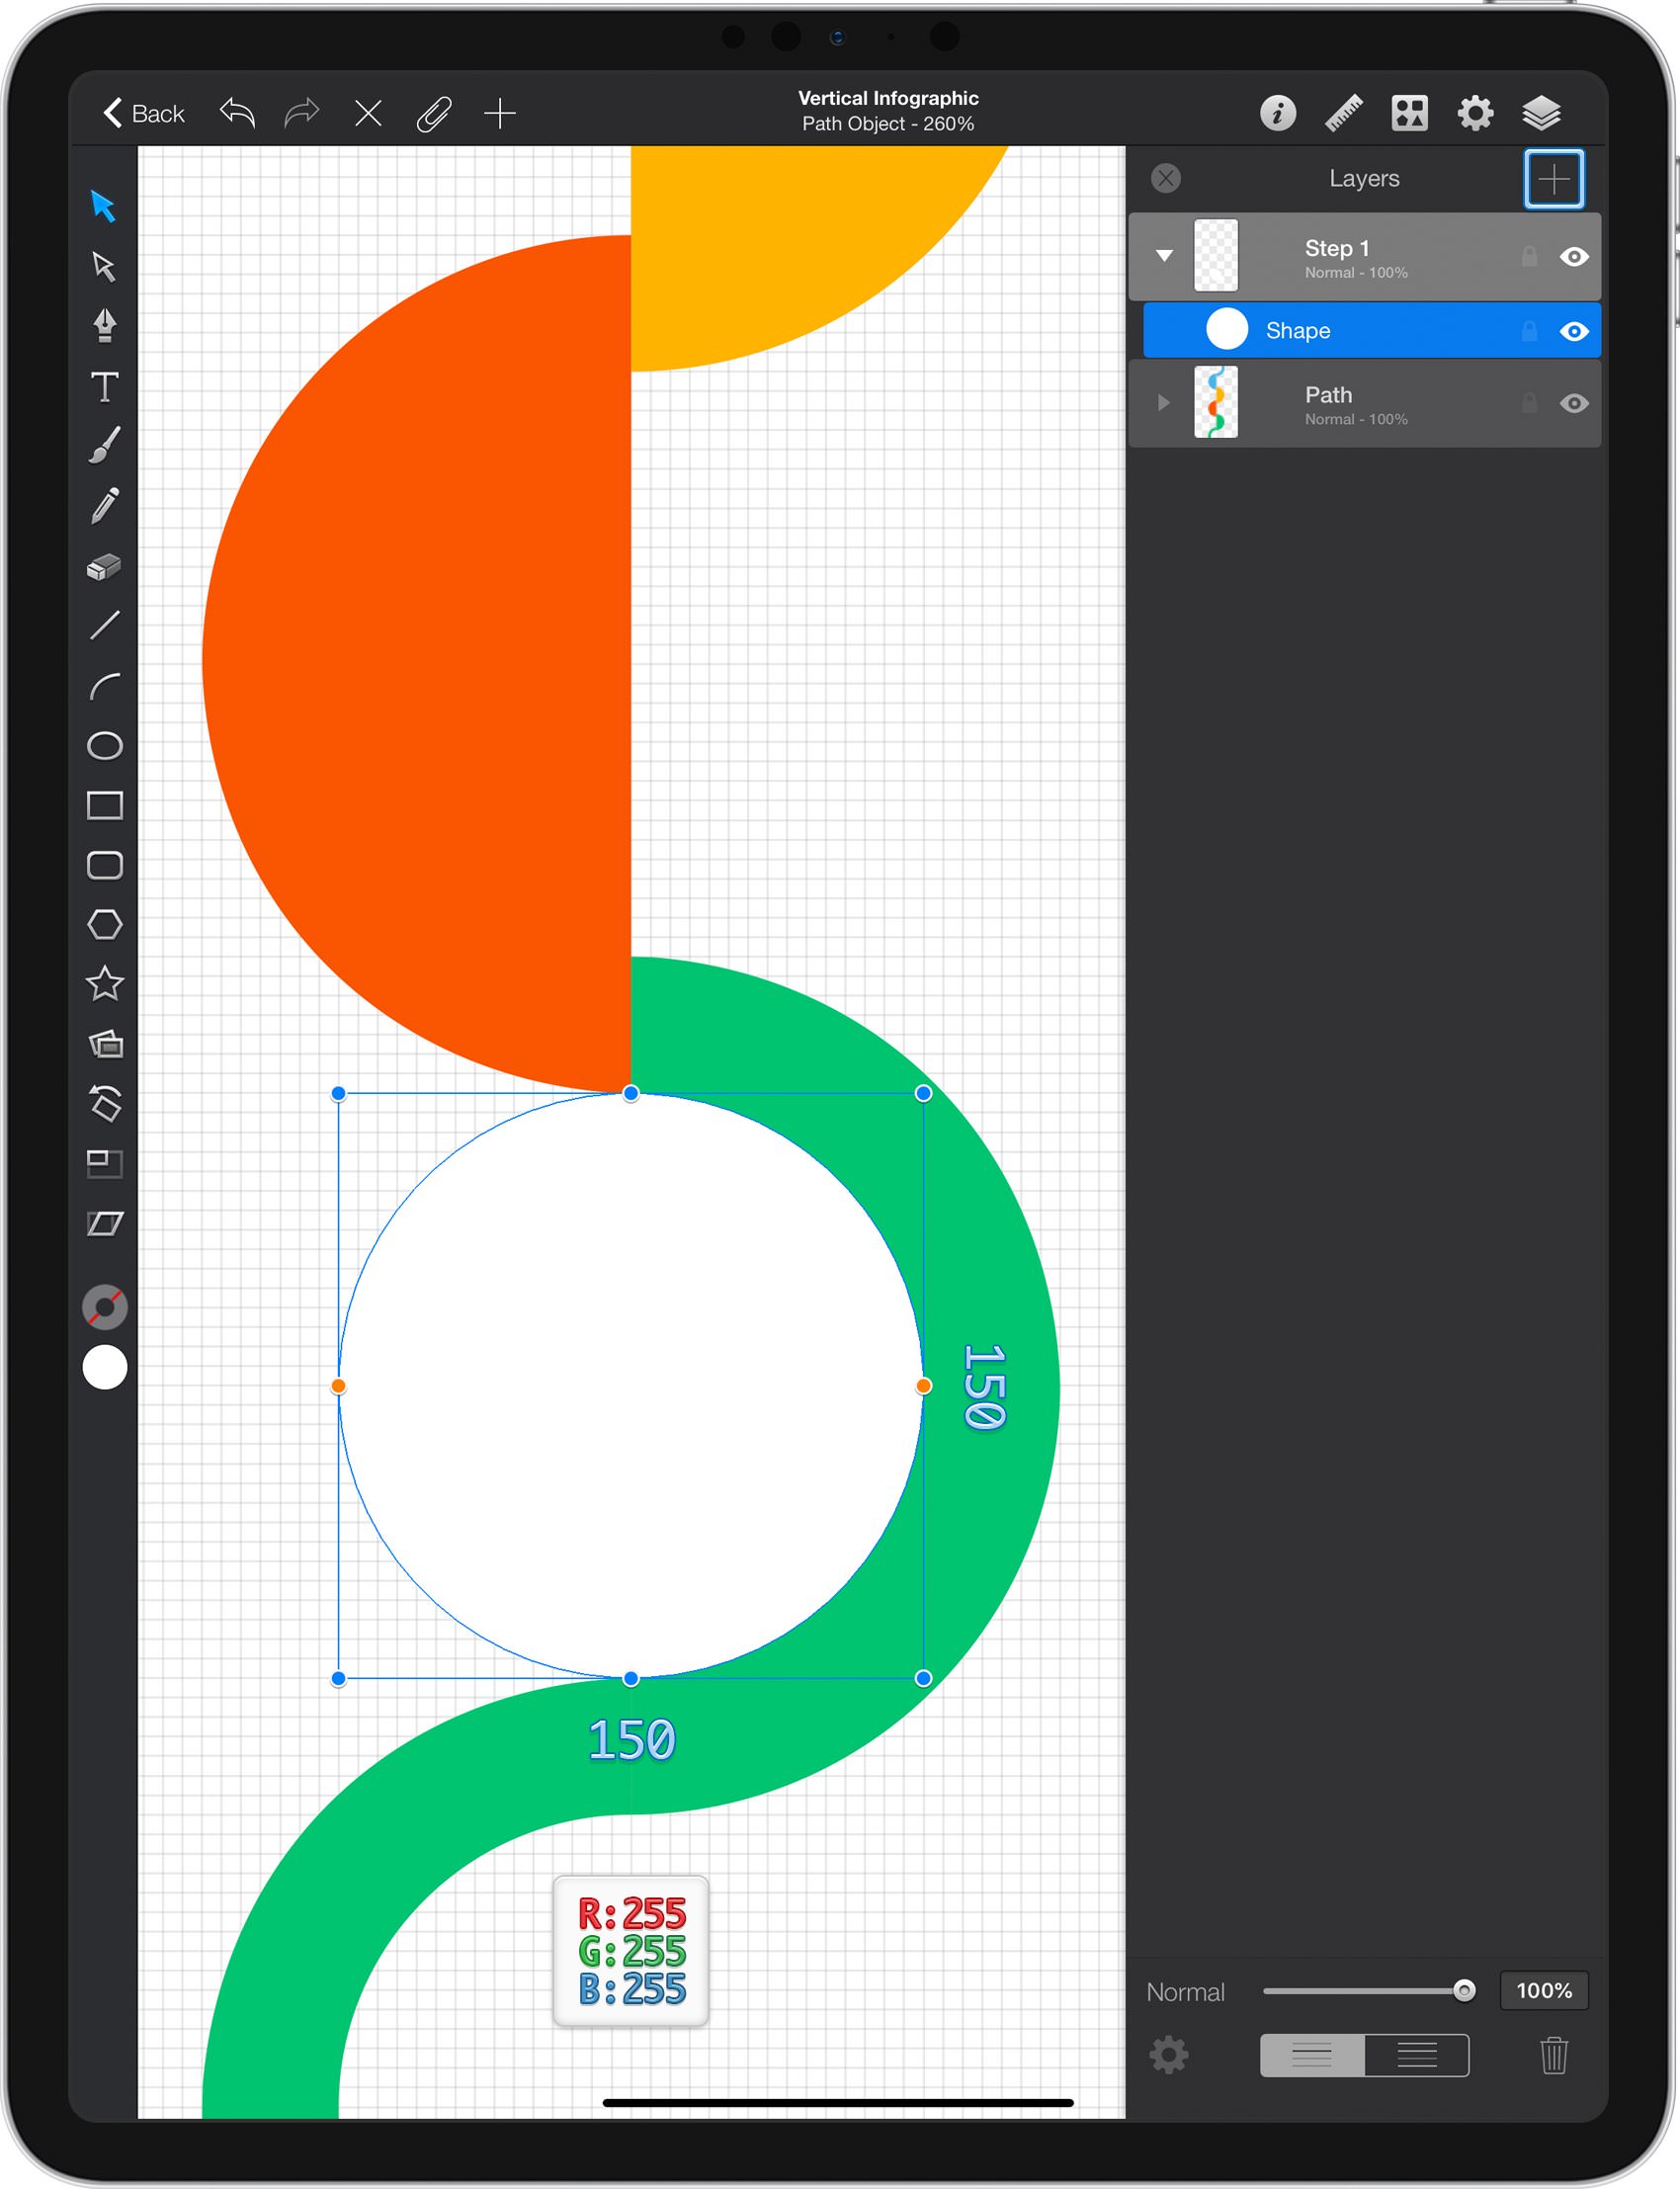
Pick the Ellipse Tool and create a 150 px circle. Fill this new shape with white (R=255 G2=255 B=255) and place it as shown in the following image.
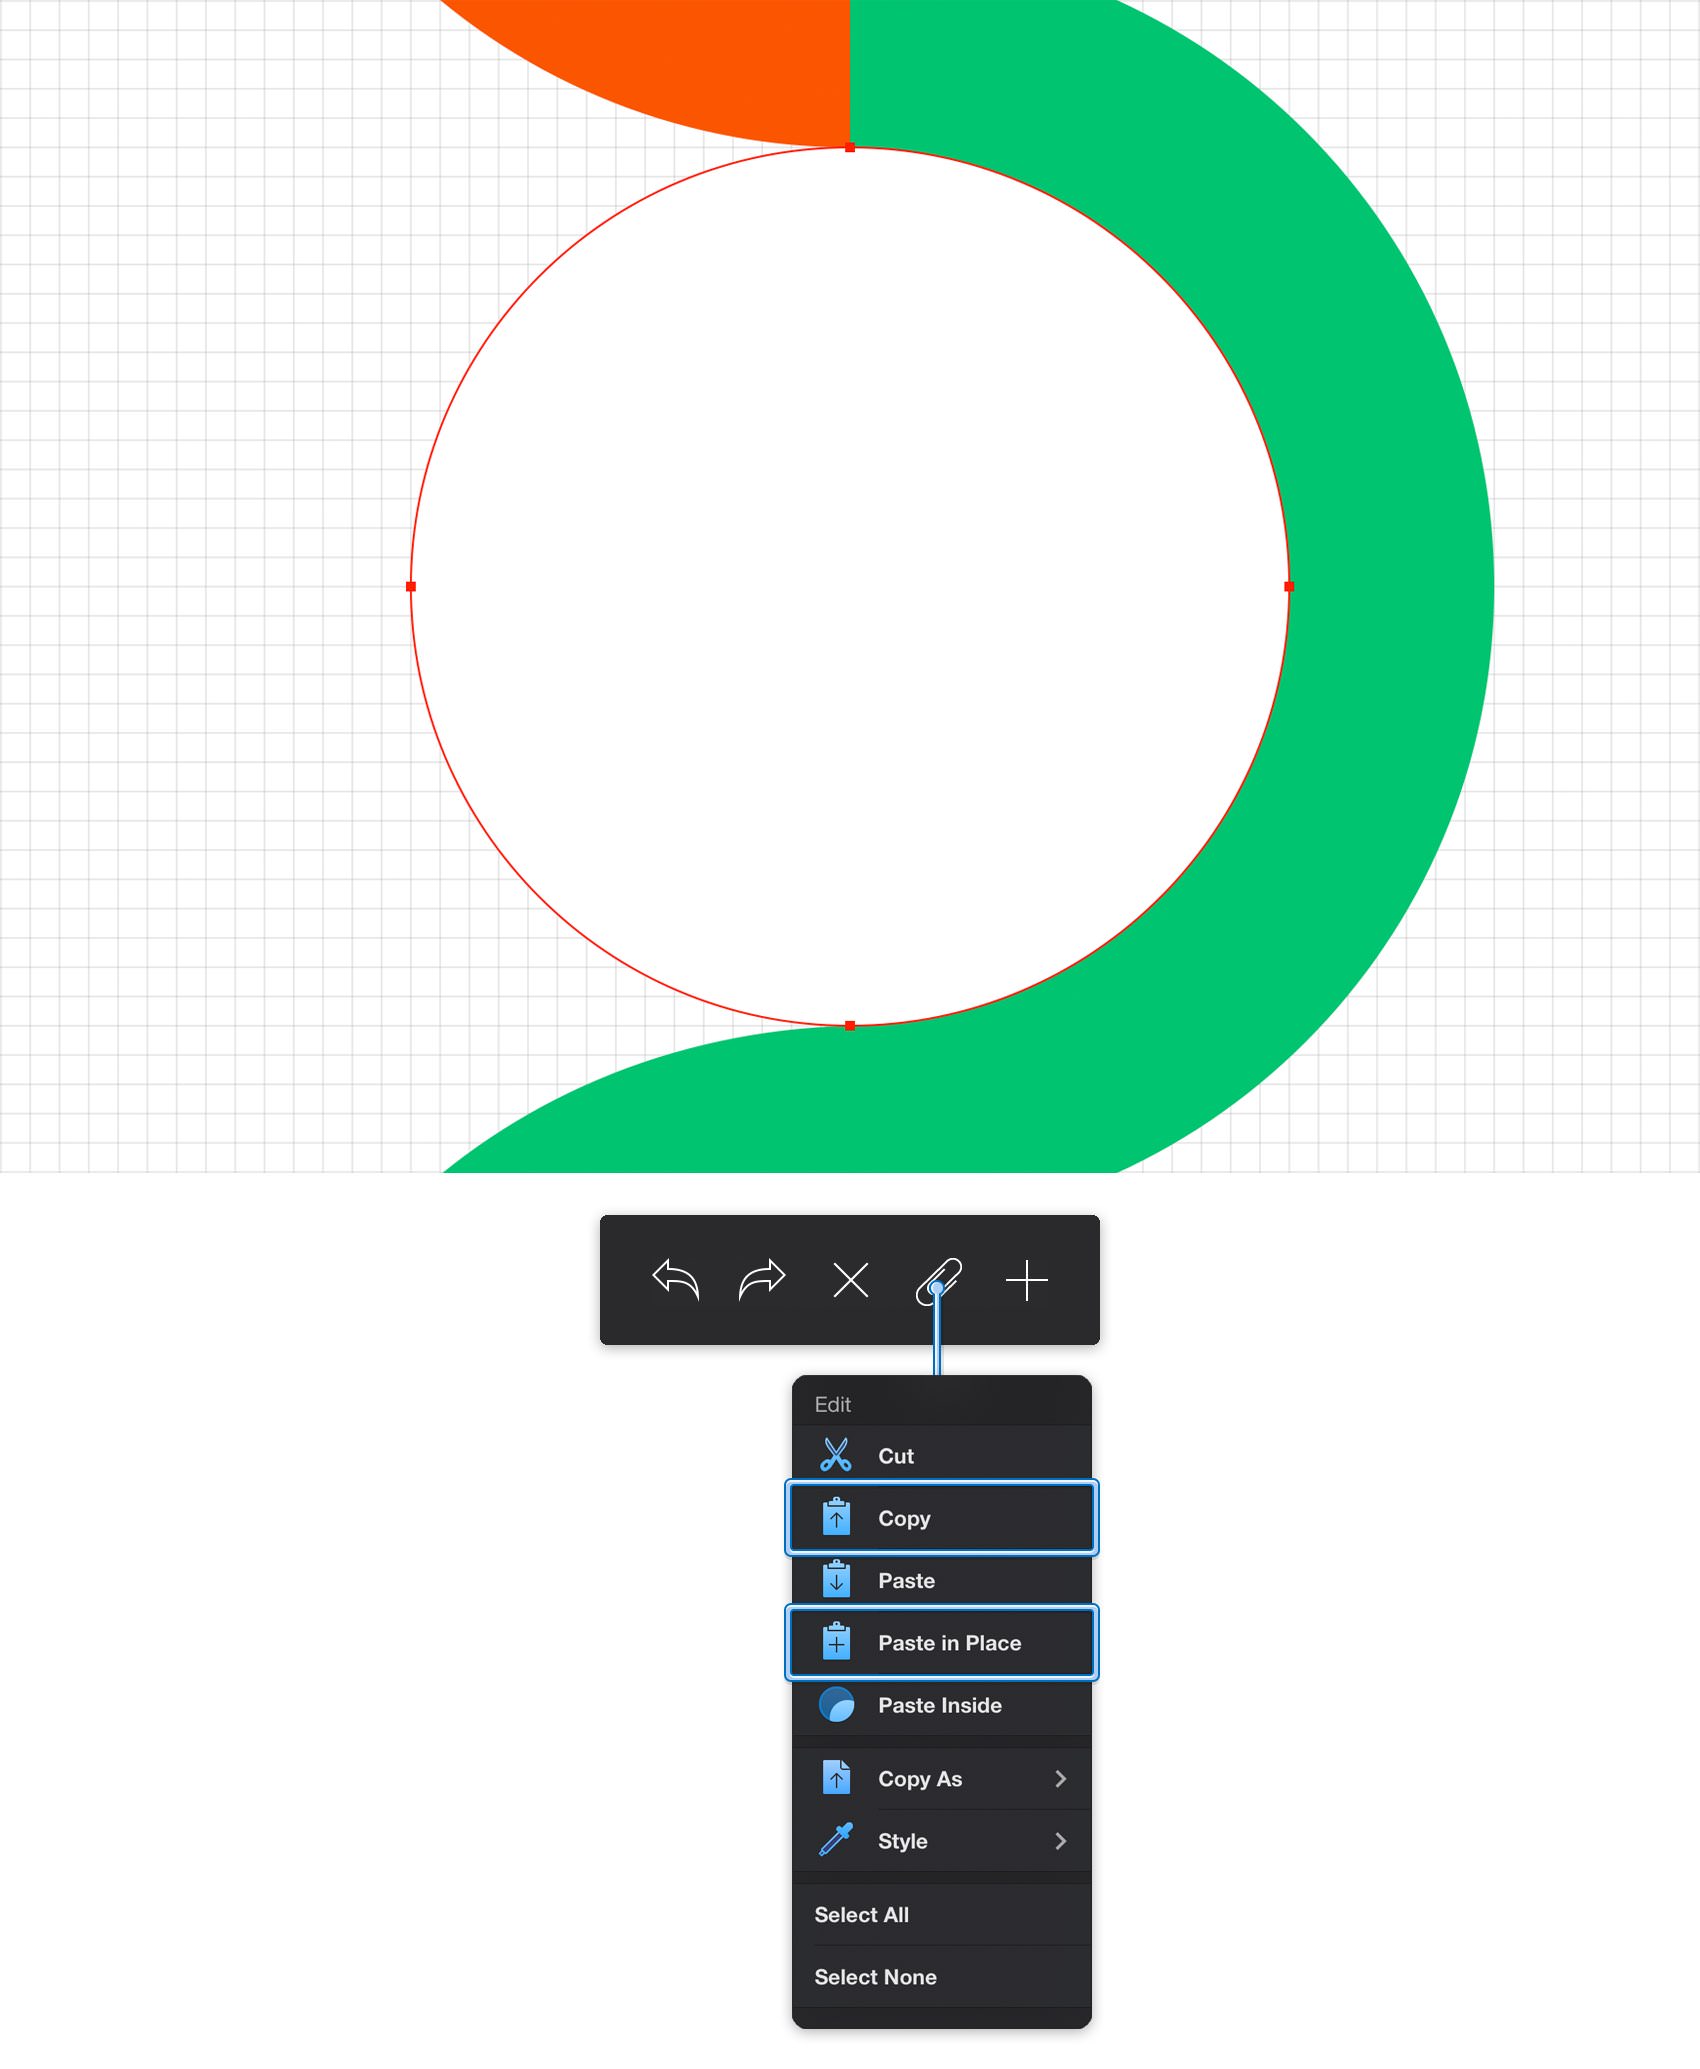
Make sure that your white circle stays selected and open the Edit pane. First, tap the Copy command and then tap the Paste in Place command. This will add a copy of your selection in the same place.
Step 11
Pick the Ellipse Tool and create a 135 px circle. Fill this new shape with black and place it as shown in the first image.
Switch to the Path Selection Tool and make sure that the Add to Selection mode is active. Select your black circle along with the copy of that white circle and tap the Intersect command from the Combine pane. Select the resulting shape, focus on the right side of your Titlebar and tap the leftmost icon. Move to the Effects pane and tap the Fill color well. Set the color to black and drag that Alpha slider to 5%.
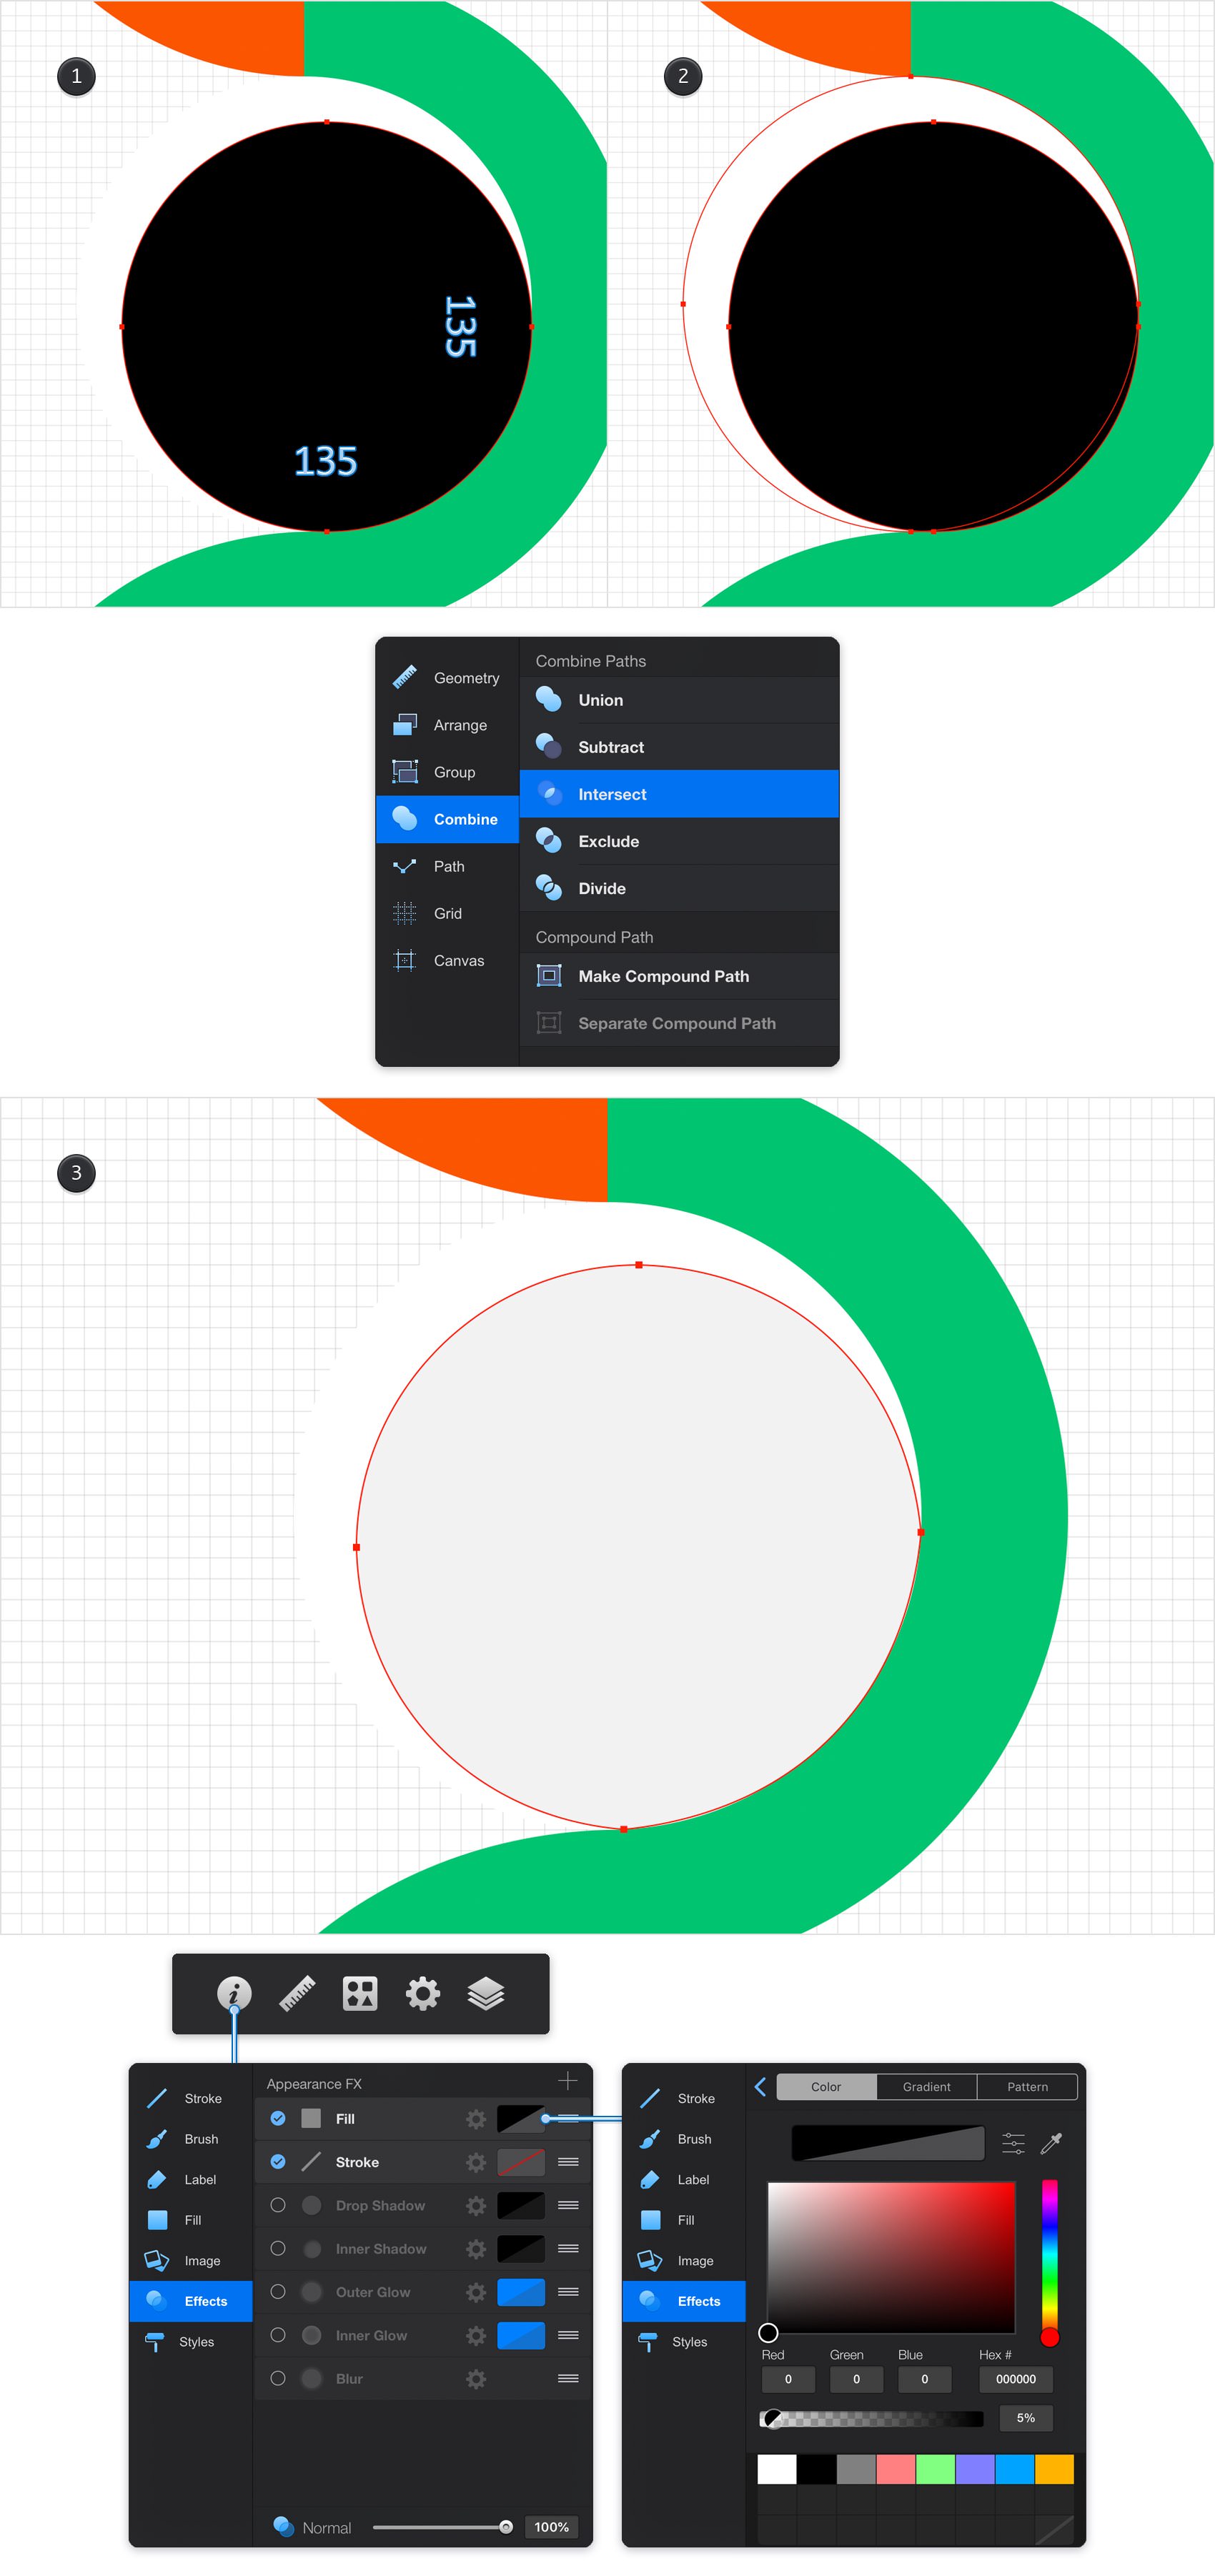
Make sure that your shape is still selected, open the Edit pane and tap the Copy Style command (Style > Copy Style).
Step 12
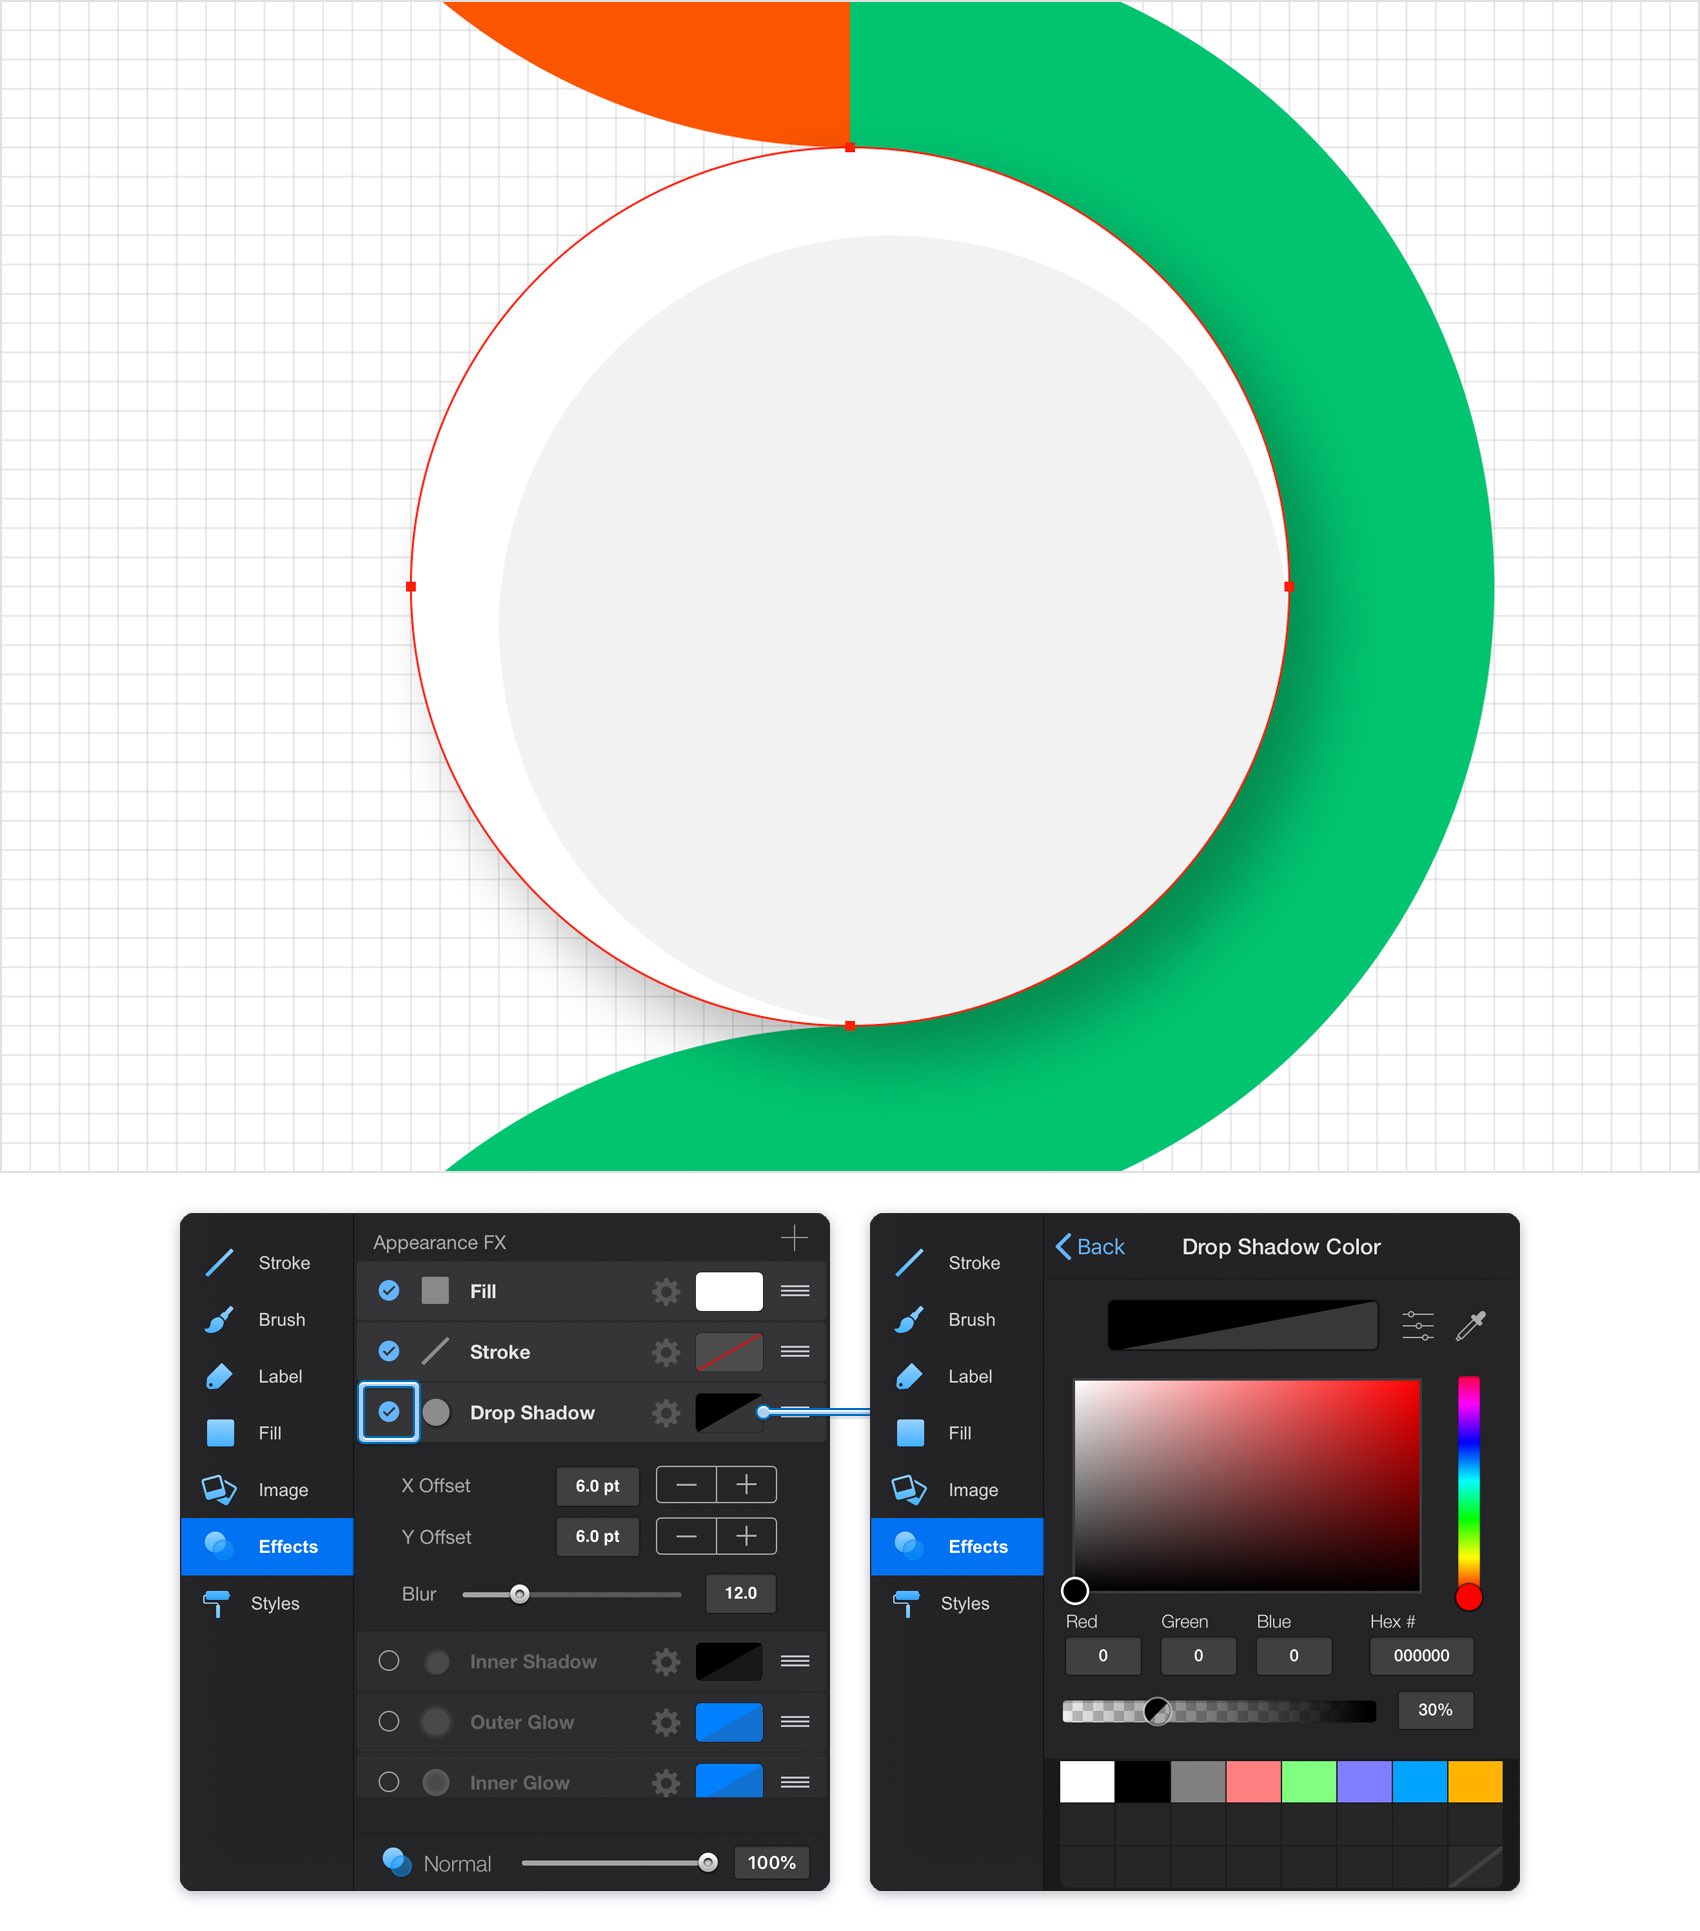
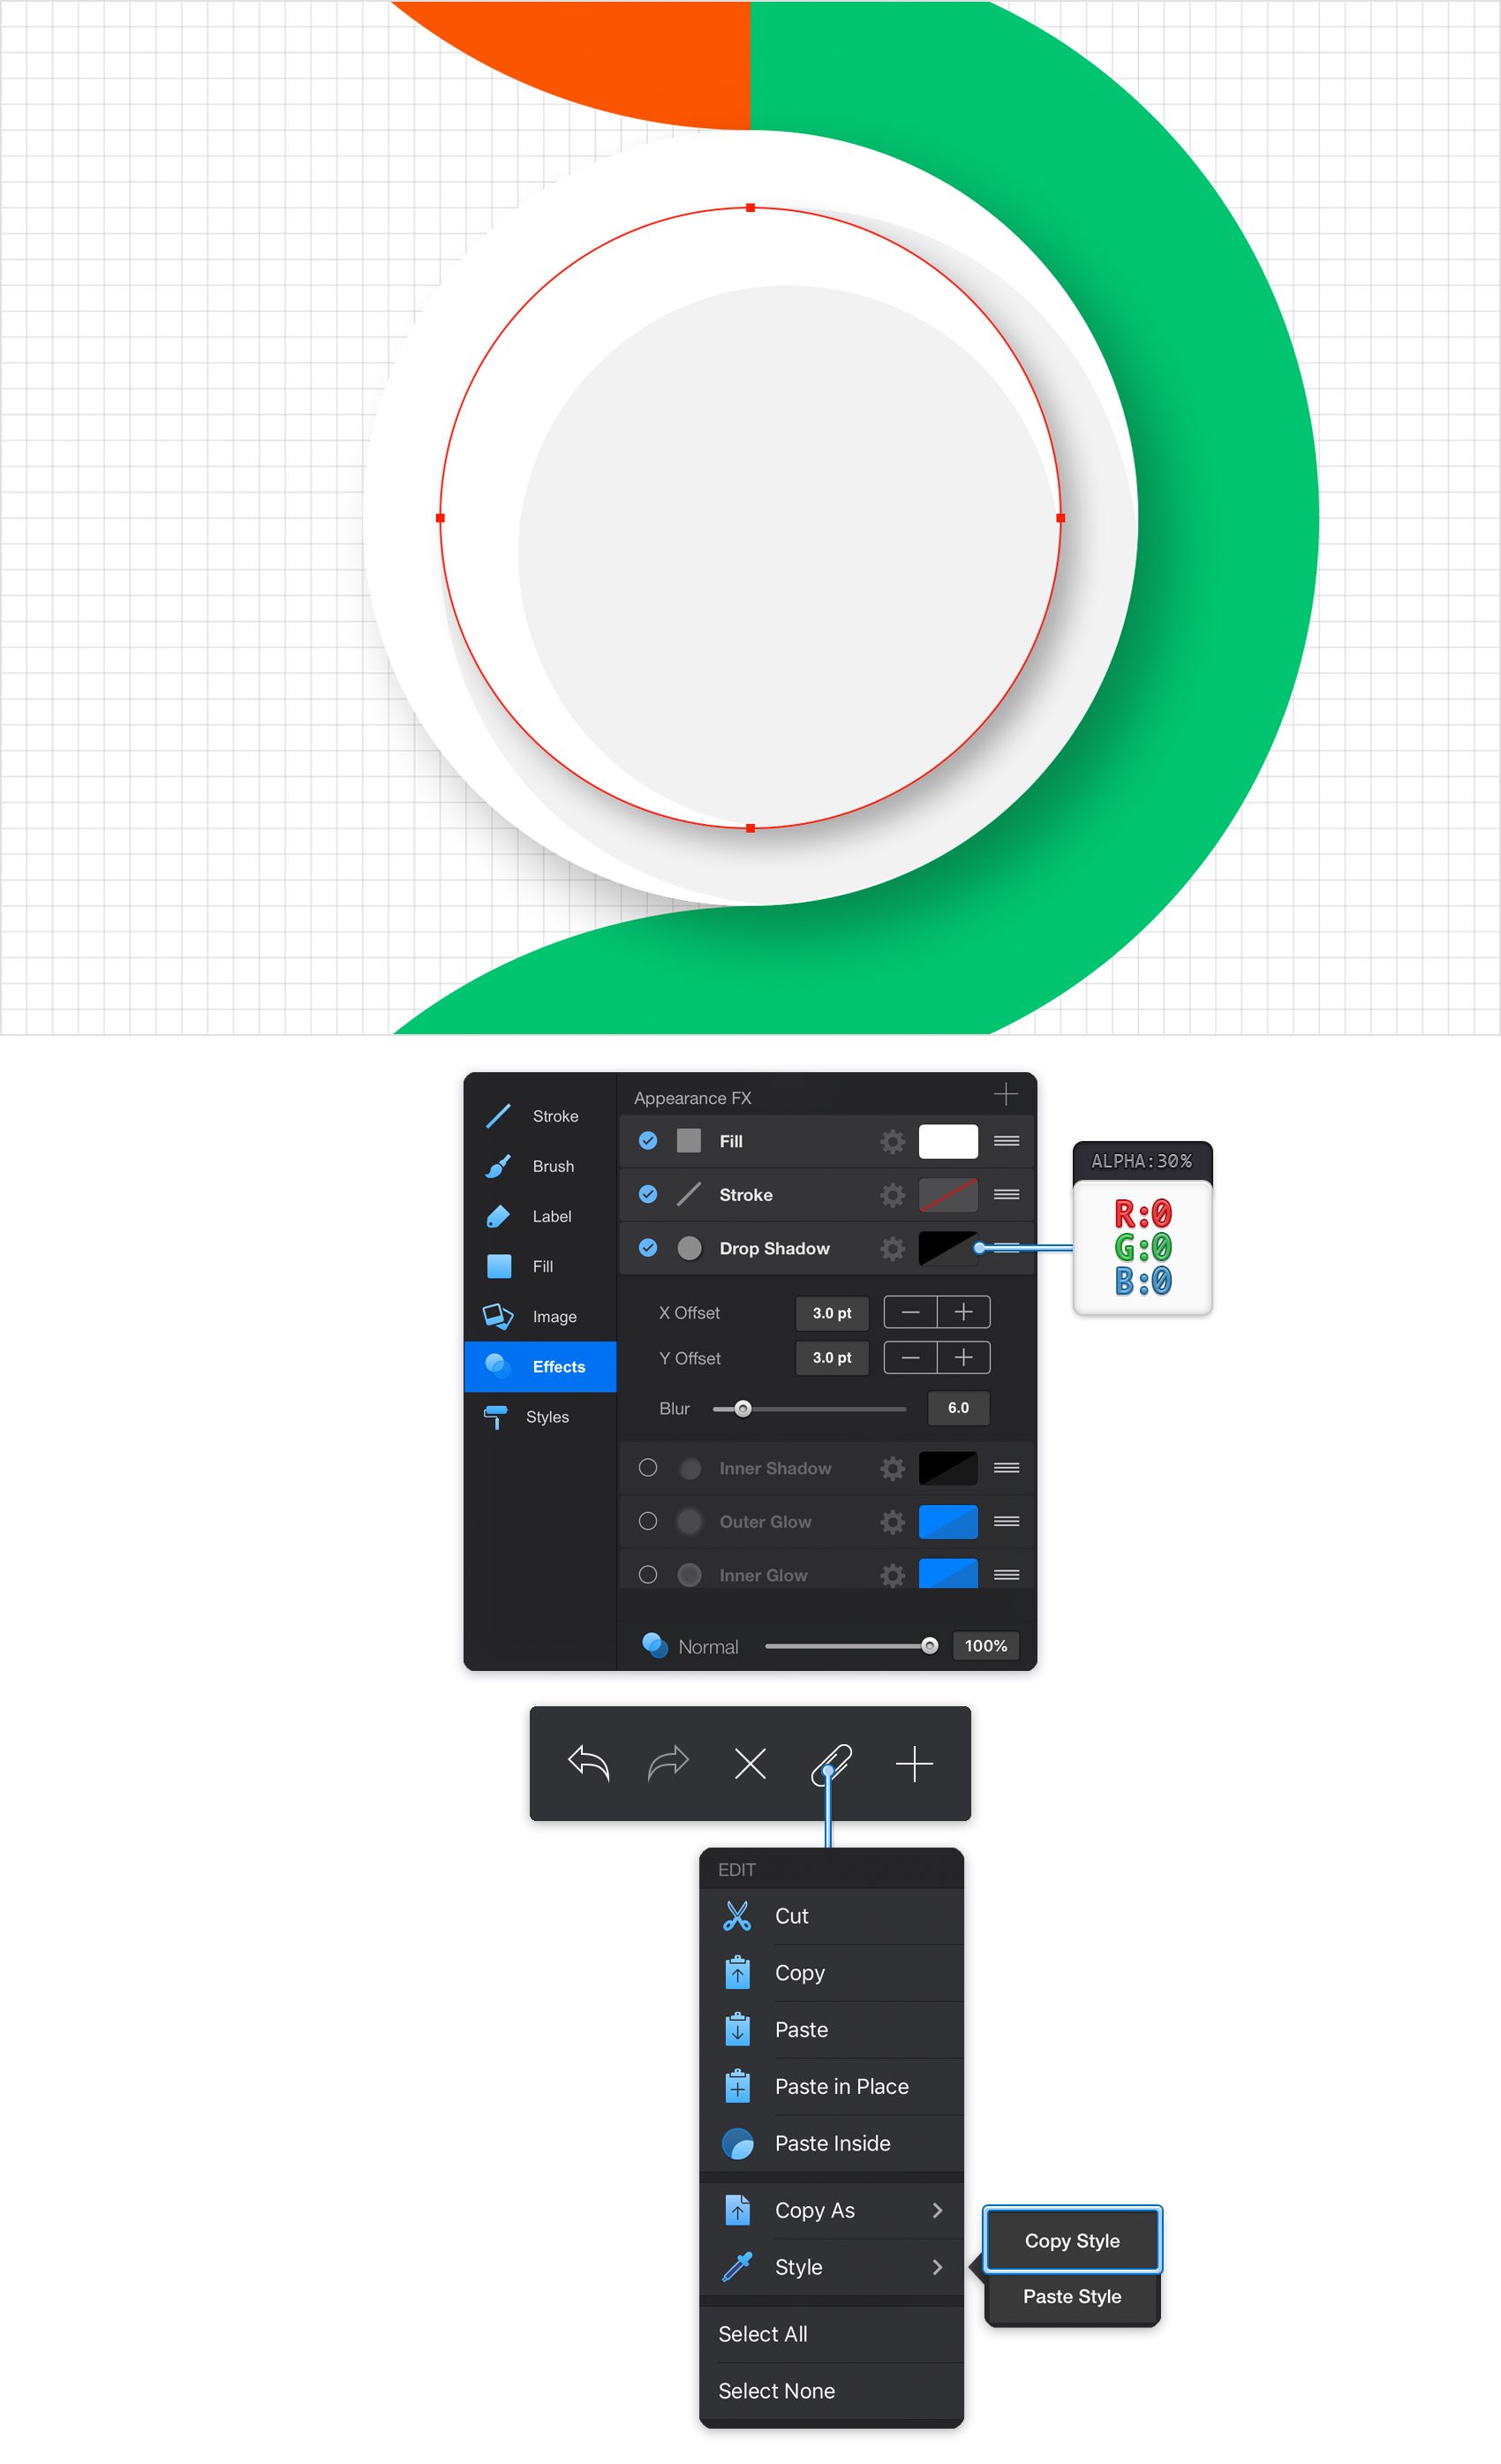
Select your white circle, keep focusing on the Effects pane and activate the existing Drop Shadow effect. Enter 6 pt in the X and Y boxes and then drag that Blur slider to 12. Tap the color well of this effect and drag the Alpha slider to 30%.
Step 13
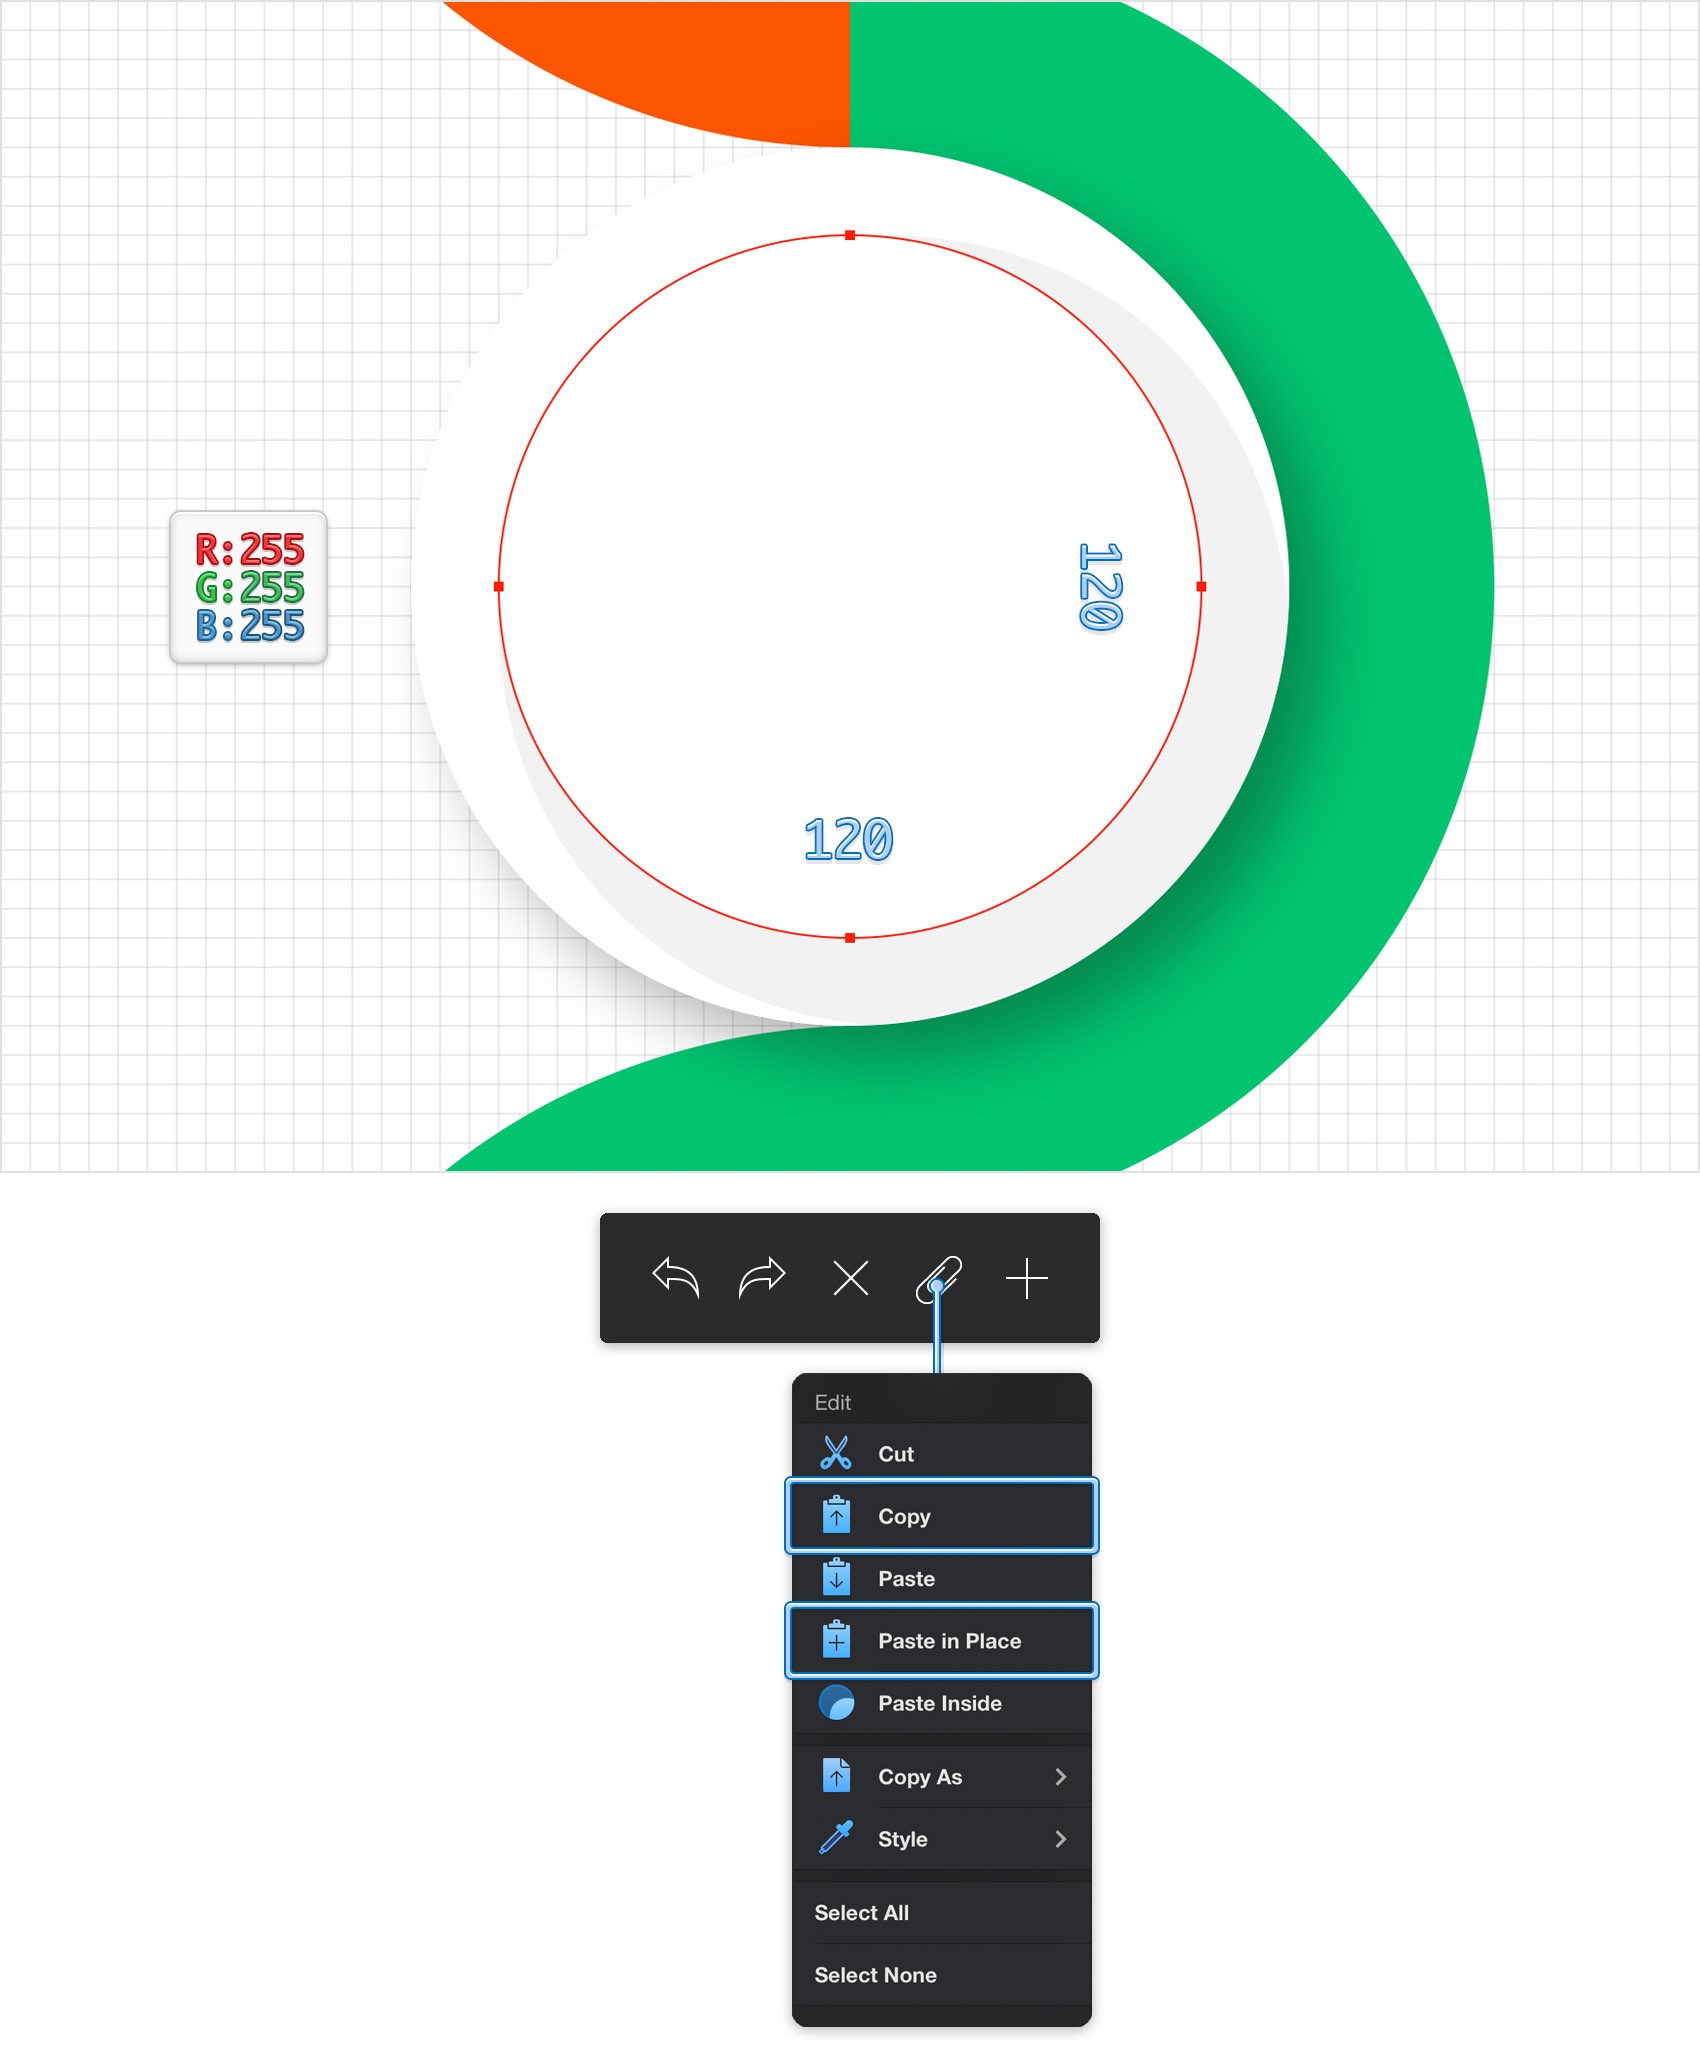
Pick the Ellipse Tool and create a 120 px circle. Fill this new shape with white, place it as shown in the following image and don't forget to add a copy in the same place.
Step 14
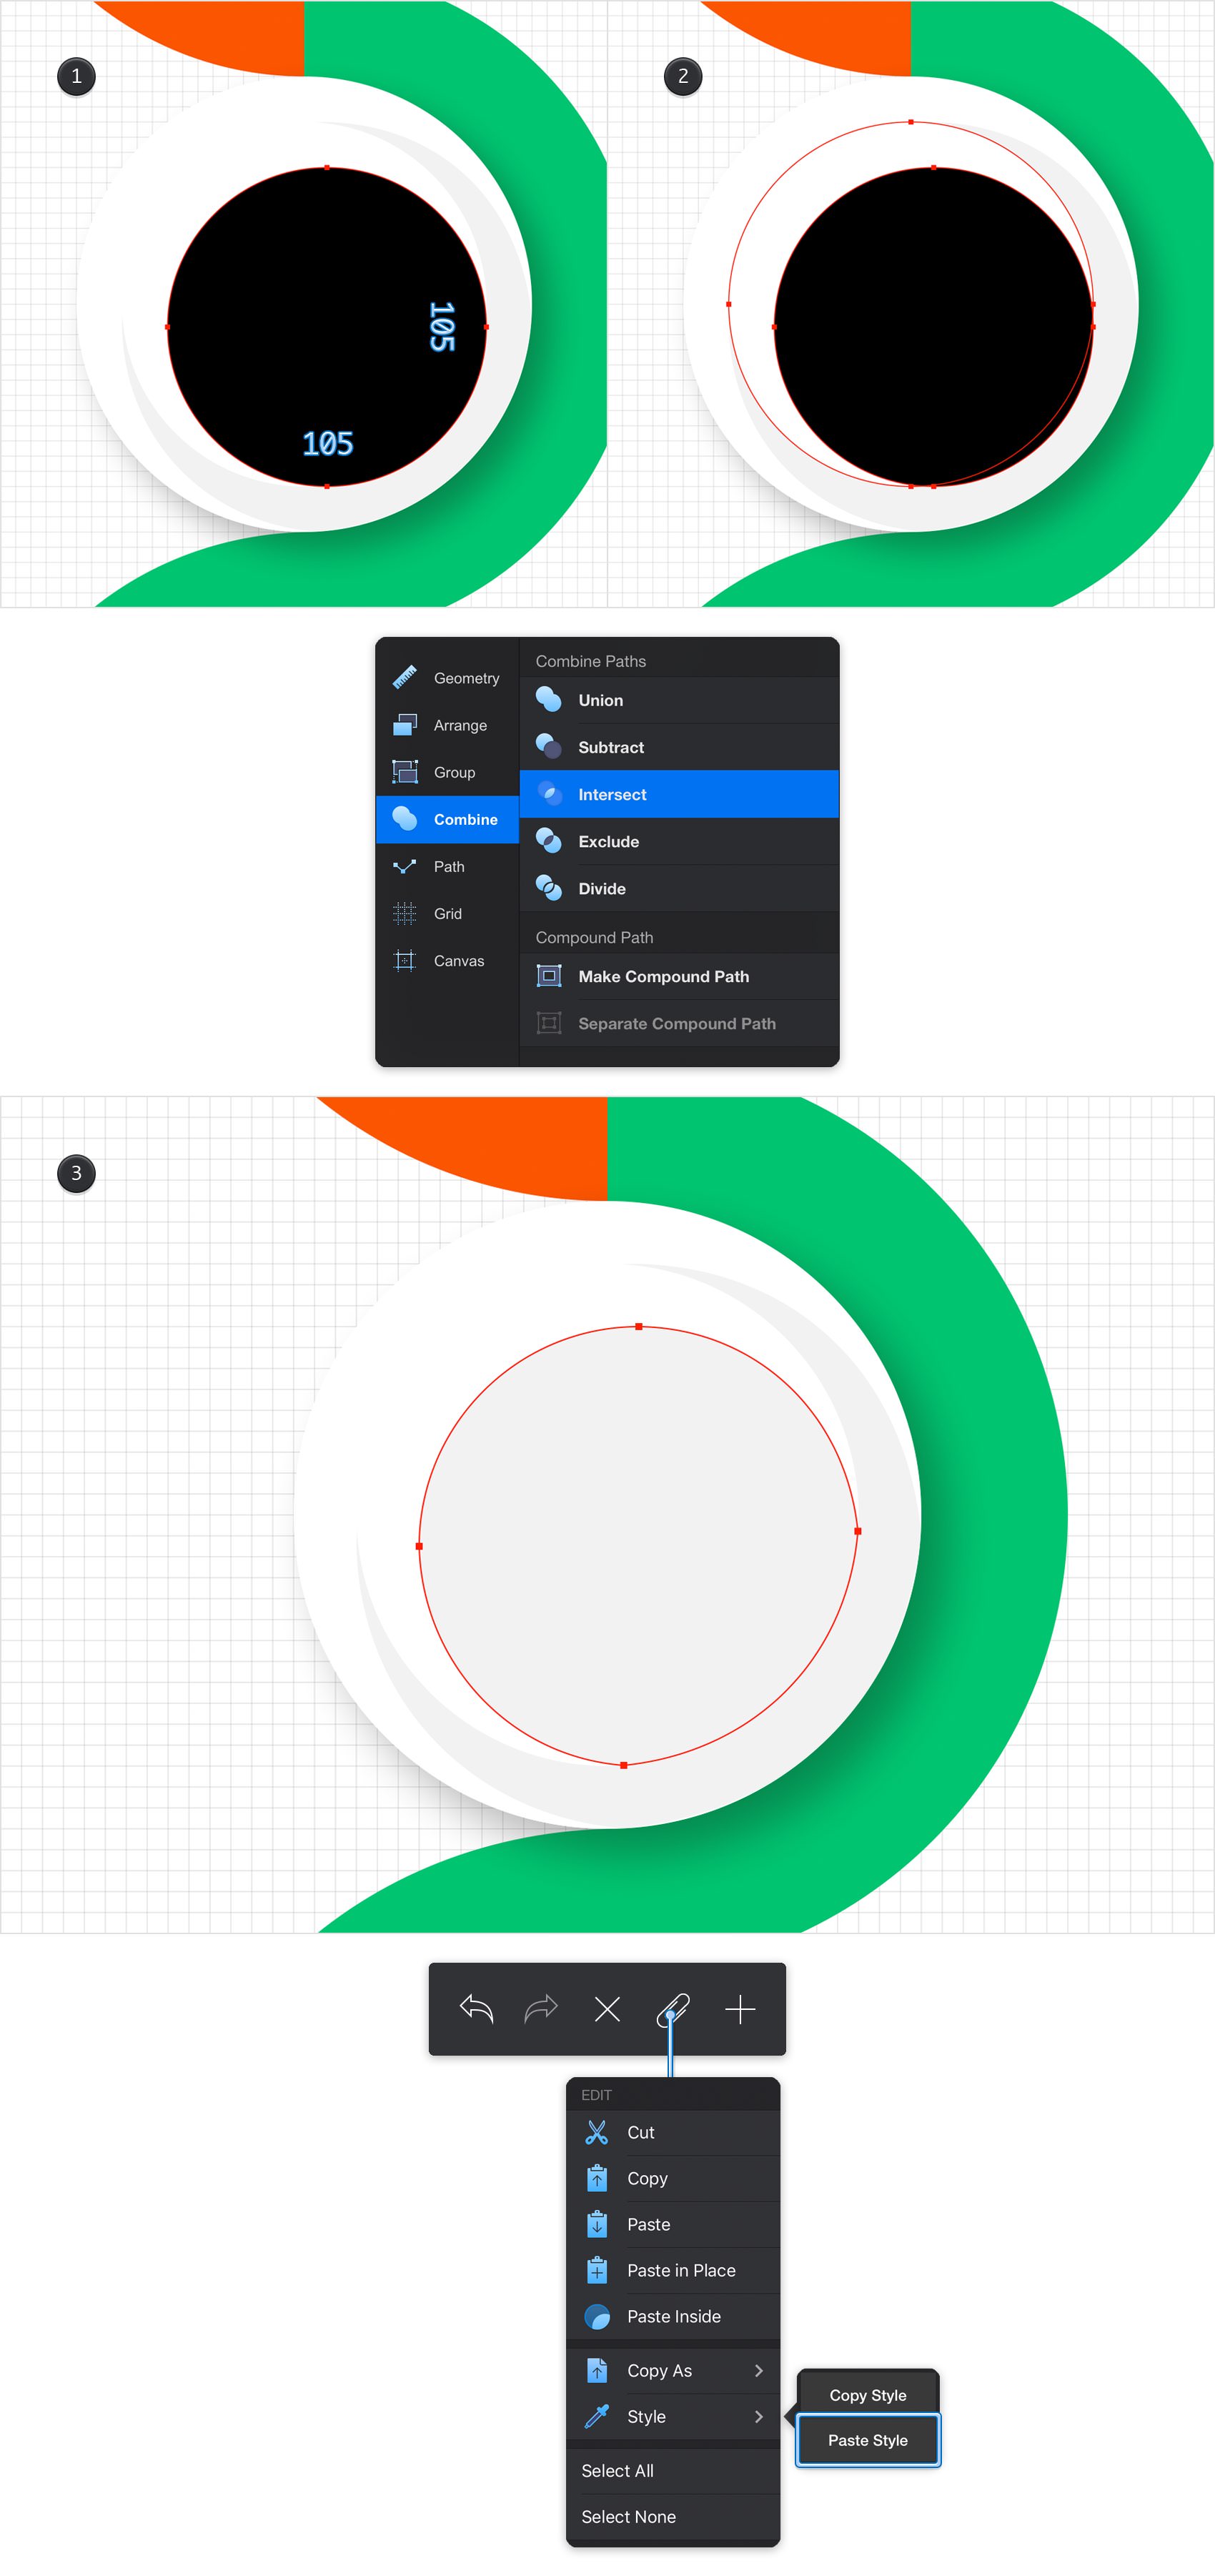
Pick the Ellipse Tool and create a 105 px circle. Fill this new shape with black and place it as shown in the first image.
Switch to the Path Selection Tool and make sure that the Add to Selection mode is active. Select your black circle along with the copy of that white circle (made in the previous step) and tap the Intersect command from the Combine pane.
Select the resulting shape and use the Paste Style command from that Edit pane to paste the style copied in the eleventh step.
Step 15
Select your 120 px, white circle and focus on the Effects pane. Activate the existing Drop Shadow effect and enter the attributes shown below. Once you're done, copy the style of this shape.
Step 16
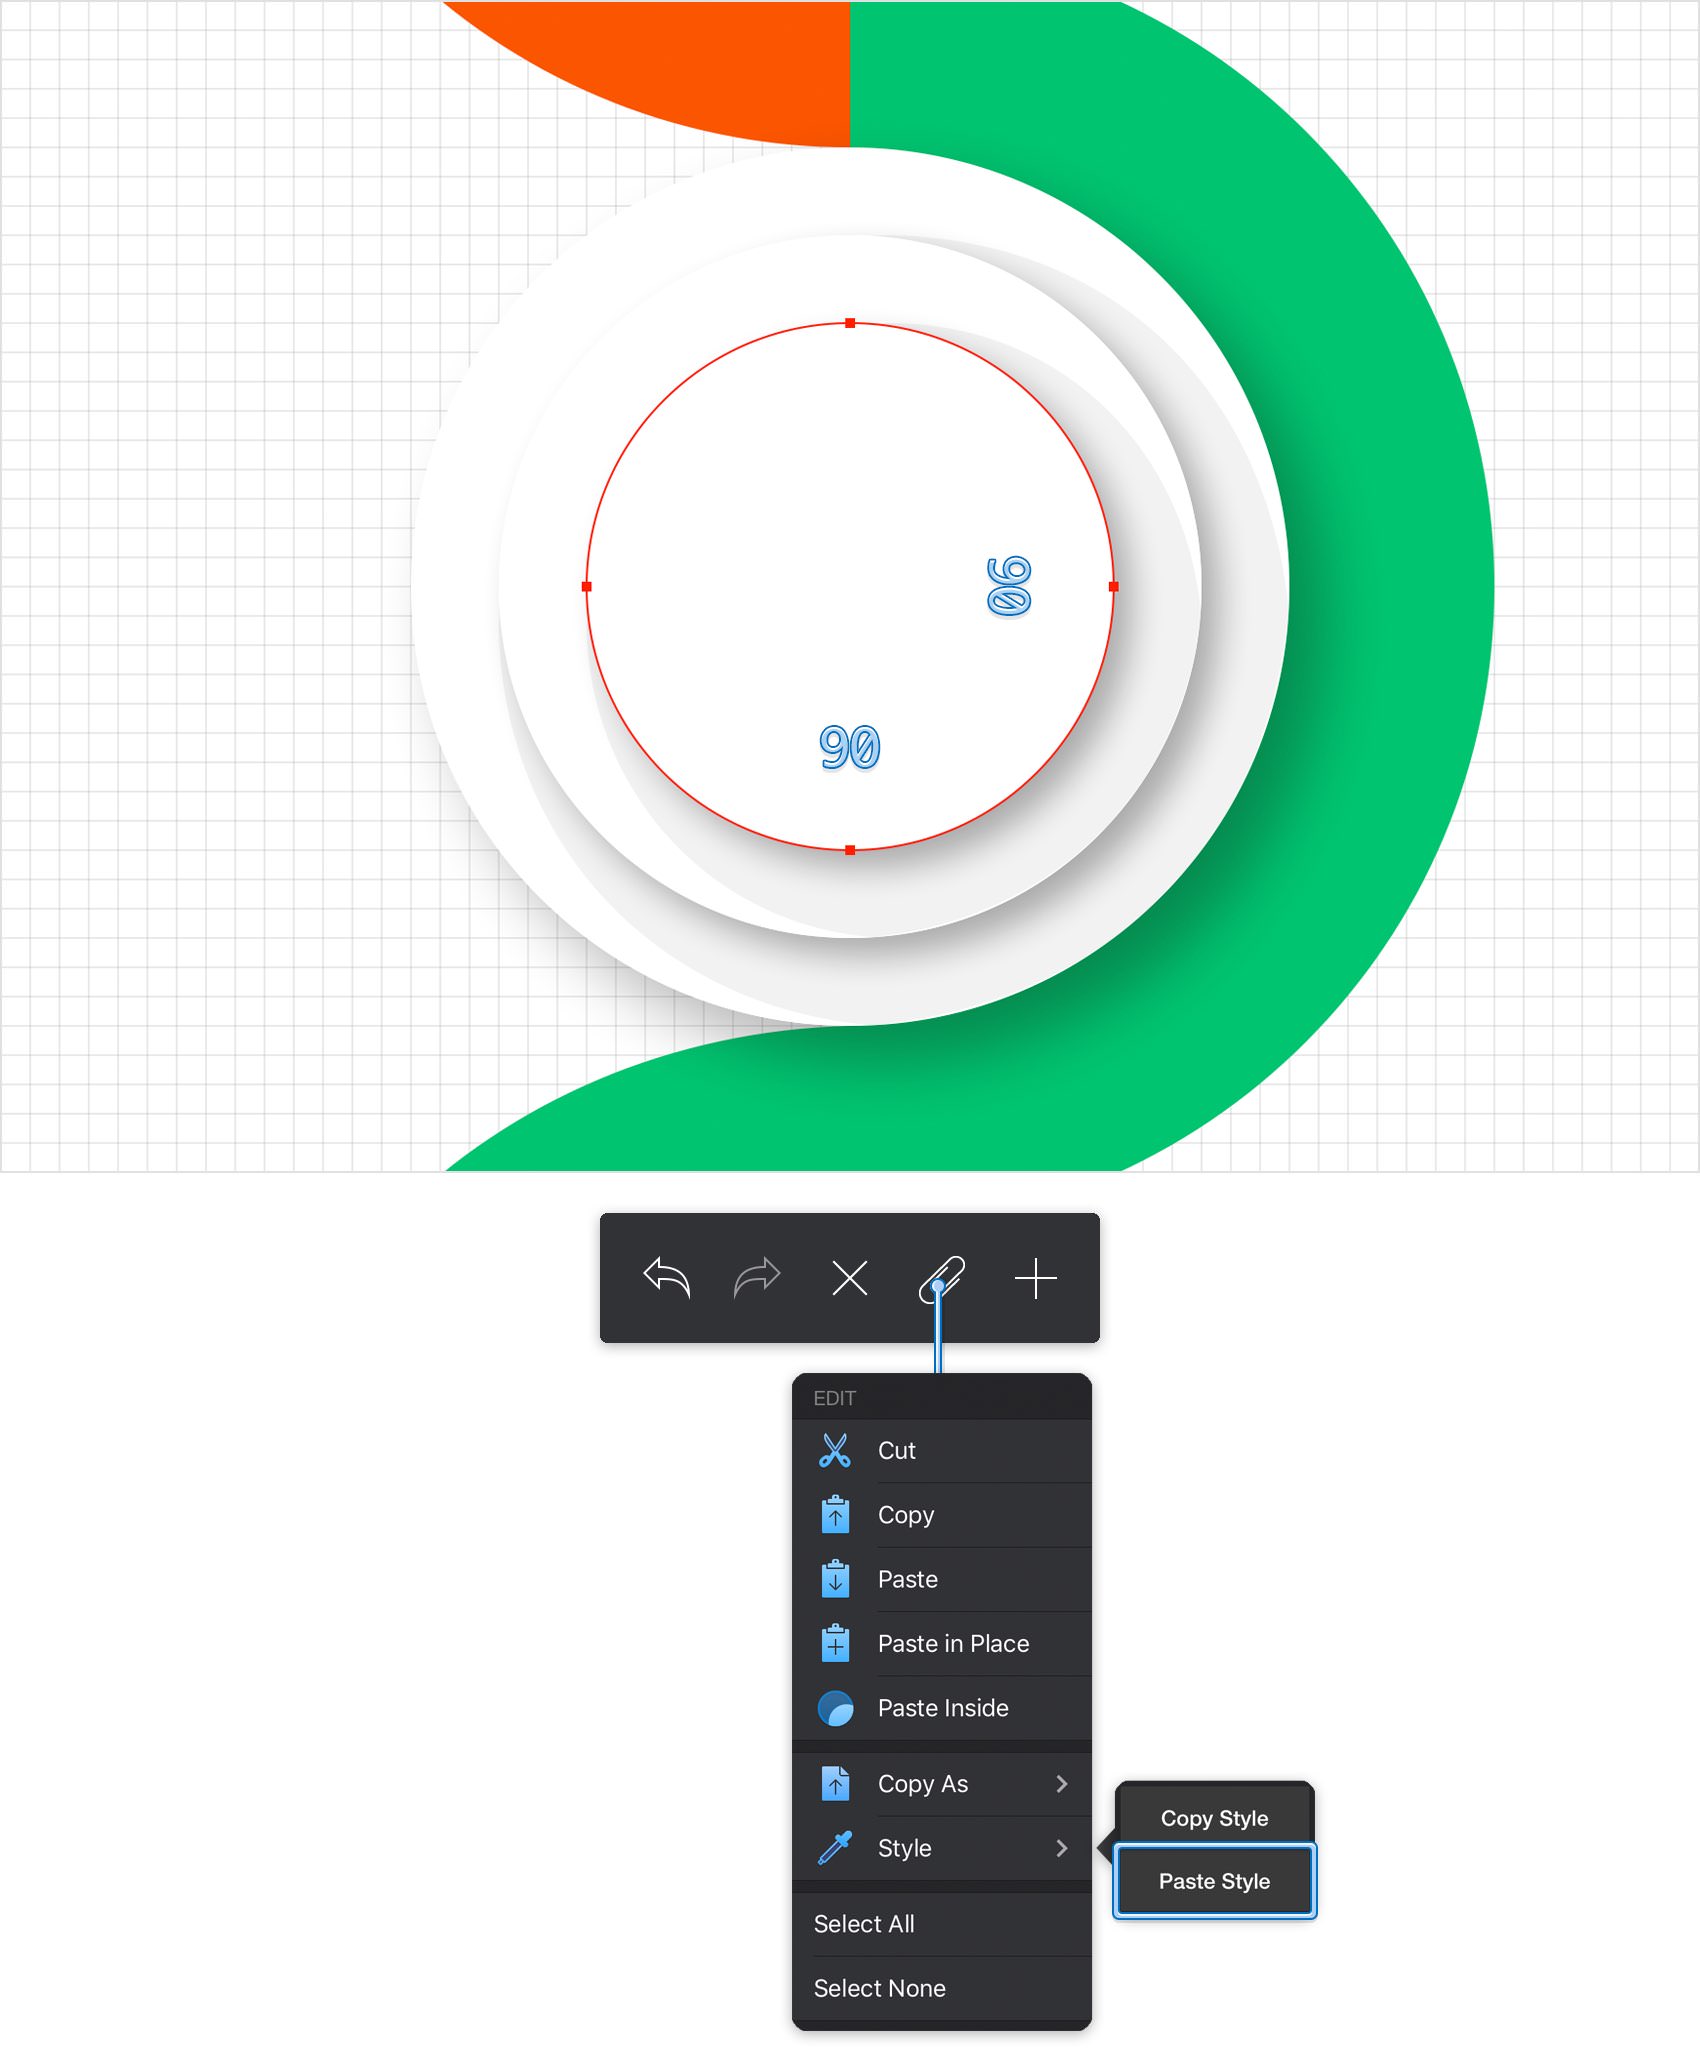
Pick the Ellipse Tool and create a 90 px circle. Place this new shape as shown in the following image and then tap the Paste Style command from that Edit pane.
Step 17
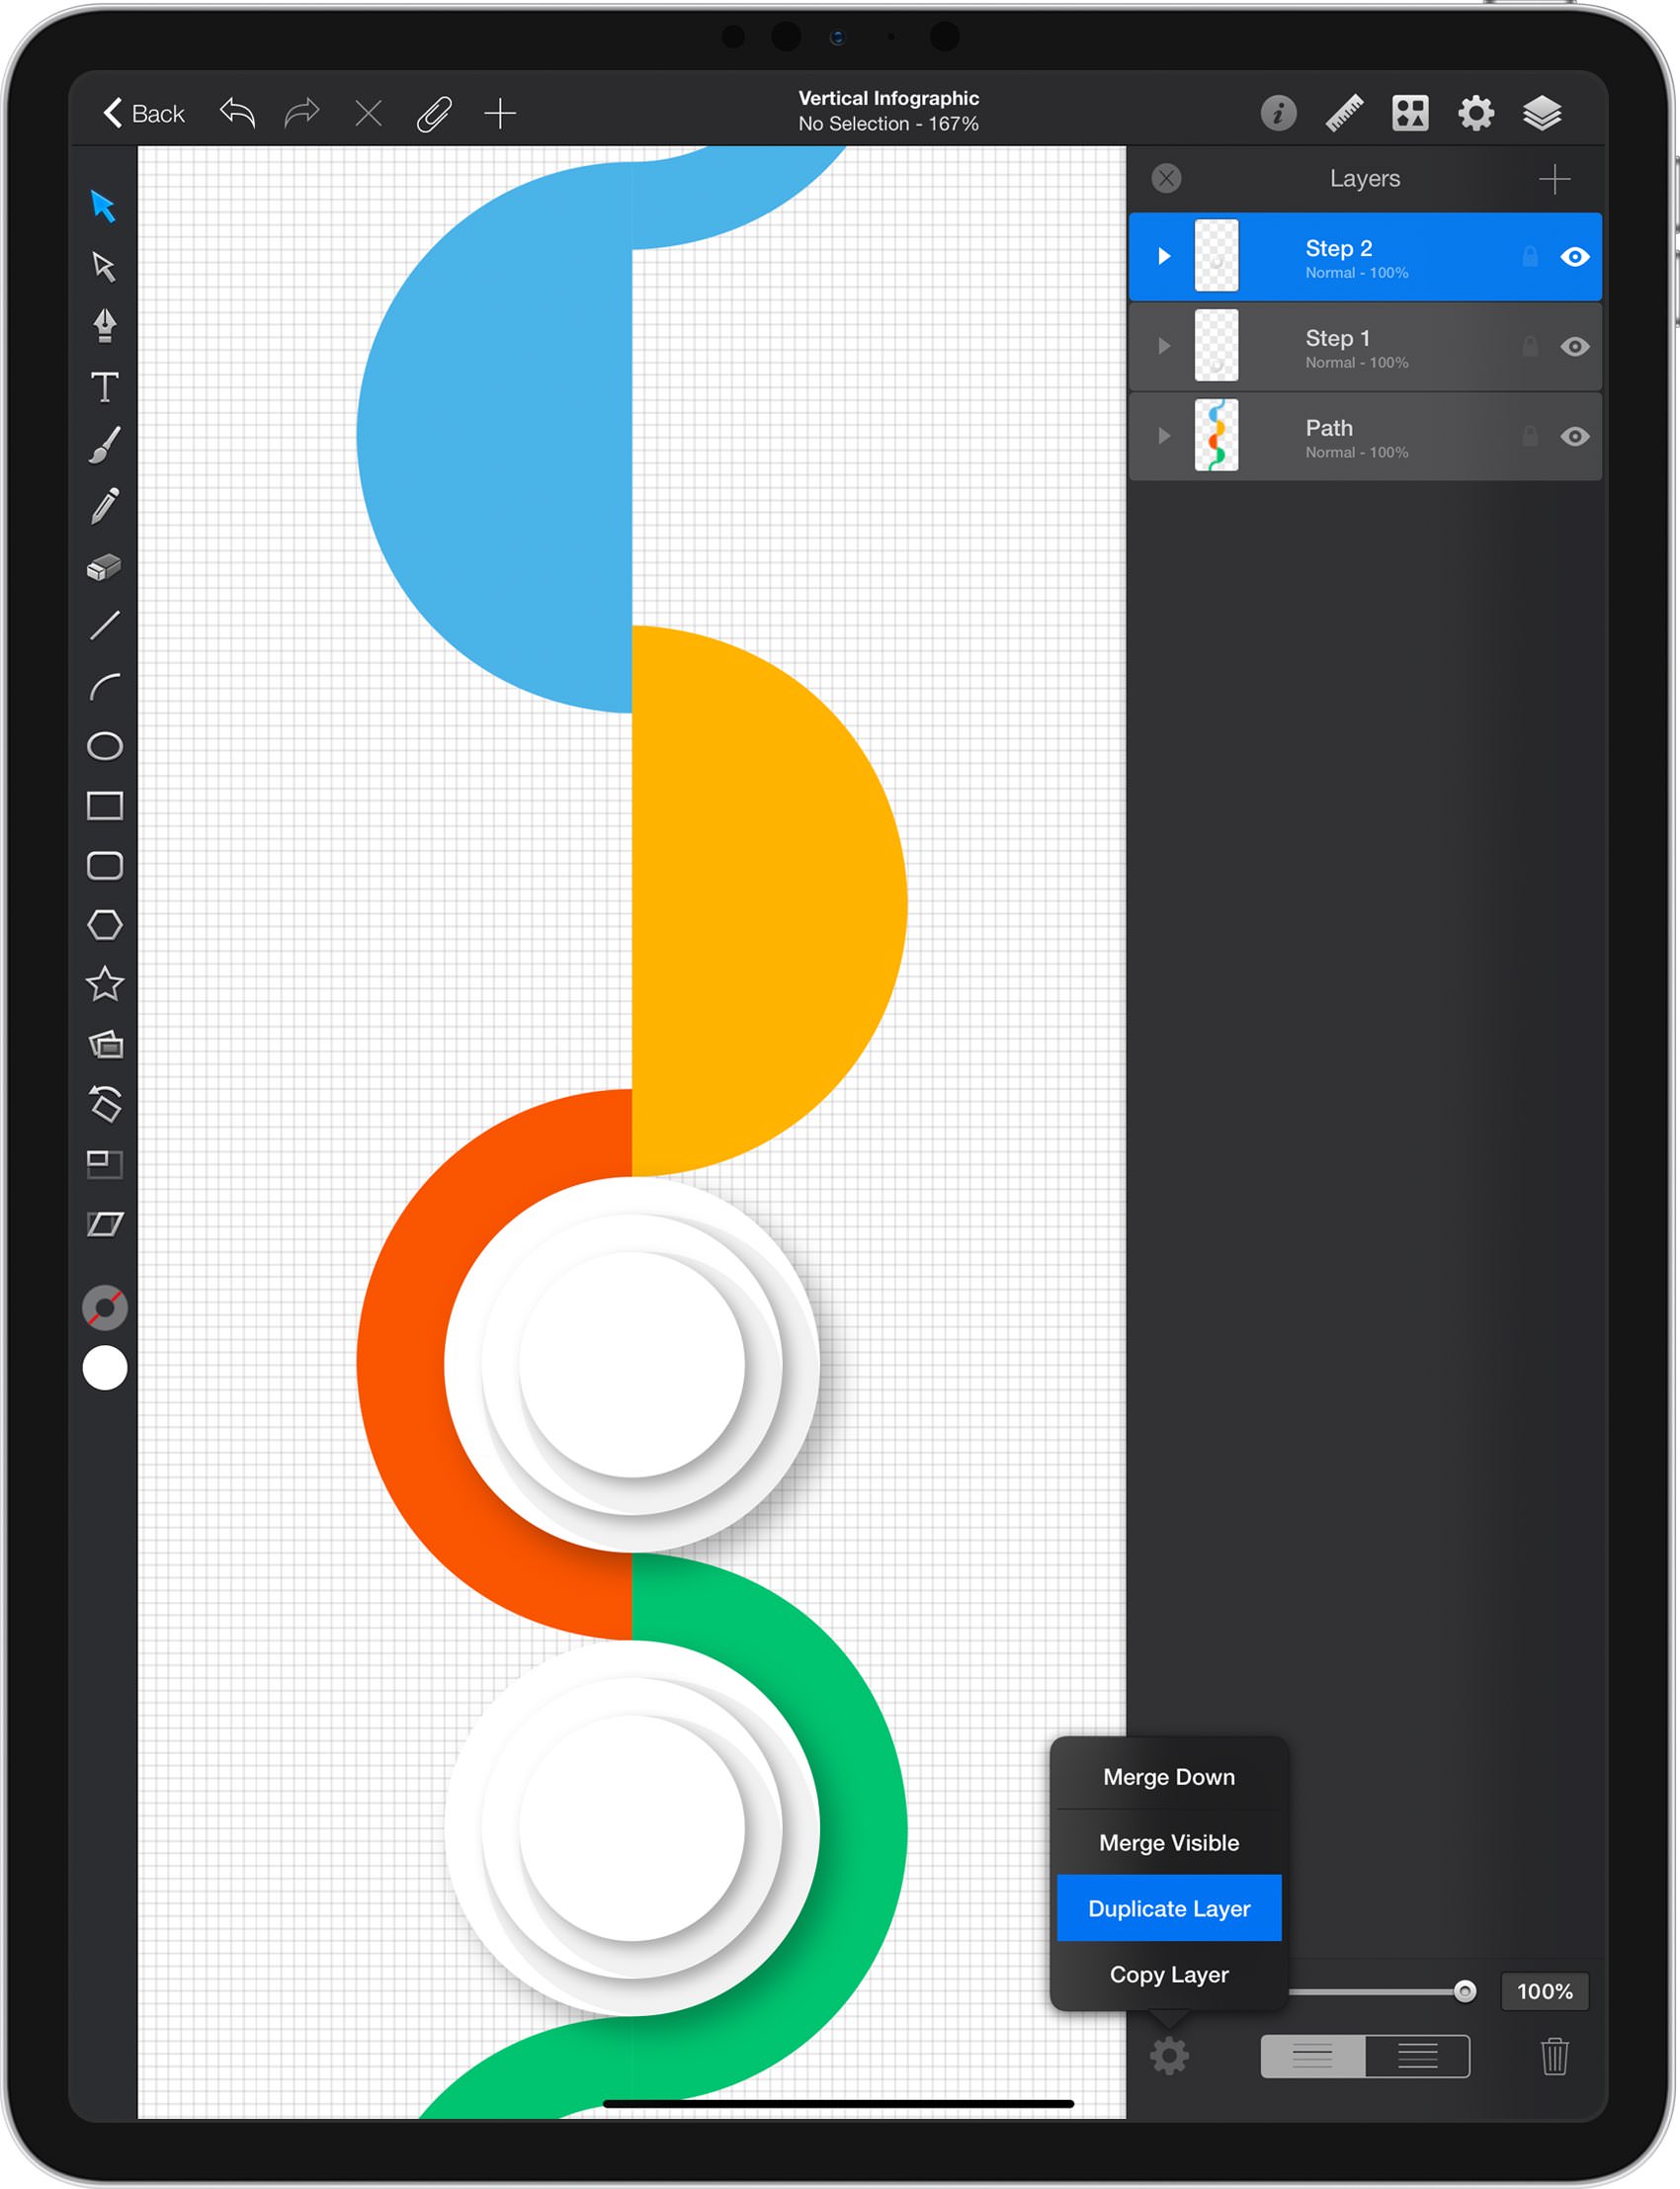
Focus on the Layers panel and make sure that your "Step 1" layer is still selected. Tap the settings icon from the bottom of the panel and go to Duplicate Layer.Rename that layer copy "Step 2" and make sure that it stays selected.
Using the Move Tool, select all the shapes from your active layer and move them up, as shown in the second image.
Step 18
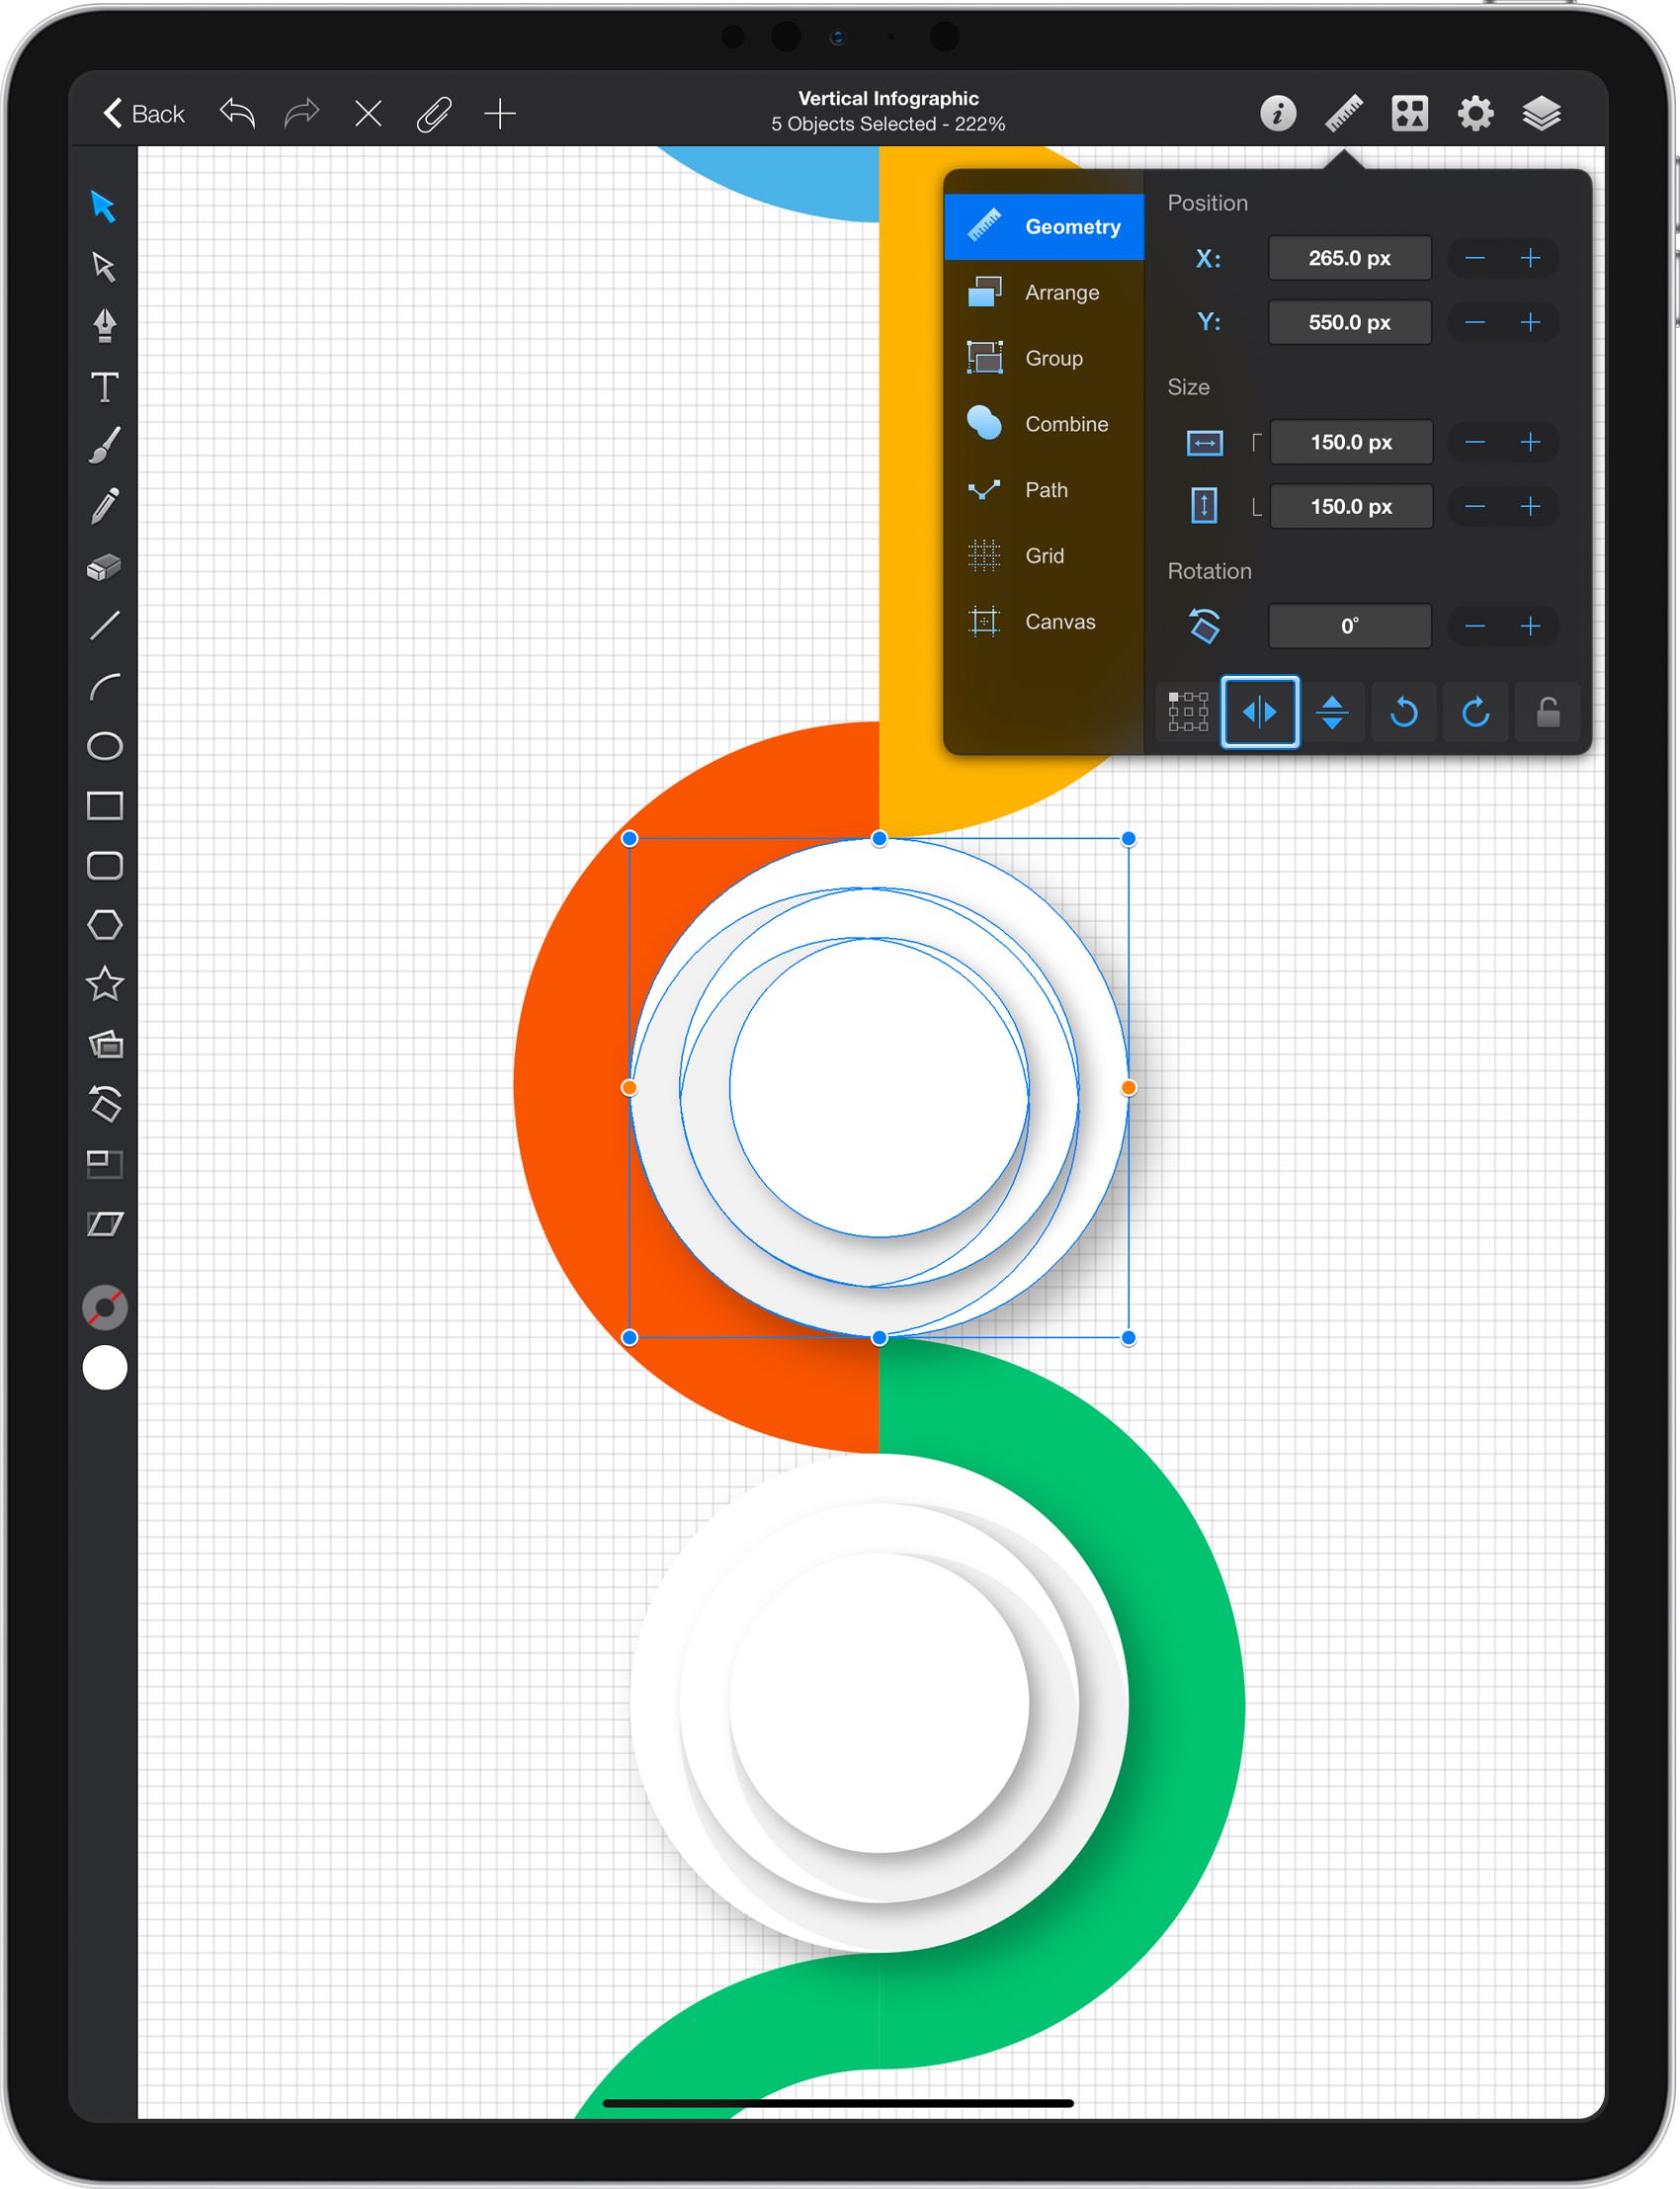
Make sure that the shapes from your activate layer are still selected. Focus on the right side of your Titlebar, tap that ruler icon to open the Geometry pane and tap the Flip Horizontal button.
Step 19
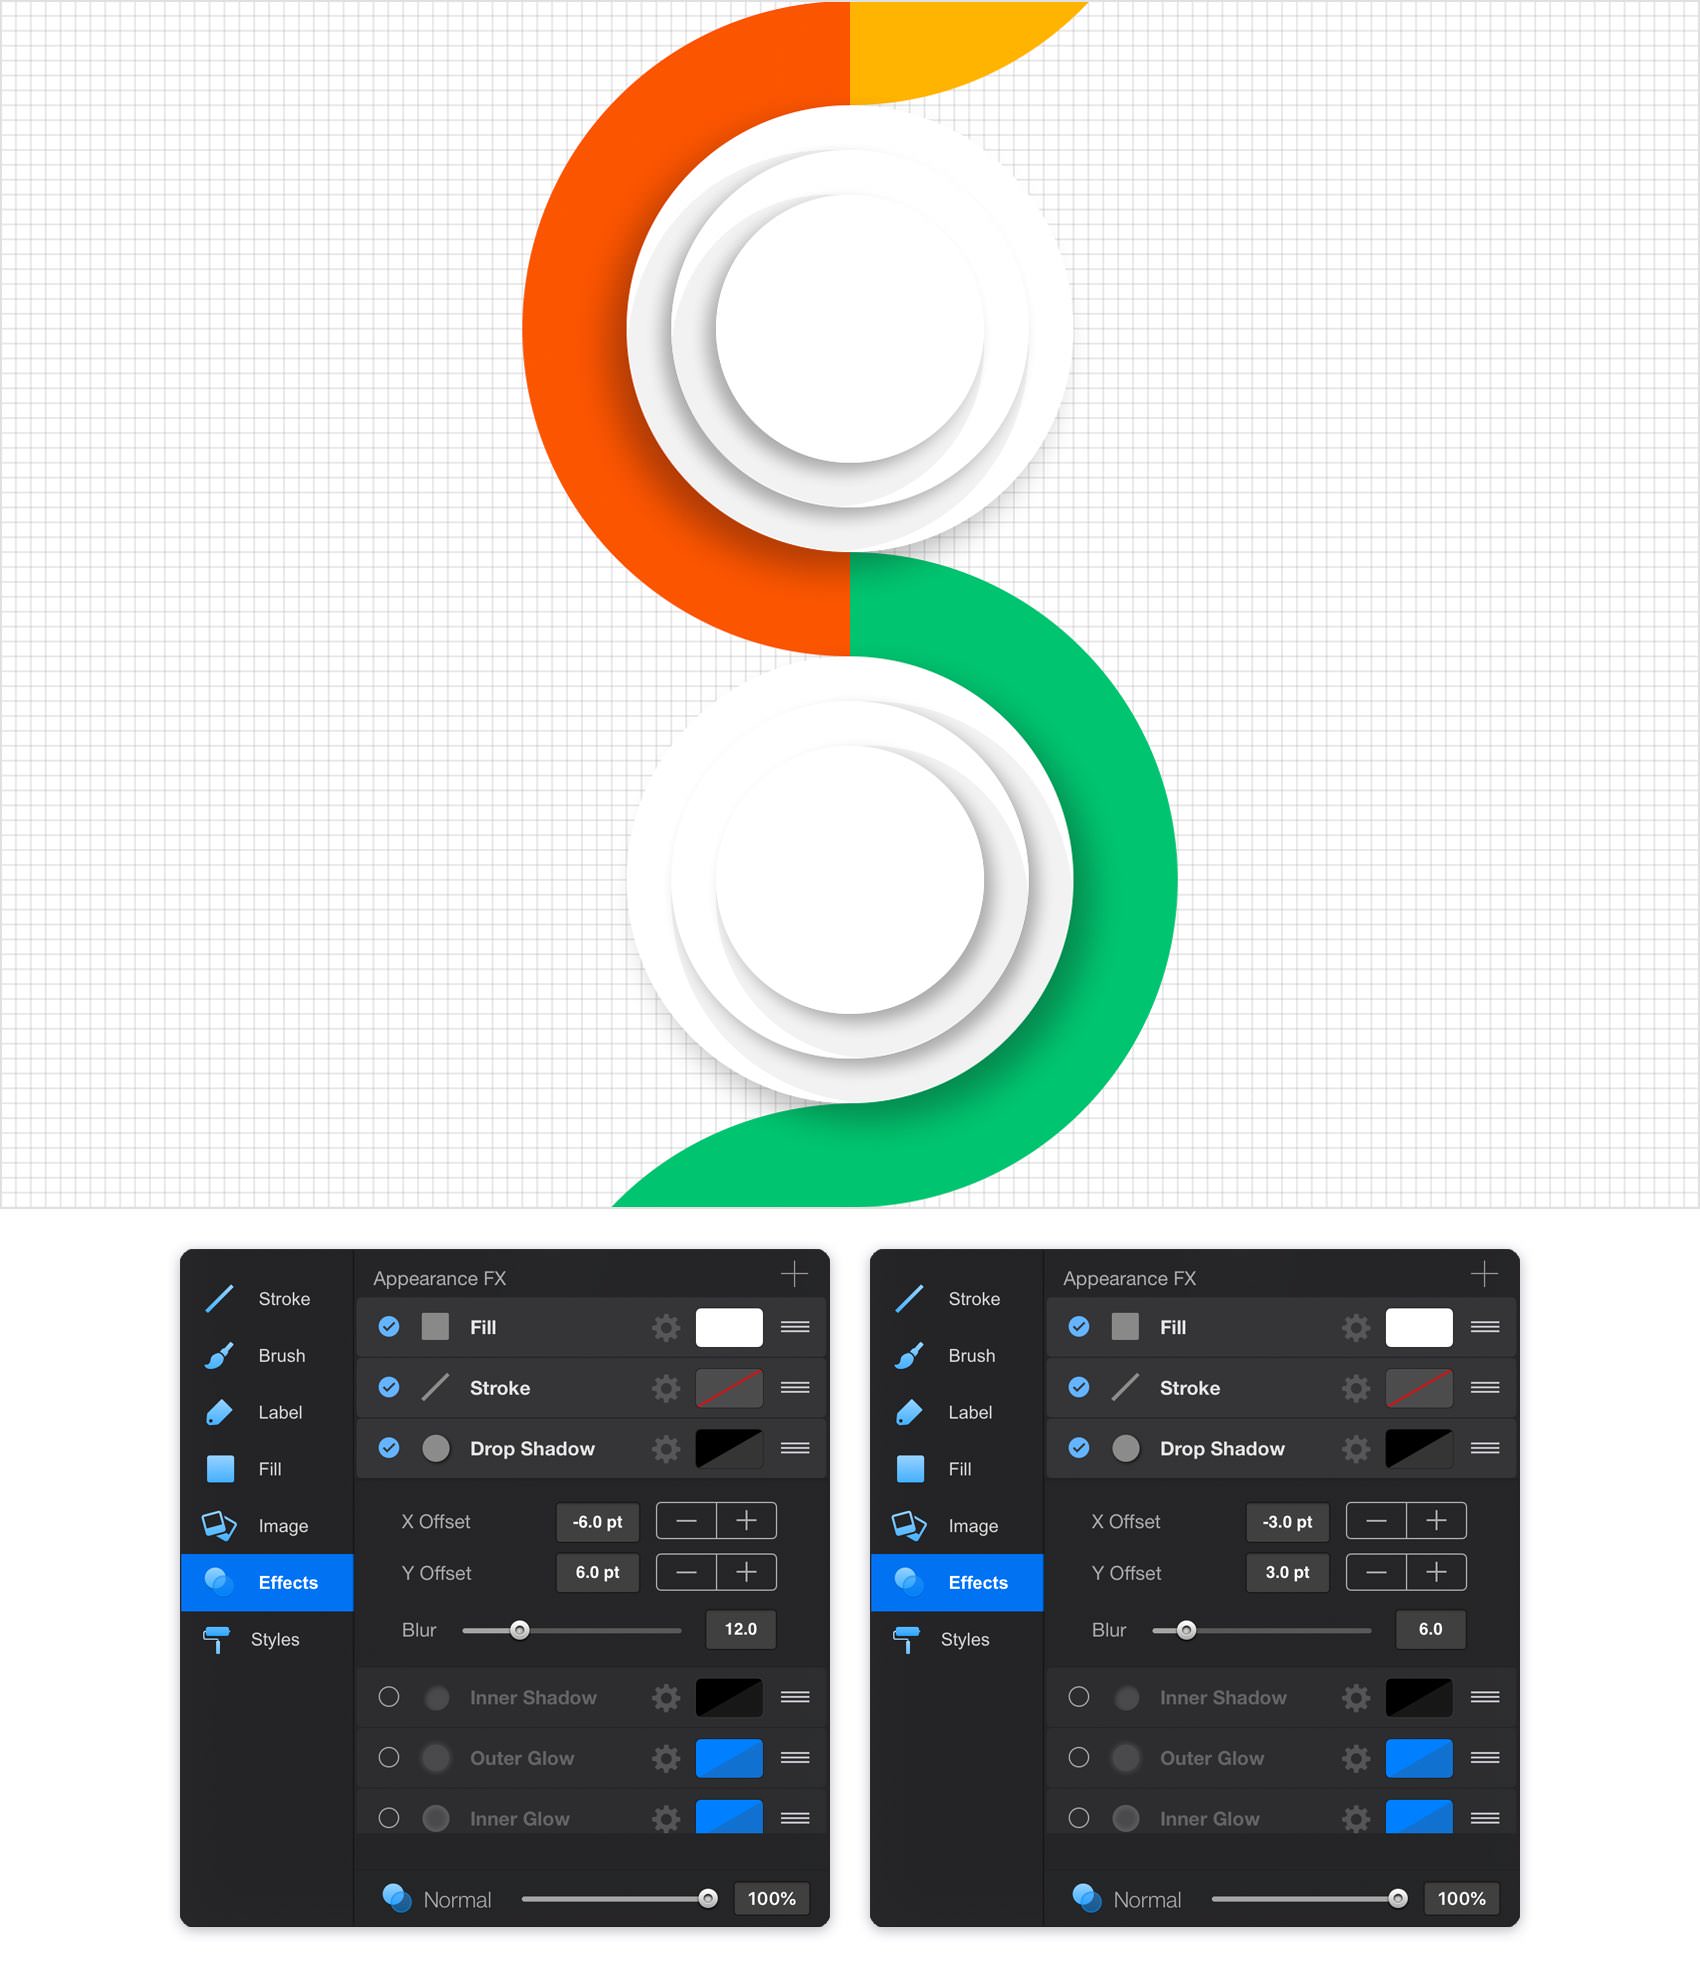
Keep focusing on the shapes from your active layer. Select the largest, white circle and open the Effects pane. Select the Drop Shadow effect and inverse the X value, from 6 pt to -6 pt.
Select the other two white circles and return to the Effects pane. Again, focus on the Drop Shadow effect and inverse that same X value. In the end, things should look like in the following image.
Step 20
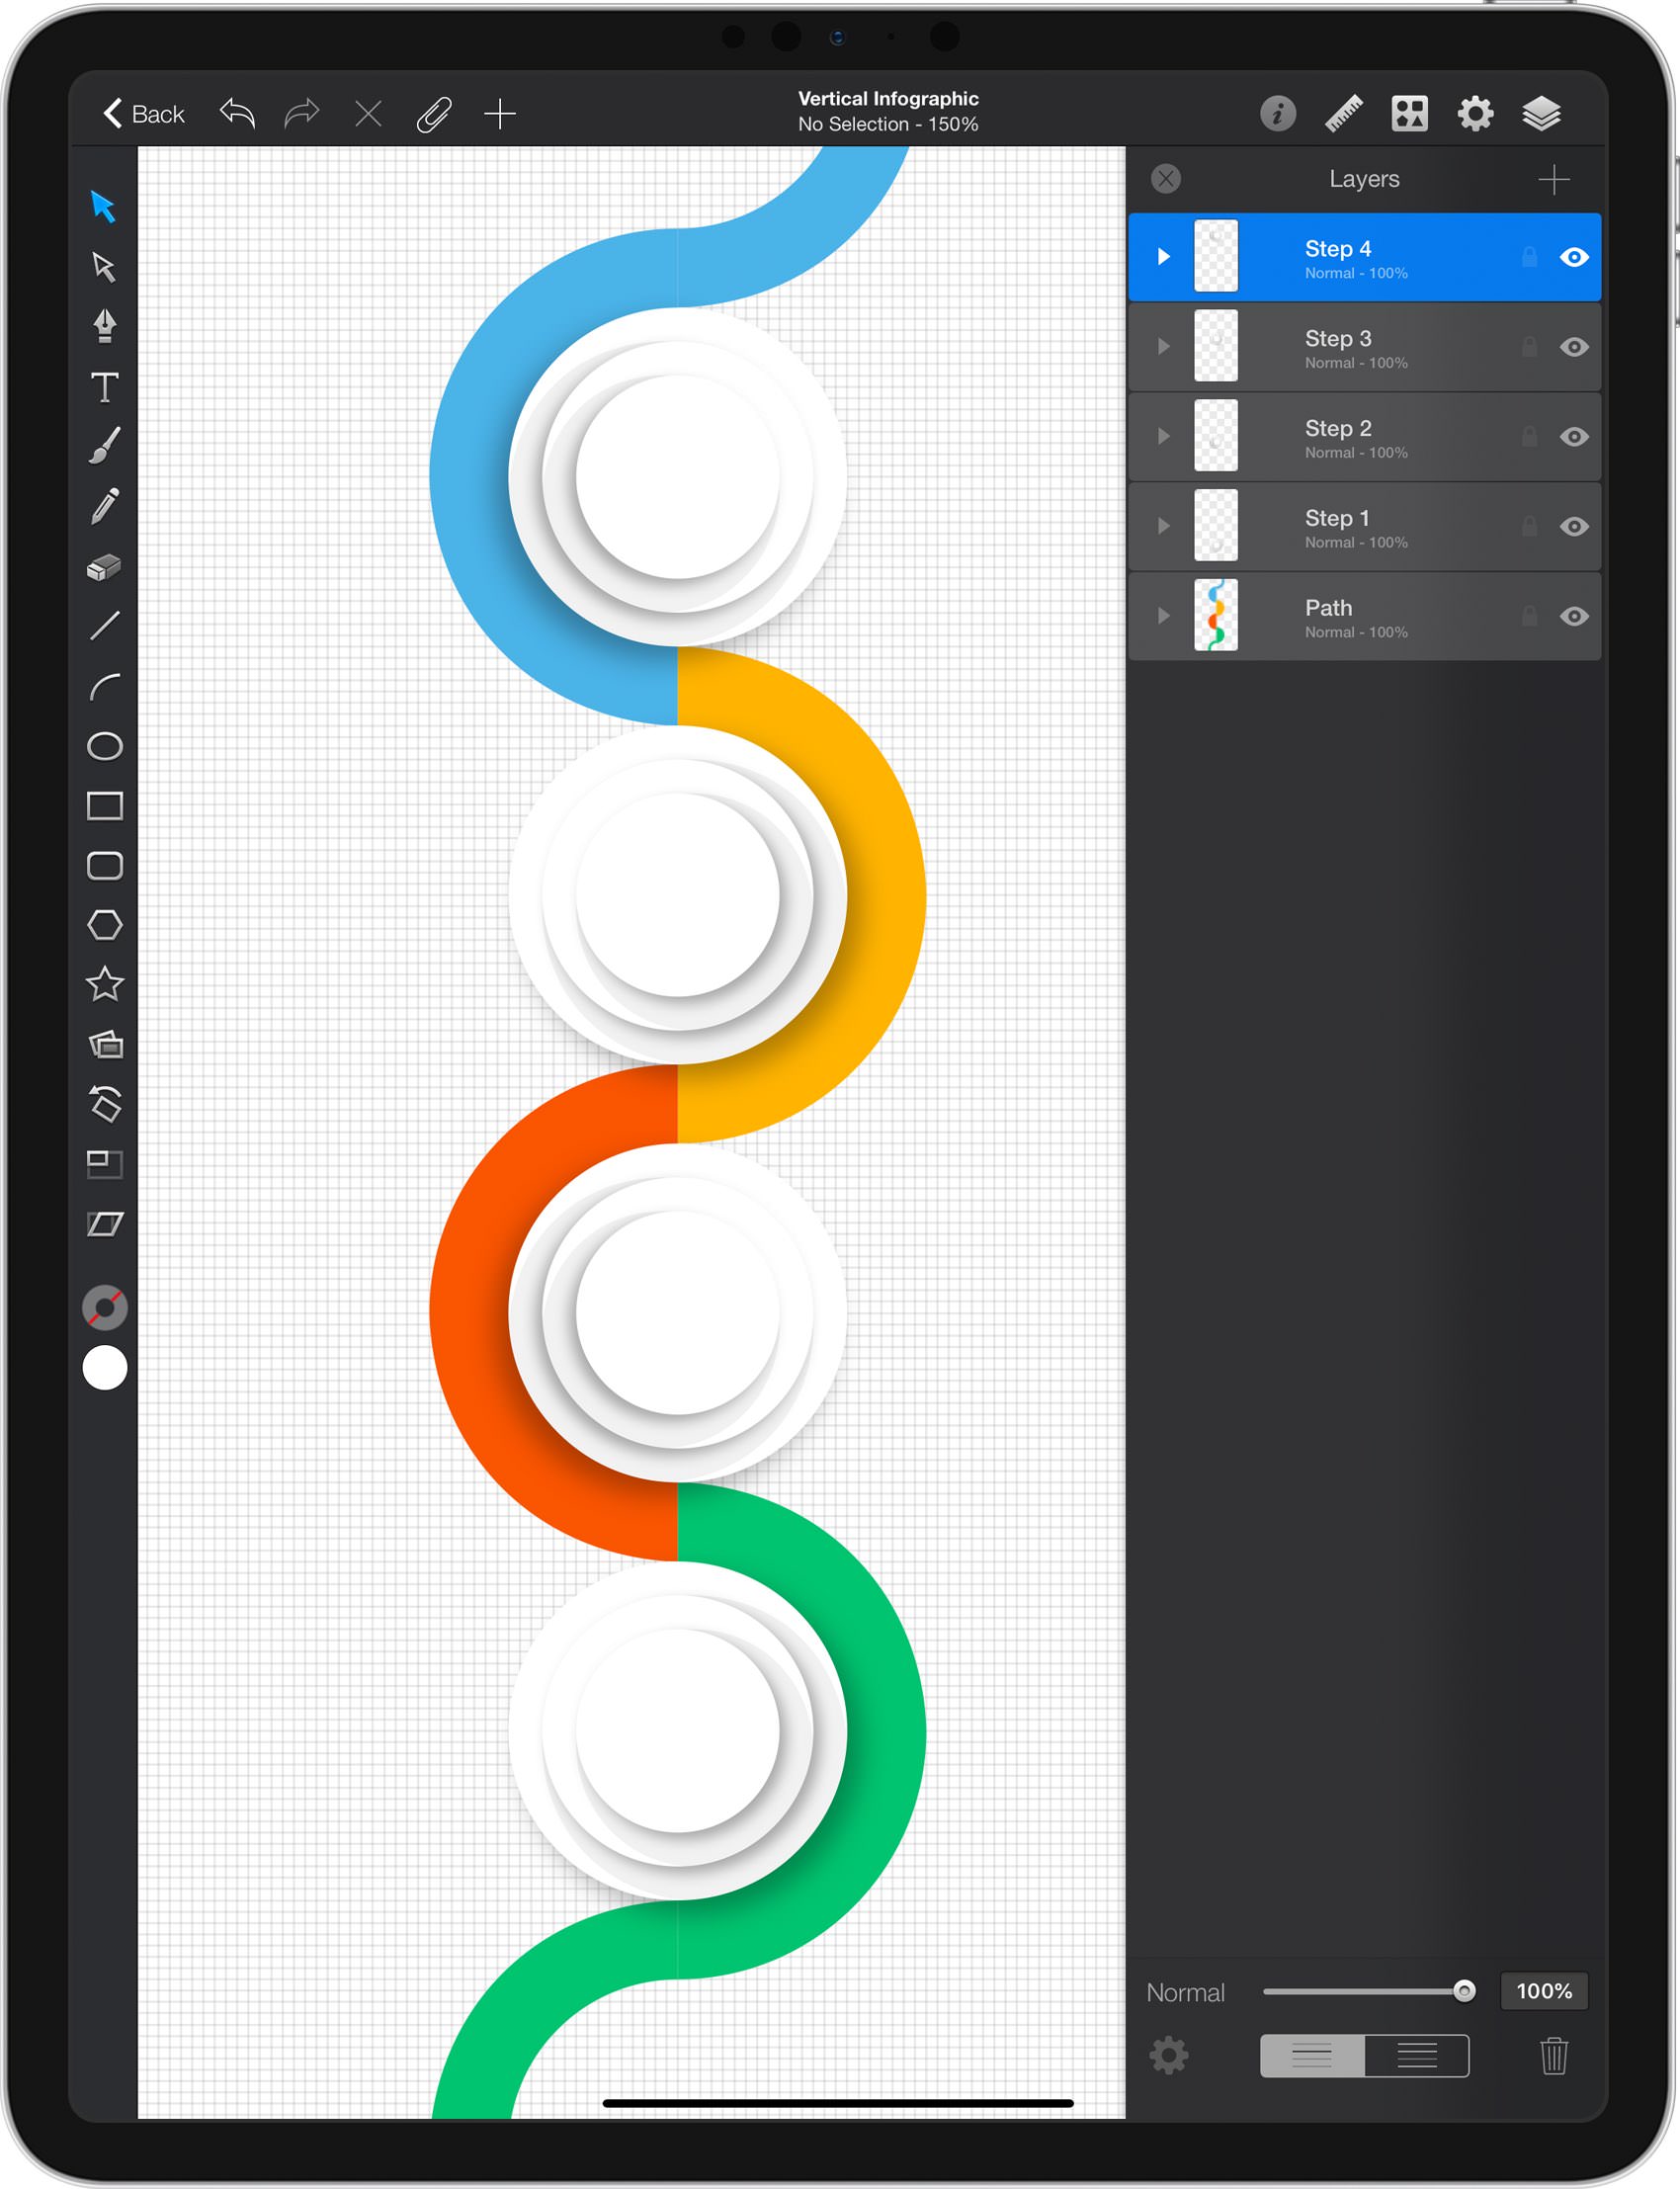
Focus on the Layers panel and duplicate the "Step 1" and "Step 2" layers.
Select the copy of "Step 1" layer and rename it "Step 3". Select all the shapes that lie inside this layer and drag them above that yellow half circle, as shown in the second image.
Select the copy of "Step 2" layer and rename it "Step 4". Select all the shapes that lie inside this layer and drag them above that blue half circle, as shown in the second image.
Step 21
Keep focusing on the Layers panel and add a new layer. Drag it to the top of the panel, rename it "Black" and make sure that it stays selected.
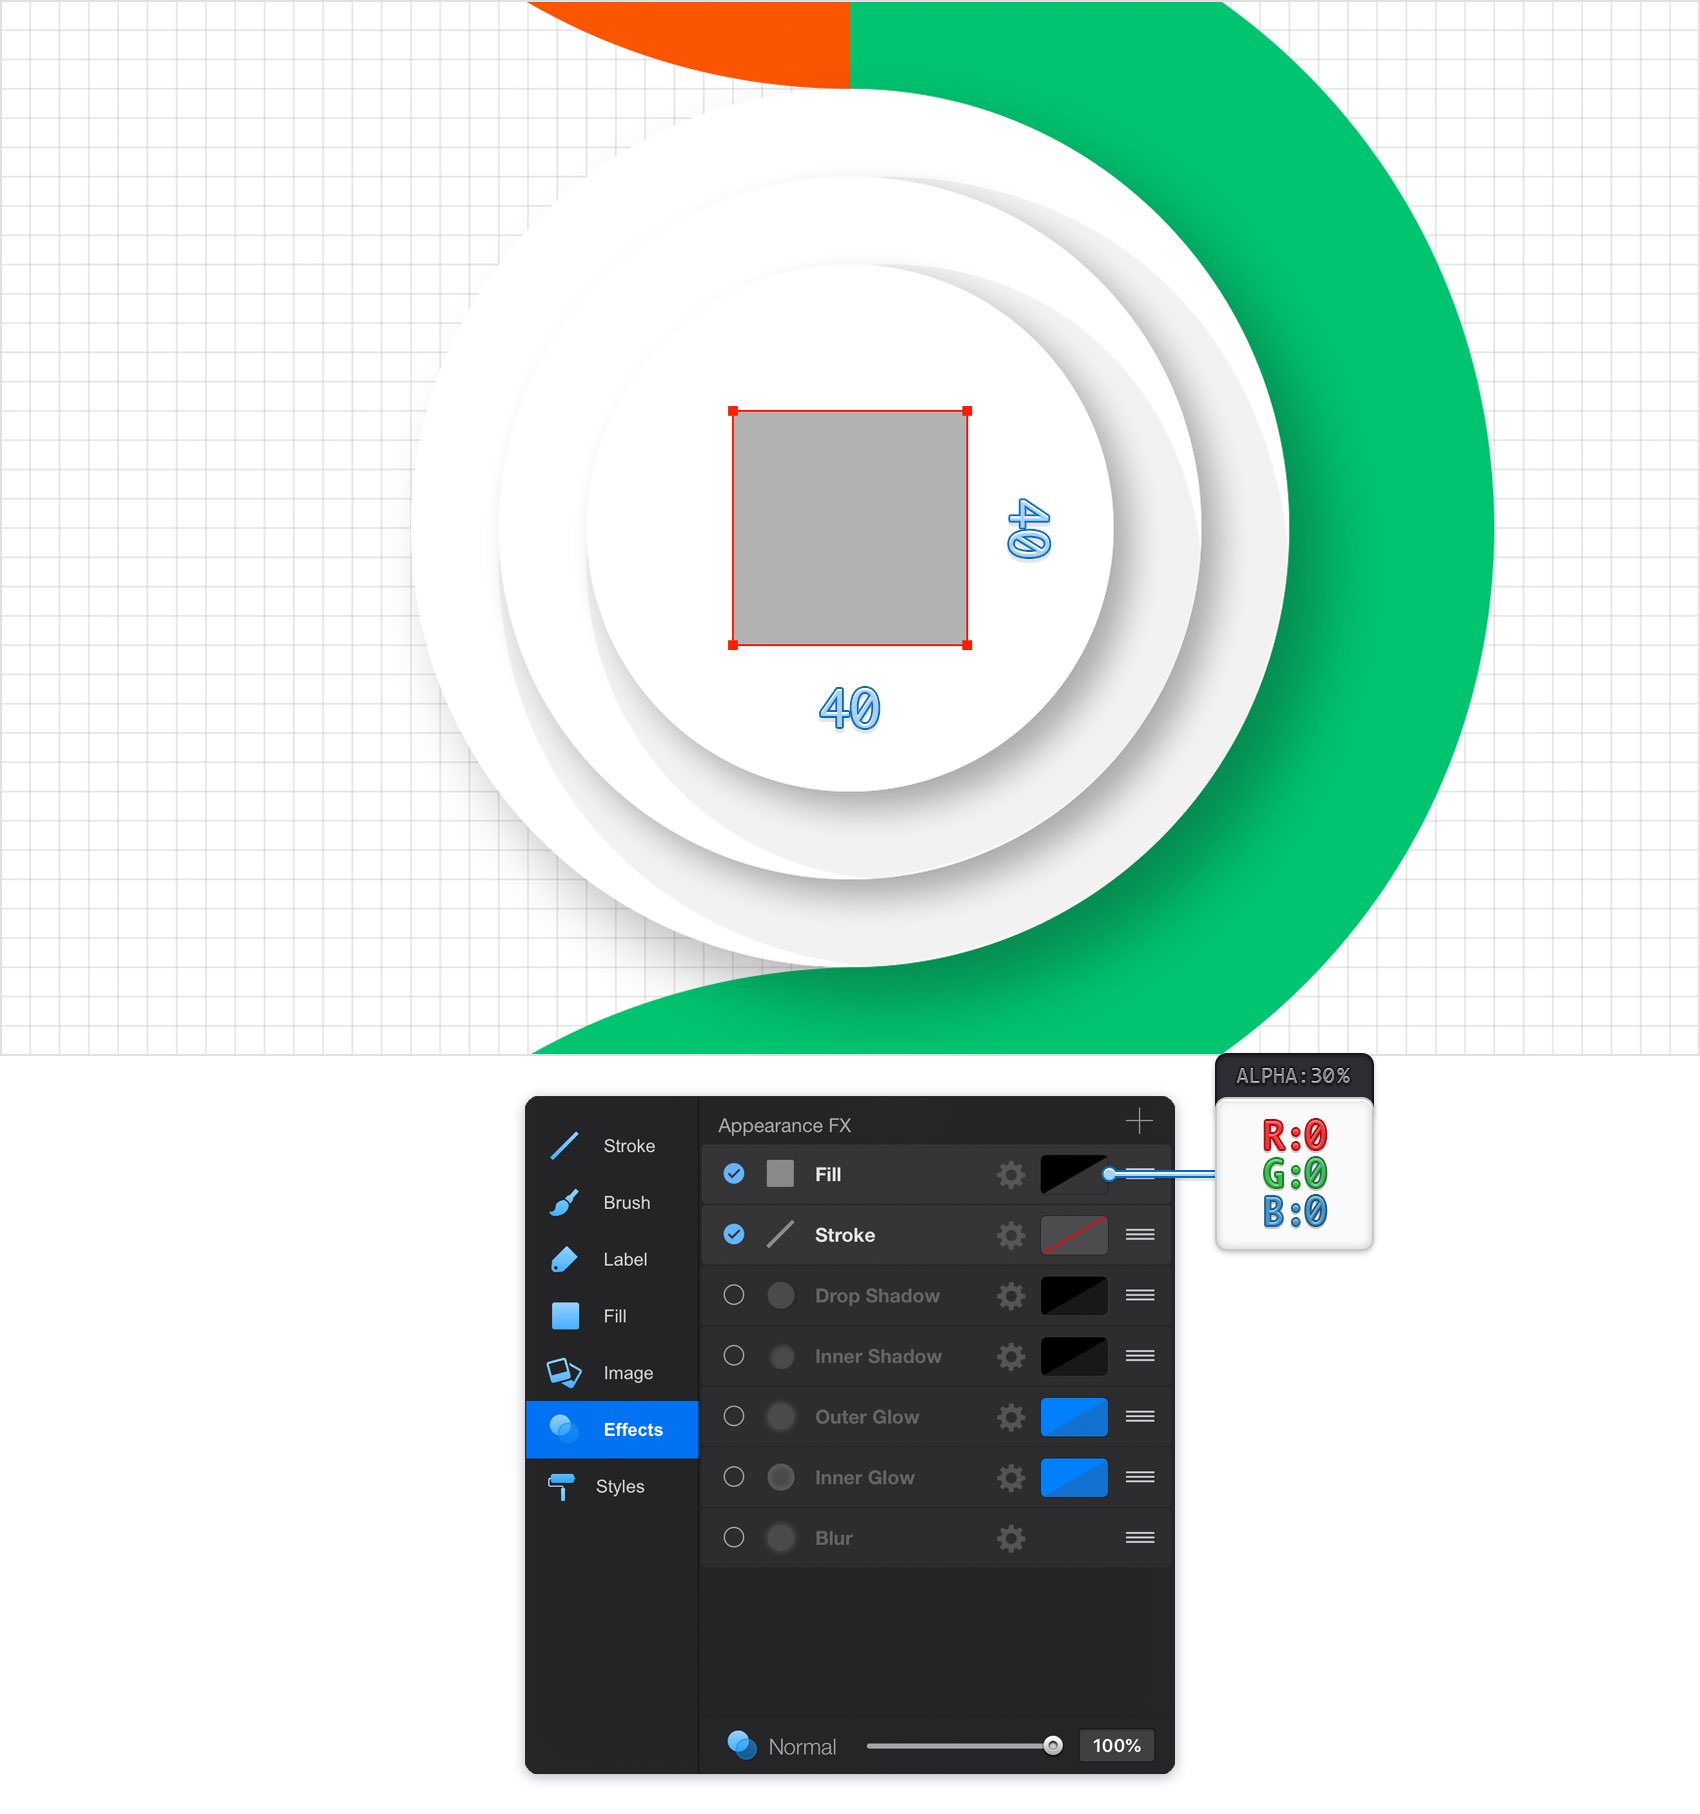
Pick the Rectangle Tool, create a 40 px square and place it as shown in the following image. Make sure that this shape stays selected and focus on the Effects pane. Tap the Fill color well, set the color to black and drag that Alpha slider to 30%.
Step 22
Add three copies of your black square using the Copy and Paste buttons from the Edit pane and place them as shown in the following image. These four shapes won't be part of your final design. You're only going to use them as a simple guide.

Step 23
Go to the Layers panel and add a new layer. Drag it to the top of the panel, rename it "Icons" and make sure that it stays selected.
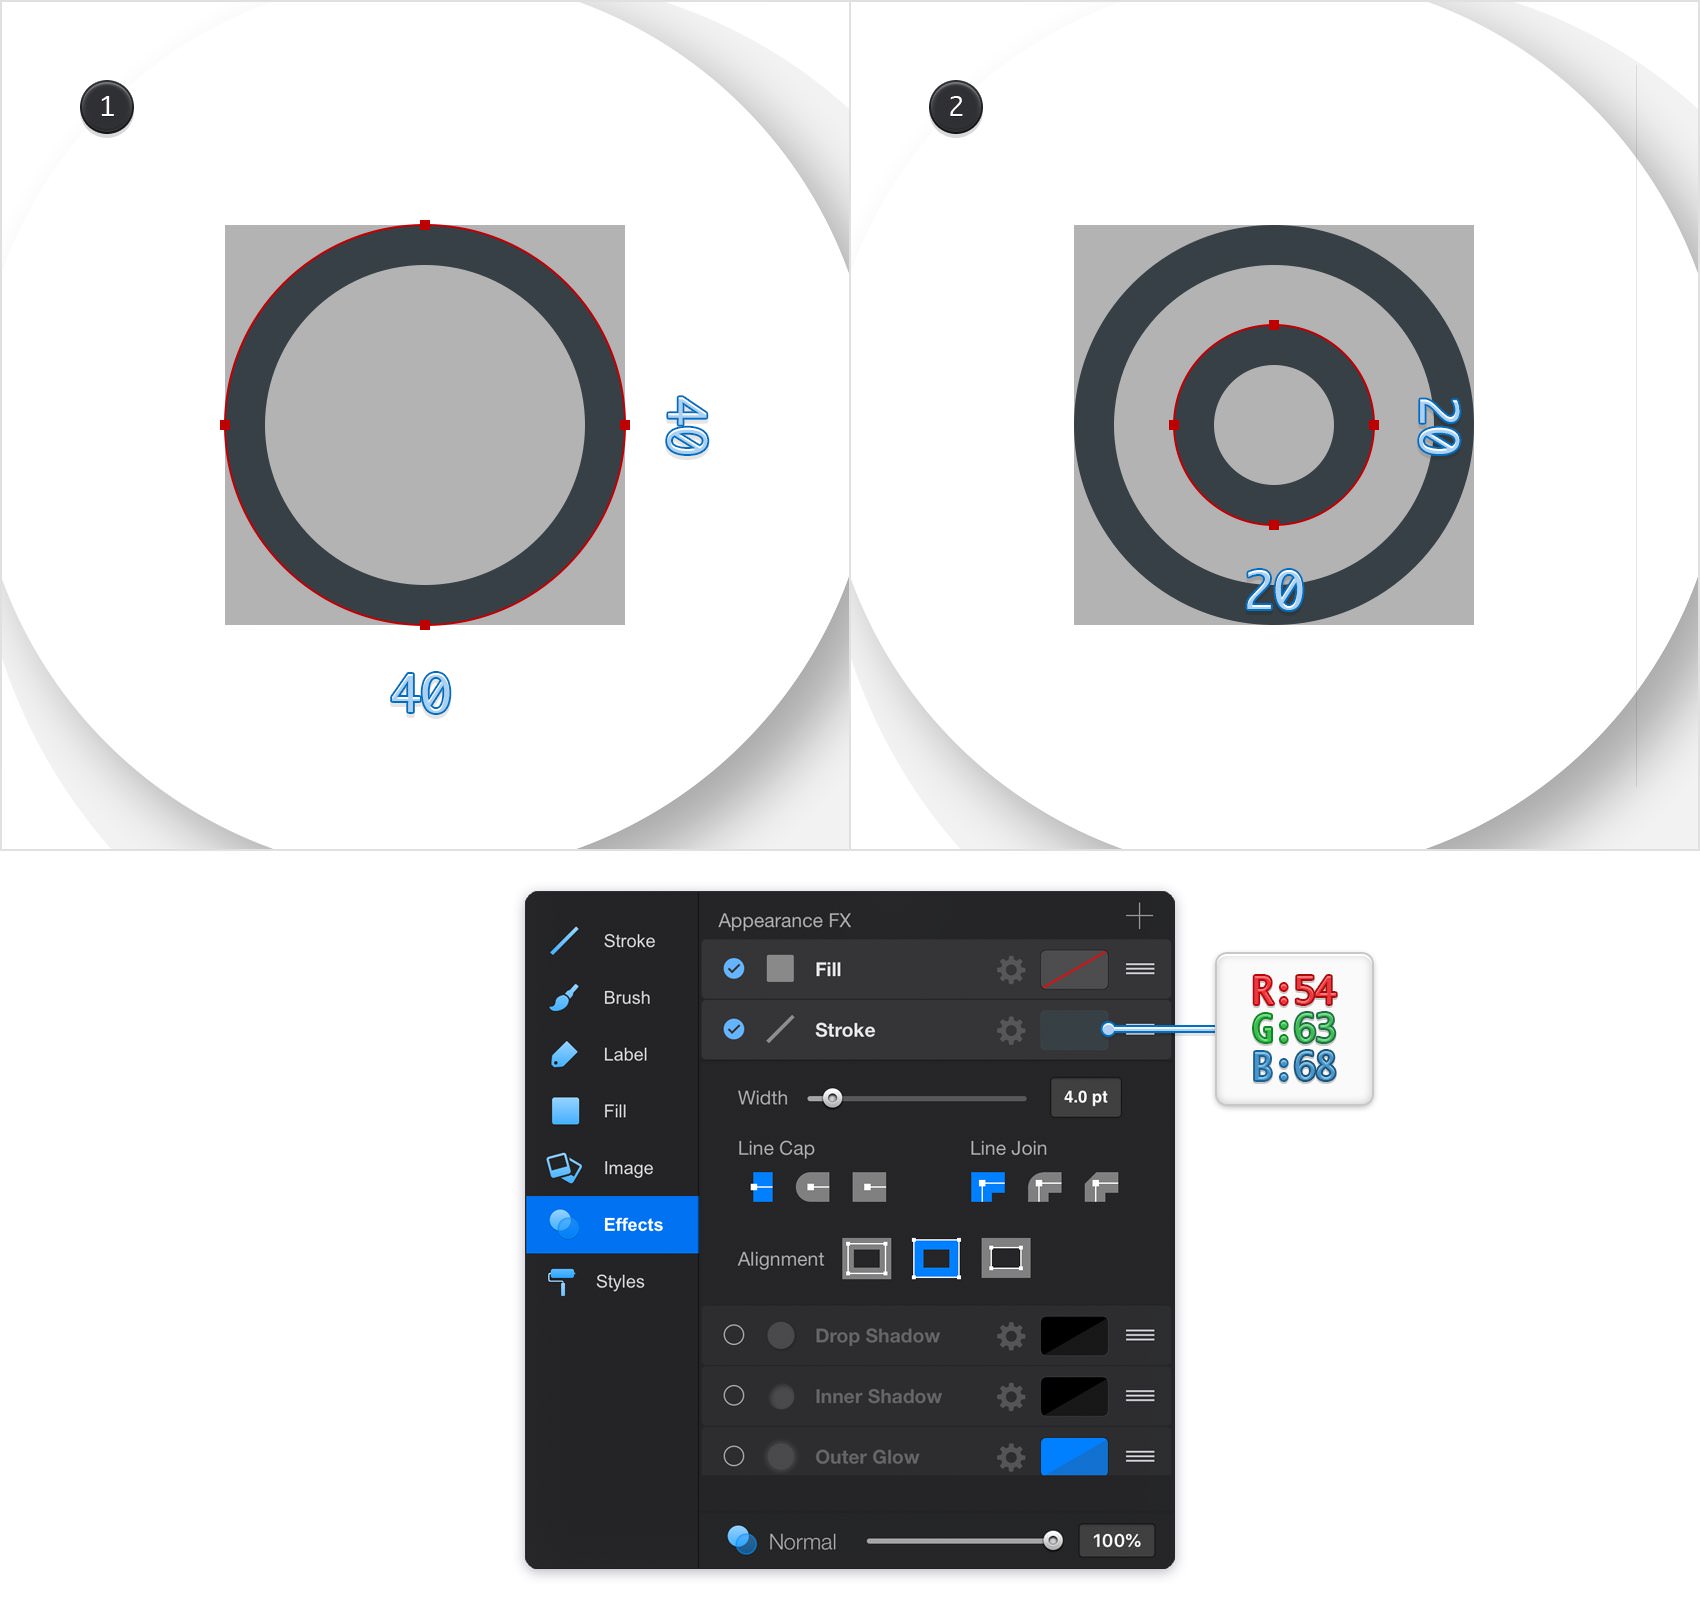
Focus on your bottom, black square. Pick the Ellipse Tool, create a 40 px circle and place it as shown in the first image. With this new shape selected, move to the the Effects pane.
First, make sure that the Fill is invisible and then select the Stroke. Drag that Width slider to 4 pt and set the Alignment to Inside, and then tap the color well of this Stroke. Set the color to R=54 G=63 B=68 and drag the Alpha slider to 100%.
Use the same tool to create a 20 px circle. Place it as shown in the second image and apply the same Effects attributes used for the 40 px circle.
Step 24
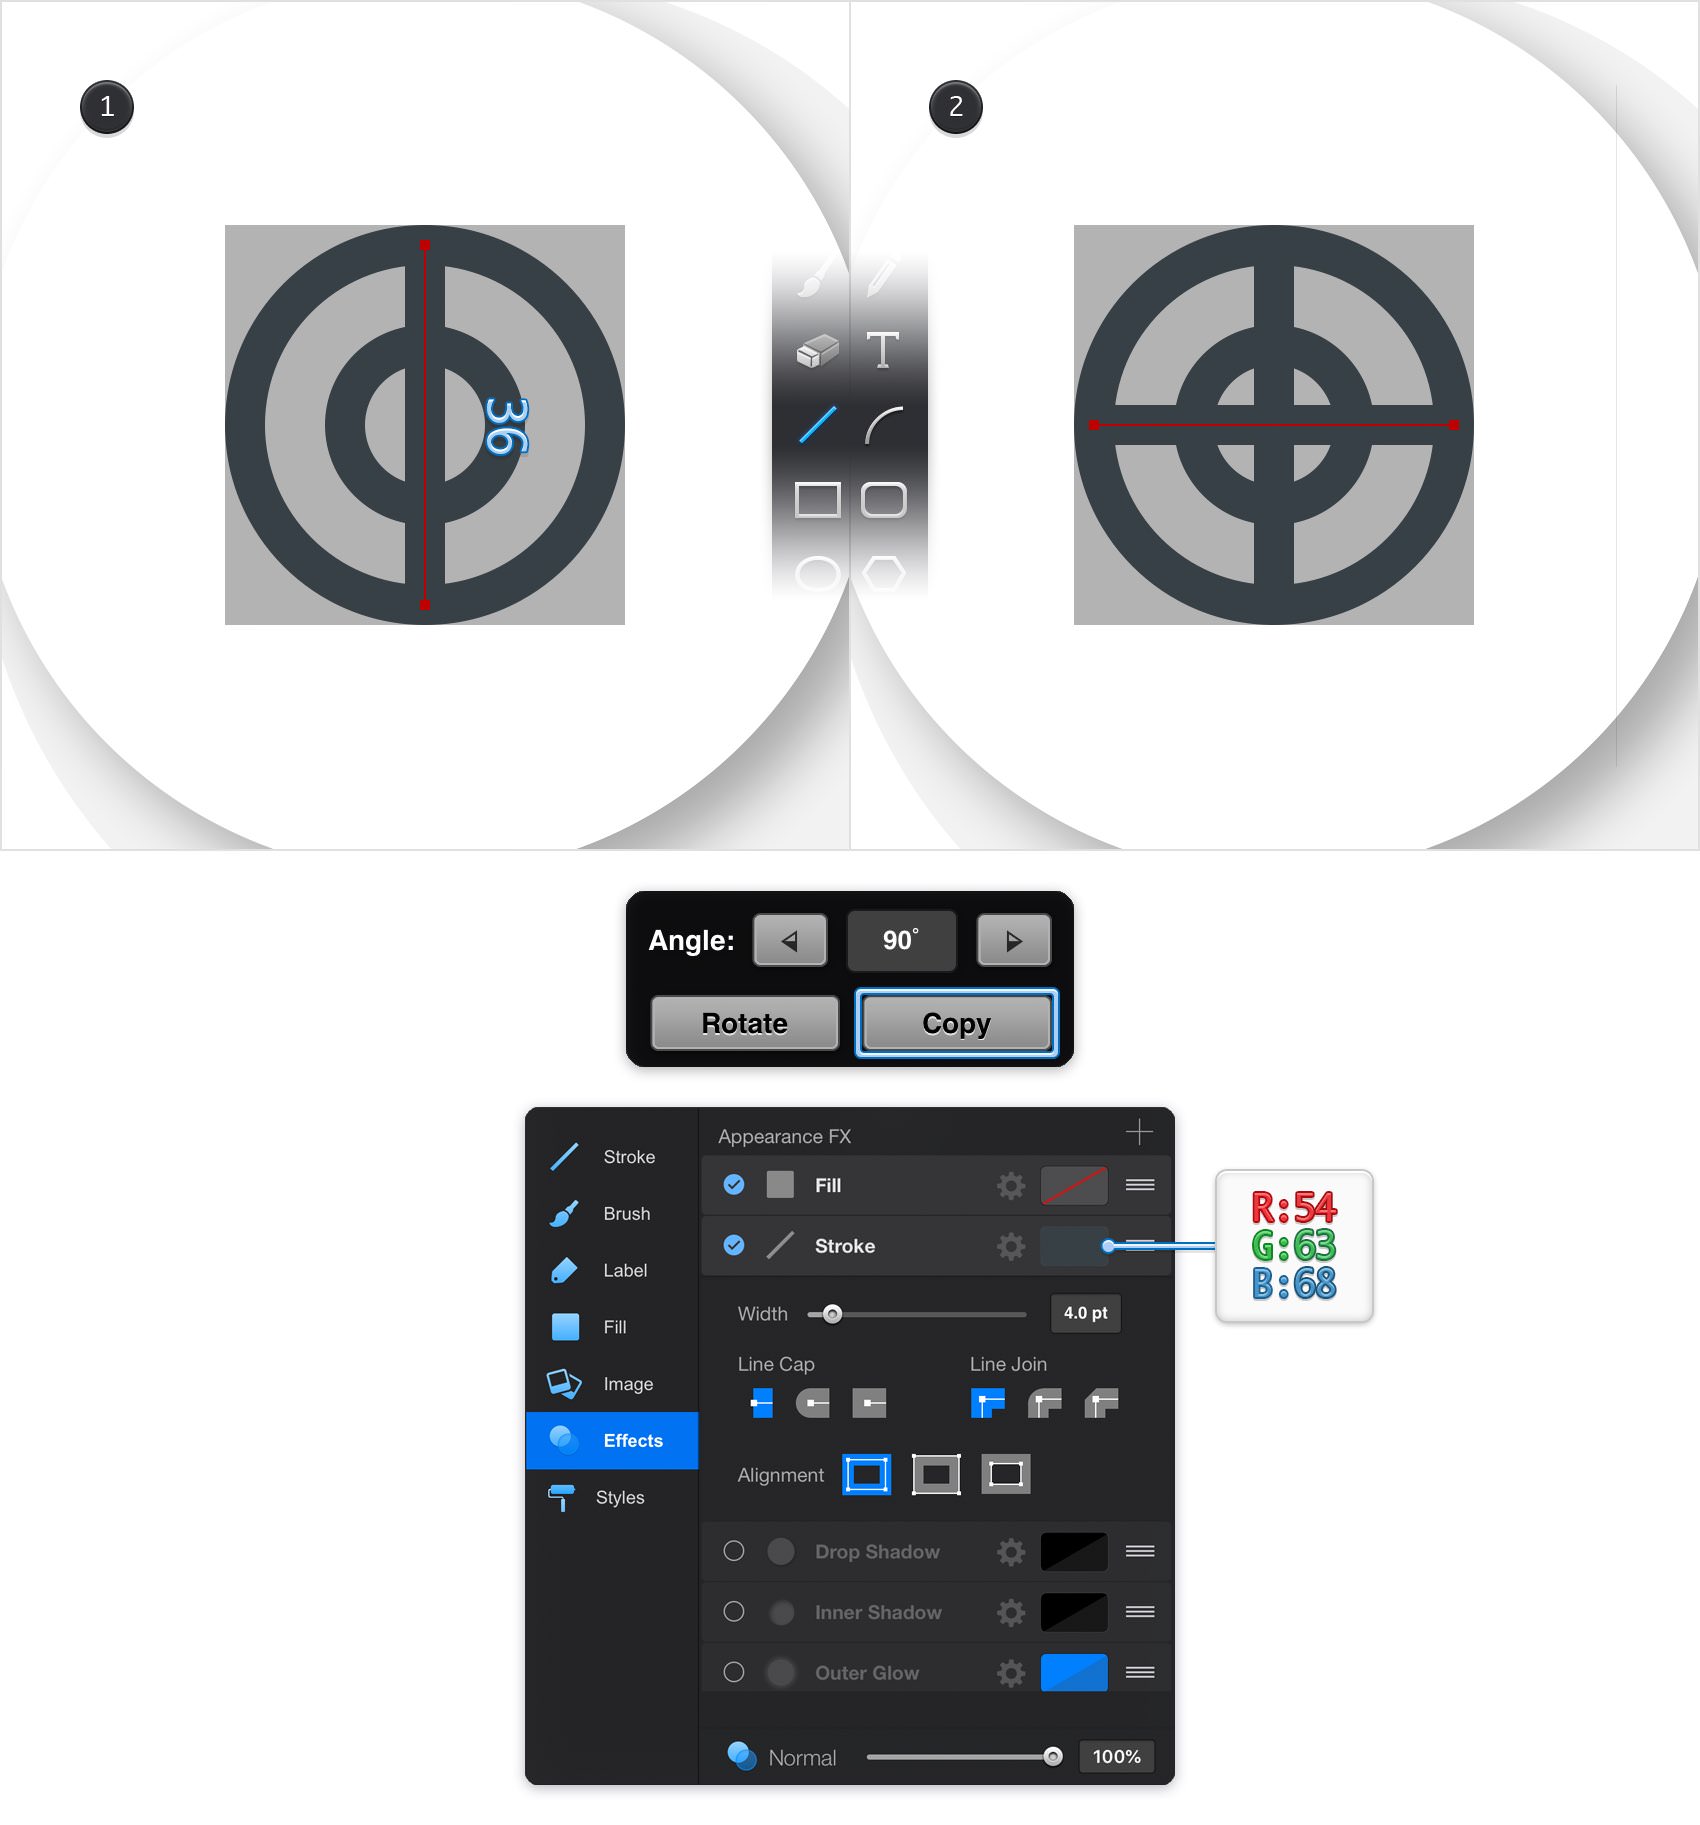
Now, you will need a grid every 1px which means that you need to return to the Grid Spacing pane and enter 1 px in both Spacing boxes.
Using the Line Tool, create a 36 px, vertical path and place it as shown in the first image. Add a 4 pt stroke for this new path, set the Alignment to Center and the color to R=54 G=63 B=68.
Make sure that your vertical path stays selected and switch to the Rotate Tool. Set the Angle to 90 degrees and then tap that Copy button.
Step 25
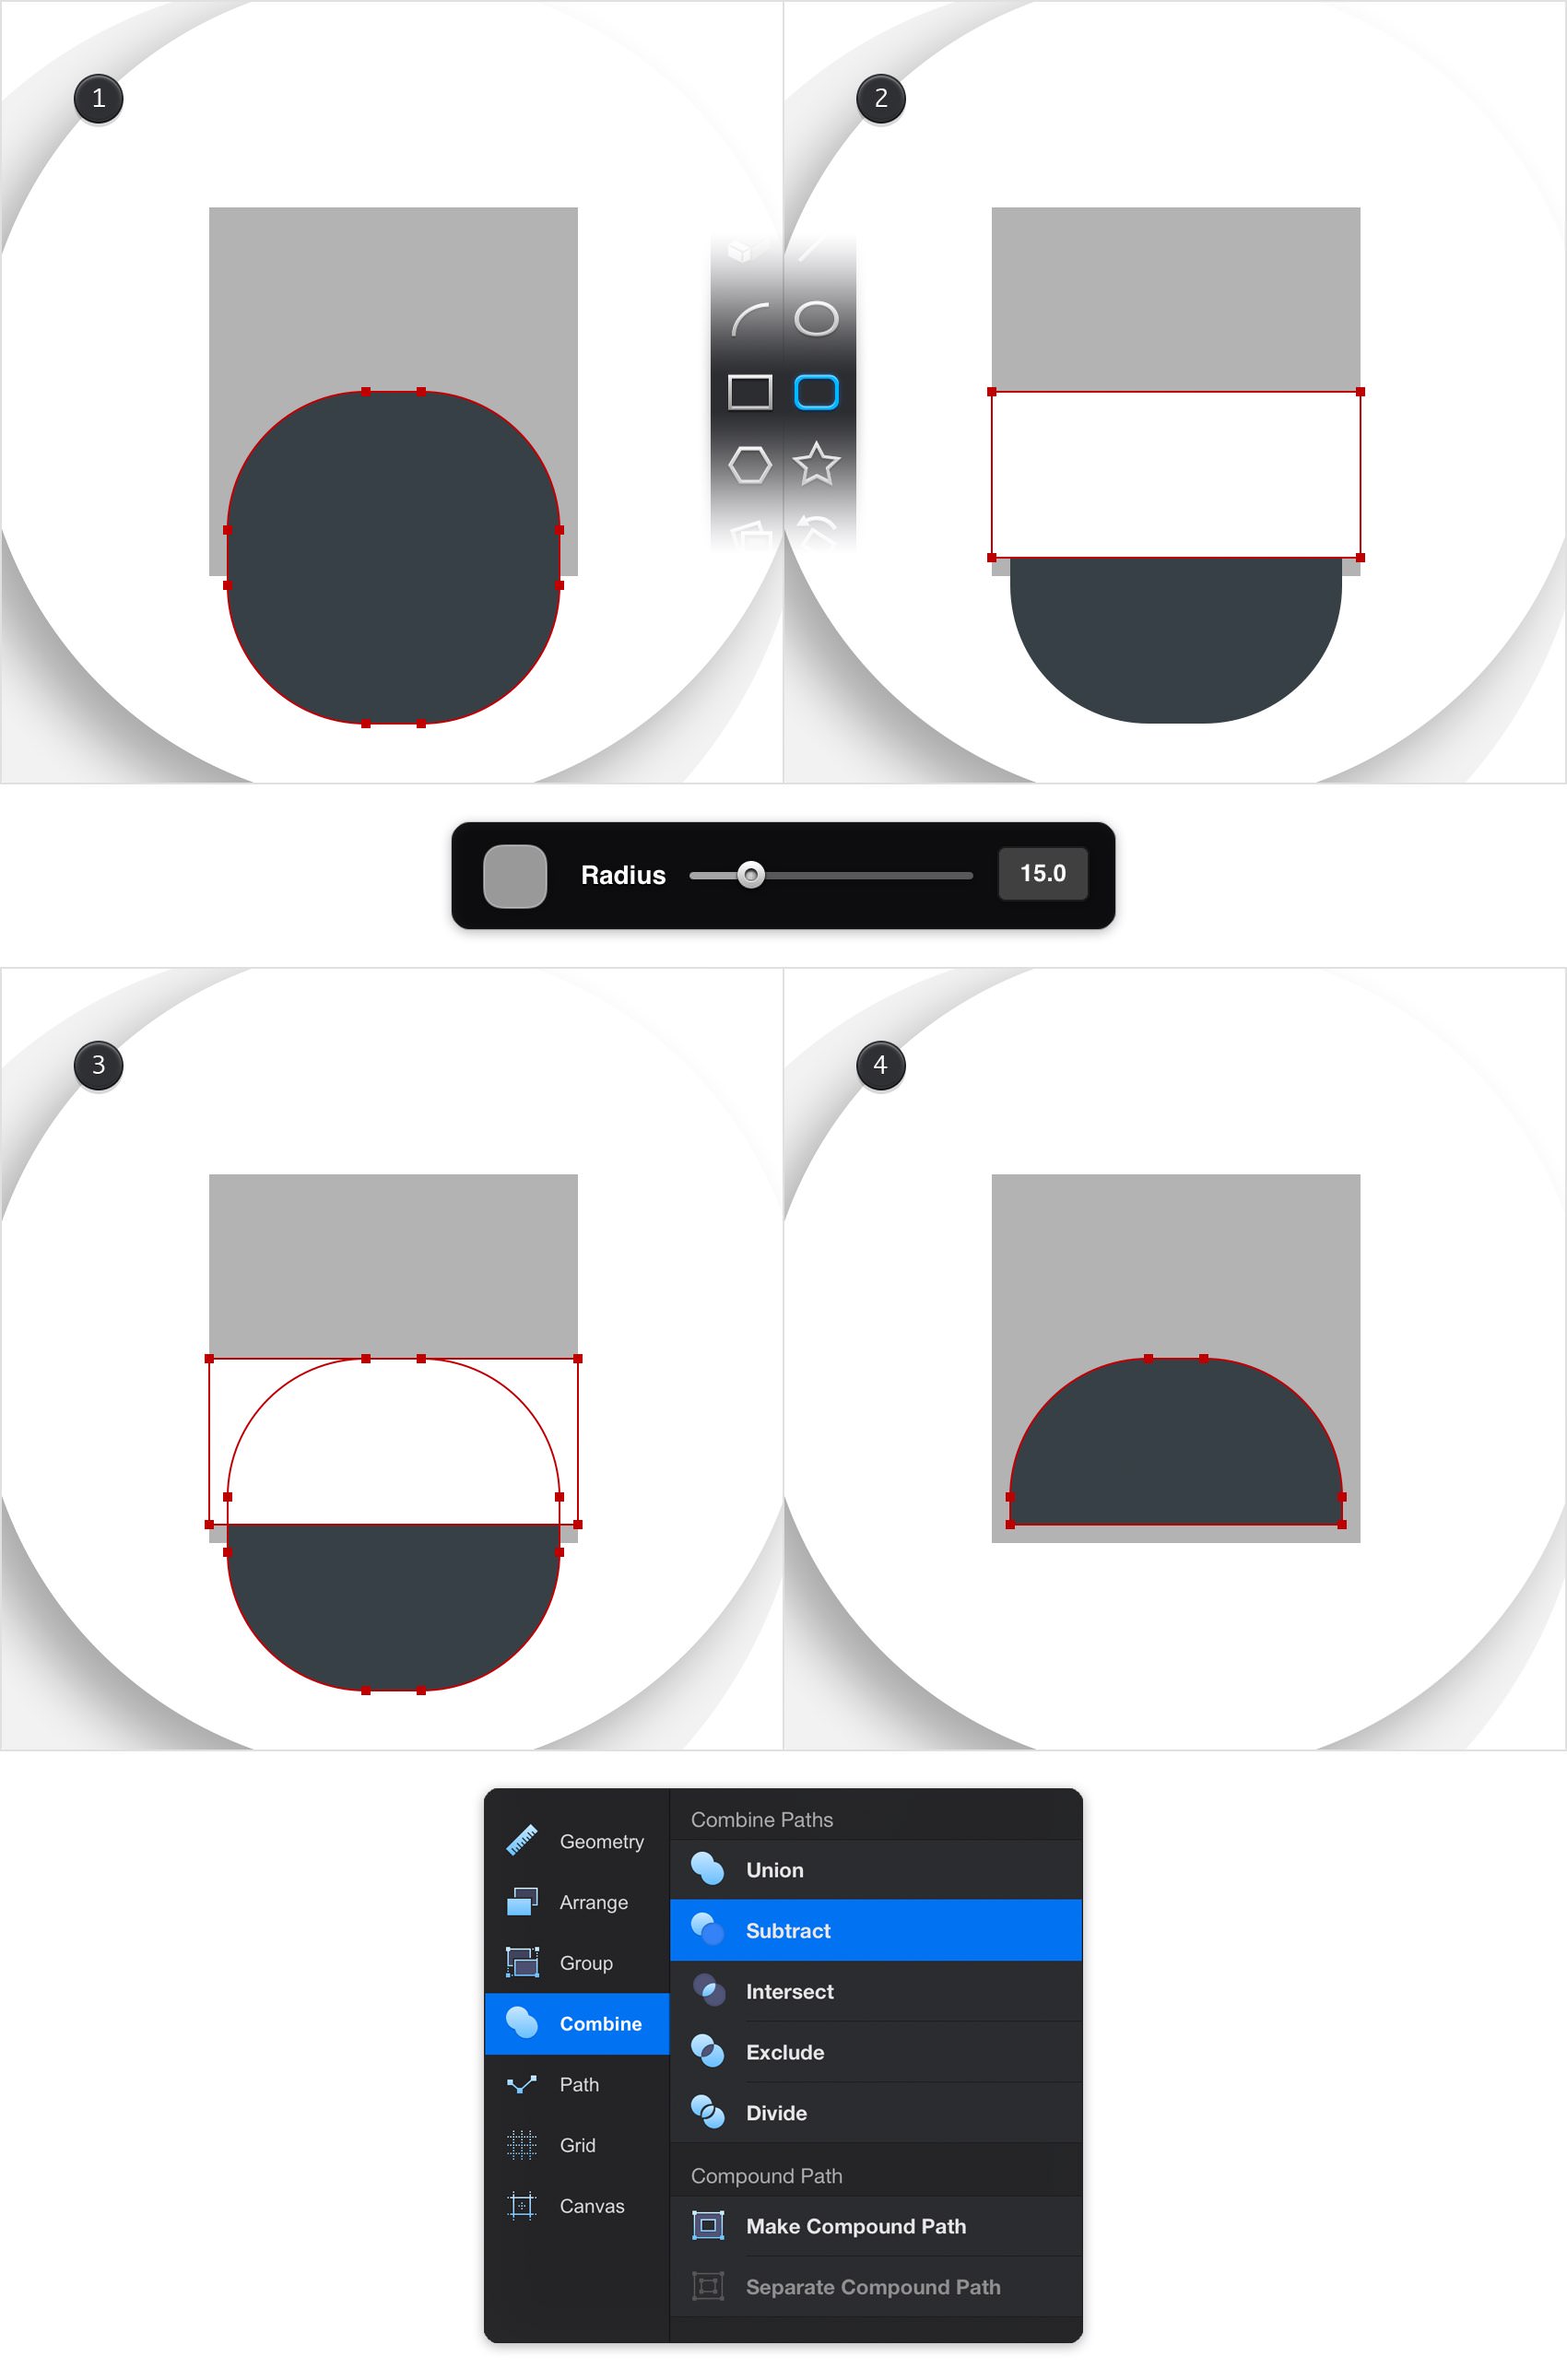
Move up, to your next black square. Pick the Rounded Rectangle Tool, focus on the Tool Options pane and set the Radius to 15. Create a 36 x 36 px shape, fill it with R=54 G=63 B=68 and place it as shown in the first image.
Switch to the Rectangle Tool, create a 40 x 18 px shape and place it exactly as shown in the second image.
Select both shapes made in this step and tap the Subtract command from the Combine pane. In the end, your shape should look like in the fourth image.
Step 26
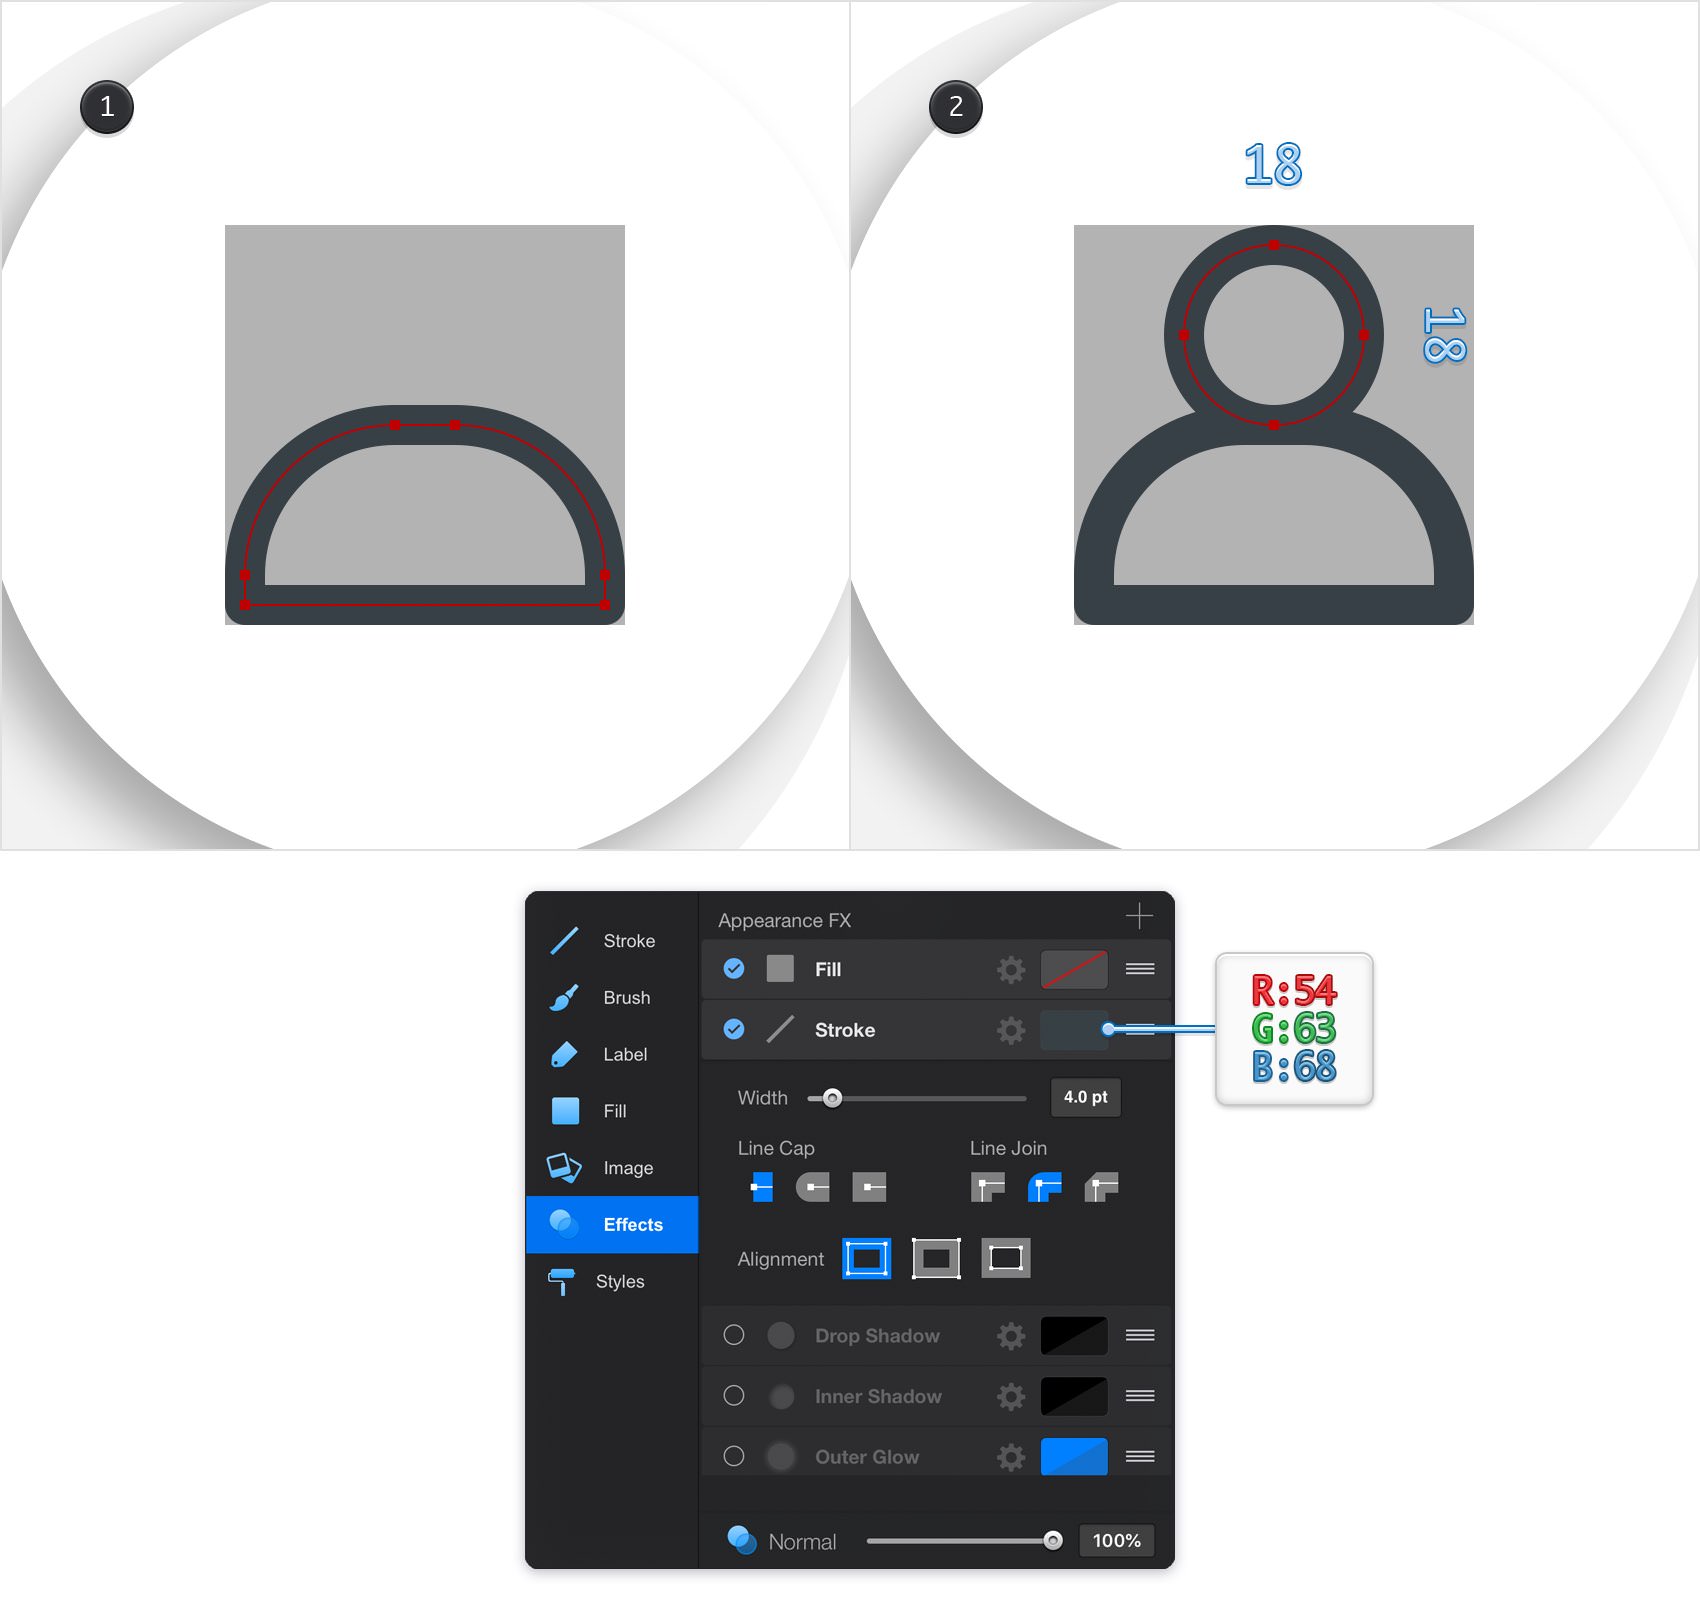
Make sure that the shape made in the previous step stays selected and focus on the Effects pane.
First, make the Fill invisible and set the Stroke color to R=54 G=63 B=68. Keep focusing on the Stroke and drag the Width slider to 4 pt. Be sure that the Position is set the Center and don't forget to check the Rounded Join button. Once you're done, copy the style of this shape.
Pick the Ellipse Tool and create an 18 px circle. Place it as shown in the second image and paste the style.
Step 27
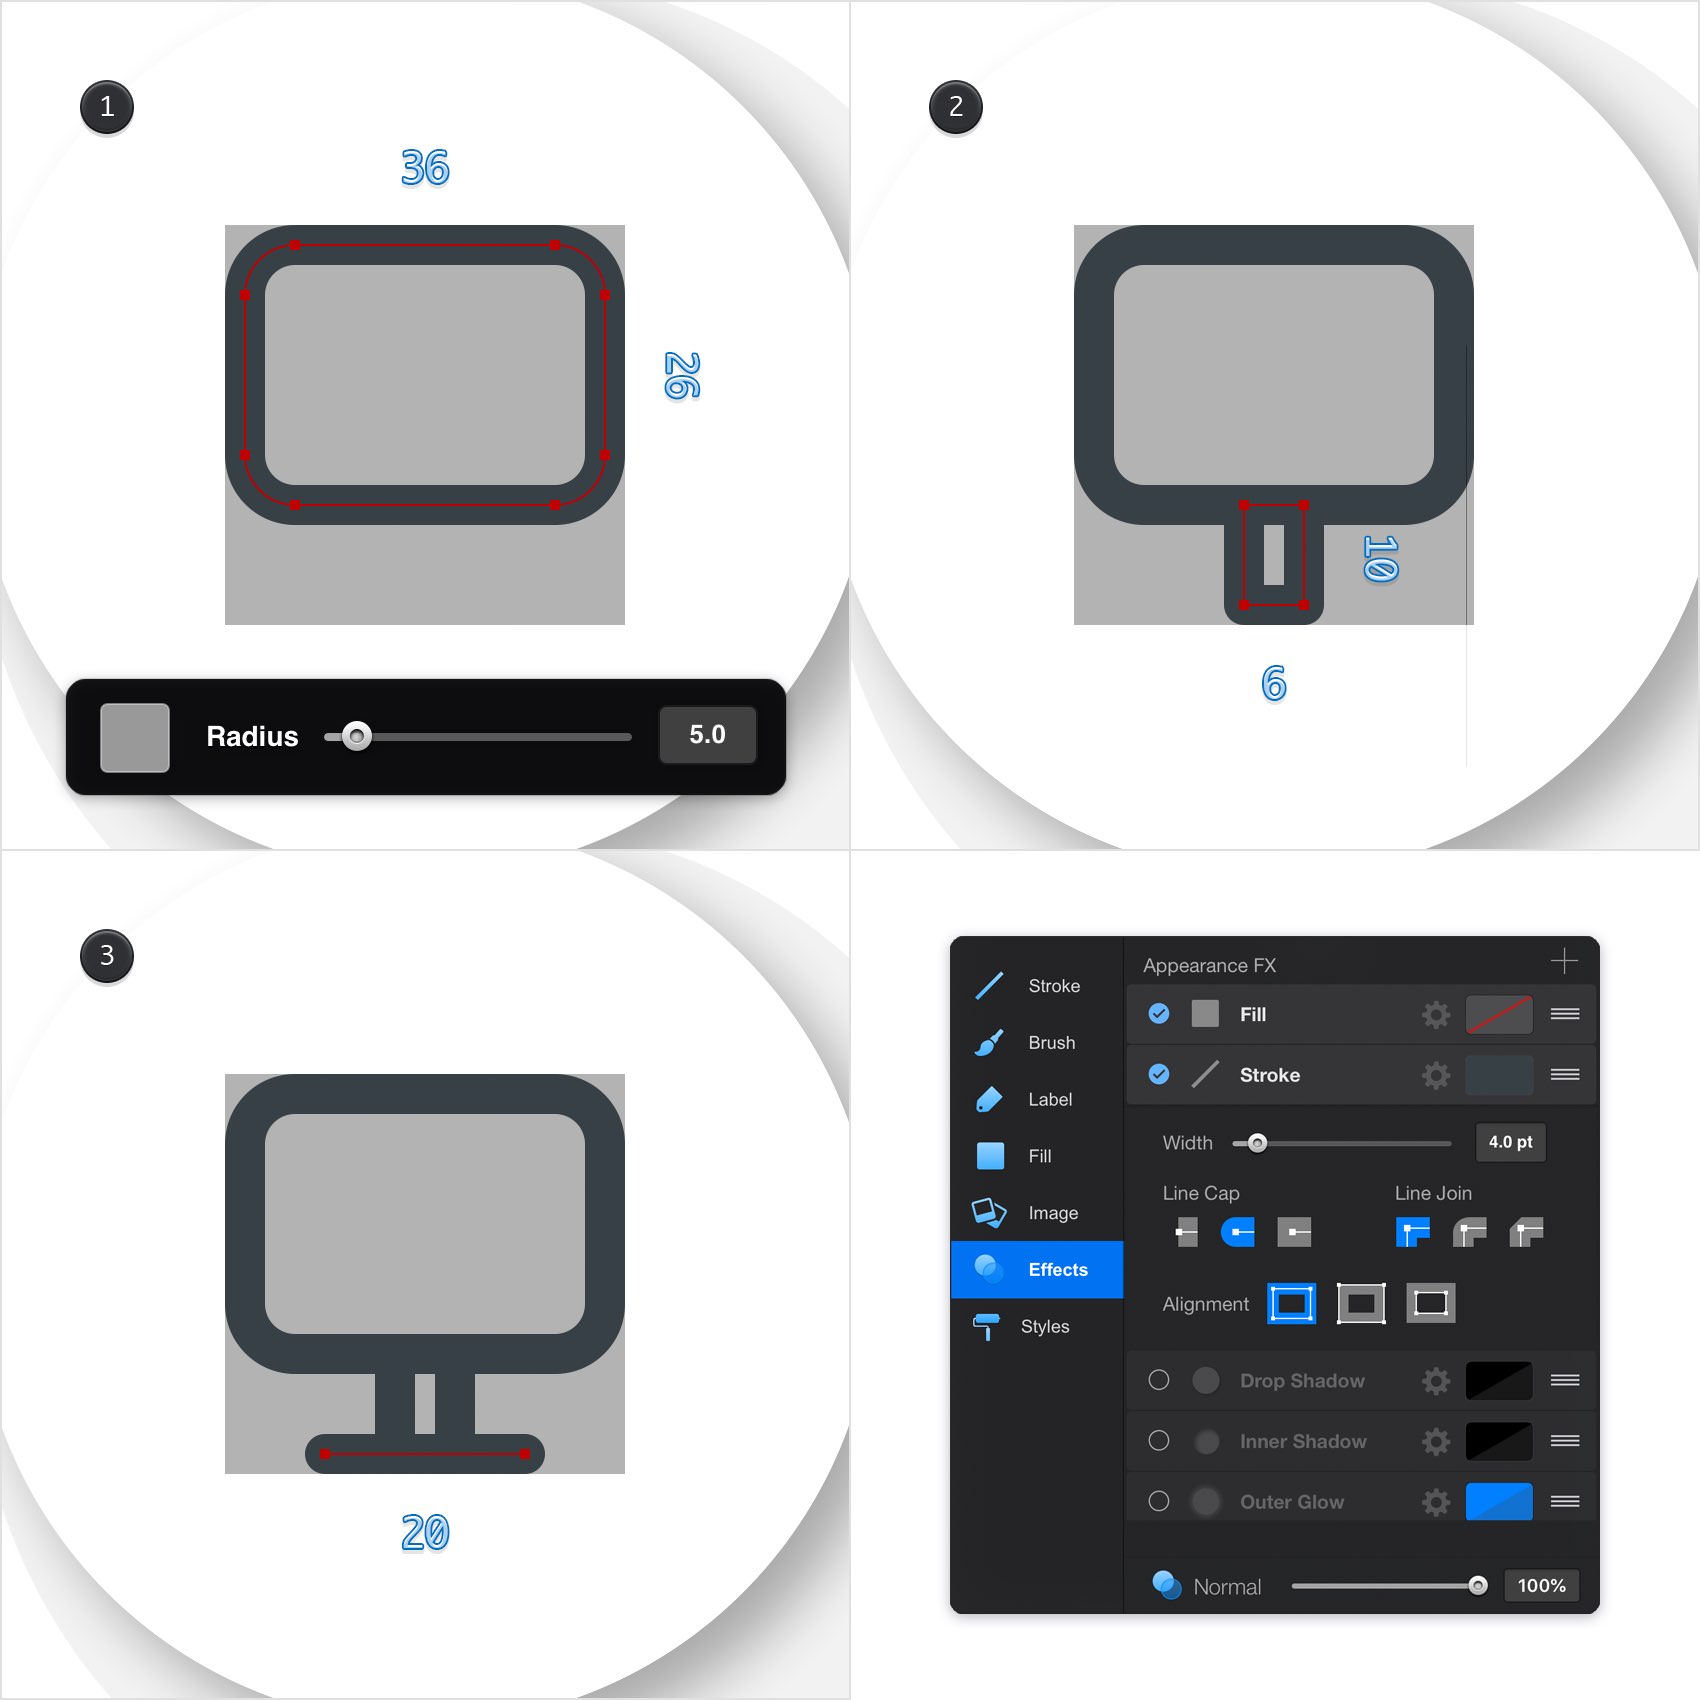
Move up, to your next black square. Pick the Rounded Rectangle Tool and set the Radius to 5. Create a 36 x 26 px shape, place it as shown in the first image and paste the style.
Switch to the Rectangle Tool and create a 6 x 10 px shape. Place it as shown in the second image and paste the style.
Using the Line Tool, create a 20 px, vertical path. Place it as shown in the third image, paste the style, and then go to the Effects pane and check the Rounded Cap button.
Step 28
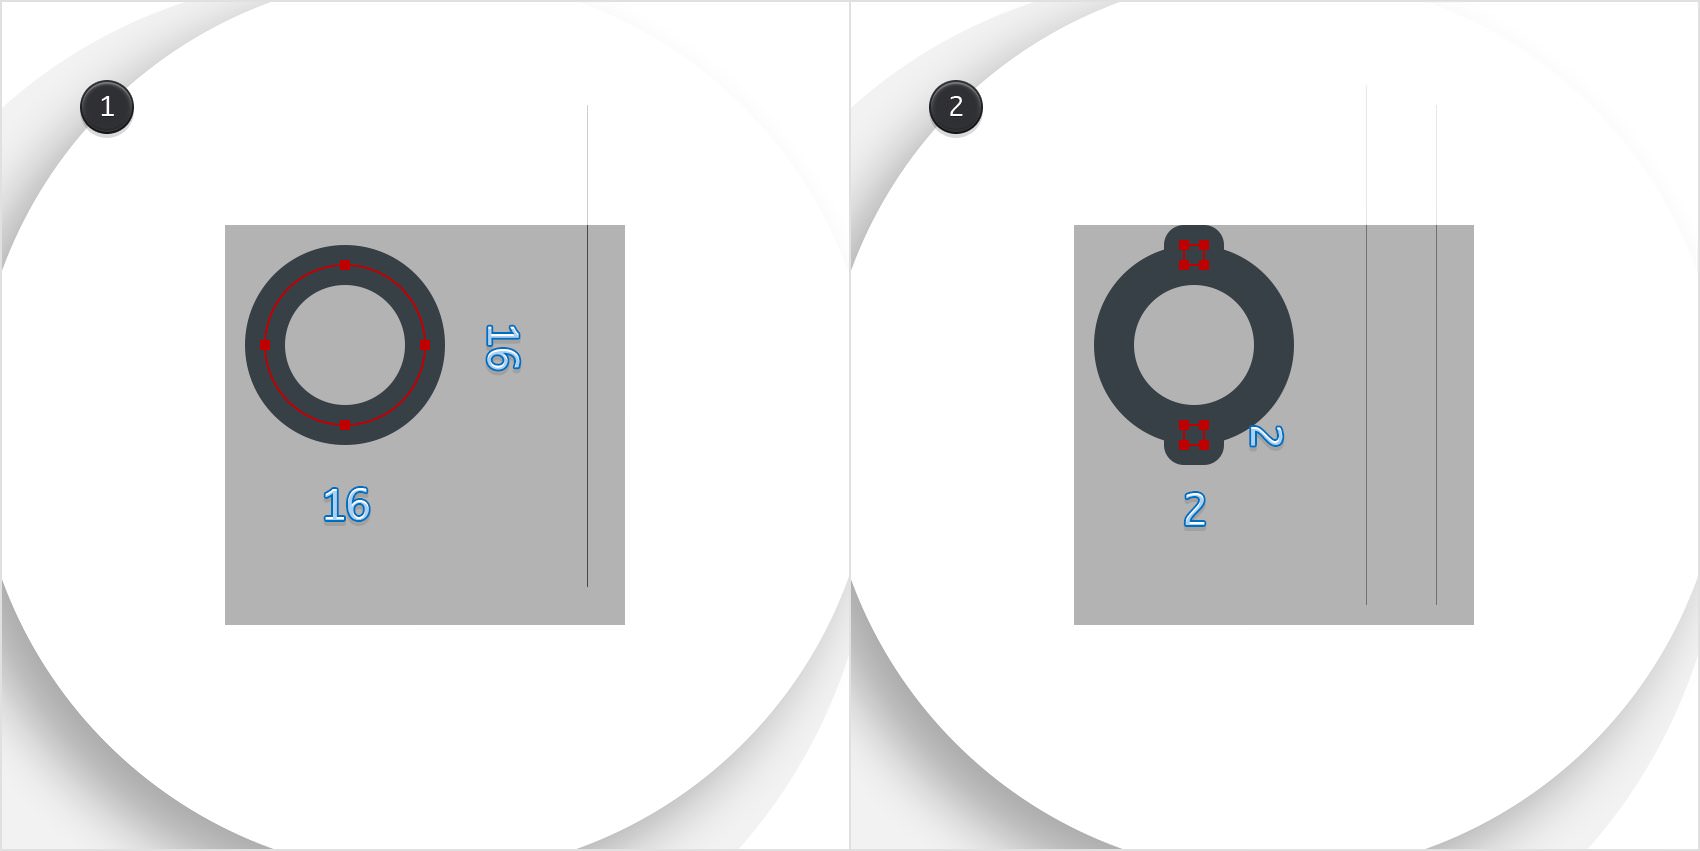
Move up, to your top black square. Pick the Ellipse Tool and create a 16 px circle. Place it as shown in the first image and paste the style.
Switch to the Rectangle Tool and create two, 2 px squares. Place these new shapes as shown in the second image and paste the style.
Step 29
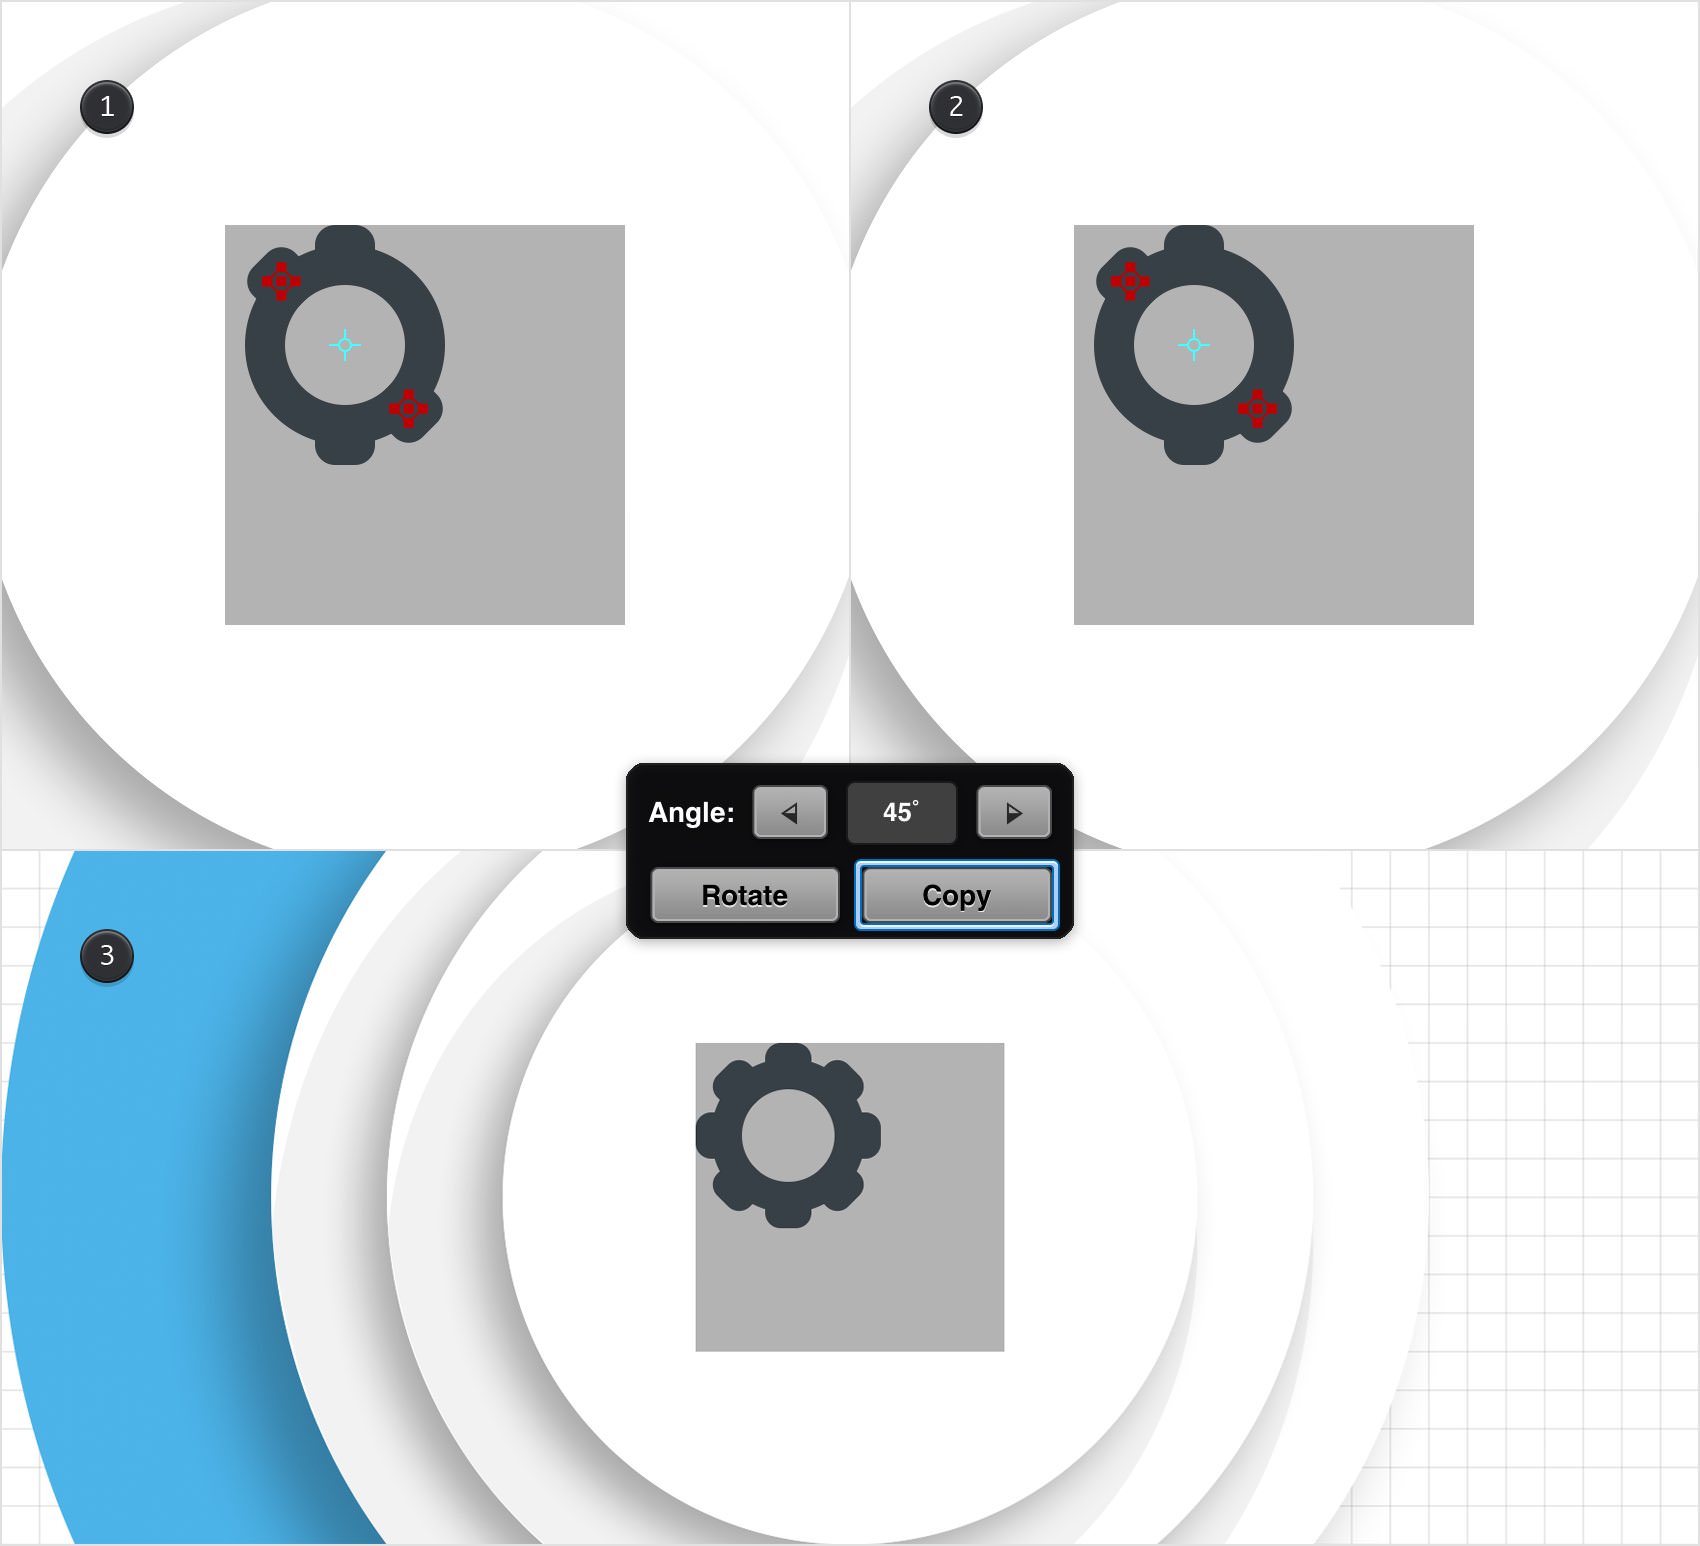
Select both tiny squares added in the previous step and pick the Rotate Tool. Set the Angle to 45 degrees and then tap that Copy button three times. In the end, things should look like in the third image.
Step 30
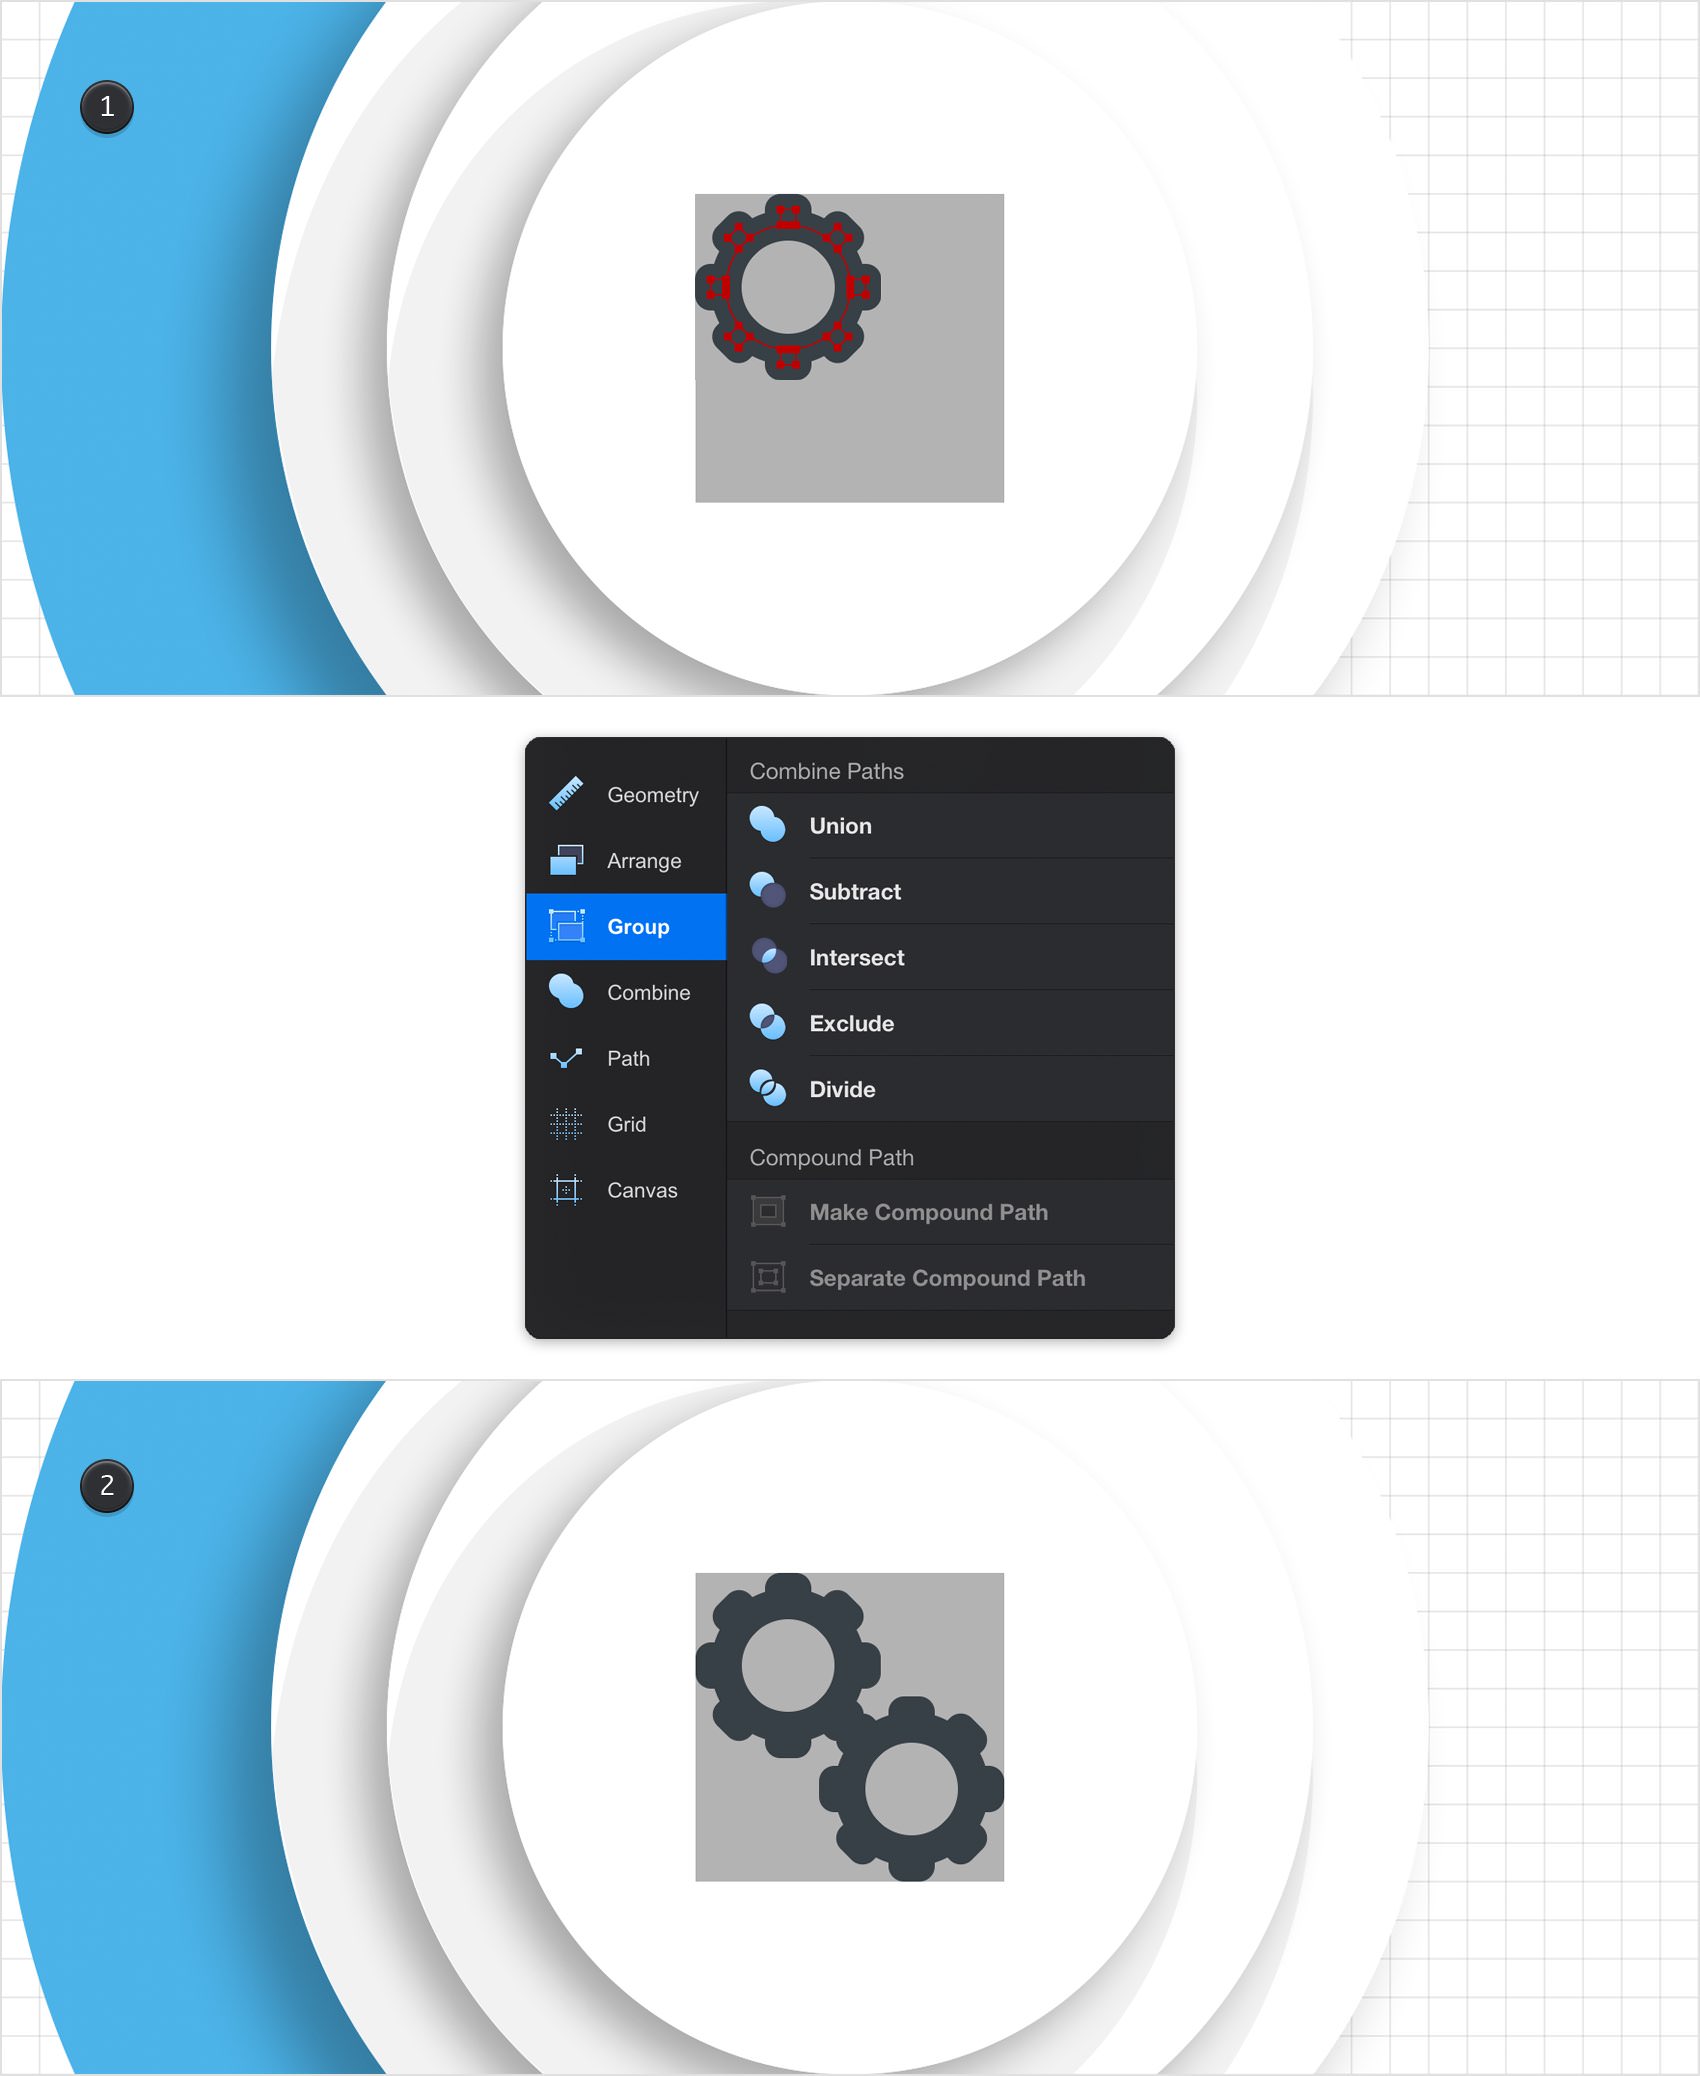
Select the shapes highlighted in the first image and Group them using the Group command from the Properties panel. Make a copy of this group and place it as shown in the second image.
Step 31
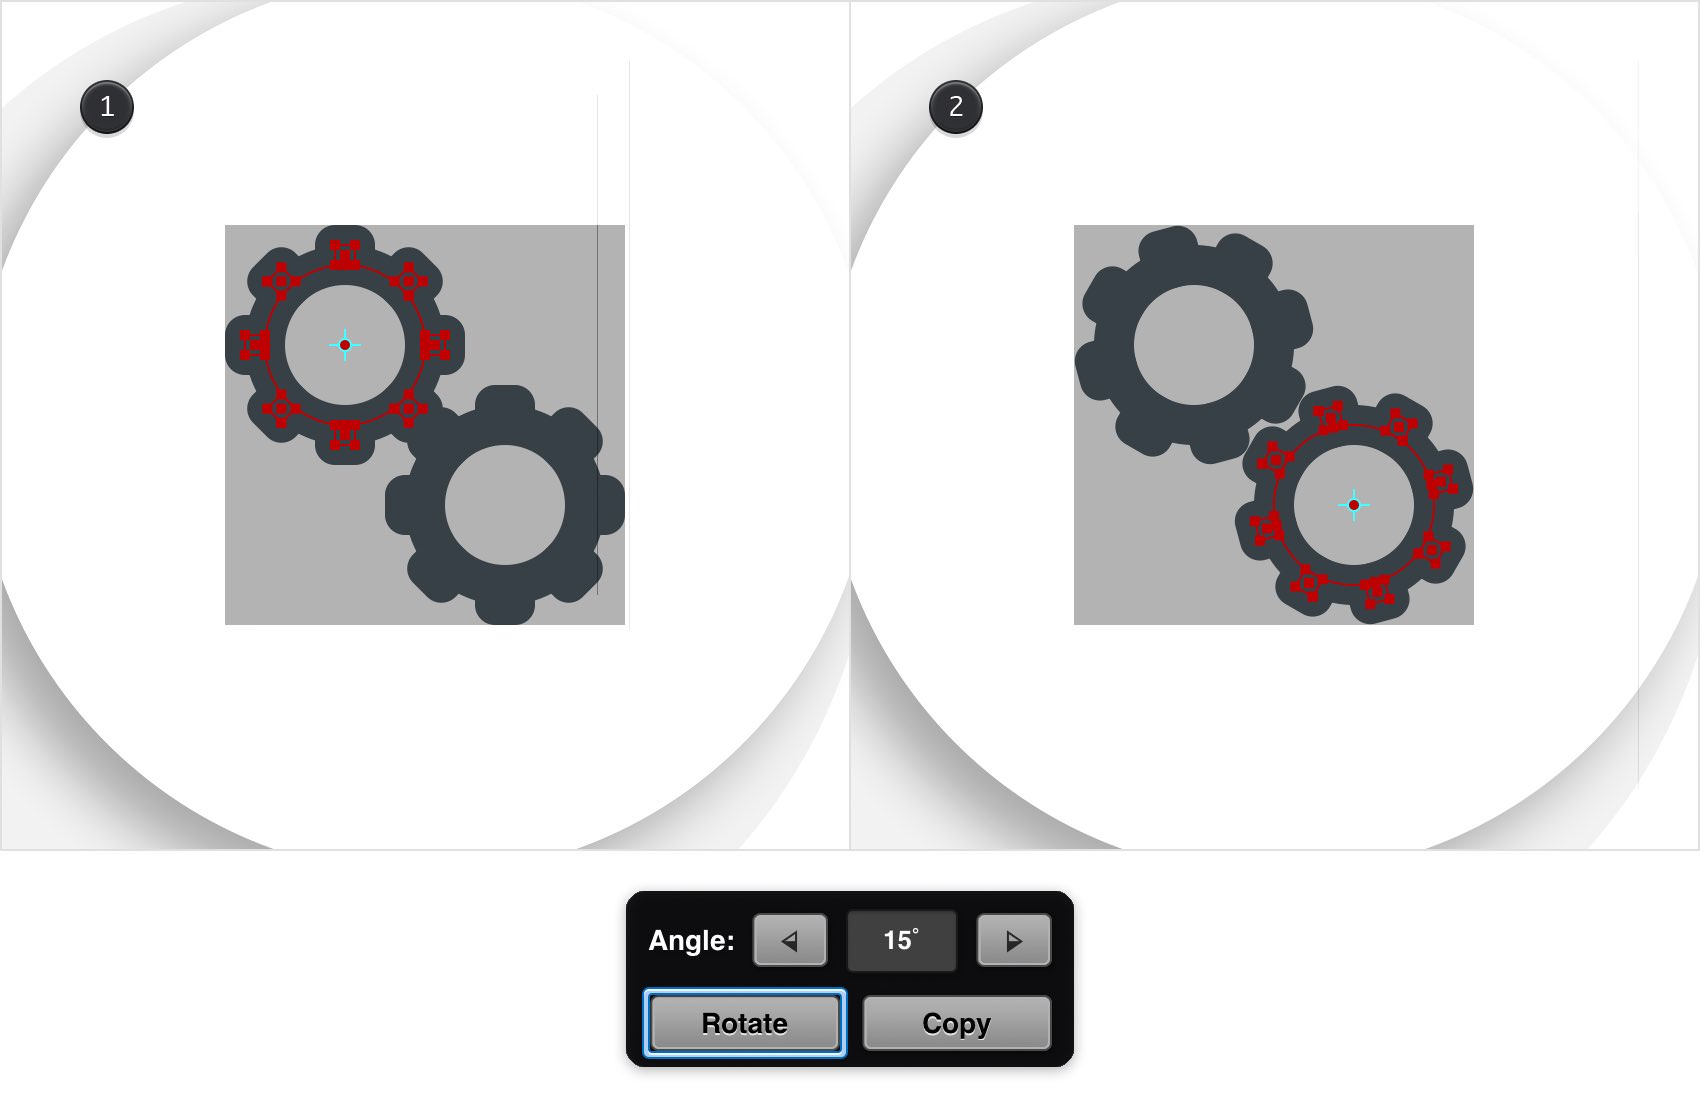
Select your top group and pick the Rotate Tool. Set the Angle to 15 degrees and then tap that Rotate button. Select the other group and do the same thing.
Step 32
Focus on the Layers panel, select the "Black" layer and delete it using the Trash icon from the bottom of the panel.
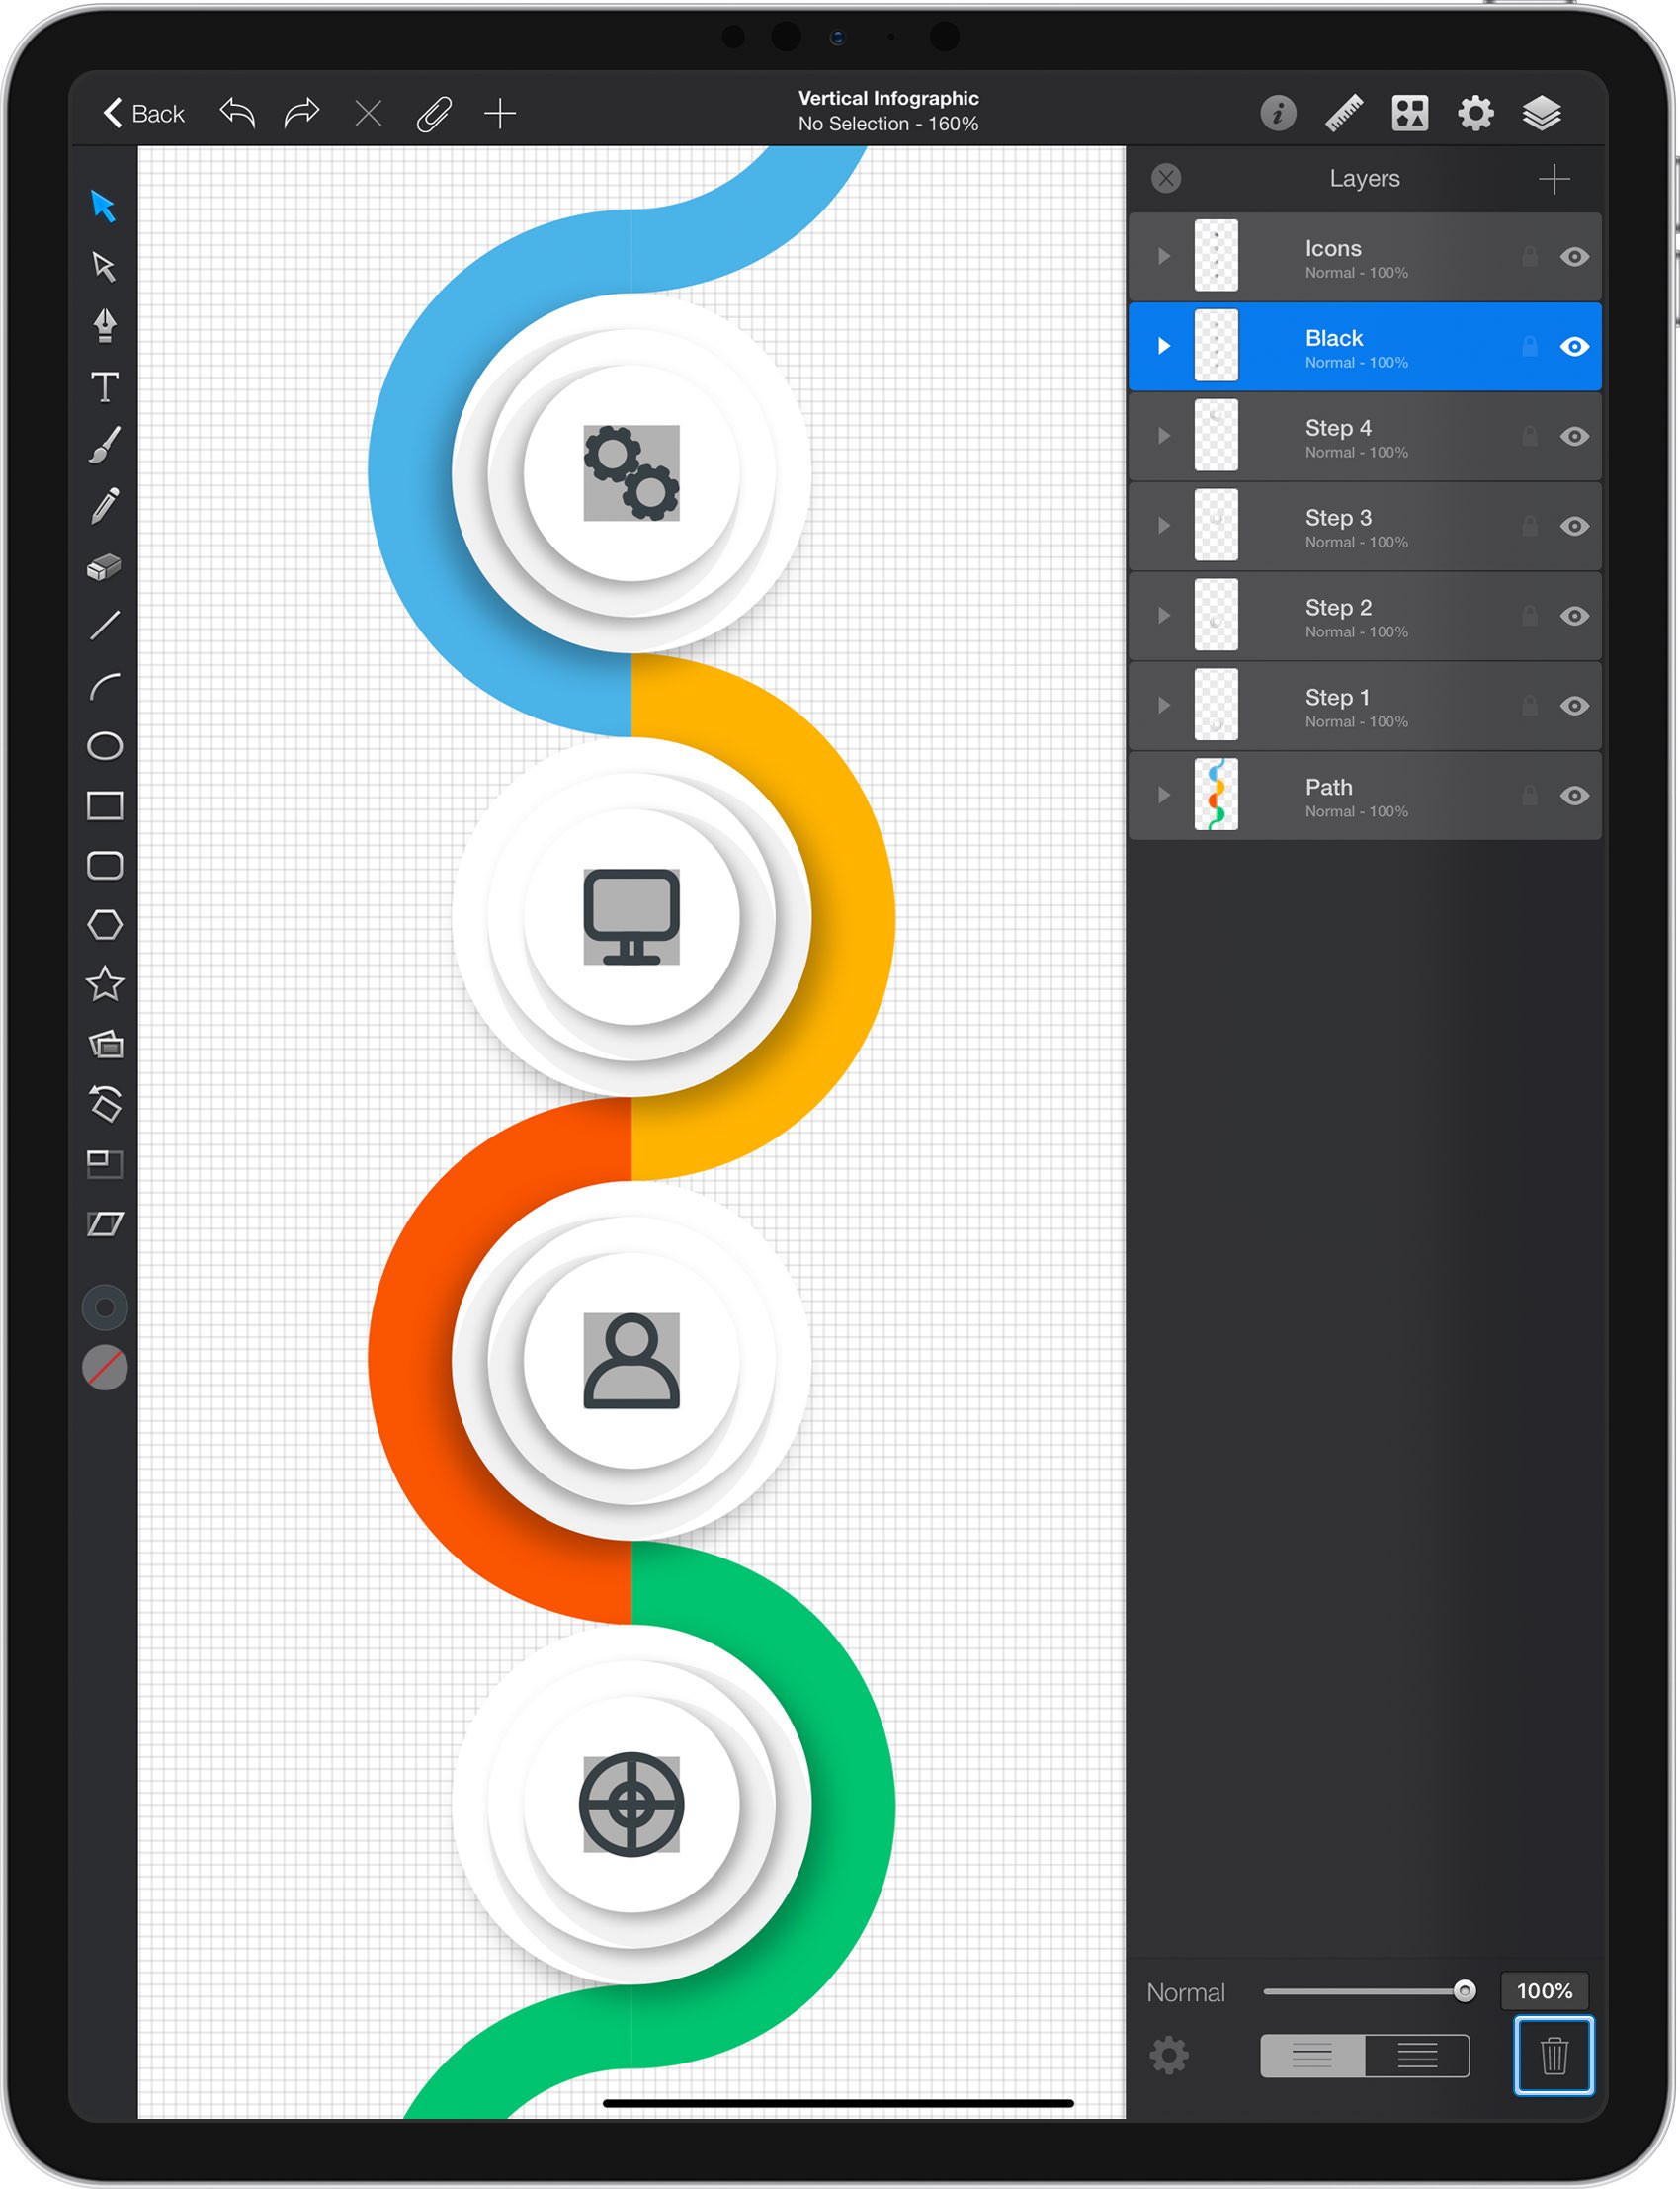
Step 33
Go to the Layers panel and add a new layer. Drag it in the top of the panel, rename it "Text" and make sure that it stays selected.
Again, you will need a grid every 5 px. Return to the Grid pane and enter 5 px in both Grid Spacing boxes.
Pick the Rectangle Tool and create a 20 px square. Fill this new shape with R=54 G=63 B=68 and place it as shown in the first image. Keep focusing on this square and pick the Path Selection Tool . First, select the top anchor point and remove it using the Delete button from the Titlebar. Next, select the bottom anchor point and drag it 10 px up. In the end, your square should turn into a triangle, as shown in the third image.
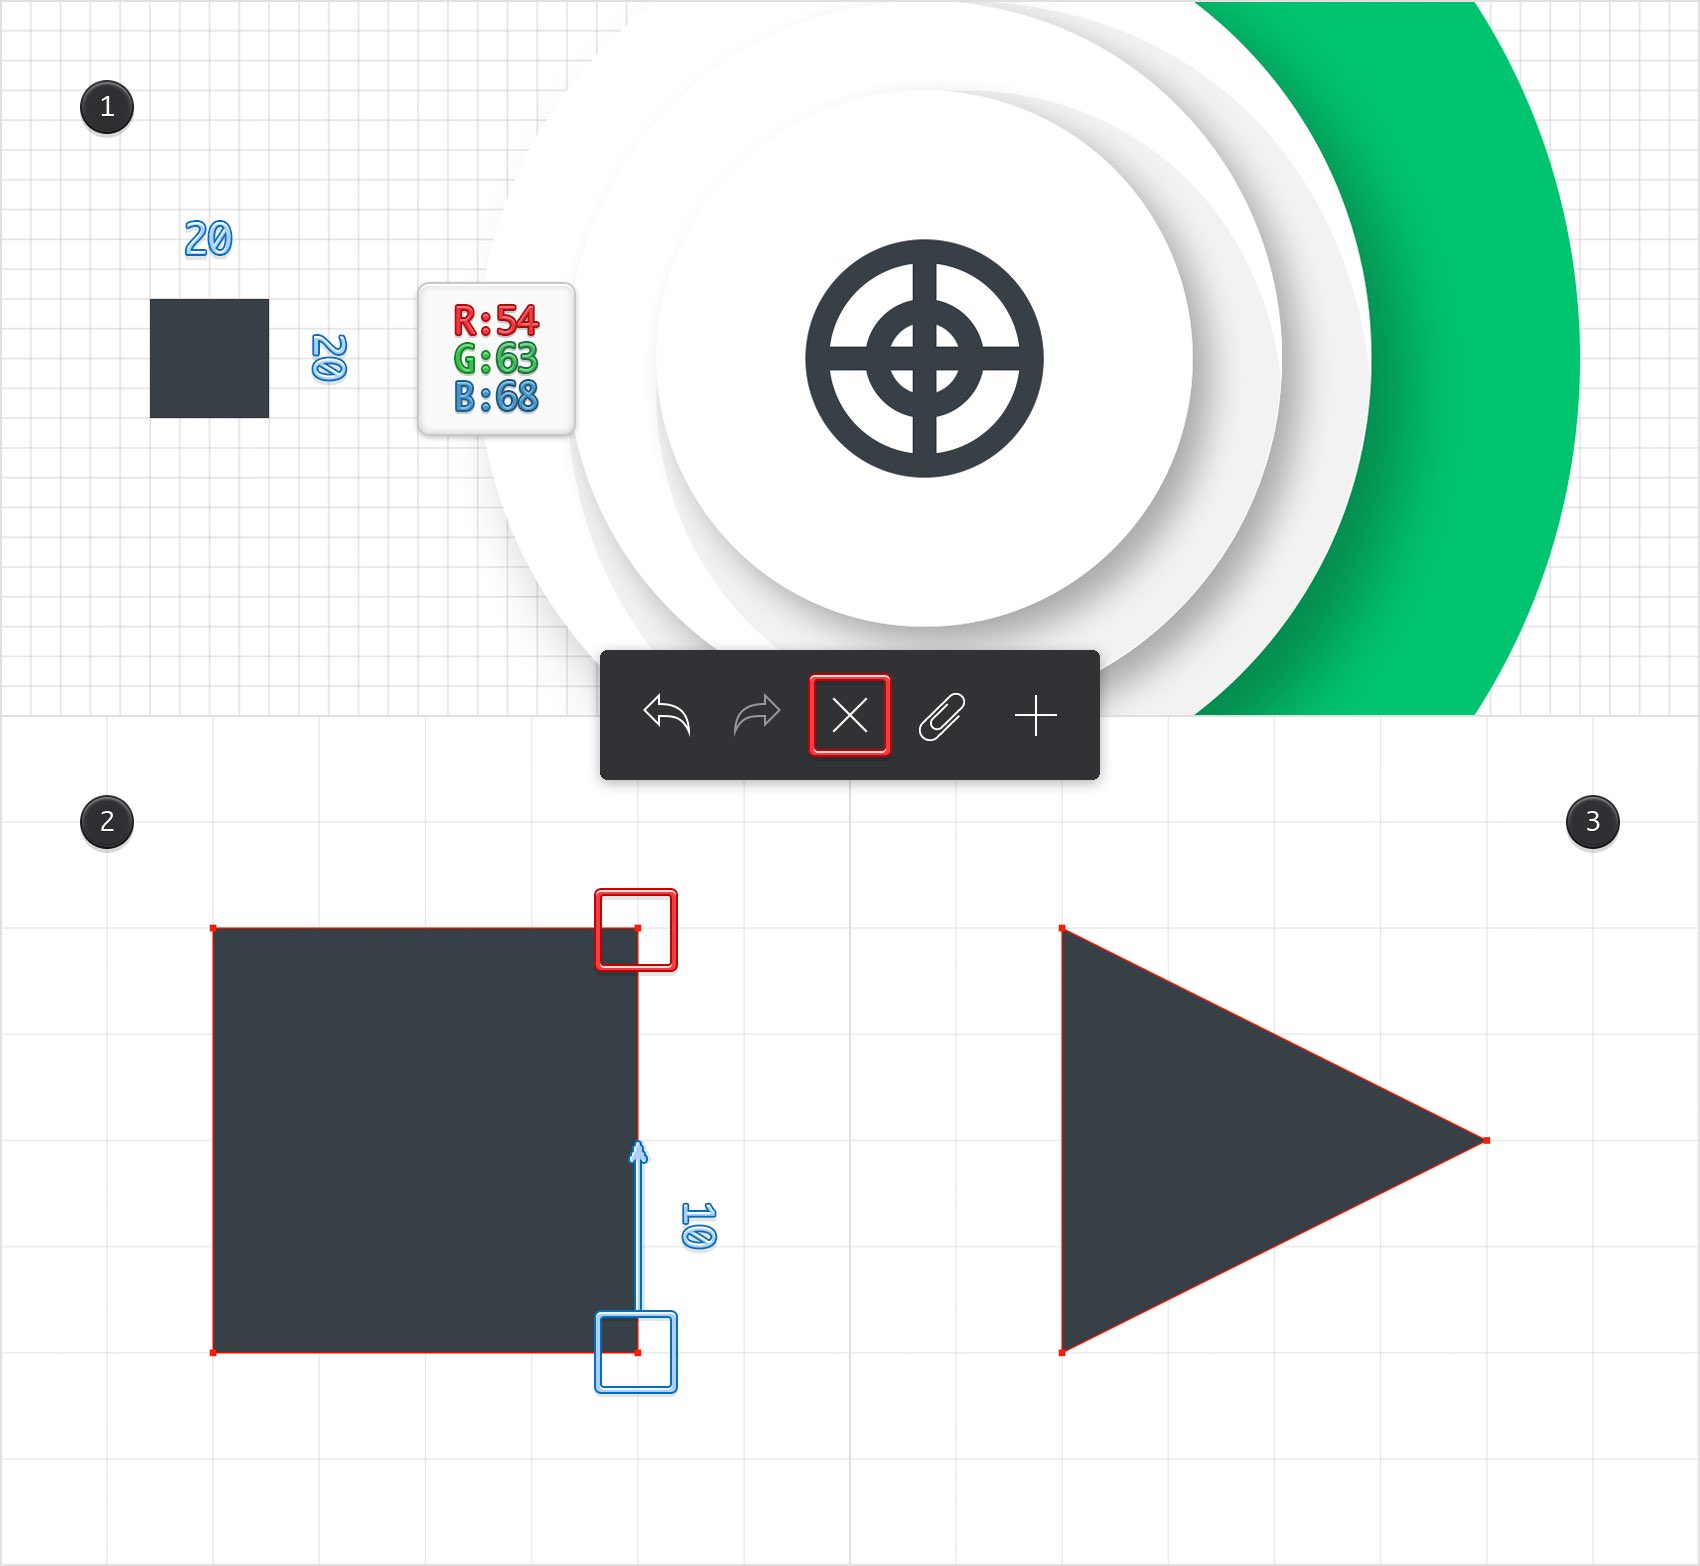
Step 34
Make three copies of your triangle. Select two of these copies and rotate them 180 degrees. Place the three copies as shown in the following image.

Step 35
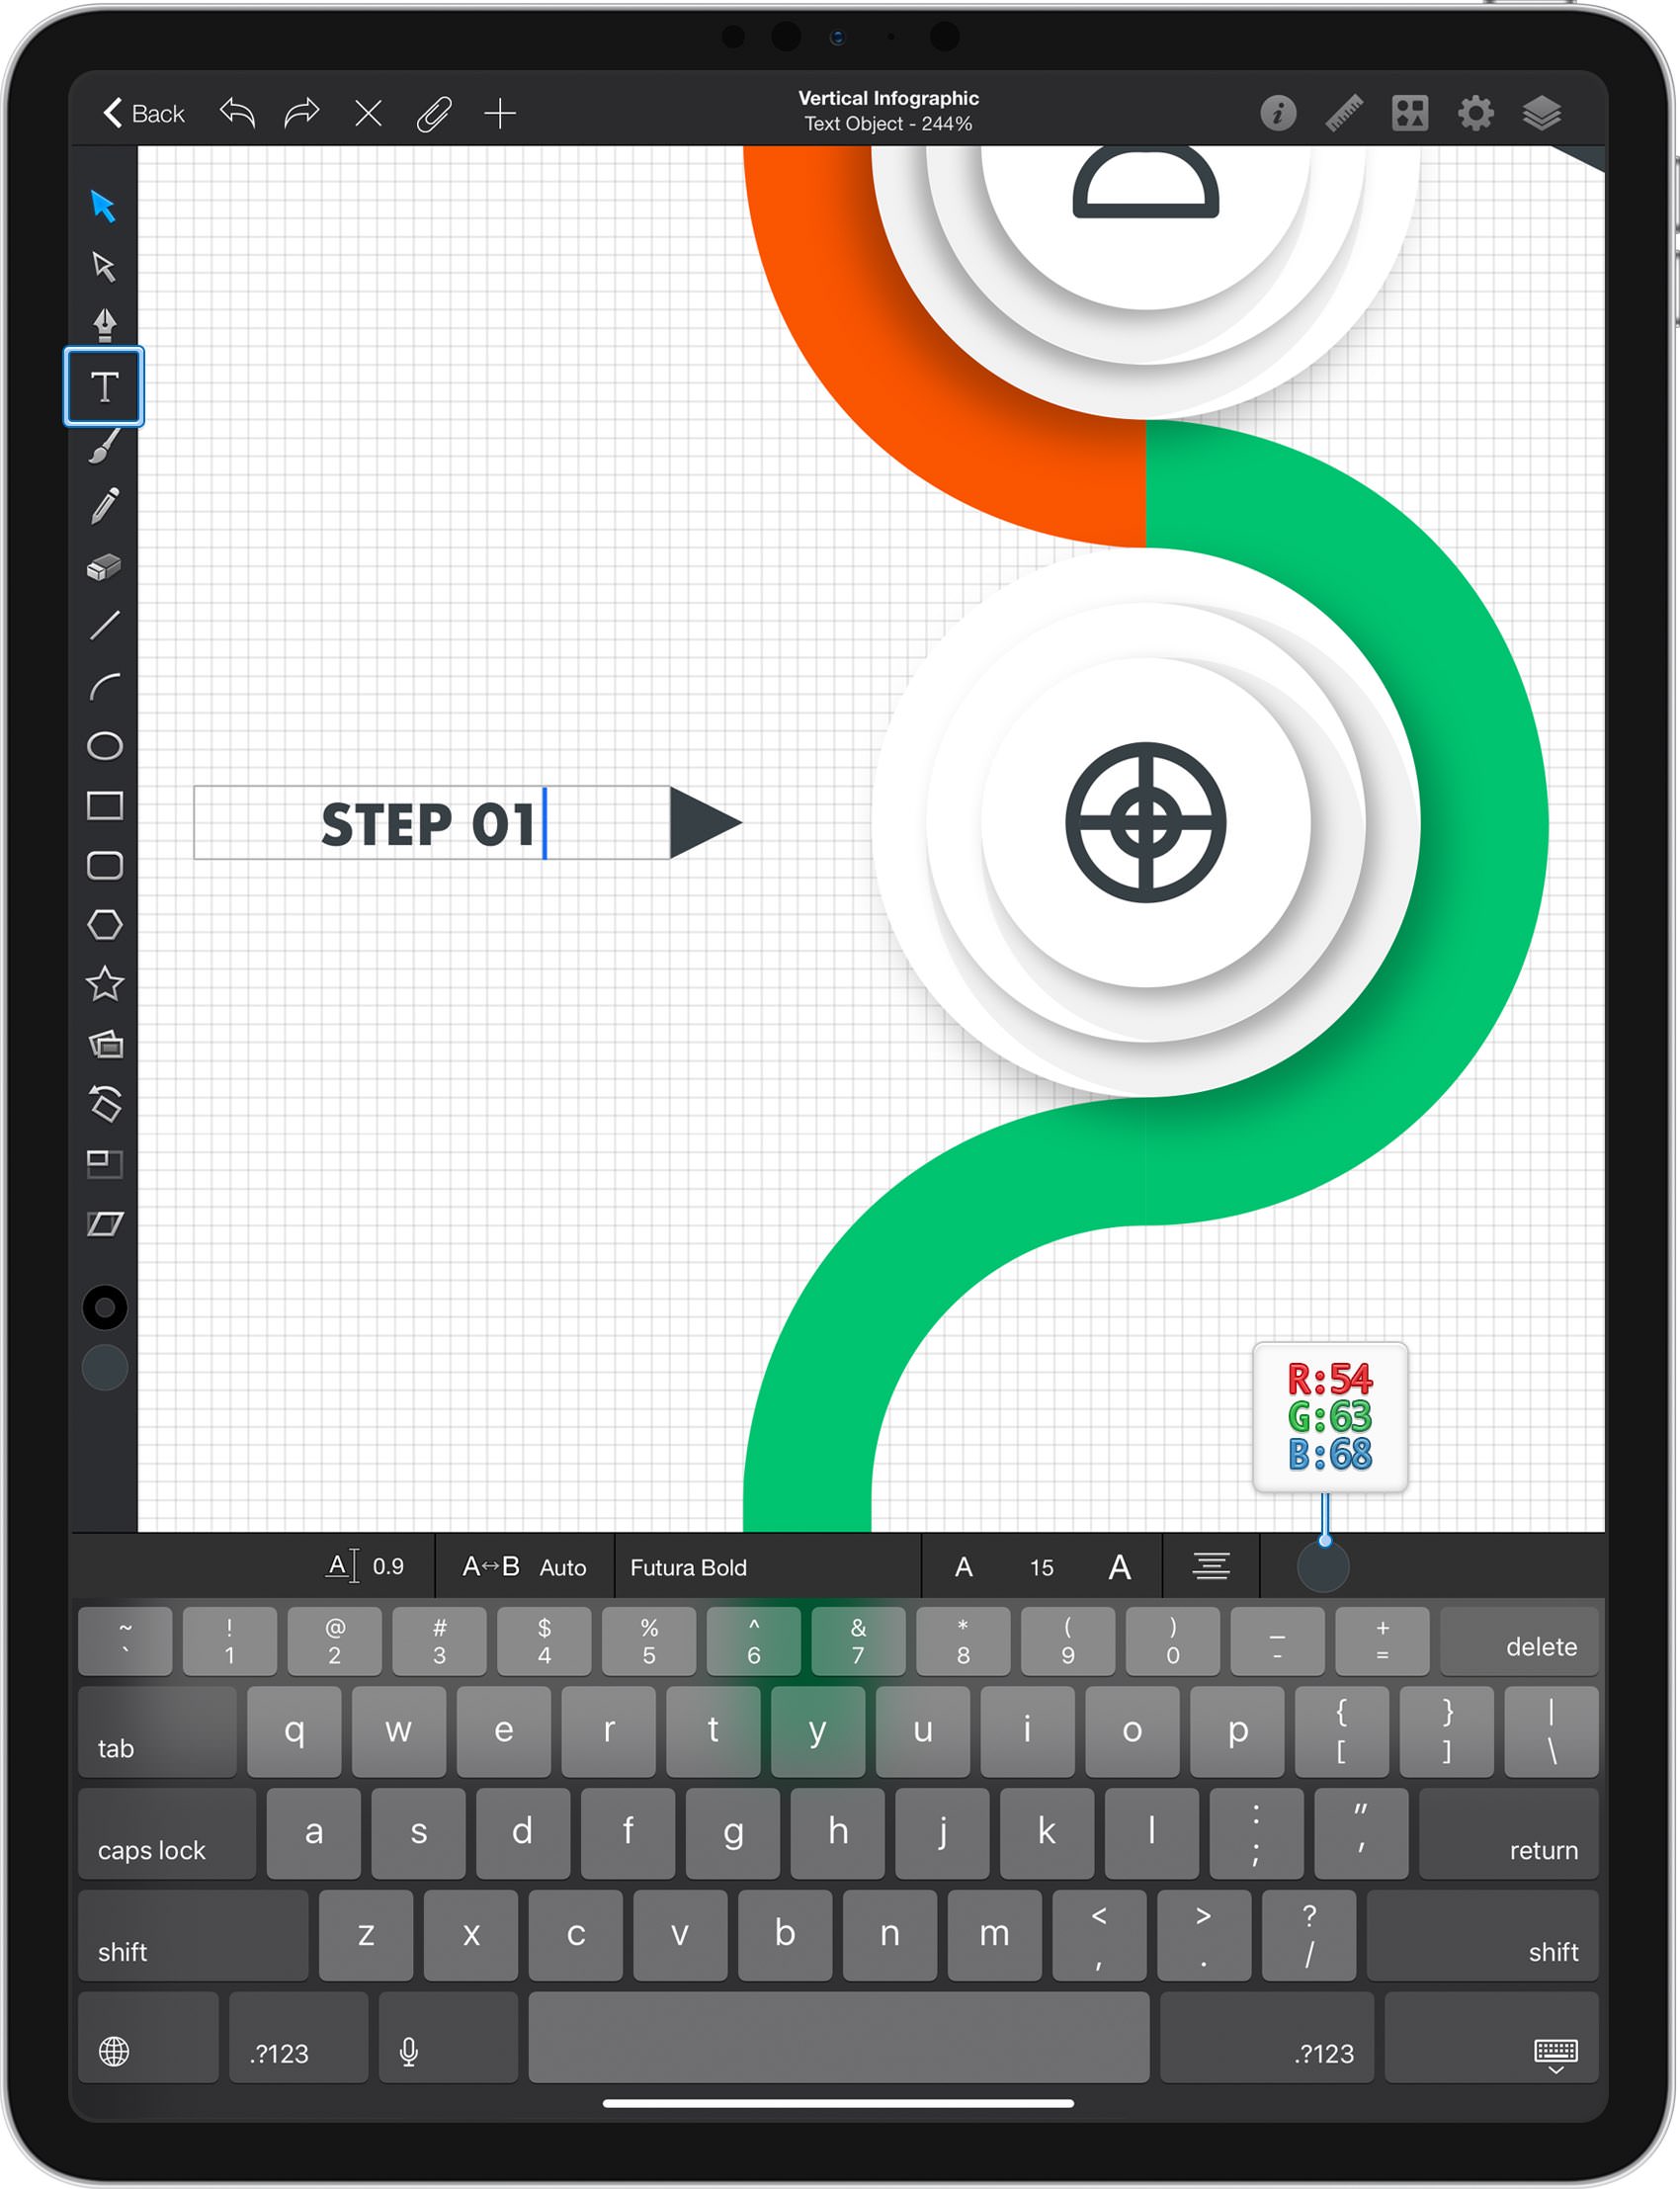
Pick the Text Tool and double-tap inside that new field. Select the Futura font and change the Style to Bold. Set the Size to 15, change the color to R=54 G=63 B=68 and set the Text Alignment to Centered. Make sure that the Line Spacing is set to 0.9 and then move to your canvas.
Add the "STEP 01" piece of text, make your text field 130 px wide and 20 px tall, and then place it as shown in the following image.
Step 36
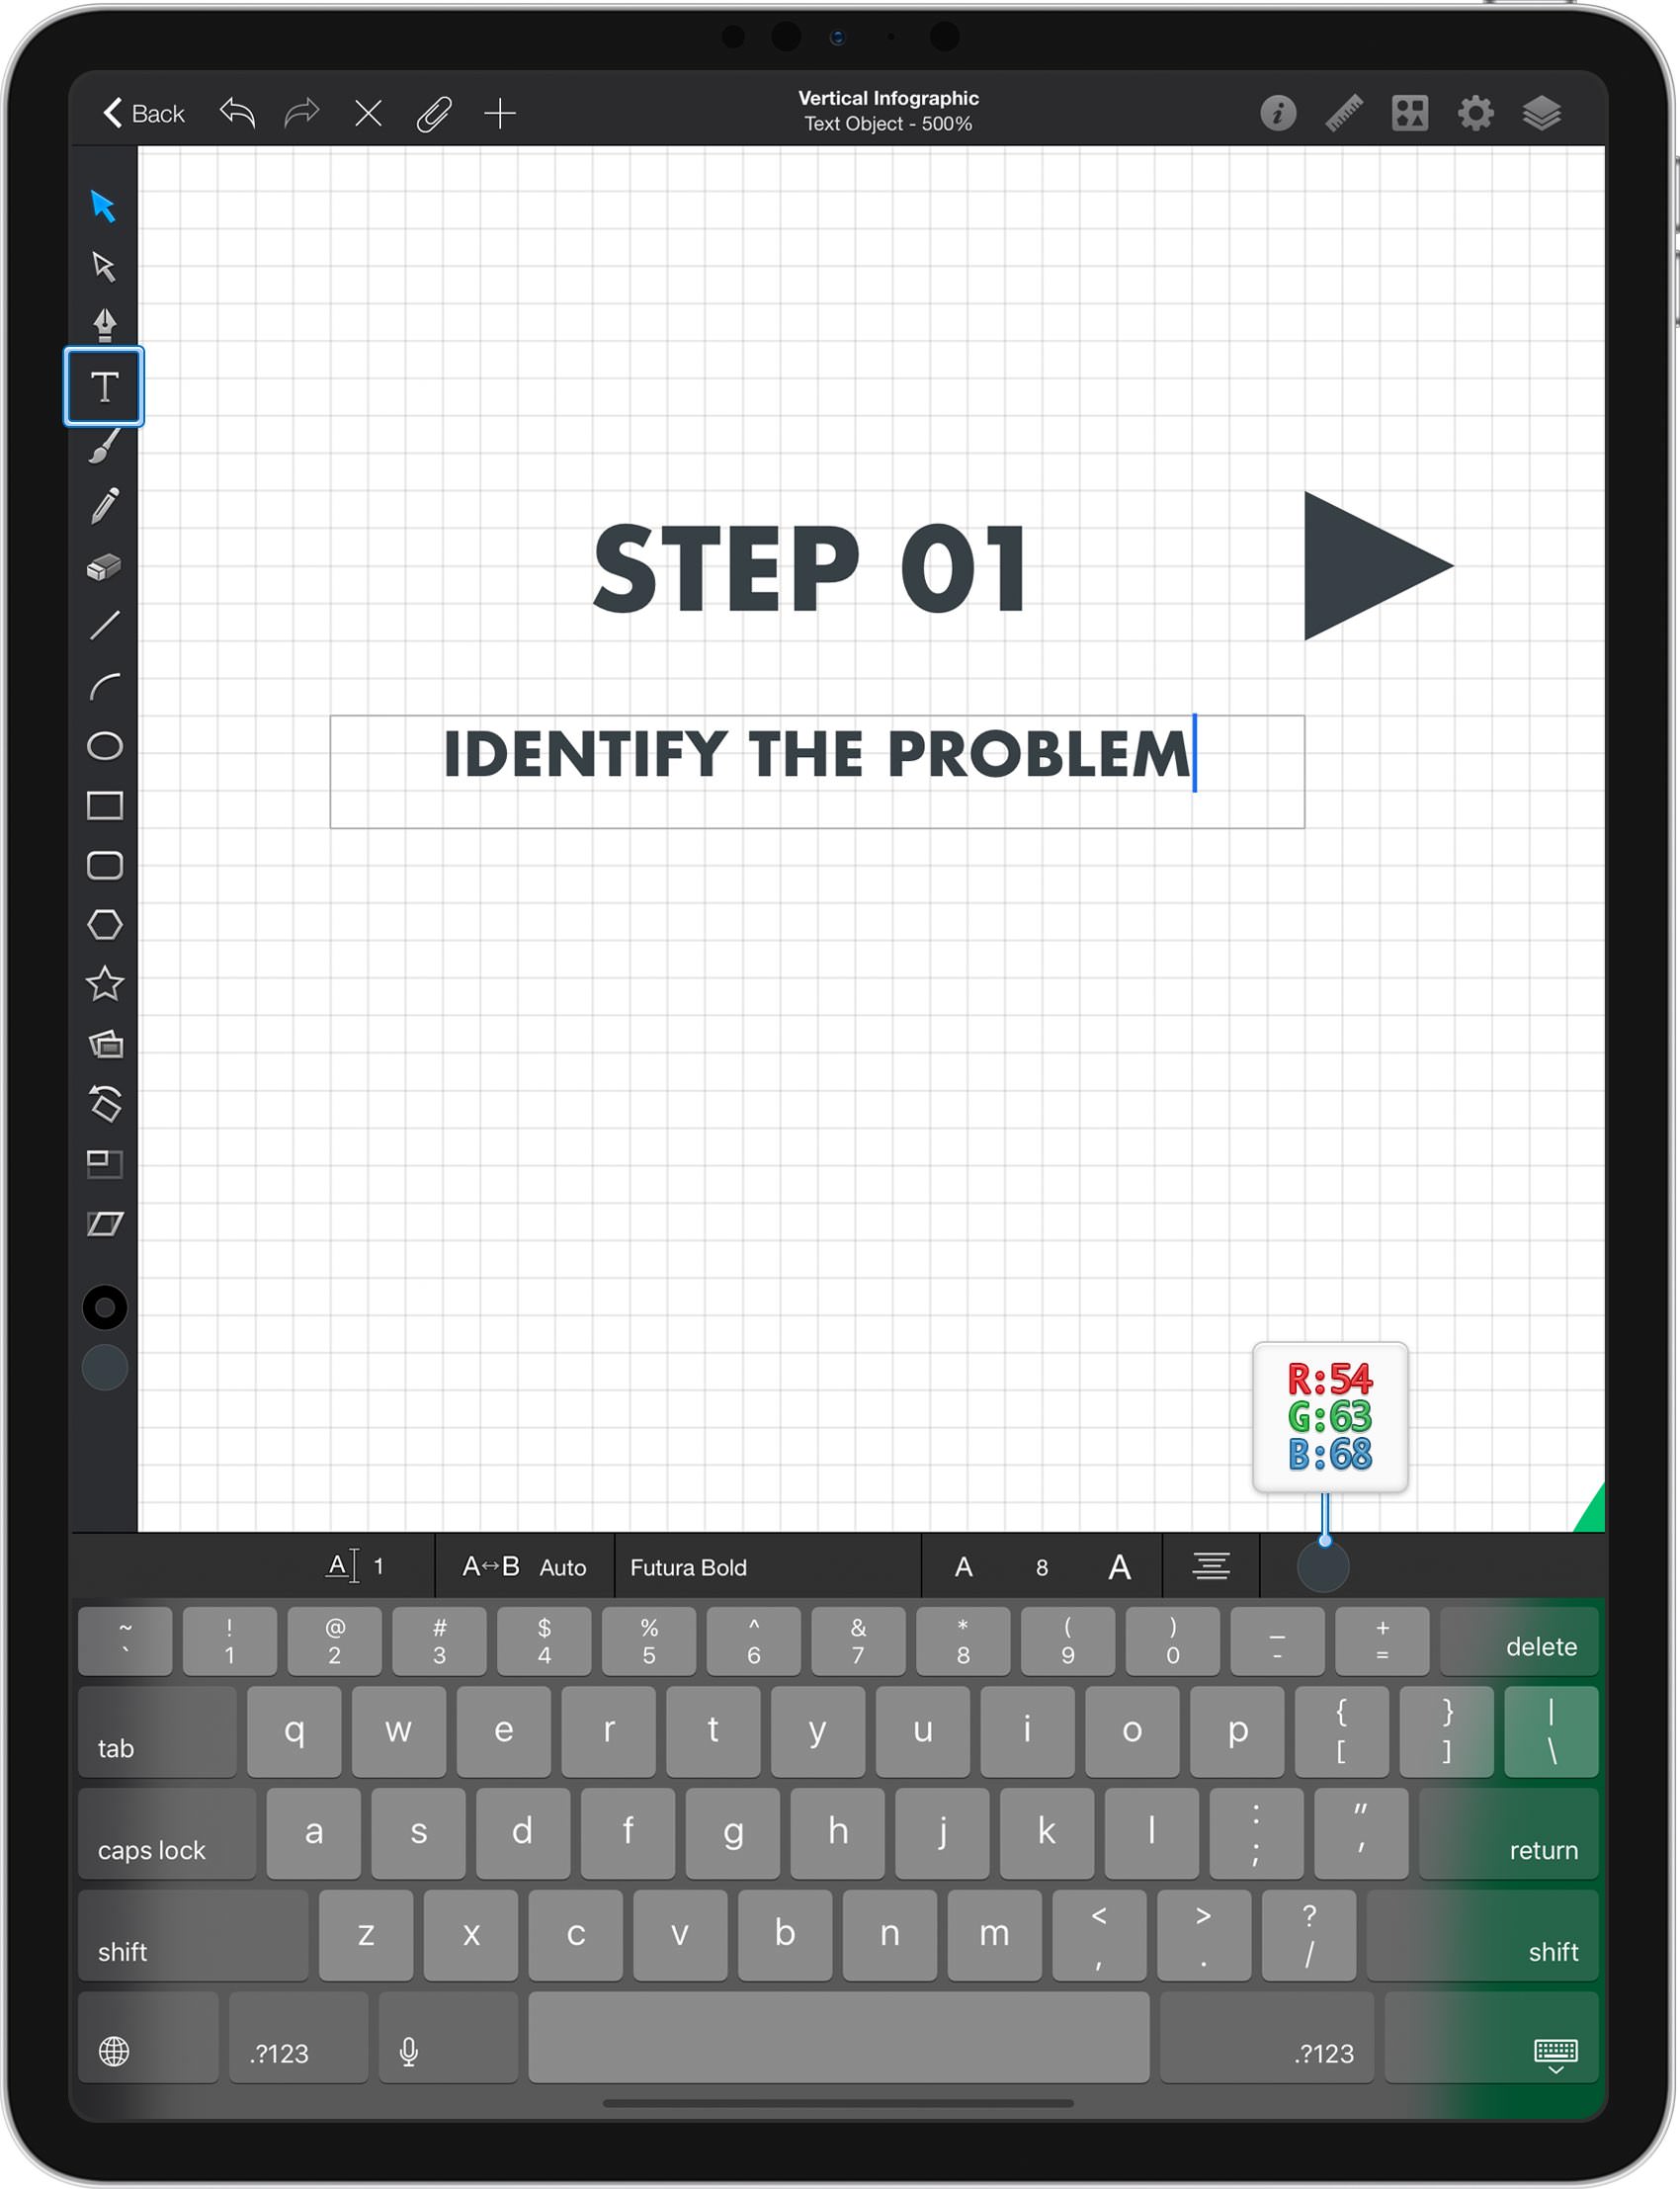
Add a second text field and lower the Size to 8 pt. Create a 130 x 10 px text field, place it as shown in the following image and add the "IDENTIFY THE PROBLEM" piece of text.
Step 37
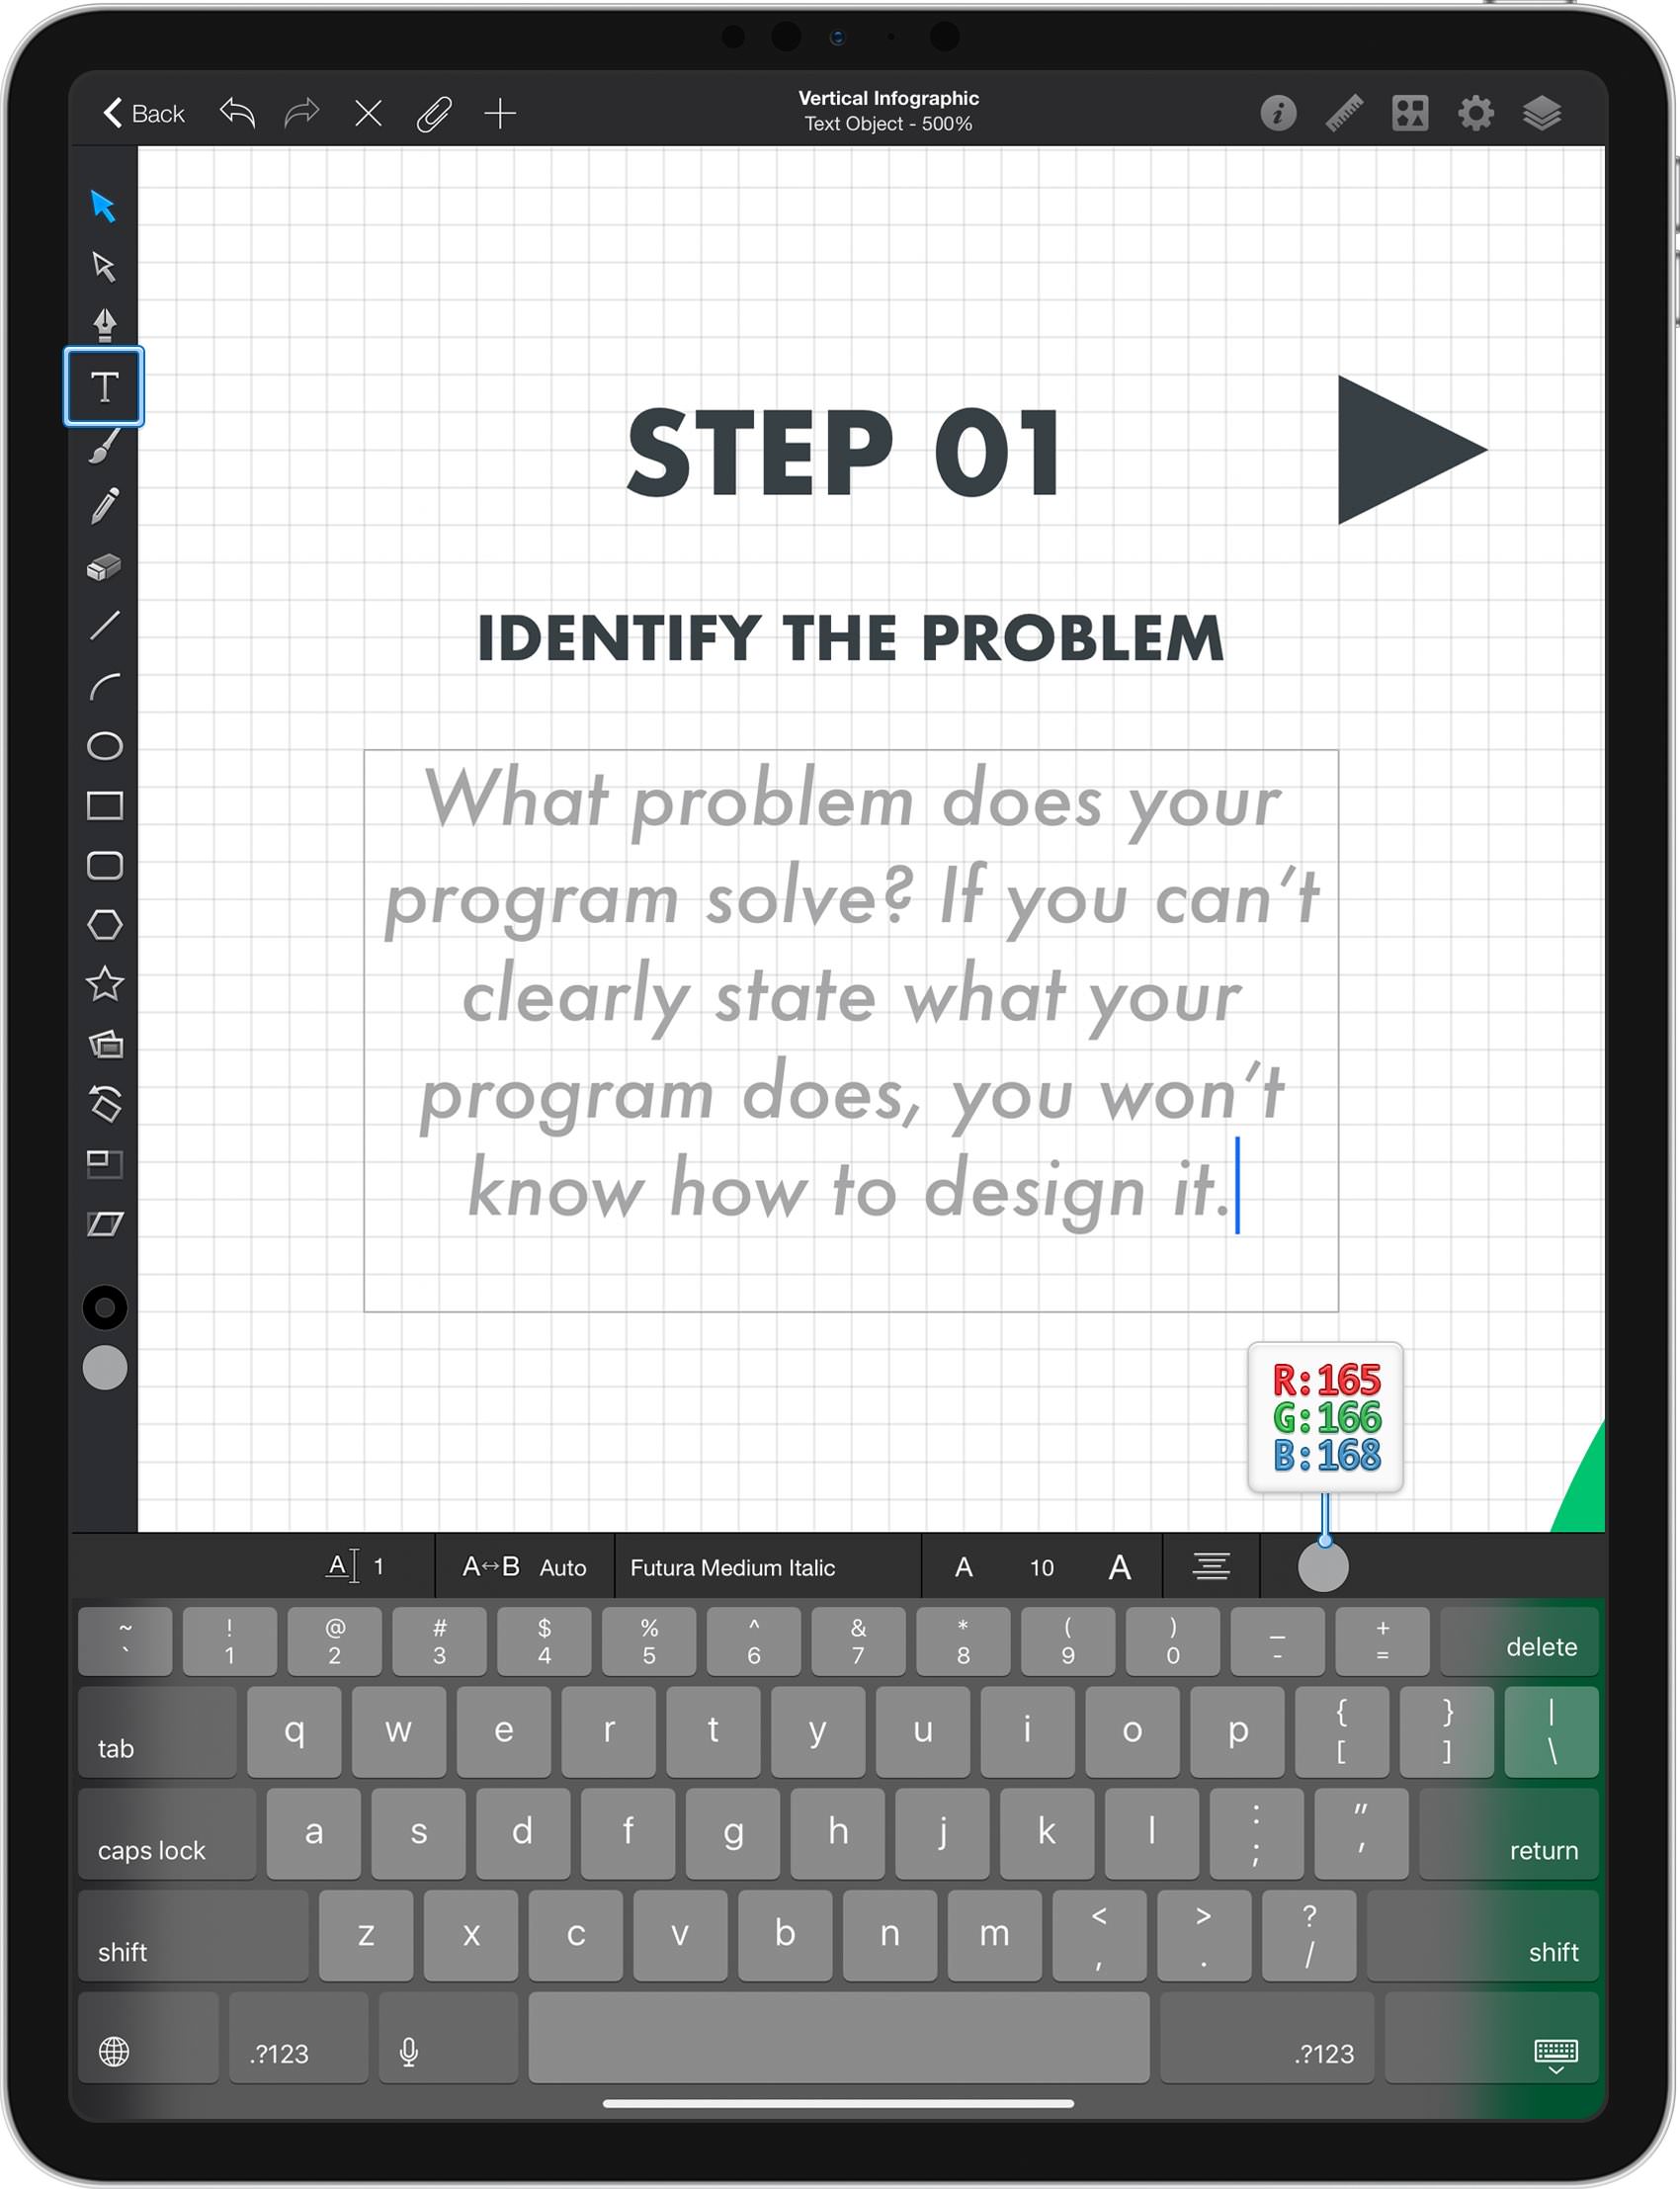
Ad a third text field, change the Style to Medium Italic and increase the Size to 10 pt. Change the color to R=165 G=166 B=168 and then create a 130 x 75 px text field. Place it as shown in the following image and add the text shown below.
Step 38
Multiply your text fields, place the copies as shown below and don't forget to replace their content.

Step 39
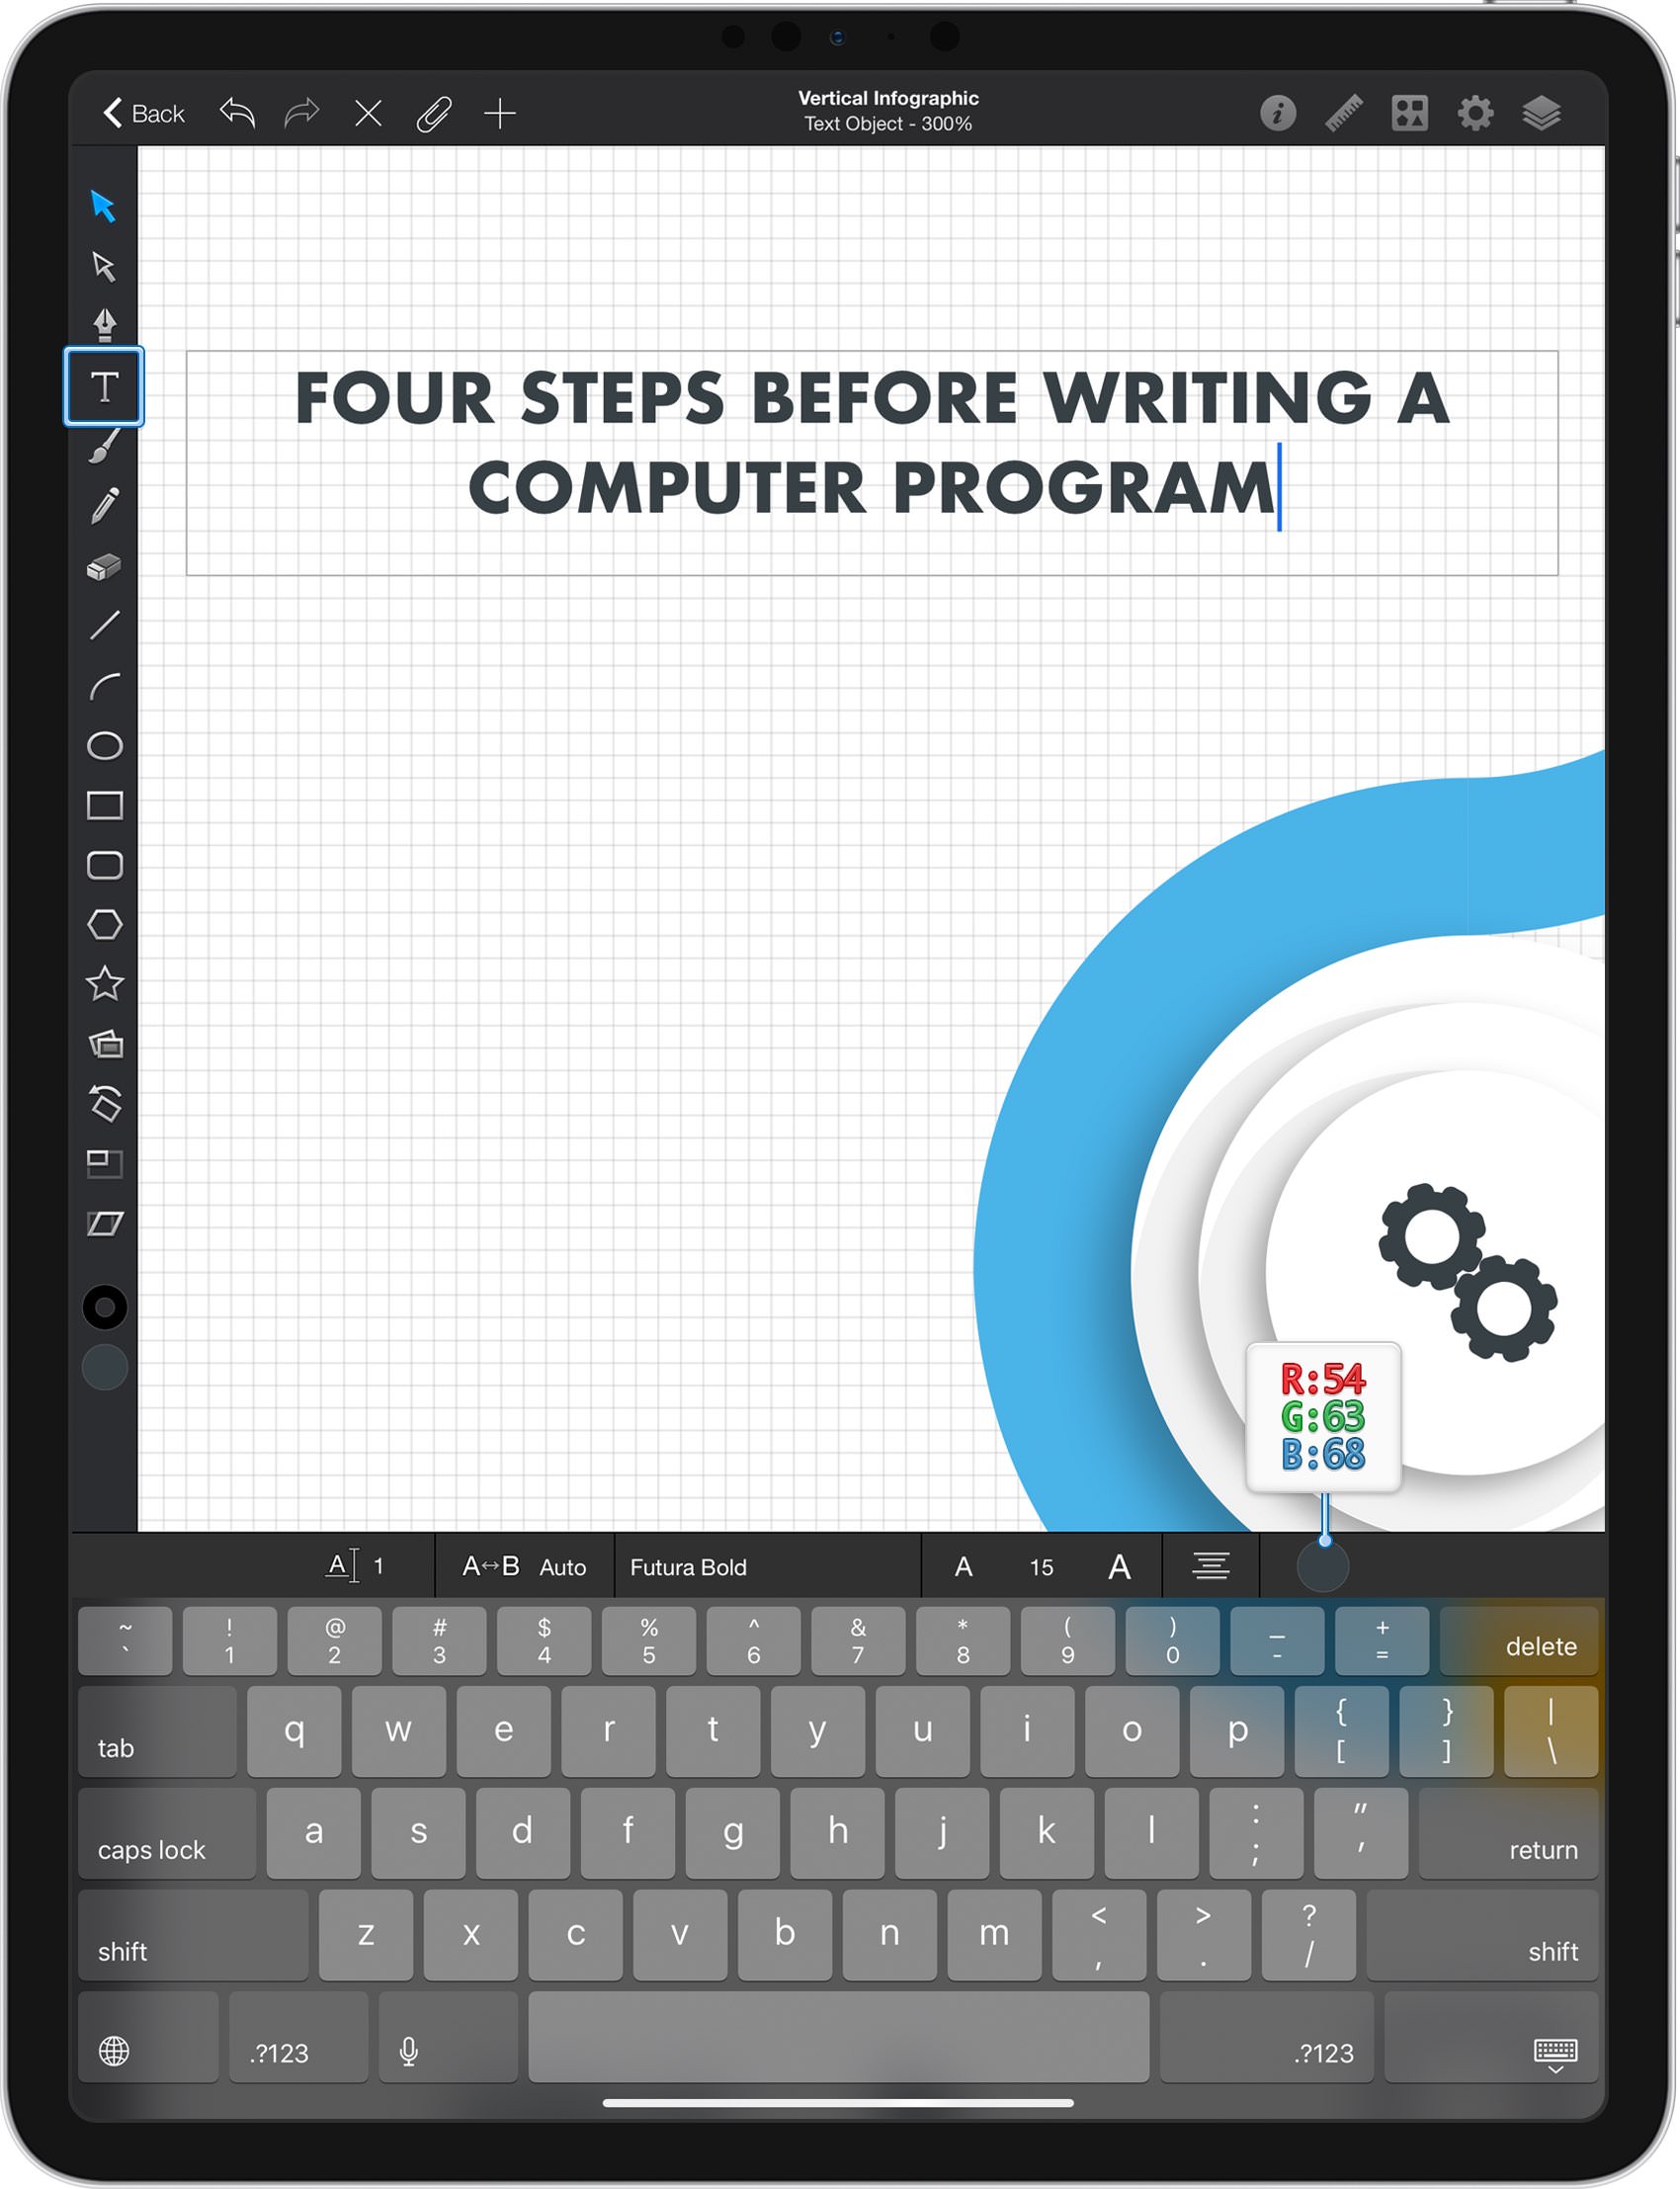
Add a new text filed, change the Style to Bold and increase the Size to 15 pt. Change the color back to R=54 G=63 B=68 and then add the text shown below. Resize your text field to 305 x 40 px and place it as shown in the following image.
Step 40
Go to the Layers panel and add one last layer. Rename it "BG", drag it to the bottom of the panel and make sure that it stays selected.
Pick the Rectangle Tool and create a 680 x 1065 px shape. Fill this rectangle with R=247 G=248 B=250 and make sure that it covers your entire canvas.
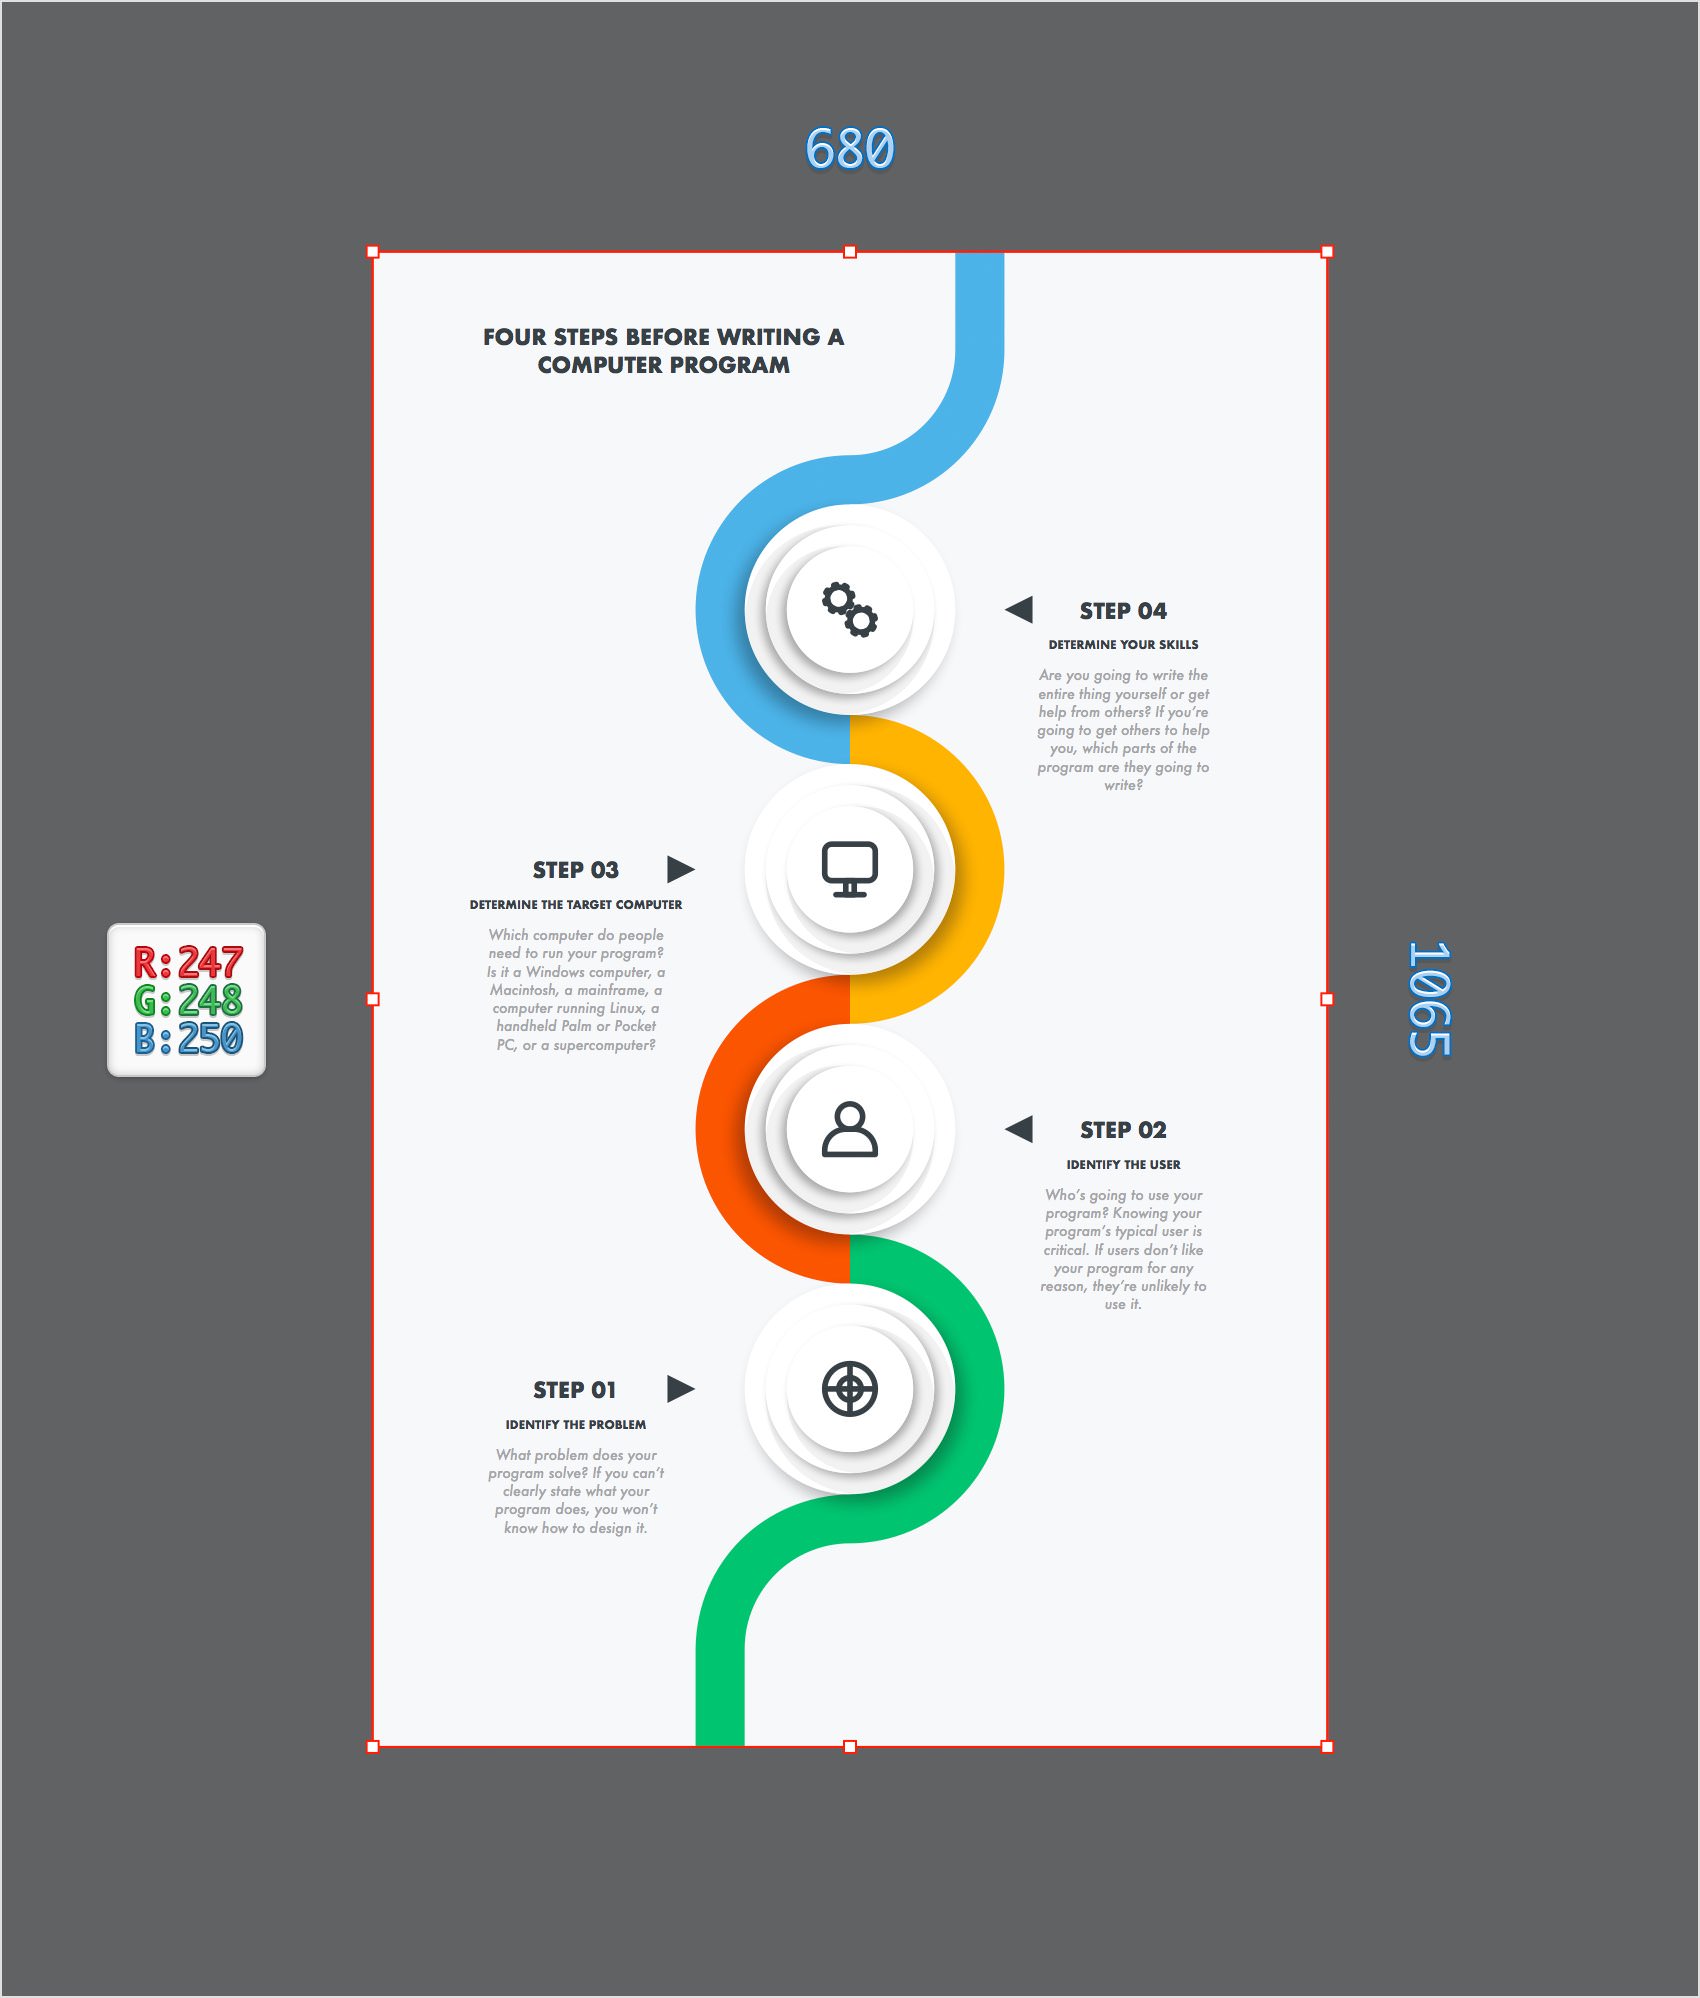
Finished Design
Congratulations, you've finished the tutorial!
Hope you've enjoyed learning some of the techniques and processes presented in these steps. As always, feel free to adjust the final design and make it your own.

Download Graphic File:
stepsverticallnfographic.idraw