


Create a Nintendo Switch Illustration
In the following tutorial you will learn how to create a detailed Nintendo Switch illustration in Graphic for Mac.
For starters, you will learn how to set-up a simple grid, how to center objects and how to numerically position shapes. Using basic shapes along with some boolean commands, you will learn how to create the more complex objects. Taking full advantage of the Effects pane and its features, you will learn how to add subtle shading and highlights.
Using the Layers panel, you will learn how to group, organize and name the components of your illustration. Finally, you will learn how to easily multiply objects and how to add a pretty simple text label.
If you're new to Graphic and fear that you might not be able to easily follow the tutorial, a quick read of the Graphic User Guide might be what you need. It's not a must, but it will help you get familiarized with Graphic's interface, tools and features. Whether you read it or not following the tutorial should be fairly easy. Let's get started.
Step 1
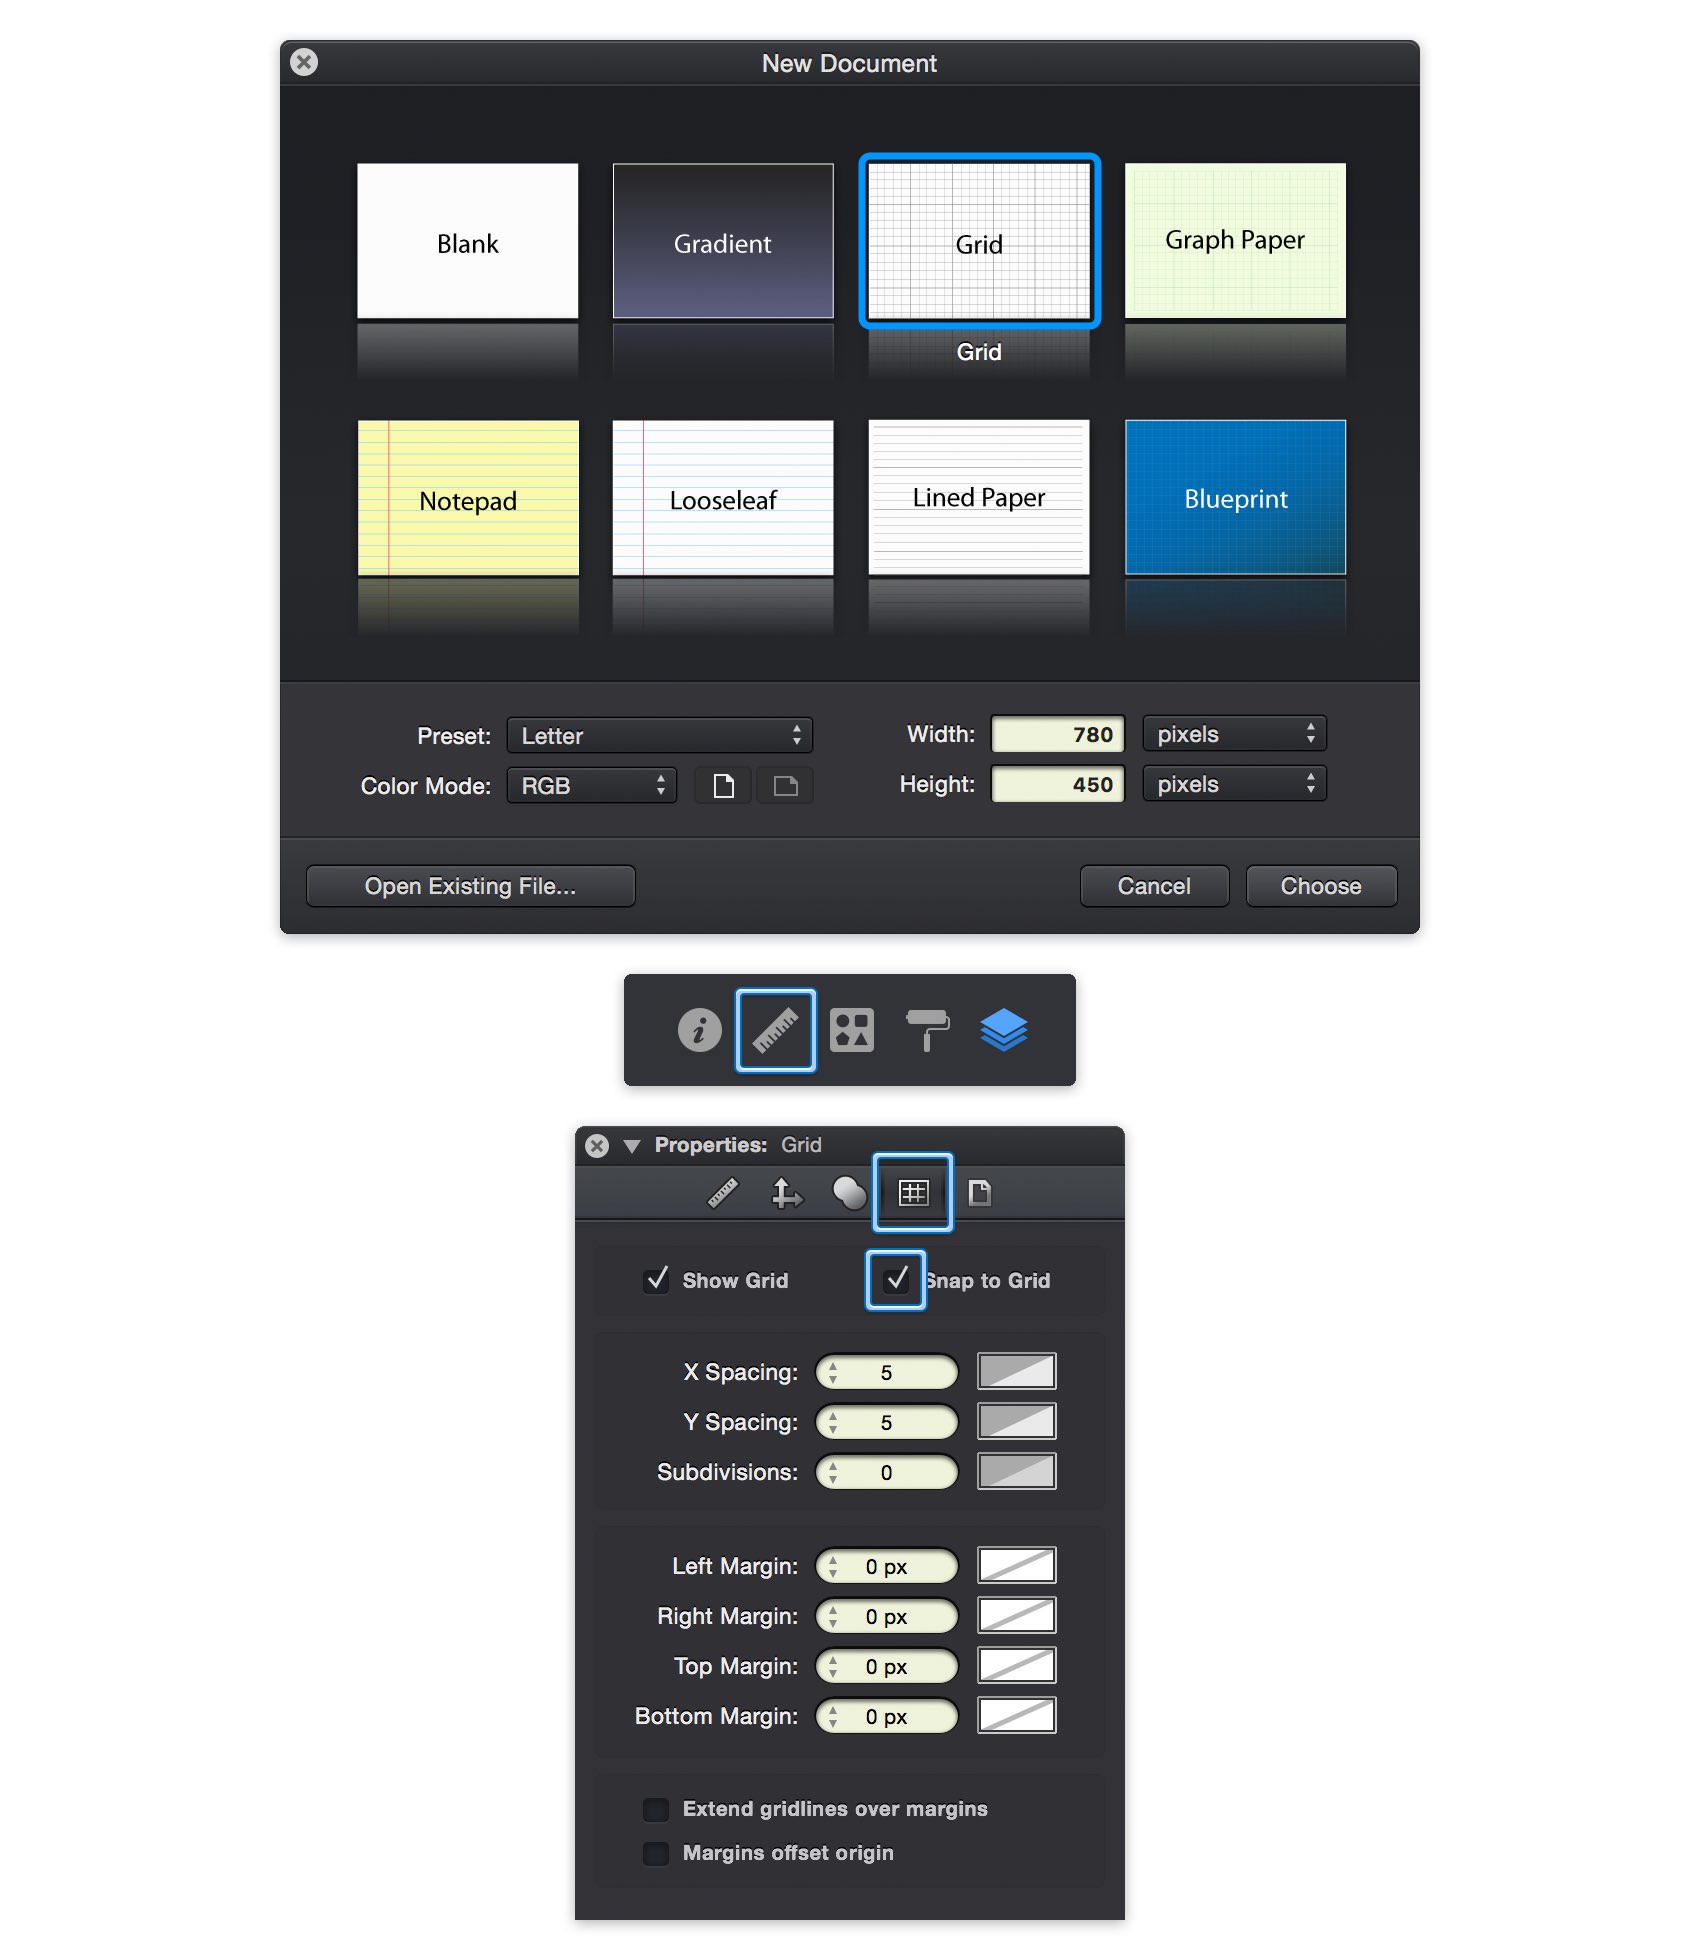
For this tutorial we'll create a 780 x 450 px document. Go to File > New (Command - N) to bring up the New Document pop-up window. Select the Grid document style and set the document units to pixels. Set the document dimensions to 780 pixels wide by 450 pixels high and then click Choose to create your document.
Next, we'll adjust the document grid. Switch to the Grid pane in the Properties panel. You can easily open or close the Properties panel using that ruler icon. Change the X & Y Spacing to 5, set the Subdivisions to 0 and don't forget to enable Snap to Grid – all these features will make your work easier.
Don't forget that you can quickly enable or disable the grid and the Snap to Grid feature using the Command + ' and the Command + Shift + ' keyboard shortcuts. Do your best to get used with keyboard shortcuts, using them will save you a lot of time.
Step 2
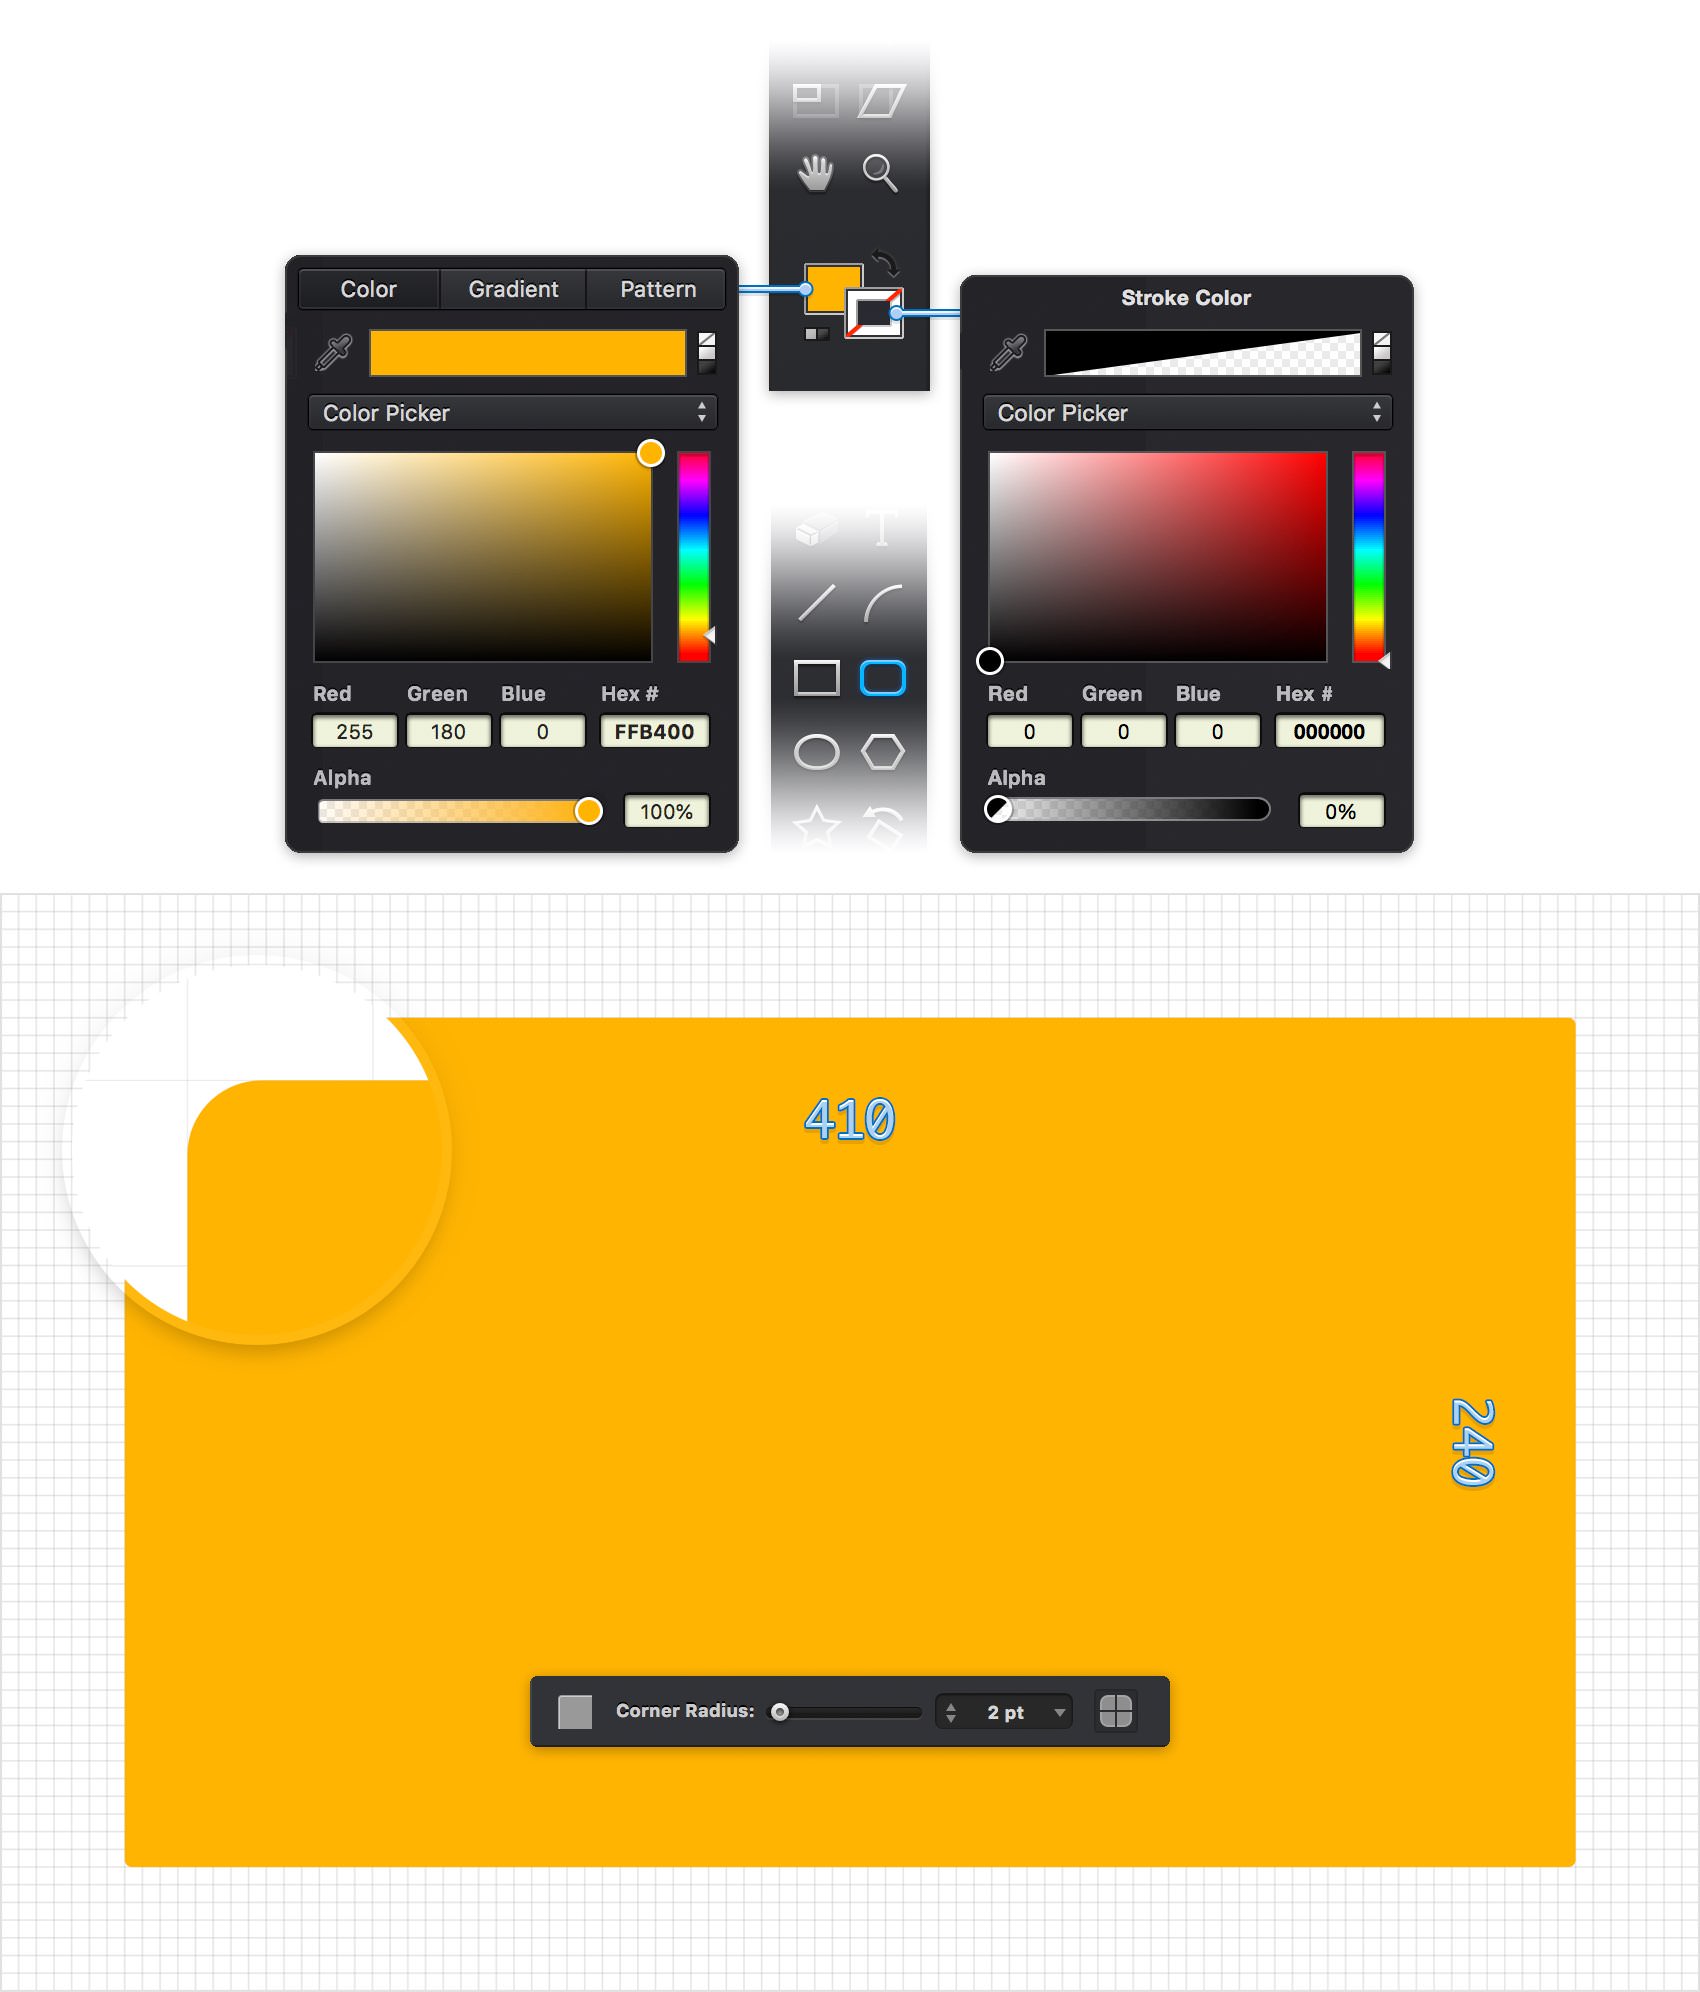
Focus on the Toolbar and click the Stroke color well. Drag the Alpha slider to 0% to make your Stroke invisible. Click the Fill color well and replace the existing color with R=255 G=180 B=0.
Pick the Rounded Rectangle Tool (Shift + M), focus on the Tool Options bar and drag that Corner Radius slider to 2 pt. Move to your canvas and create a 410 x 240 px shape.
Step 3
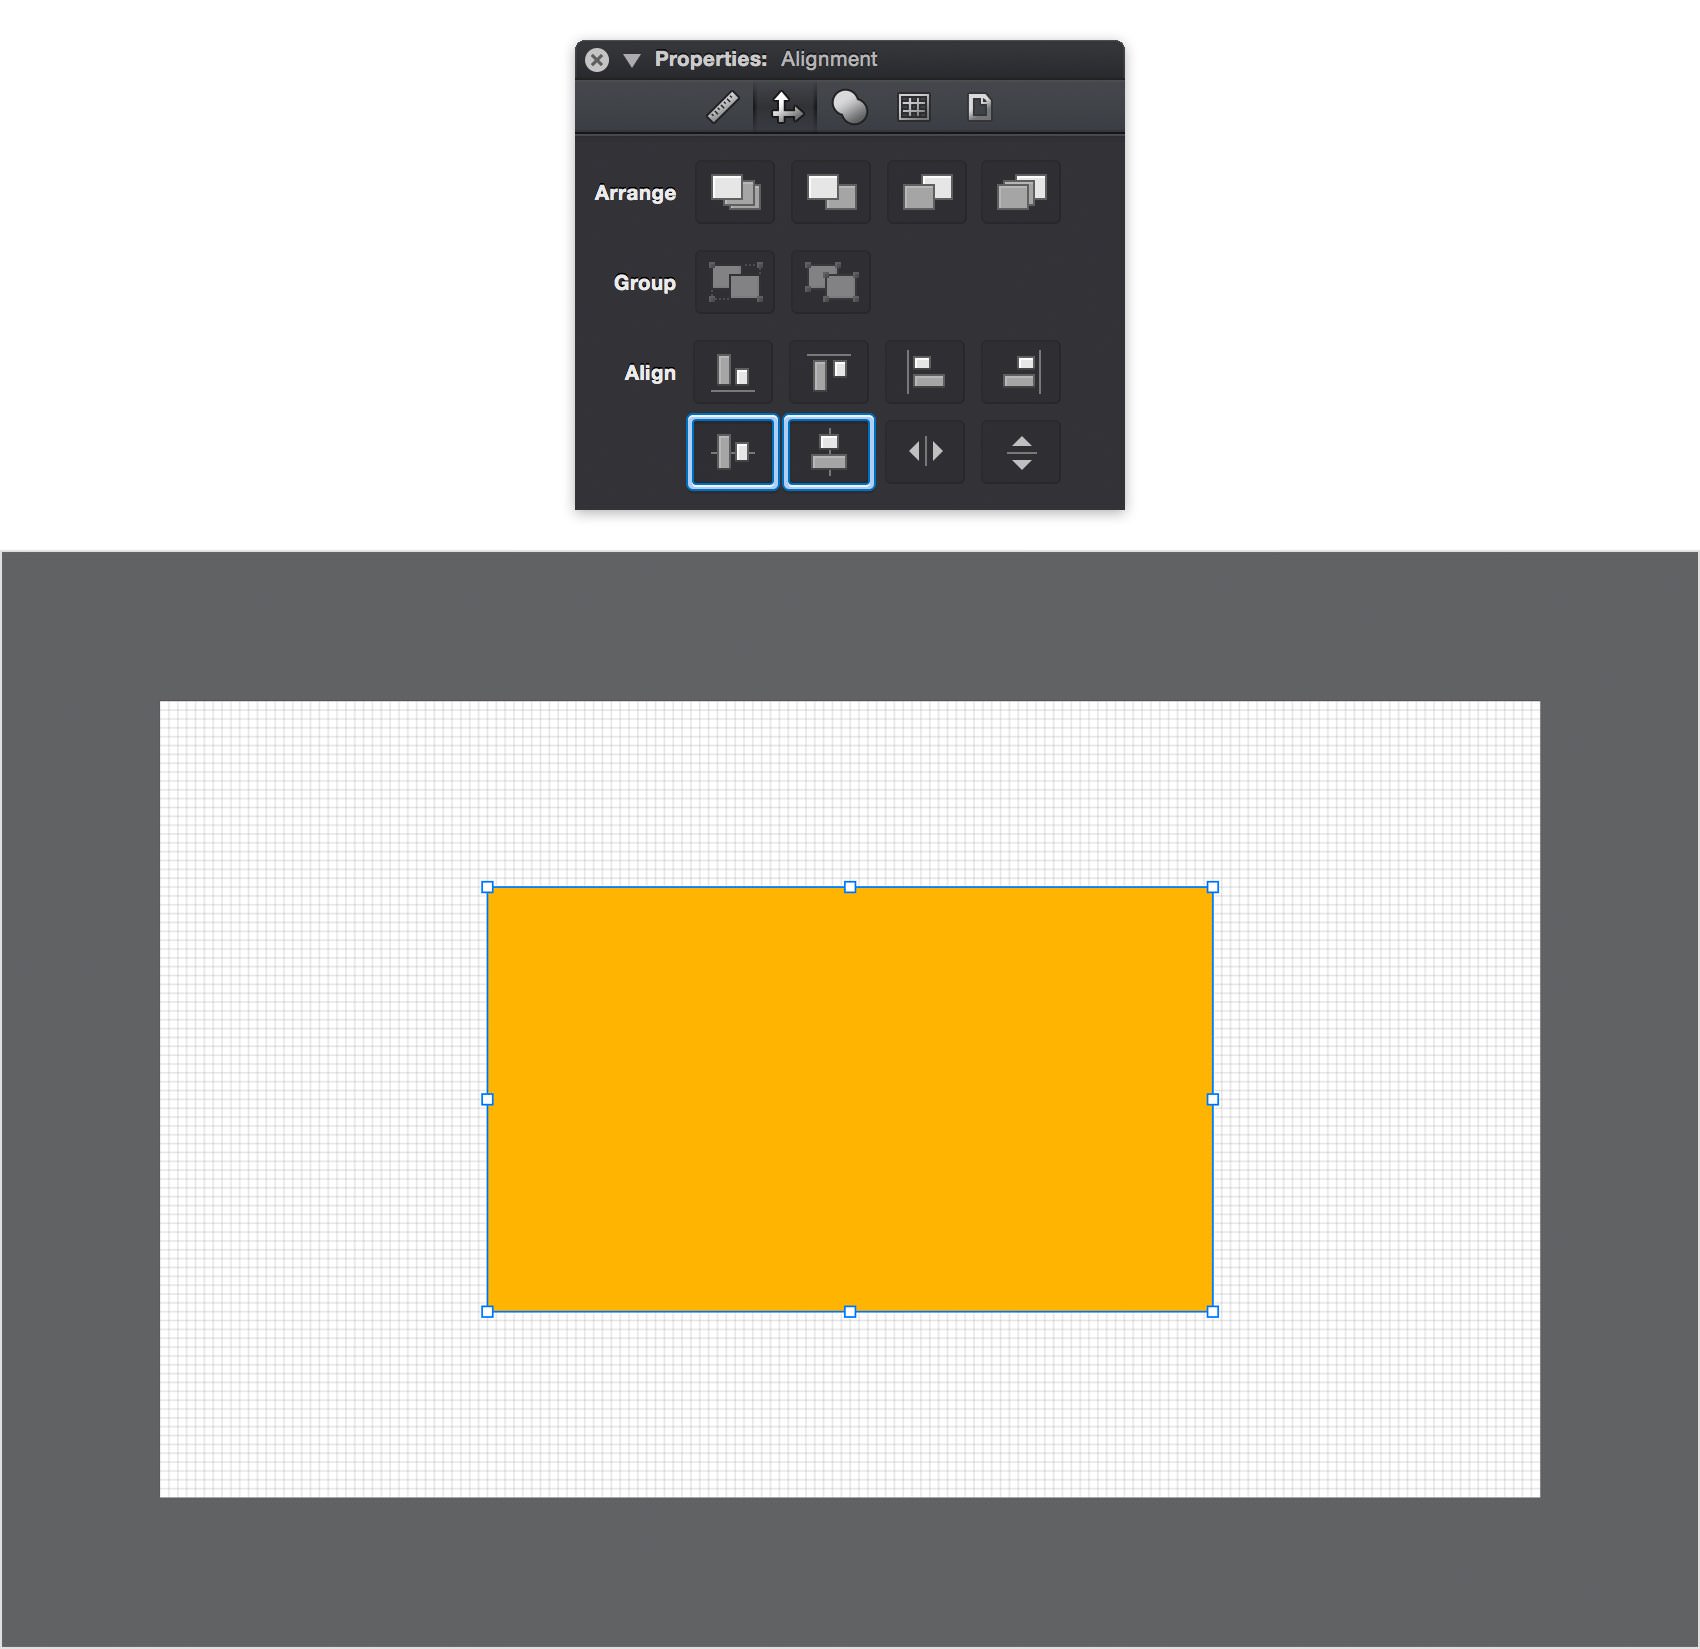
Make sure that your rounded rectangle is still selected and open the Alignment pane from the Properties panel. Click the Horizontal Centers and Vertical Centers commands to move your selection in the center of the canvas.
Step 4
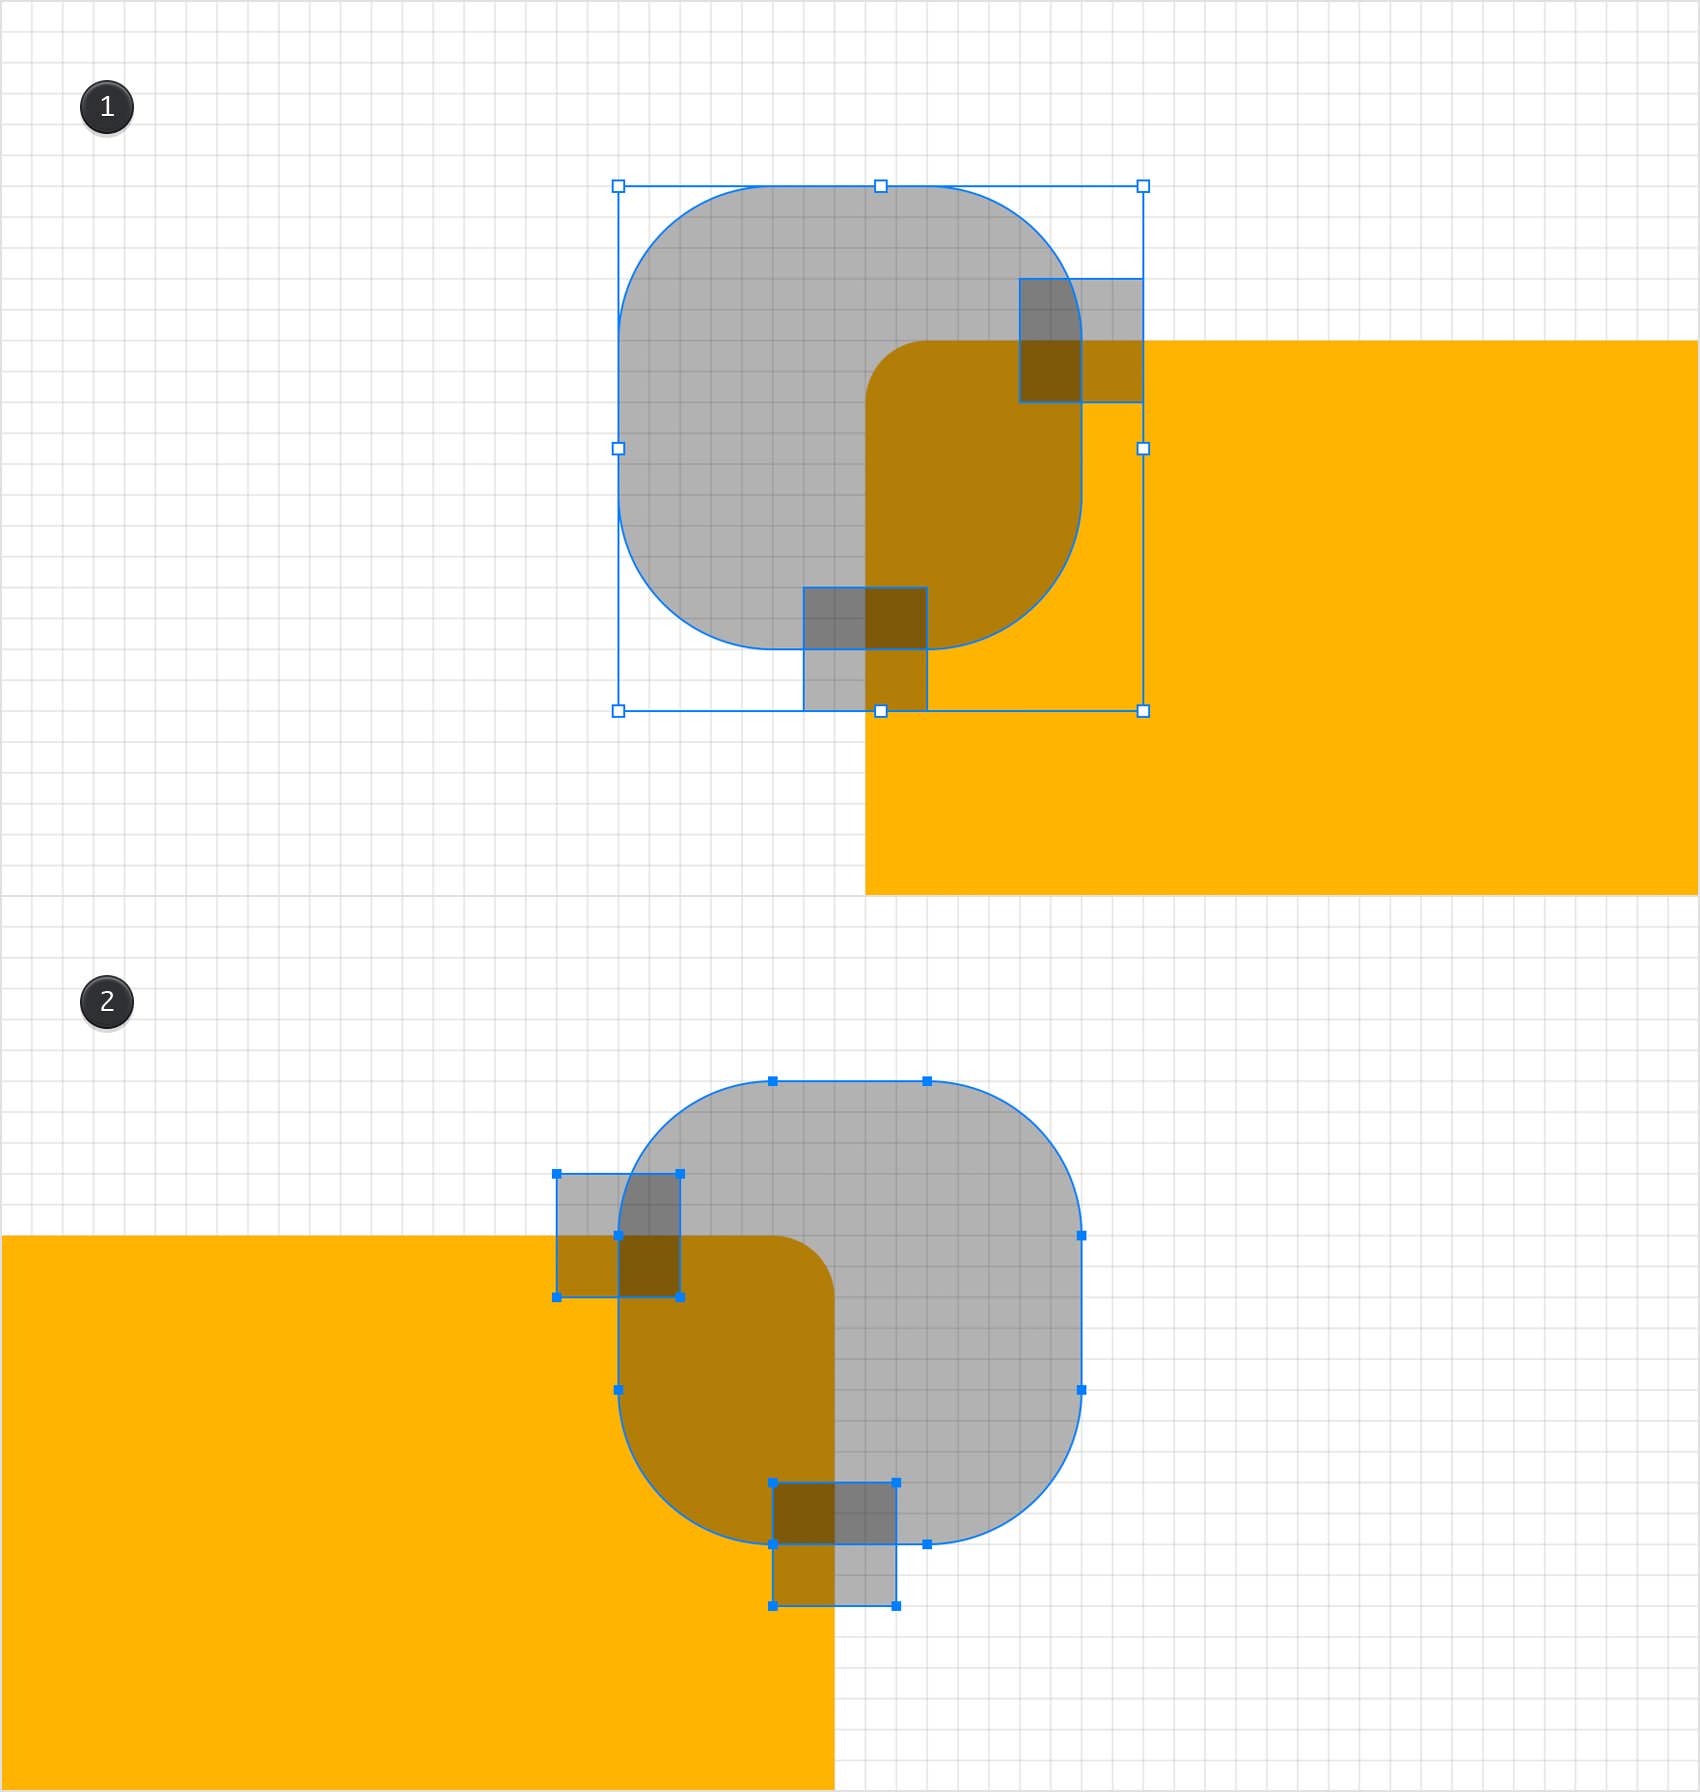
For the following steps you will need a grid every 1 px. This means that you need to return to the Grid pane from the Properties panel and enter 1 px in both Spacing boxes.
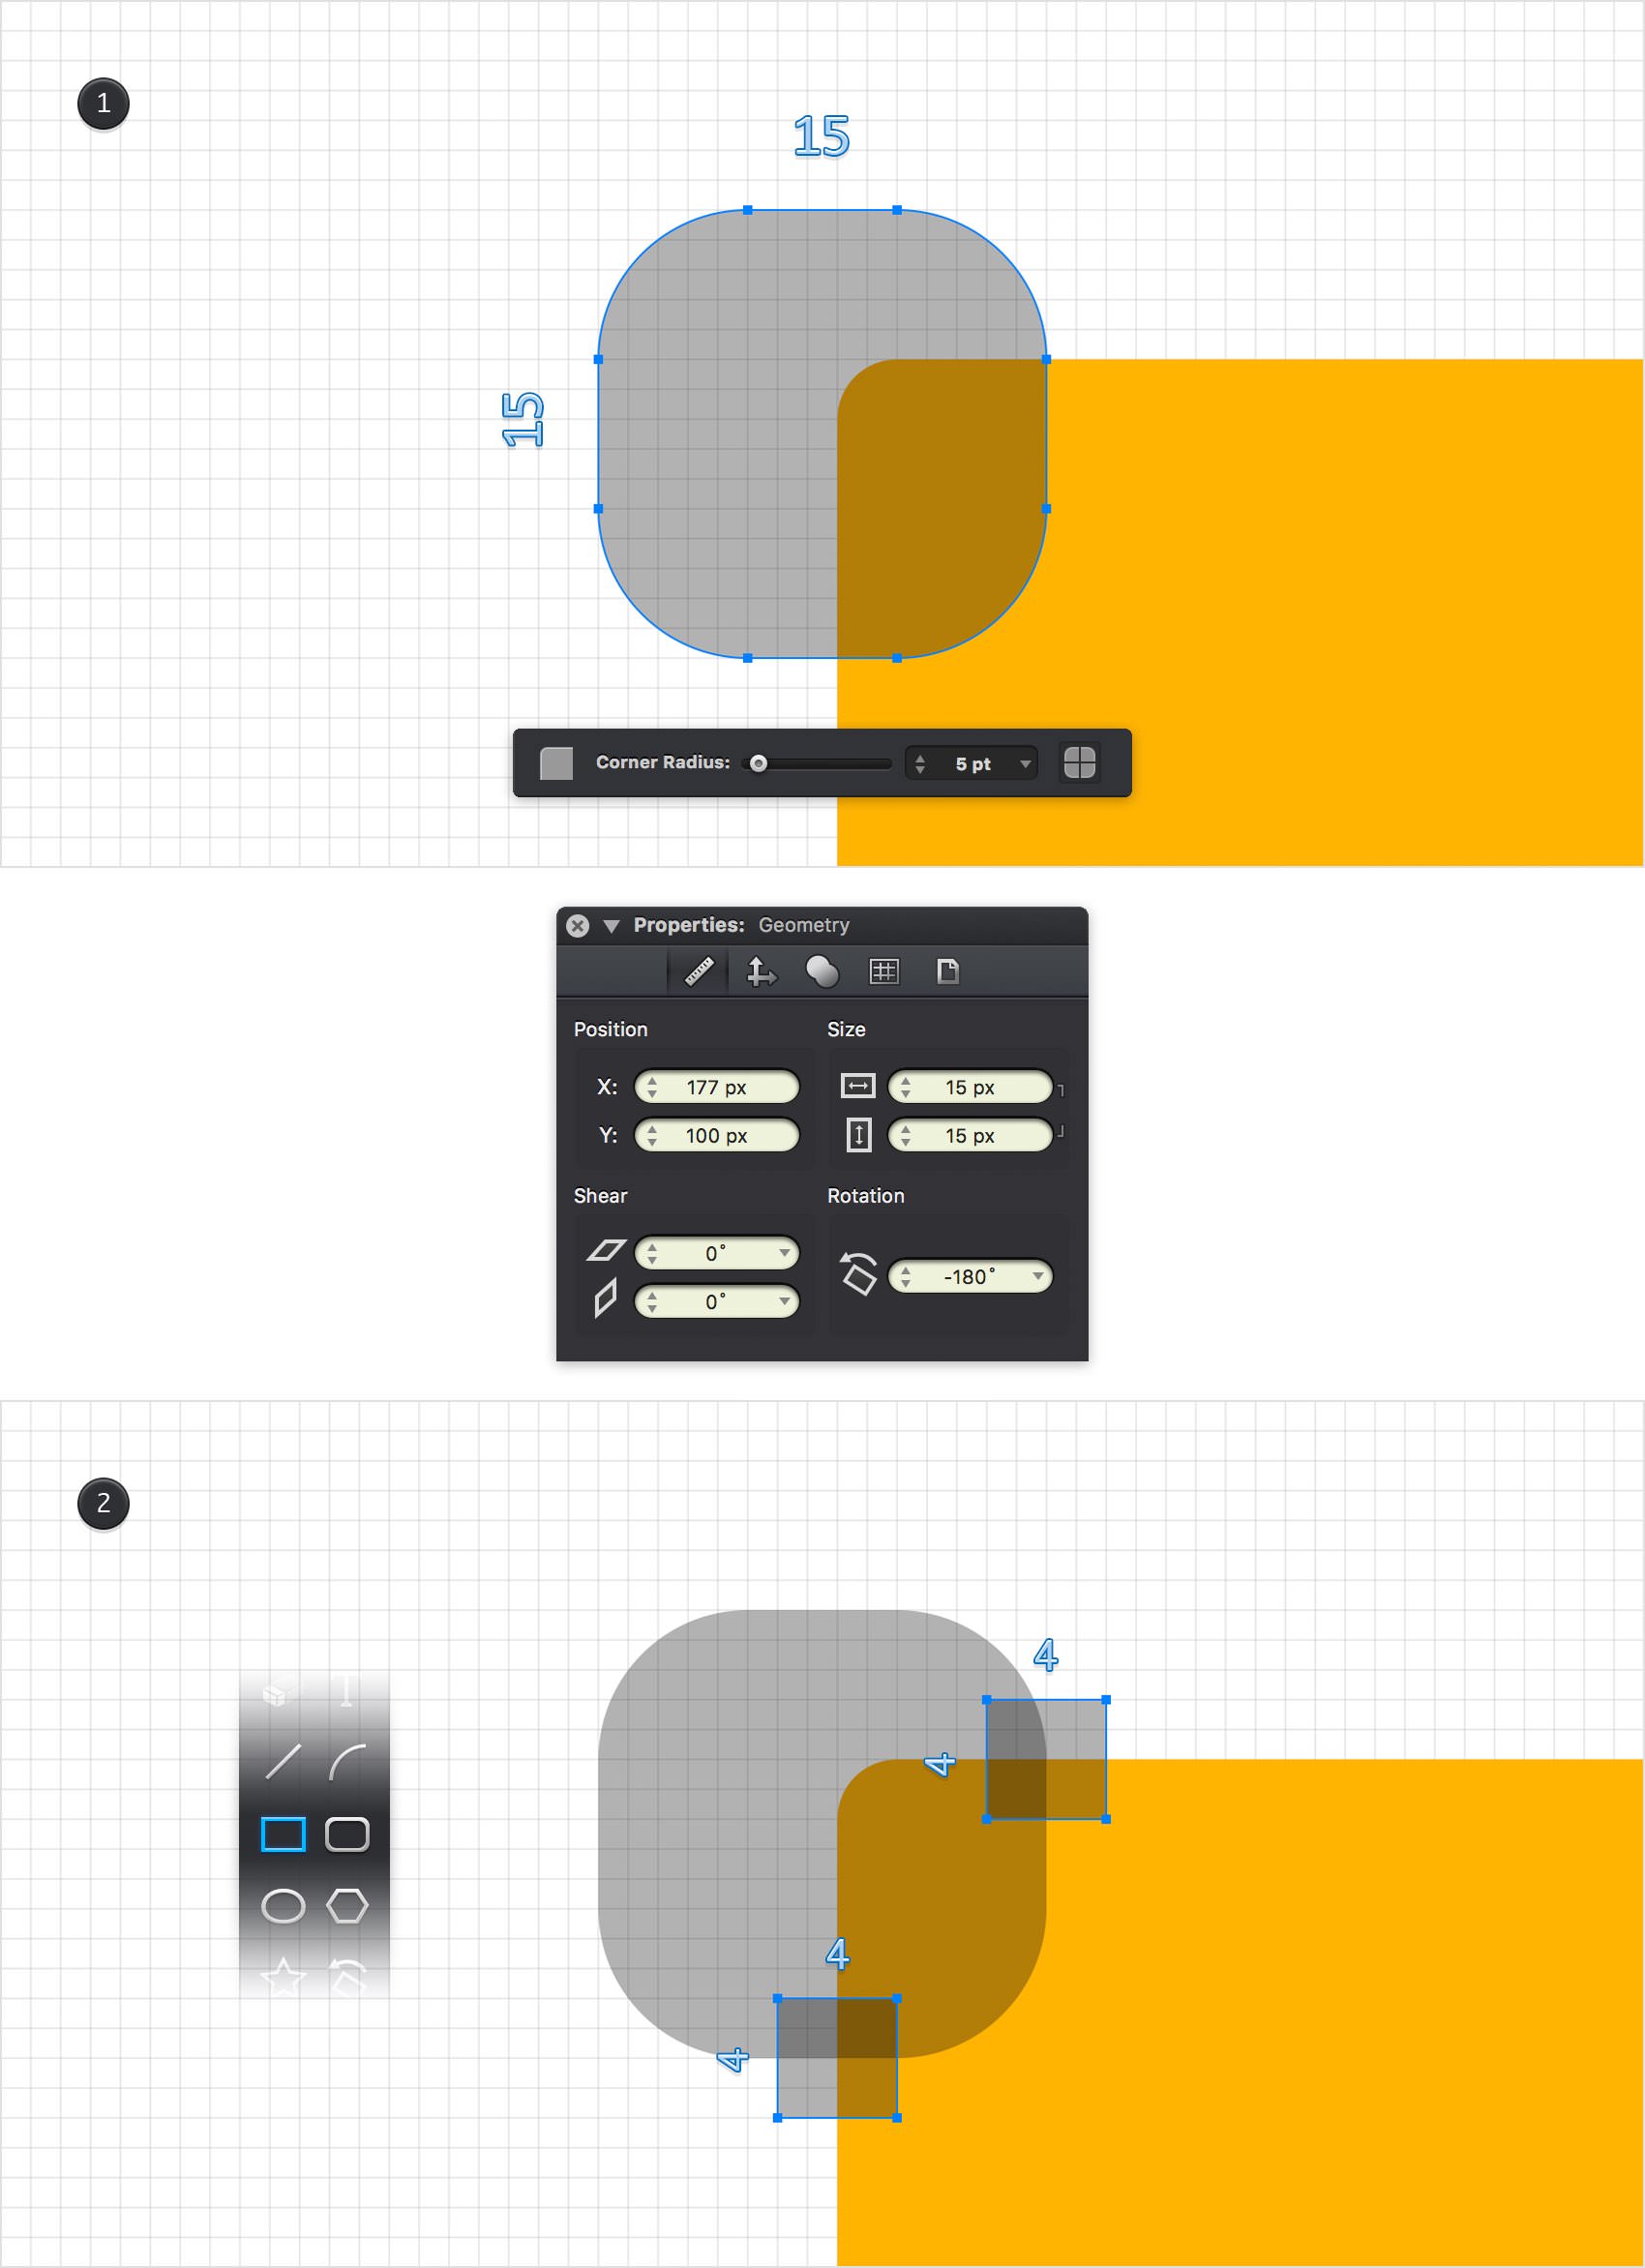
Pick the Rounded Rectangle Tool (Shift + M) and set the Corner Radius to 5 pt. Create a 15 px rounded square and place it exactly as shown in the first image. Hold the Shift key while dragging to easily create a perfect rounded square. You can position this shape manually, using the grid as a references or you can do it numerically using the Geometry pane from the Properties panel. Make sure that your rounded square is selected, focus on the Position settings, and then set the X to 177 px and the Y to 100 px.
Switch to the Rectangle Tool (M) and create two, 4 px squares. Place these new shapes as shown in the second image.
Step 5
Pick the Move Tool (V), hold down the Shift key and select your rounded square along with the two tiny squares. Duplicate these shapes (Command + D), flip the copies horizontally (Modify > Rotate and Transform > Flip Horizontal) and then place them as shown in the second image.
Step 6
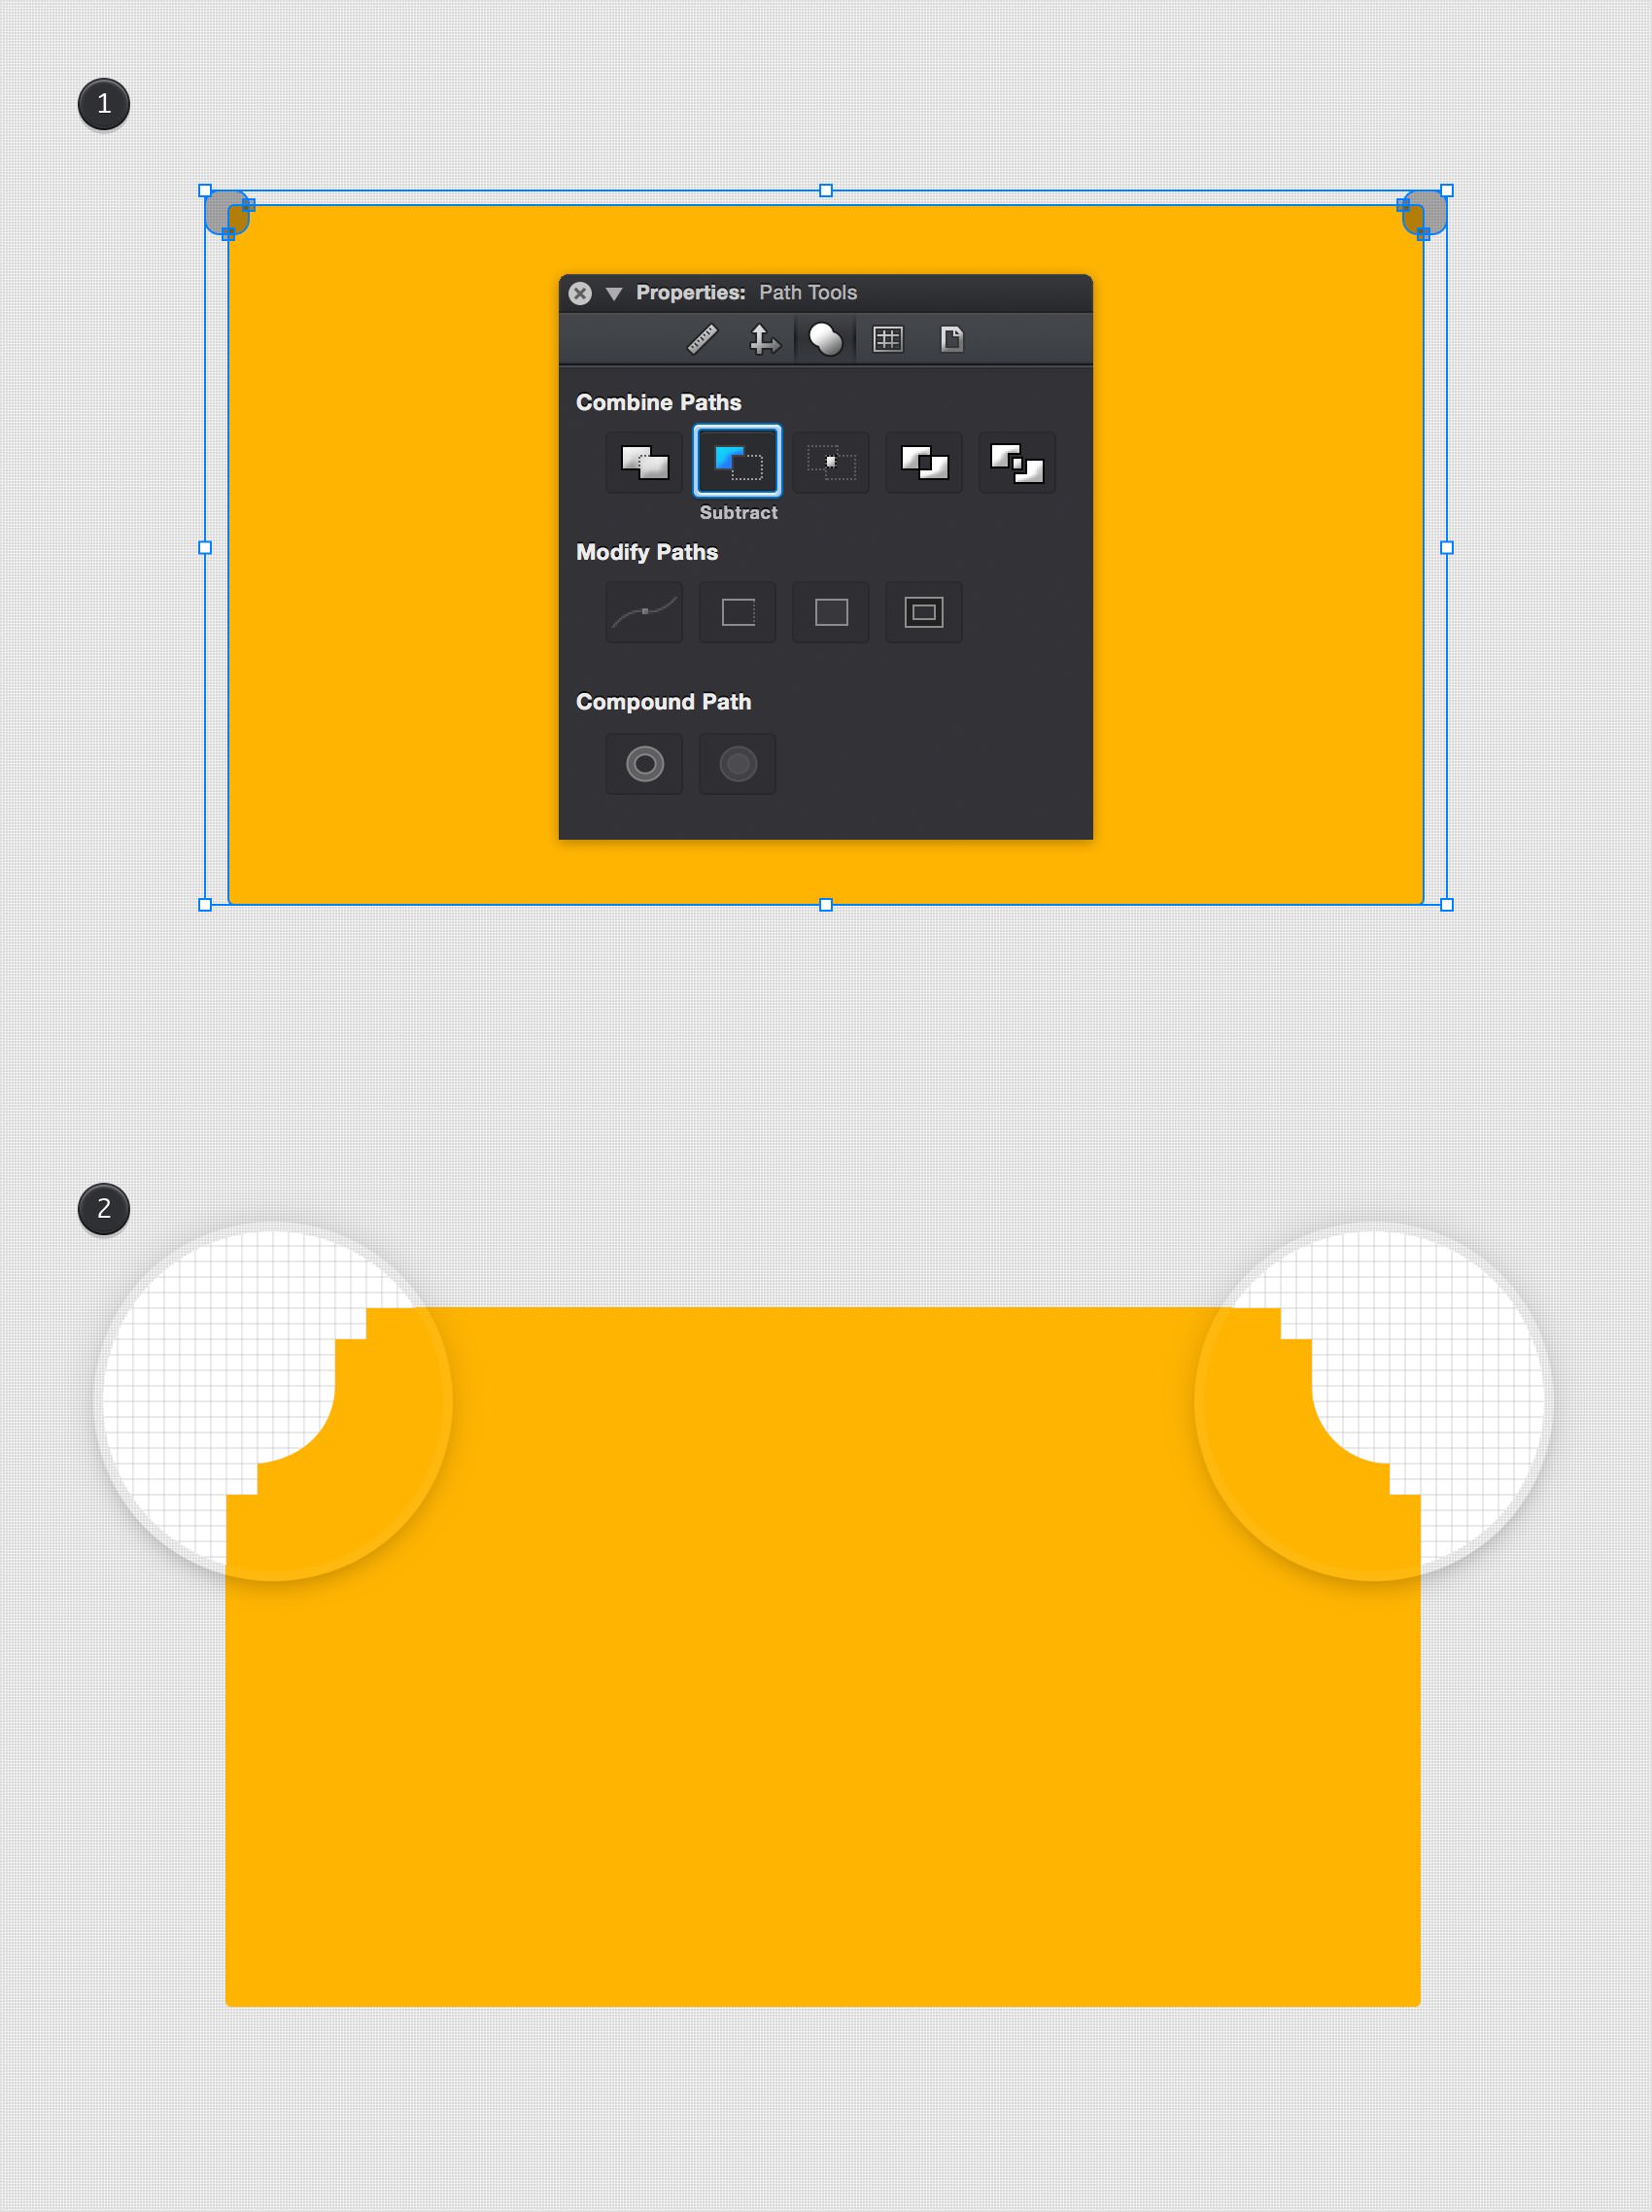
Using the Move Tool (V), select all the shapes made so far. Open the Path Tools pane from the Properties panel and click the Subtract command.
Step 7
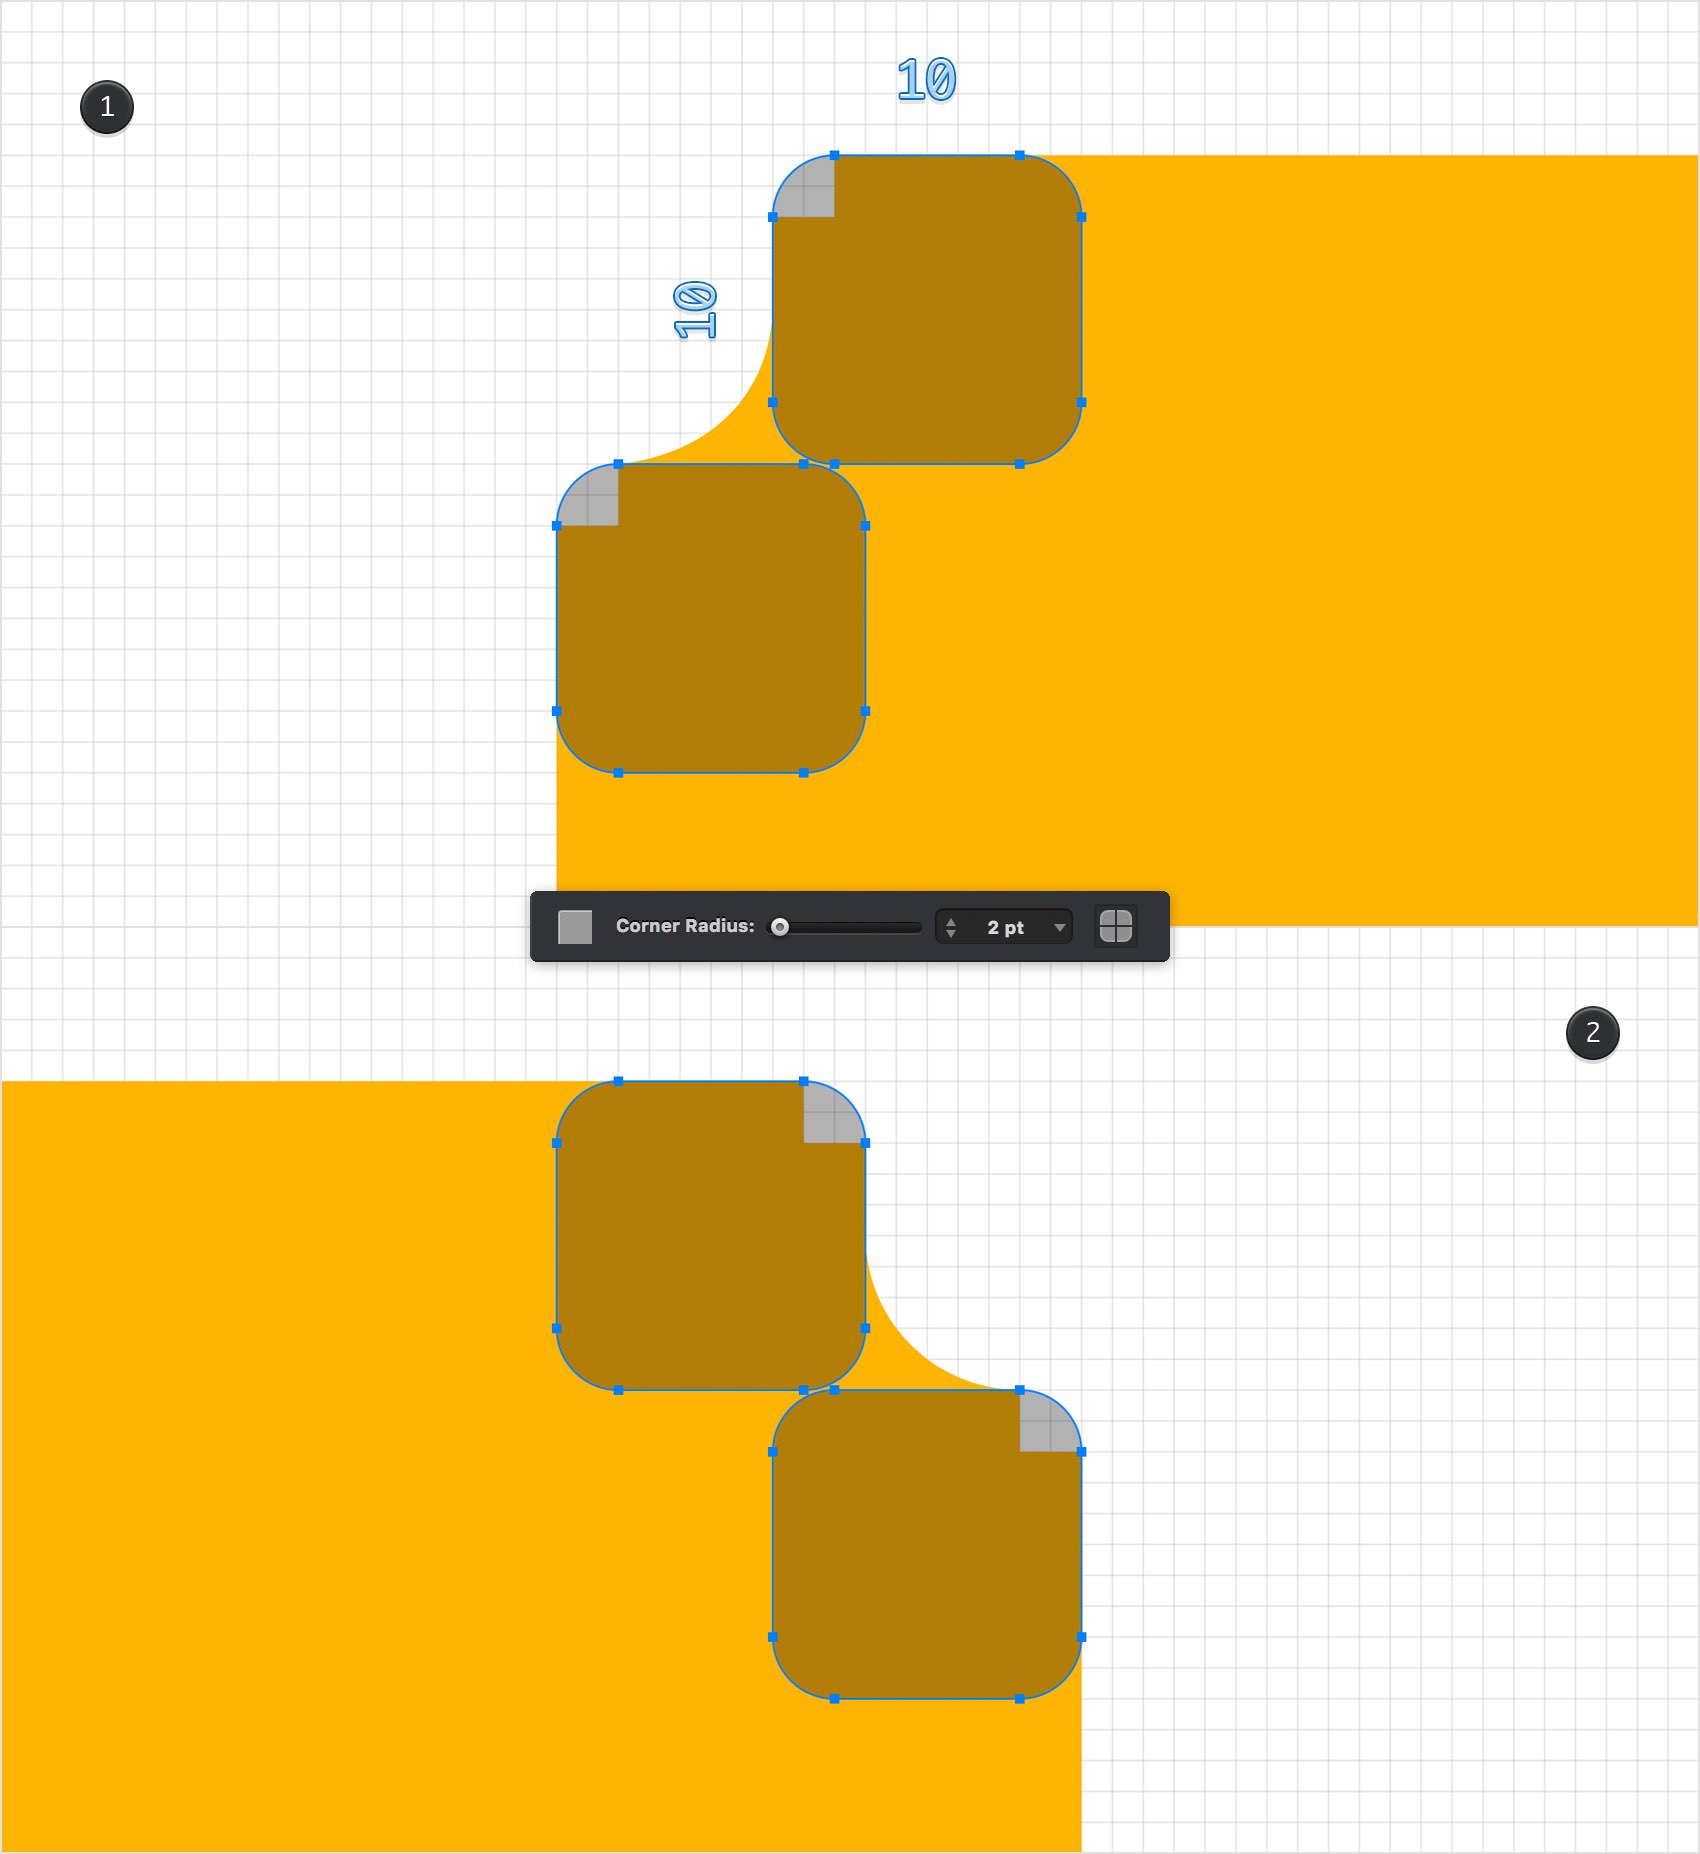
Pick the Rounded Rectangle Tool (Shift + M) and set the Corner Radius to 2 pt. Create two, 10 px rounded squares and place them as shown in the first image.
Using the same tool, create another two, 10 px rounded squares and place them as shown in the second image.
Step 8
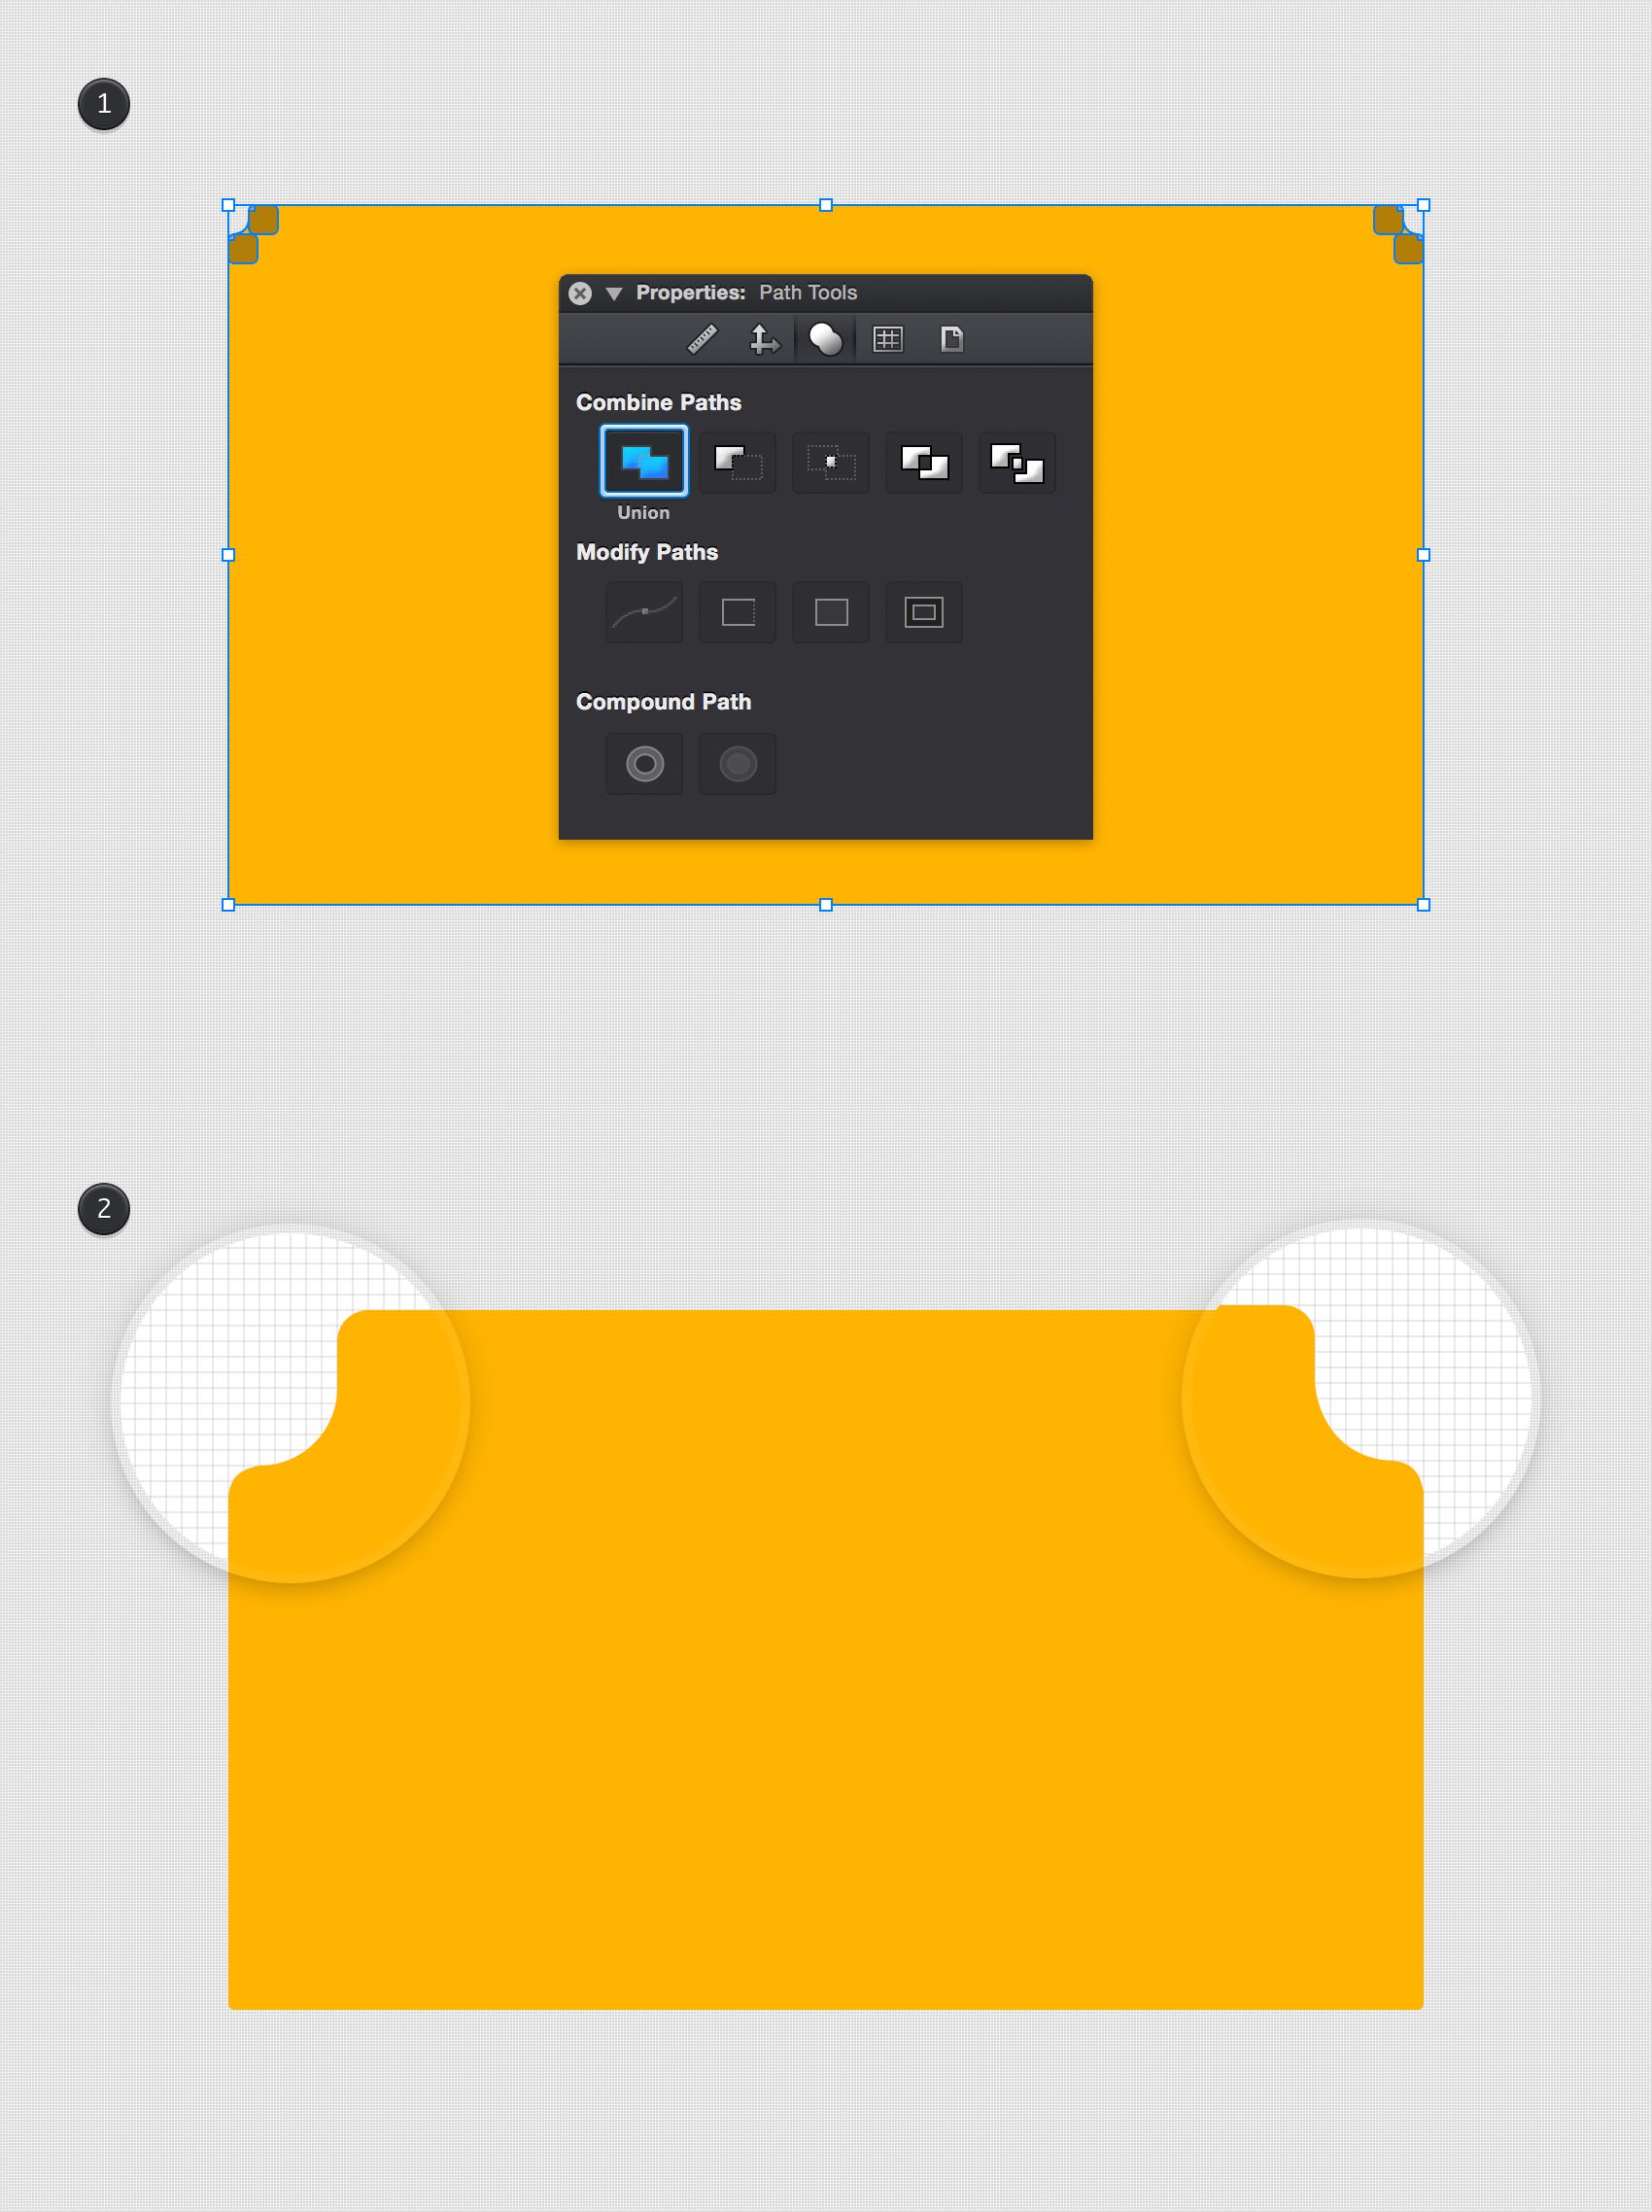
Pick the Move Tool (V), and select all the shapes made so far. Go to the Path Tools pane from the Properties panel and click the Union command.
Step 9
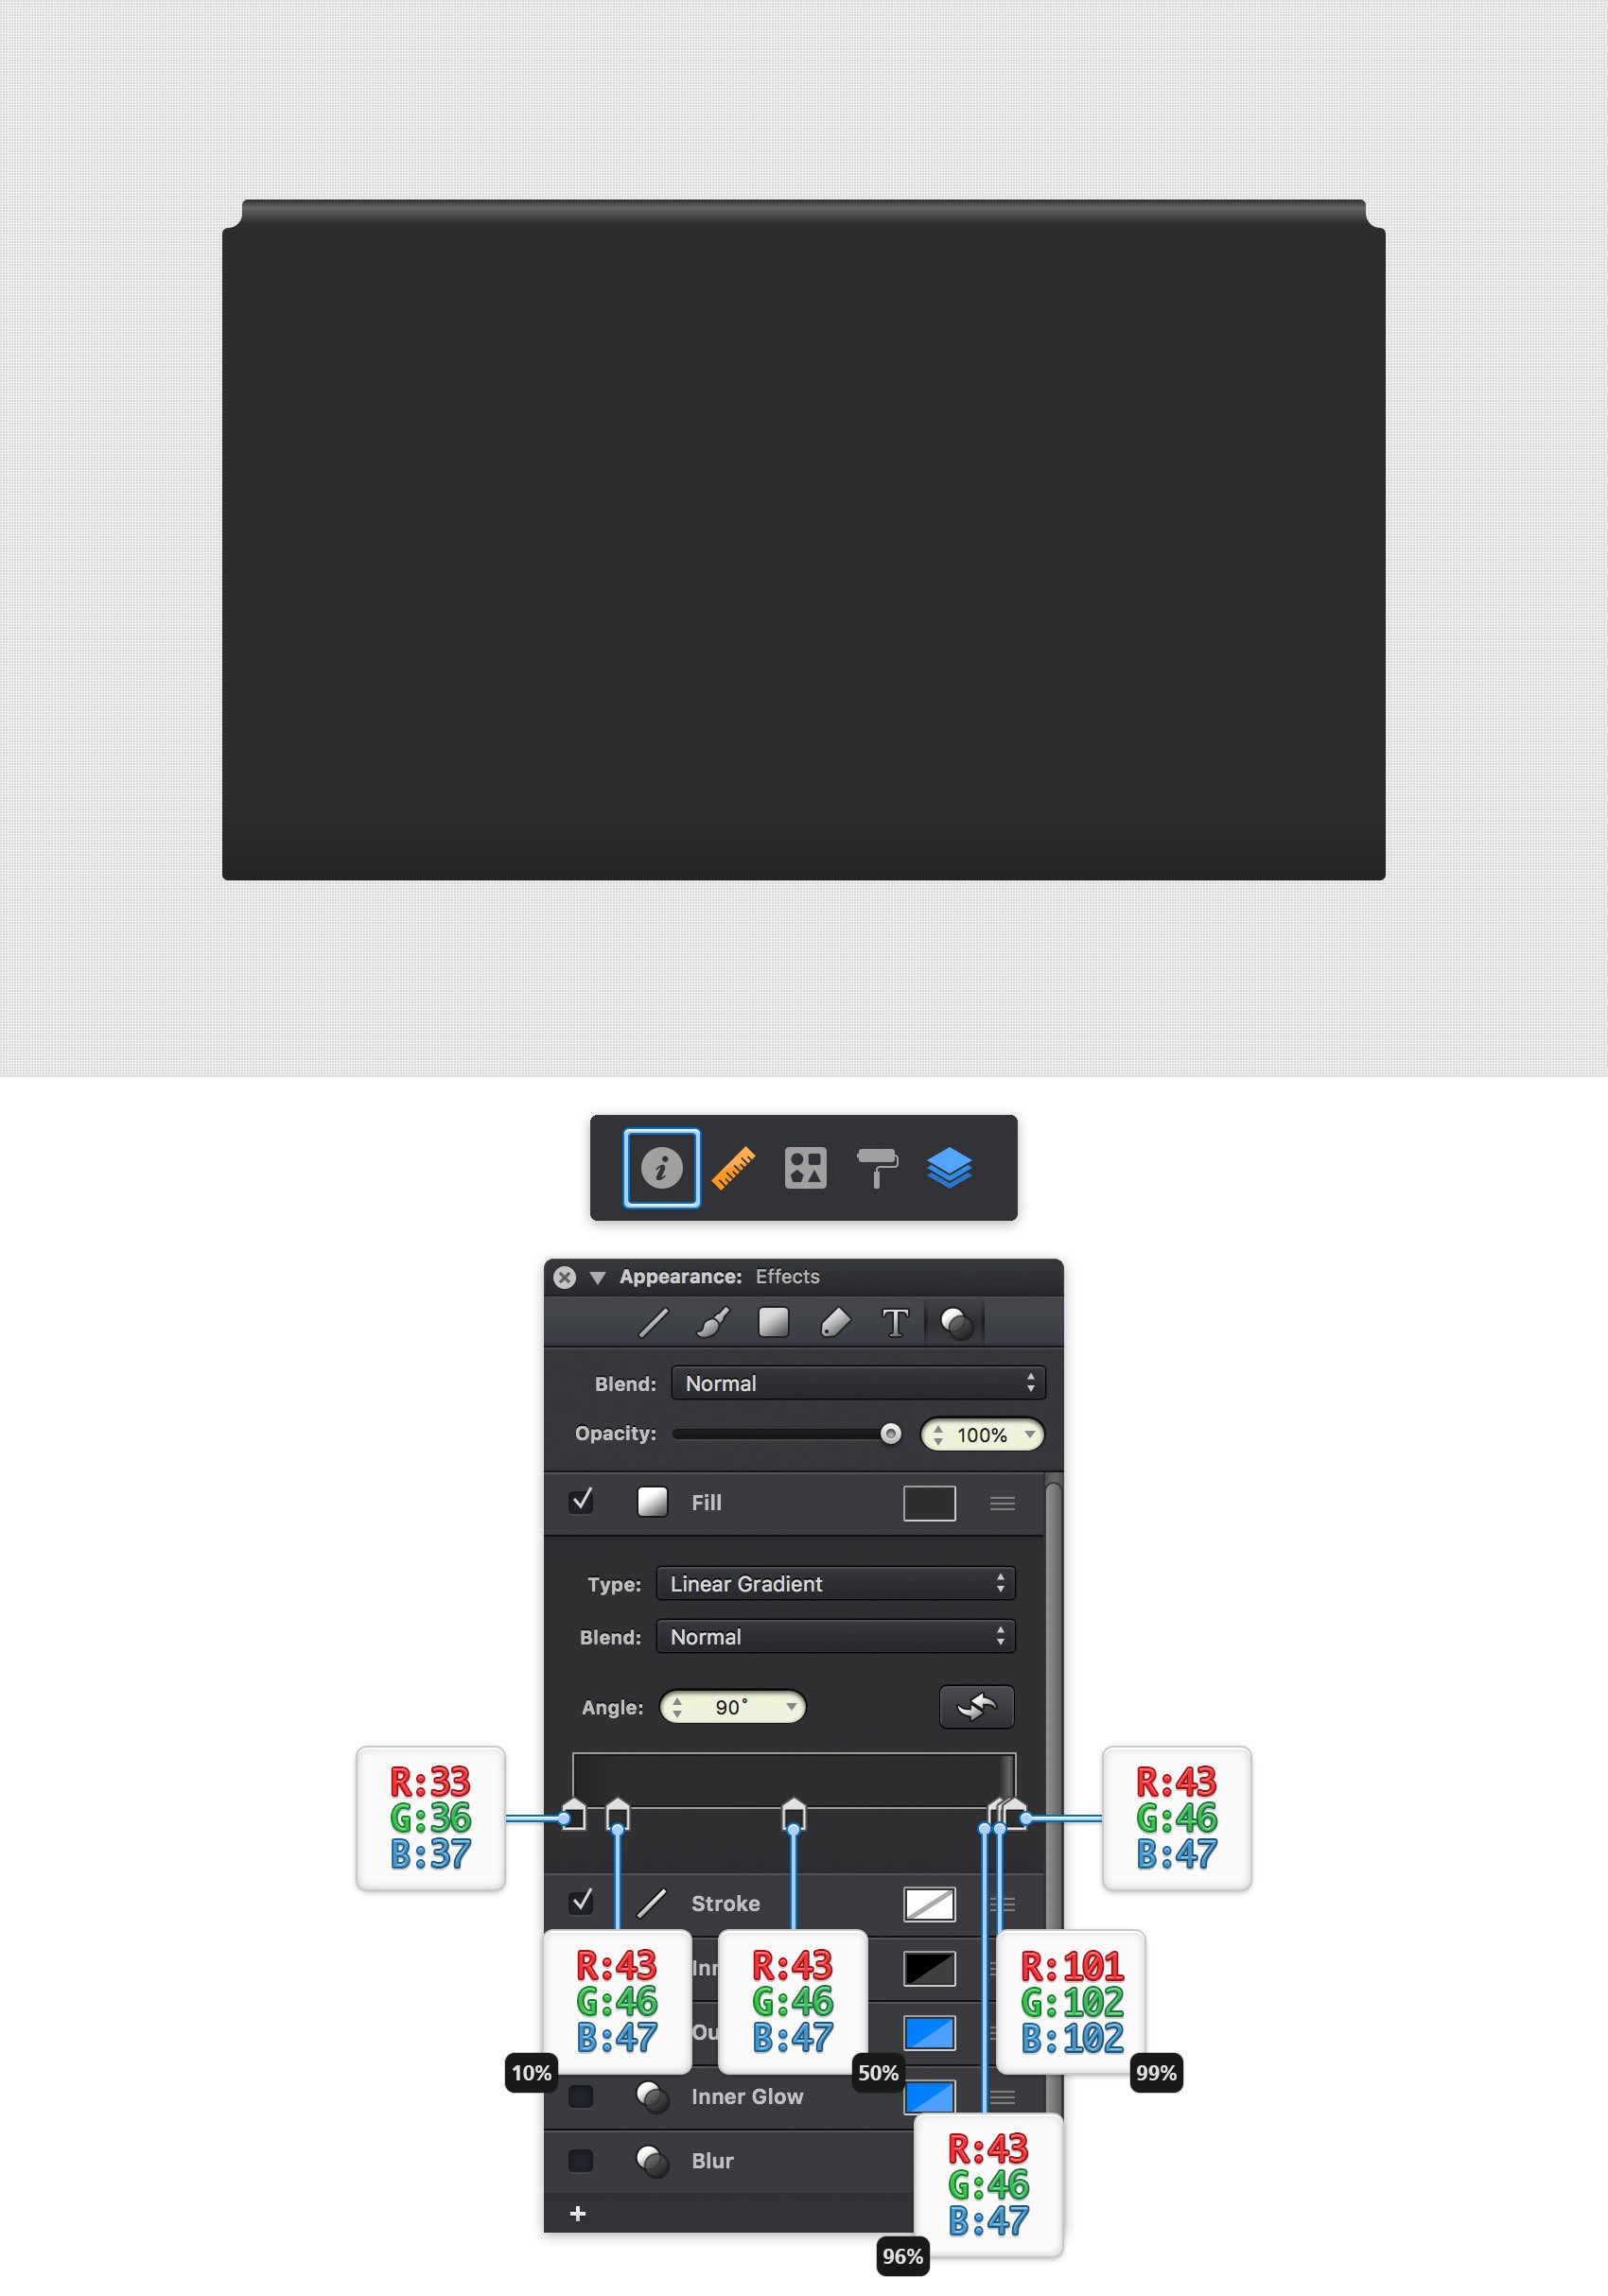
Make sure that your shape stays selected and open the Effects pane from the Appearance panel – click the leftmost inspector panel icon to open or close the Appearance panel whenever you want.
Click the existing Fill and replace the Color with a Linear Gradient. Set the Angle to 90 ° and then move to the gradient color stops. Click the left one and set its color to R=33 G=36 B=37, and then click the right one and set its color to R=43 G=46 B=47. click on the gradient bar to add a new color stop. Set its location to 99% and chnage the color to R=101 G=102 B=102. Add another three color stops and use the settings shown in the following image.
Step 10
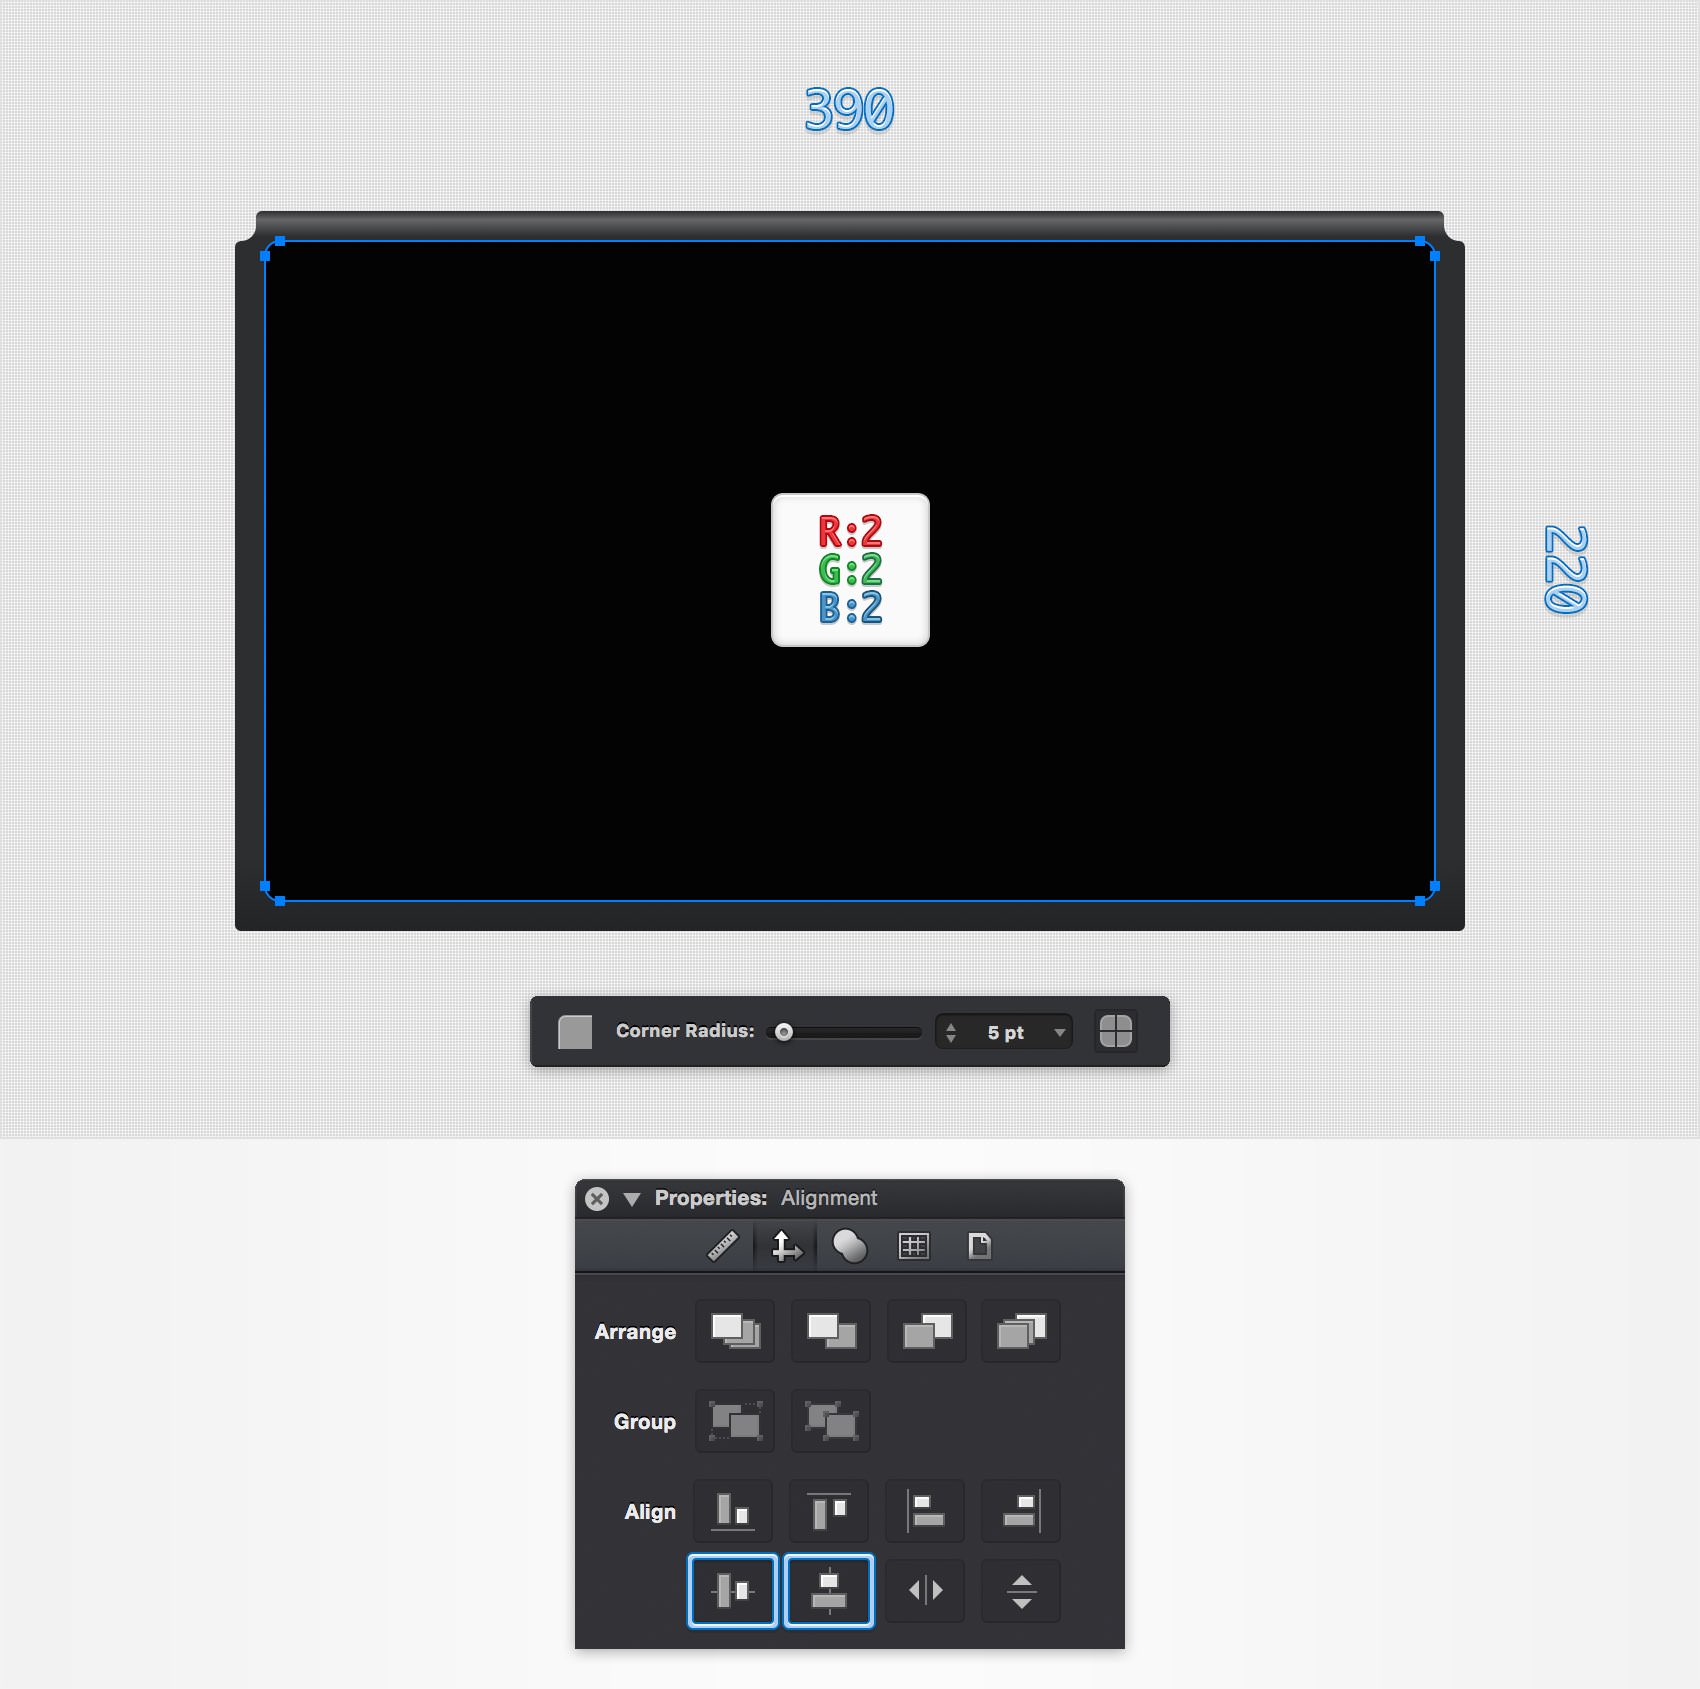
Pick the Rounded Rectangle Tool (Shift + M) and set the Corner Radius to 5 pt. Create a 390 x 220 px shape and fill it with R=2 G=2 B=2. Make sure that this new shape stays selected and move it to the center of the canvas using the same Horizontal Centers and Vertical Centers commands from the Alignment pane.
Step 11
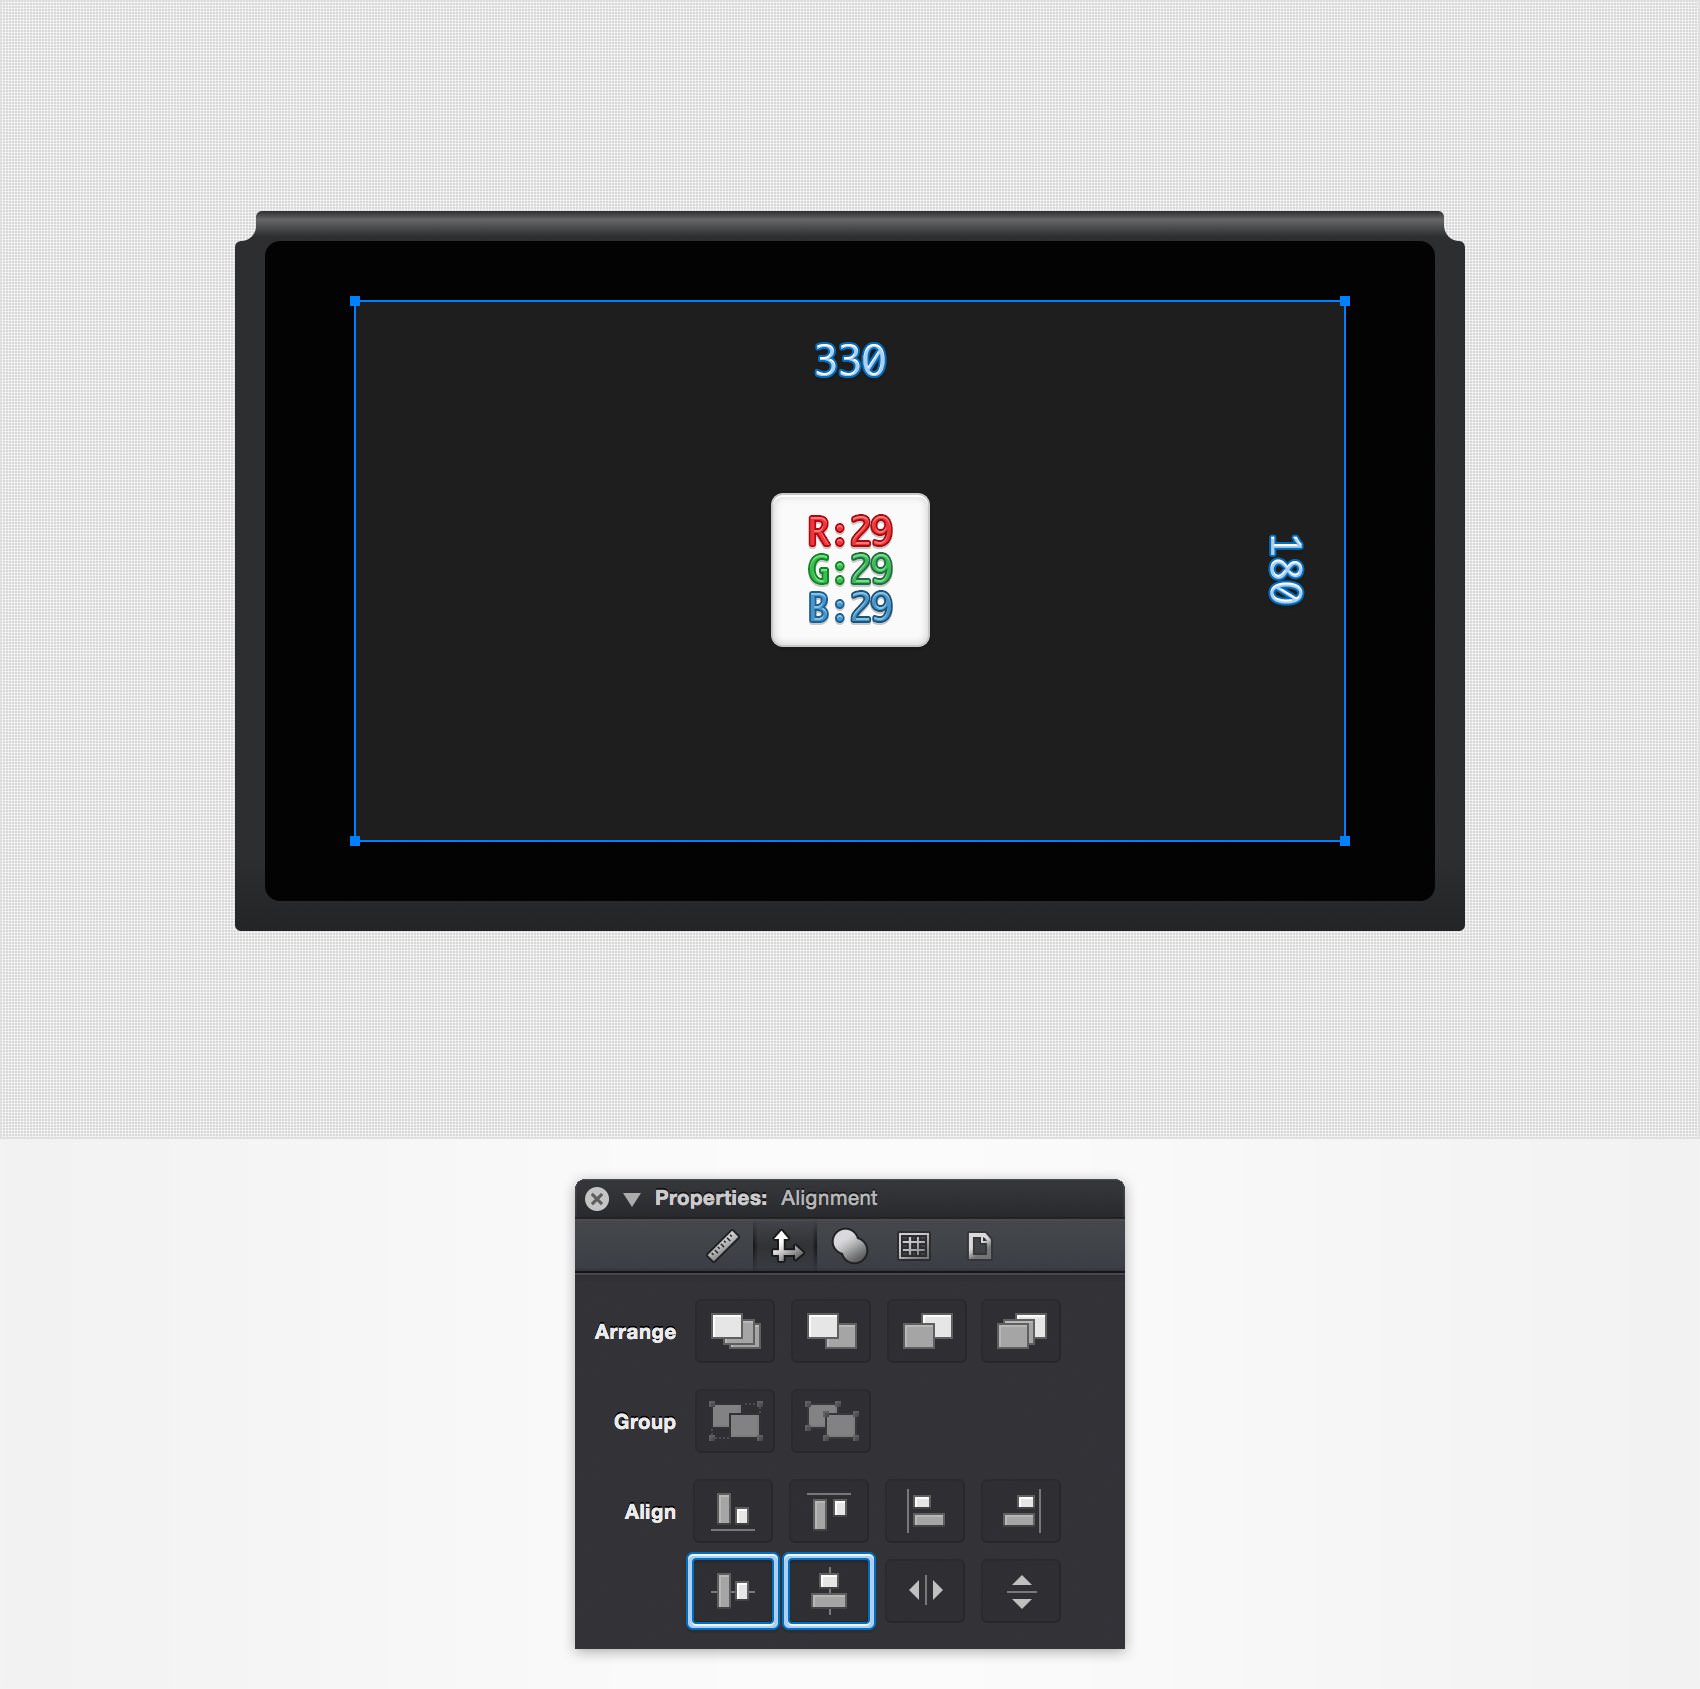
Pick the Rectangle Tool (M) and create a 330 x 180 px shape. Fill this new rectangle with R=29 G=29 B=29 and center it.
Step 12
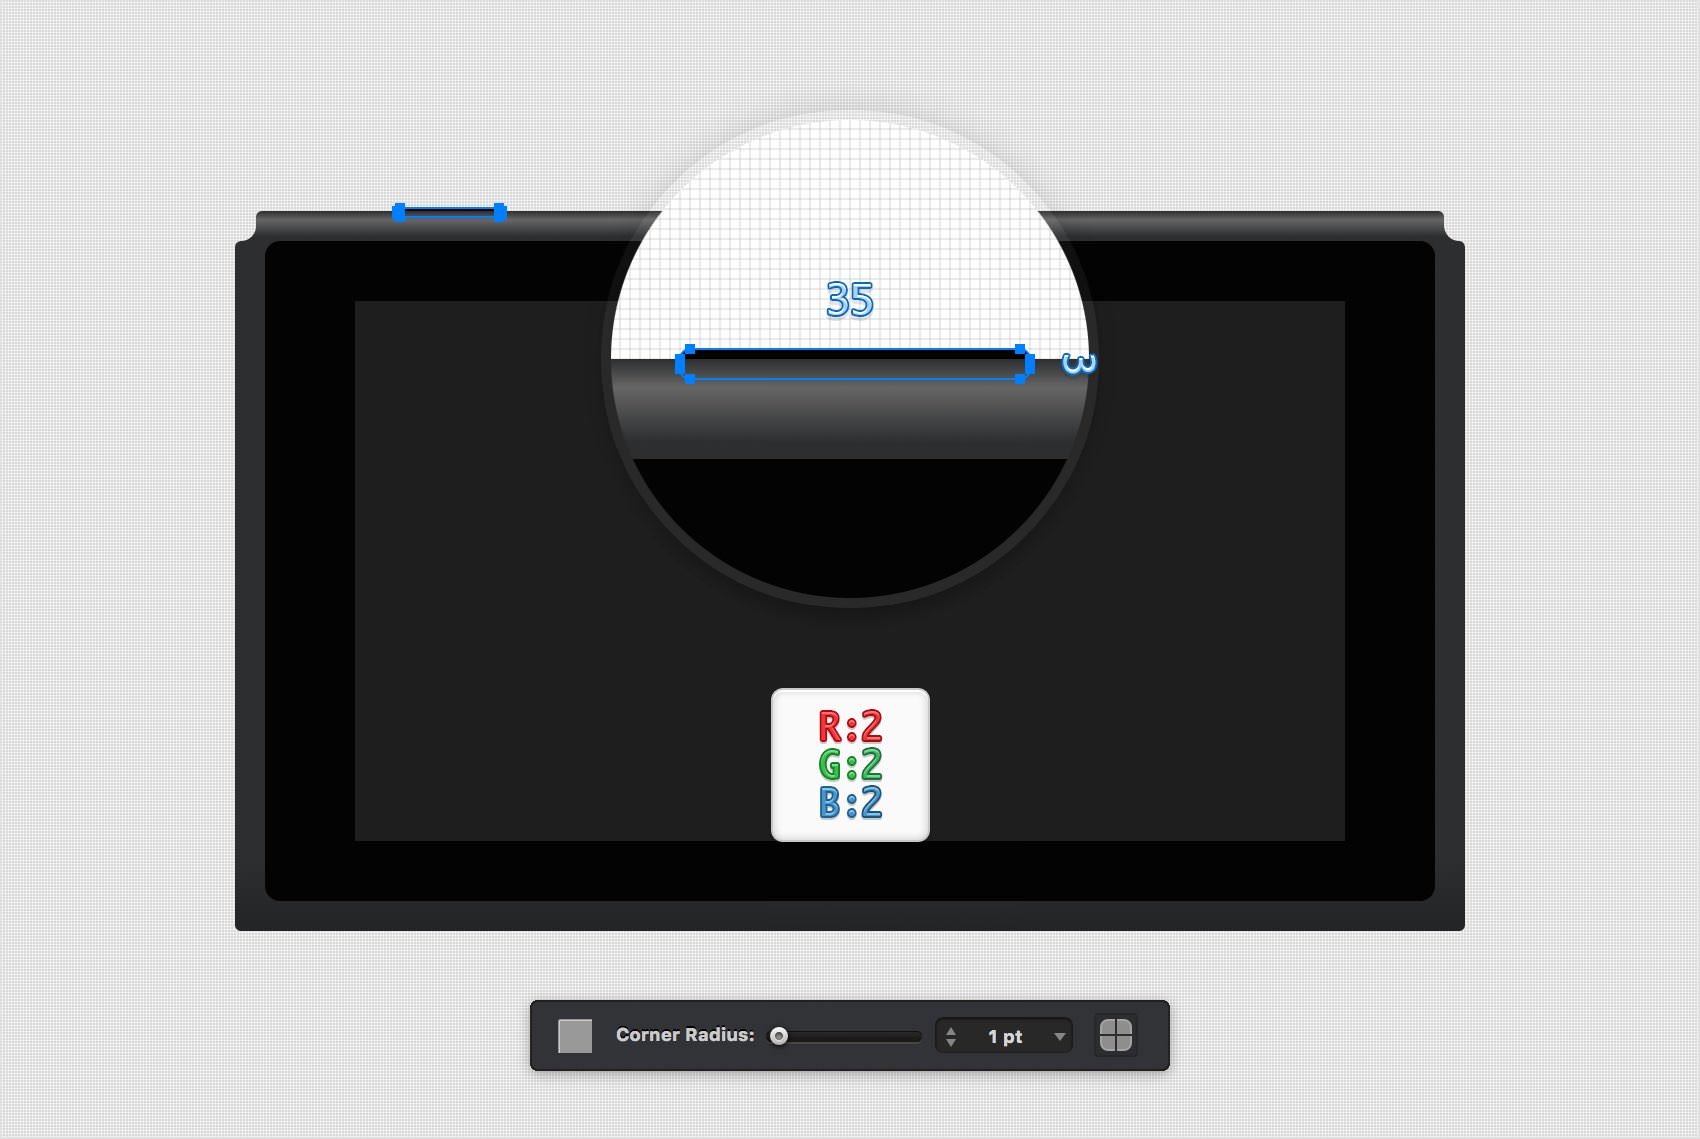
Pick the Rounded Rectangle Tool (Shift + M) and set the Corner Radius to 1 pt. Create a 35 x 3 px shape and fill it with R=2 G=2 B=2. Make sure that this new shape stays selected, go to the Geometry pane and set the Position settings to X: 239 px and Y: 104 px. Also, send this rounded rectangle to back (Shift + Command + [).
Step 13
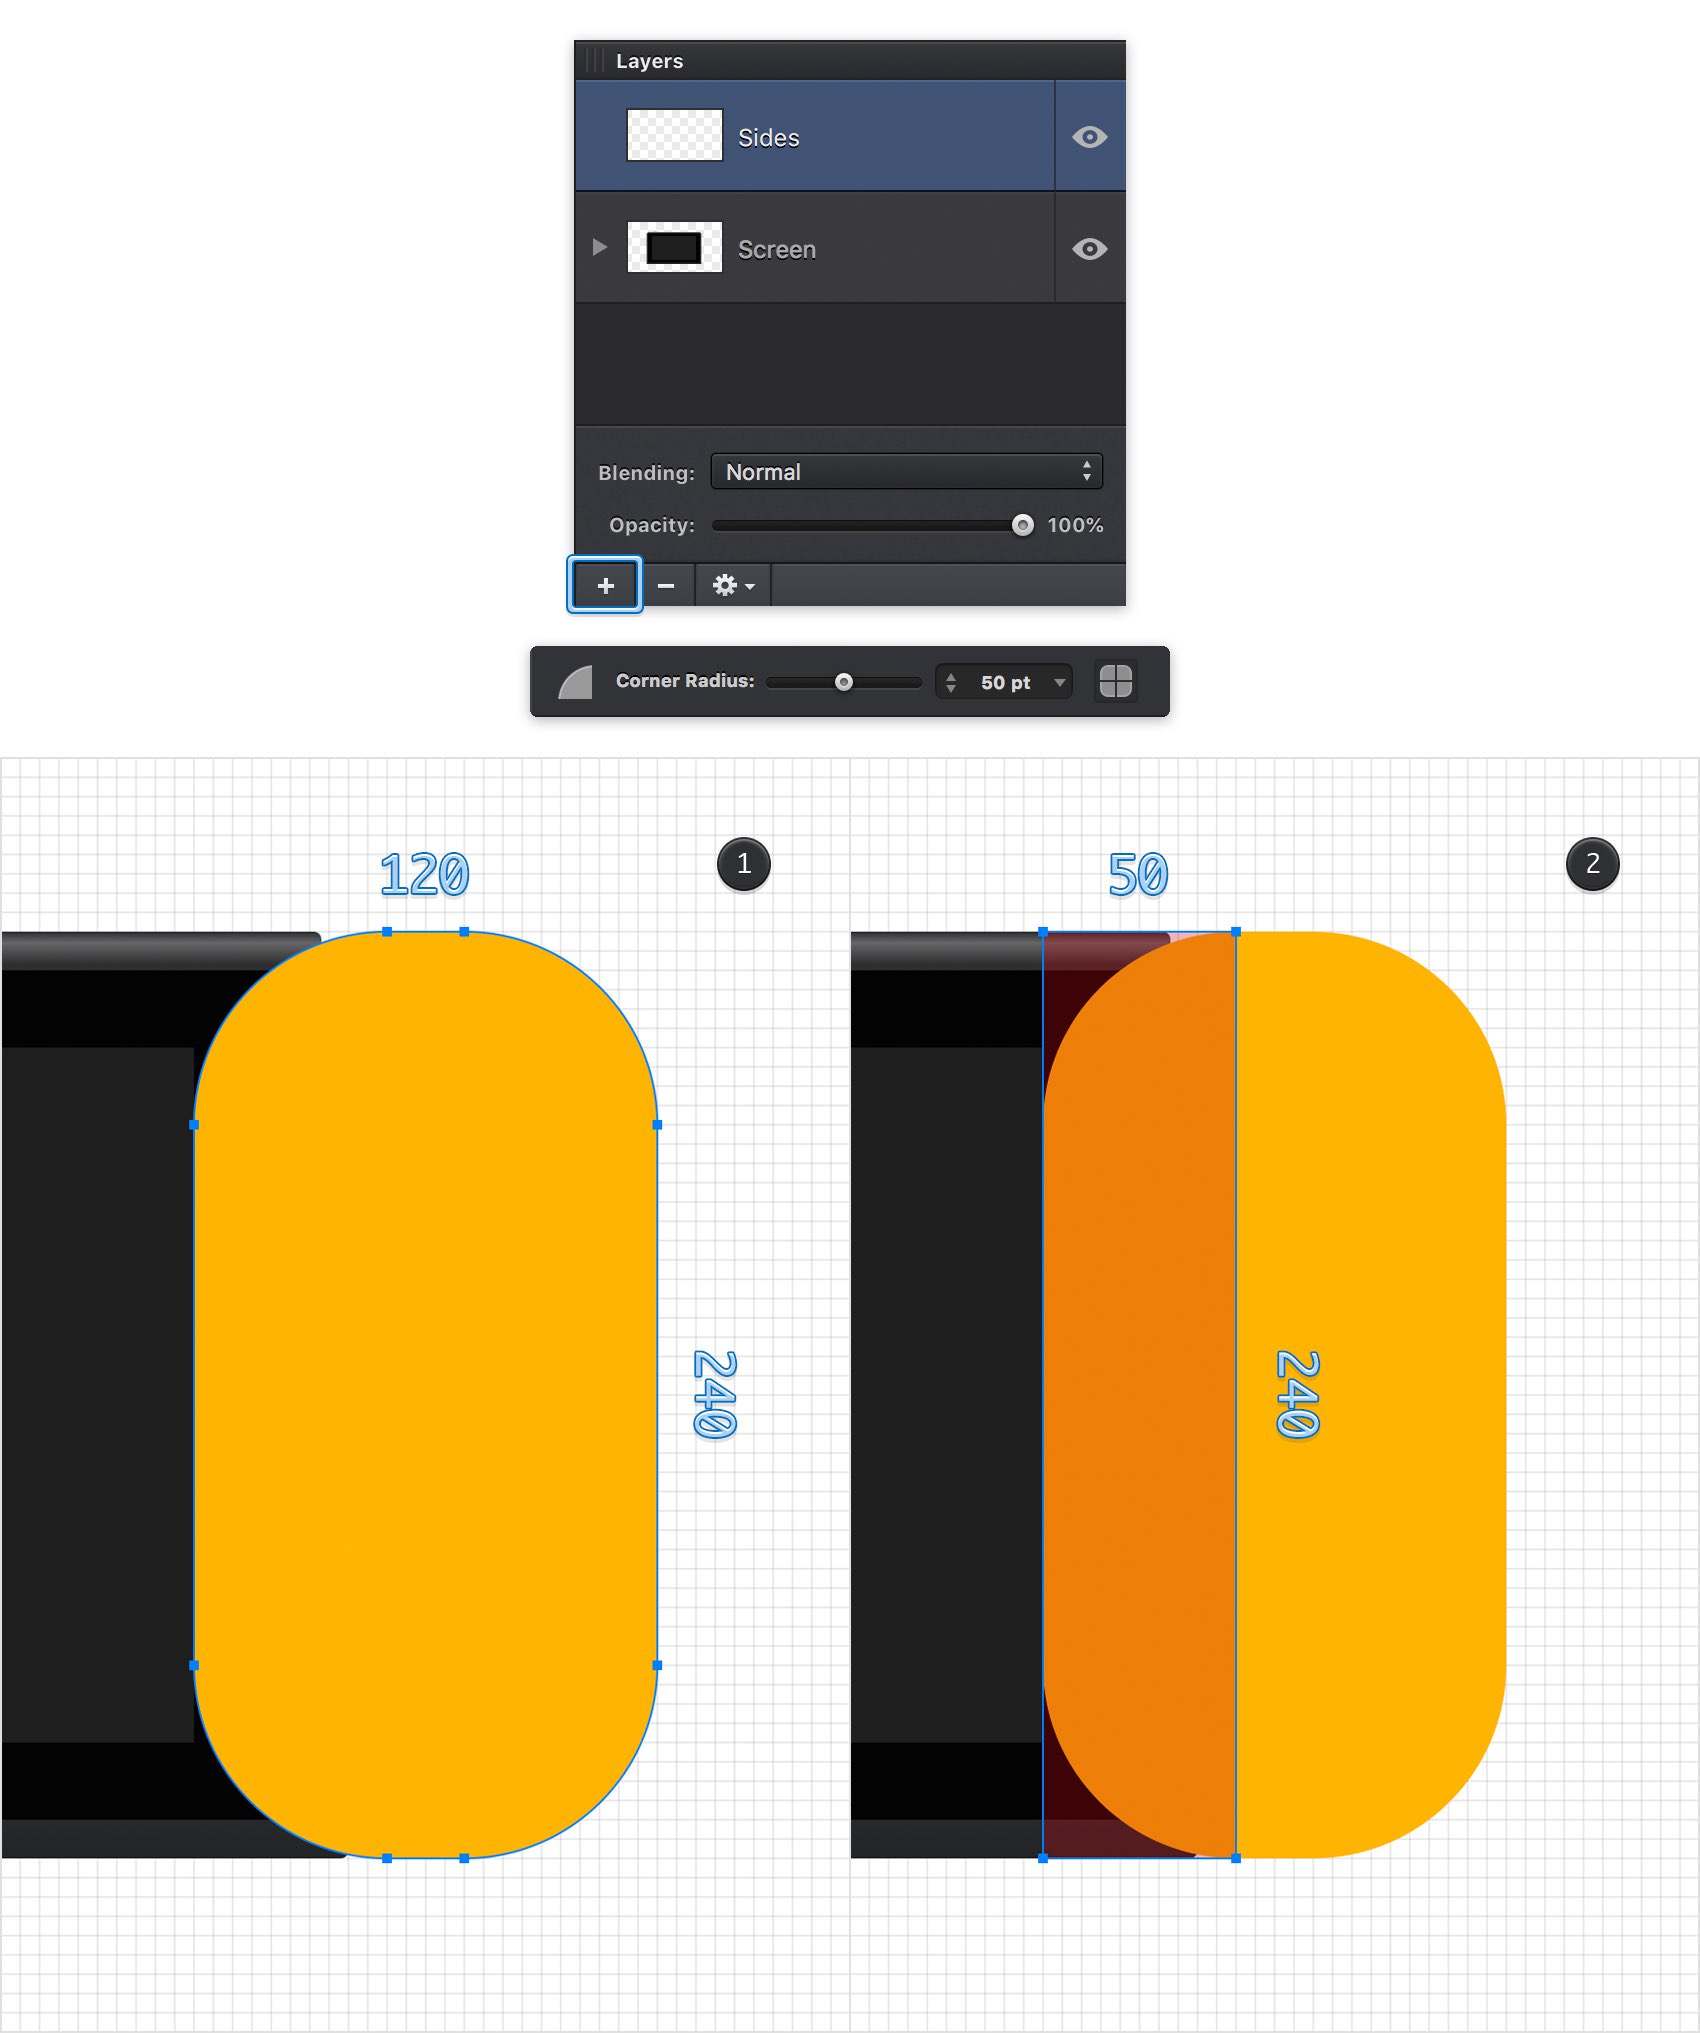
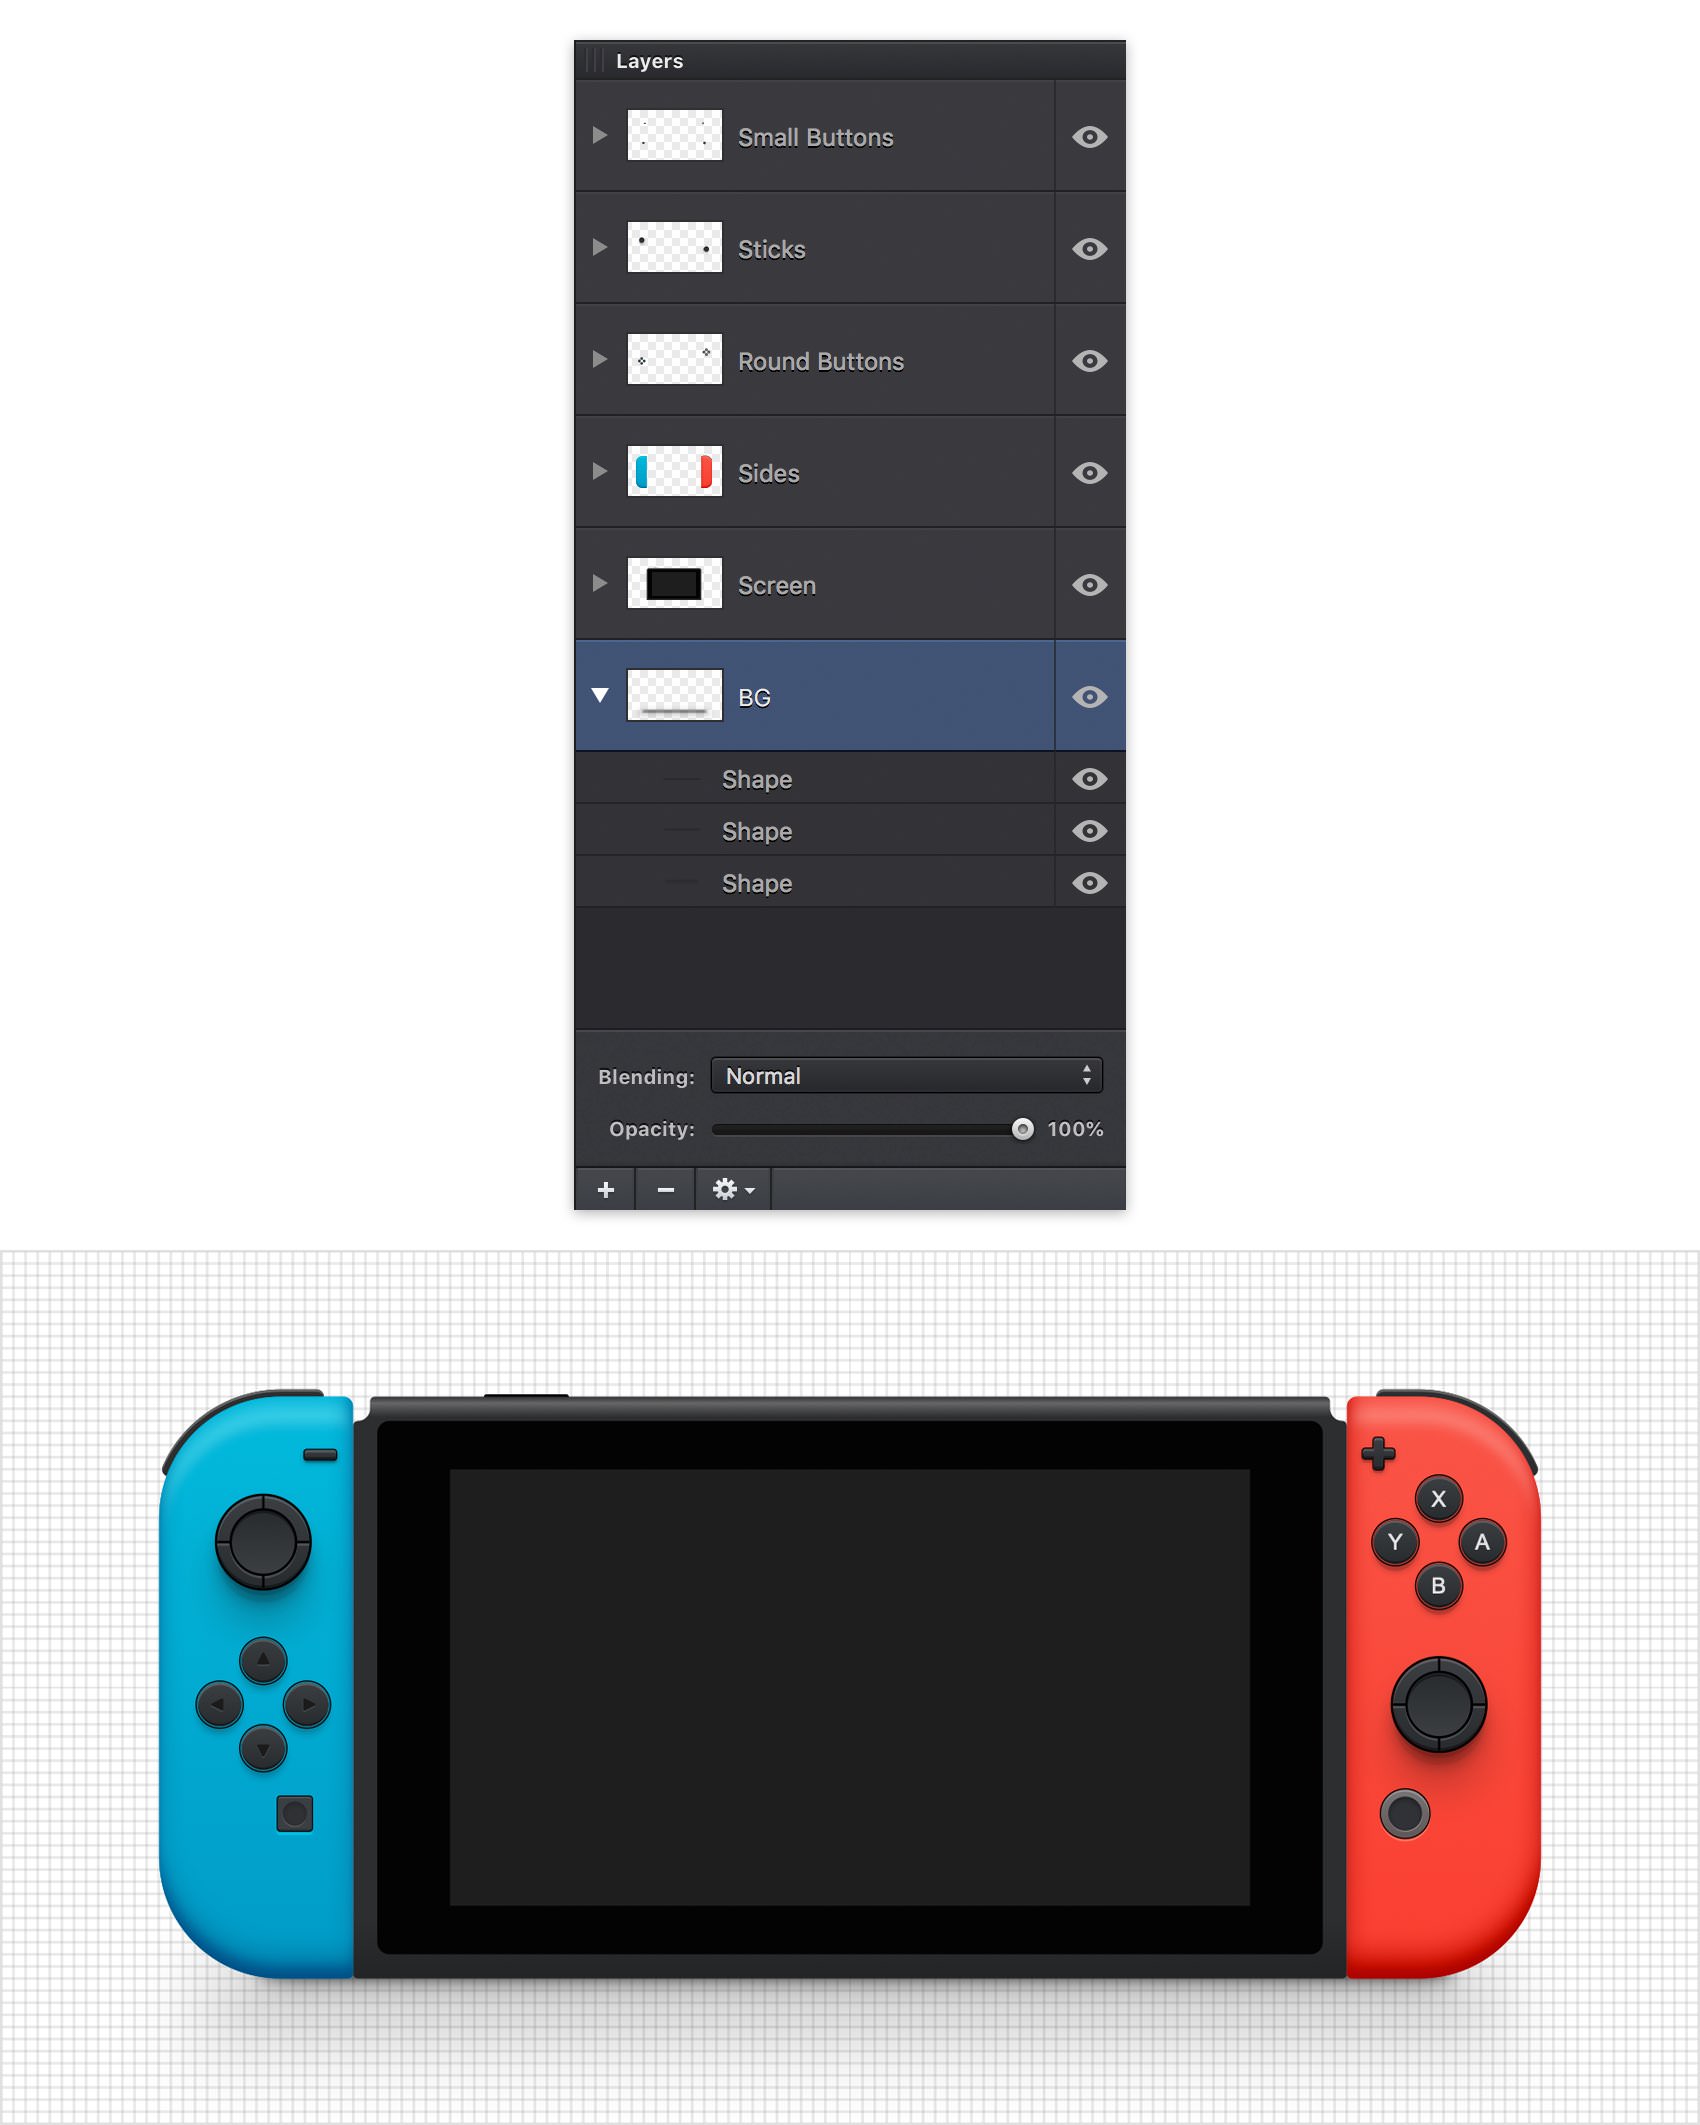
Go to the Layers panel, double click the name of the existing layer and change it to "Screen". Use the add button (+) from the bottom of the panel to add a second layer. Rename it "Sides" and make sure that it remains selected, as the new shapes you are about to create will go here.
For the following steps you will need a grid every 5 px. Return to the Grid pane from the Properties panel and enter 5 px in both Spacing boxes.
Pick the Rounded Rectangle Tool (Shift + M) and set the Corner Radius to 50 pt. Create a 120 x 240 px shape and place it as shown in the first image (X: 555px Y: 105 px). Switch to the Rectangle Tool (M), create a 50 x 240 px shape and place it as shown in the second image.
Step 14
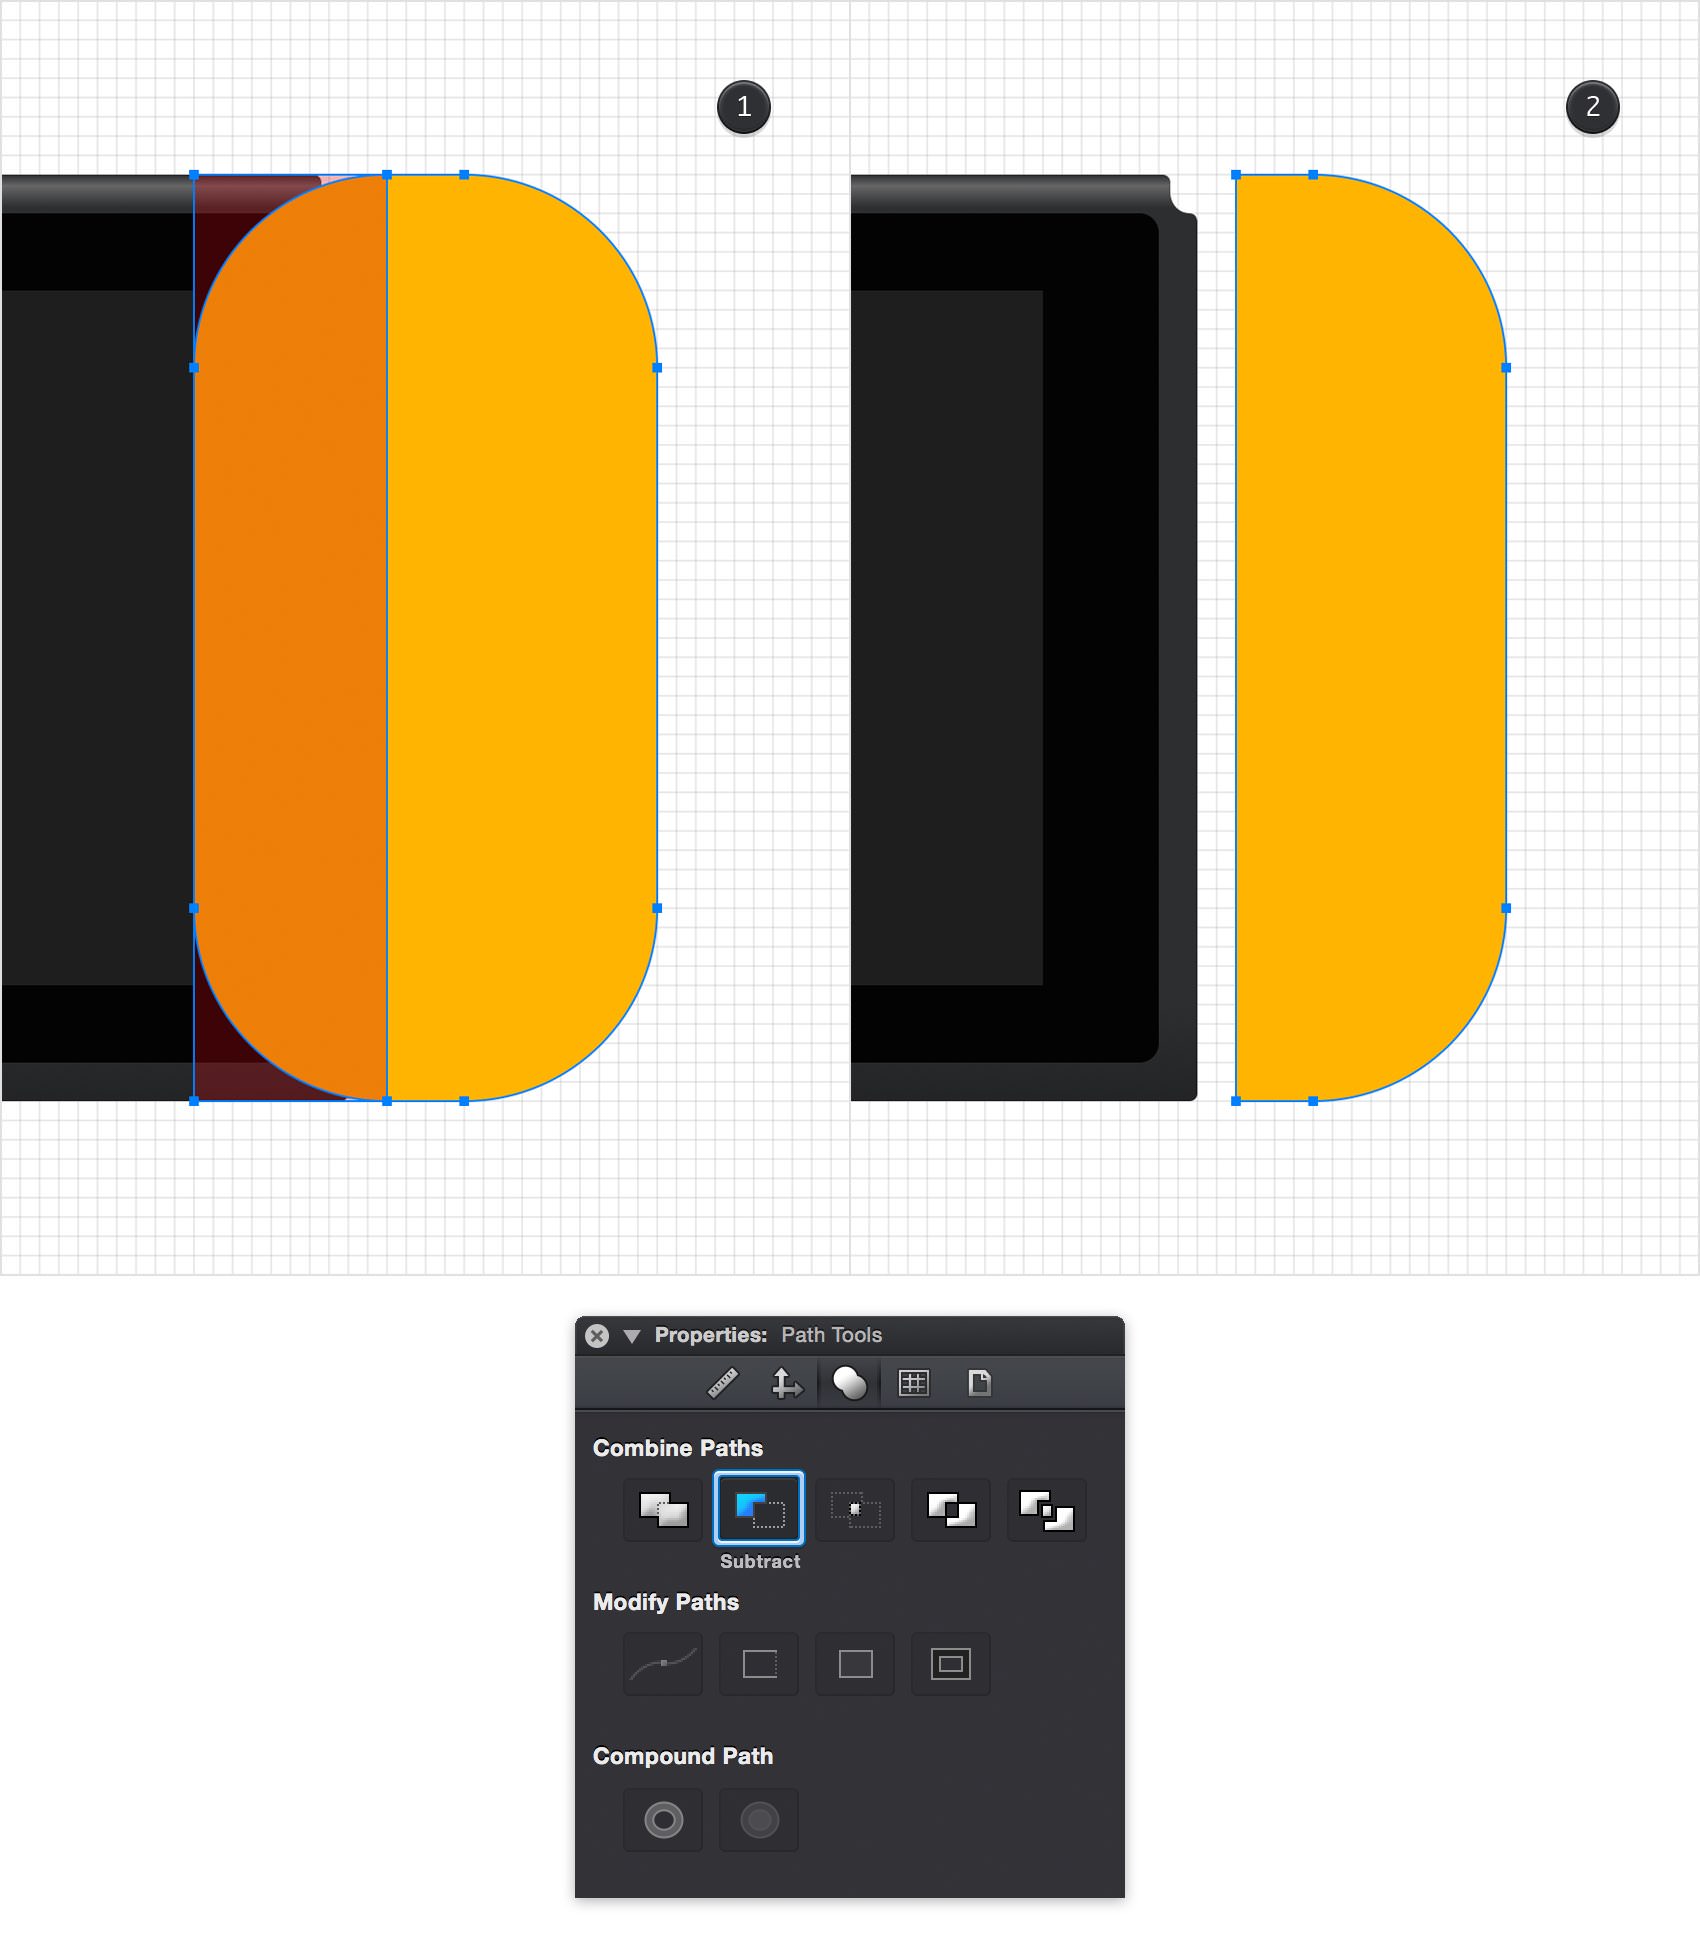
Select the two shapes highlighted in the first step and click the Subtract command from the Path Tools pane.
Step 15
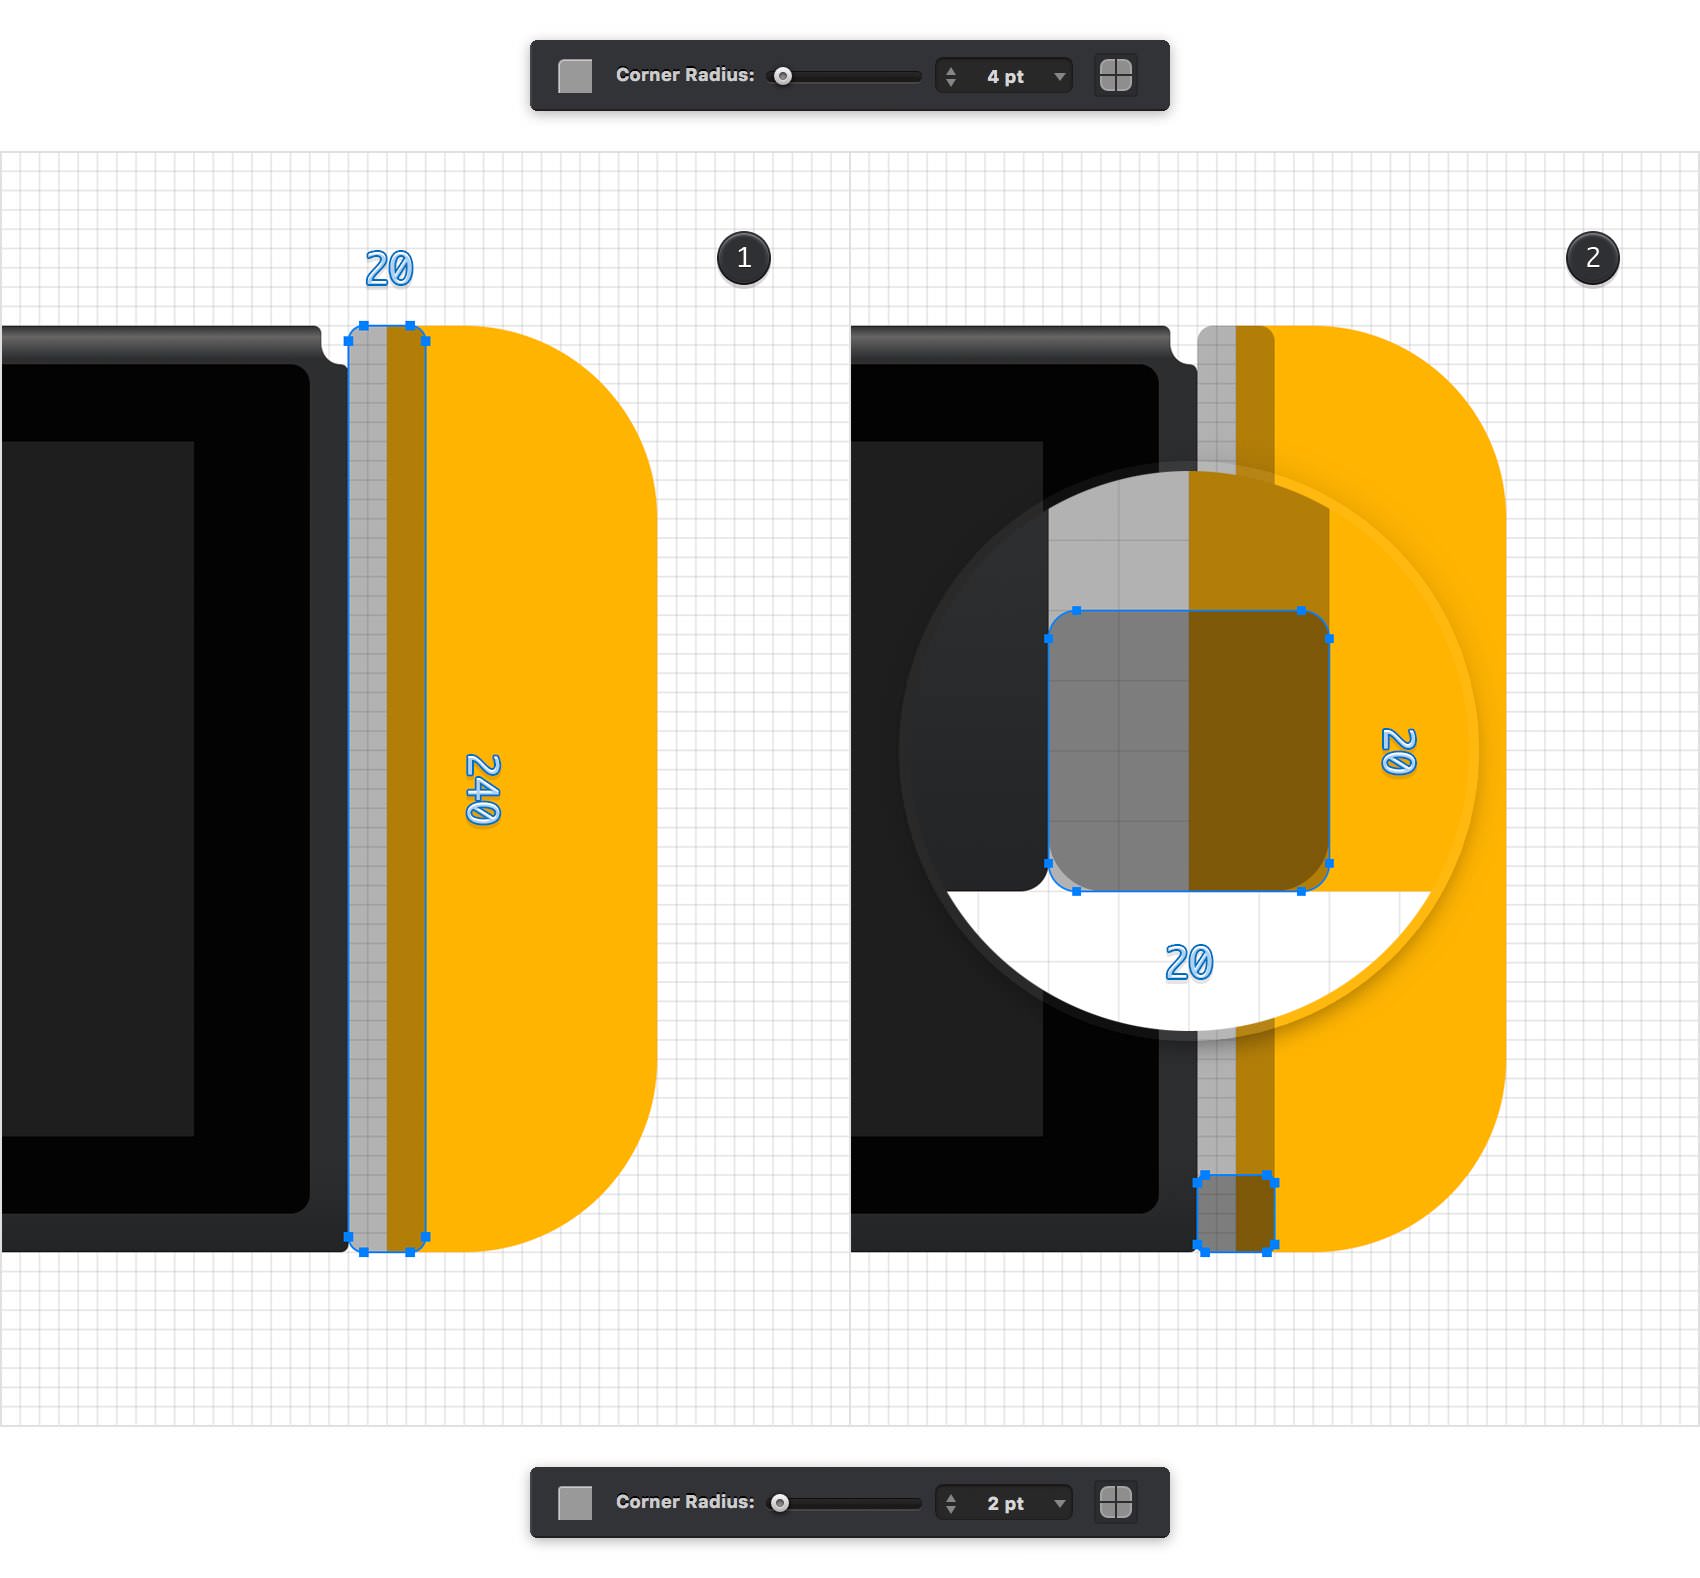
Pick the Rounded Rectangle Tool (Shift + M) and set the Corner Radius to 4 pt. Create a 20 x 240 px shape and place it as shown in the first image. Lower the Corner Radius to 2 pt, create a 20 px rounded square and place it as shown in the second image.
Step 16
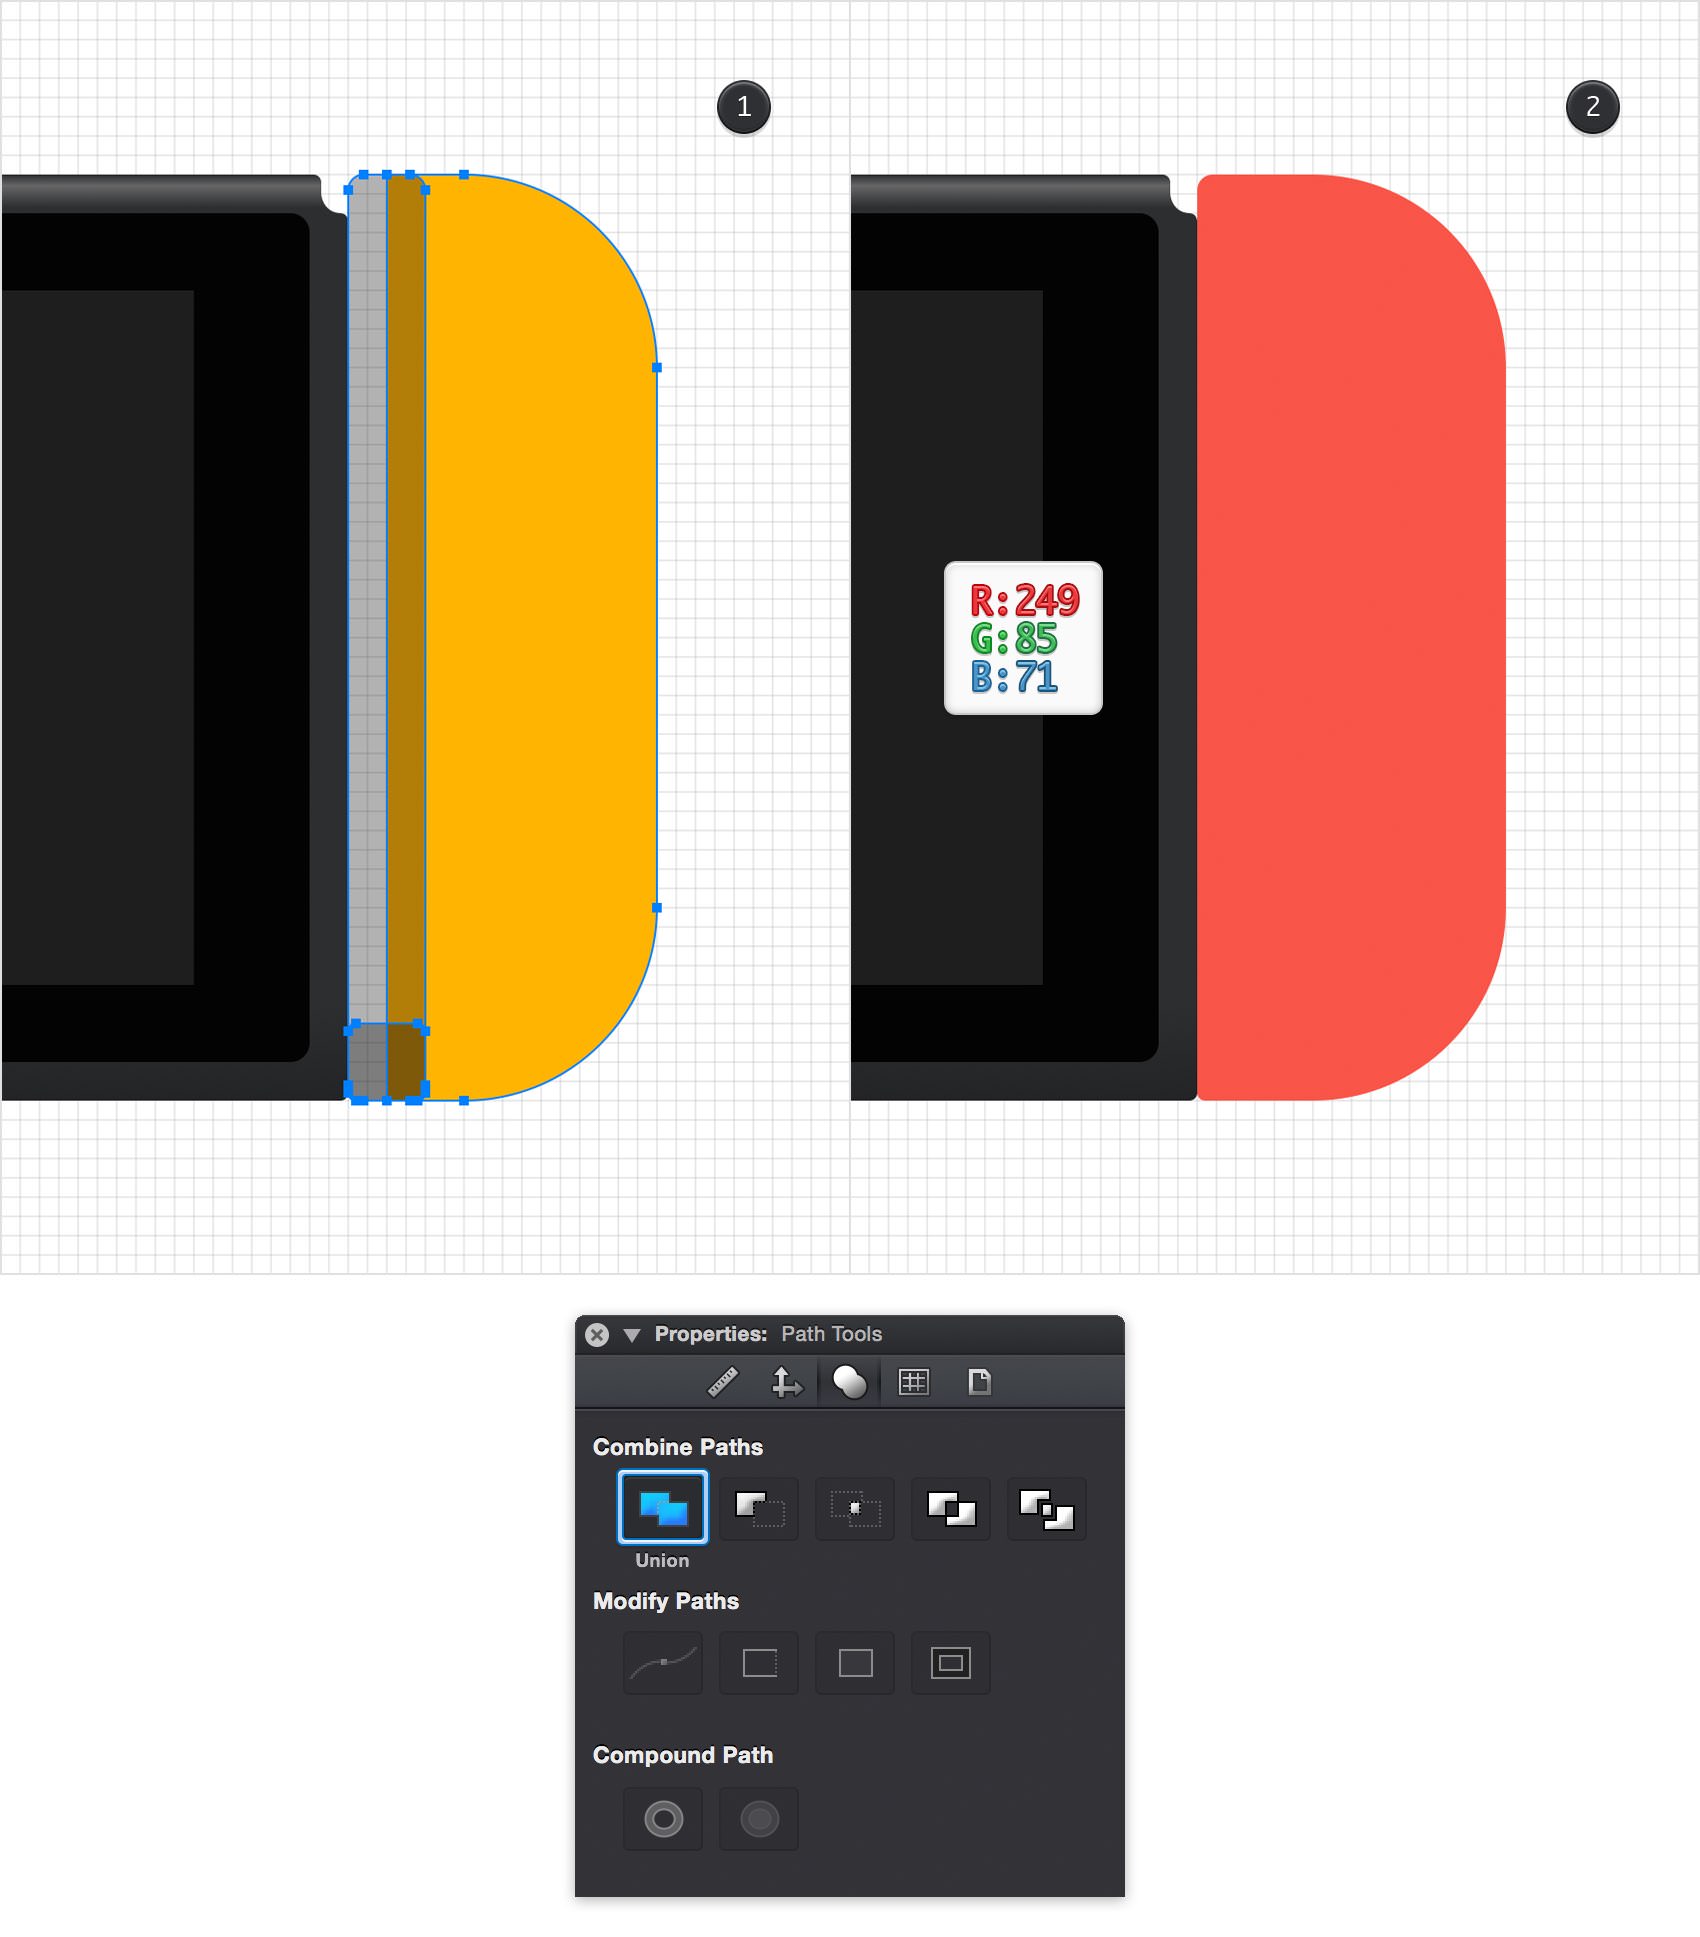
Select the three shapes highlighted in the first step and click the Union command from the Path Tools pane. Fill the resulting shape with R=249 G=85 B=71 and then add a copy in the same place (Command + C > Shift + Command + V).
Step 17
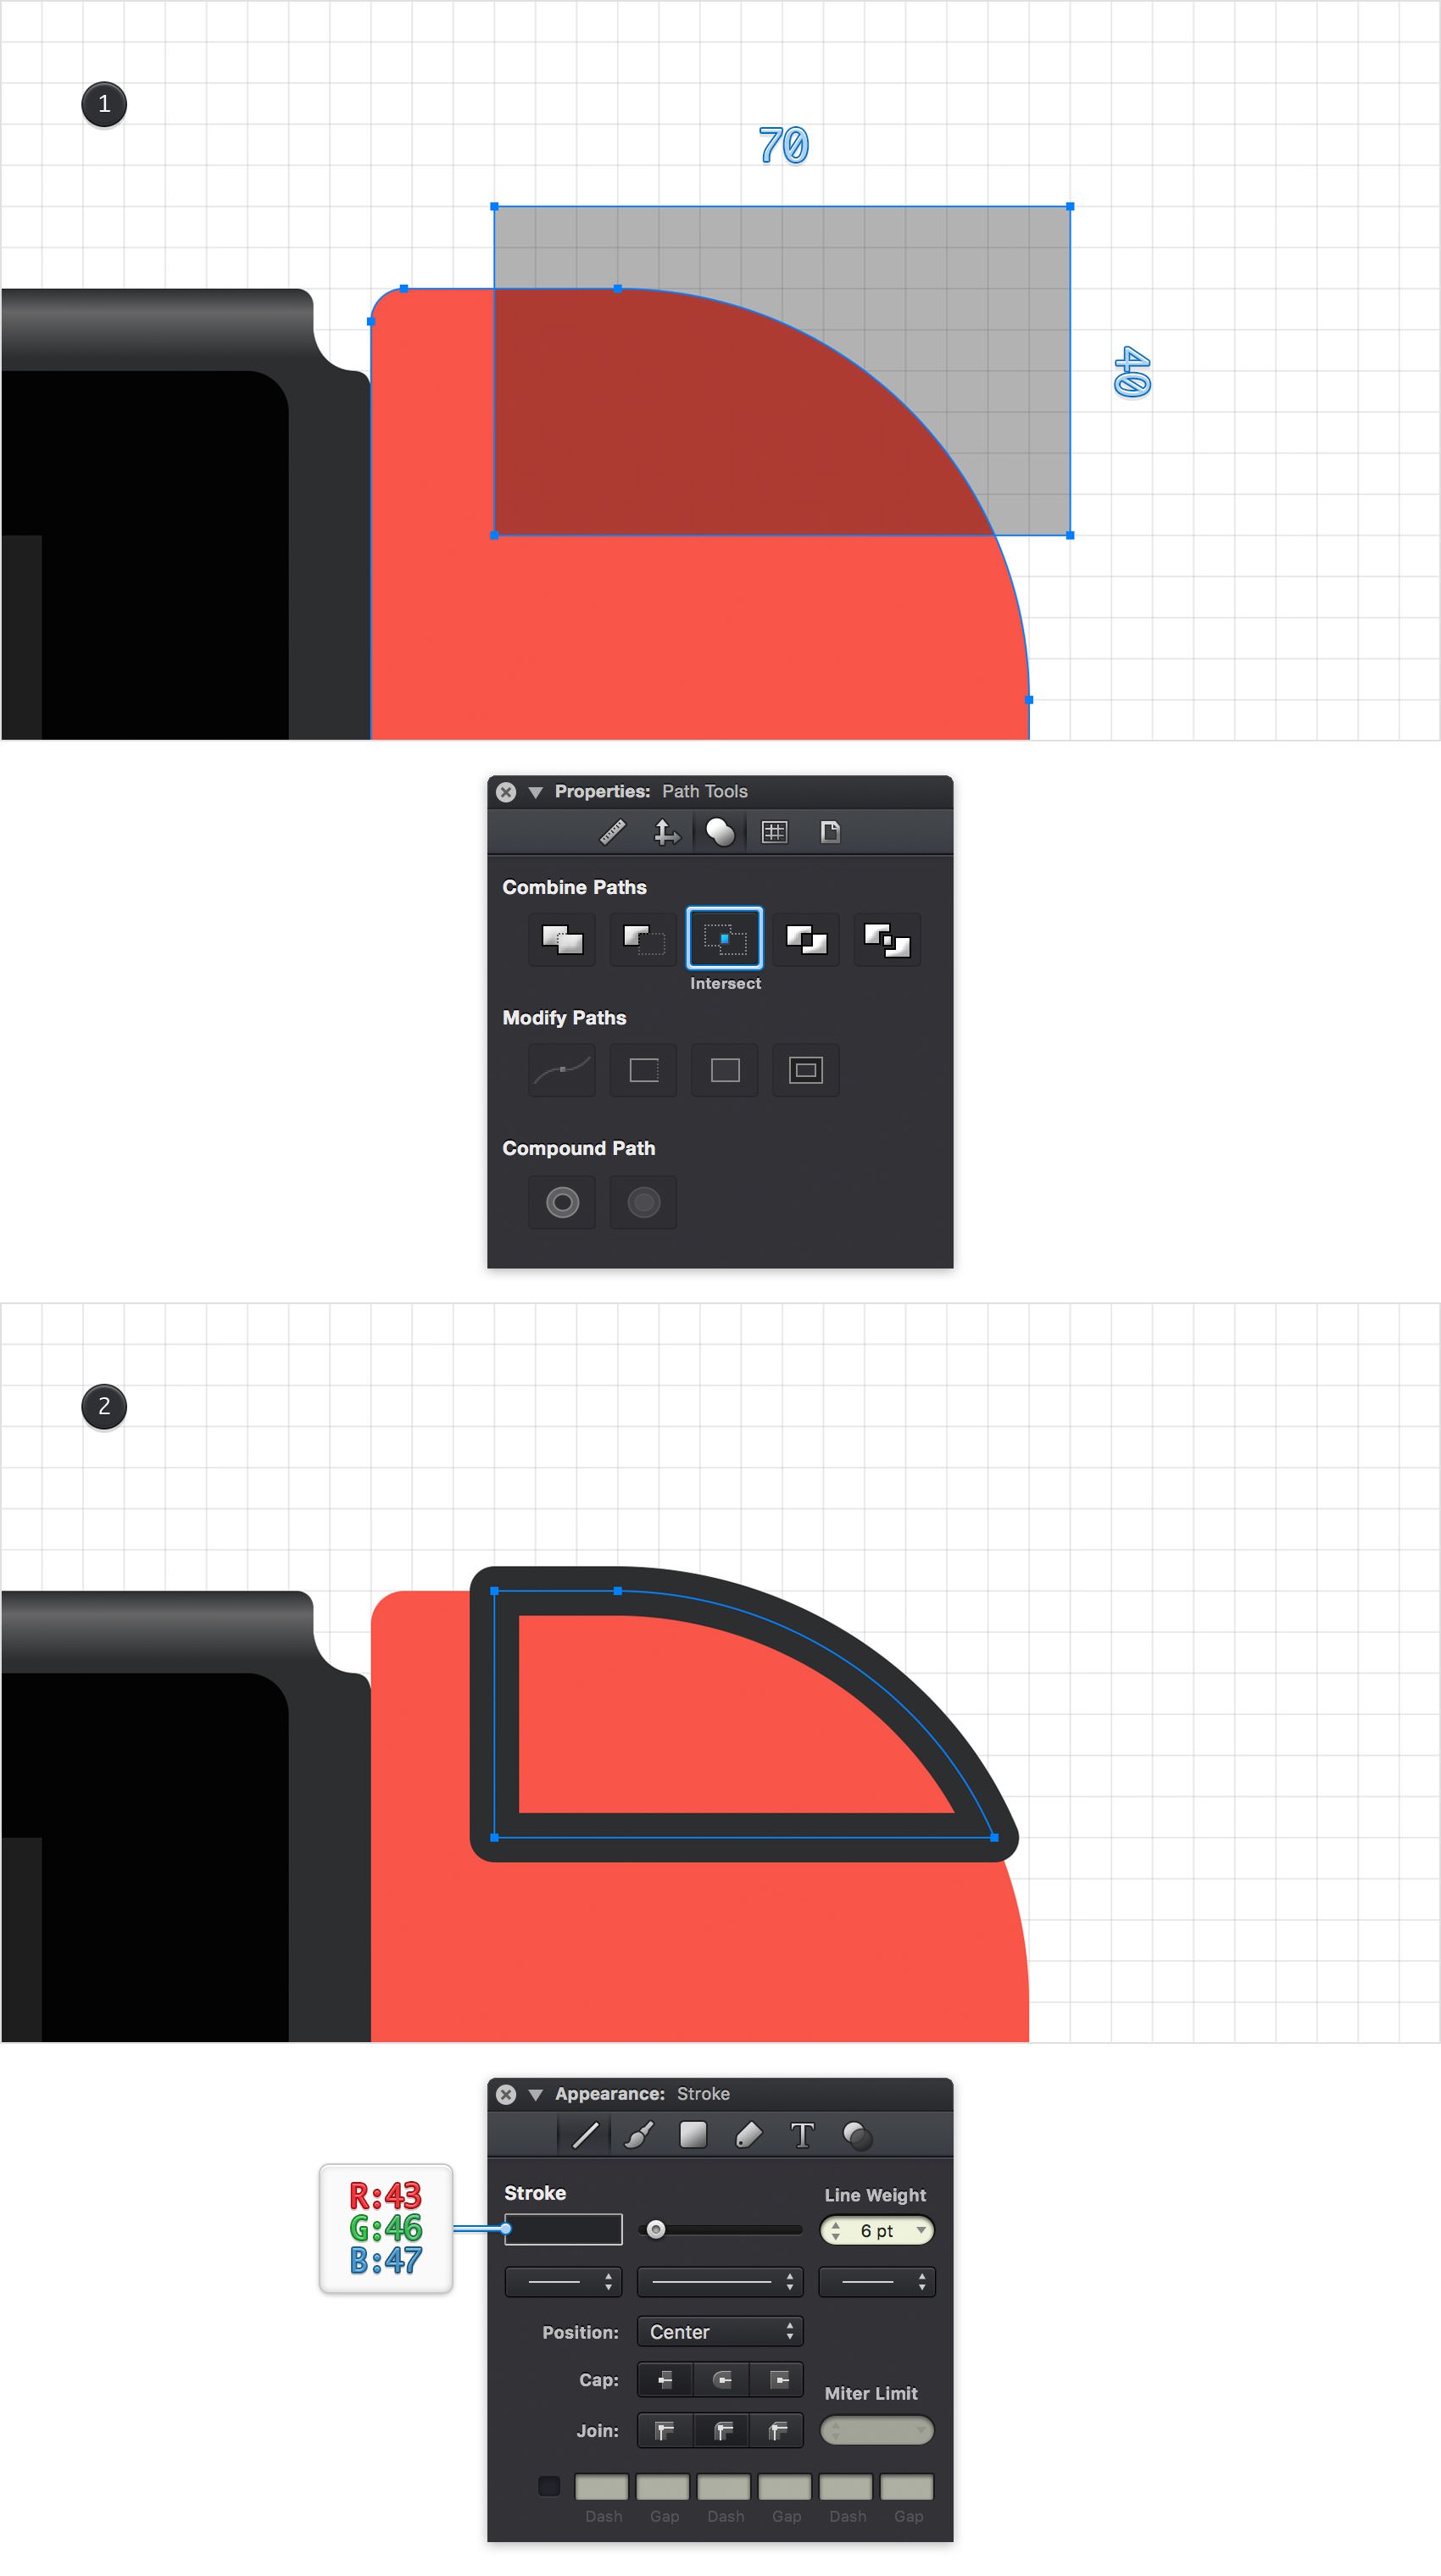
Pick the Rectangle Tool (M), create a 70 x 40 px shape and place it as shown in the first image. Select this new rectangle along with the copy of that red shape and click the Intersect command from the Path Tools pane.
Make sure that the resulting shape stays selected, remove the Fill color, and then focus on the Stroke pane from the Appearance panel. Set the Stroke color to R=43 G=46 B=47, change the Line Weight to 6 pt and don't forget to check the Round Join button.
Step 18
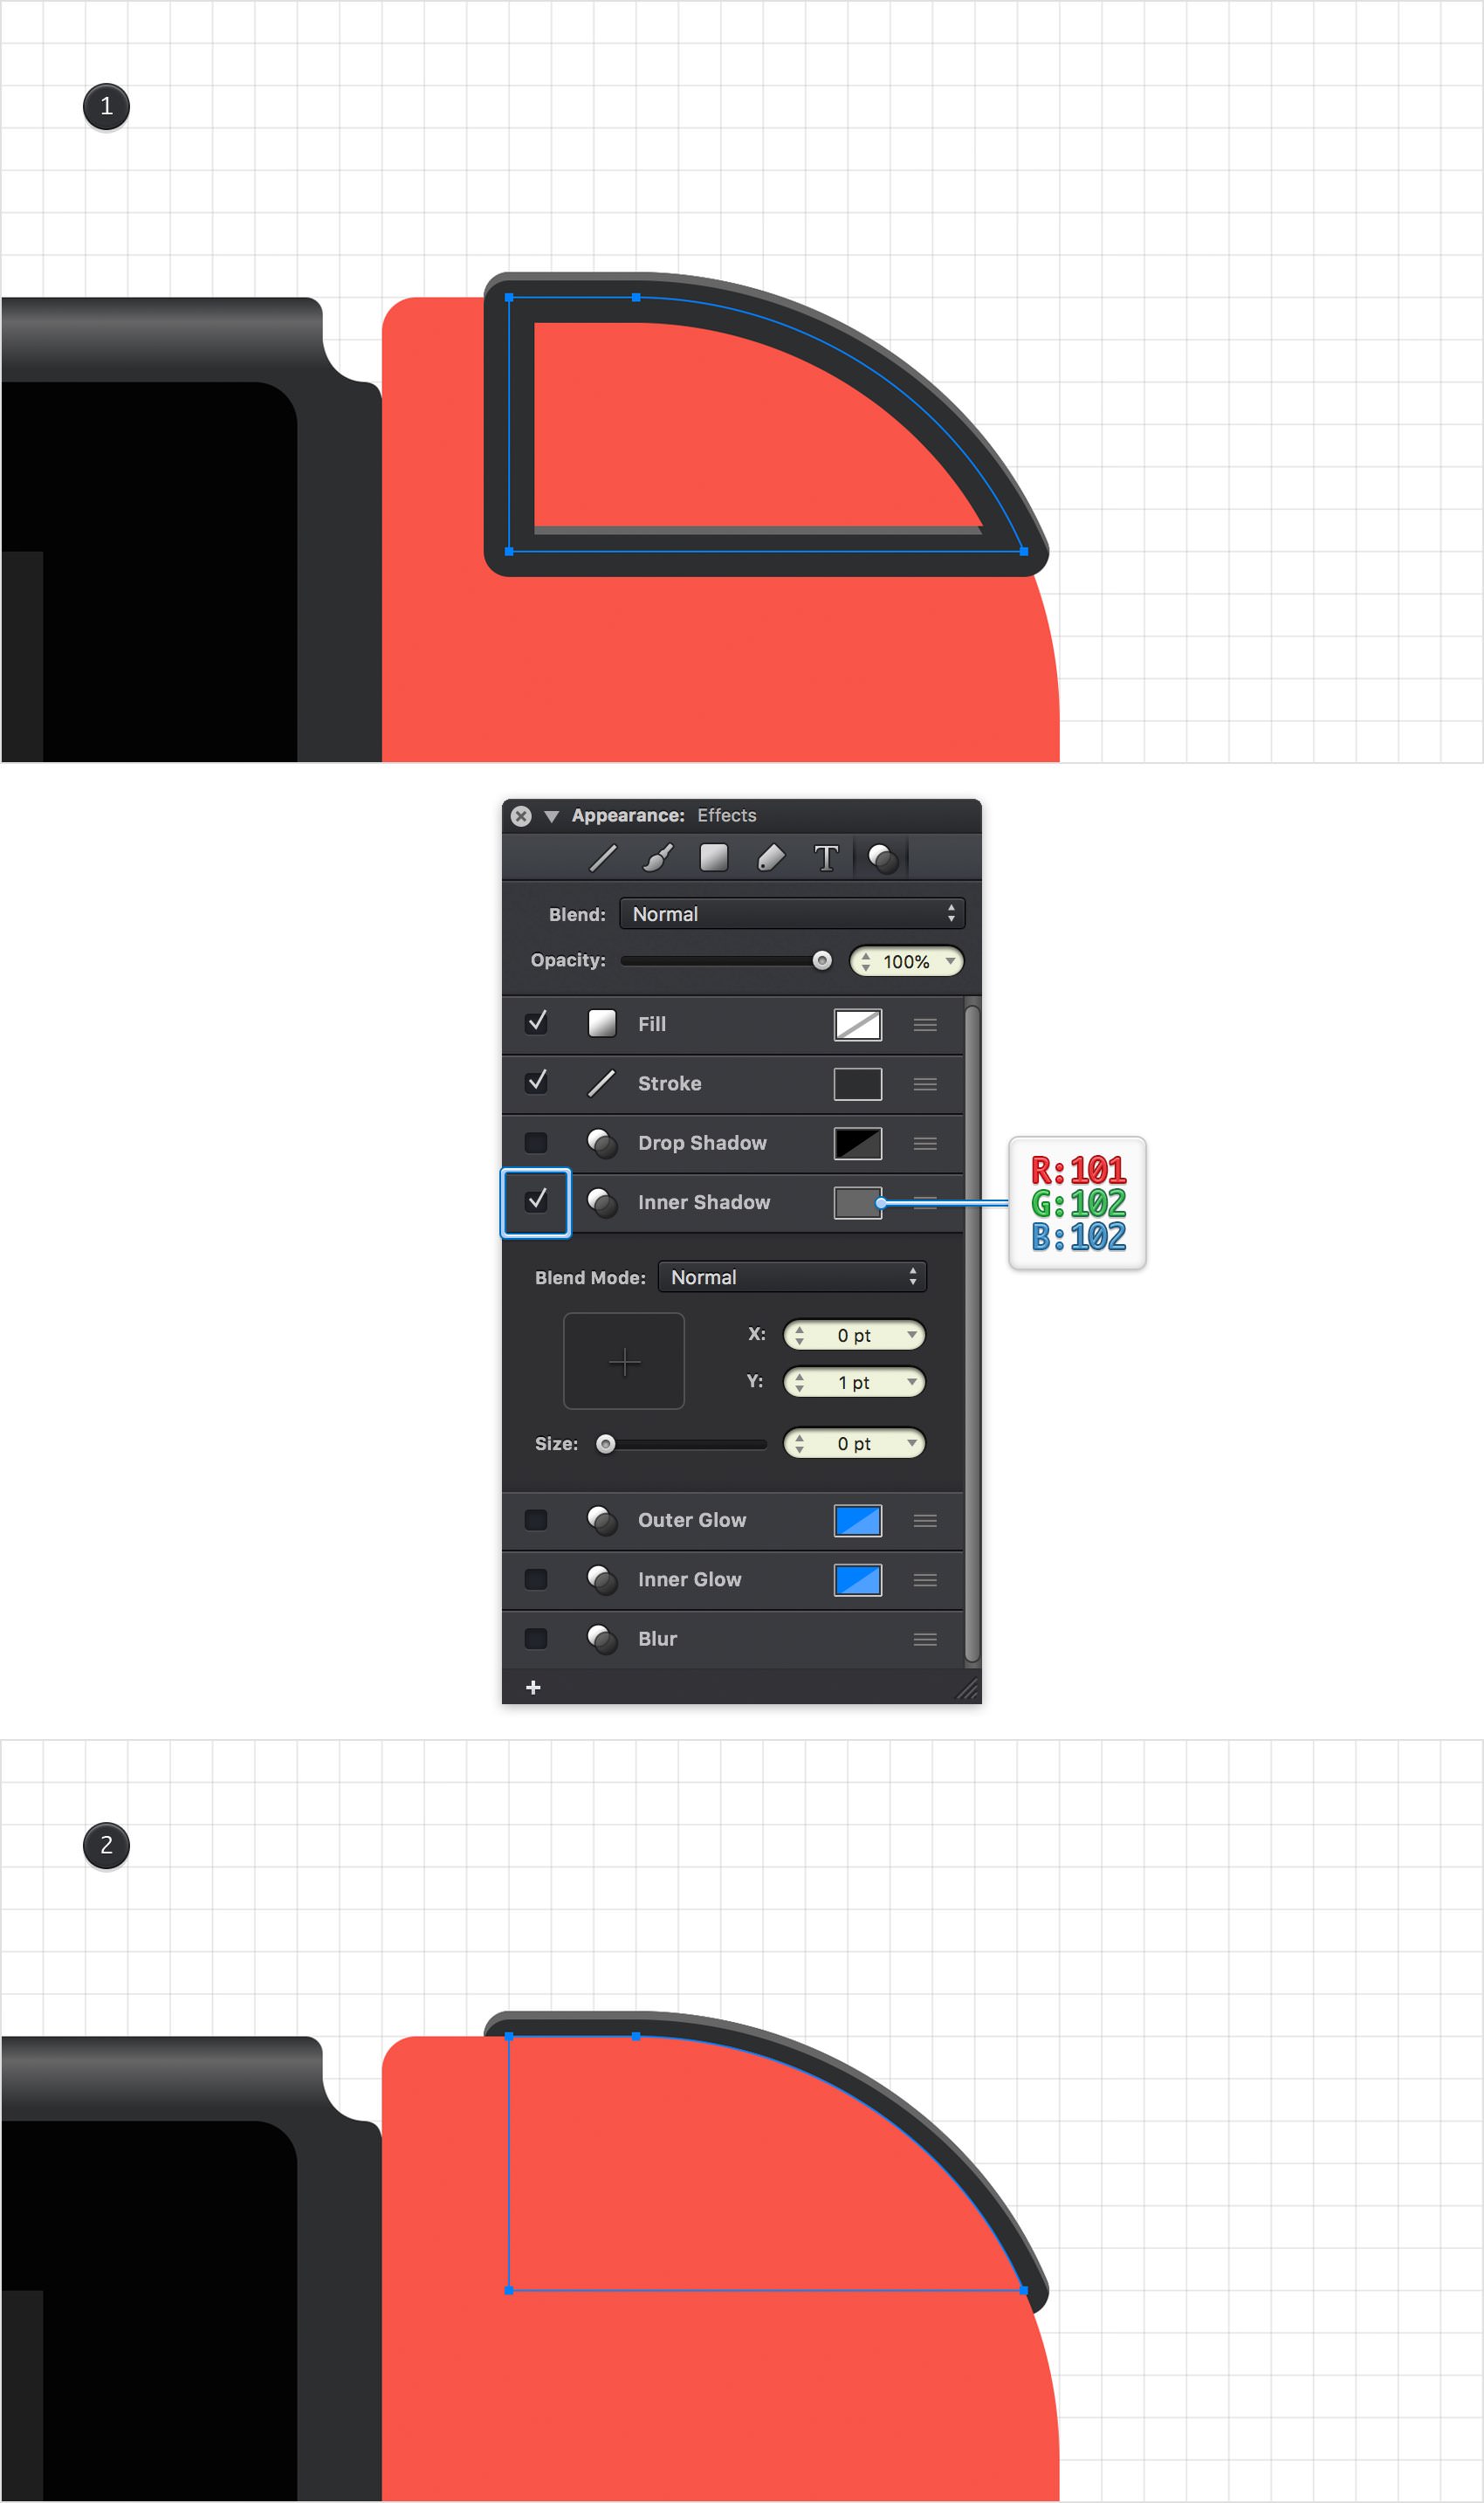
Make sure that the shape made in the previous step stays selected and focus on the Effects pane from the Appearance panel.
Check the square checkbox of the existing Inner Shadow effect to activate it and then select it. Keep the Blend Mode to Normal and then enter 0 pt in the X box and 1 pt in the Y box. Drag the Size slider to 0 pt and then click the color wheel of this effect. Drag the Alpha slider to 100% and replace the existing color with R=101 G=102 B=102. Once you're done, send this shape to back (Shift + Command + [).
Step 19
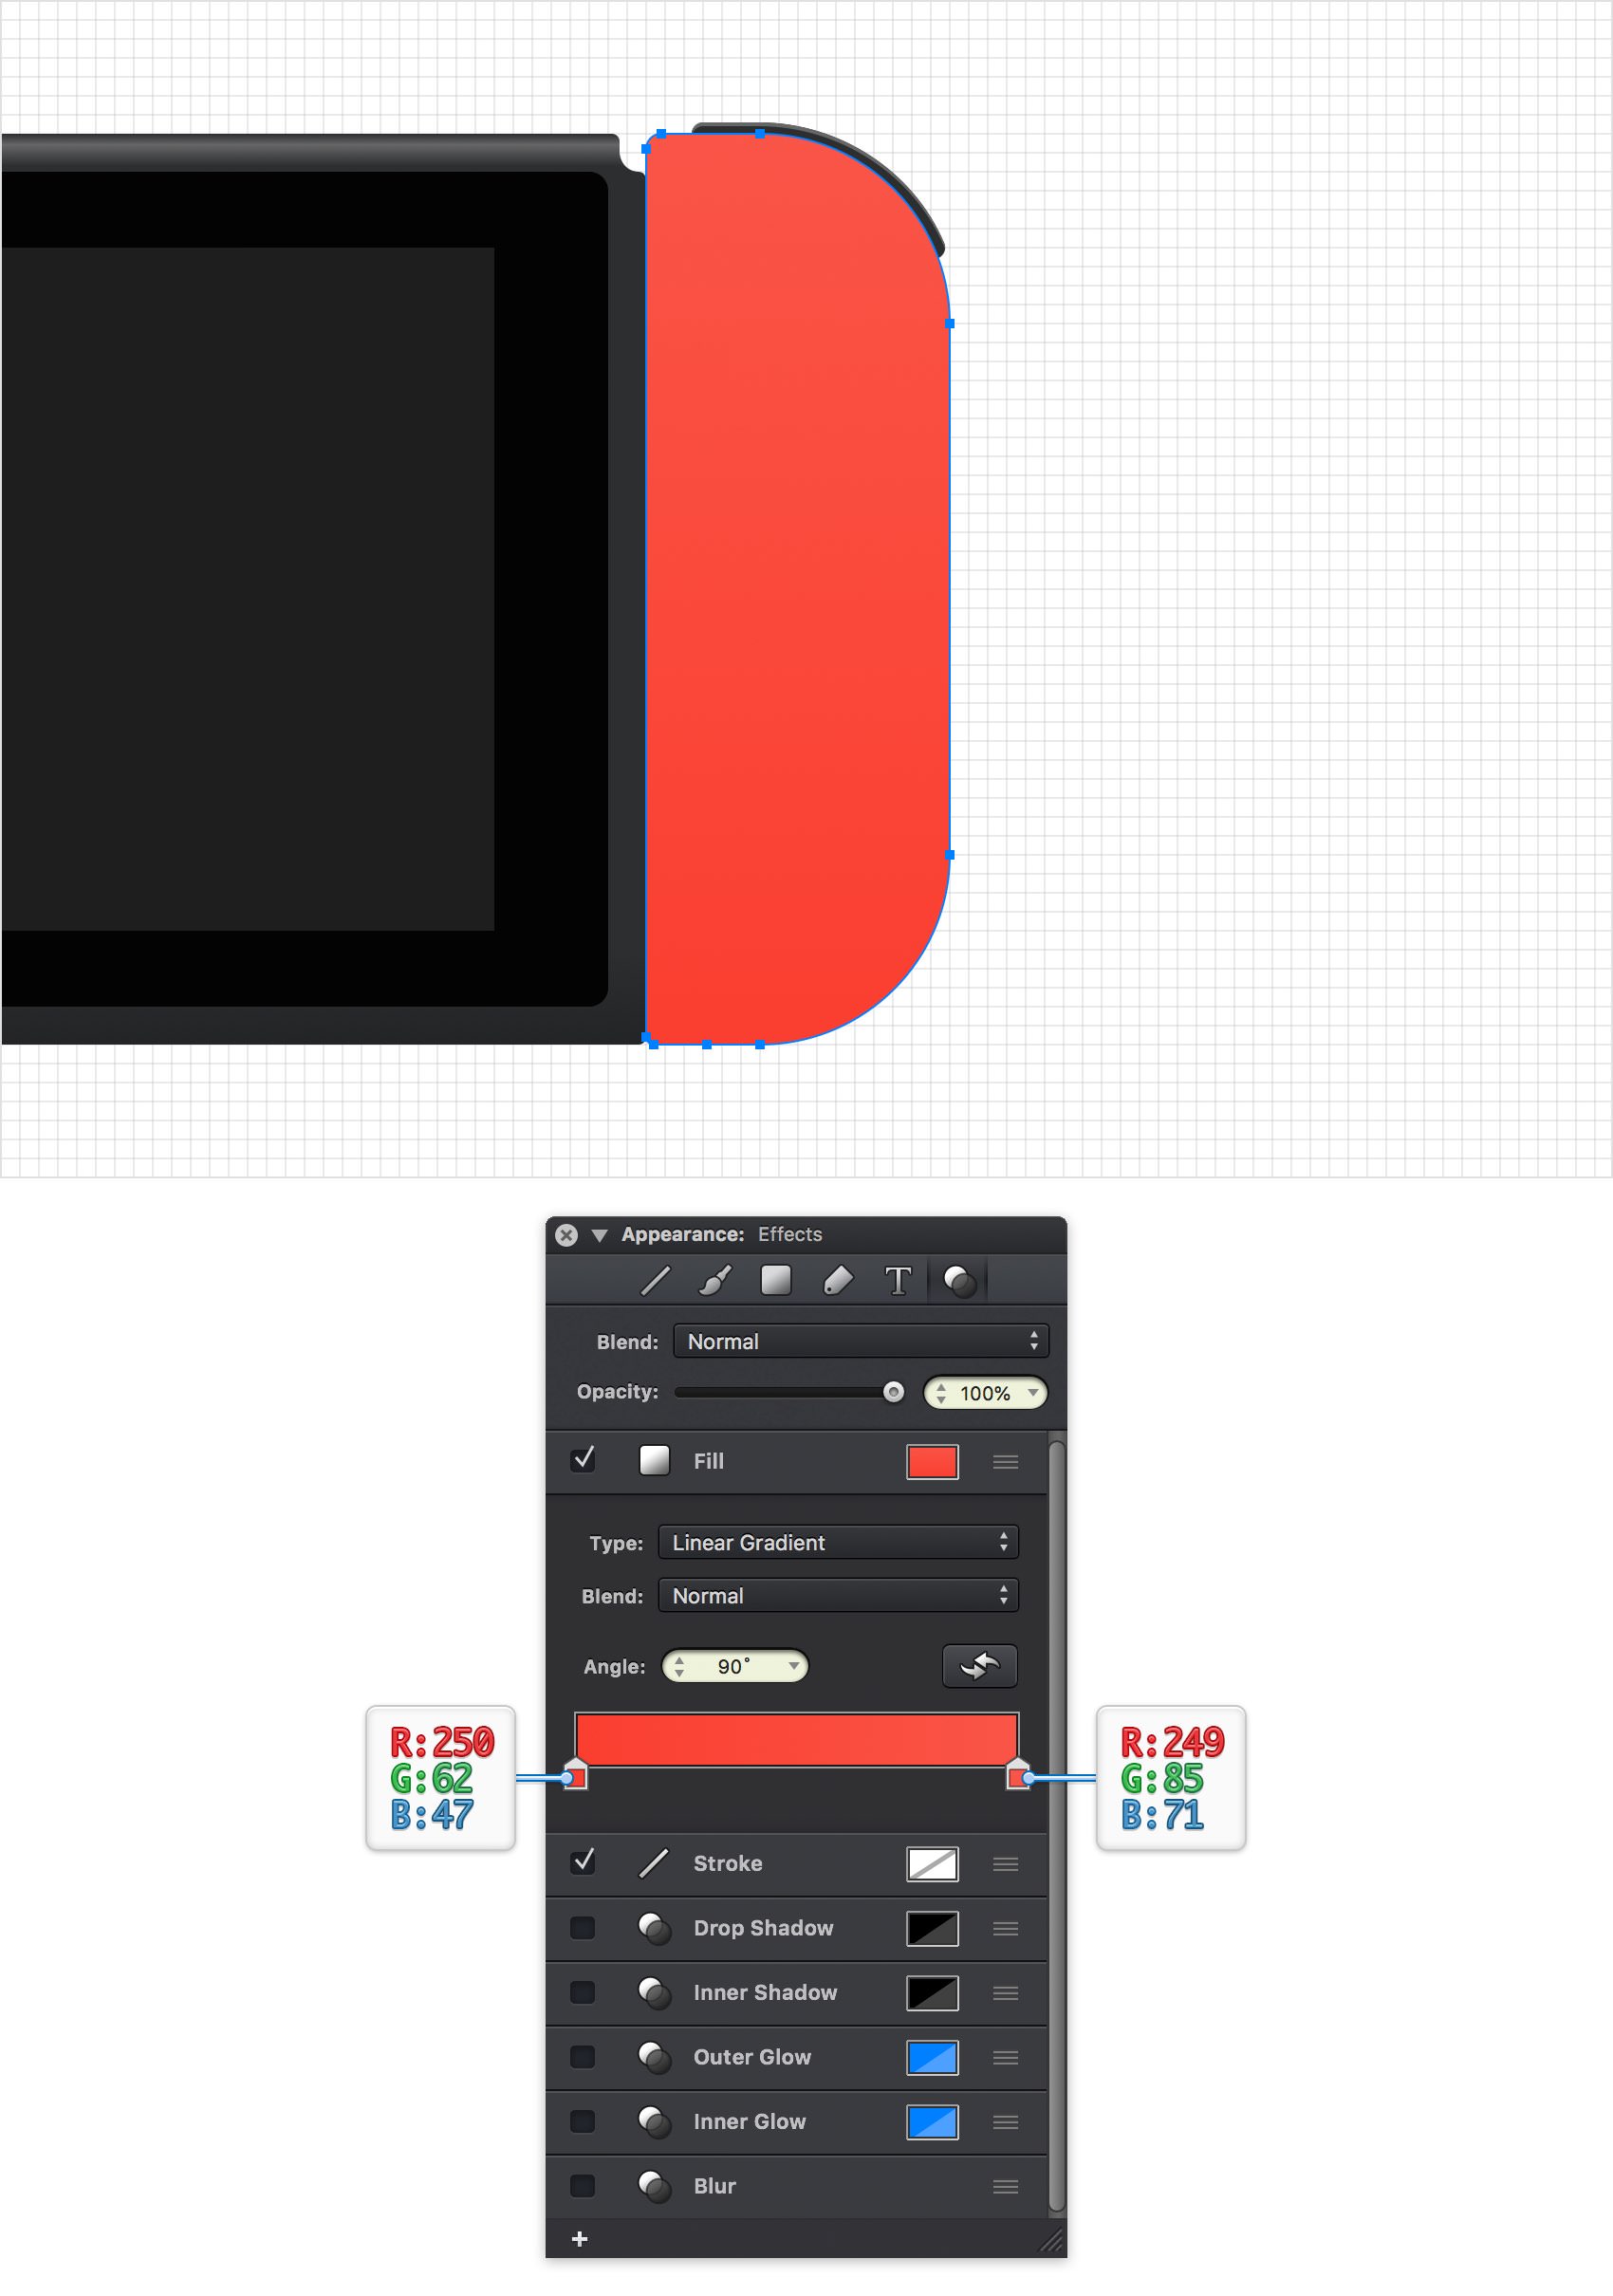
Select your red shape, focus on the Effects pane and select the Fill. Replace the color with the linear gradient shown below and make sure that the Angle is set to 90 °.
Step 20
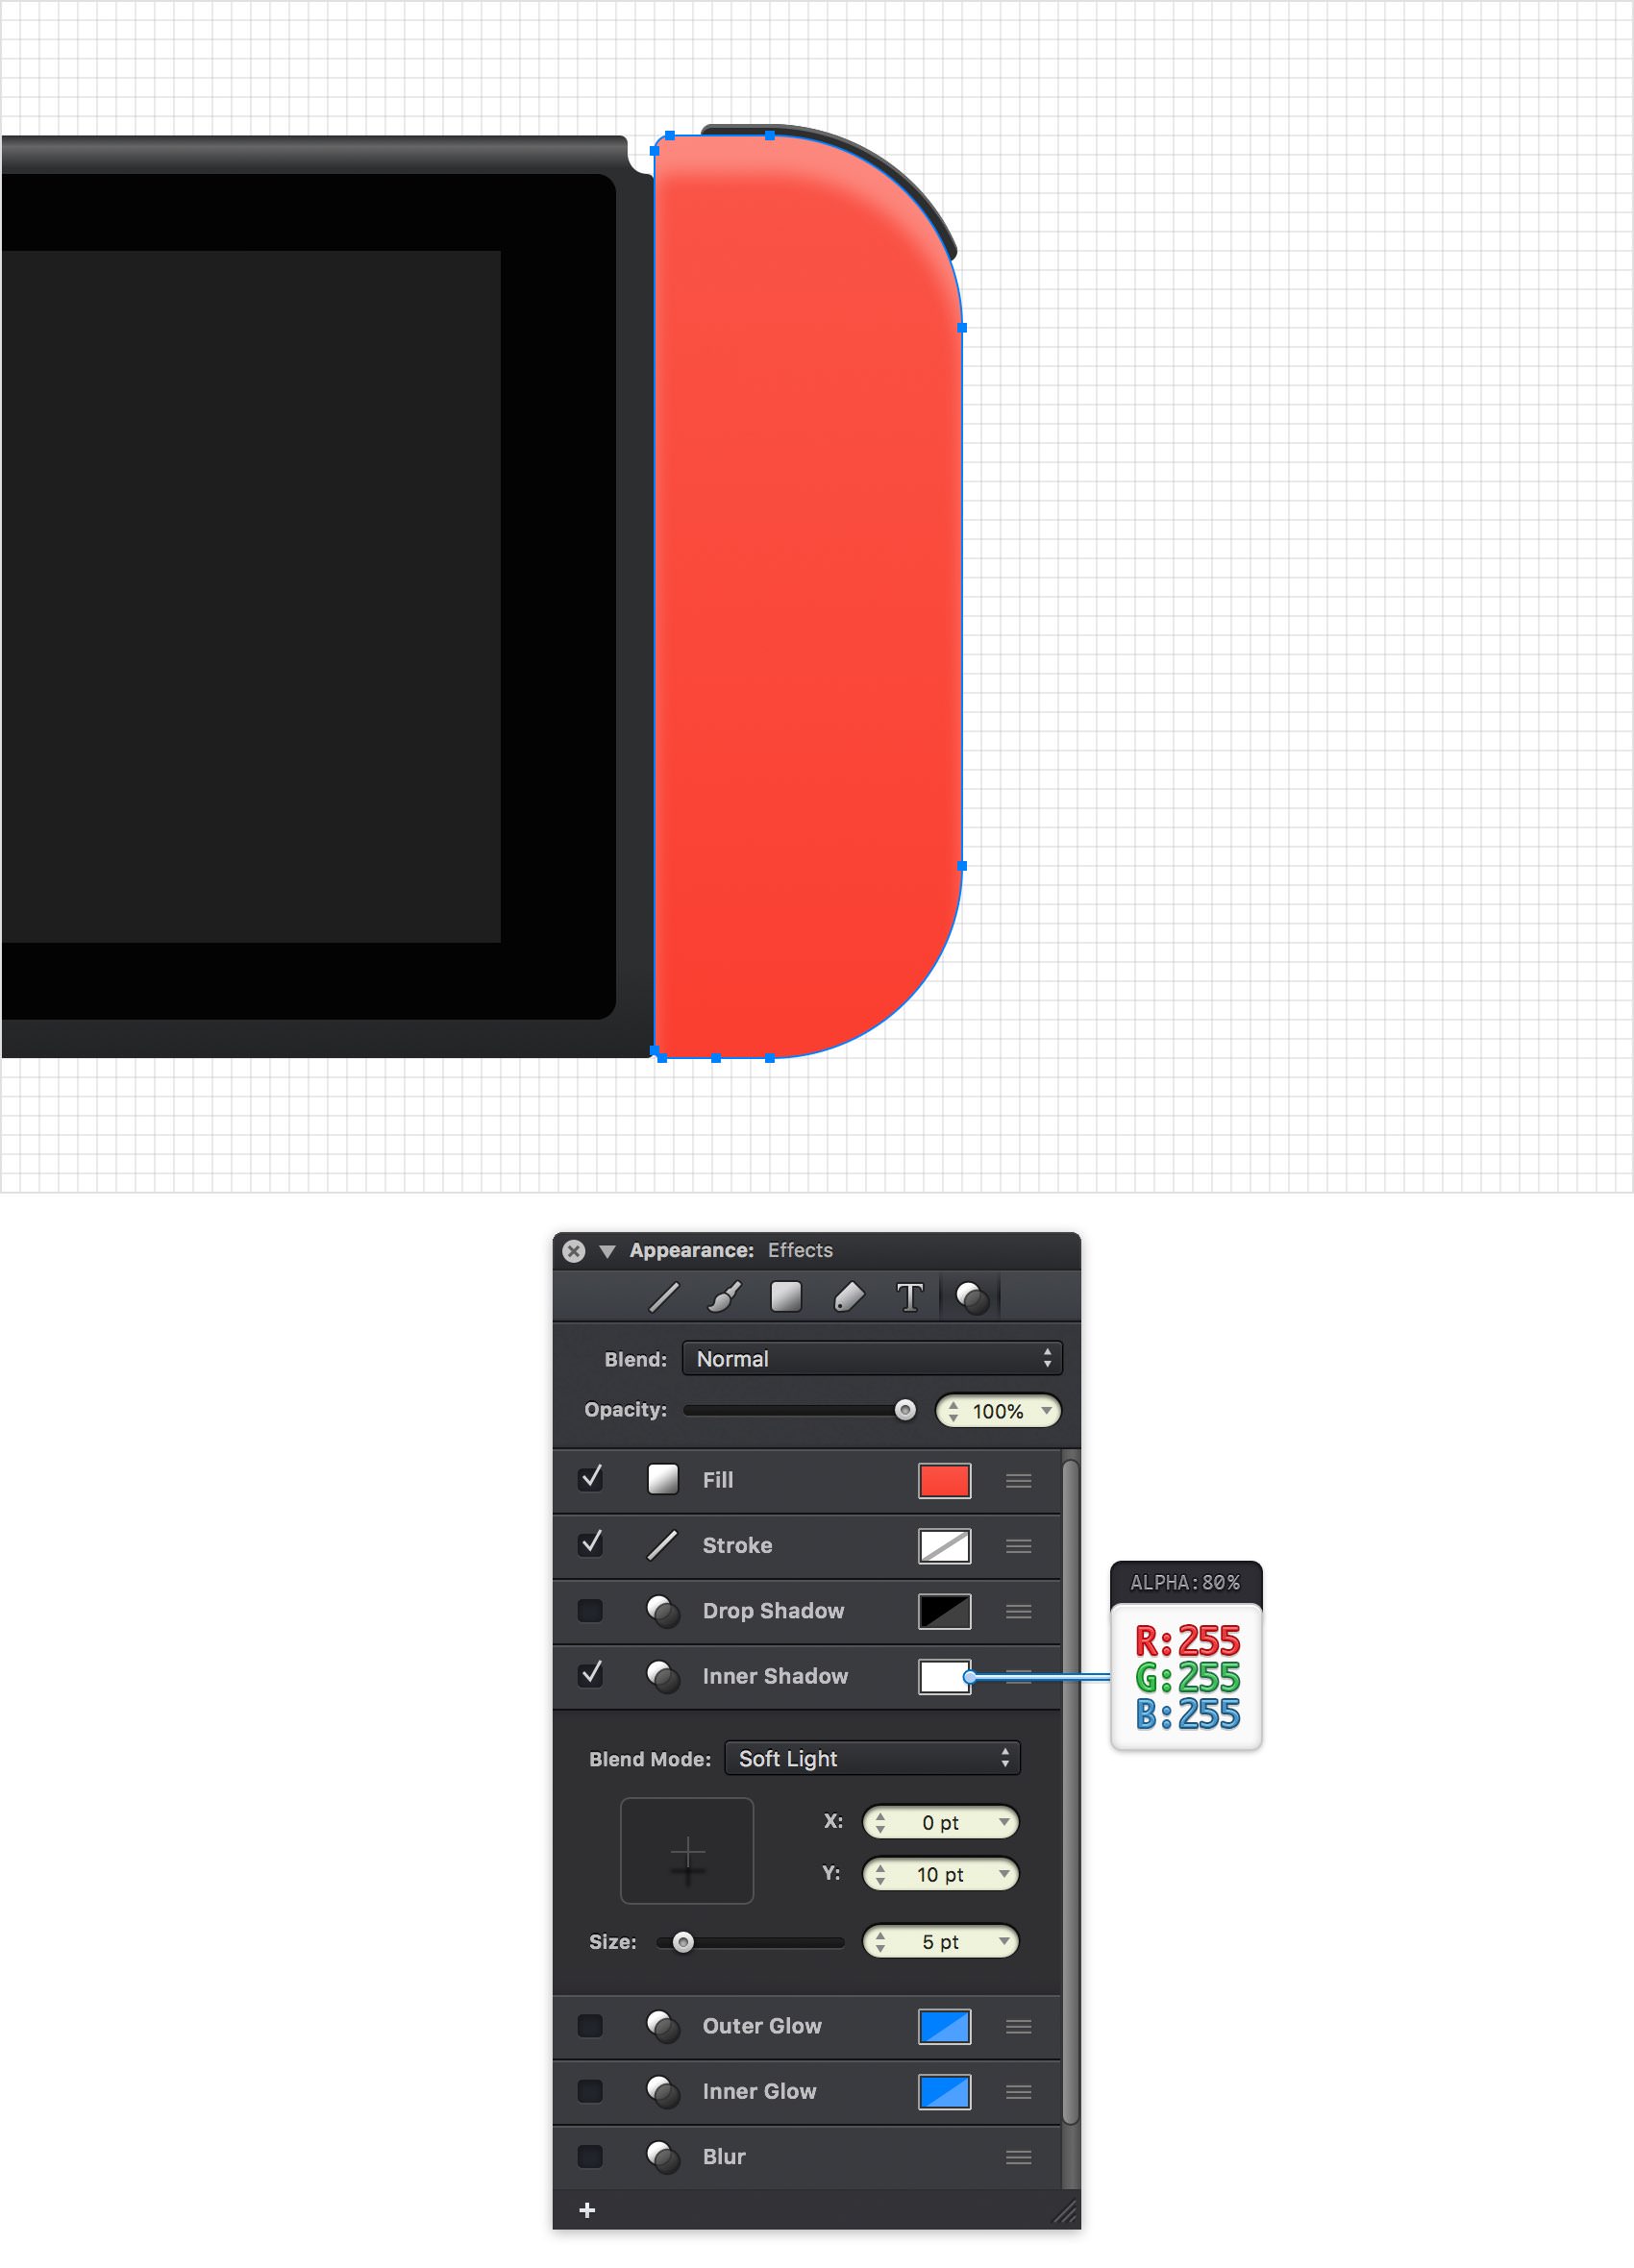
Make sure that your red shape stays selected and keep focusing on the Effects pane. Activate the existing Inner Shadow effect and enter the attributes shown below.
Step 21
Make sure that your red shape stays selected and keep focusing on the Effects pane. Use the add button (+) from the bottom of the pane to add a second Inner Shadow effect. Select it and enter the attributes shown below.
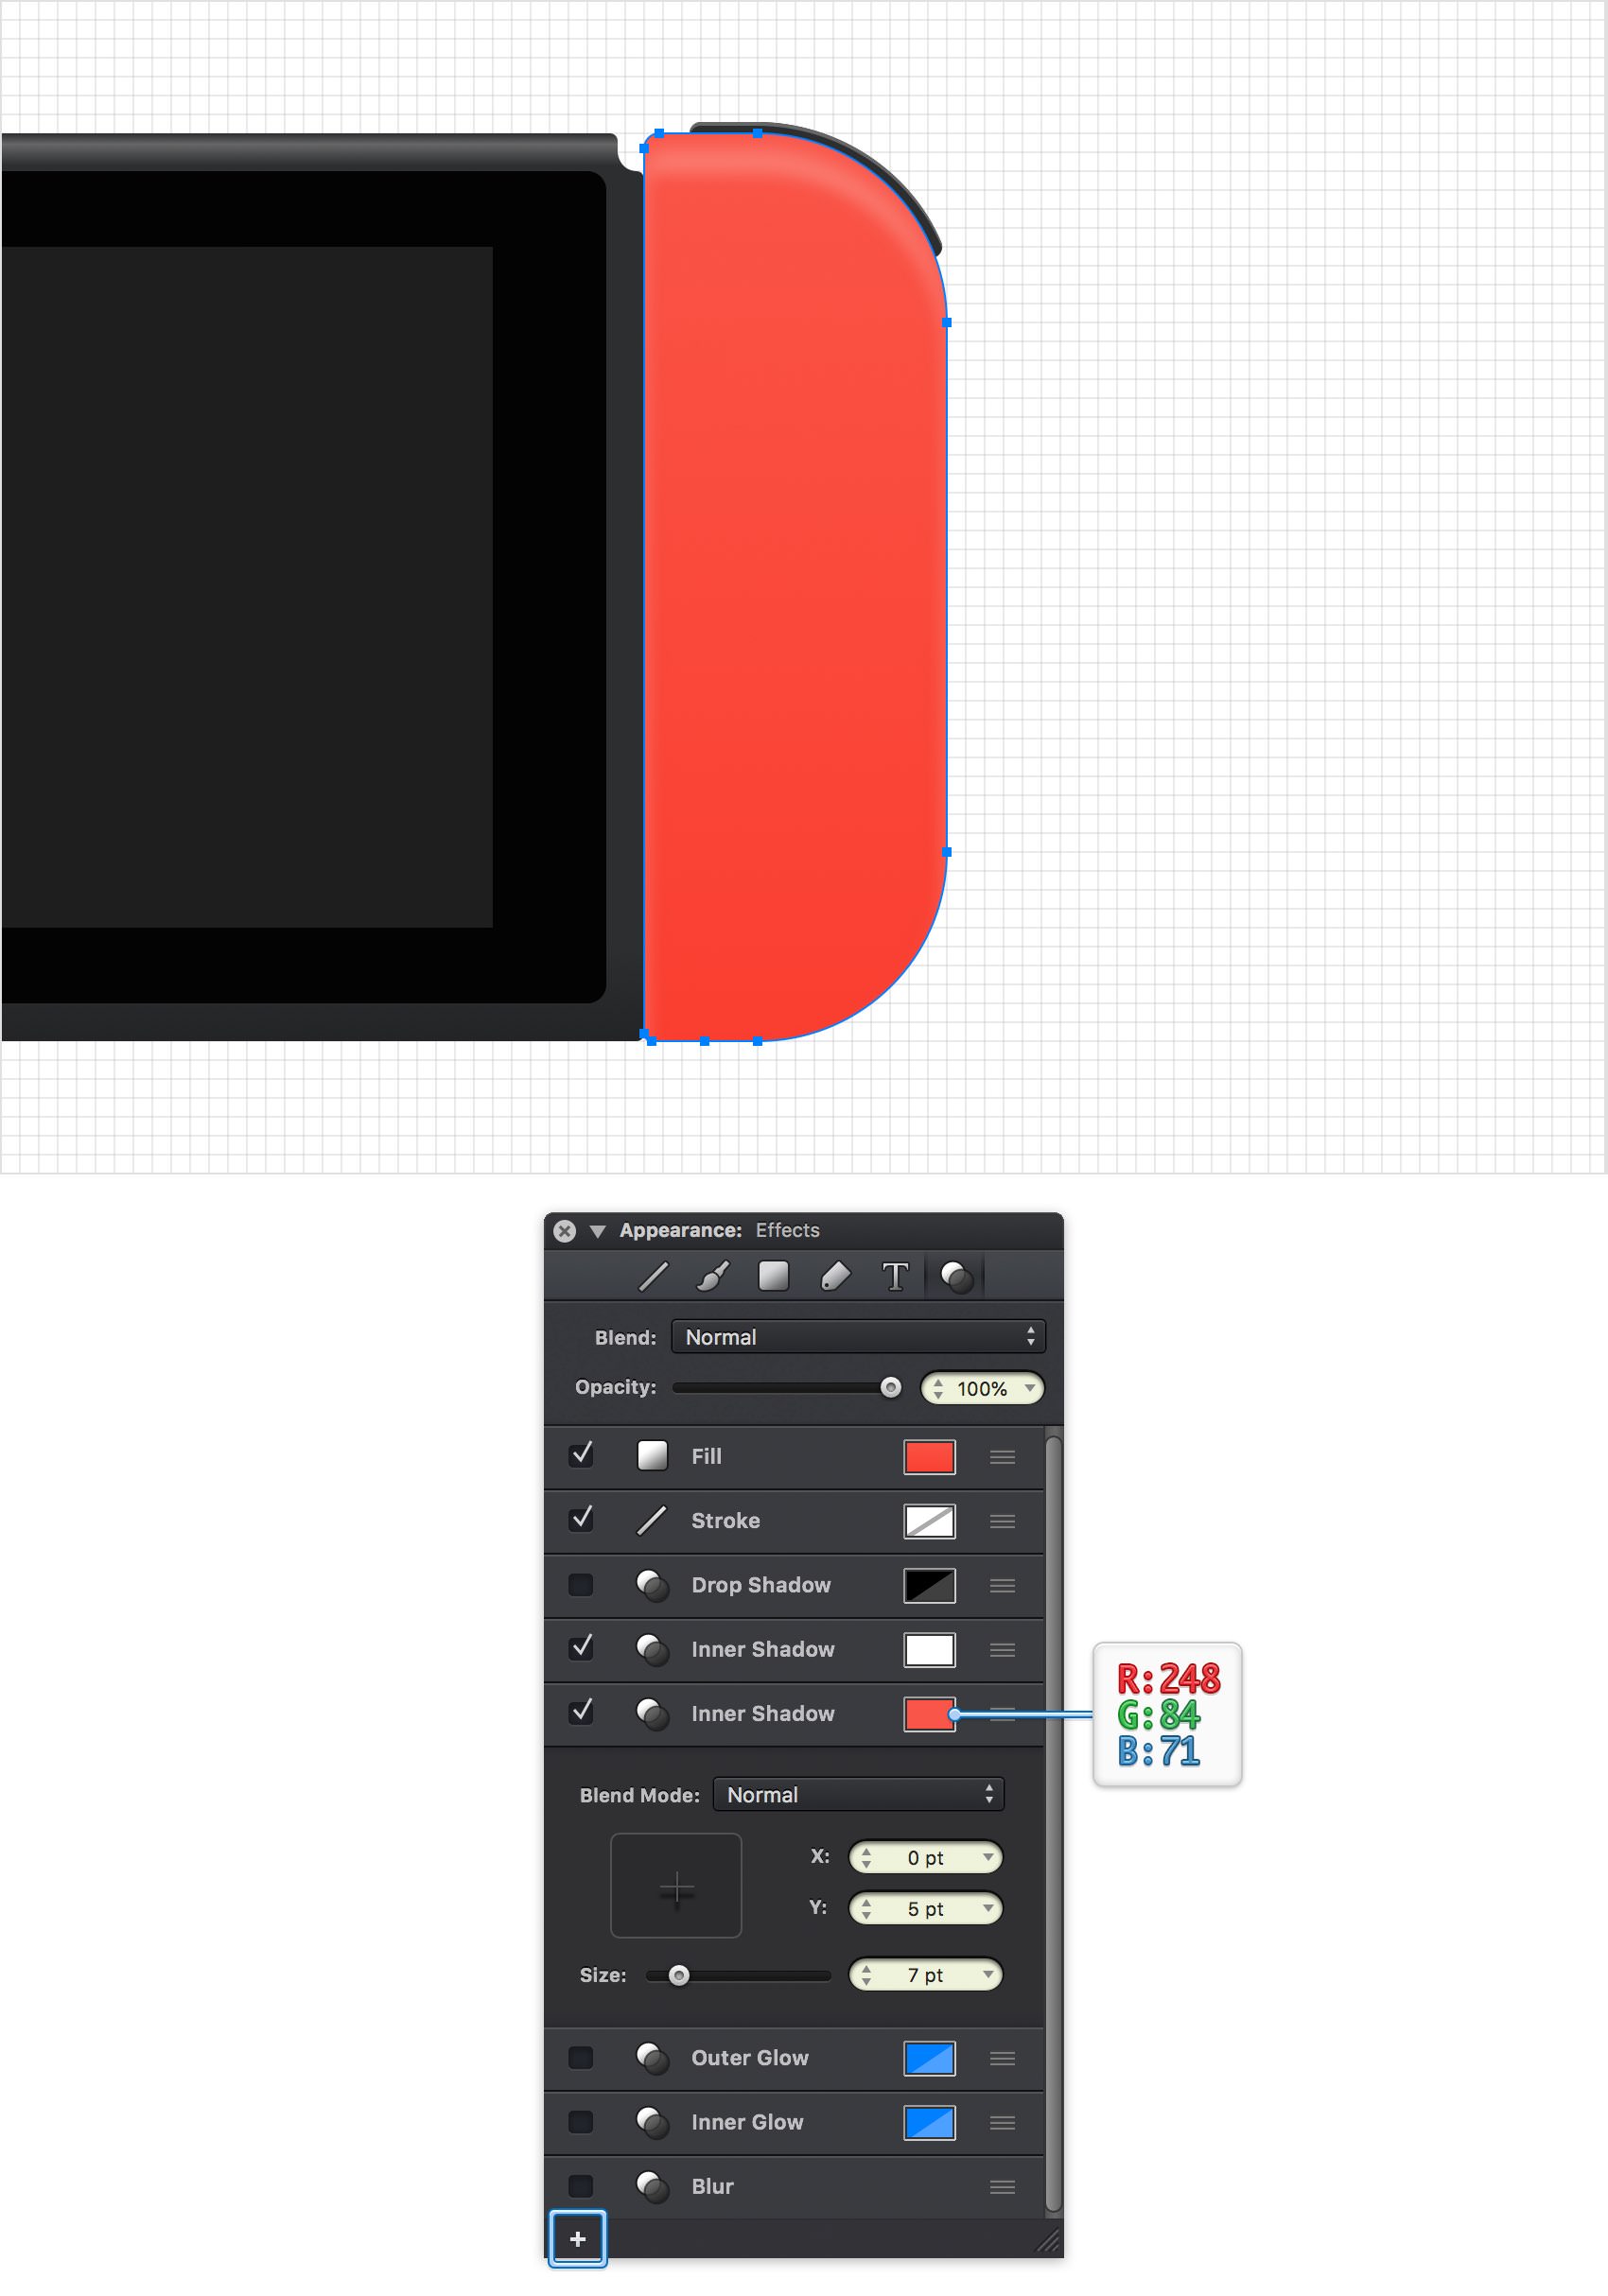
Step 22
Make sure that your red shape stays selected and keep focusing on the Effects pane. Add a third Inner Shadow effect, select it and enter the attributes shown below.
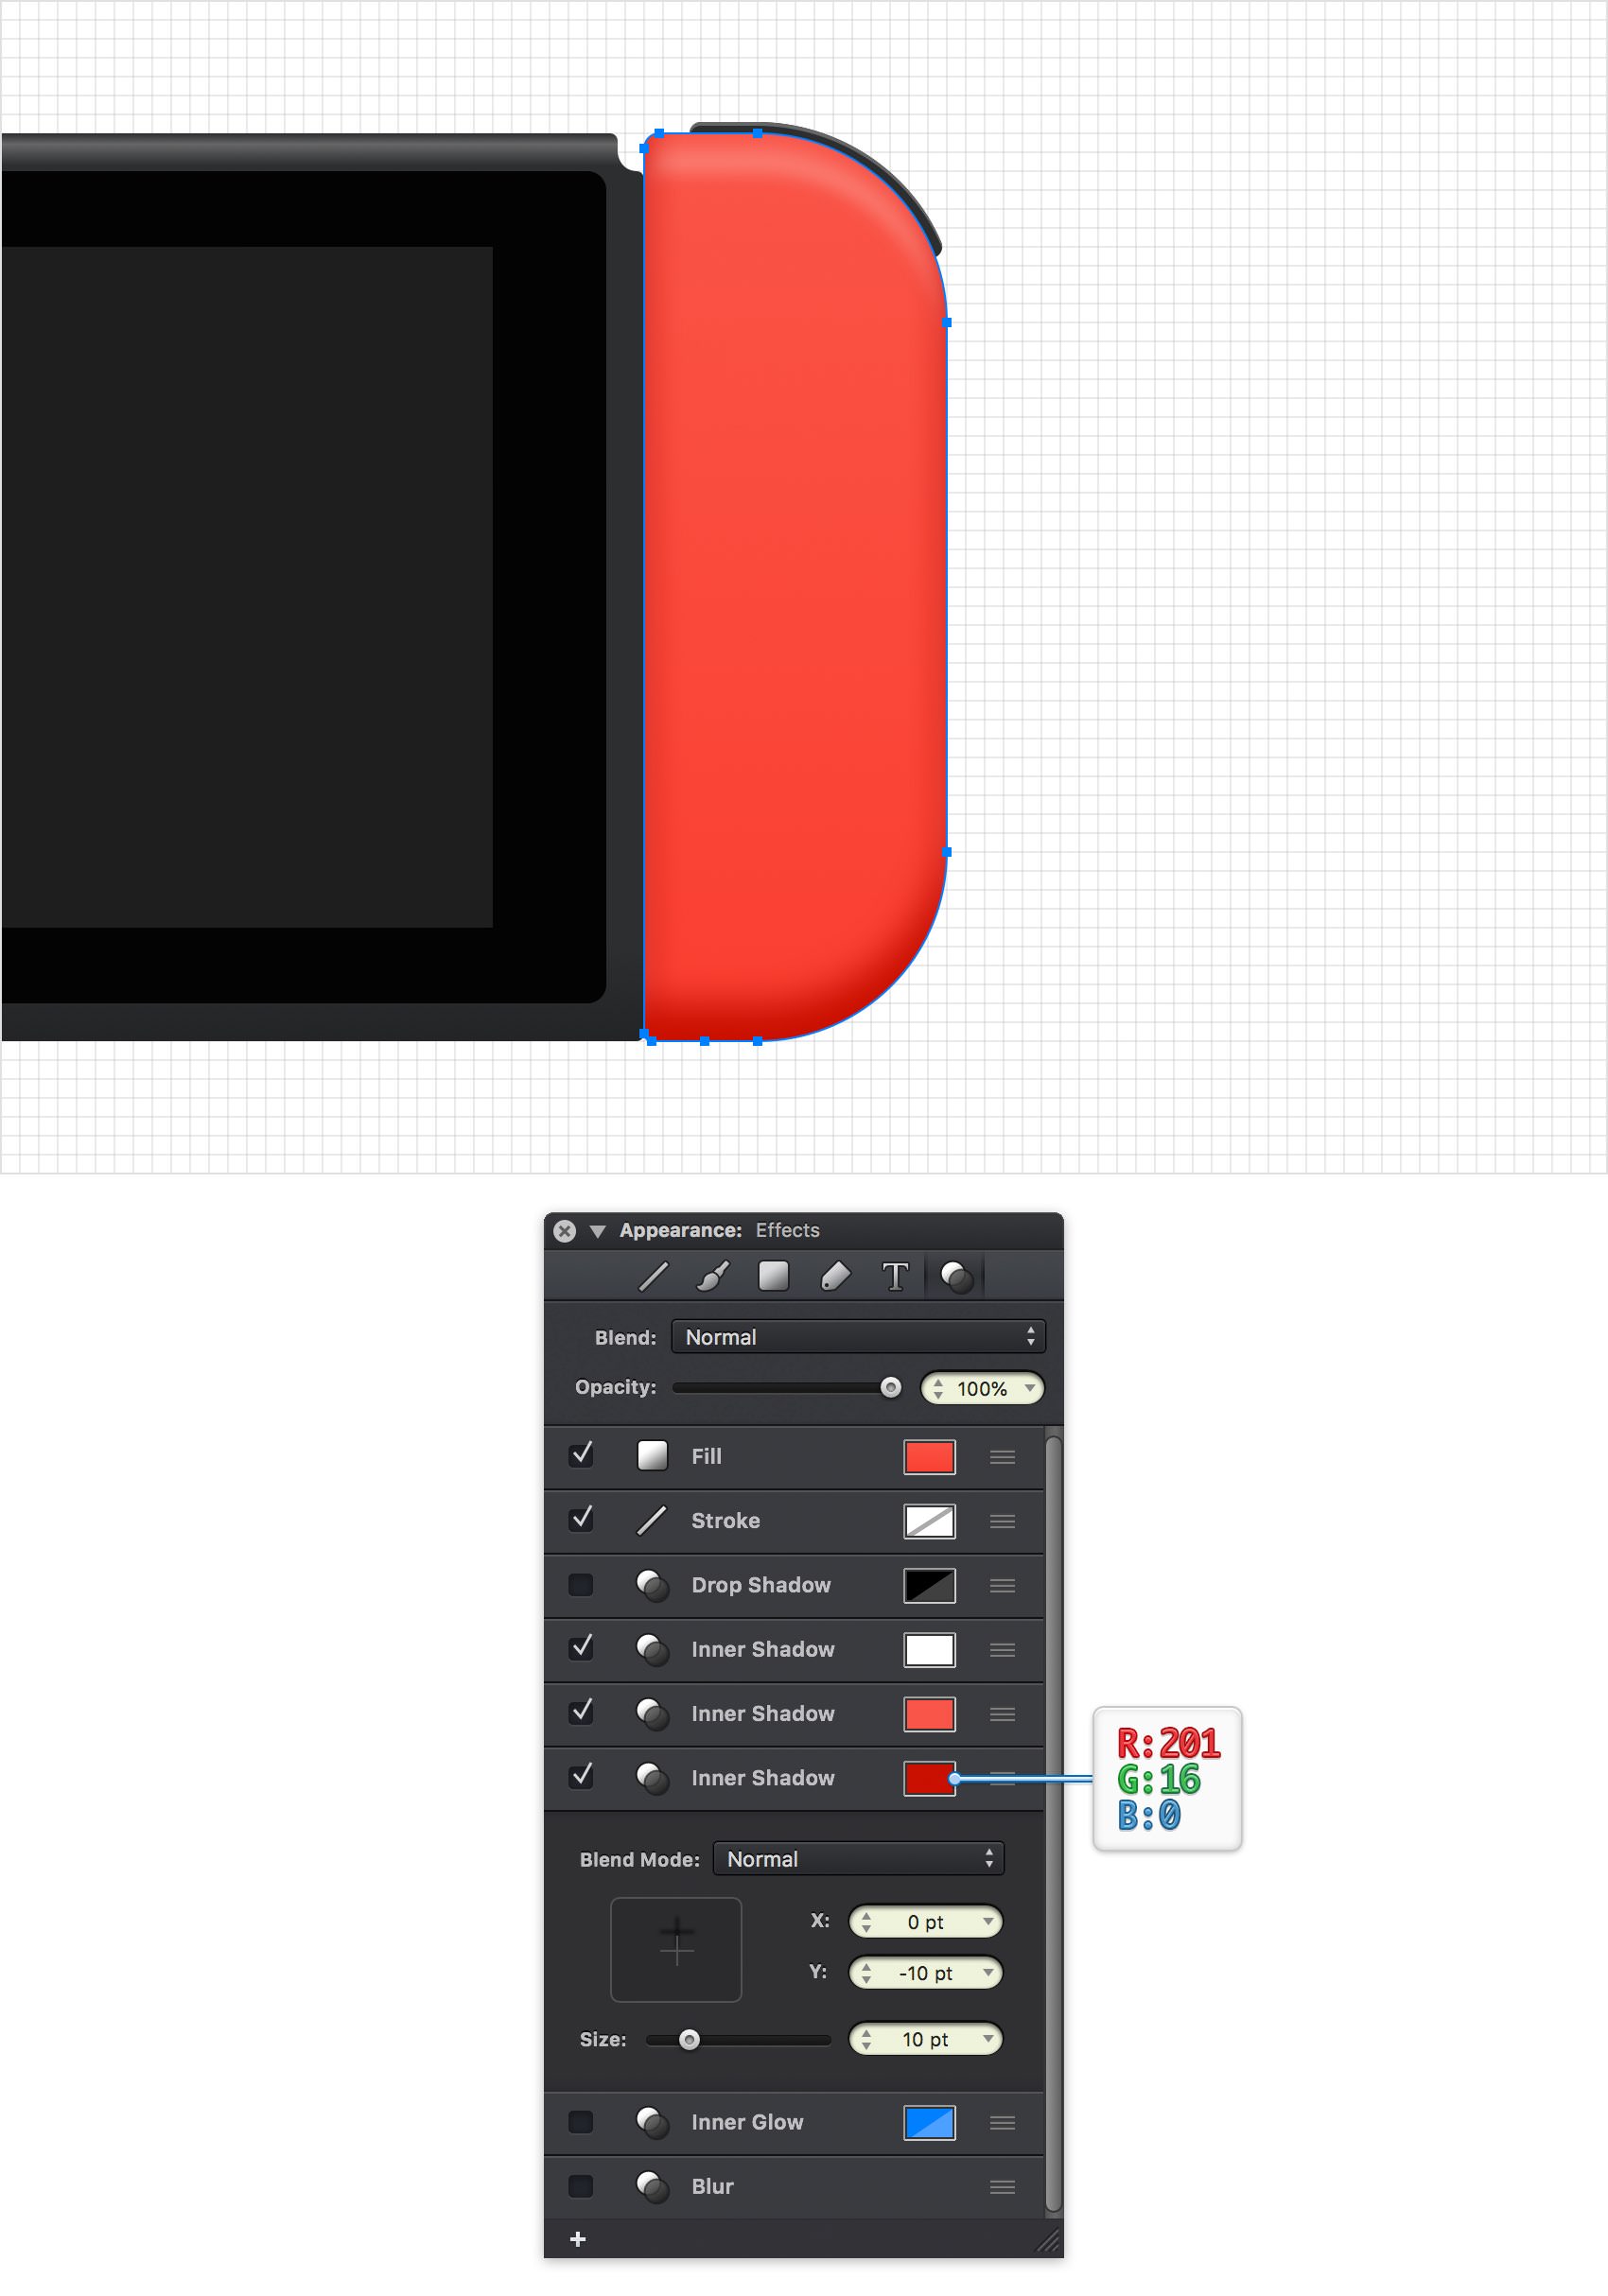
Step 23
Make sure that your red shape stays selected and keep focusing on the Effects pane. Add a fourth Inner Shadow effect, select it and enter the attributes shown below.
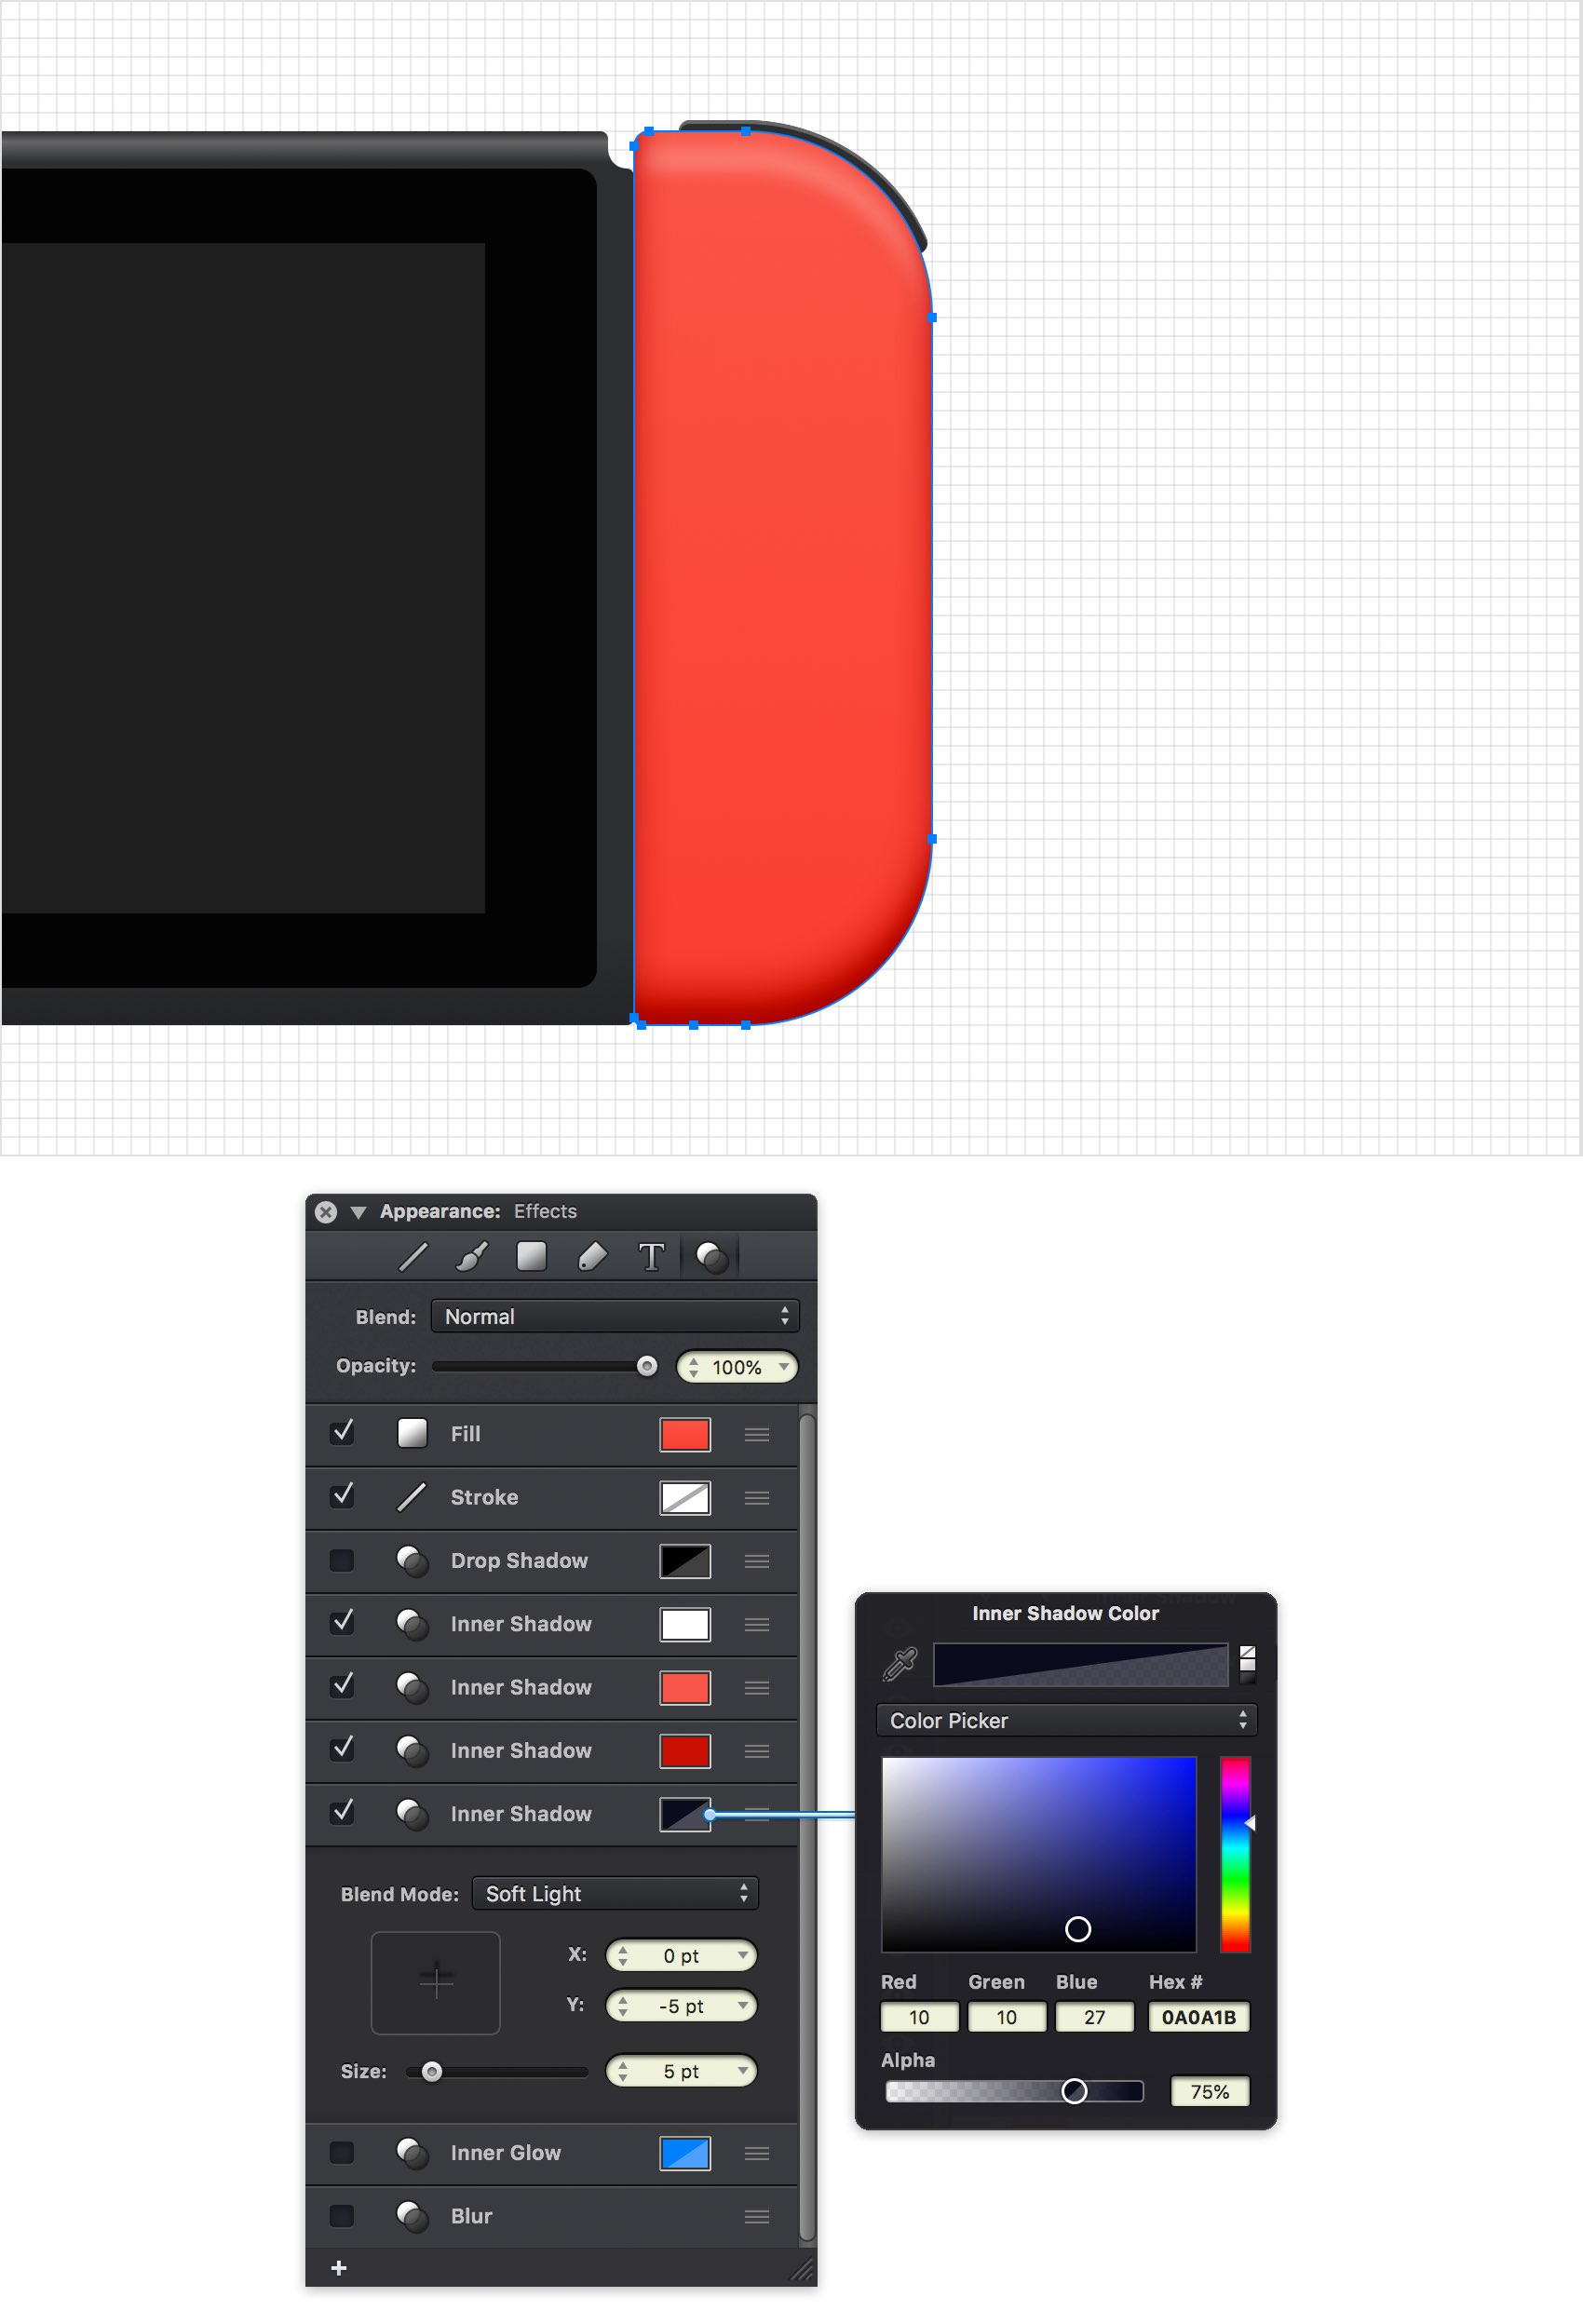
Step 24
Select the two shapes highlighted in the first image and add copies in the same place (Command + C > Shift + Command + V). Flip these copies horizontally (Modify > Rotate and Transform > Flip Horizontal) and place them as shown in the third image.
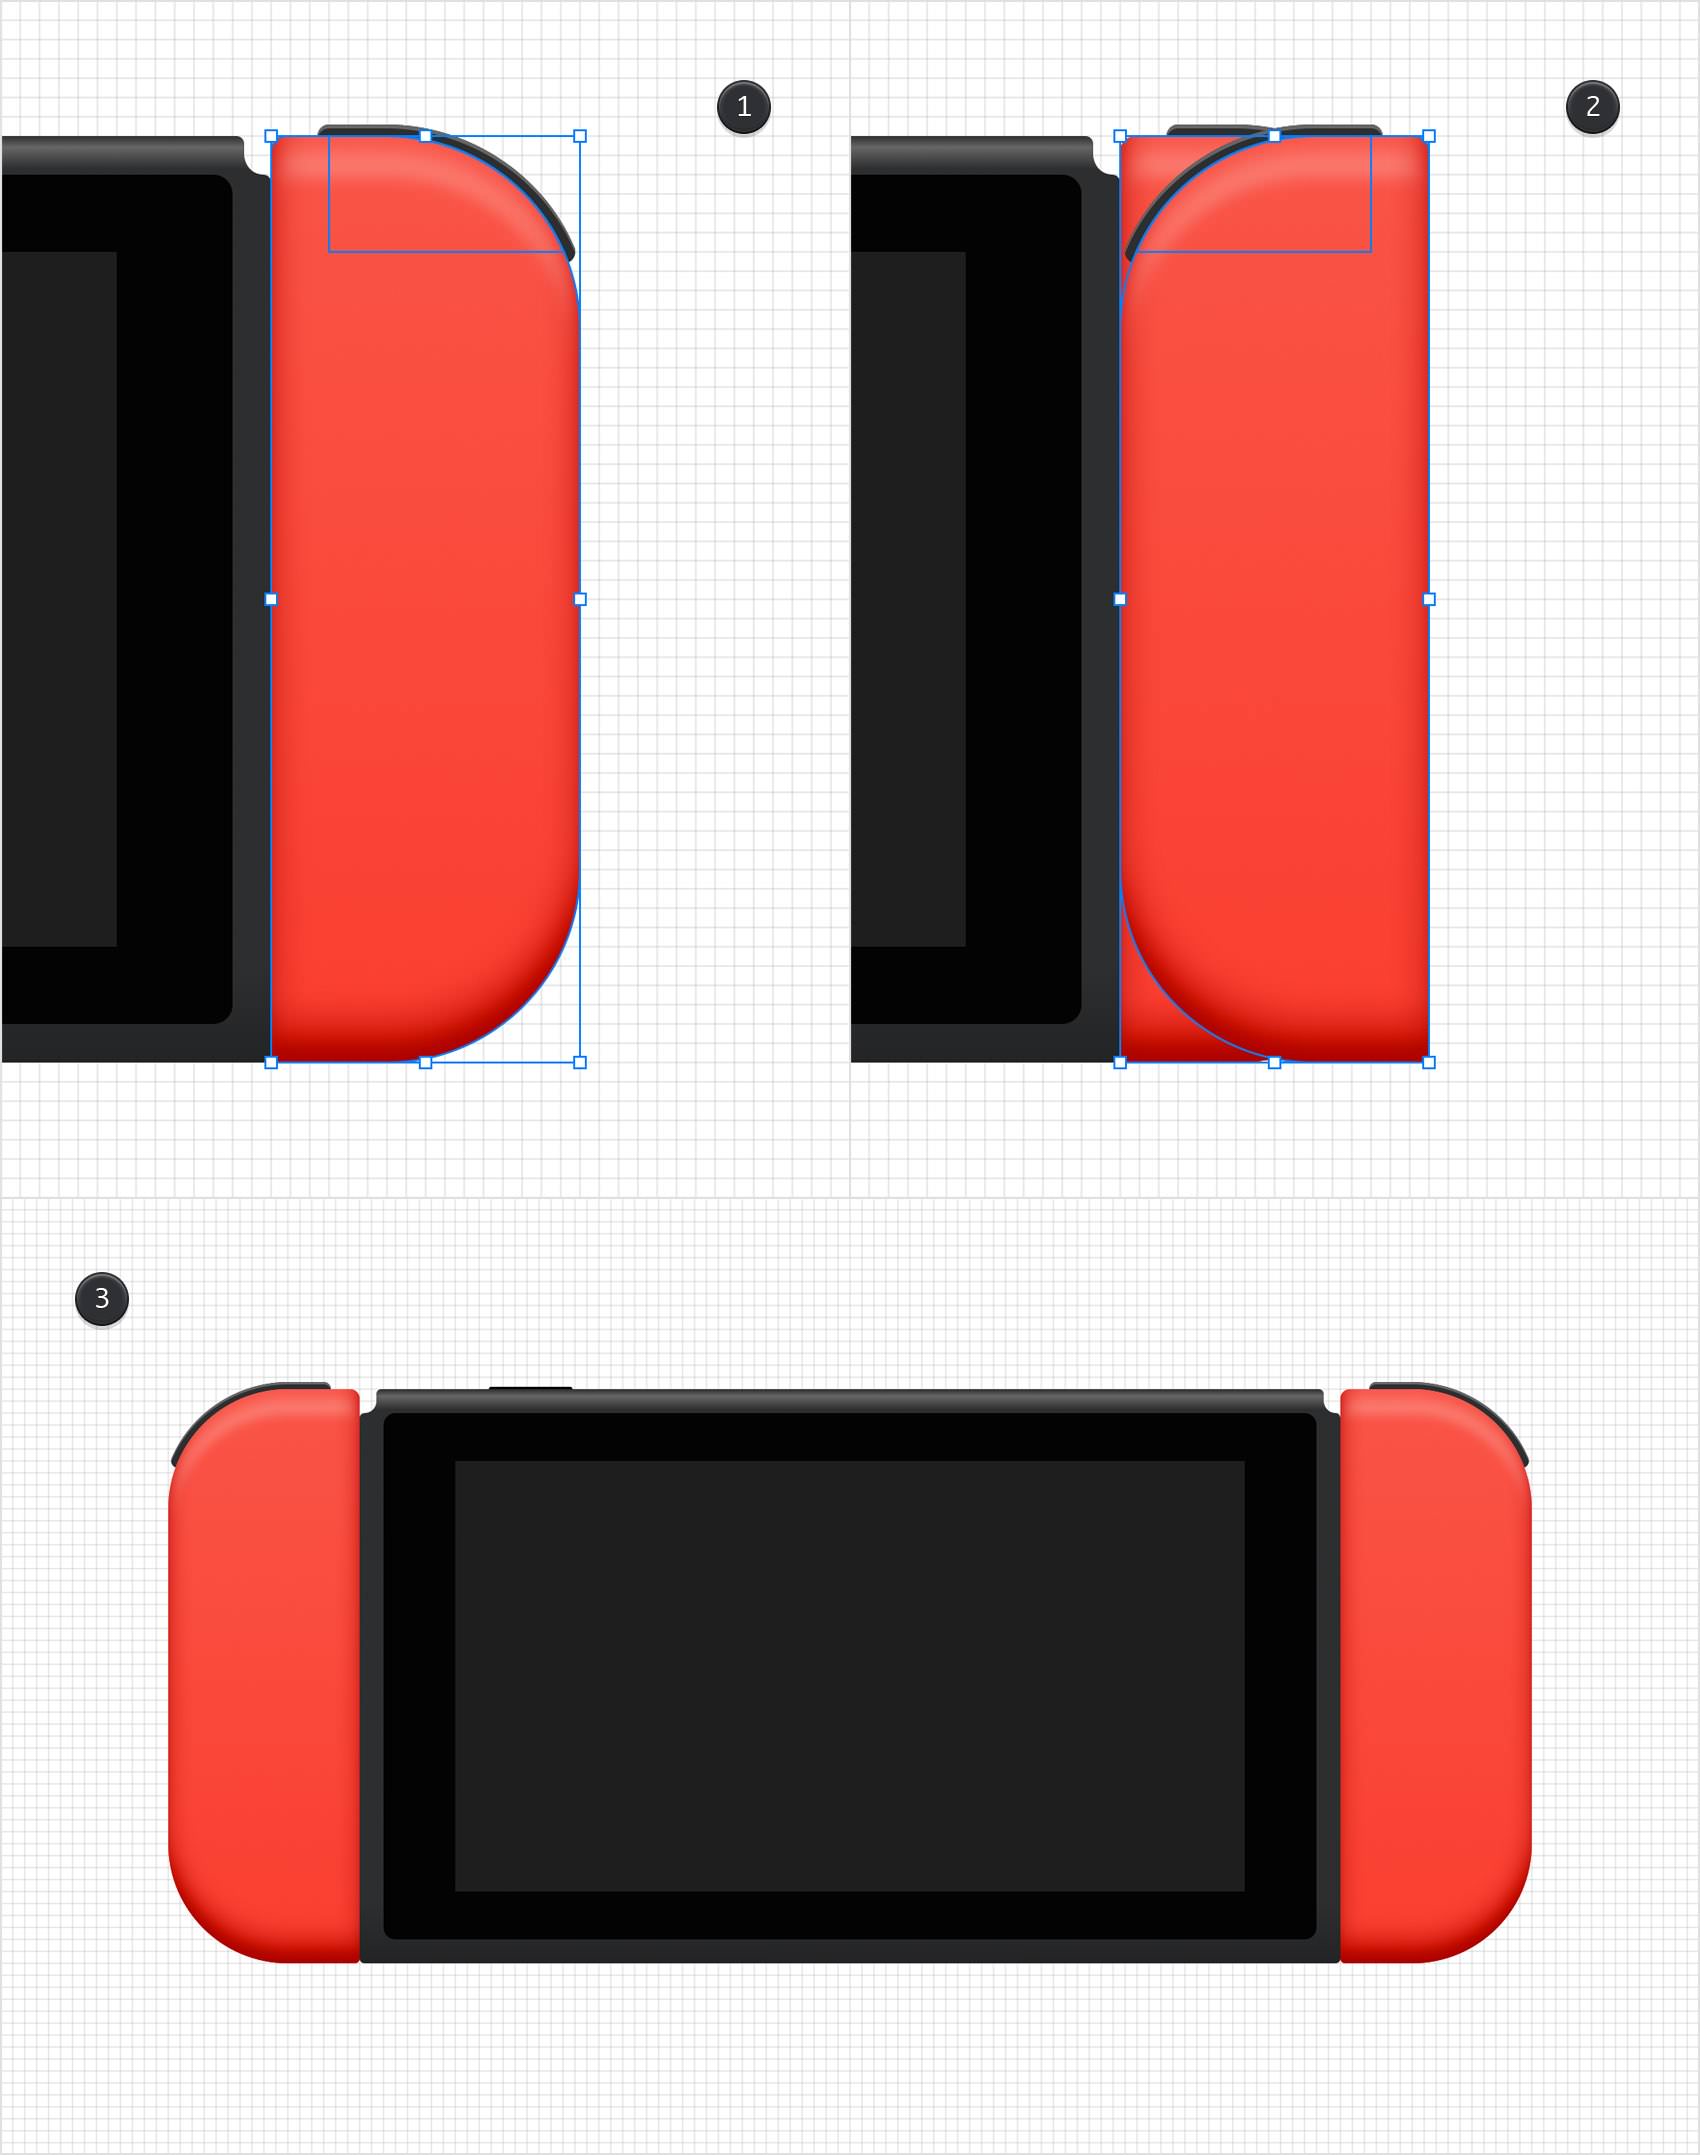
Step 25
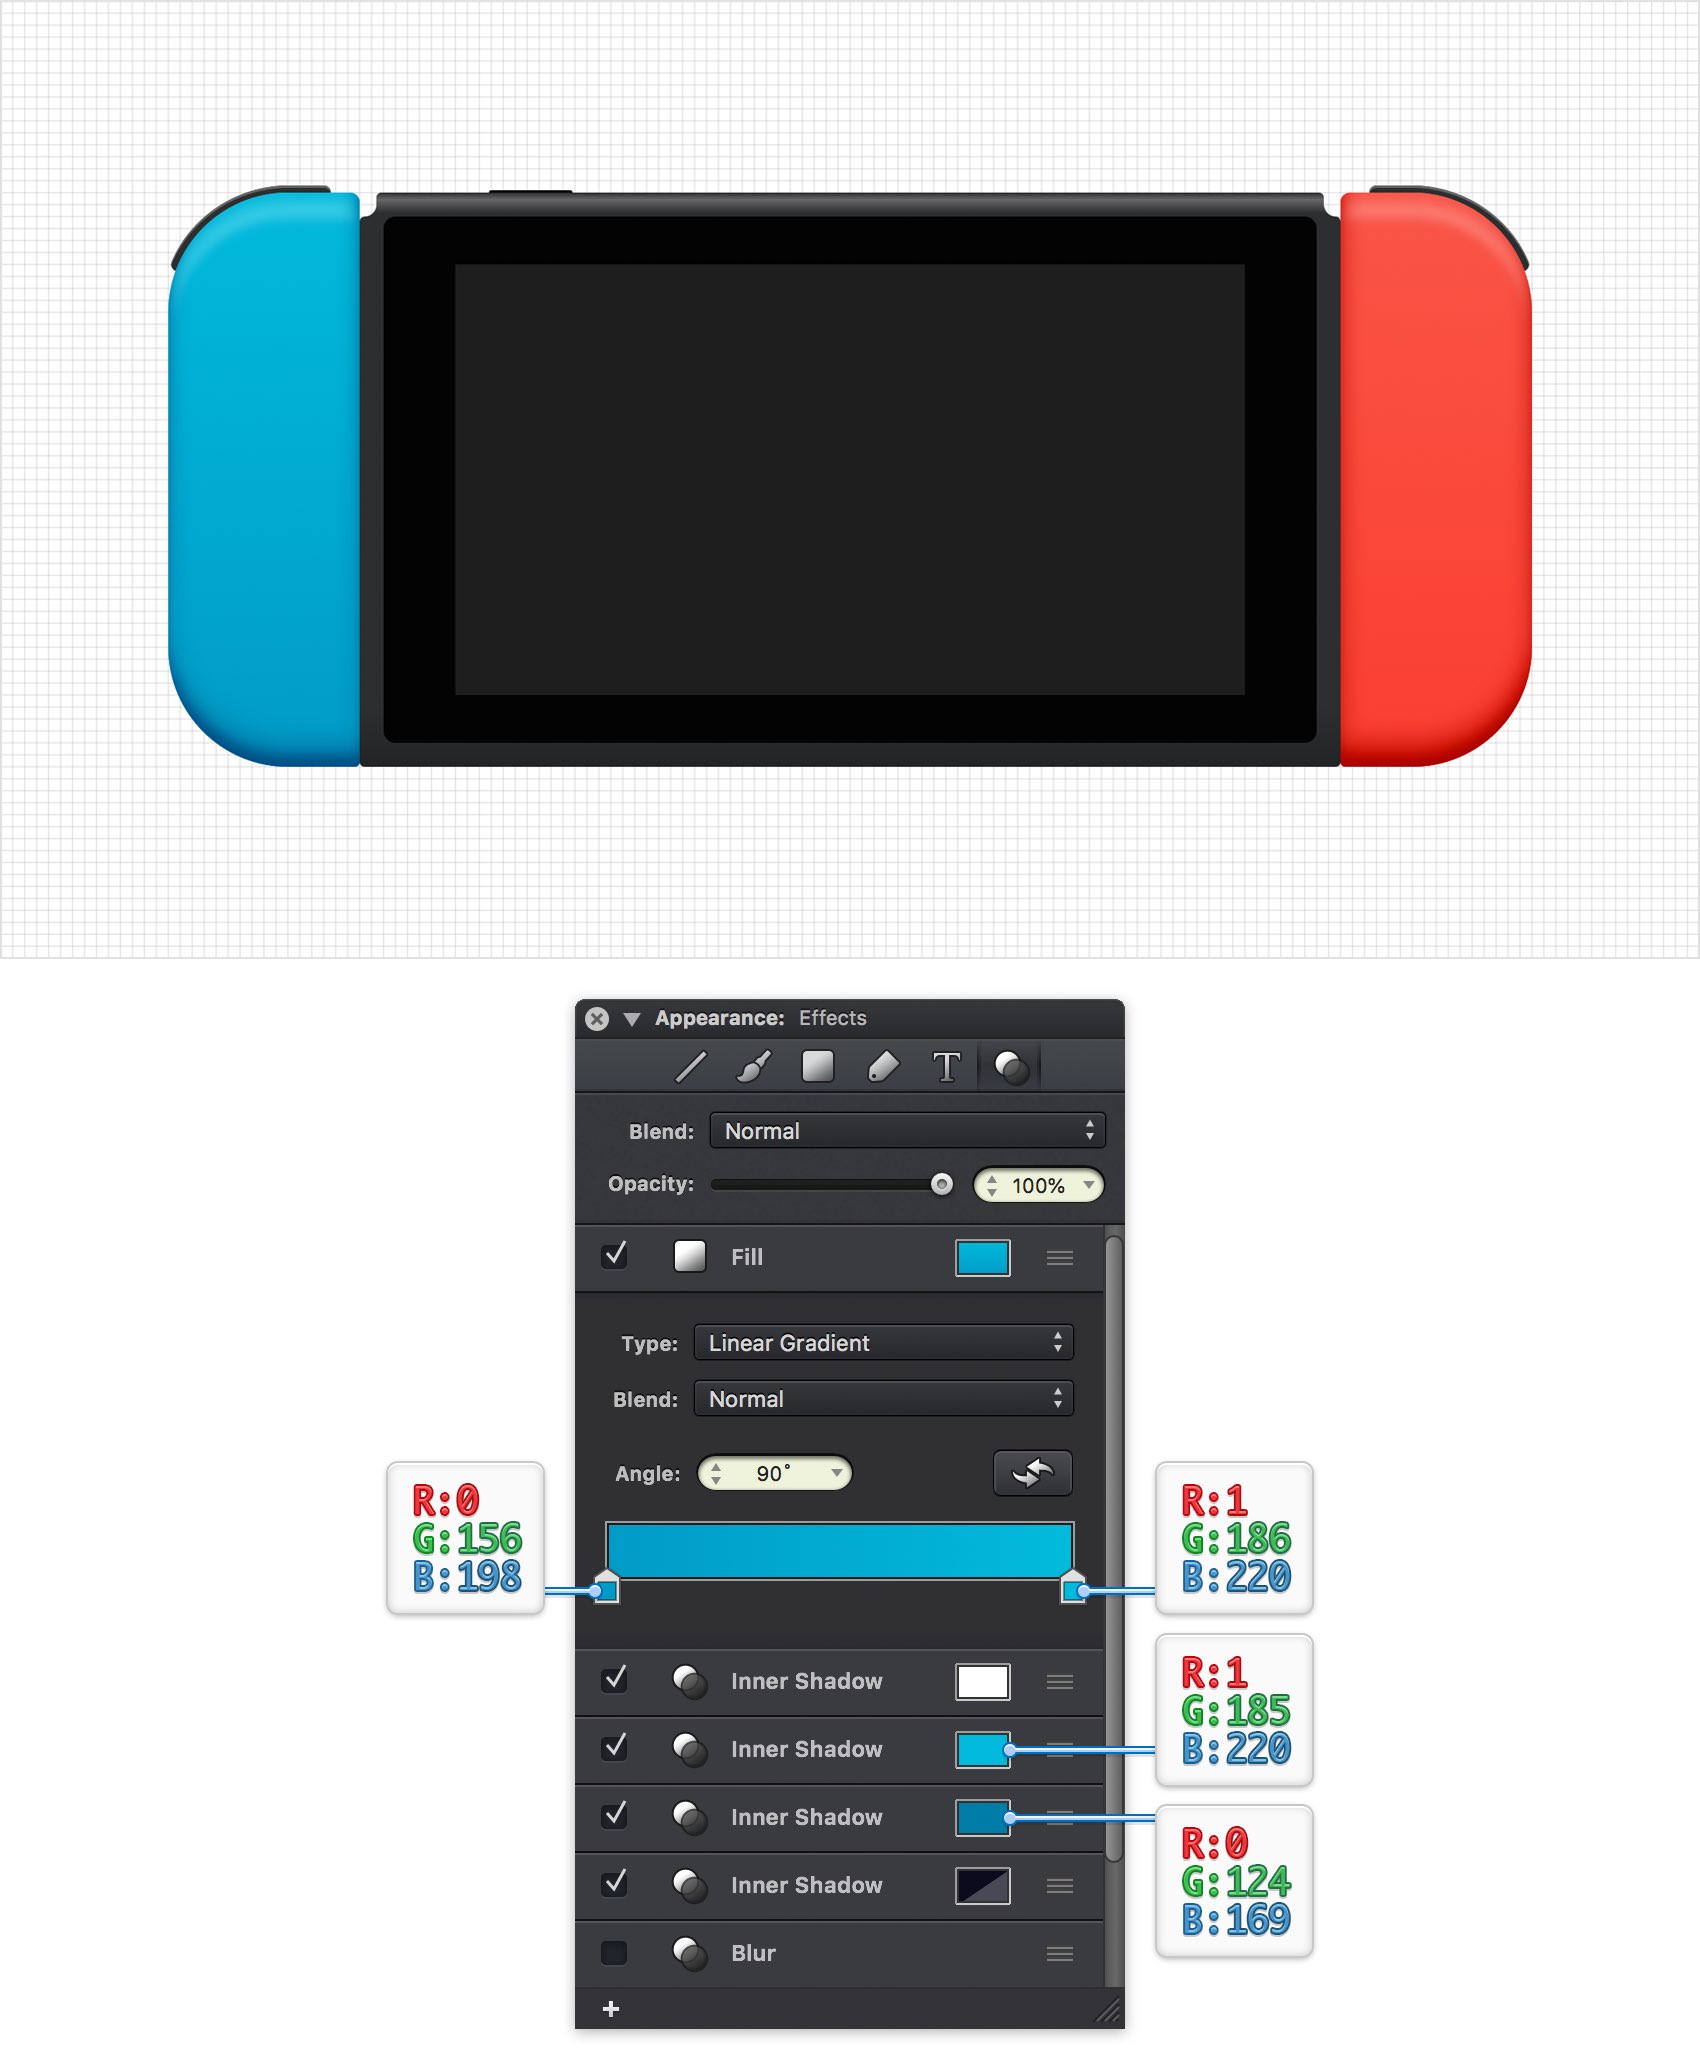
Select your right, red shape and focus on the Effects pane. Replace the linear gradient and the two colors used for the Inner Shadow effects as shown below.
Step 26
Open the Layers panel and add a third layer. Name it "Round Buttons" and make sure that it stays selected.
For the following steps you will need a grid every 1 px. Return to the Grid pane from the Properties panel and enter 1 px in both Spacing boxes.
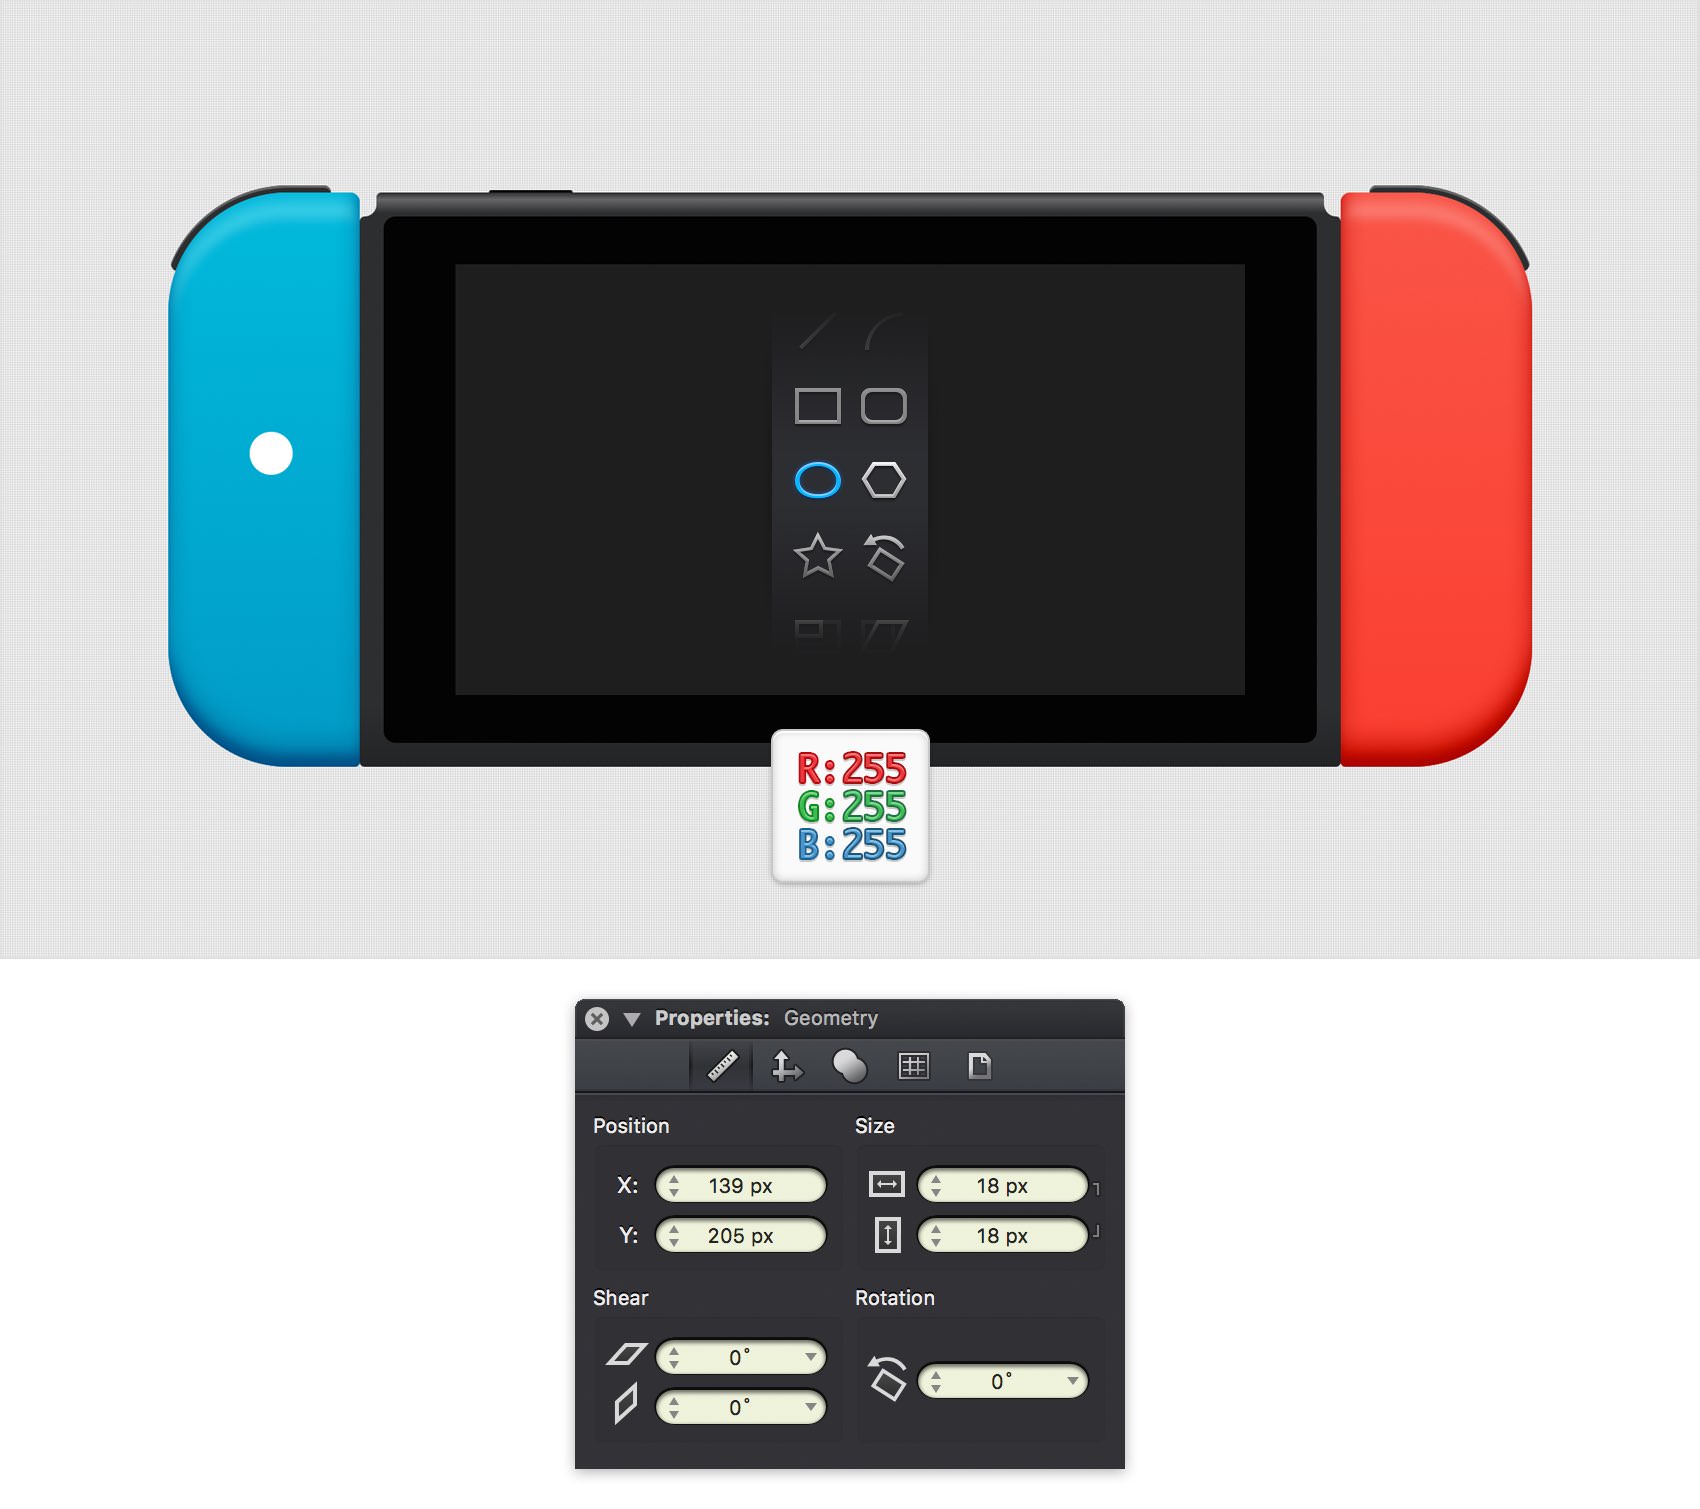
Pick the Ellipse Tool (O), create an 18 px circle and place it as shown in the following image (X: 139 px Y: 205 px). Don't forget that holding the Shift key while dragging makes it easier to create perfect circles. Fill this new shape with white (R=255 G=255 B=255), for now.
Step 27
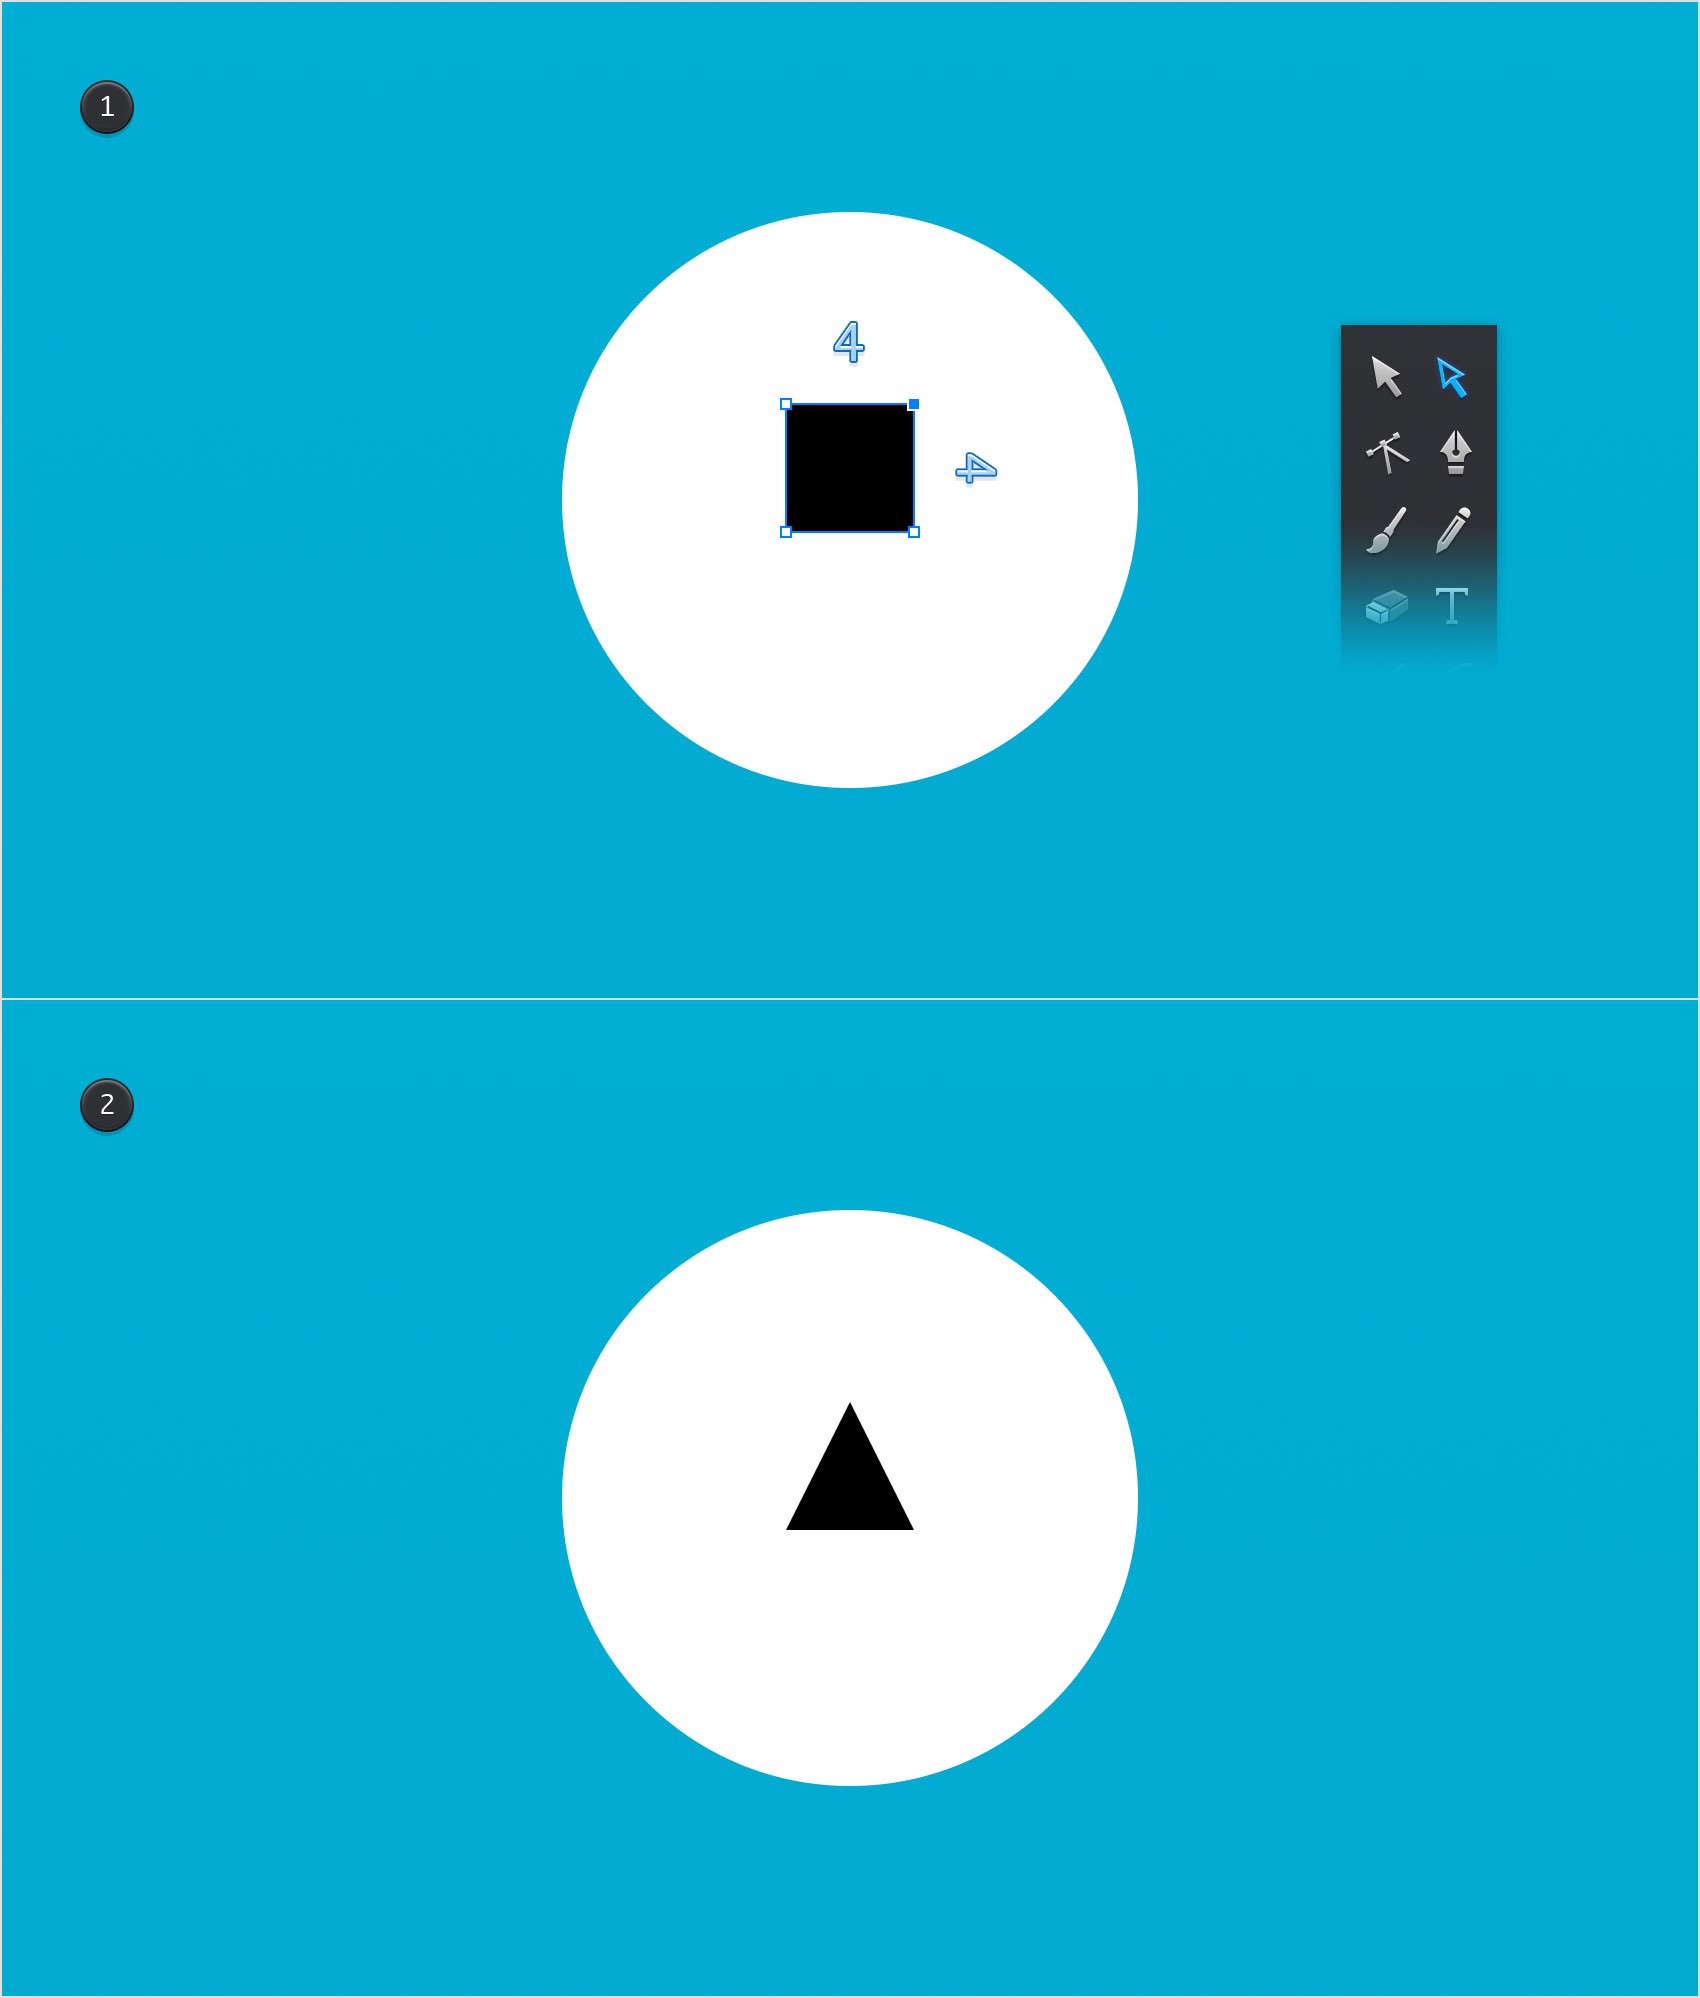
Pick the Rectangle Tool (M), create a 4 px square and place it as shown in the first image (X: 146 px Y: 211 px). Focus on the top side of this new shape and switch to the Path Selection Tool (A). First, select the right anchor point and remove it using the Delete (Backspace) key, and then select the other anchor point and drag it 2 px to the right.
Step 28
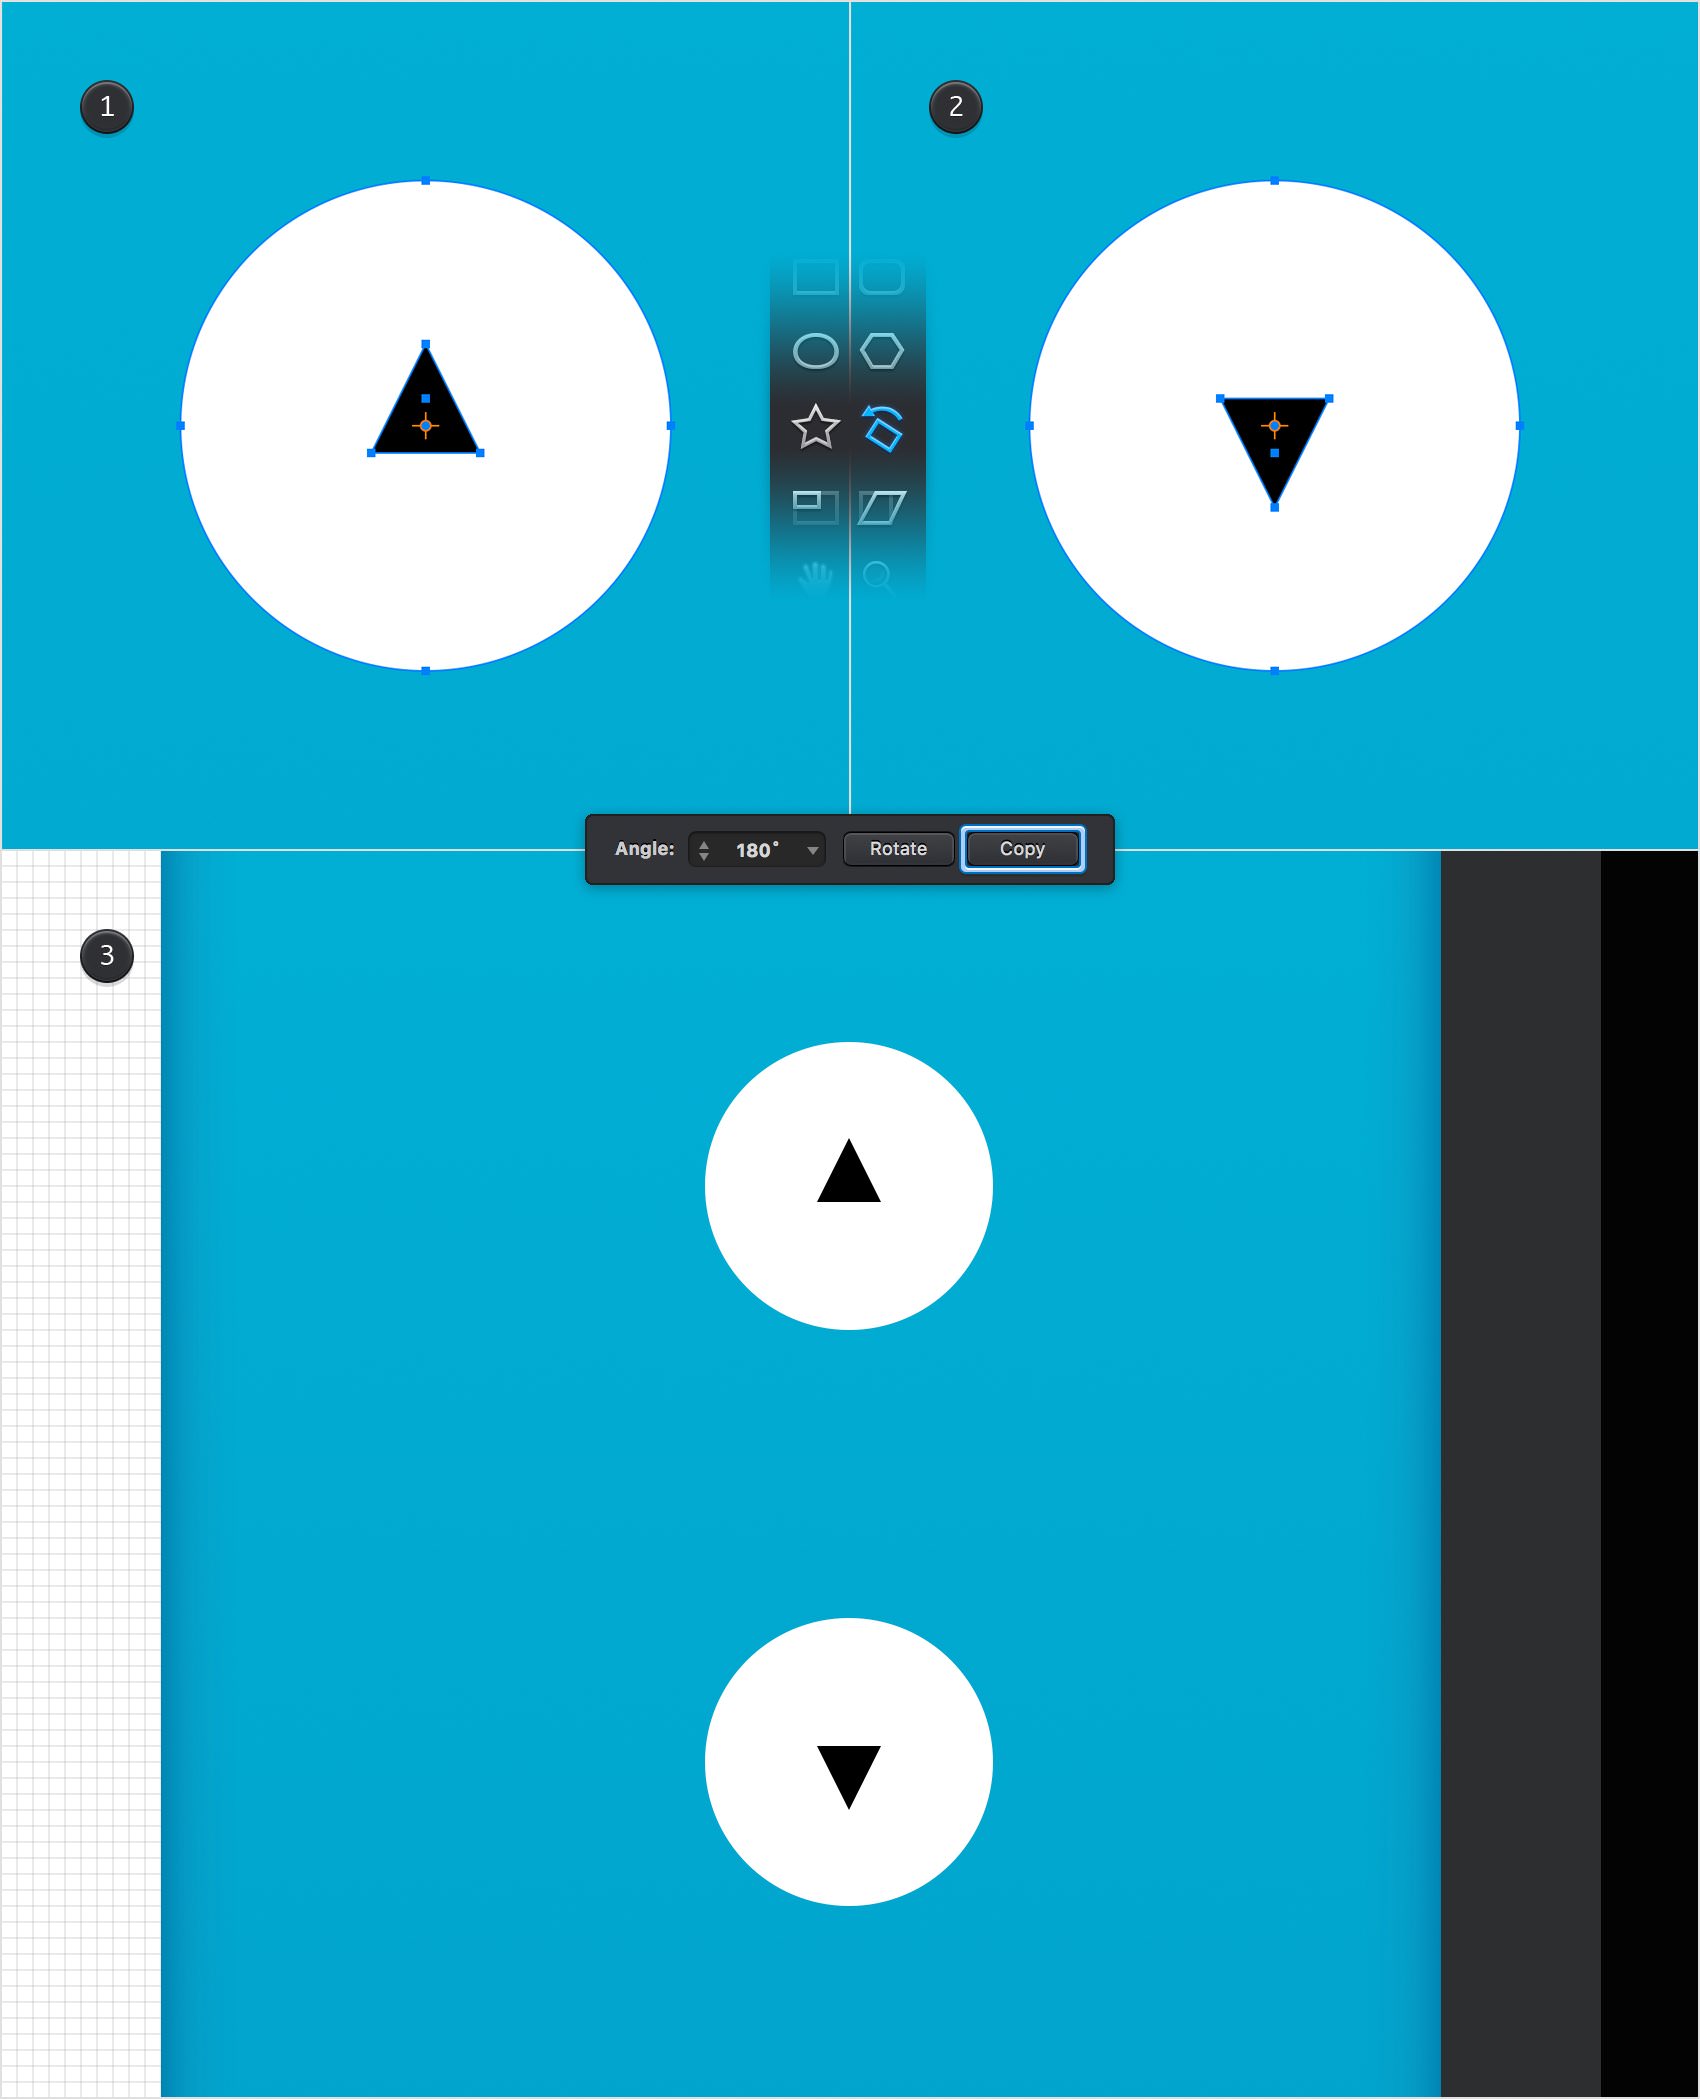
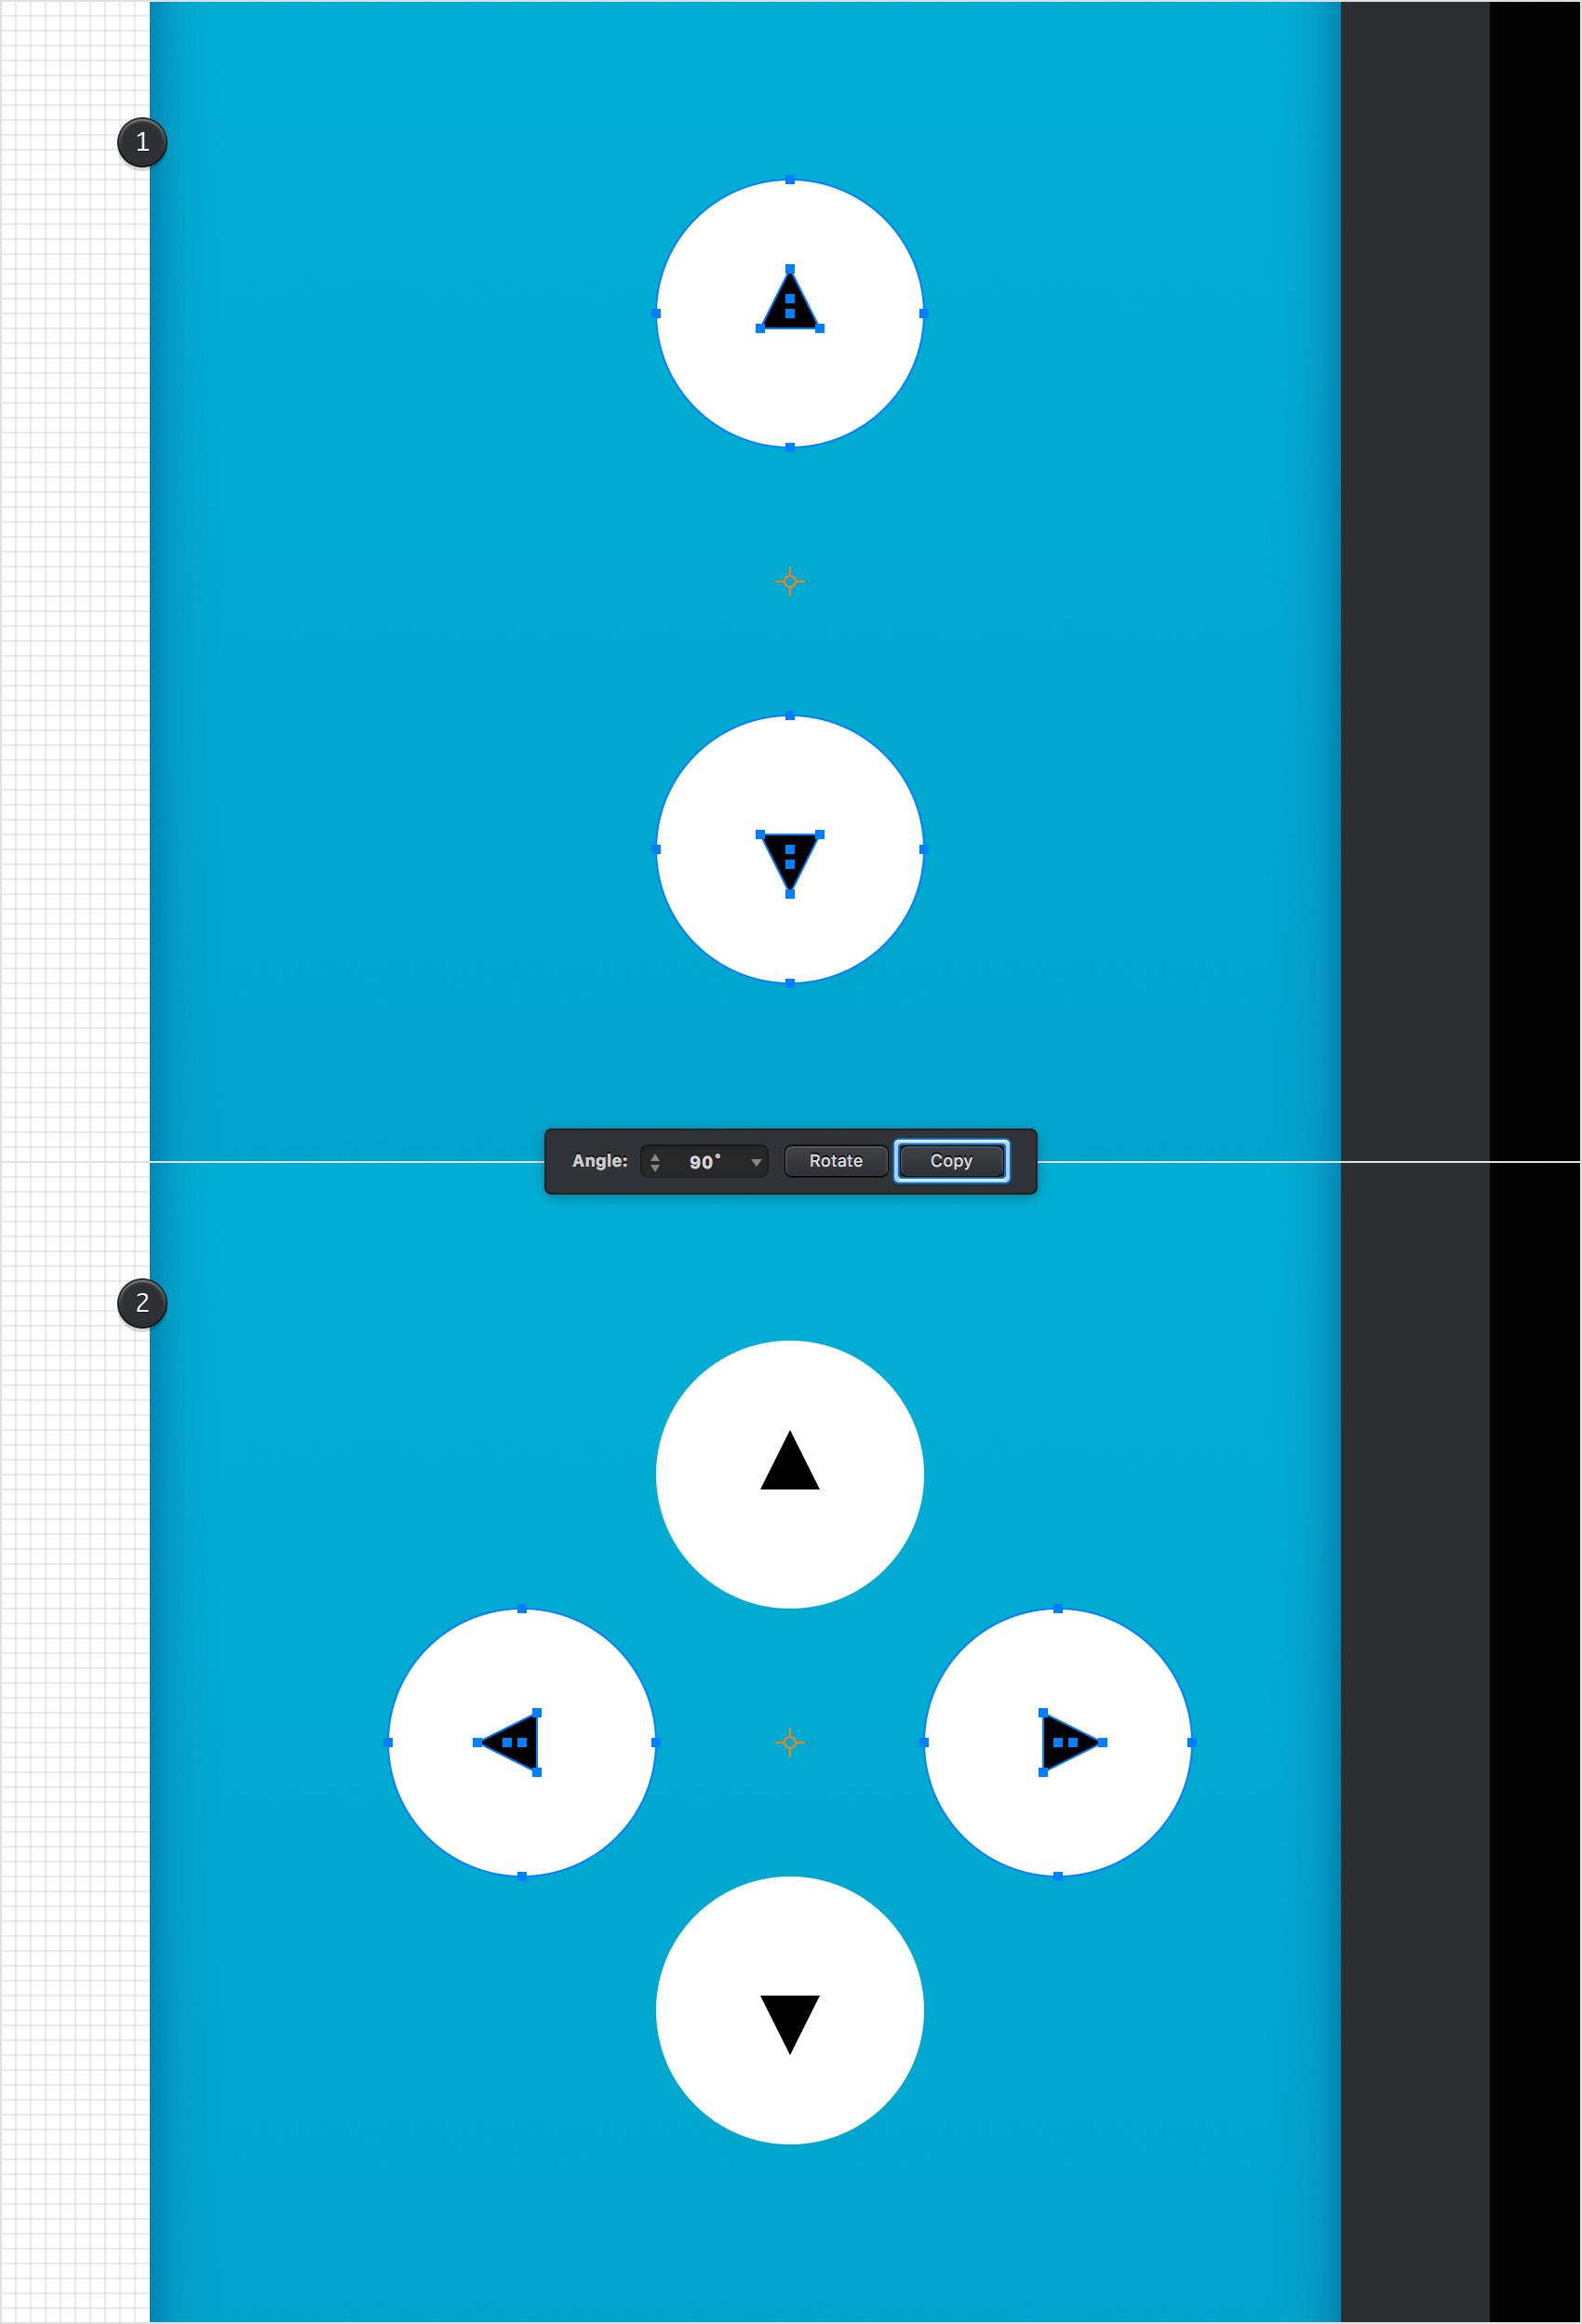
Select your white circle along with the black triangle and pick the Rotate Tool (R). Focus on the Tool Options bar, set the Angle to 180 ° and click that Copy button to create horizontally flipped copies of your selected shapes. Place the new shapes as shown in the third image (X: 139 px Y: 241 px).
Step 29
Select both white circle and black triangles and pick the Rotate Tool (R). This time set the Angle to 90 ° and click that same Copy button.
Step 30
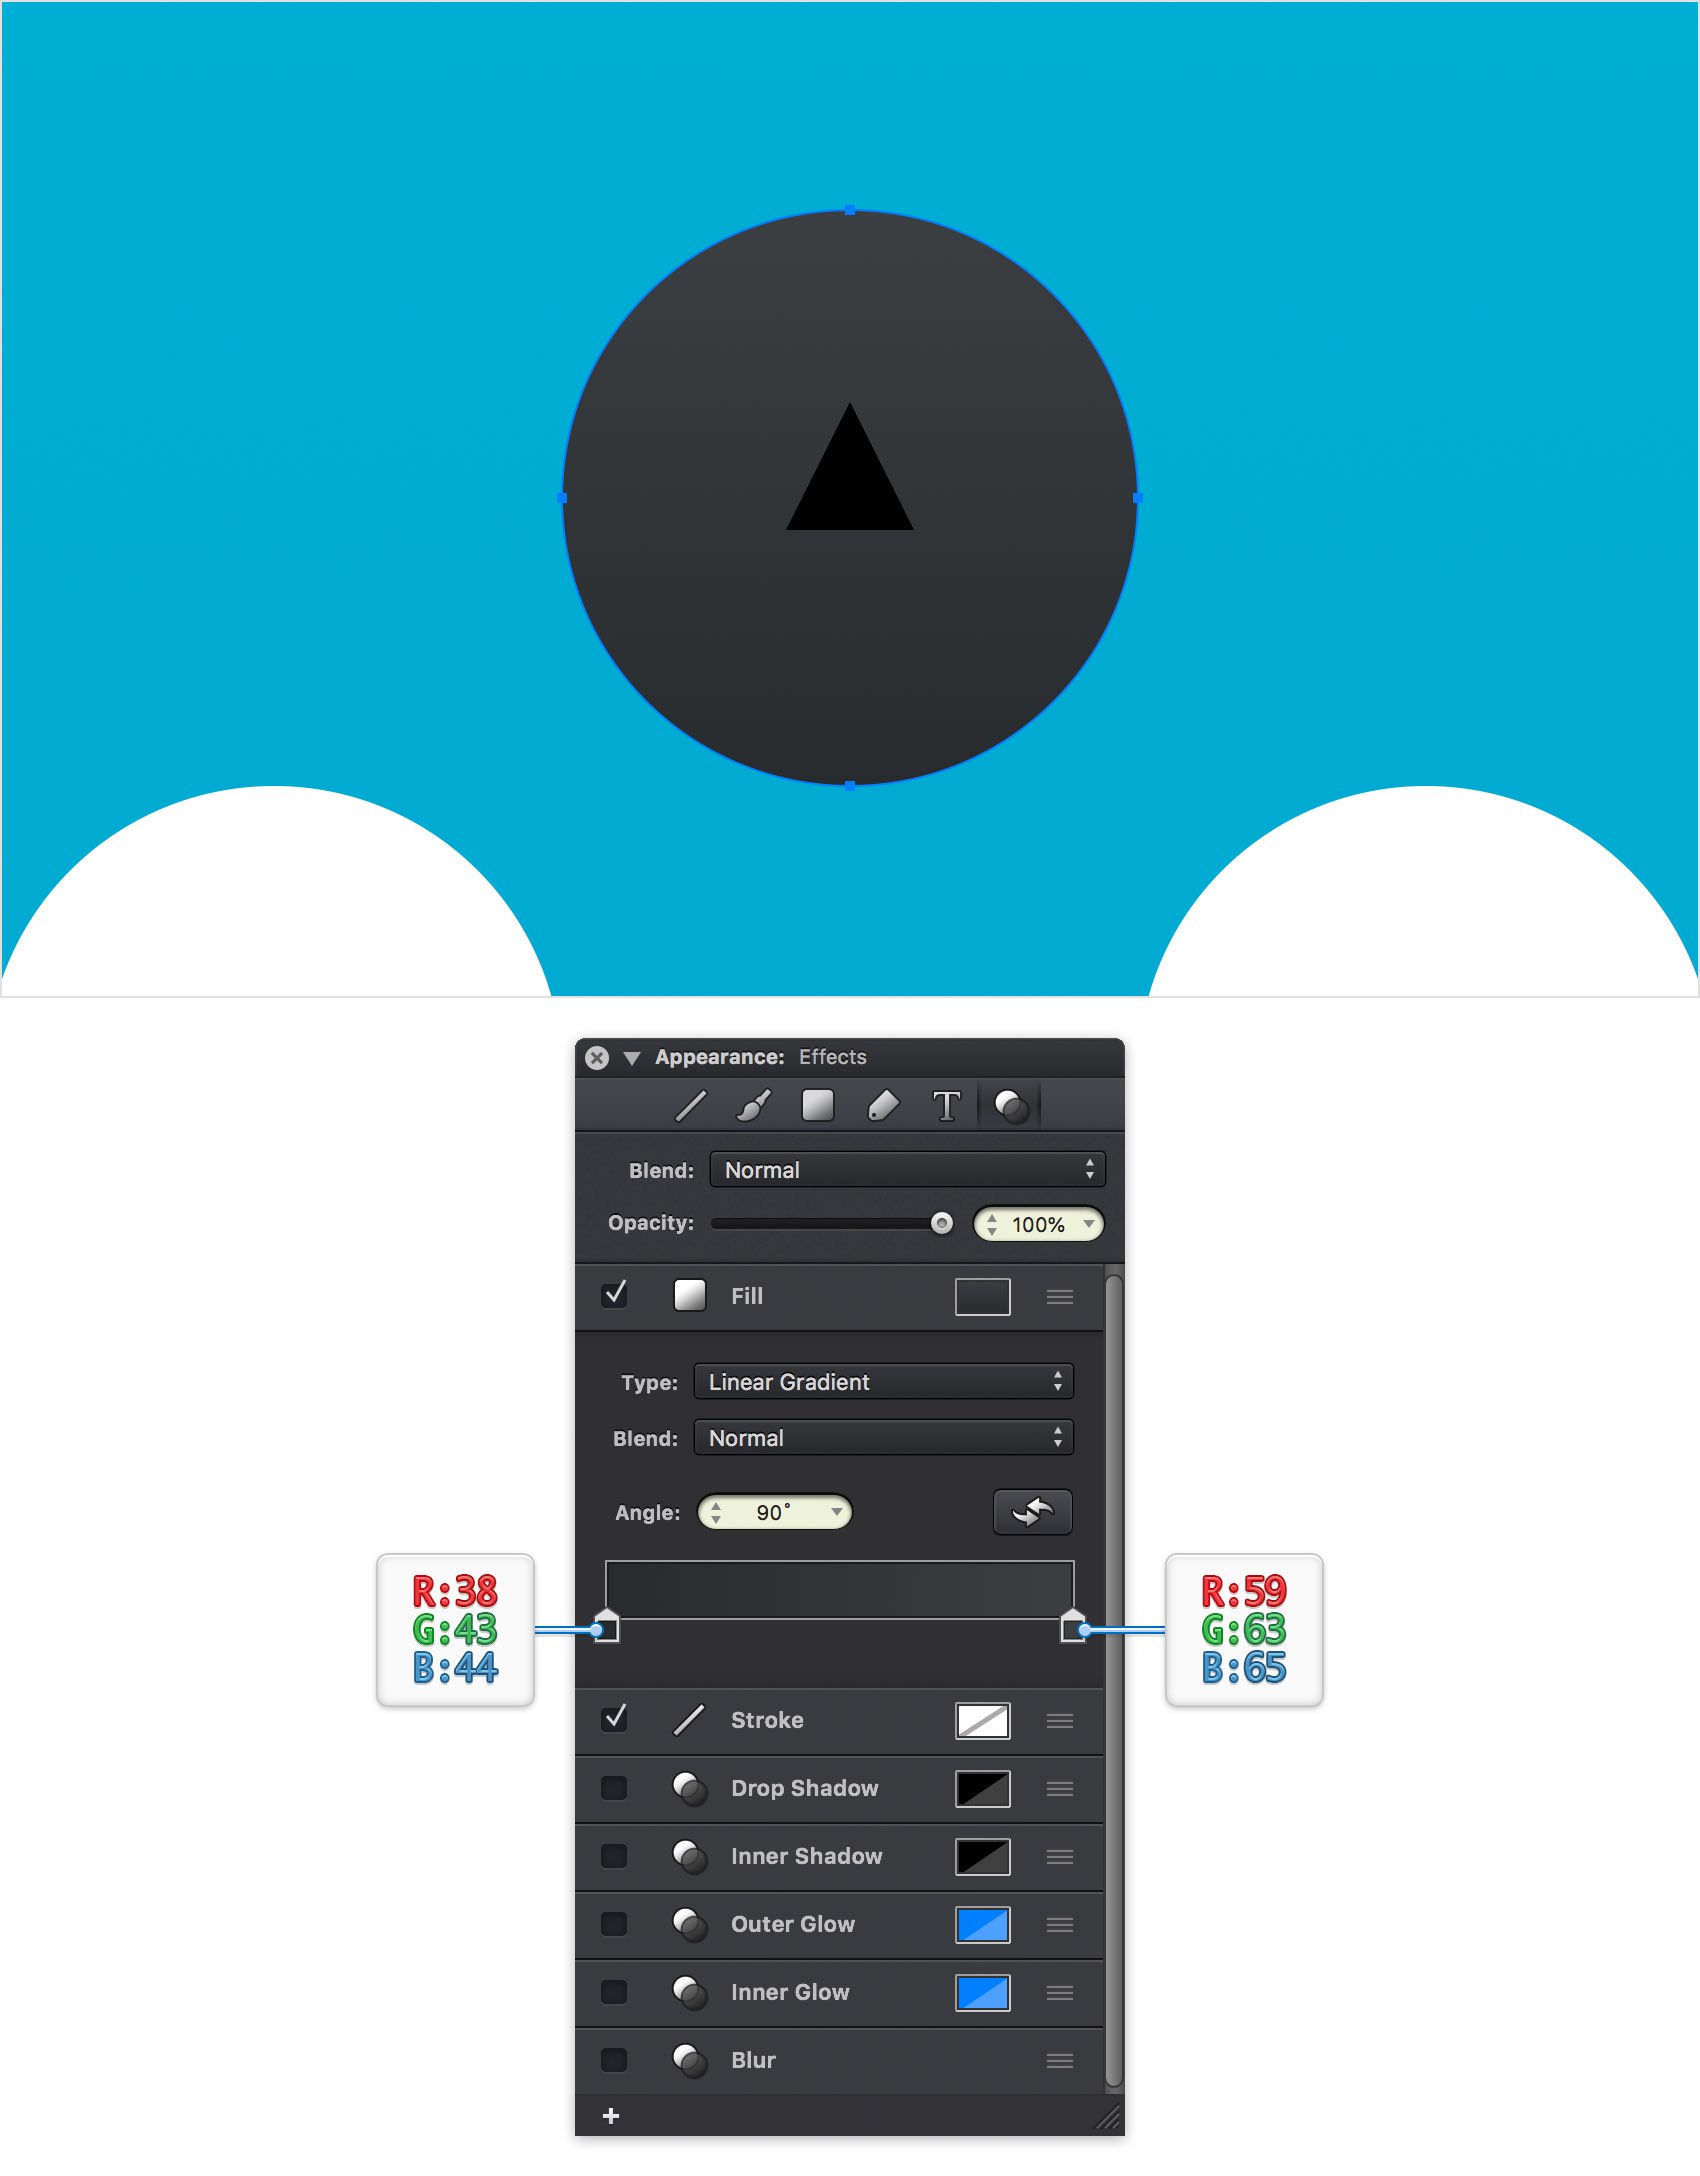
Select your top white circle and focus on the Effects pane. Select the existing Fill and replace the Fill color with the linear gradient shown below.
Step 31
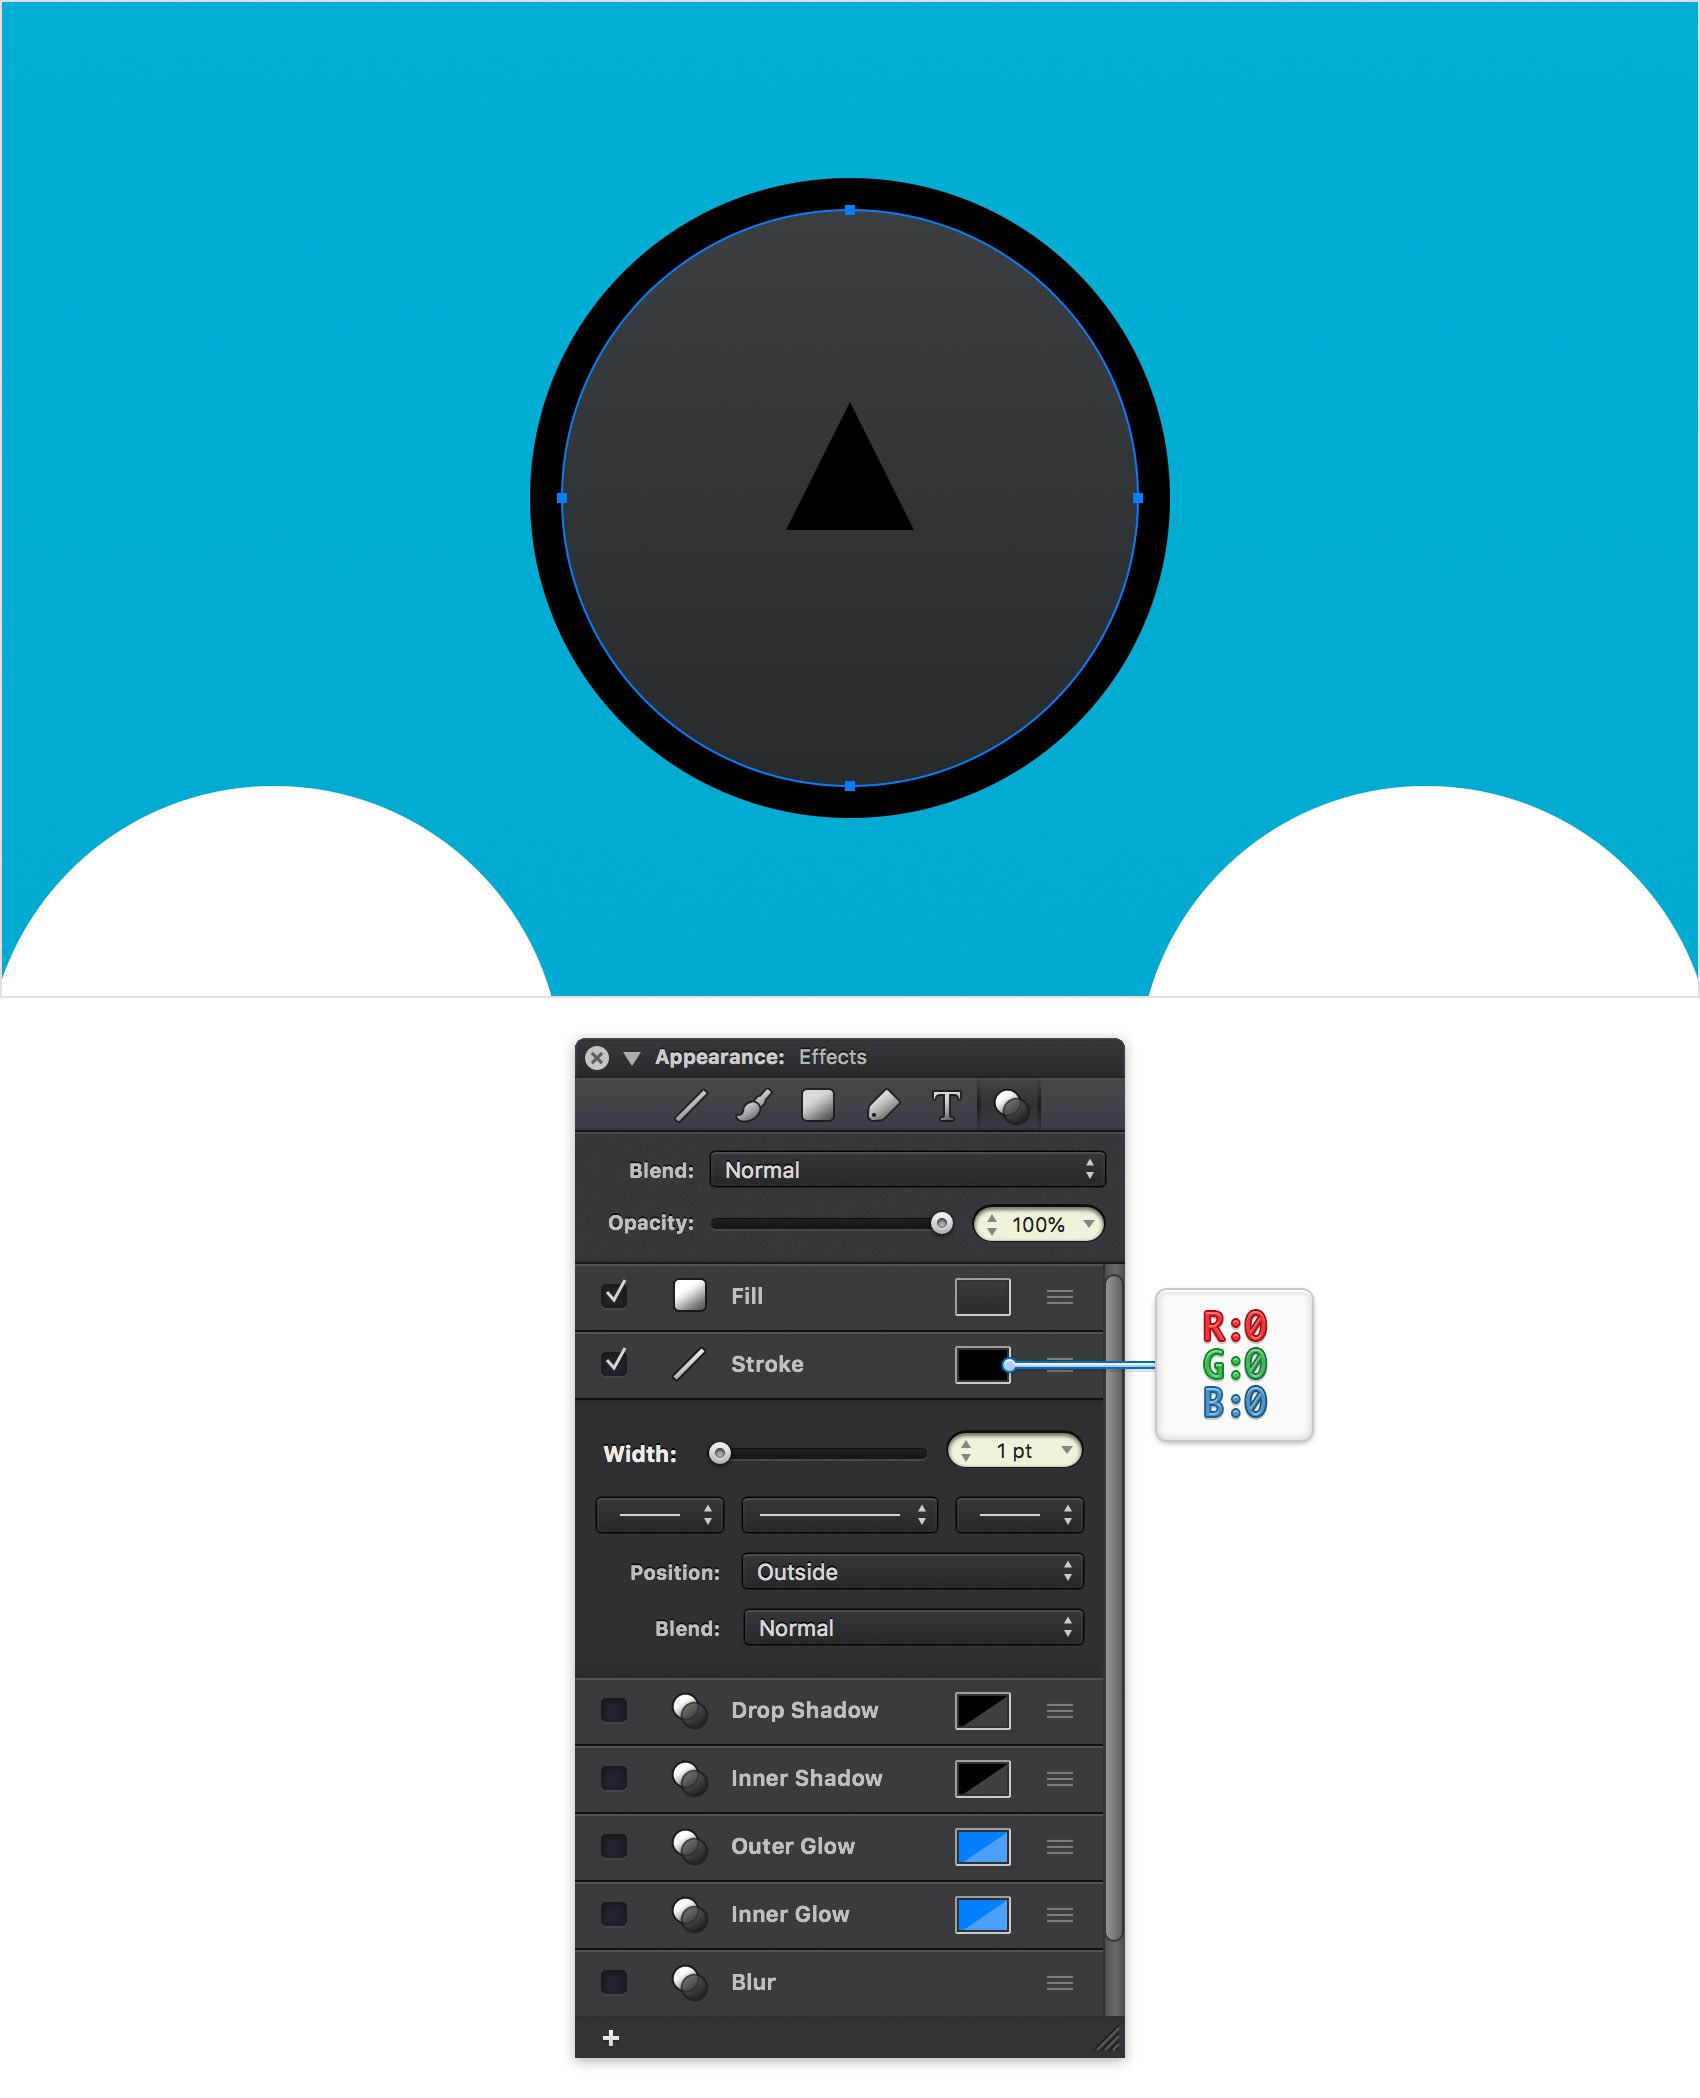
Make sure that your top circle stays selected and keep focusing on the Effects pane. Select the existing Stroke and set the color to black. Be sure that the Width slider is set to 1 pt, change the Position to Outside and keep the Blend to Normal.
Step 32
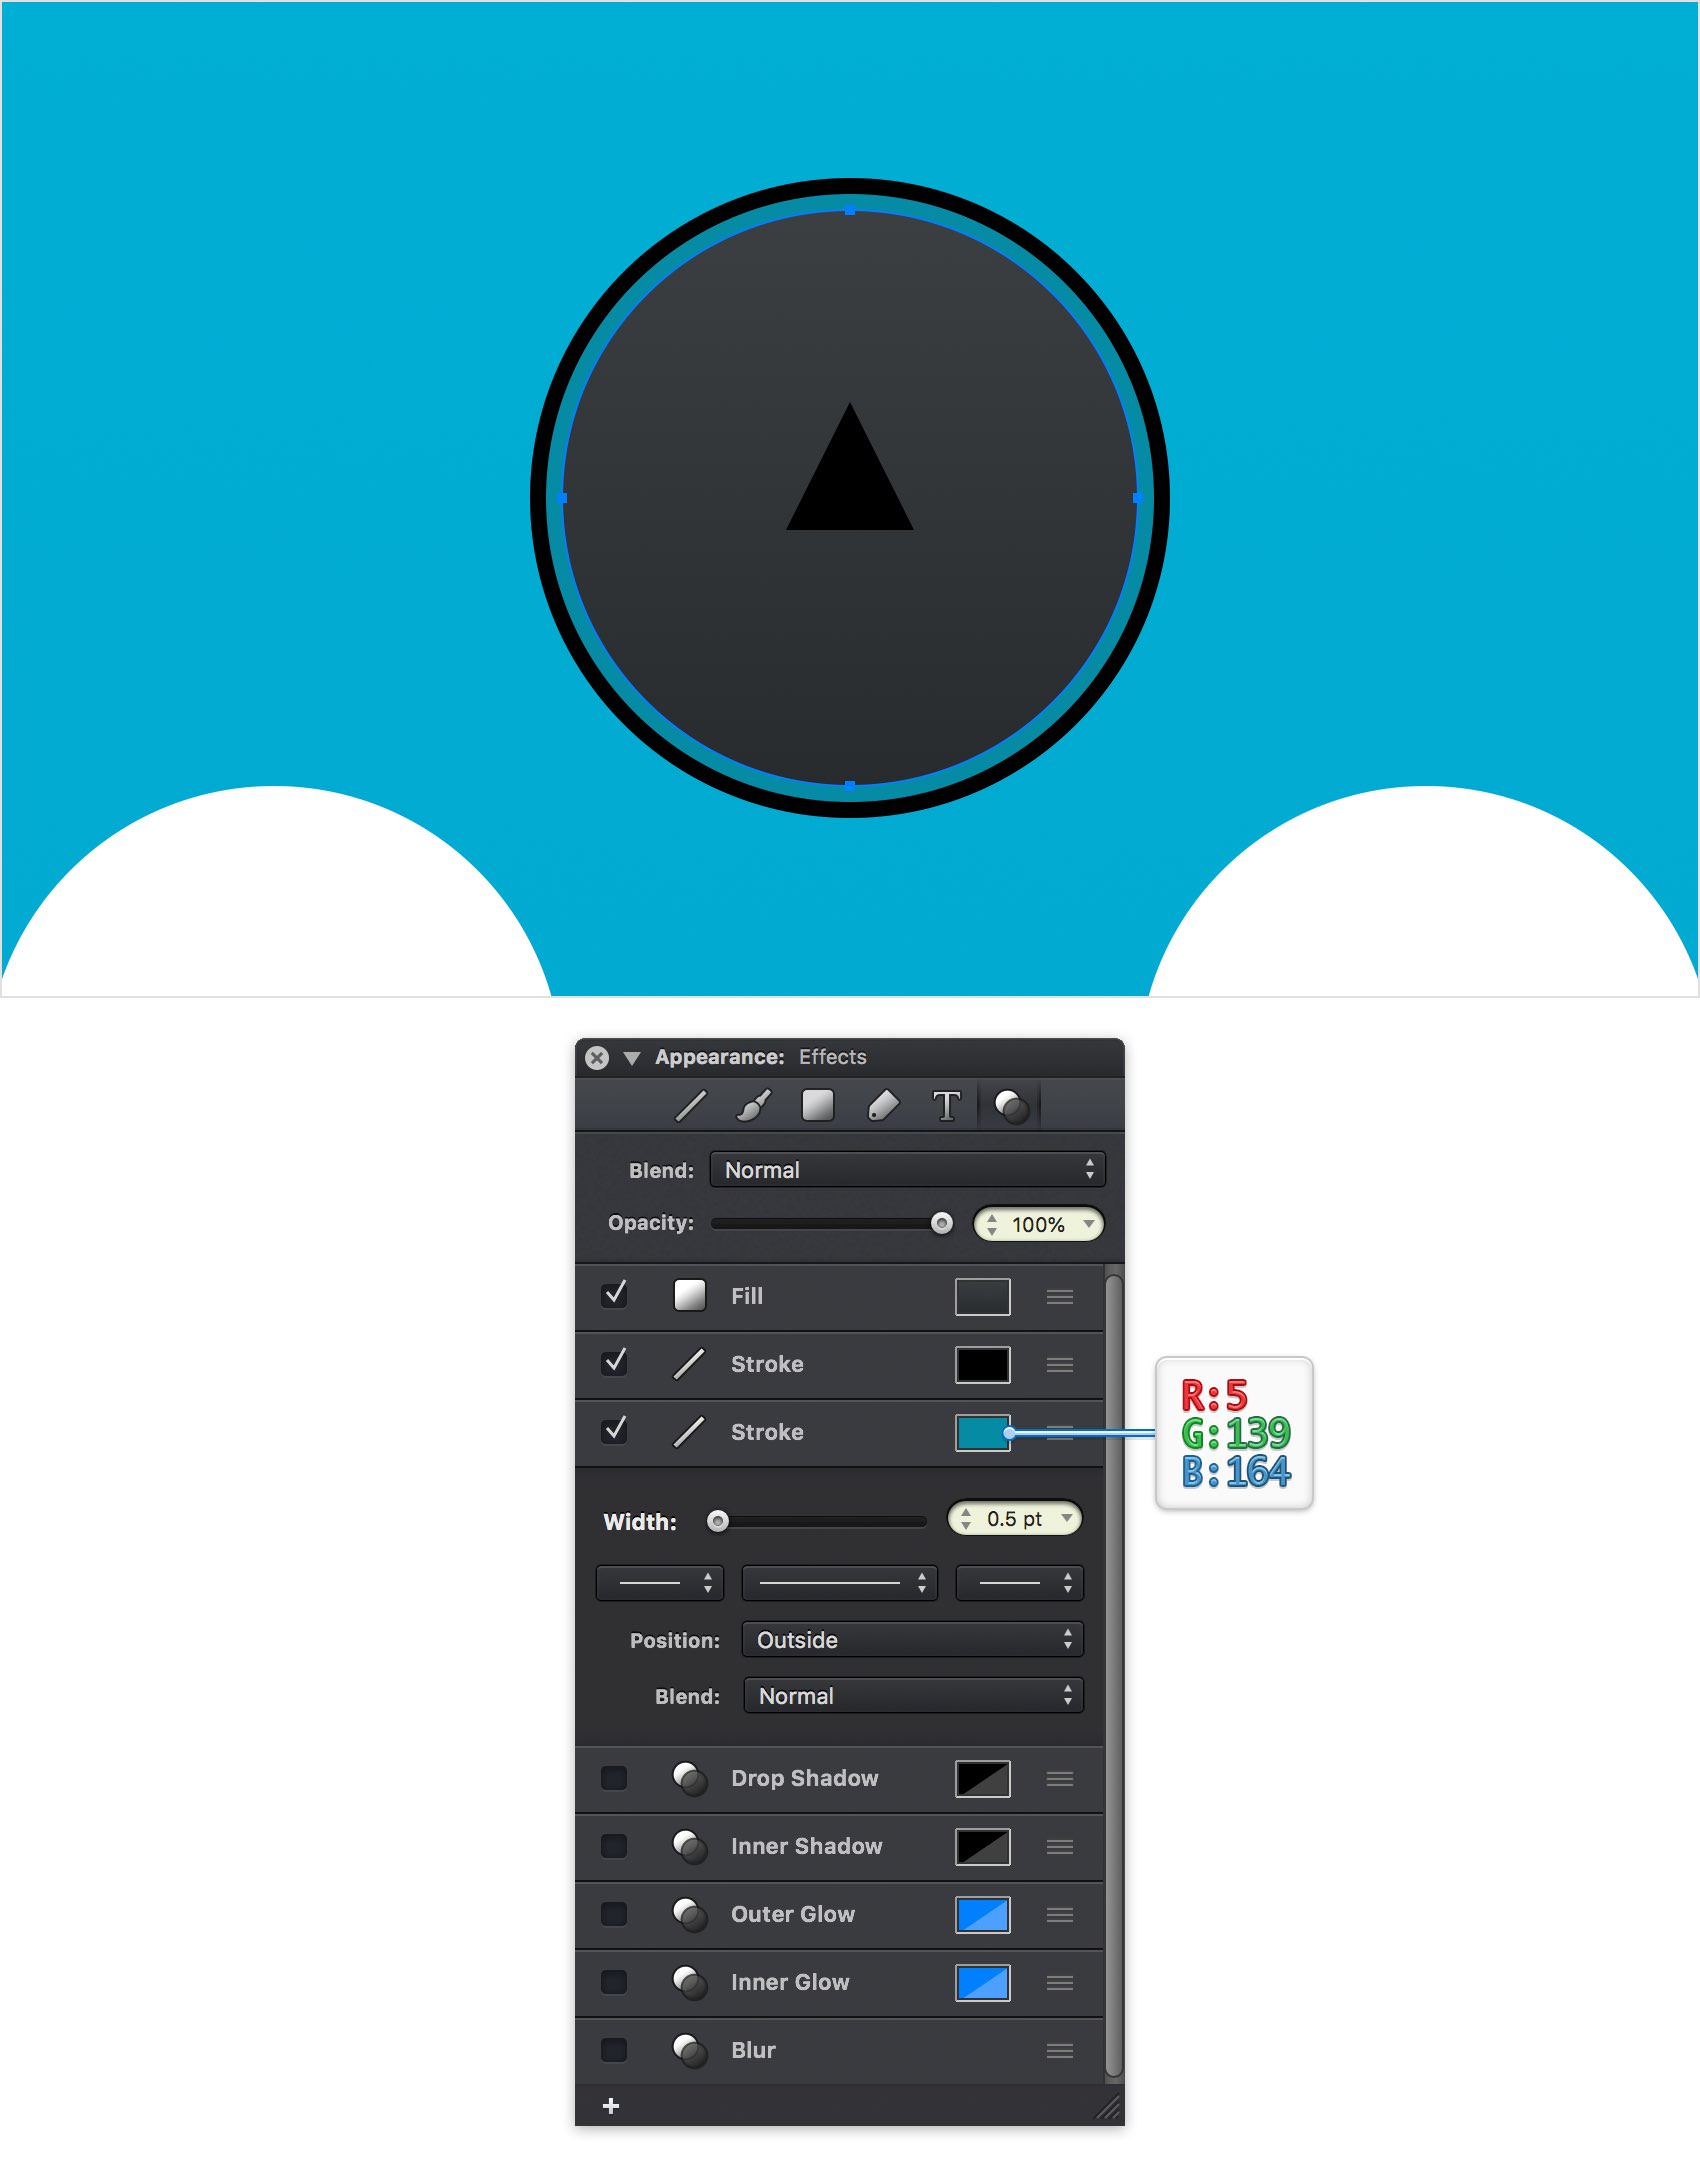
Make sure that your top circle stays selected and keep focusing on the Effects pane. Add a second Stroke, select it and enter the attributes shown below.
Step 33
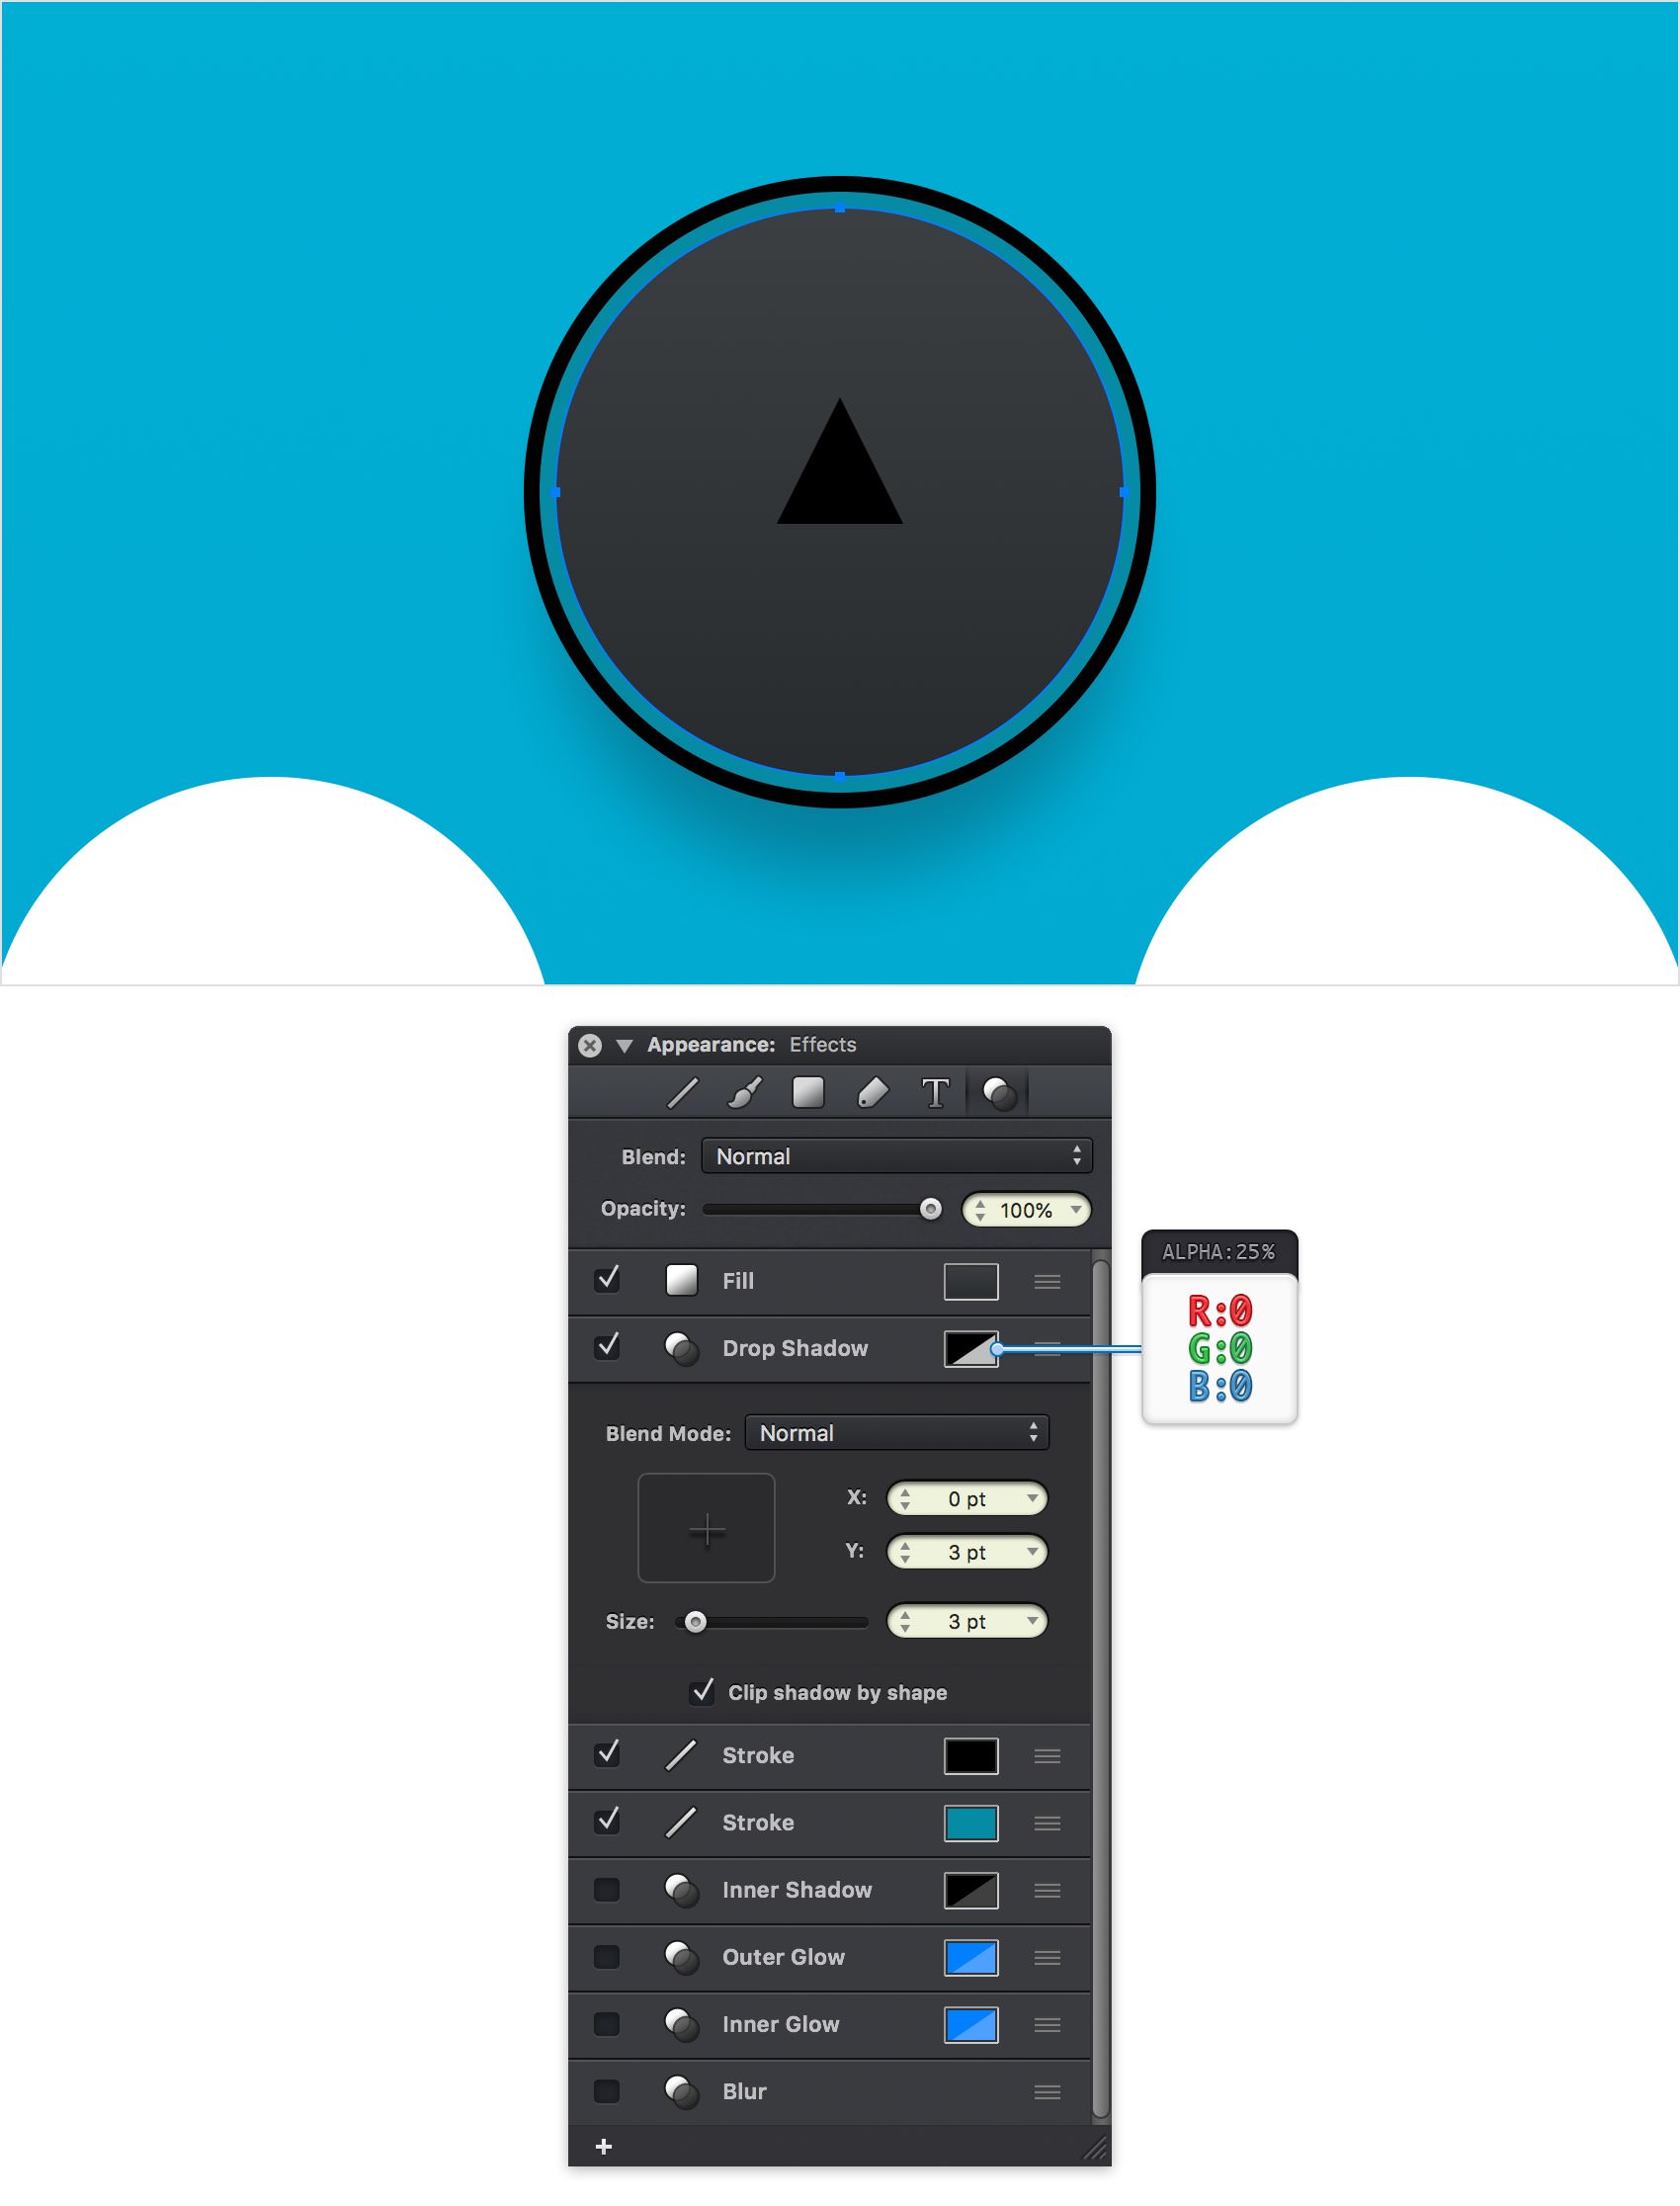
Make sure that your top circle stays selected and keep focusing on the Effects pane. Activate the existing Drop Shadow effect and drag it below the Fill using the drag bars from the right-hand side. Select this new effect and enter the attributes shown below.
Step 34
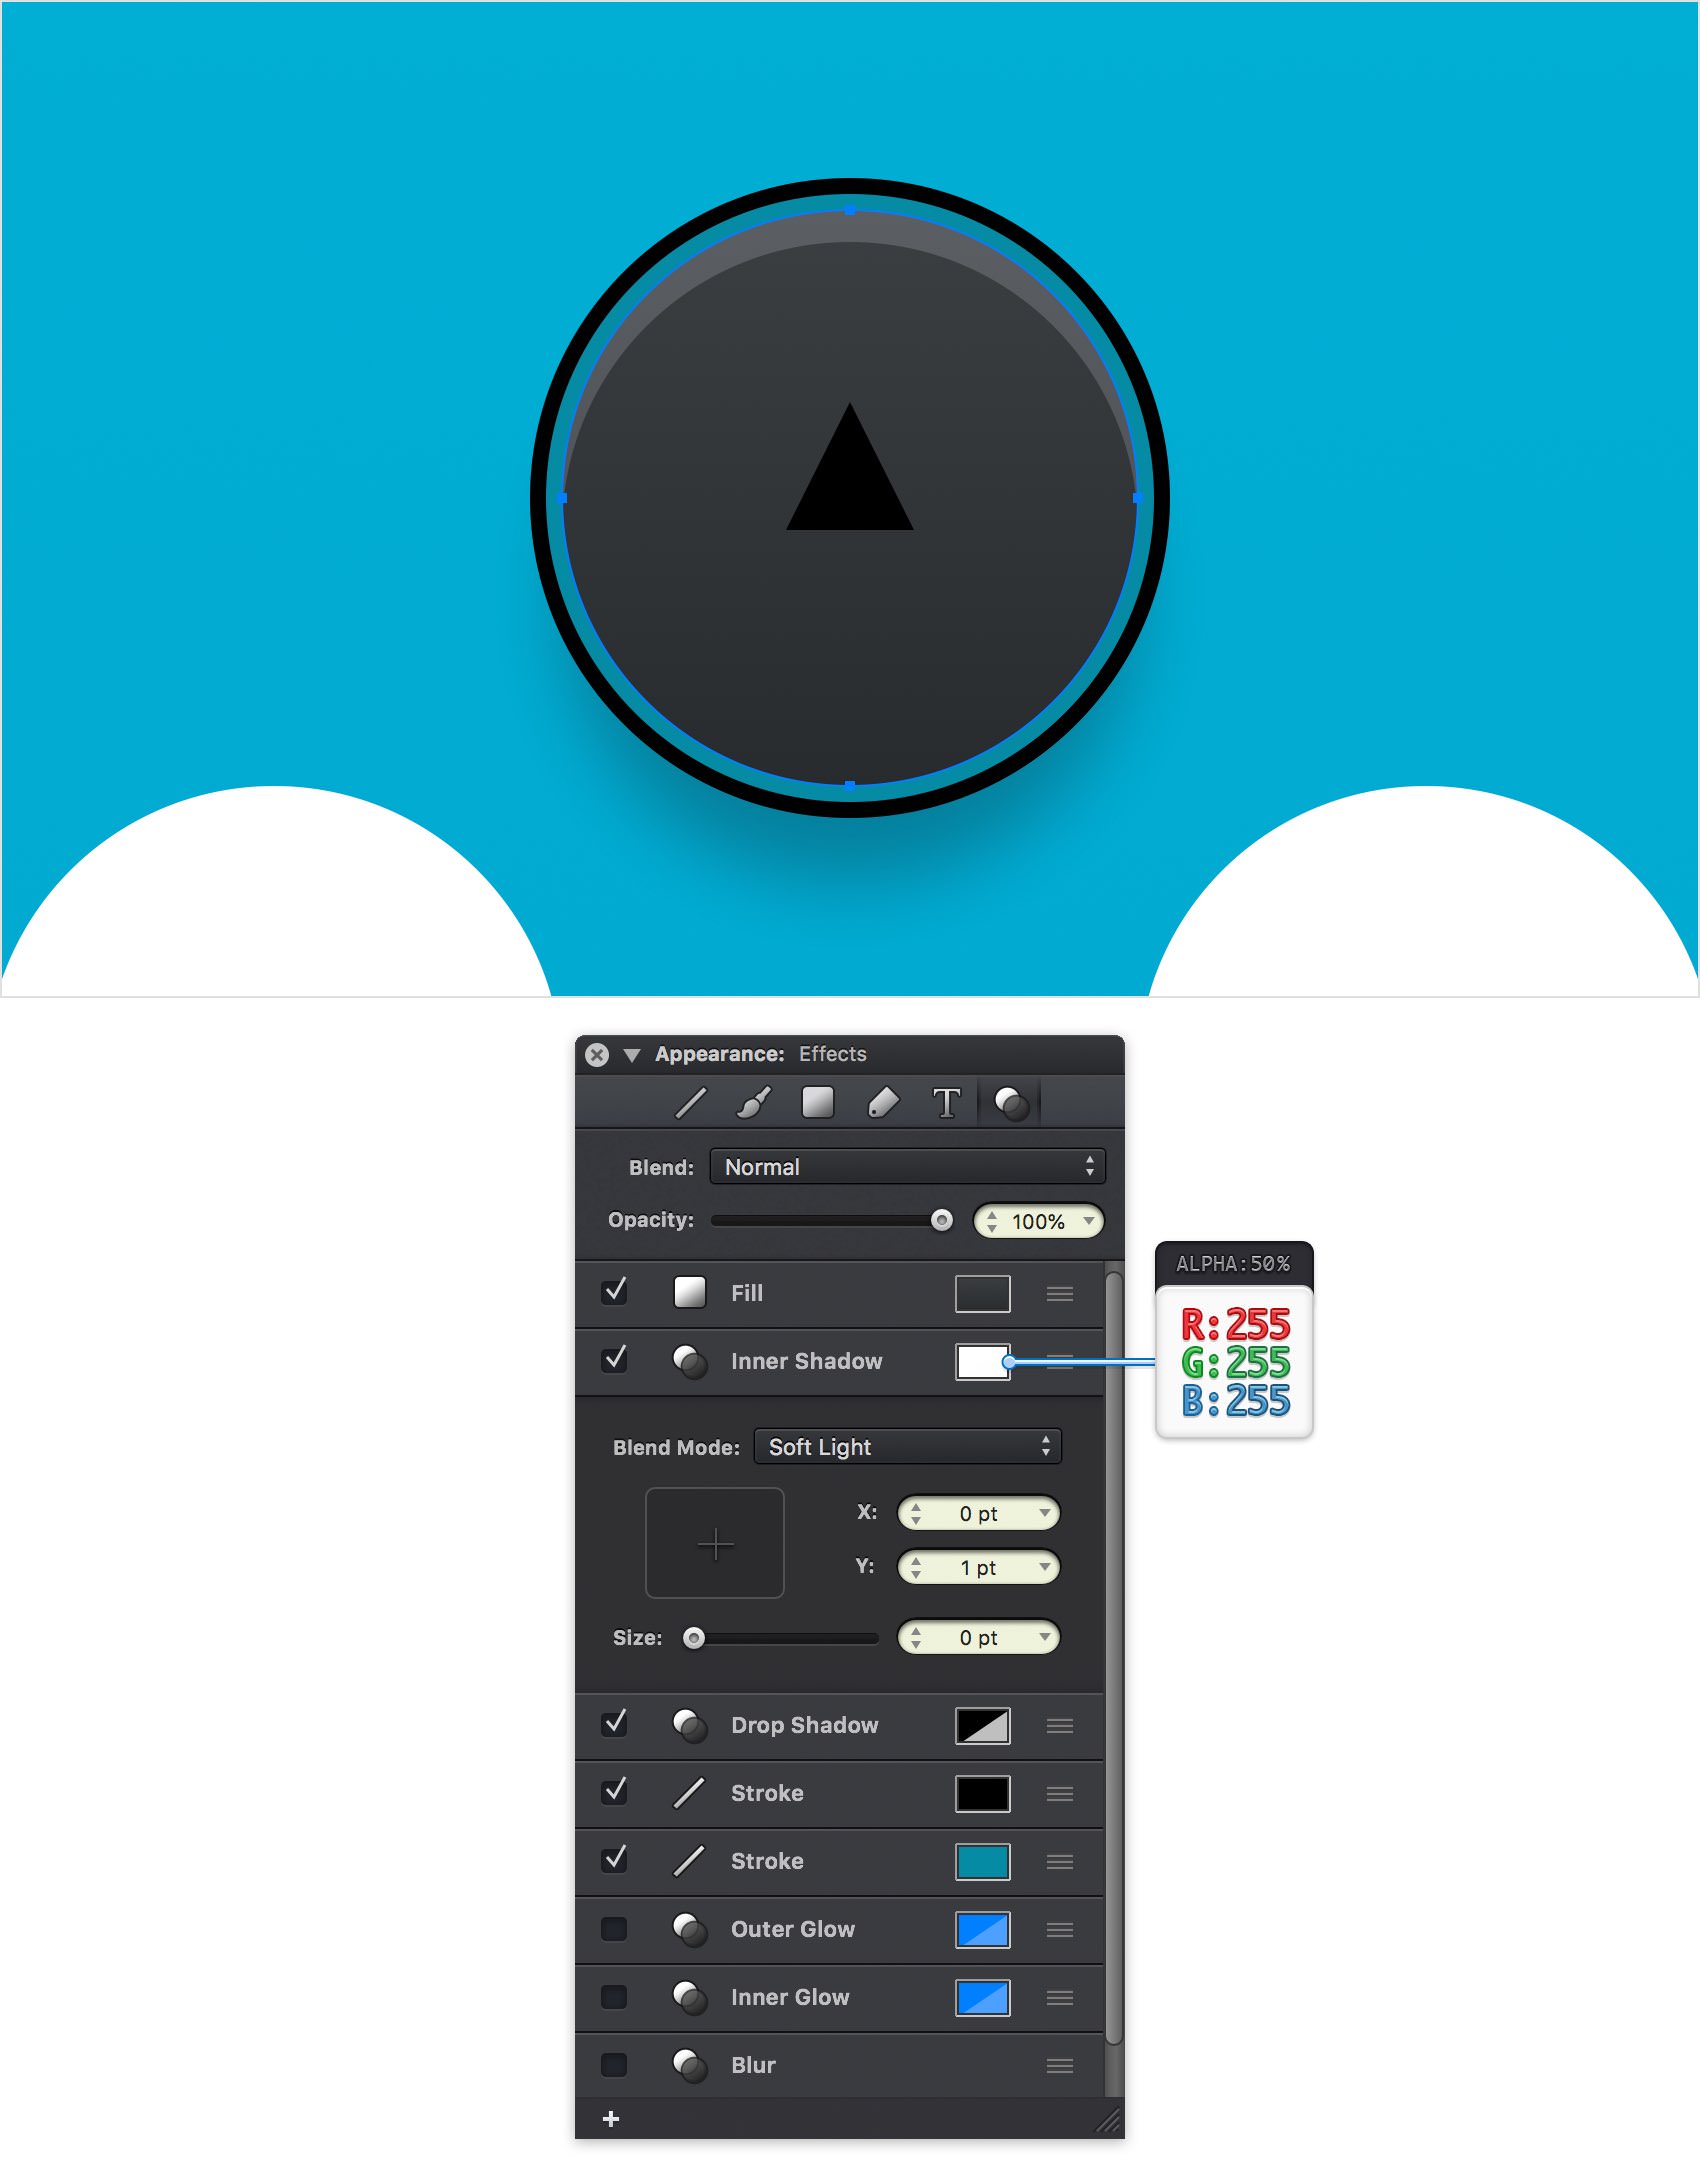
Make sure that your top circle stays selected and keep focusing on the Effects pane. Activate the existing Inner Shadow effect and drag it below the Fill using the same drag bars from the right-hand side. Select this new effect and enter the attributes shown below.
Step 35
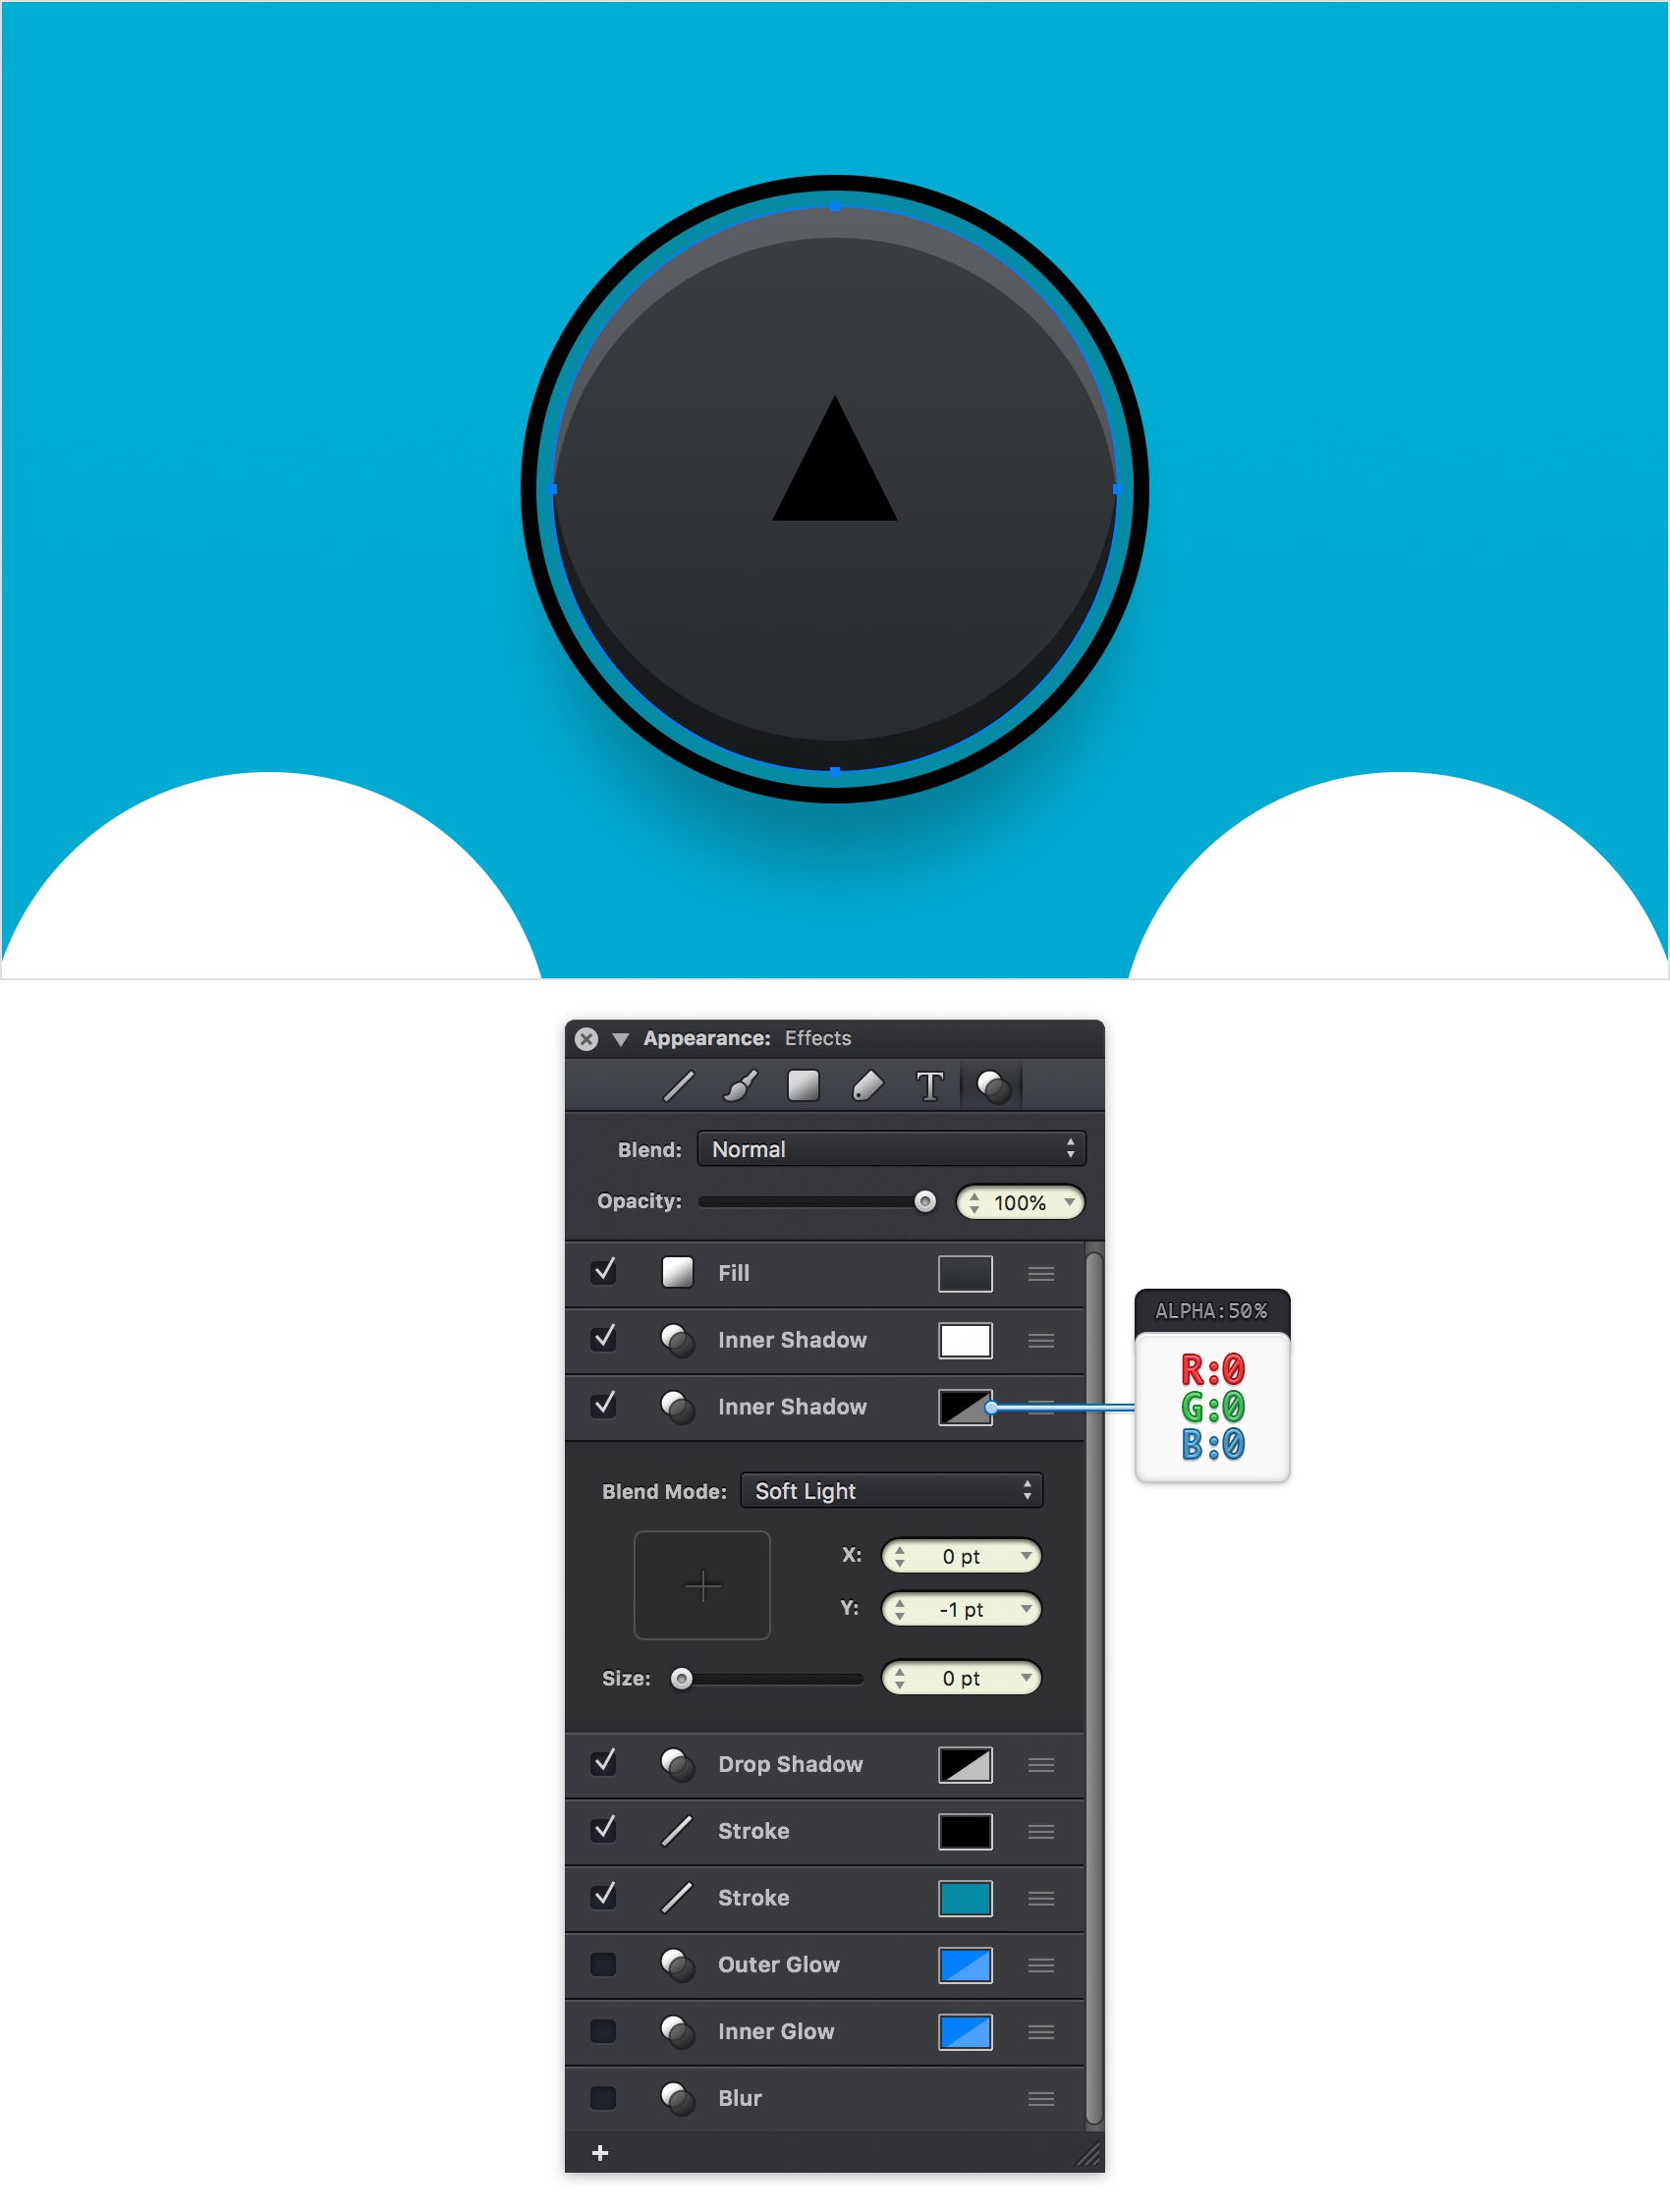
Make sure that your top circle stays selected and keep focusing on the Effects pane. Add a second Inner Shadow effect and place it below the first one, and then enter the attributes shown below.
Step 36
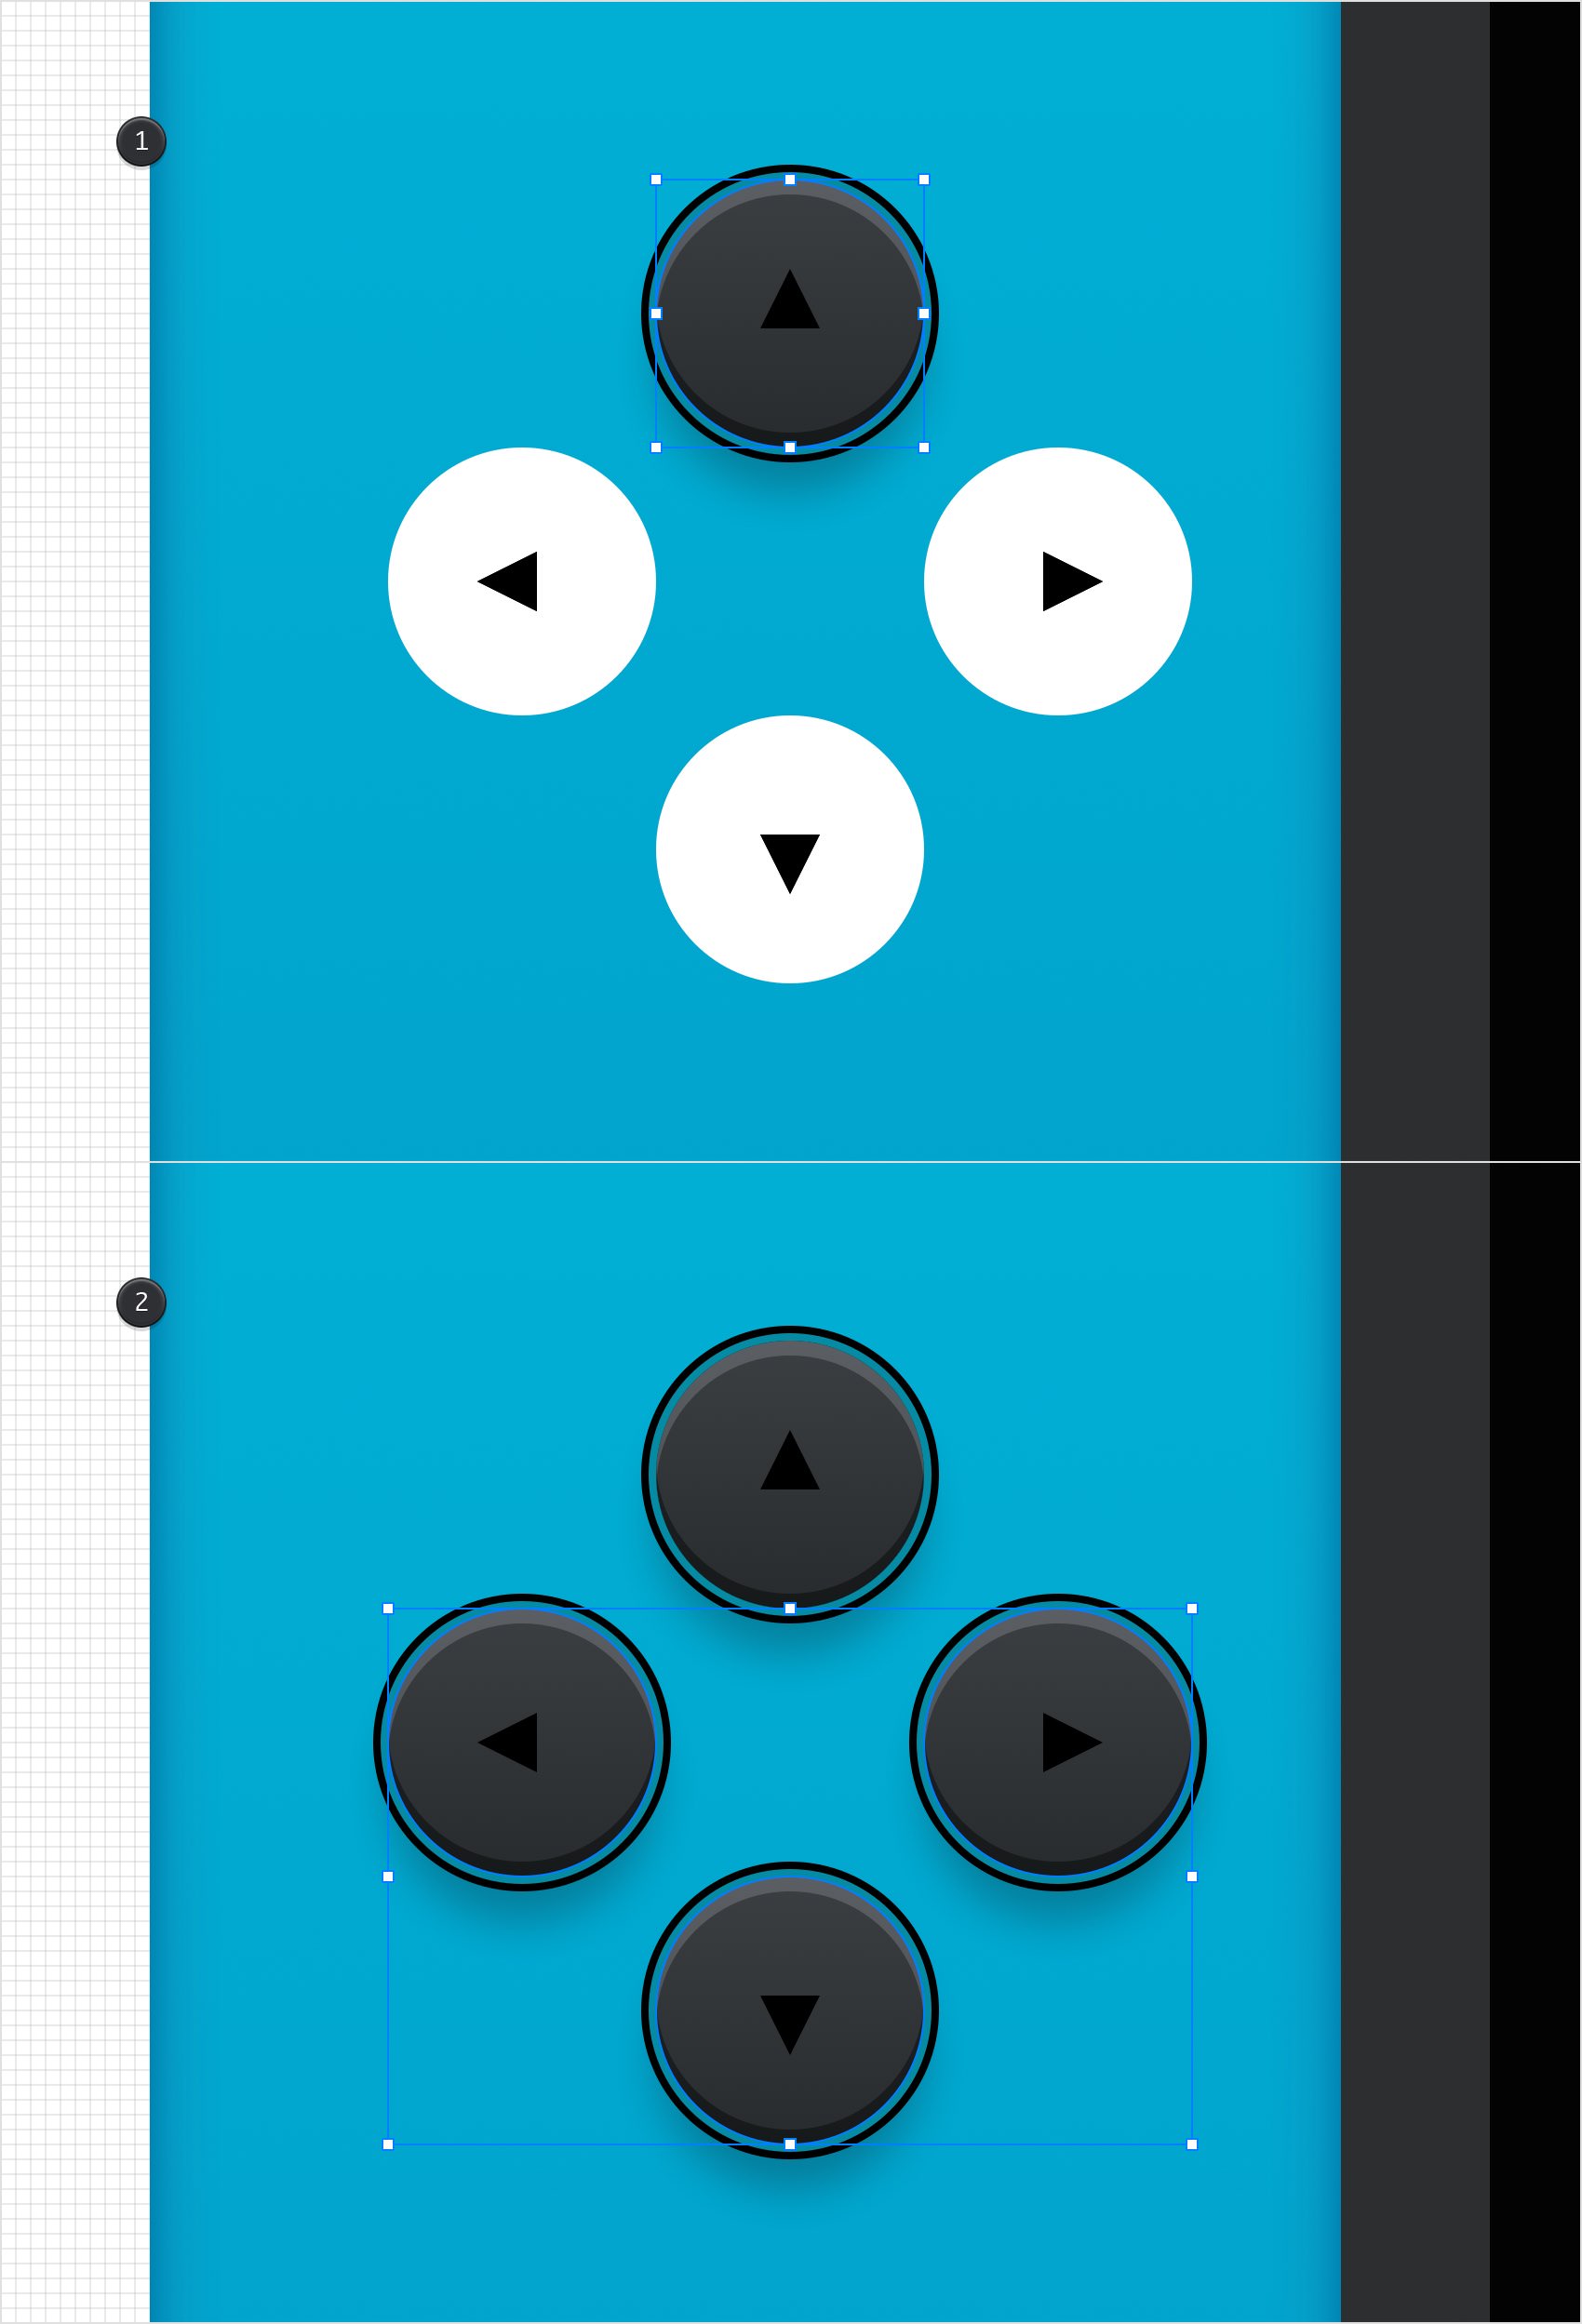
Make sure that your top circle is still selected, right click anywhere on your canvas and go to Copy Style. Select the other three white circles, right click again on your canvas and go to Paste Style.
Select these three circles one by one and adjust the gradient Angle to match the appearance of the top circle. Use a -90 ° Angle for the bottom circle, a 0 ° Angle for the left circle and a 180 ° Angle for the right circle.
Step 37
Select your black triangle and focus on the Effects pane. Set the Fill and Stroke colors to R=27 G=27 B=27 and then go to the Stroke pane. Make sure that the Line Weight slider is set to 1 pt and check the Round Join button.
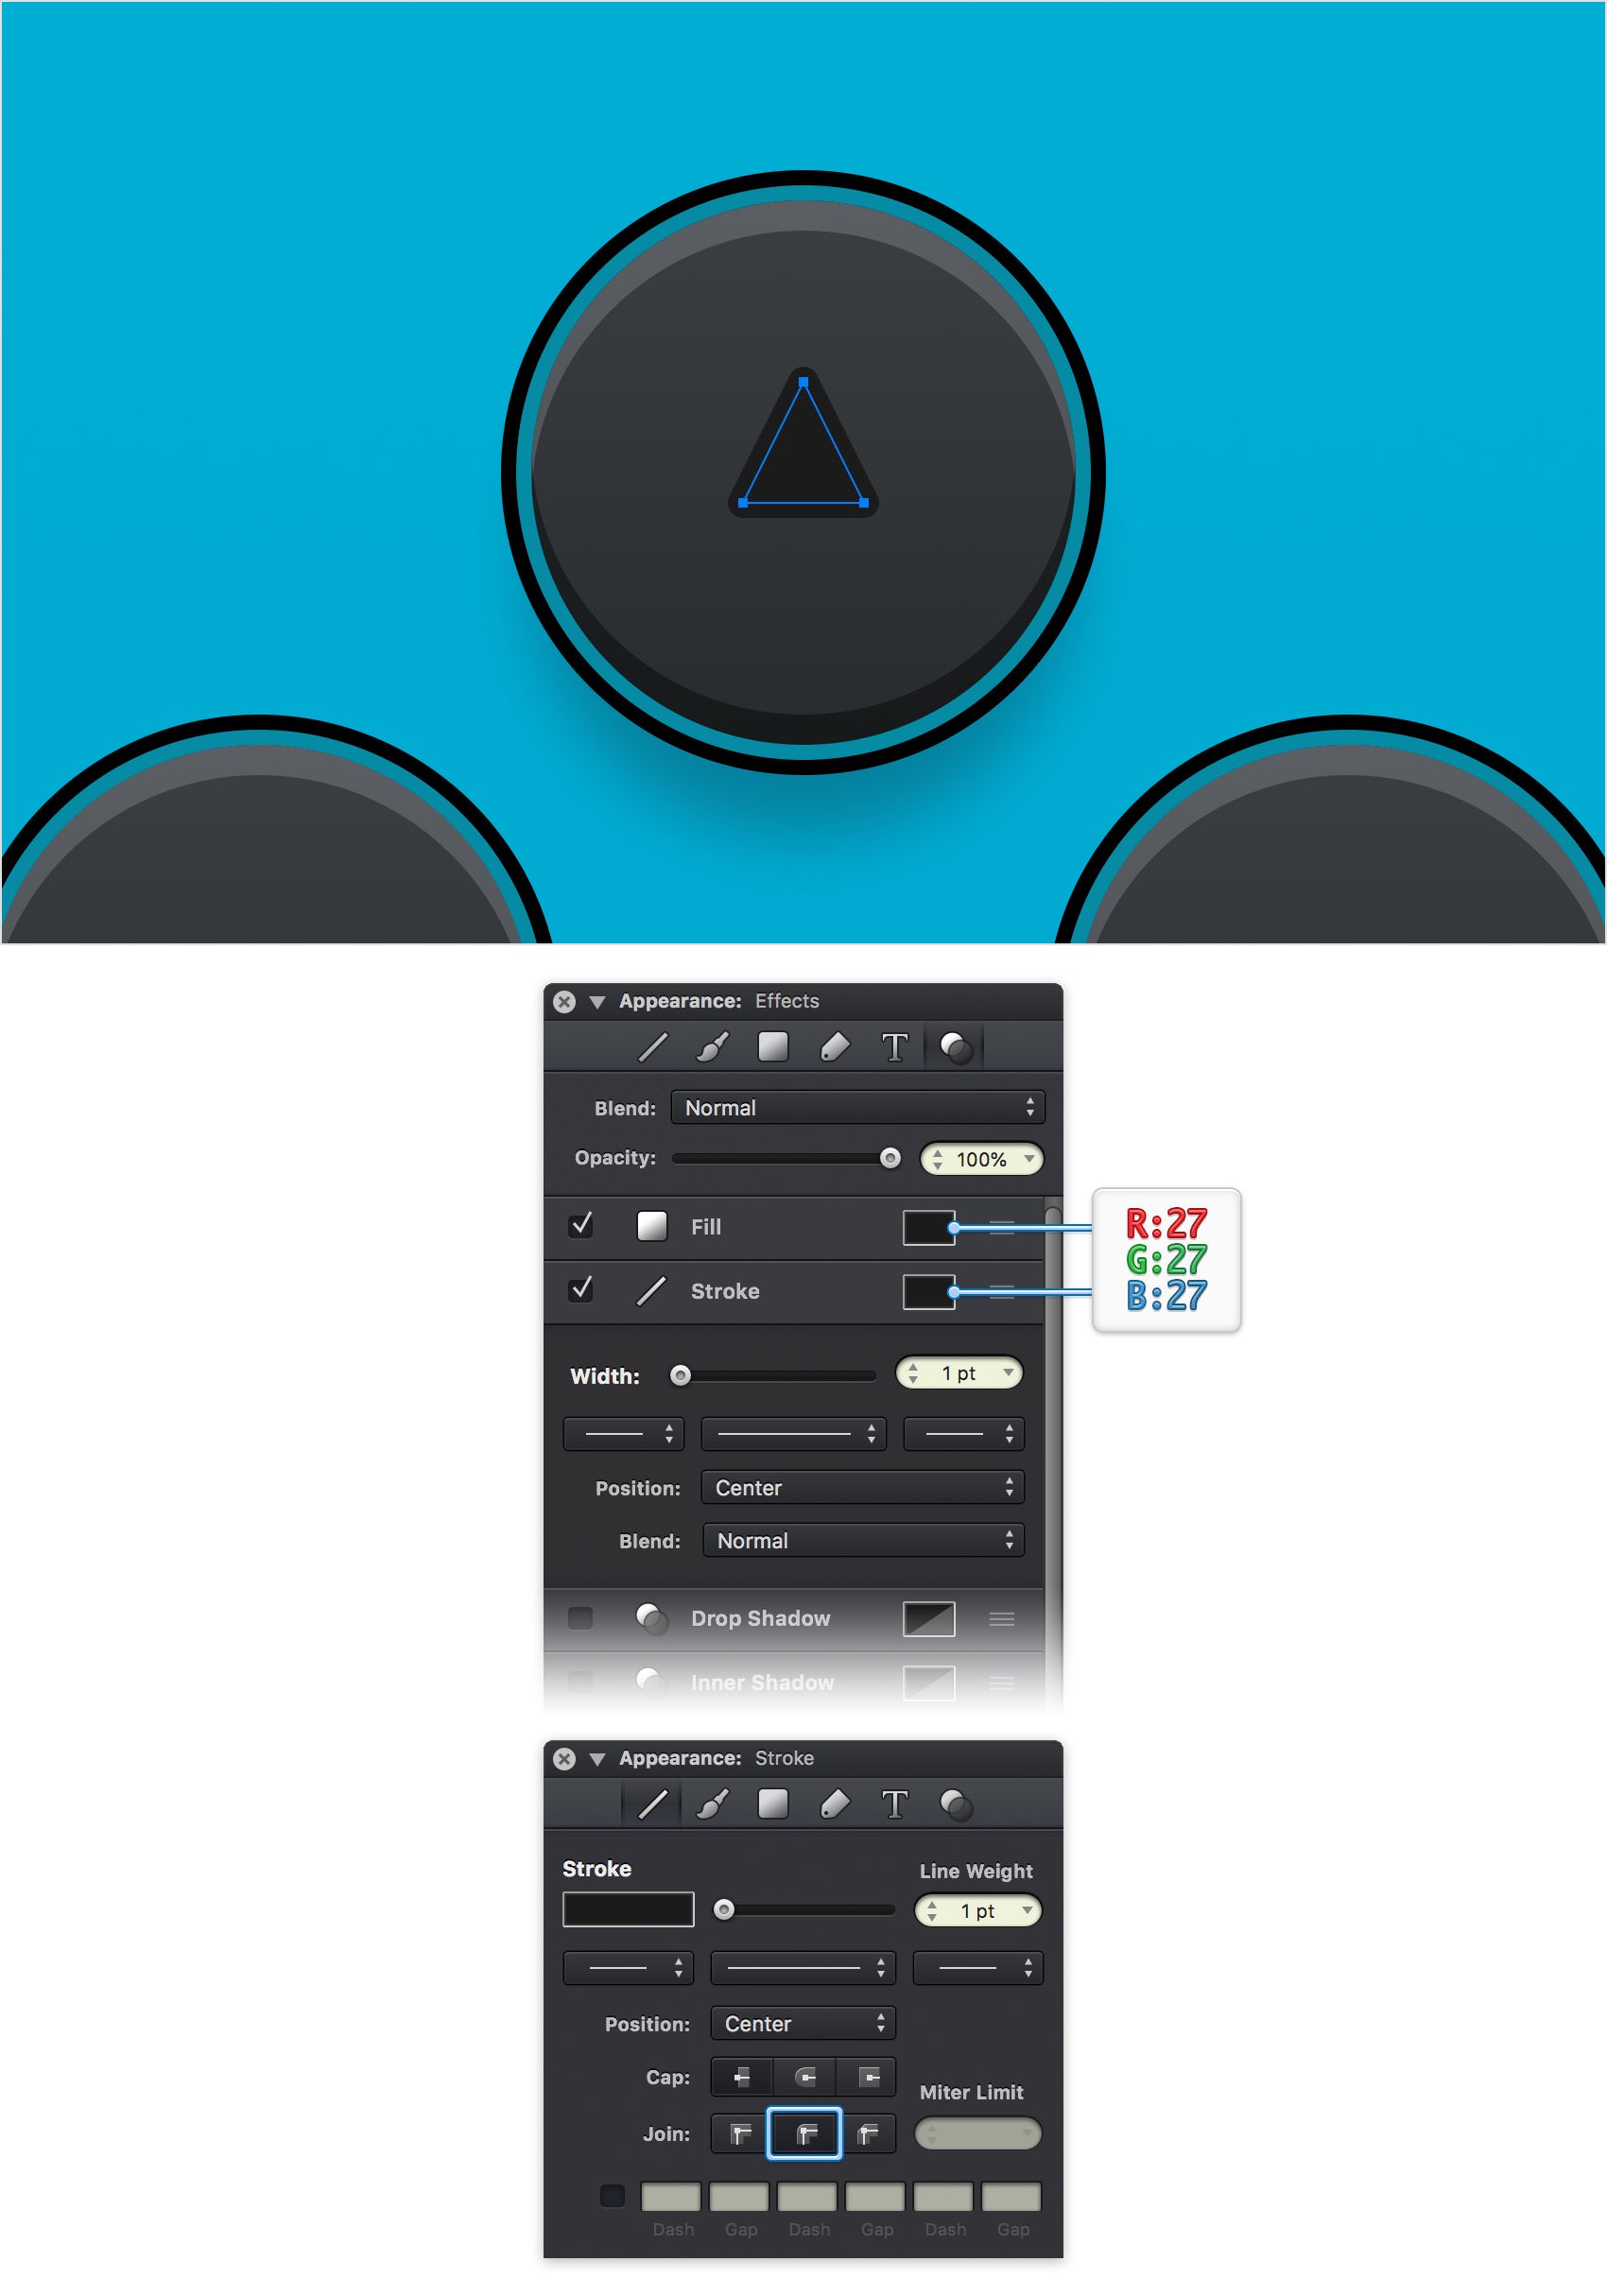
Step 38
Make sure that your triangle is still selected and keep focusing on the Effects pane. Activate the Drop Shadow effect and enter the attributes shown below.
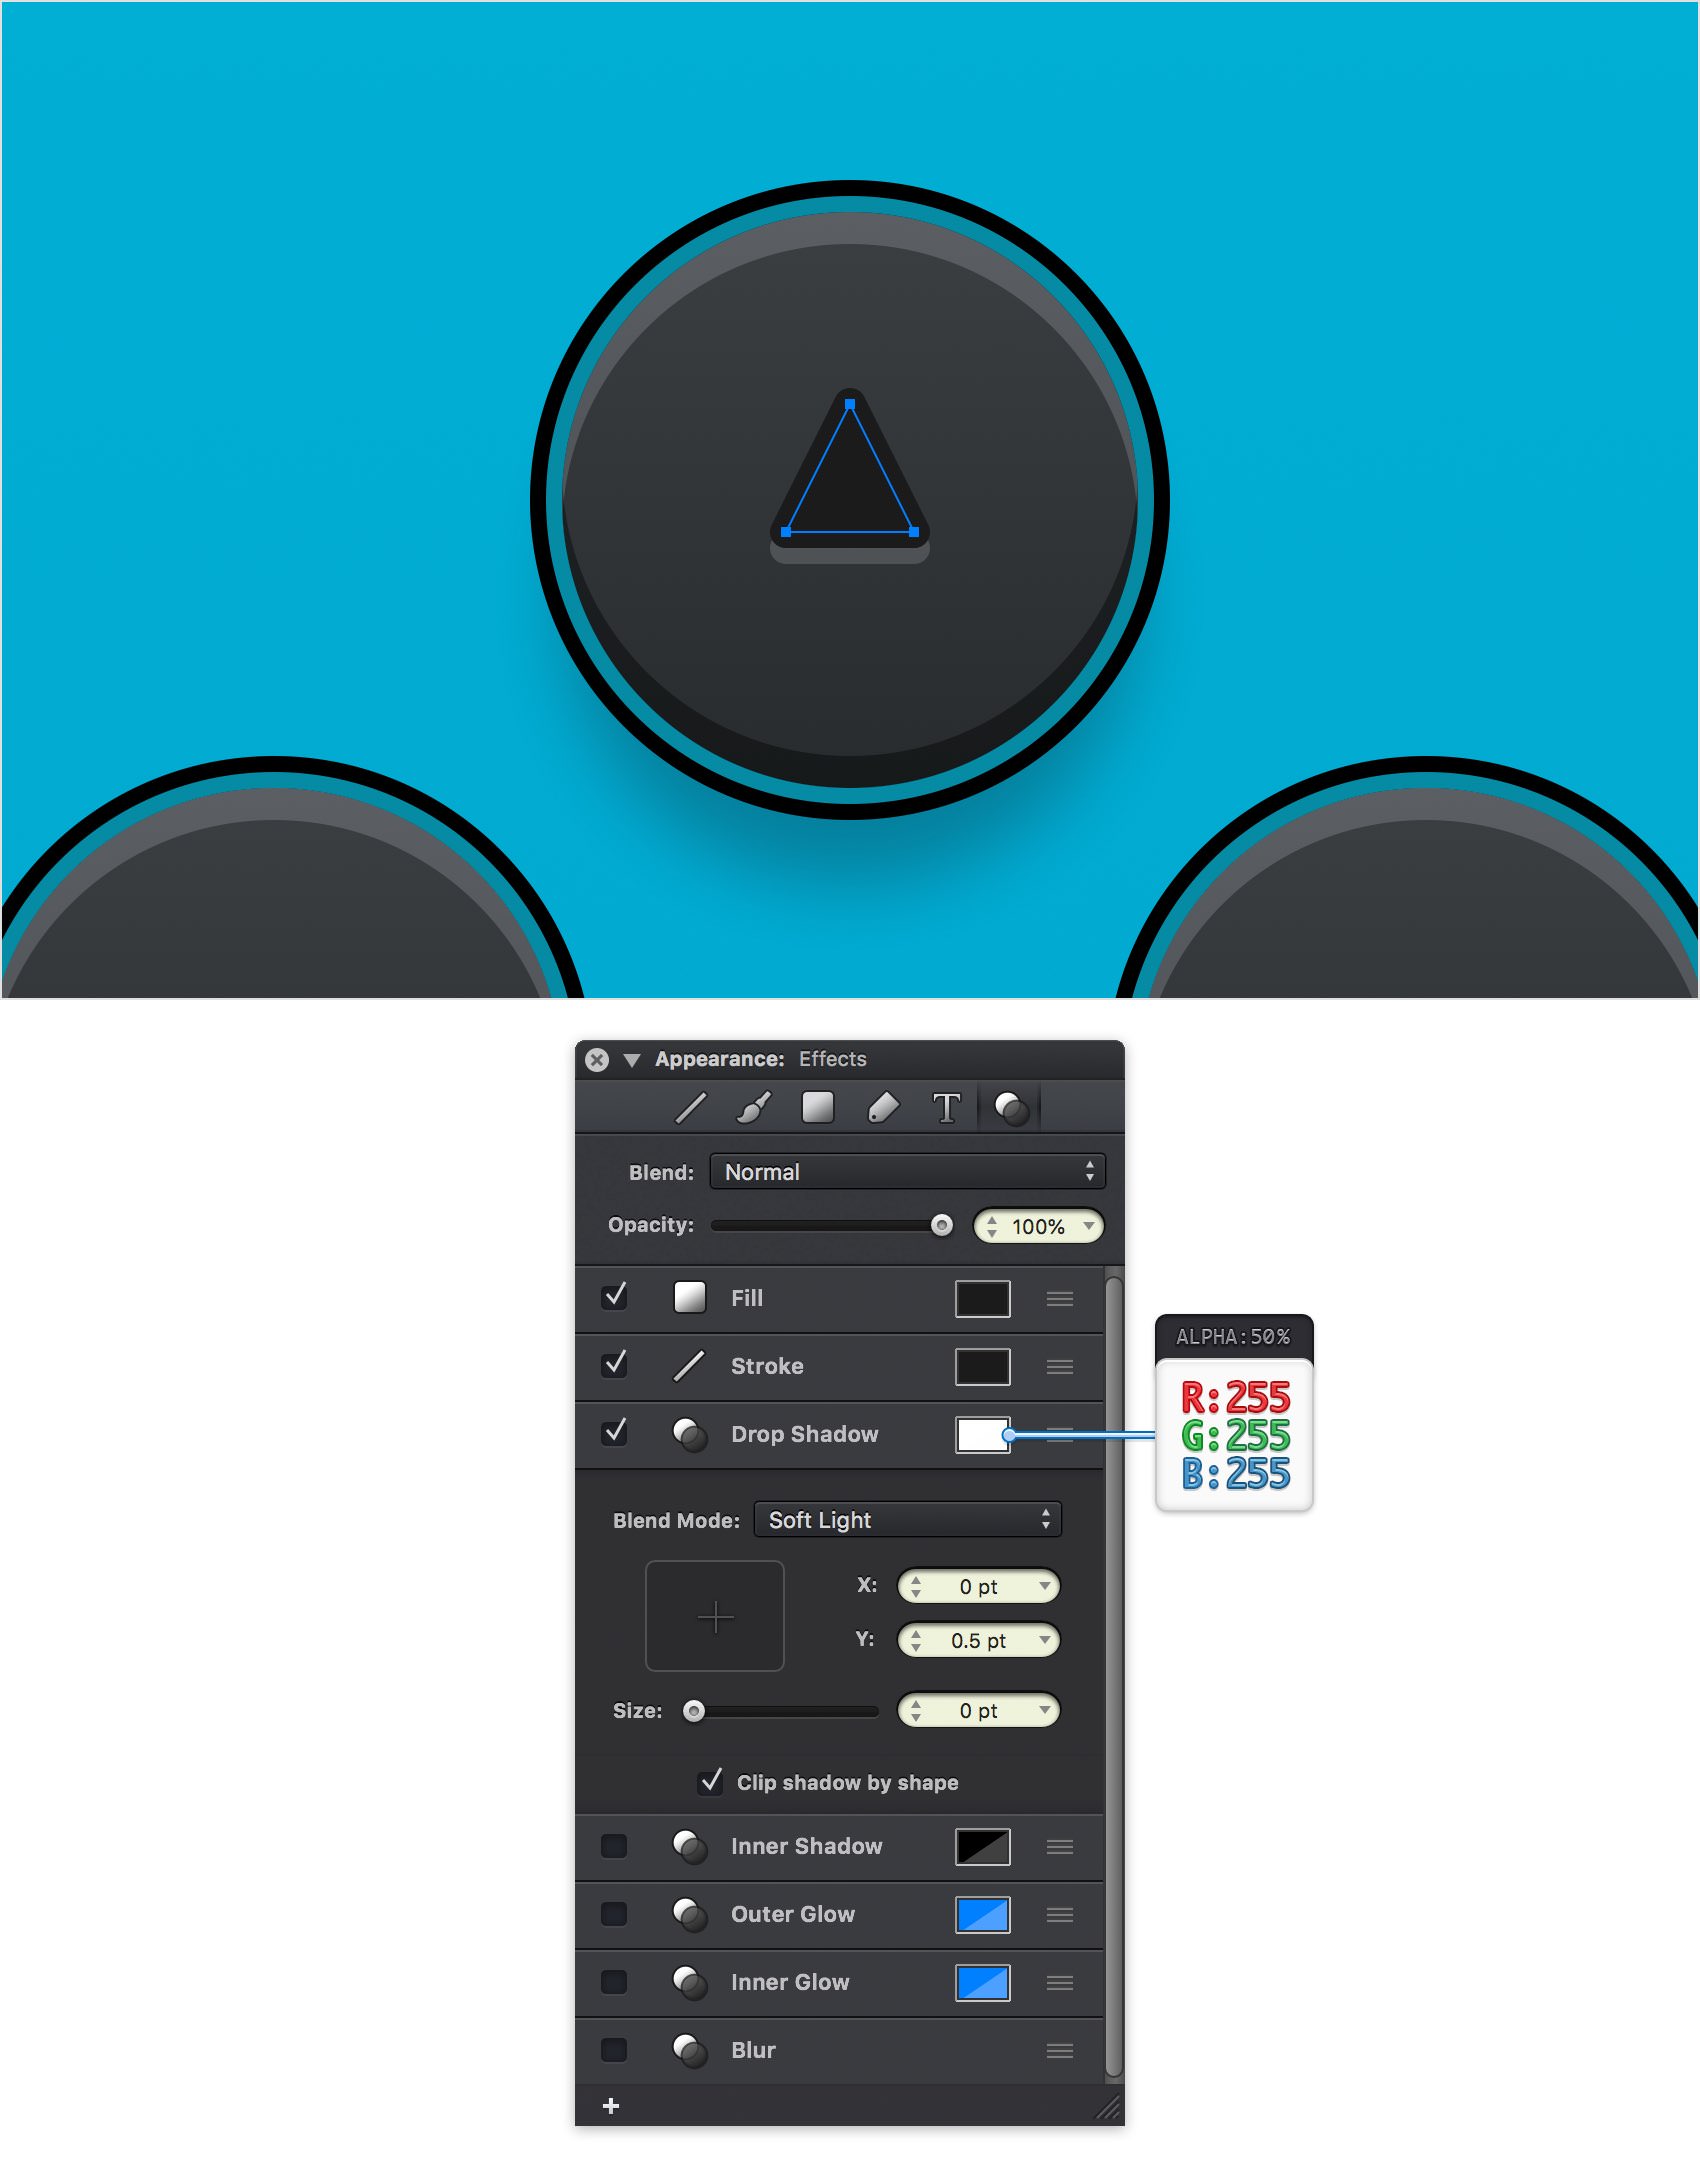
Step 39
Use that same Copy Style > Paste Style commands to apply the attributes of the top triangle to the other three triangles.
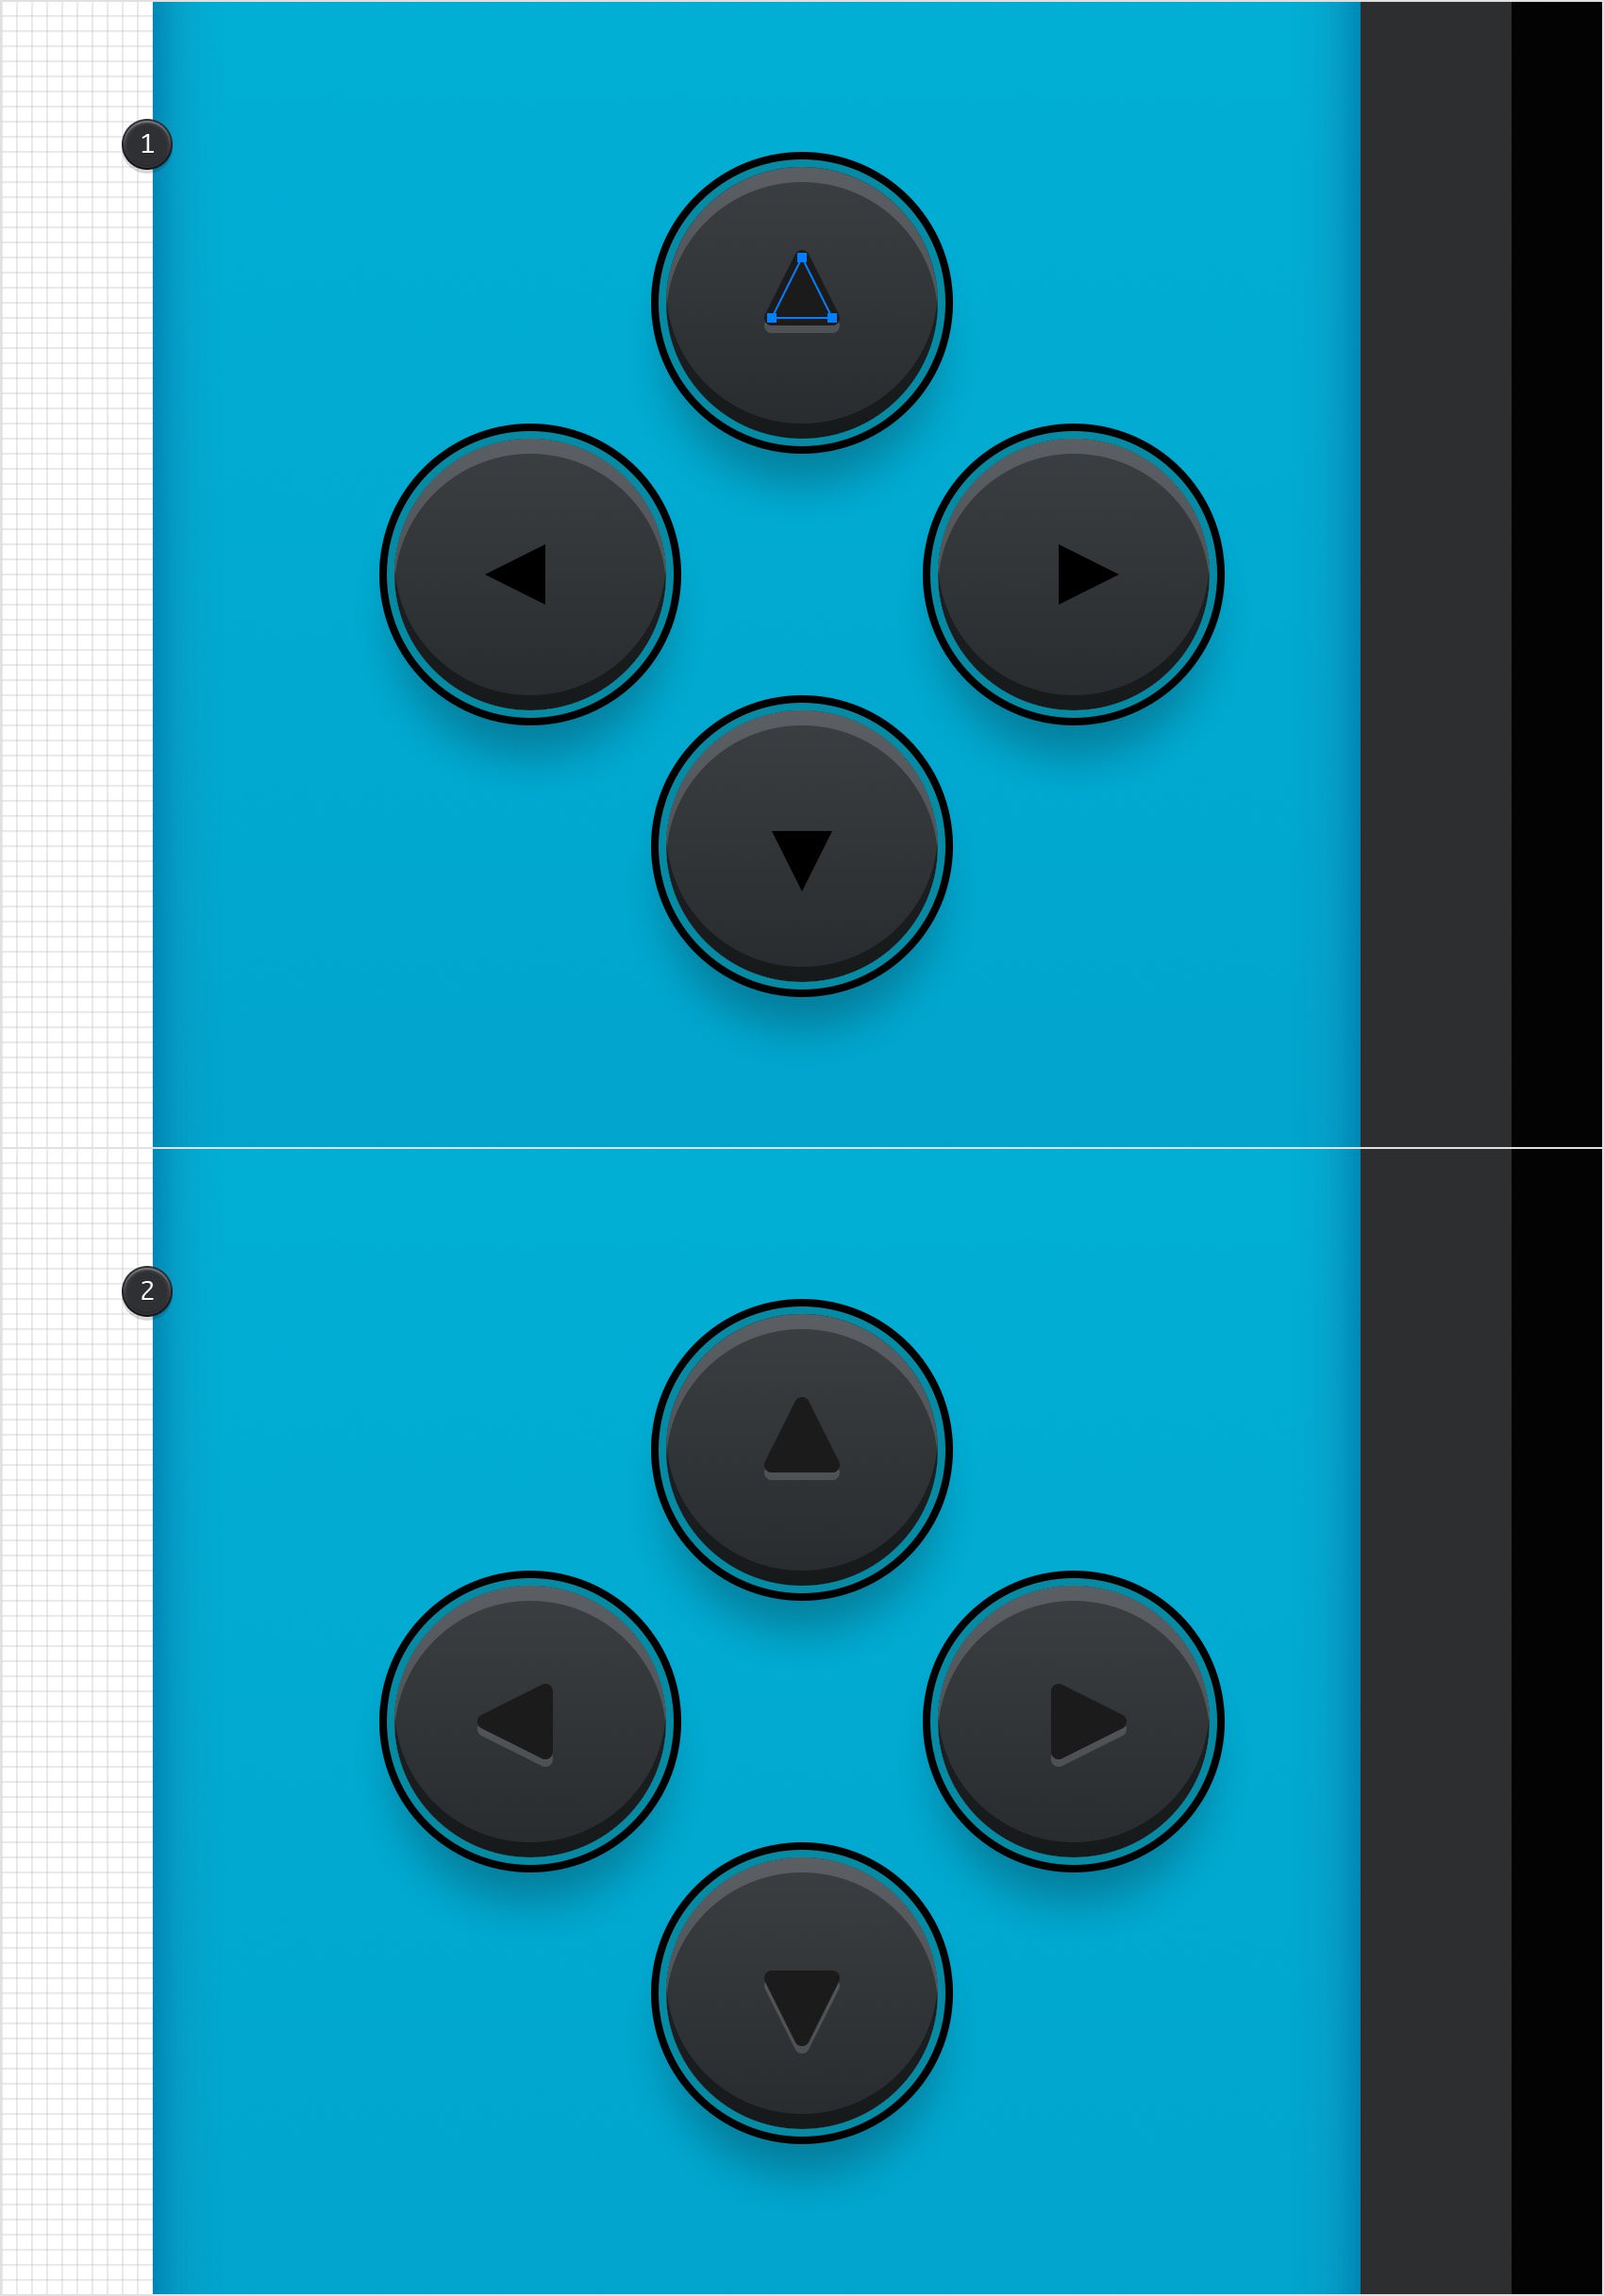
Step 40
Duplicate your four circles (Command + C > Command + V). Select these copies and place them as shown in the following image (X: 606 px Y: 138 px).
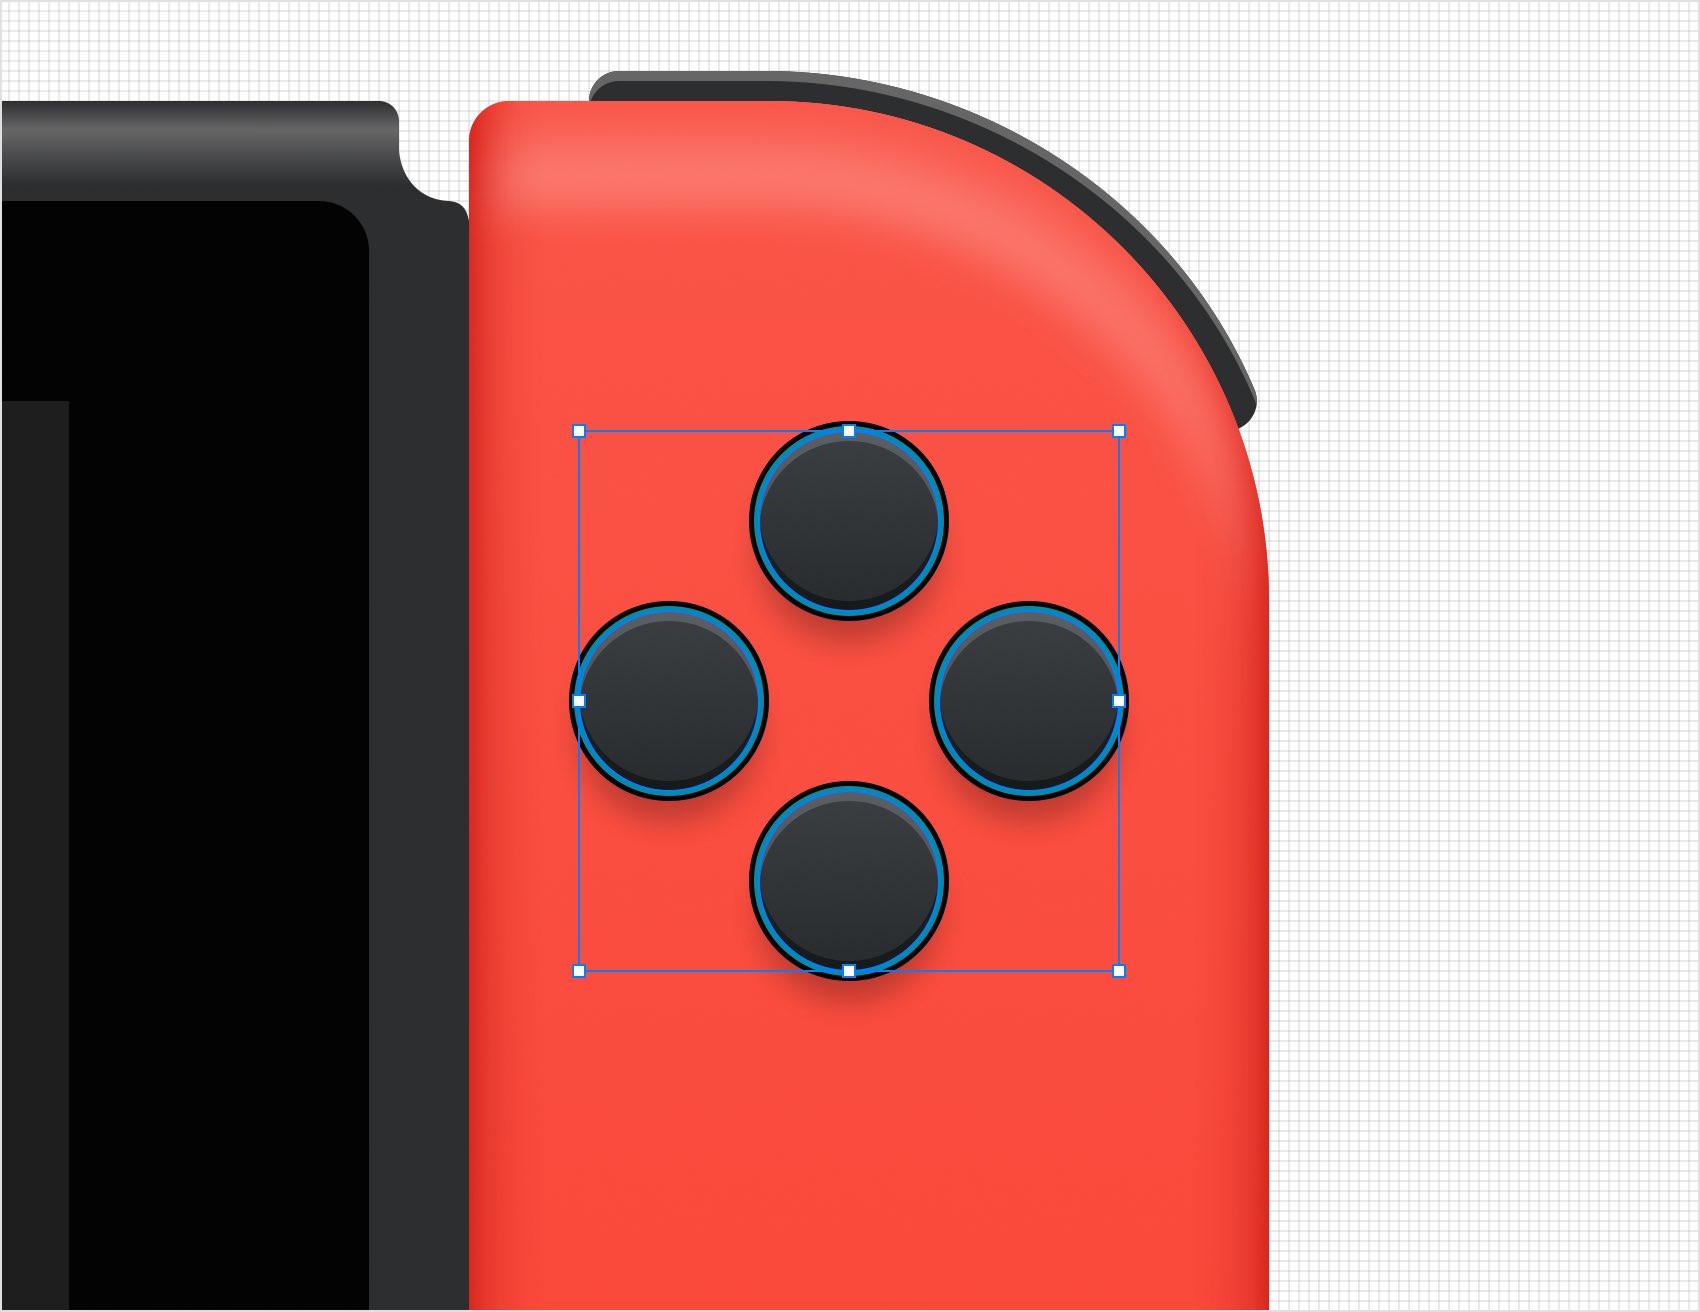
Step 41
Make sure that the circles added in the previous step are still selected and focus on the Effects pane. Select the bottom Stroke and replace the existing color with R=186 G=63 B=53.
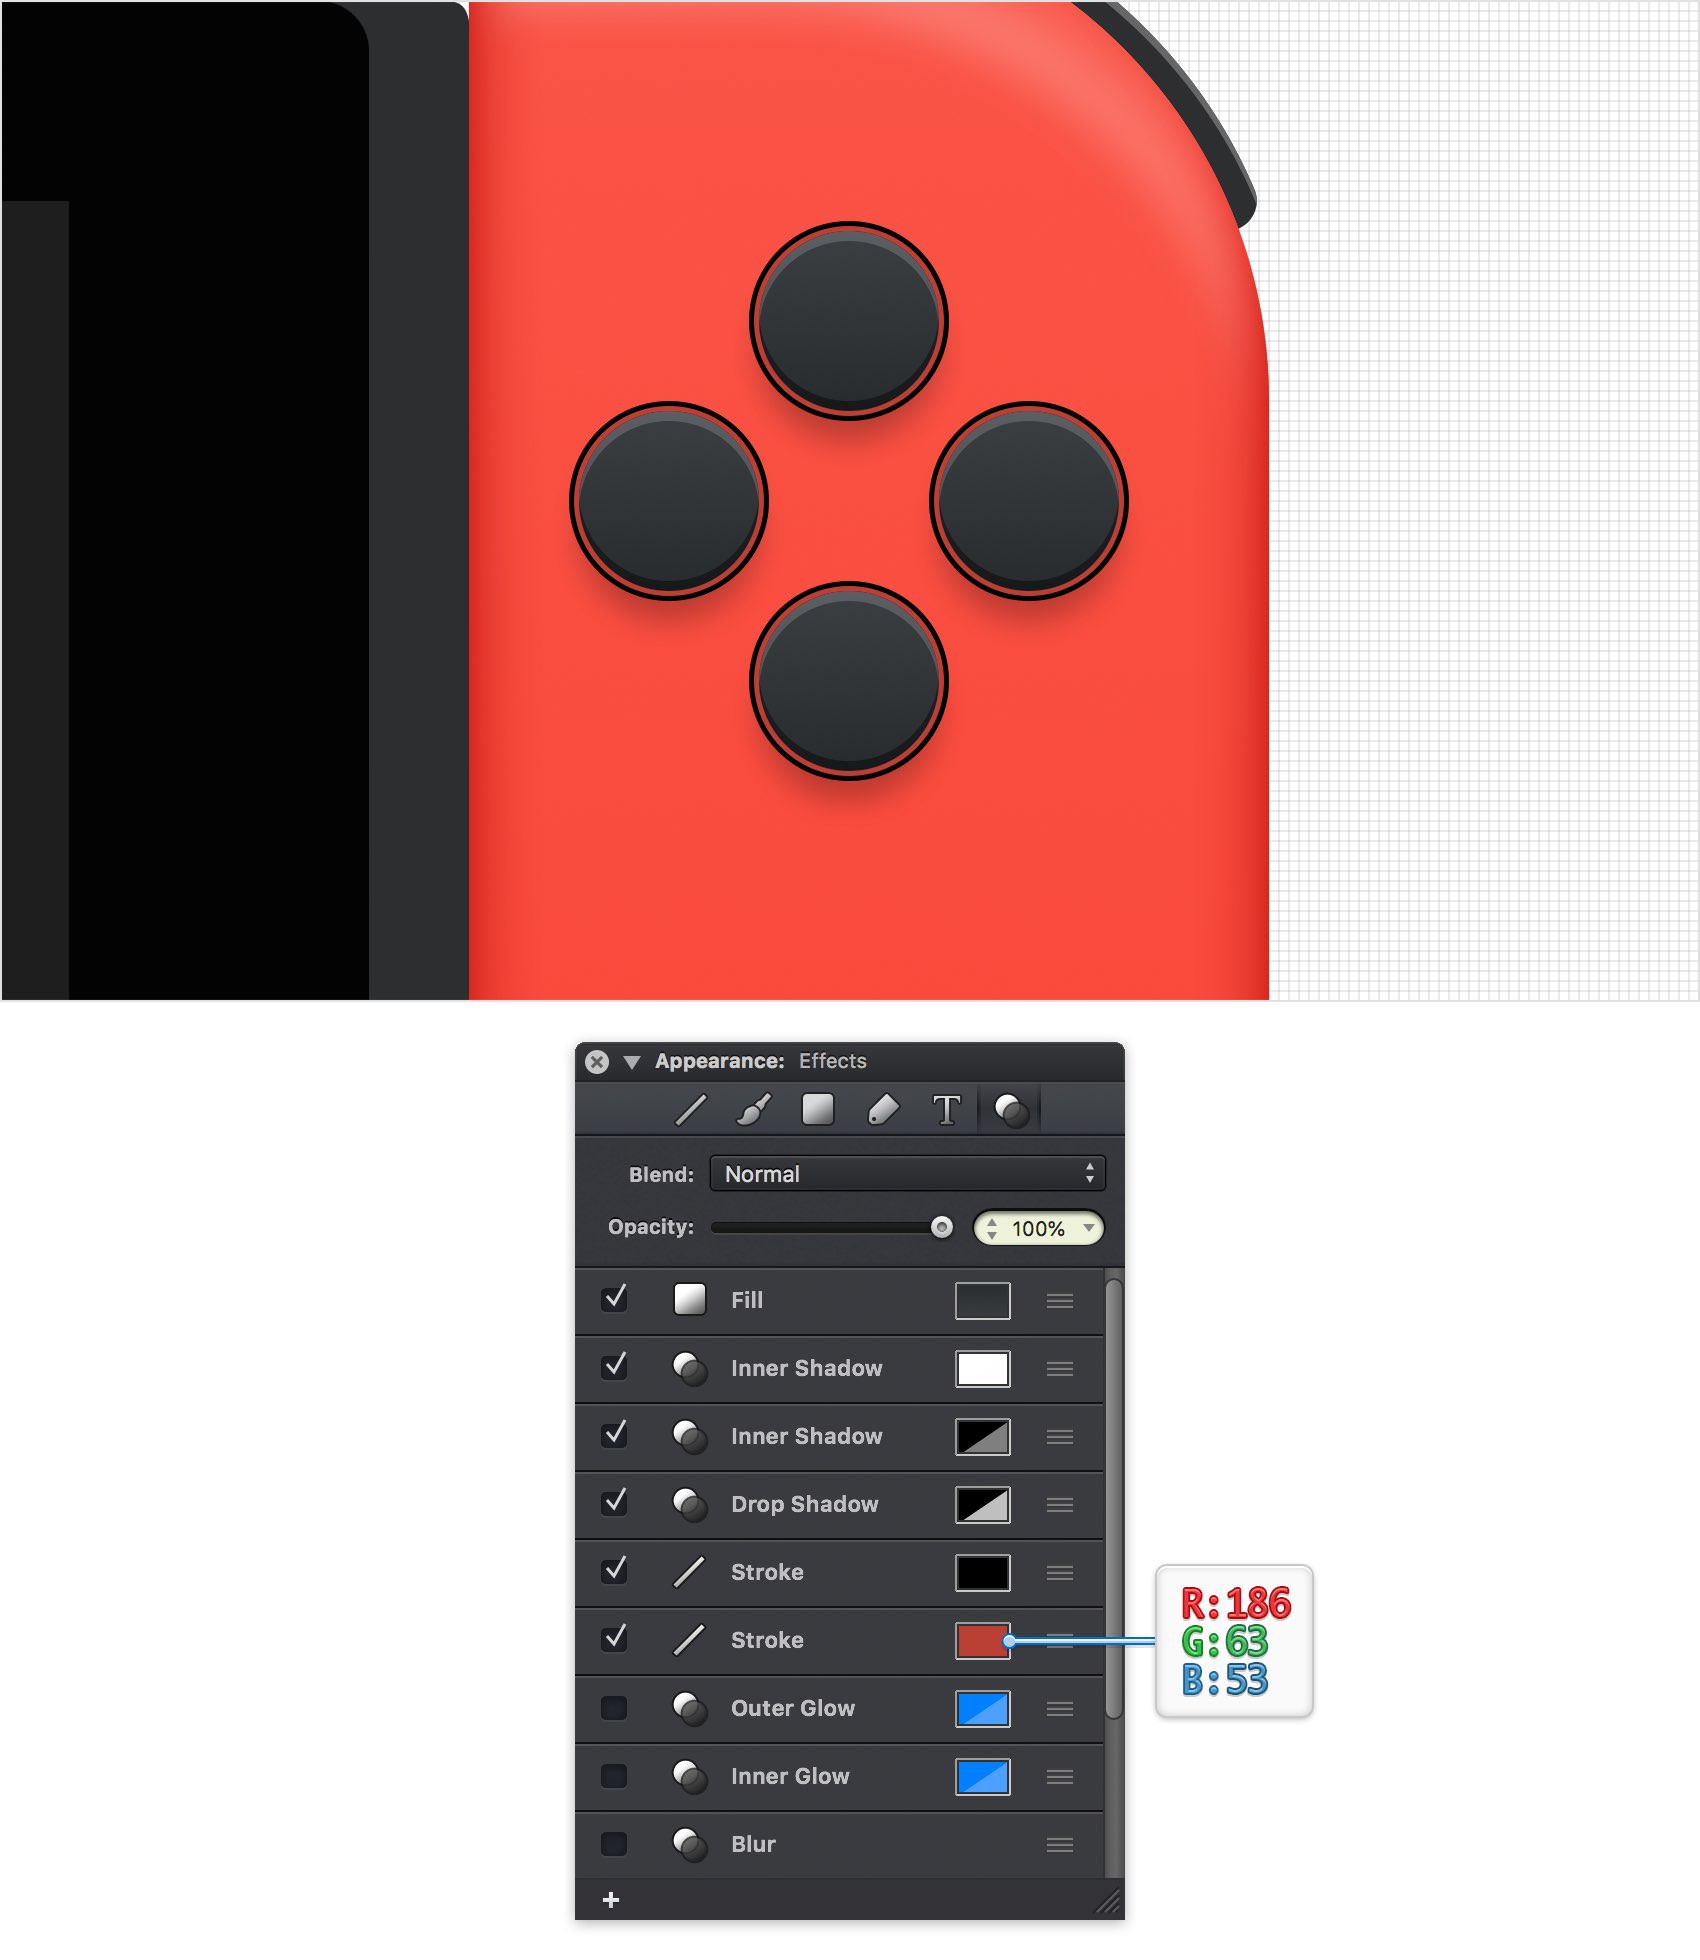
Step 42
Make sure that your red circles are still selected and focus on the Effects pane. Add a second Drop Shadow effect, place it below the first one and enter the attributes shown below.
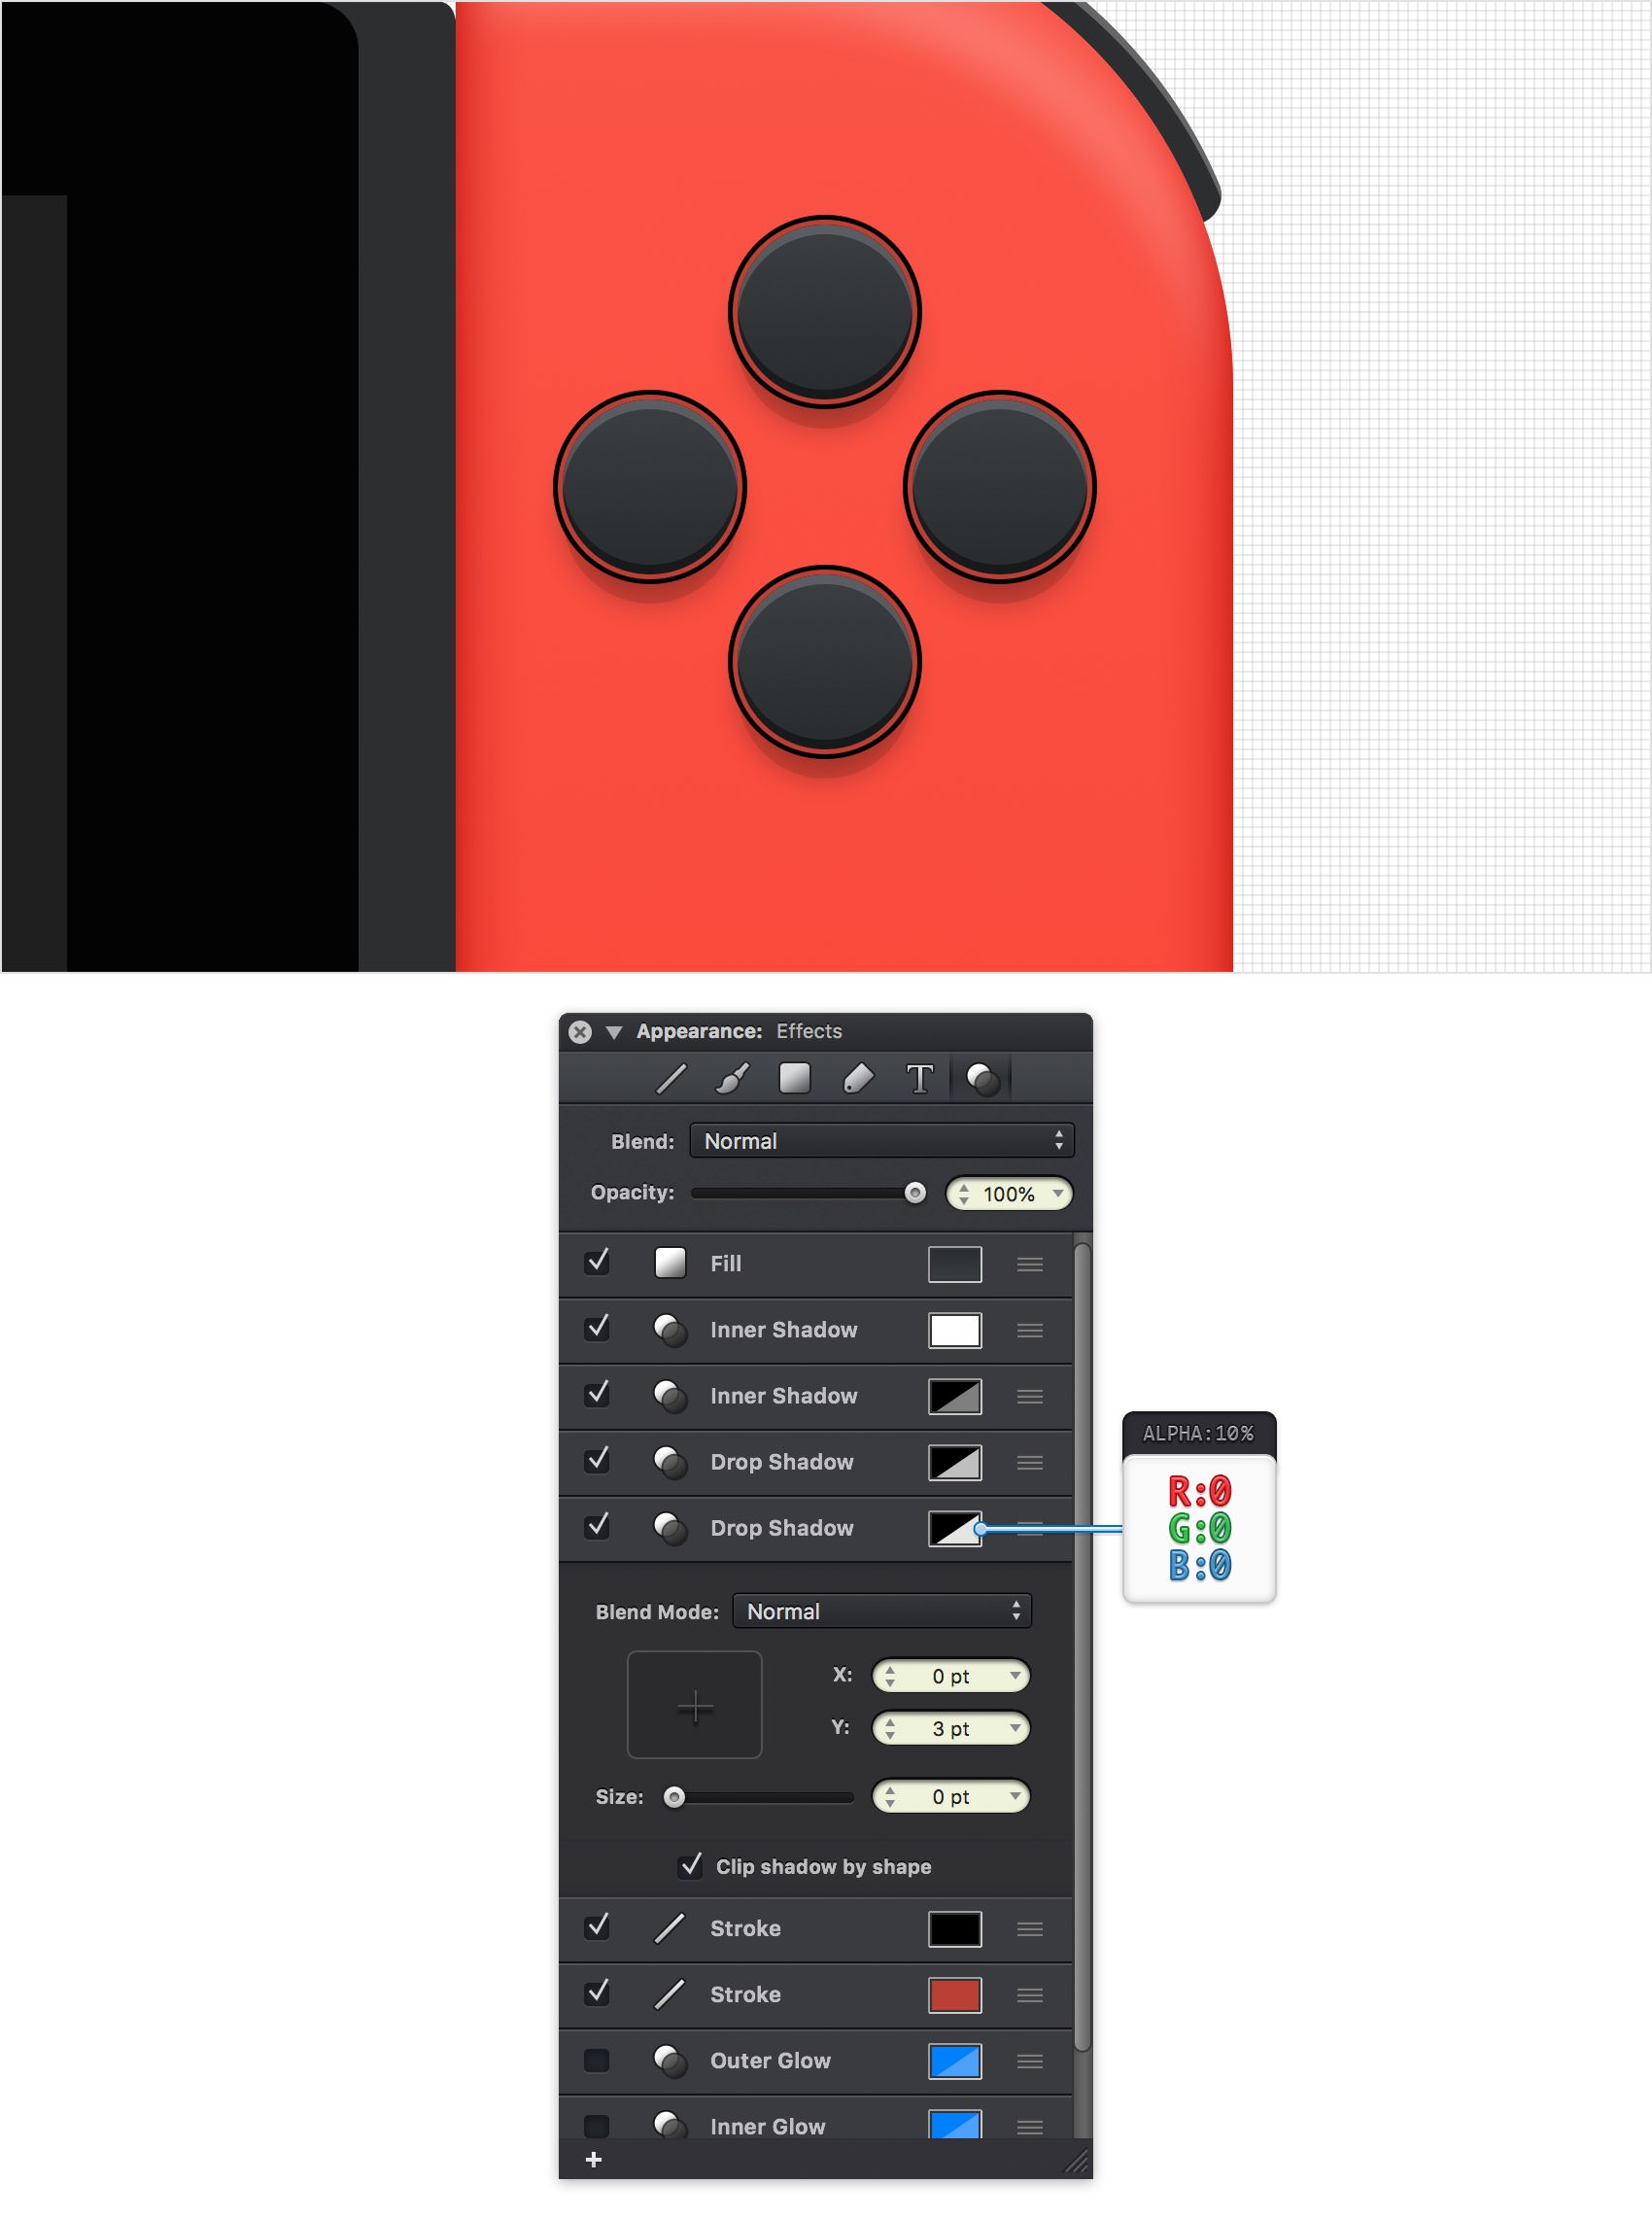
Step 43
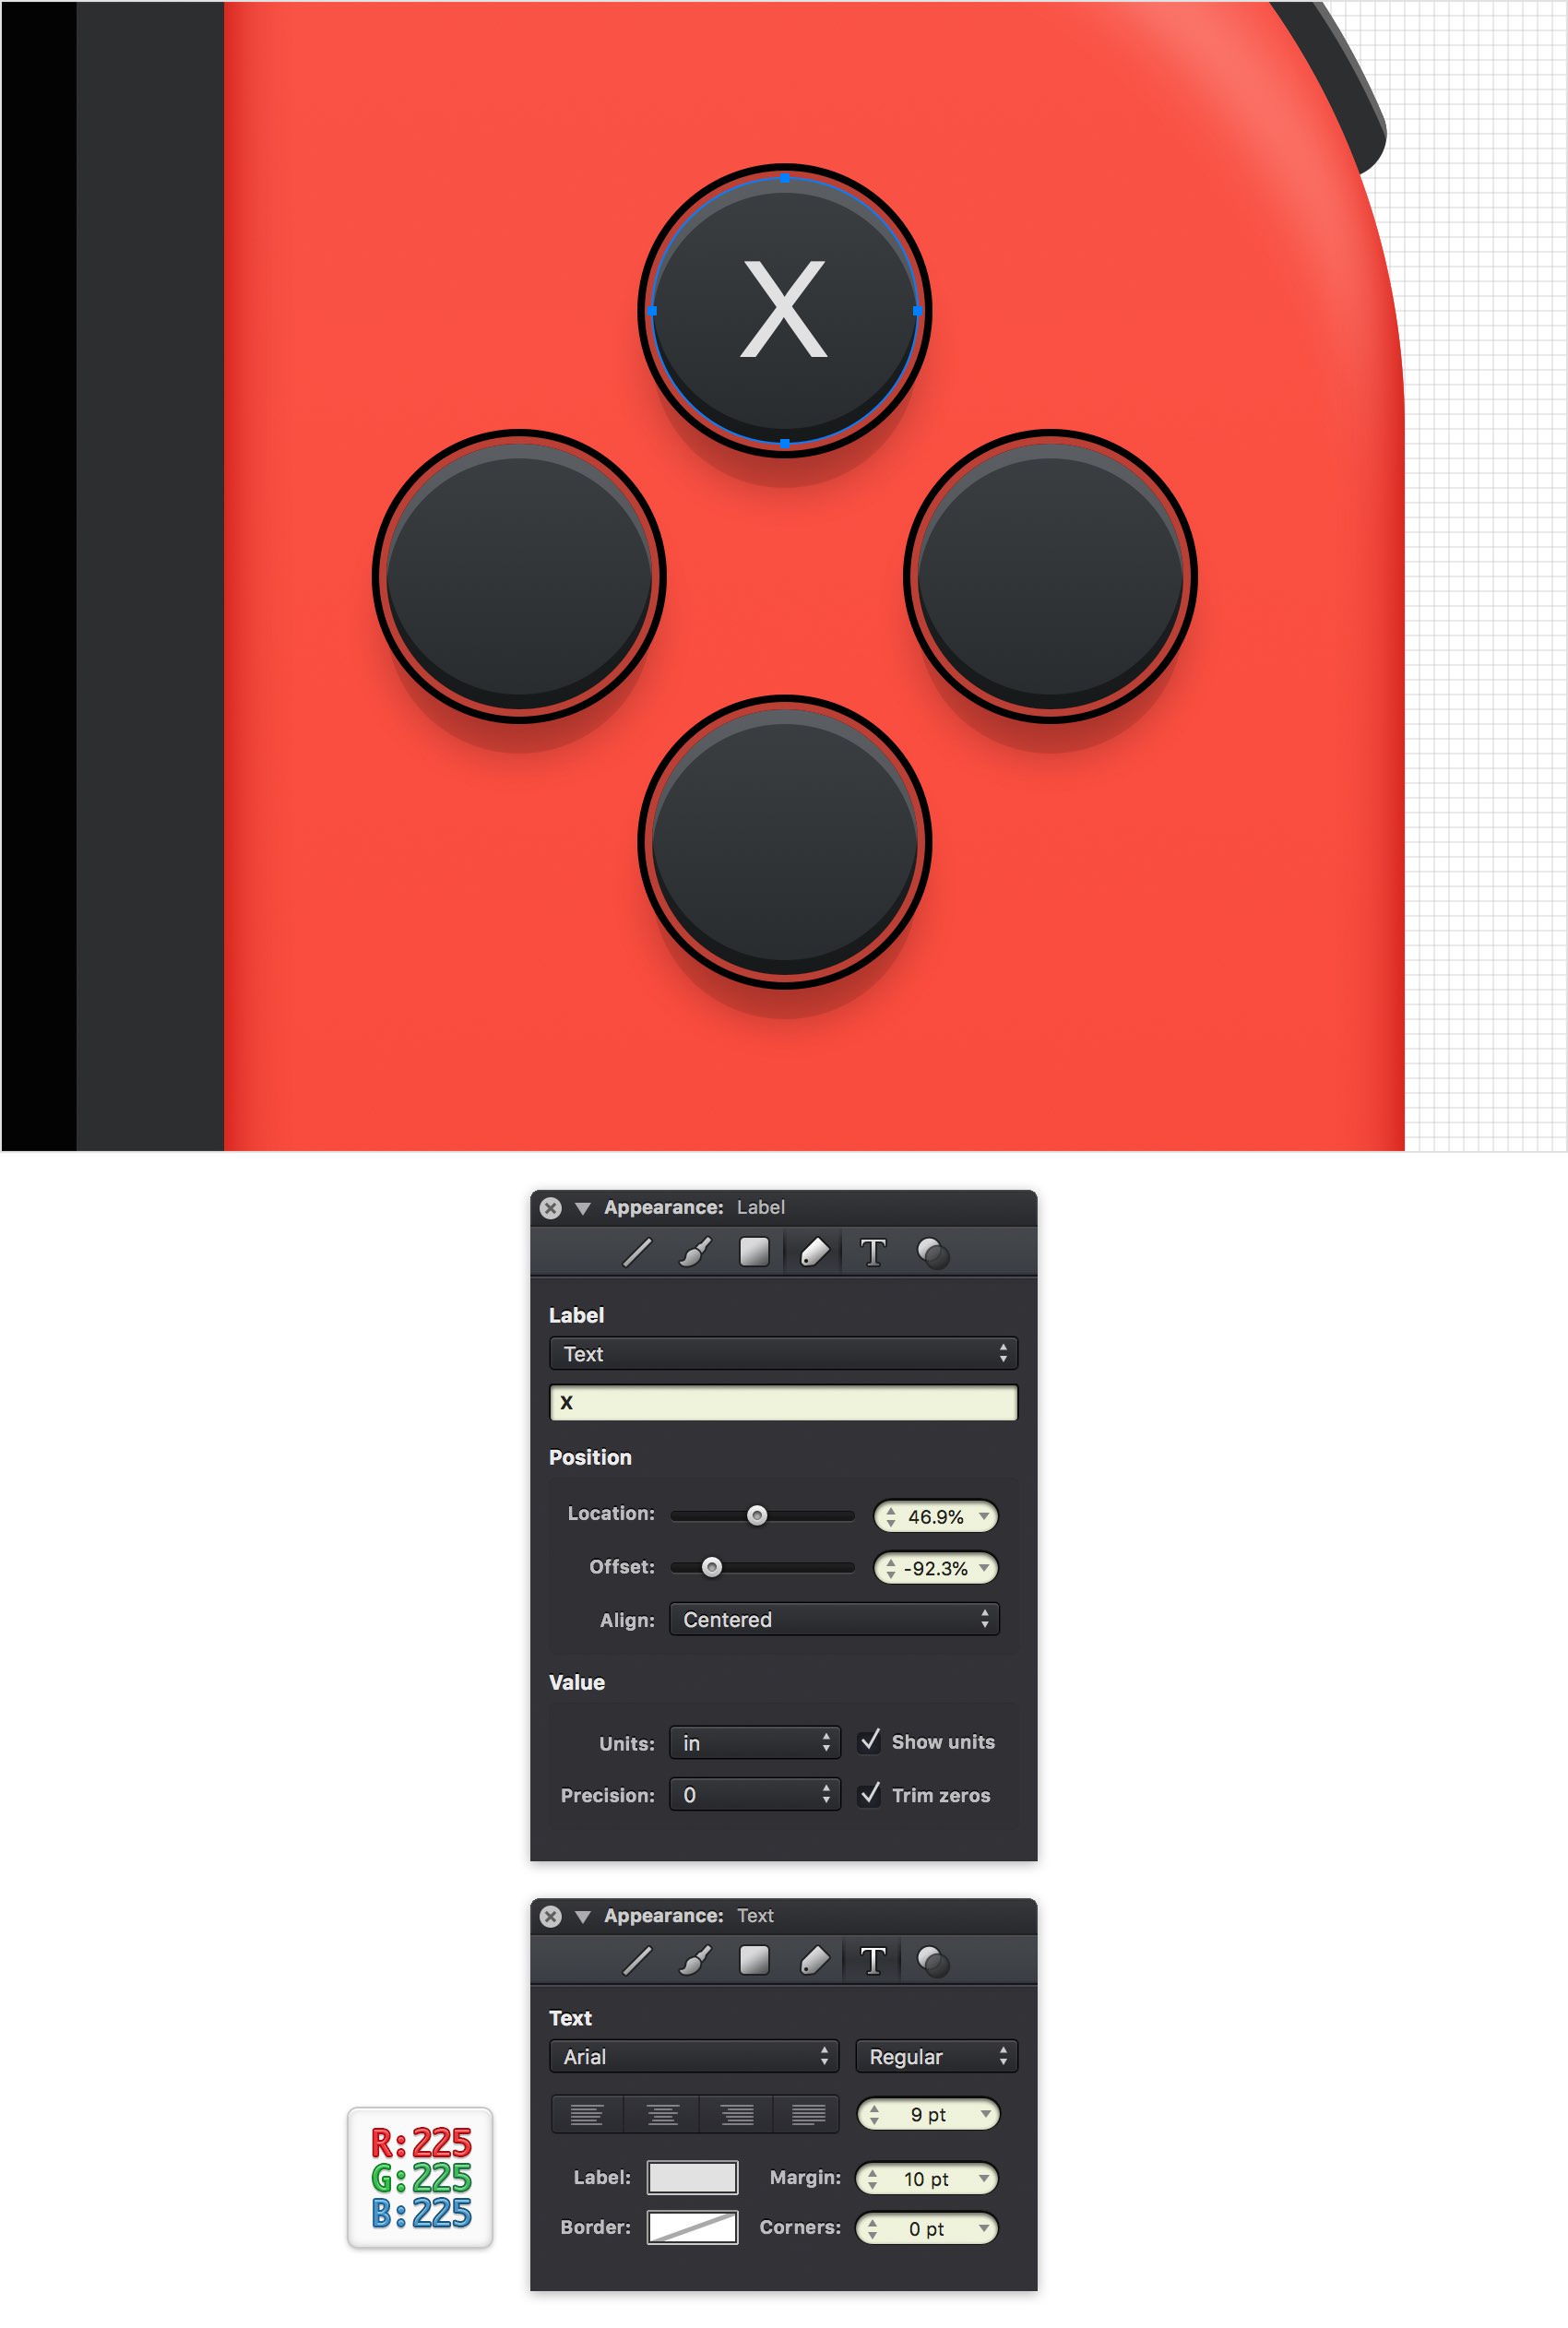
Keep focusing on your red circles and select only the top one.
Open the Label pane from the Appearance panel and add a Text label. Type a simple "X" in that text field, select Centered from the Align menu, and then go to the Text pane from the Appearance panel. Select the Arial font, keep the Regular style, change the Size to 9 pt and set the color to R=225 G=225 B=225.
Step 44
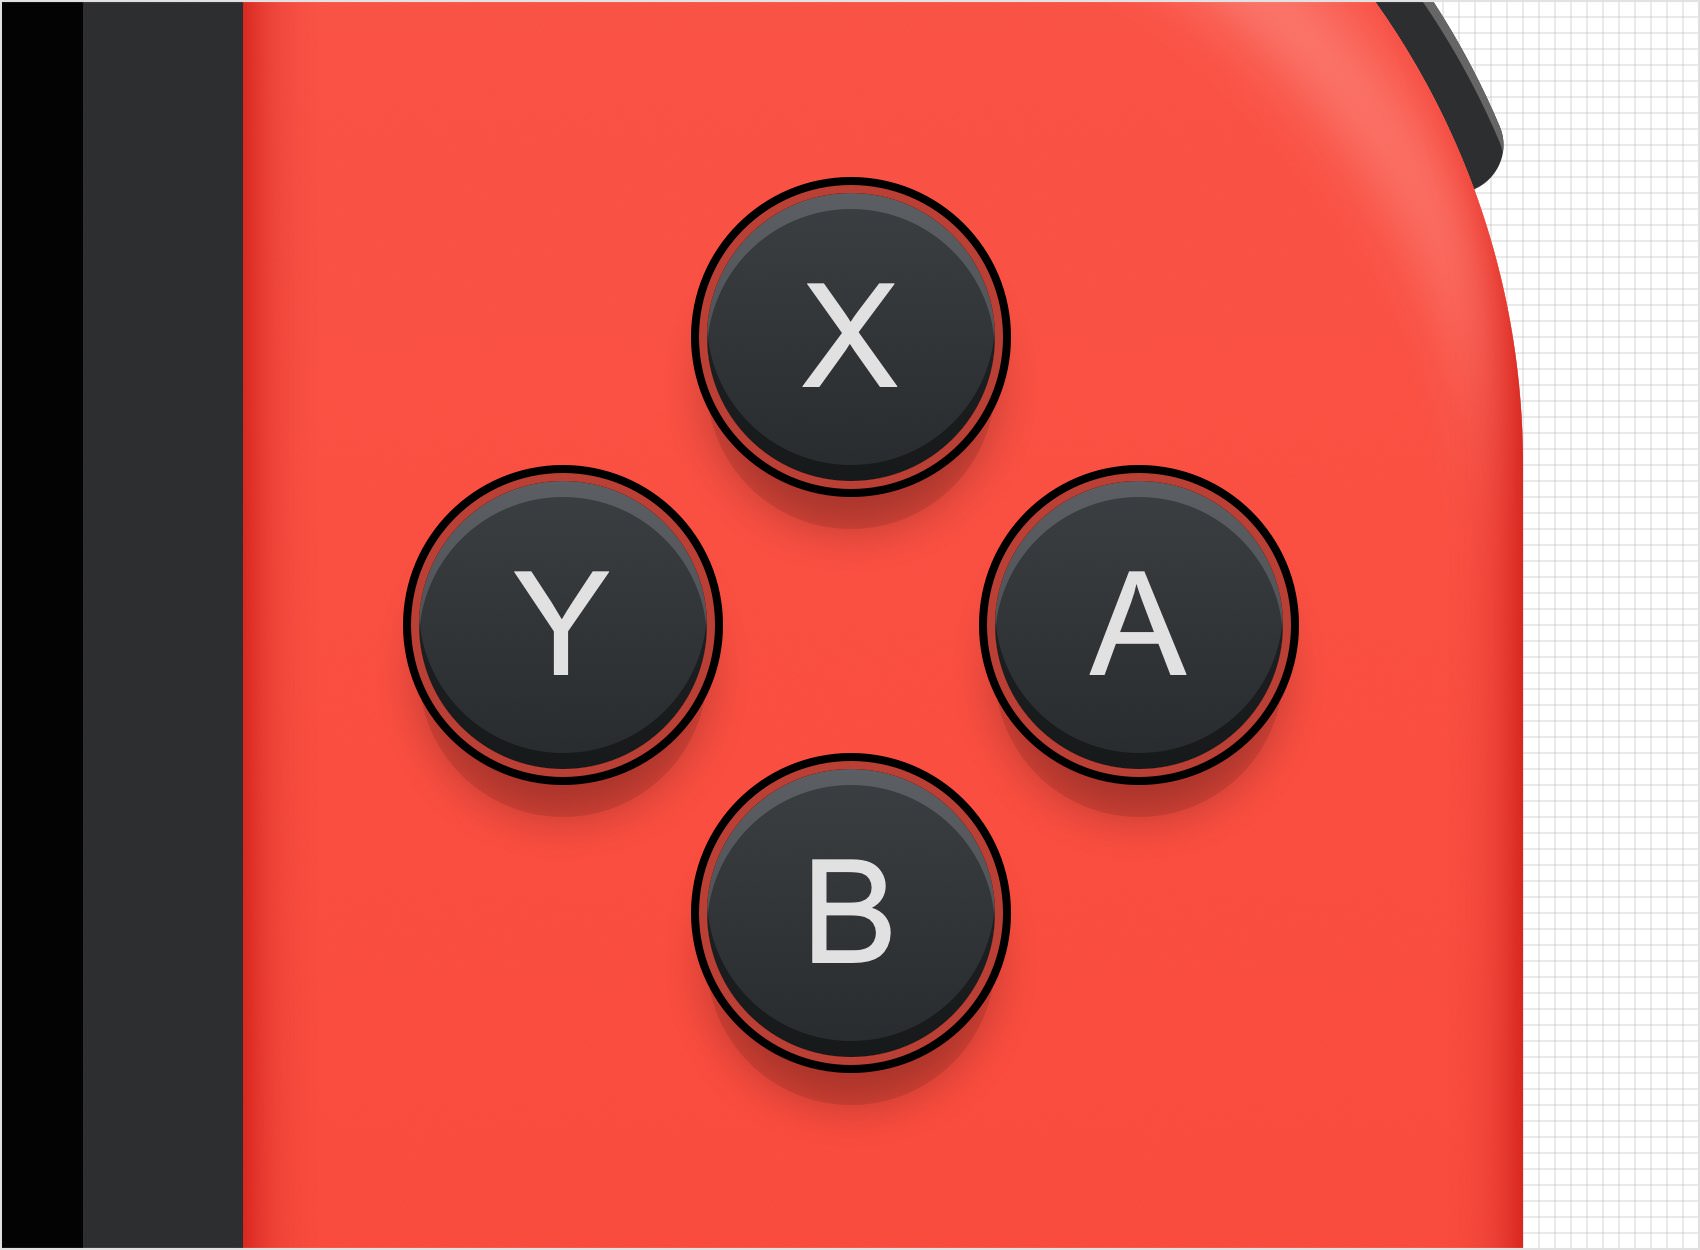
Use the same techniques and attributes to add labels for the other four red buttons. All you have to do is change the "X" with "Y", "A" and "B".
Step 45
Open the Layers panel and add a fourth layer. Name it "Sticks" and make sure that it stays selected.
Pick the Ellipse Tool (O) and create a 38 px circle. Place this new shape as shown in the following image (X: 614 px Y: 213 px) and fill it with the linear gradient shown below.
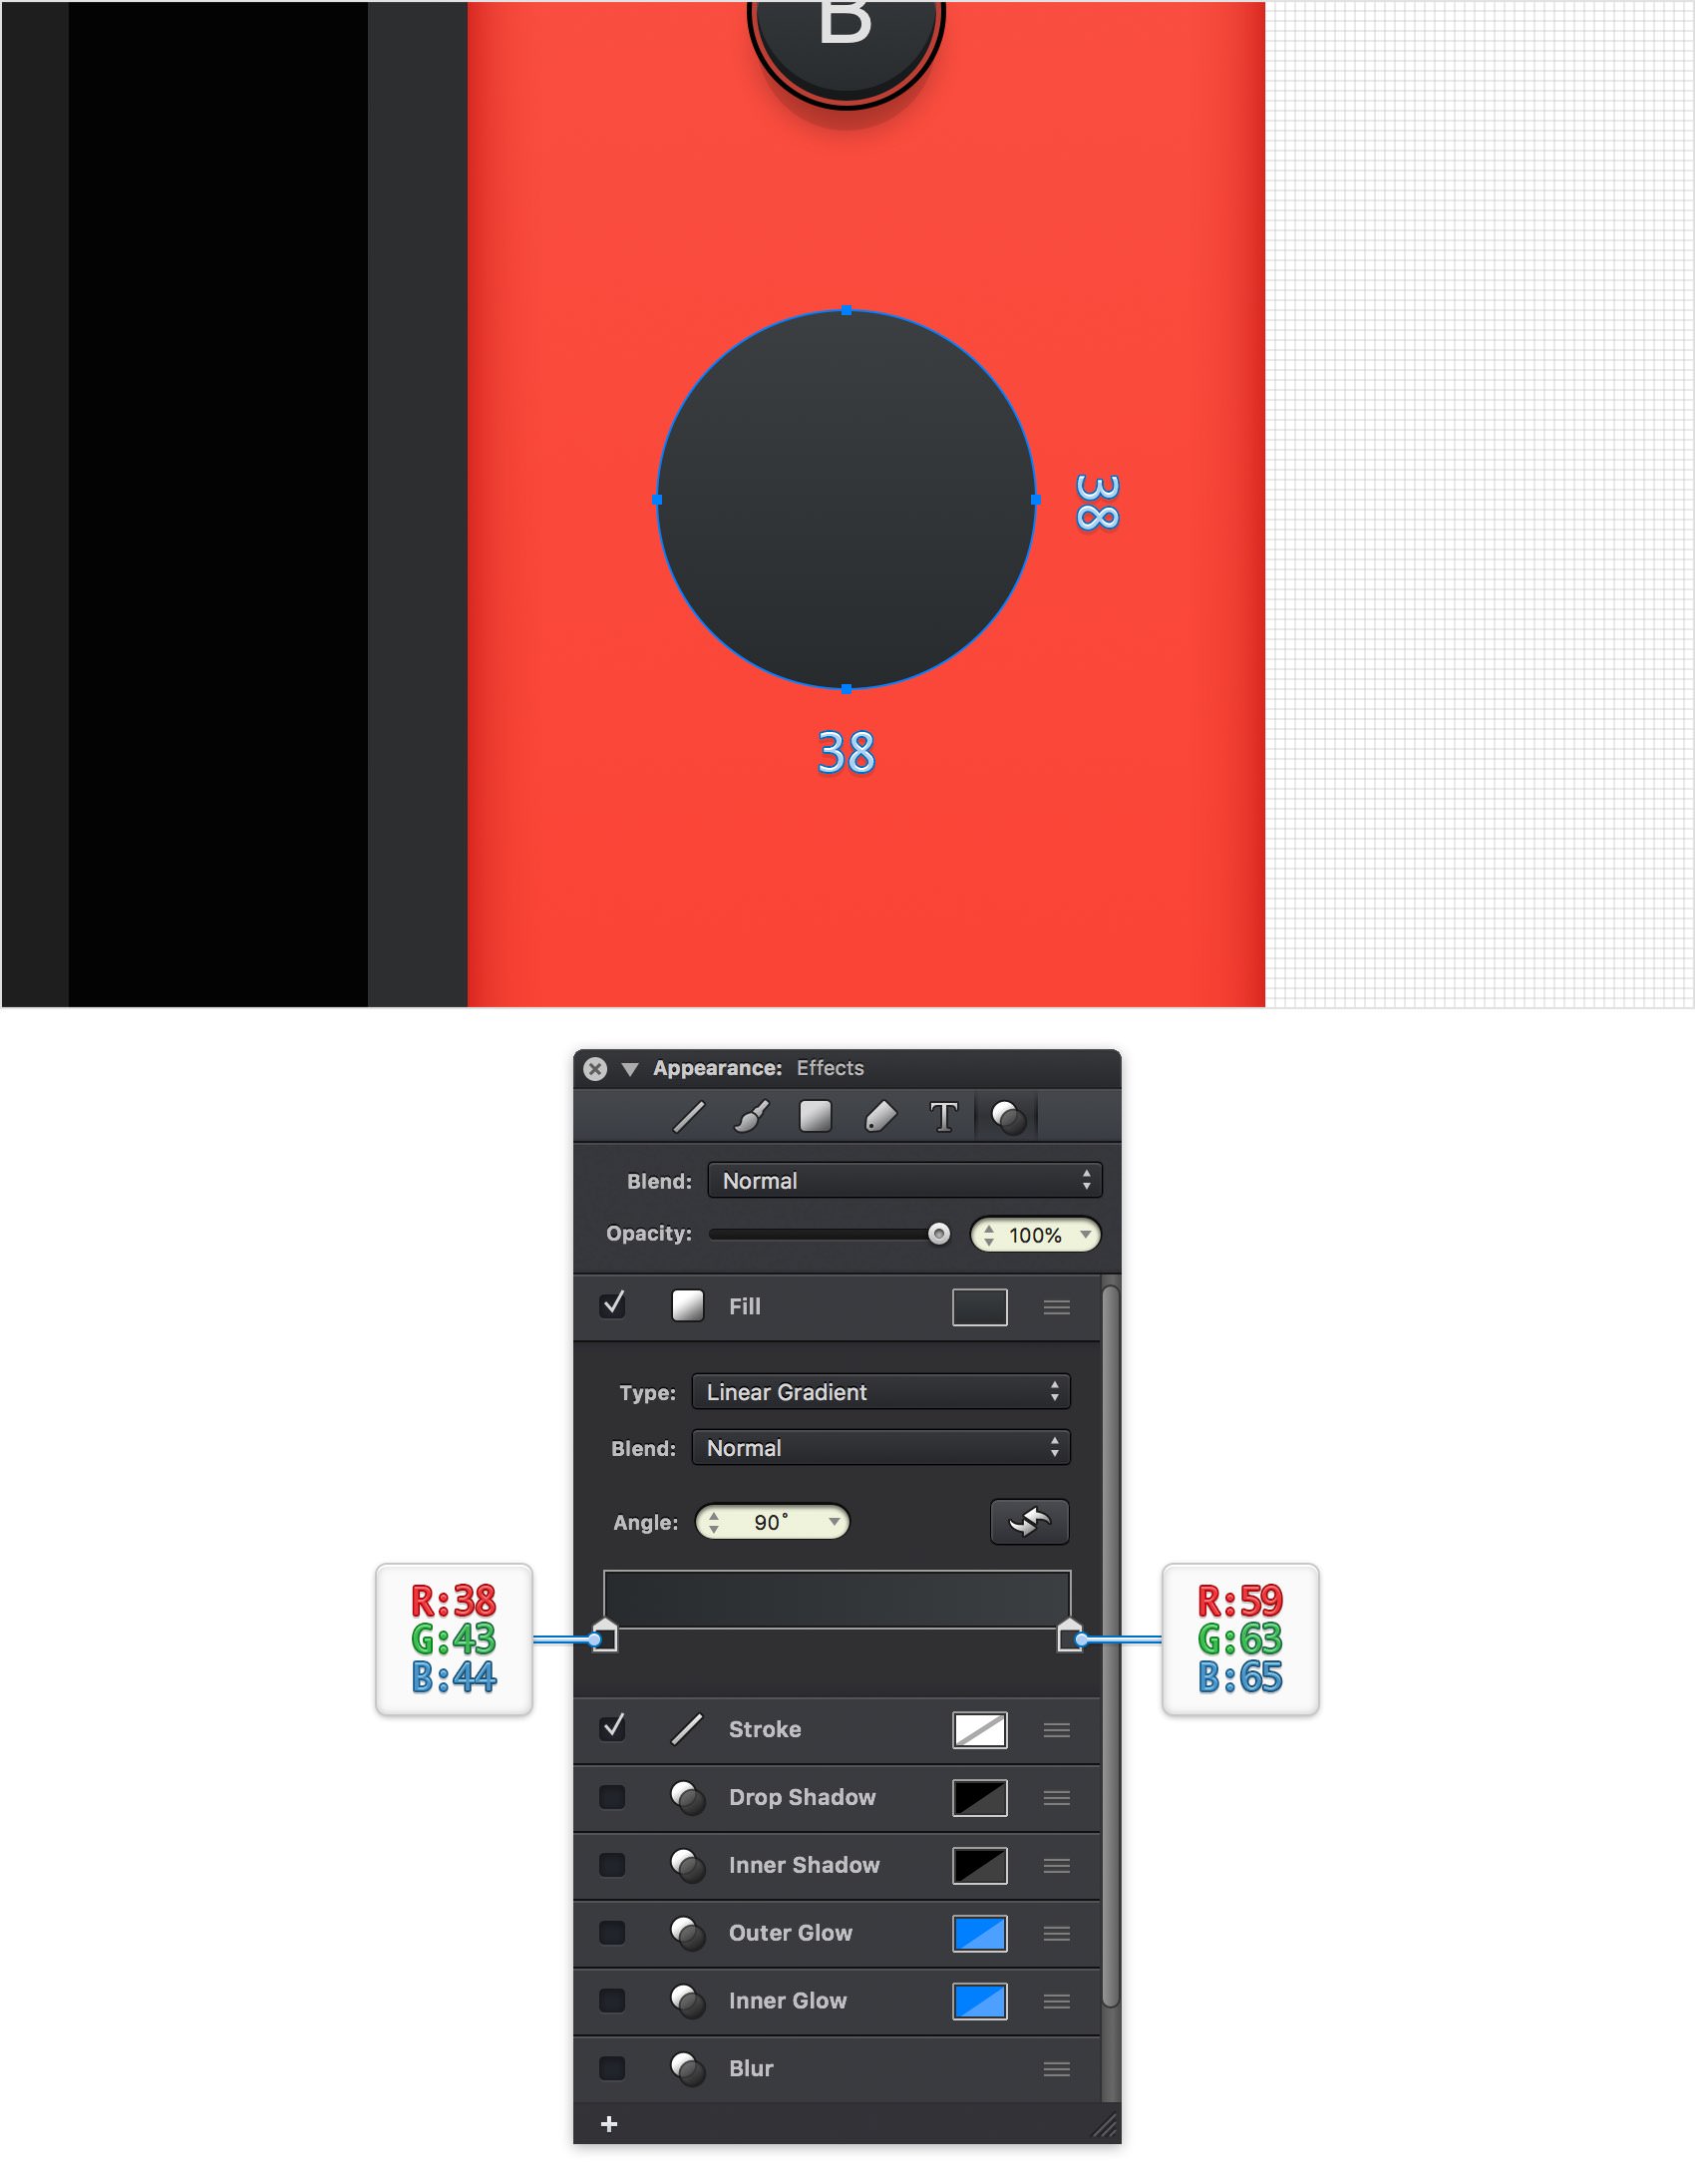
Step 46
Make sure that your new circle stays selected and focus on the Effects pane. Select the Stroke and enter the attributes shown below.
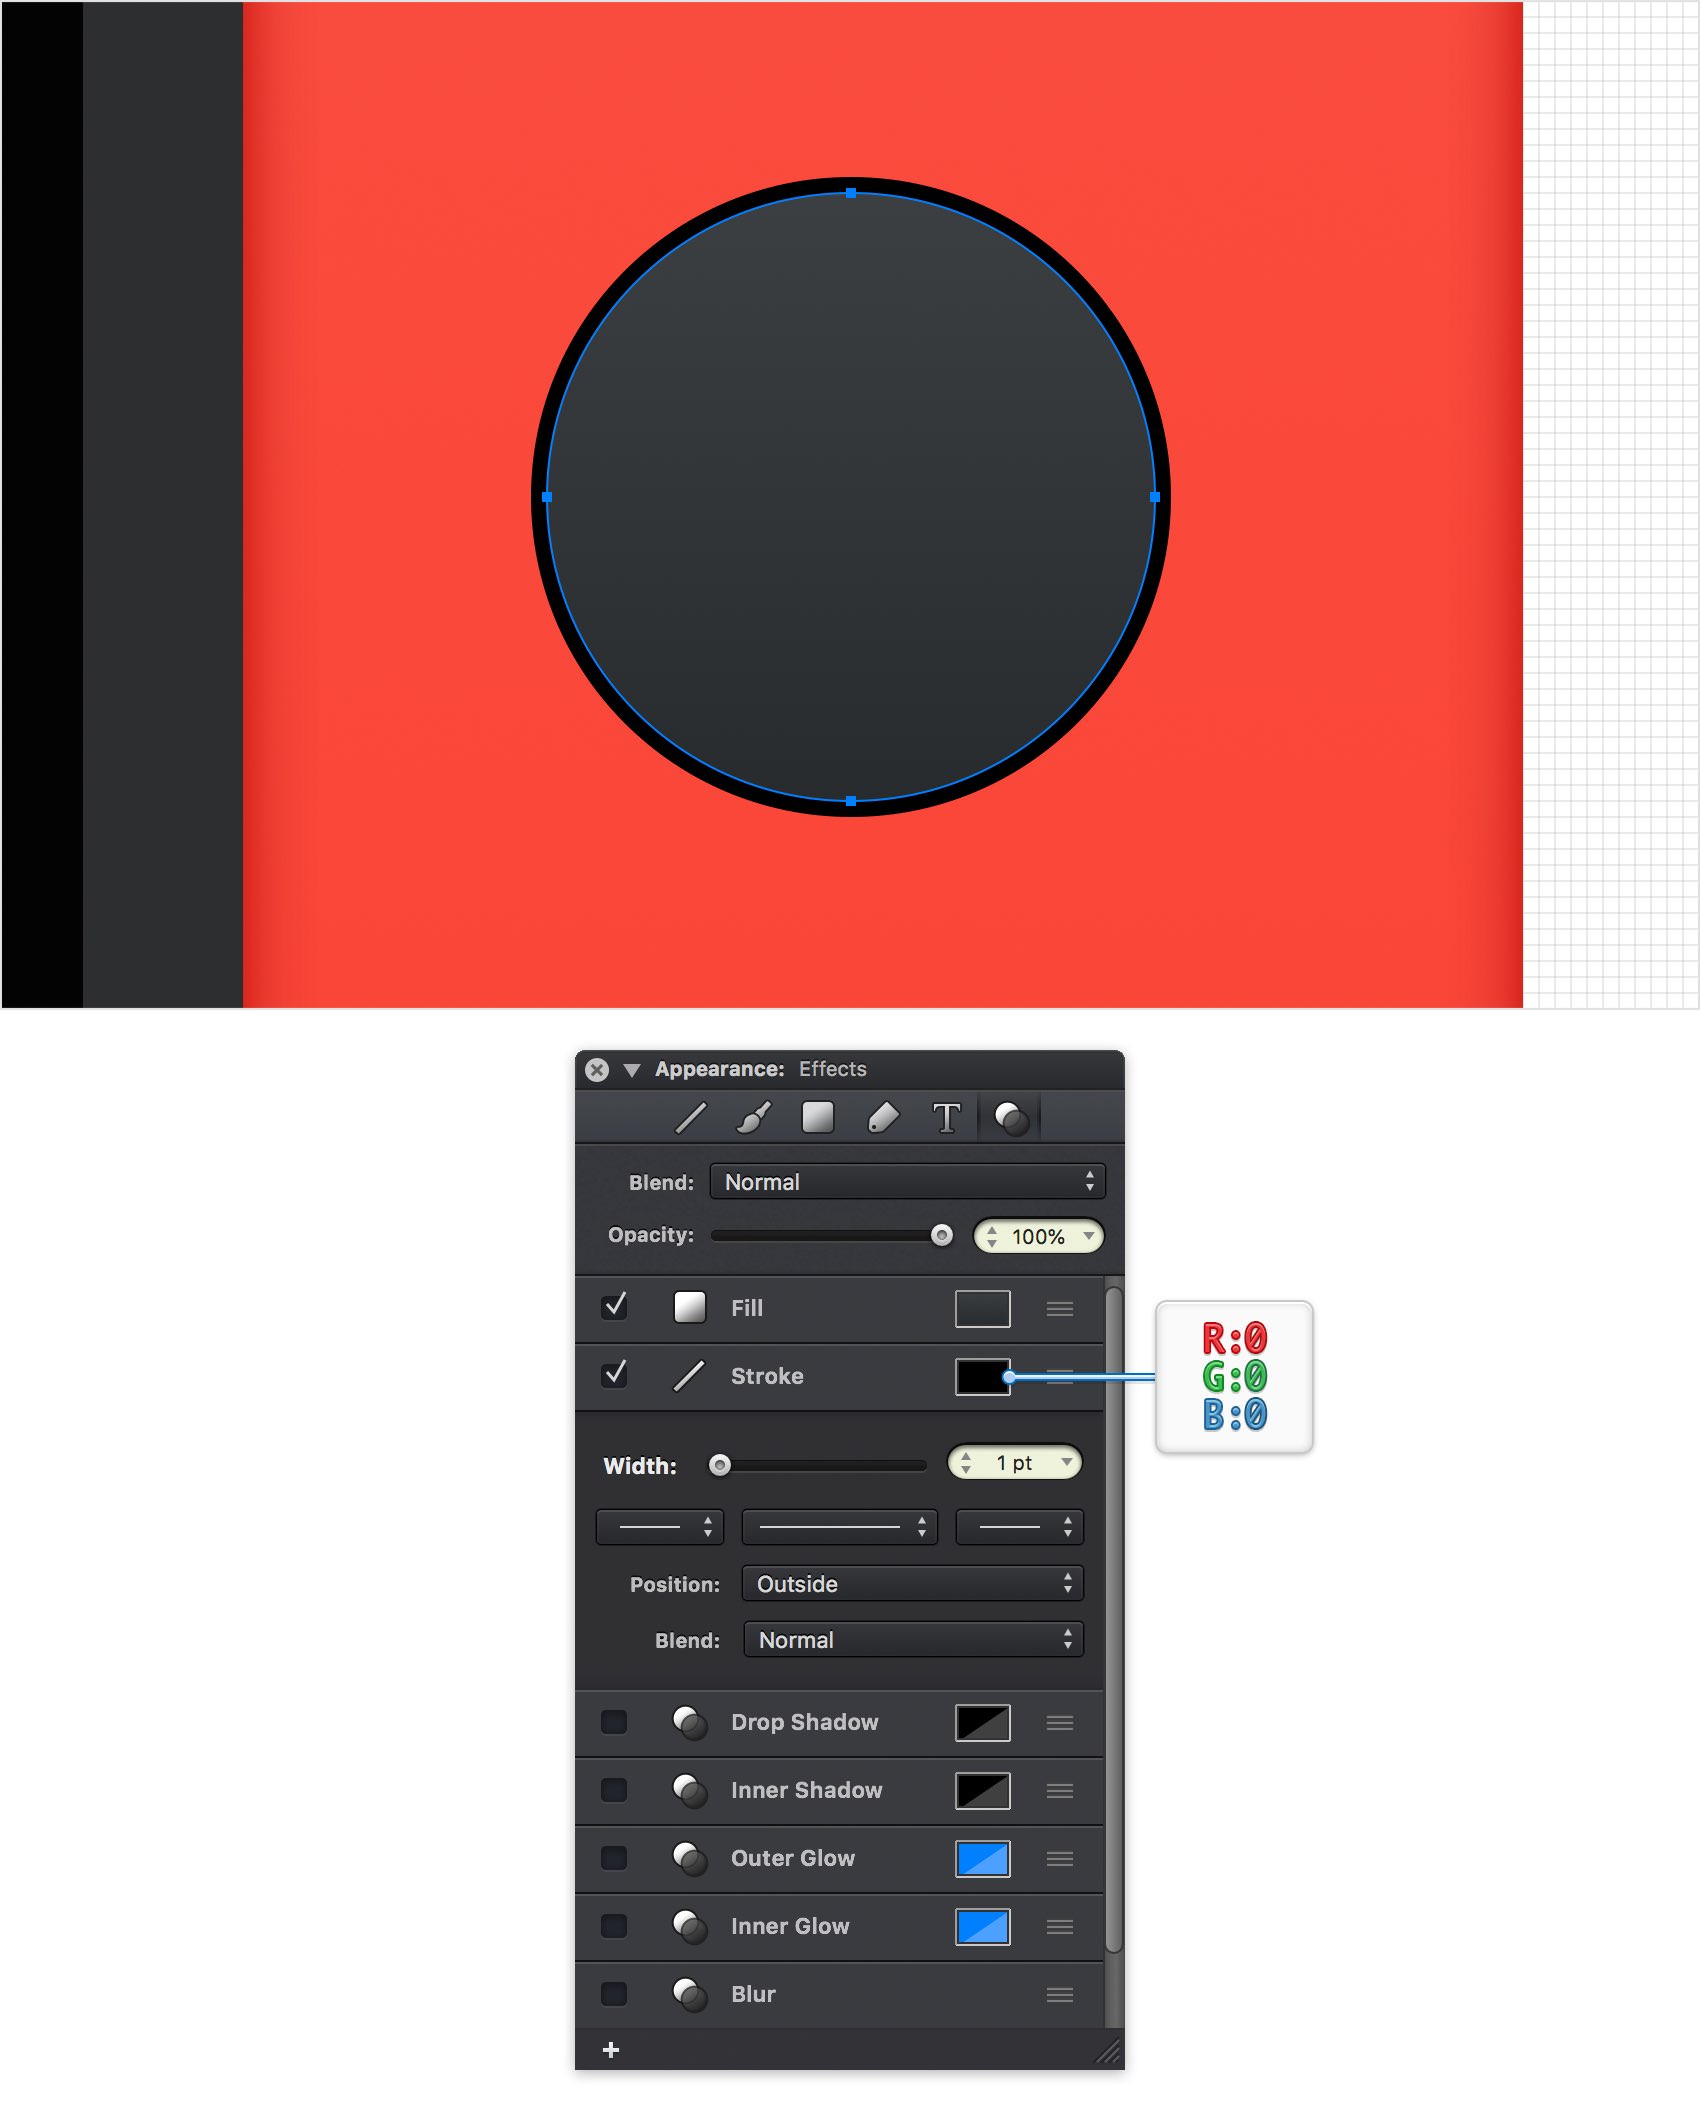
Step 47
Make sure that your circle stays selected and keep focusing on the Effects pane. Activate the Drop Shadow effect, drag it below the Fill and enter the attributes shown below.
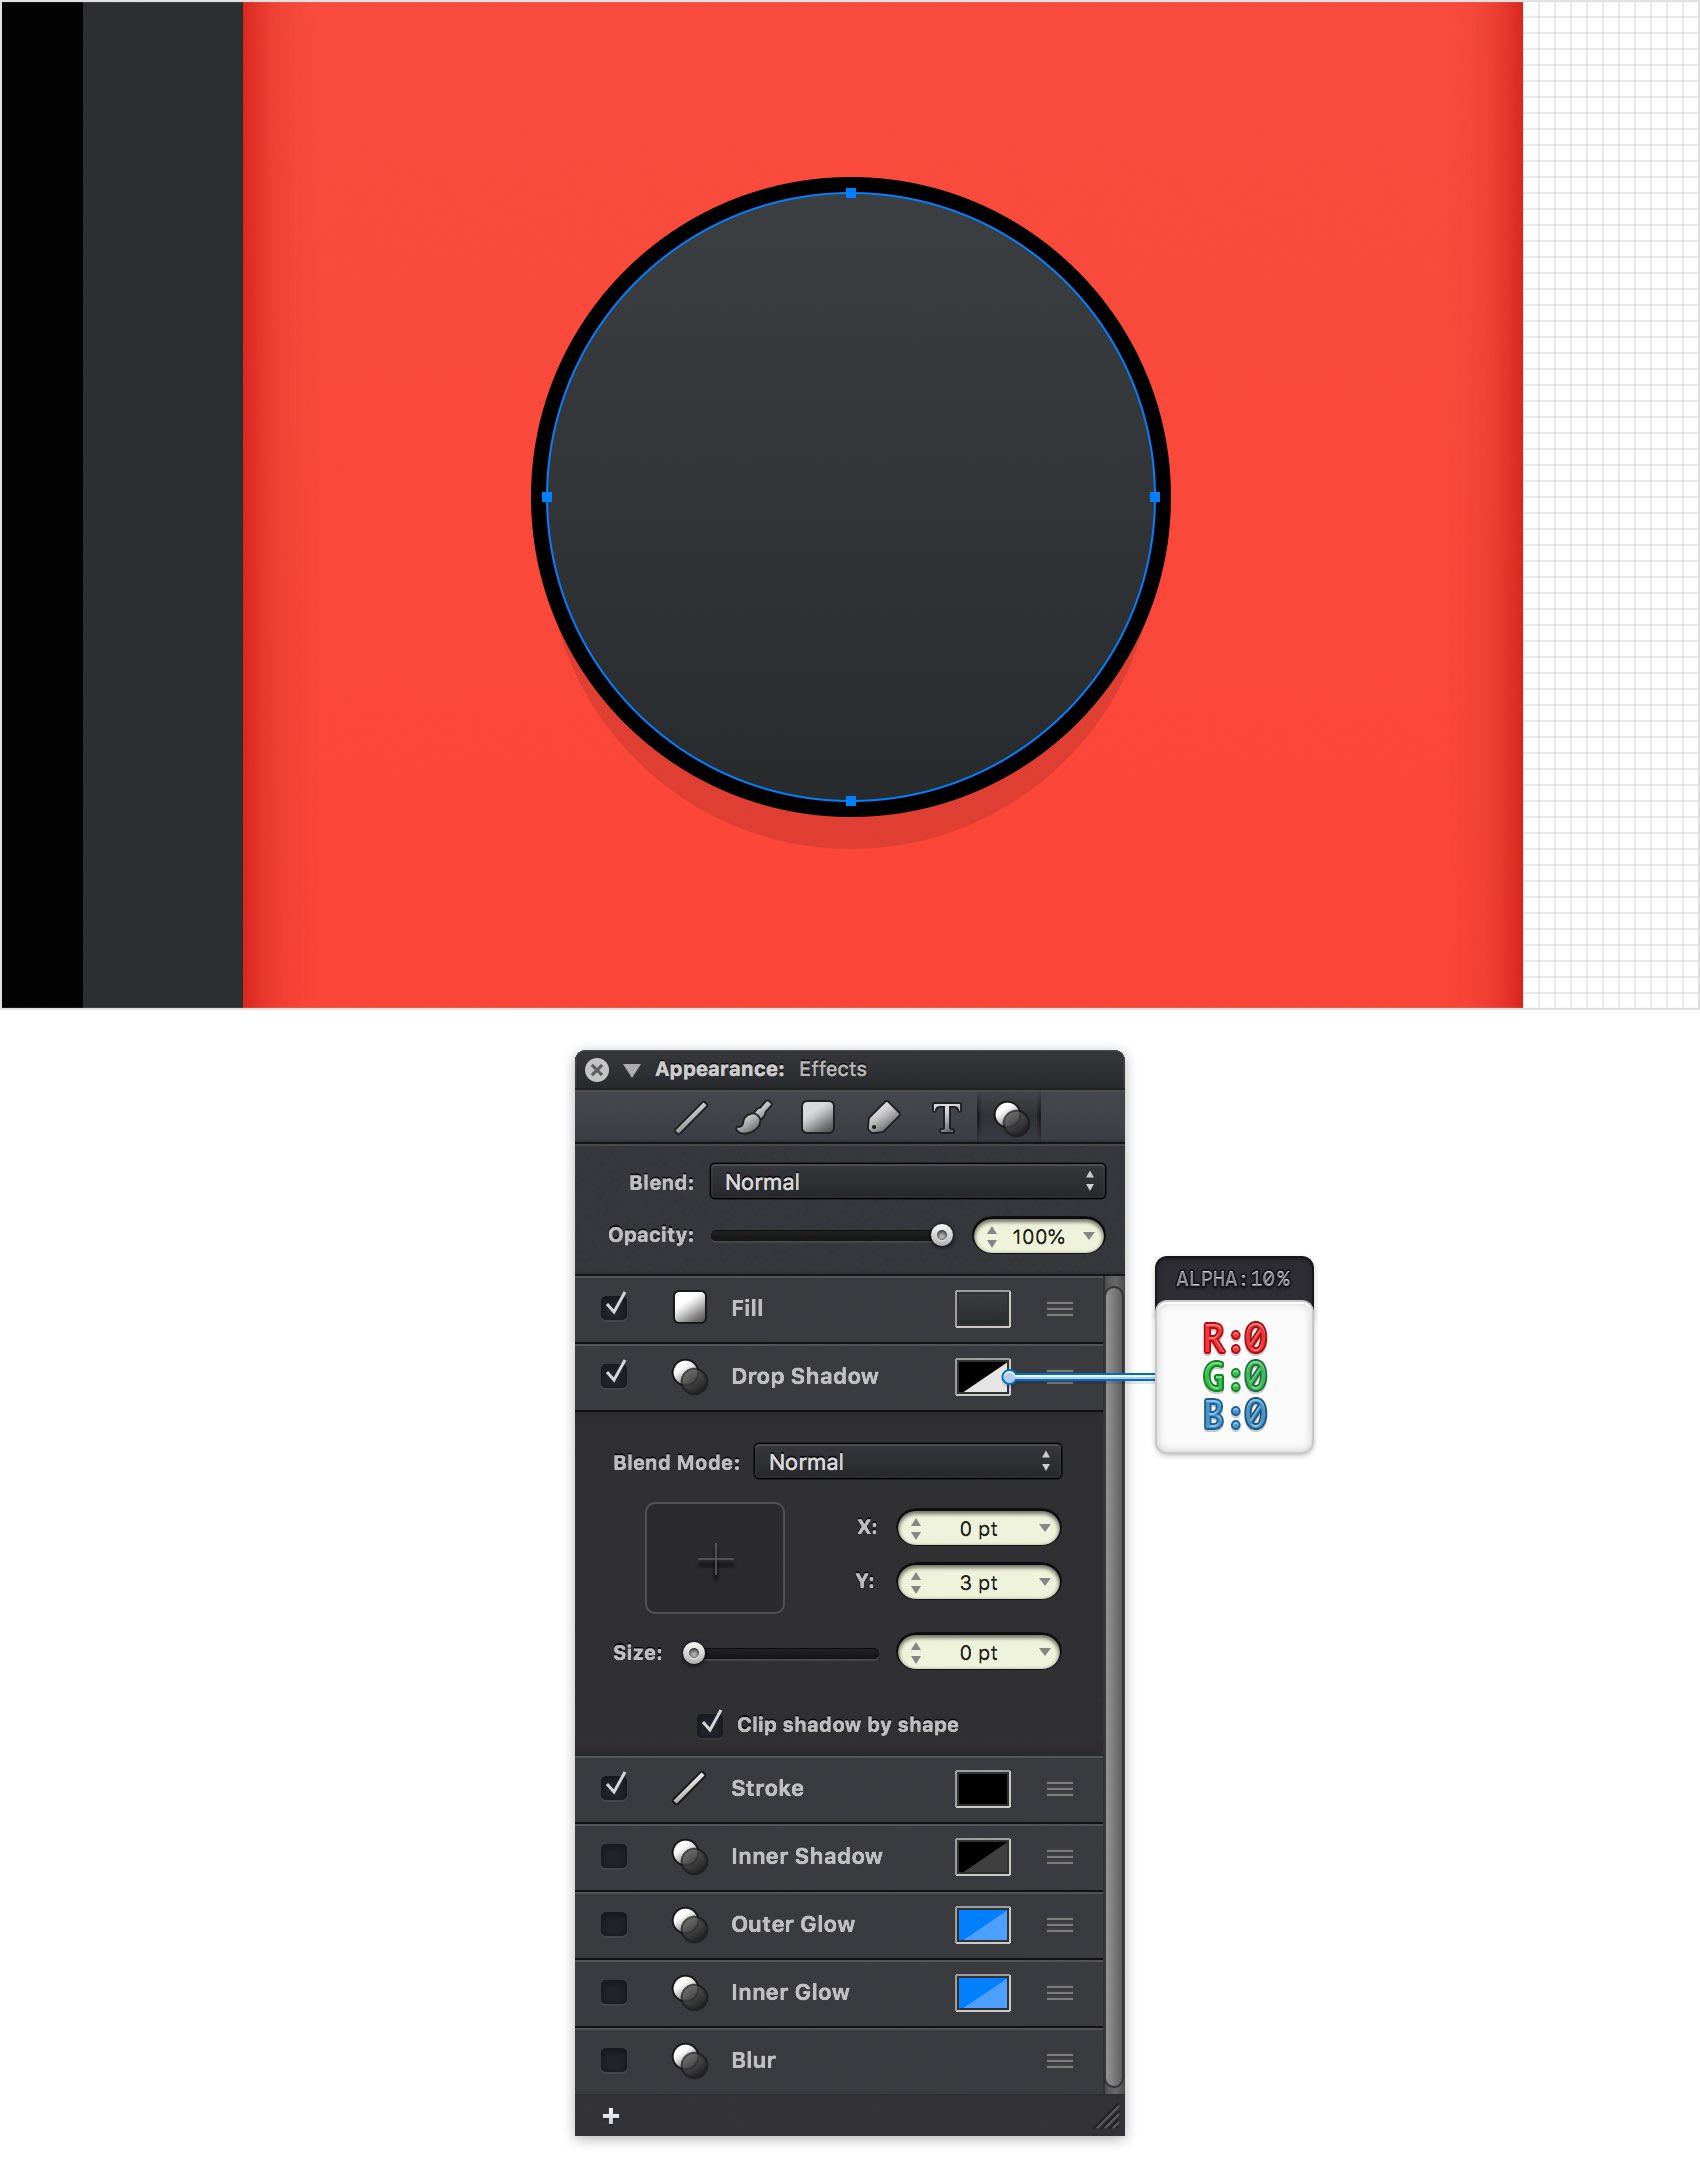
Step 48
Make sure that your circle stays selected and keep focusing on the Effects pane. Add a second Drop Shadow effect, drag it below the first one, and then enter the attributes shown below.
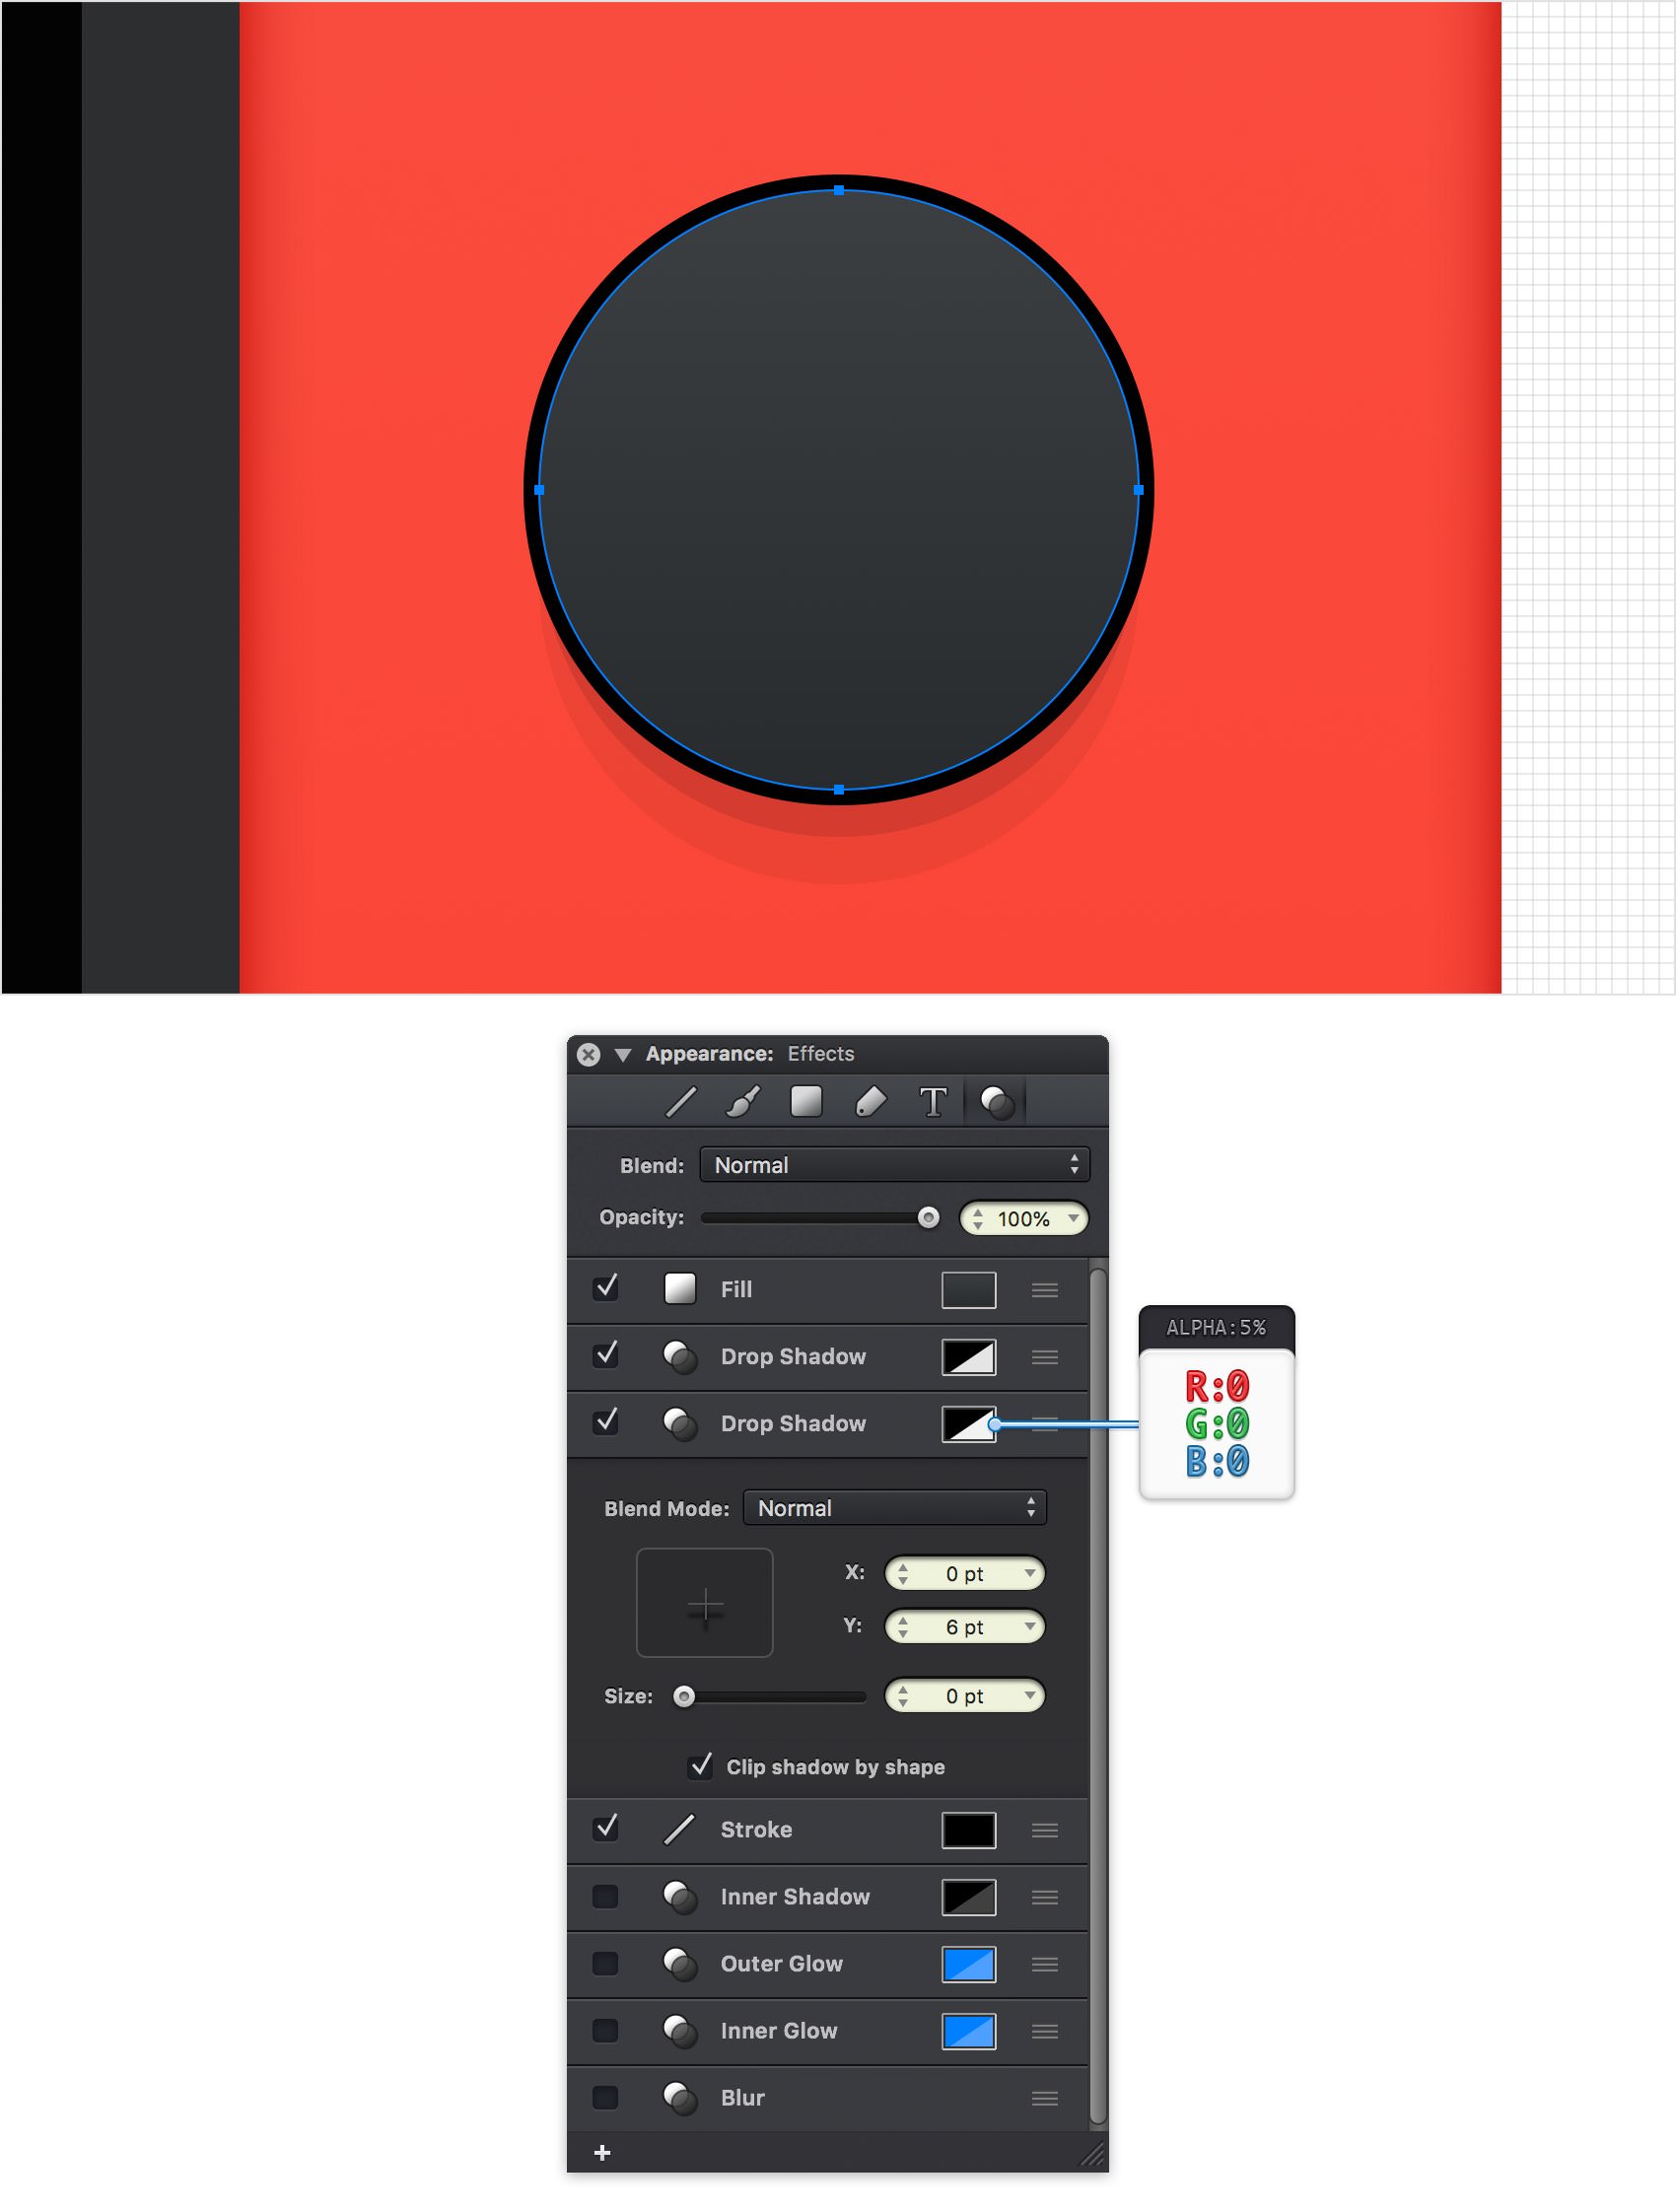
Step 49
Make sure that your circle stays selected and keep focusing on the Effects pane. Add a third Drop Shadow effect, drag it below the second one, and then enter the attributes shown below.
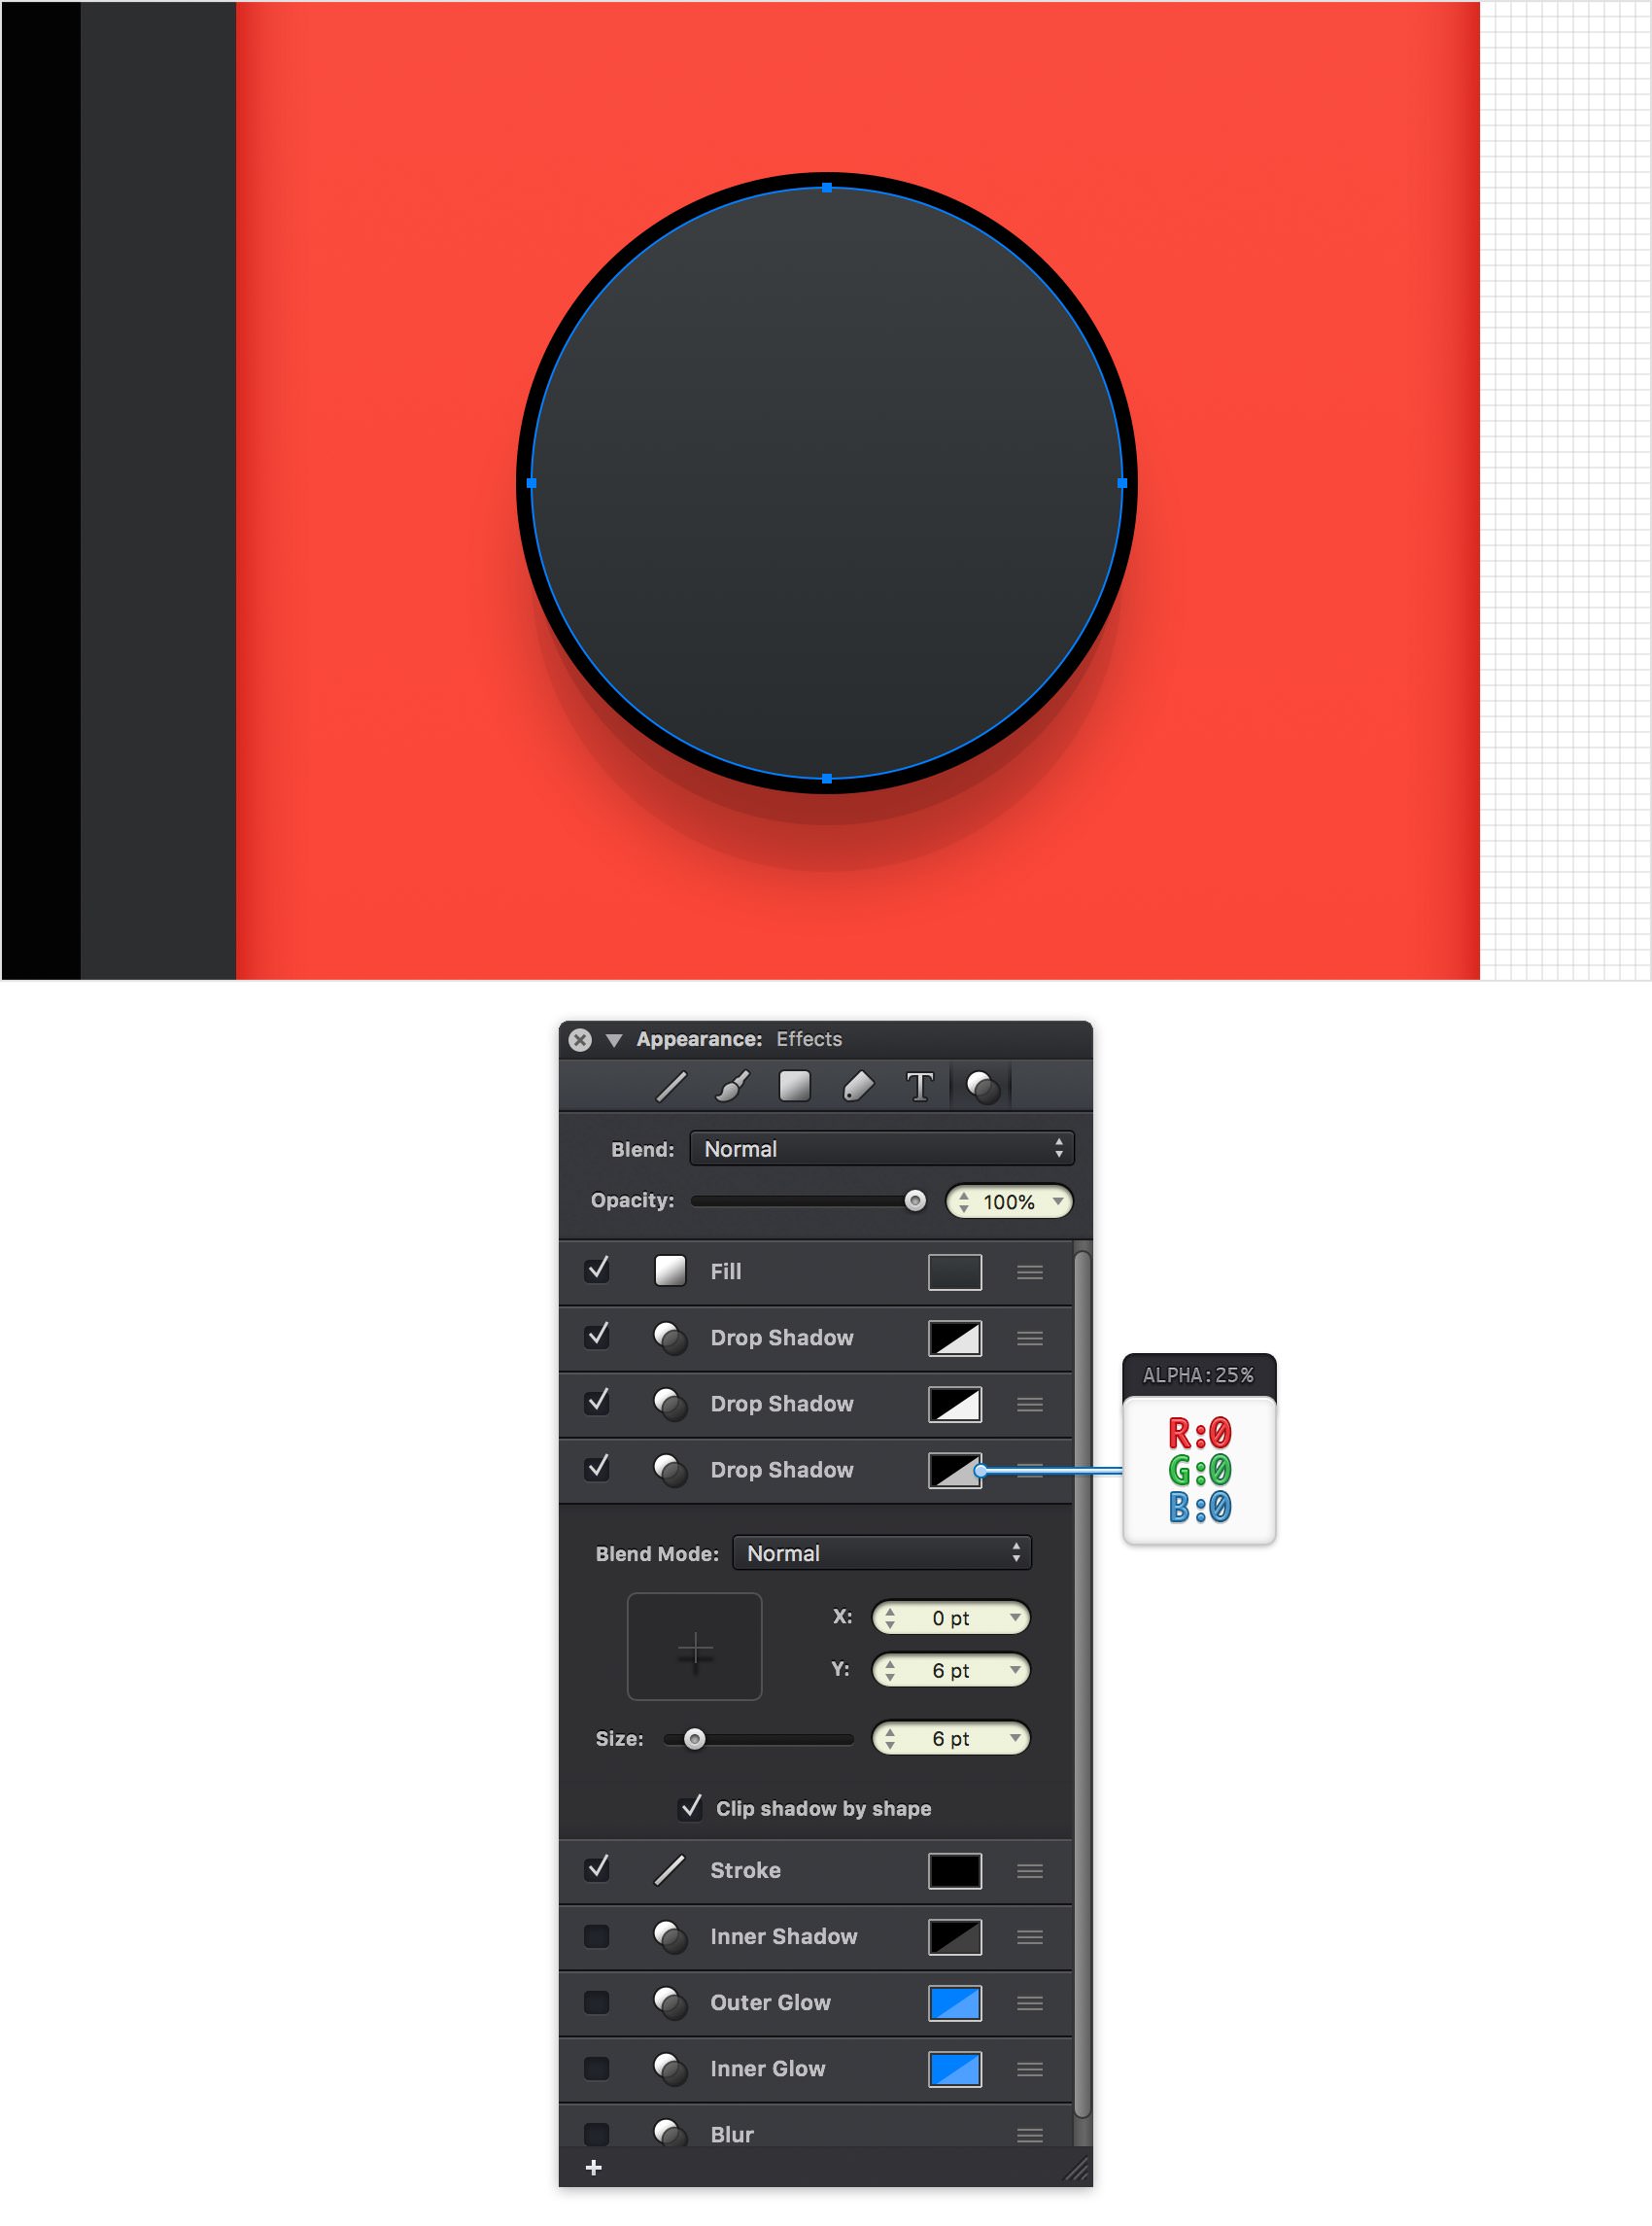
Step 50
Make sure that your circle stays selected and keep focusing on the Effects pane. Activate the Inner Shadow effect, drag it below the Fill and enter the attributes shown below.
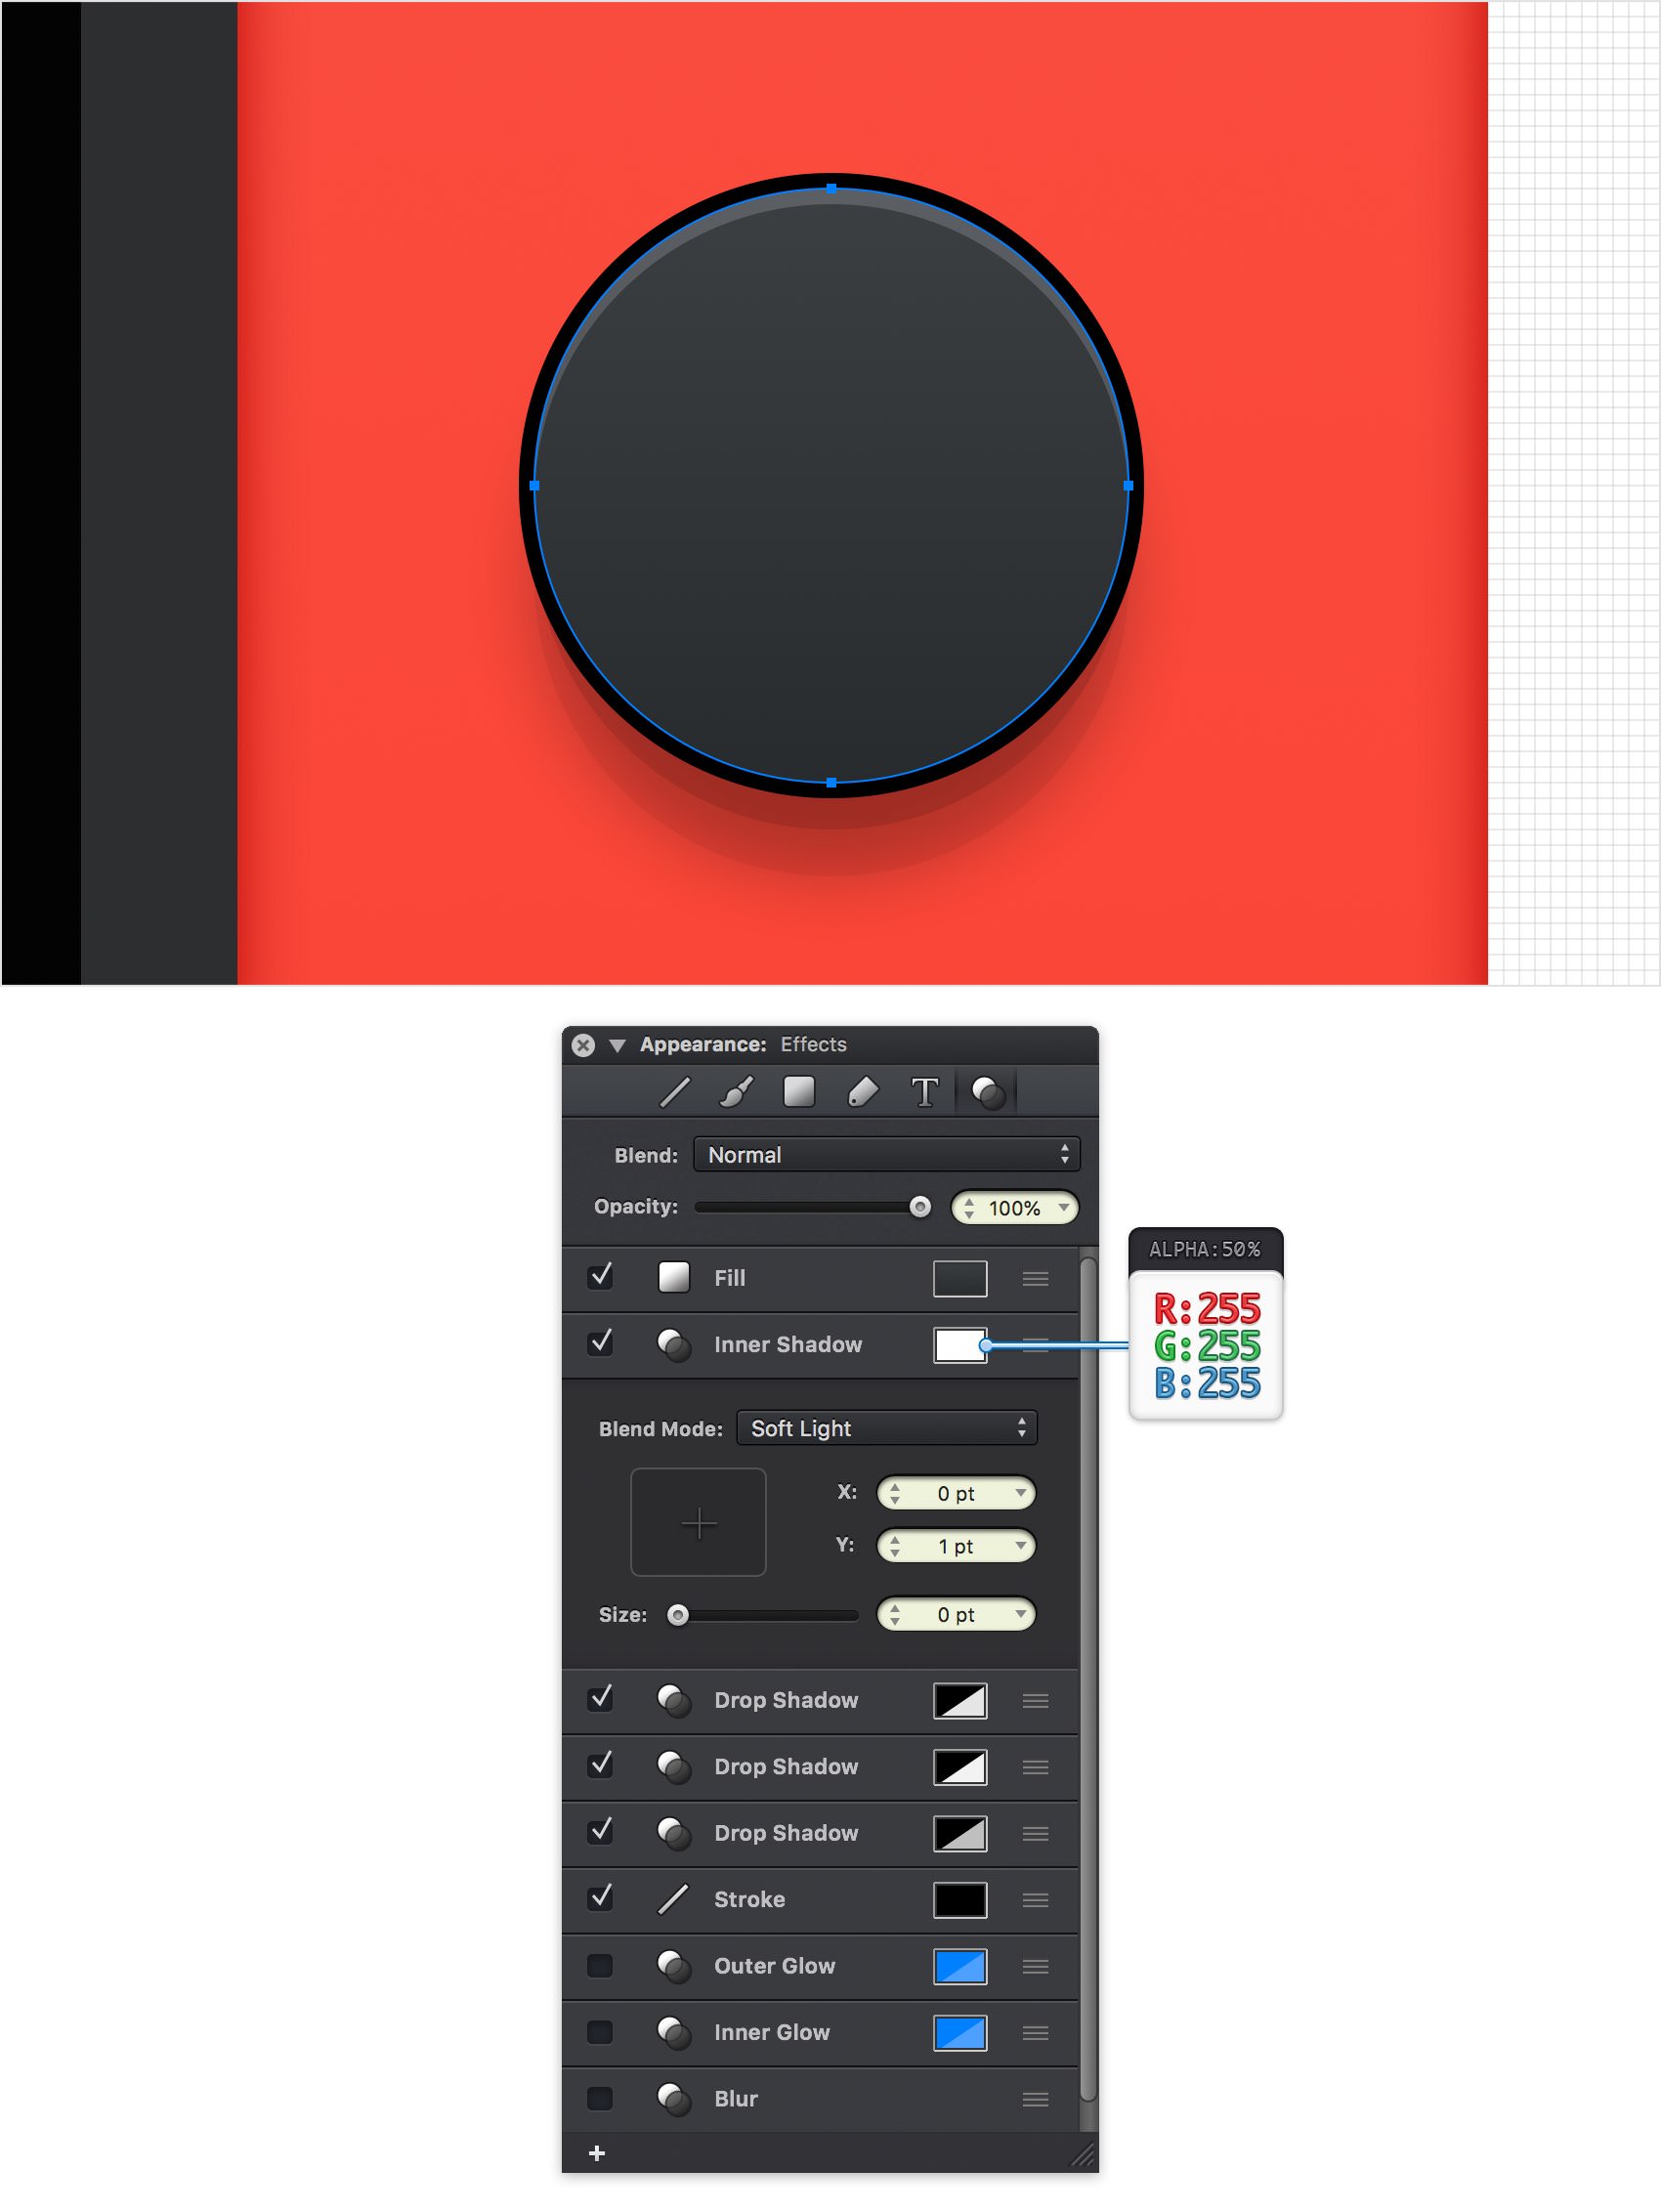
Step 51
Make sure that your circle stays selected and keep focusing on the Effects pane. Add a second Inner Shadow effect, drag it below the first one, and then enter the attributes shown below.
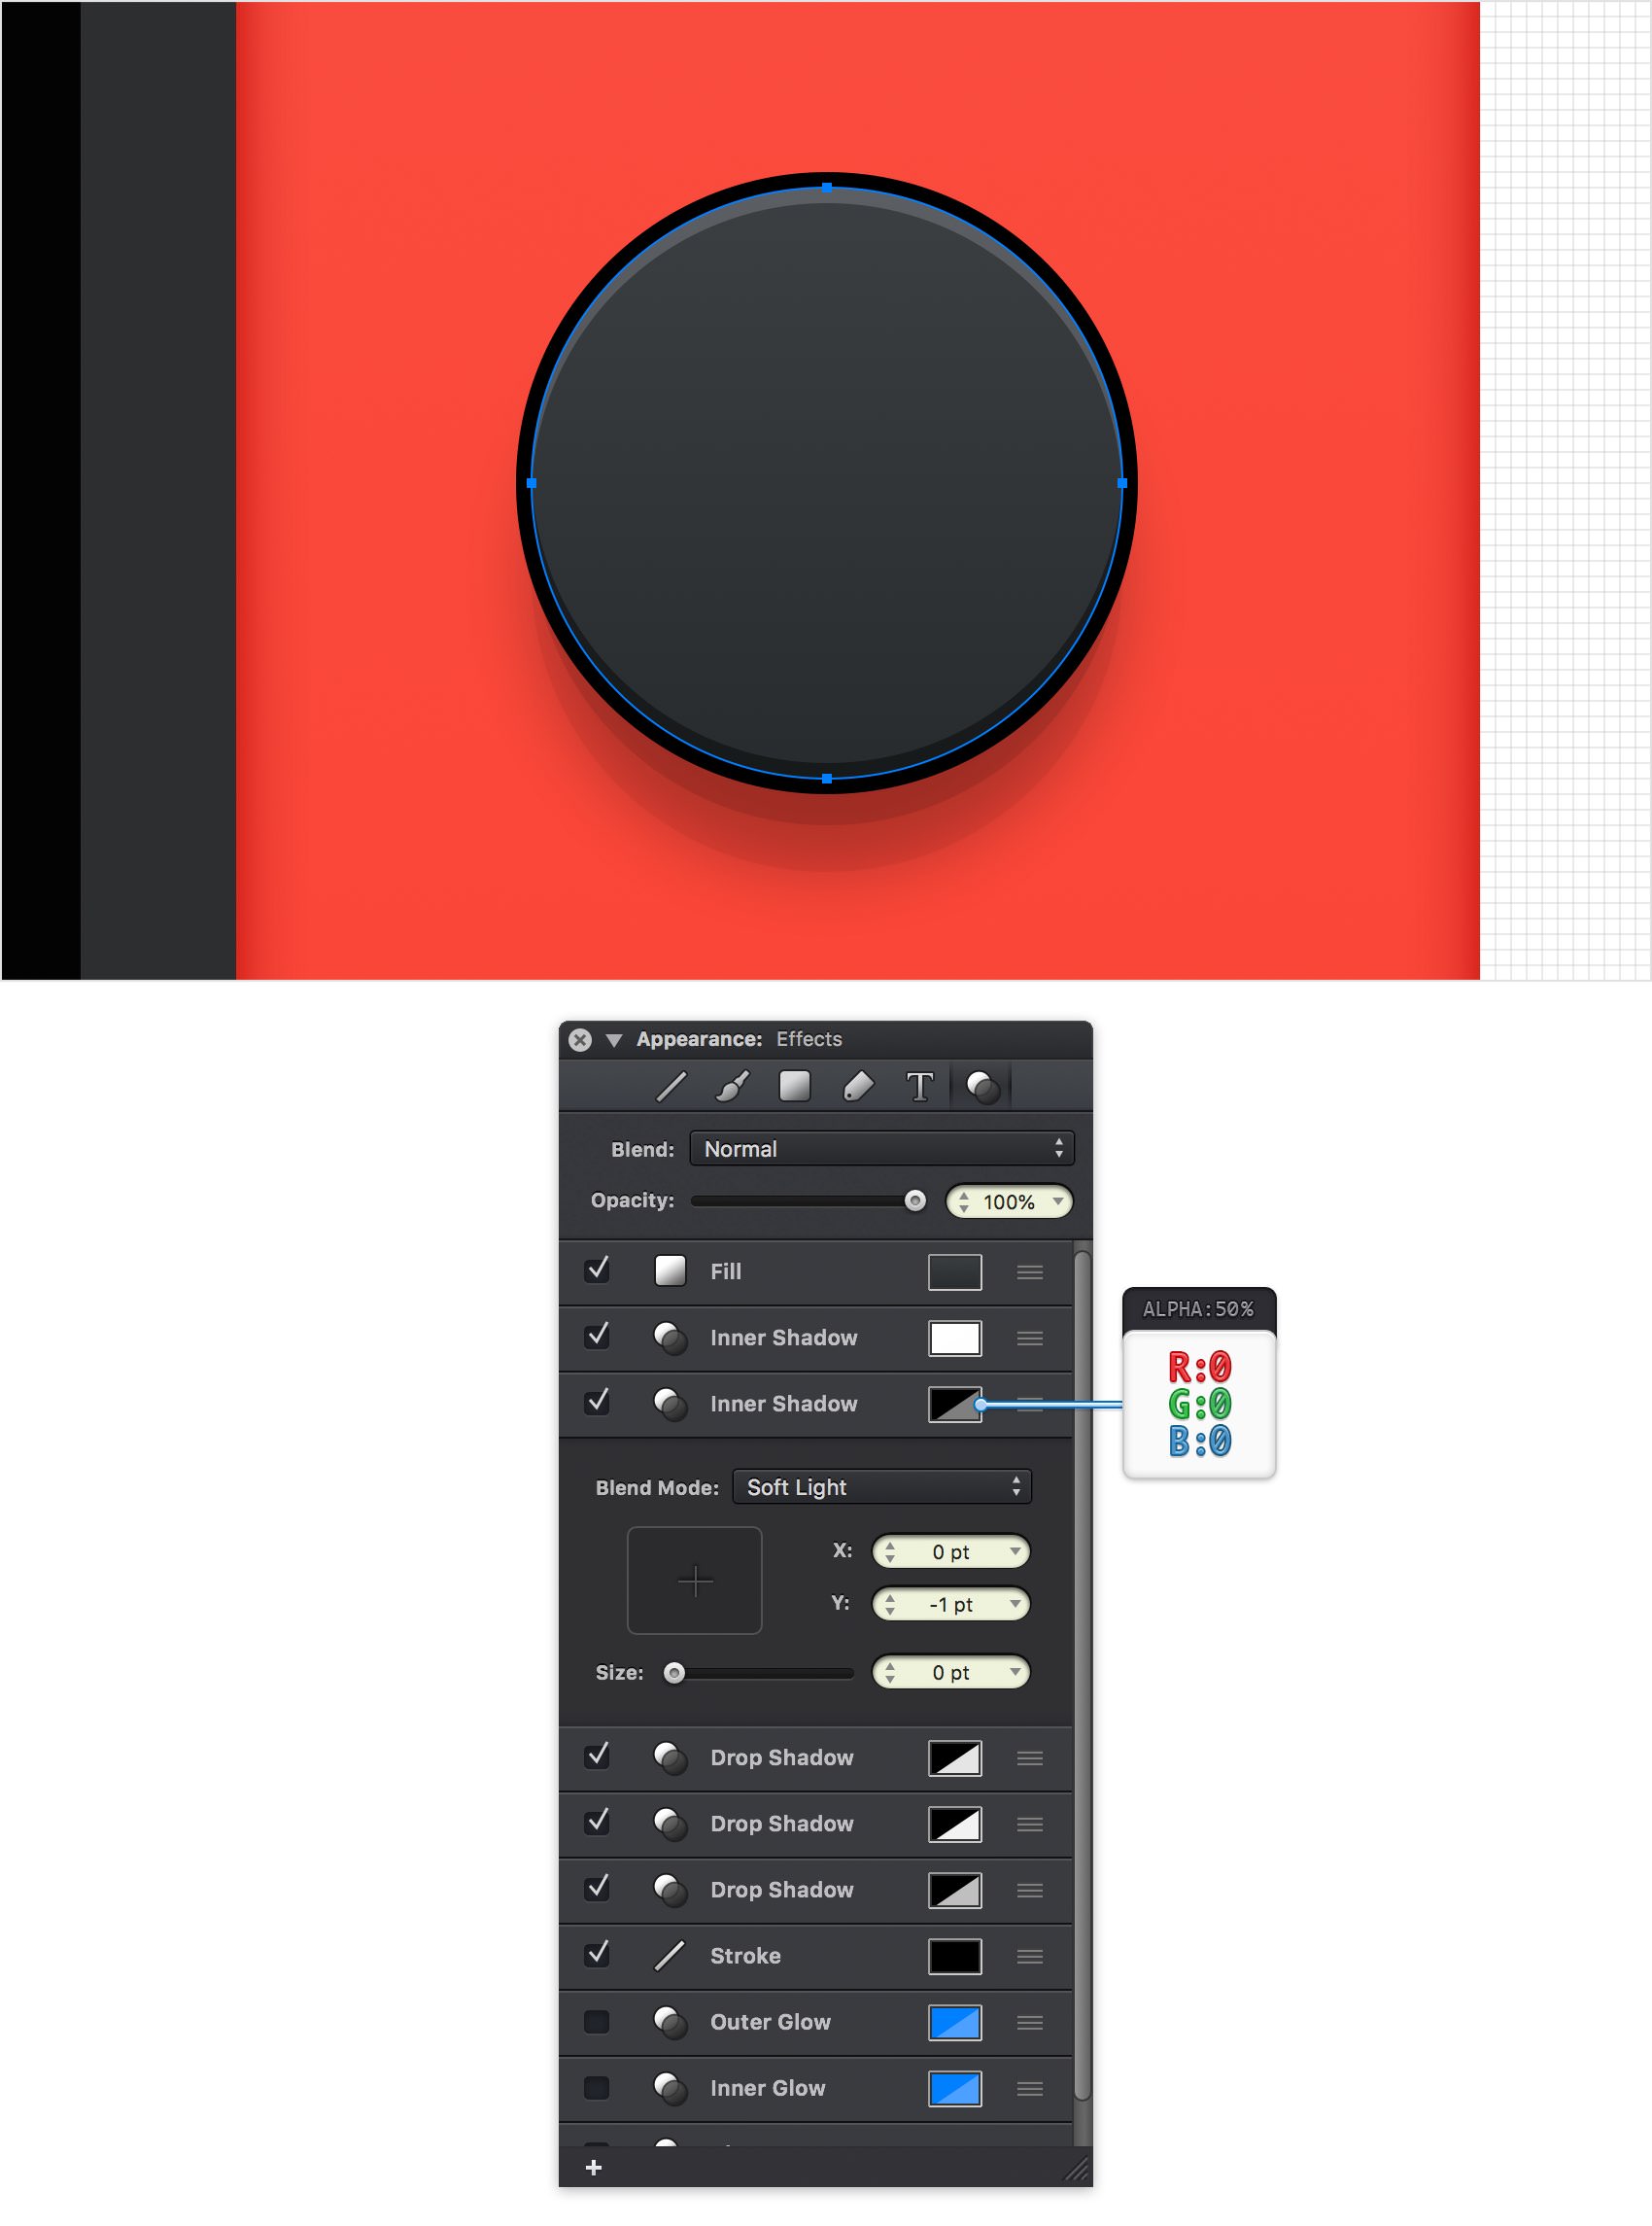
Step 52
Pick the Ellipse Tool (O) and create a 28 px circle. Place this new shape as shown in the following image (X: 619 px Y: 218 px) and fill it with a random red, for now.
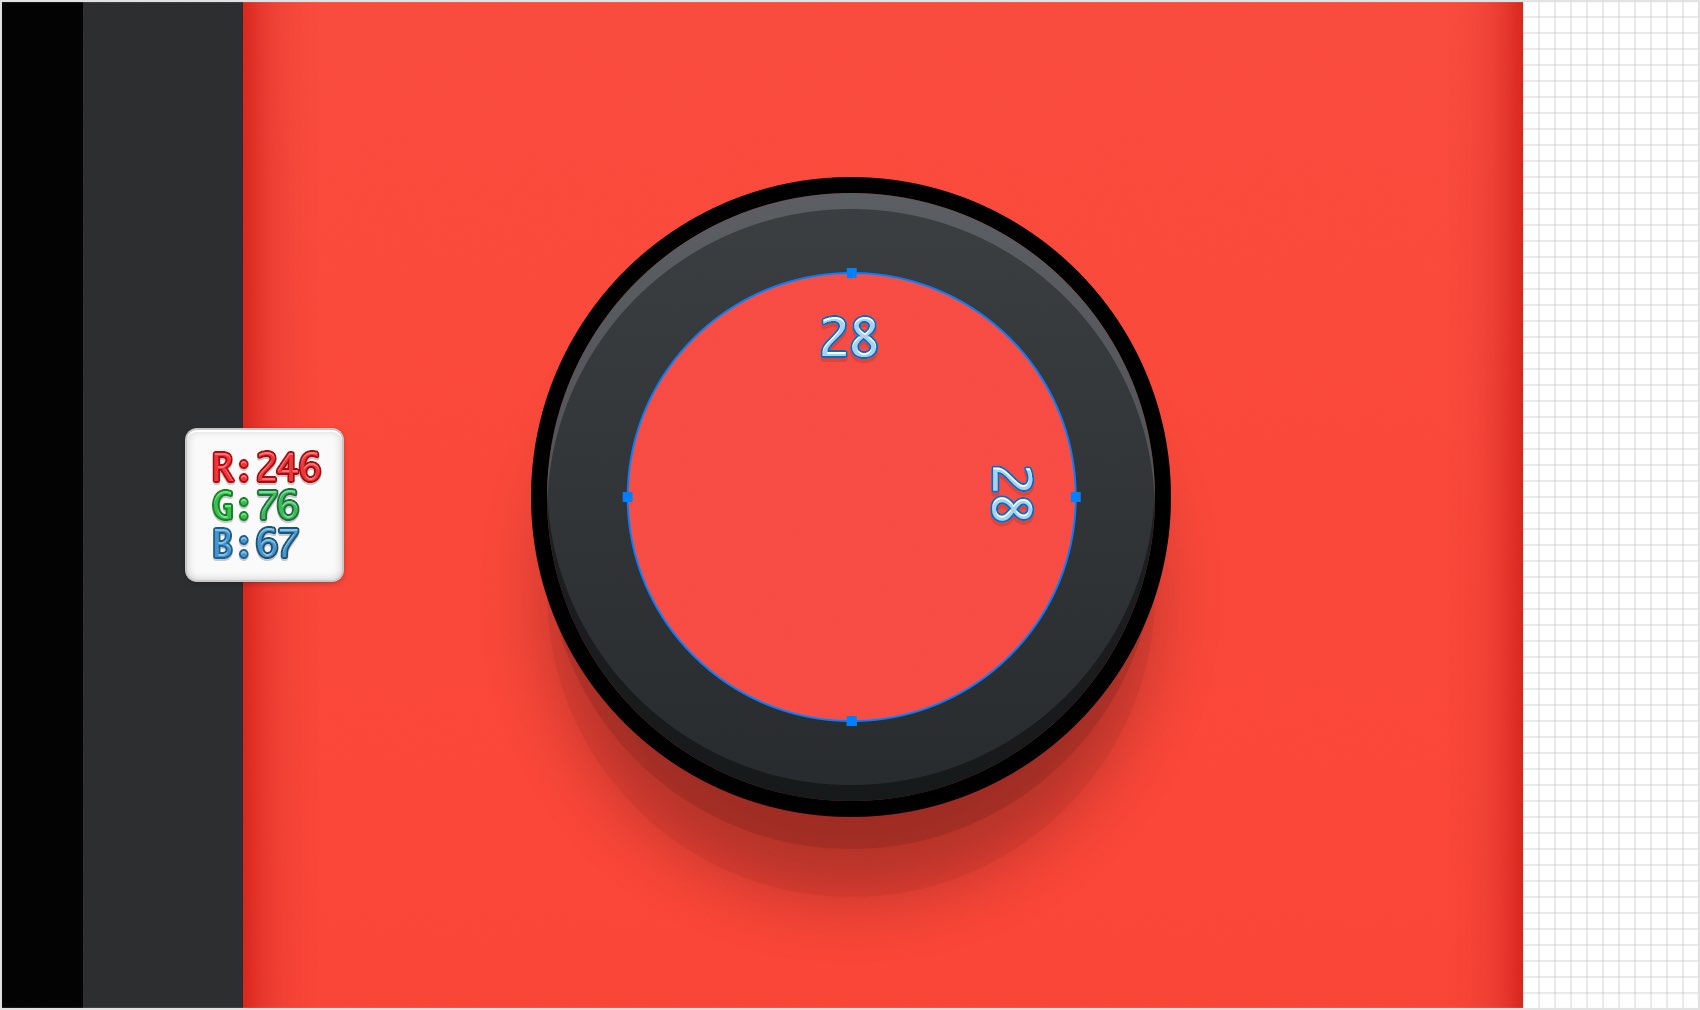
Step 53
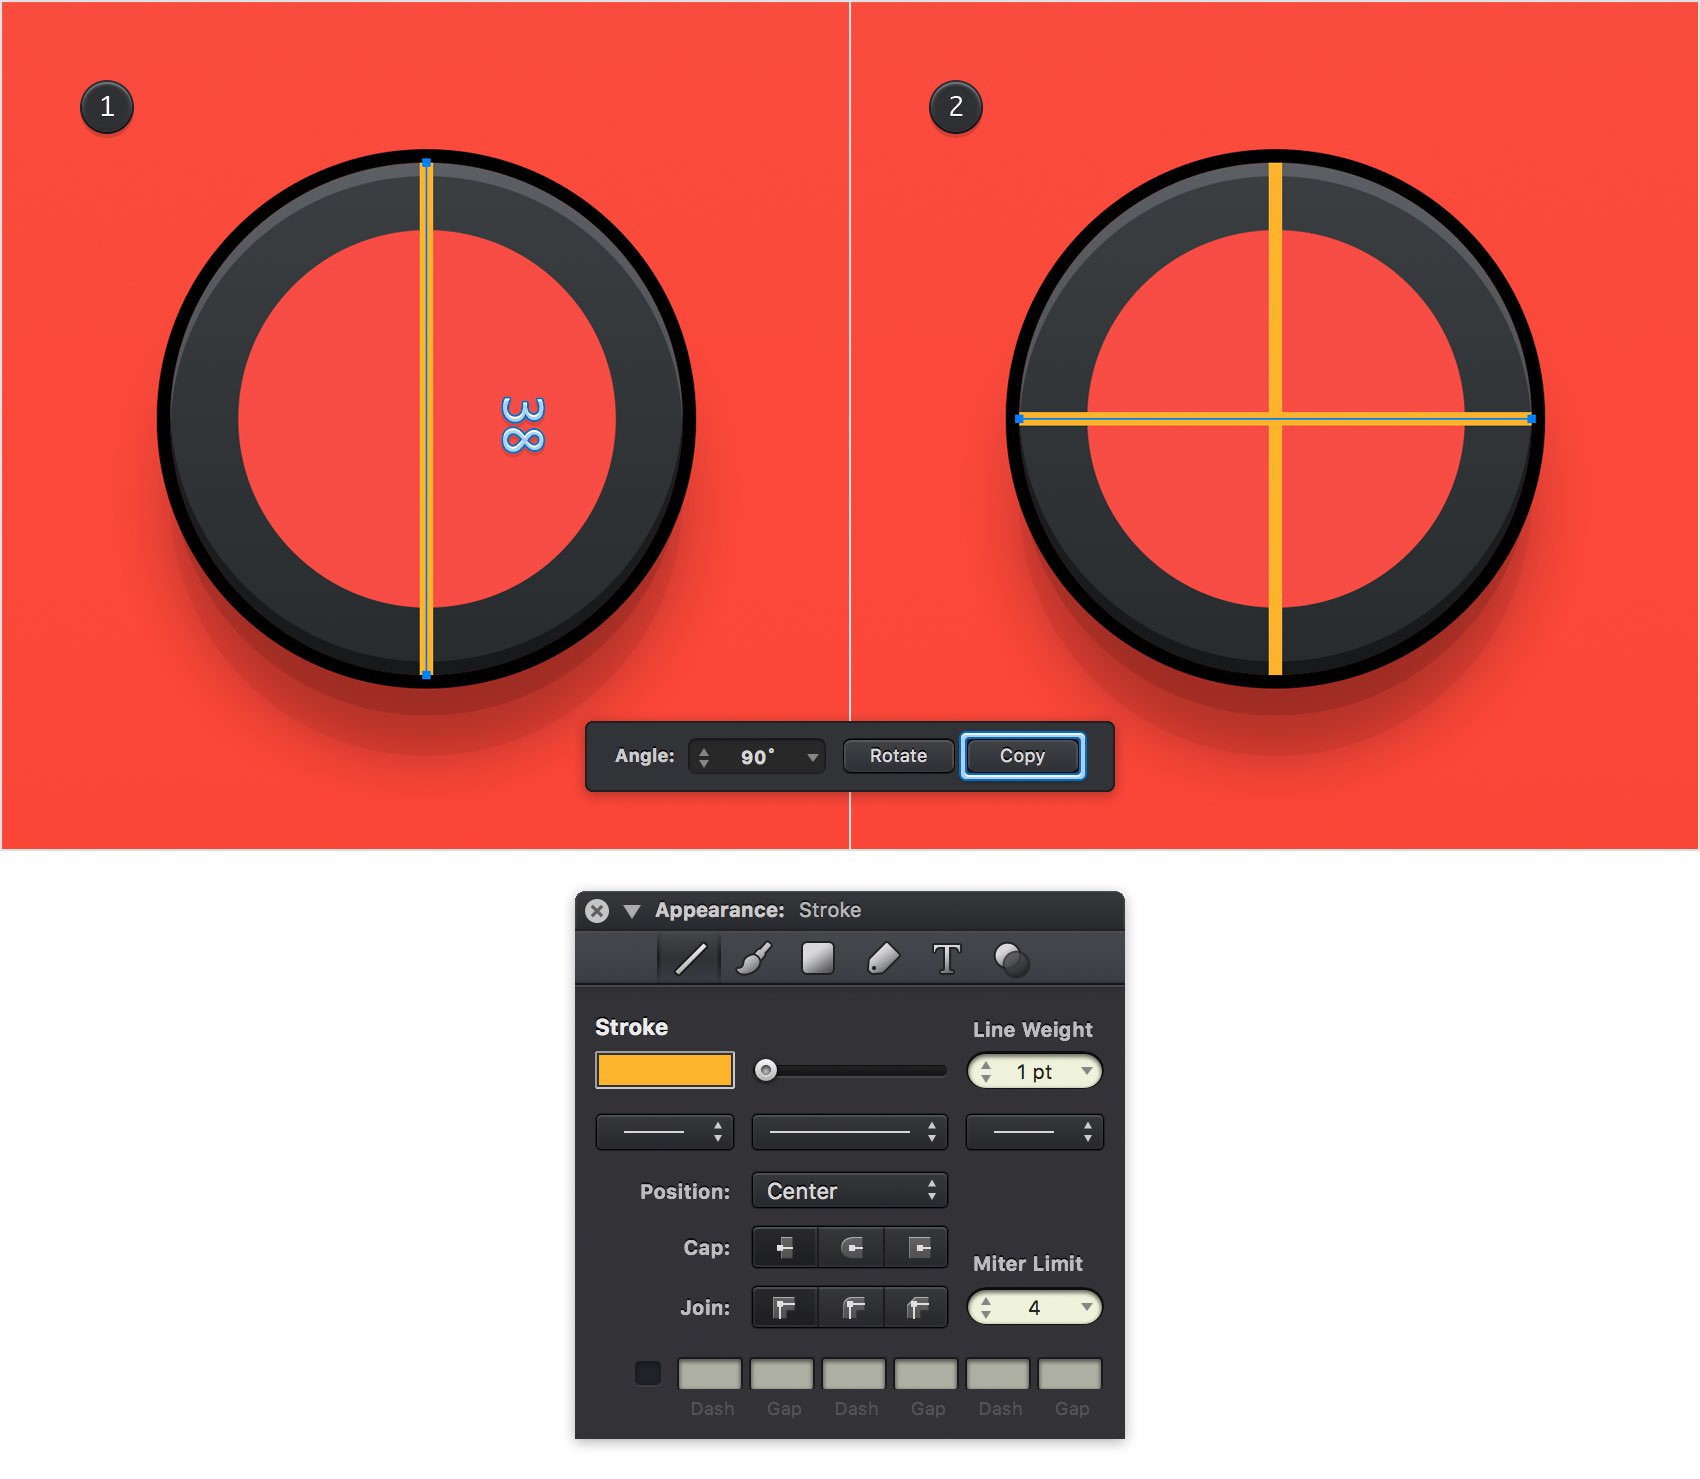
Pick the Line Tool (L) and draw a 38 px, vertical line. Hold the Shift key while dragging to easily create a vertical line. Add a 1 pt Stroke for this new path and pick a random yellow for the color.
Place it as shown in the first image and switch to the Rotate Tool (R). Set the Angle to 90° in the Tool Options bar and then click that Copy button.
Step 54
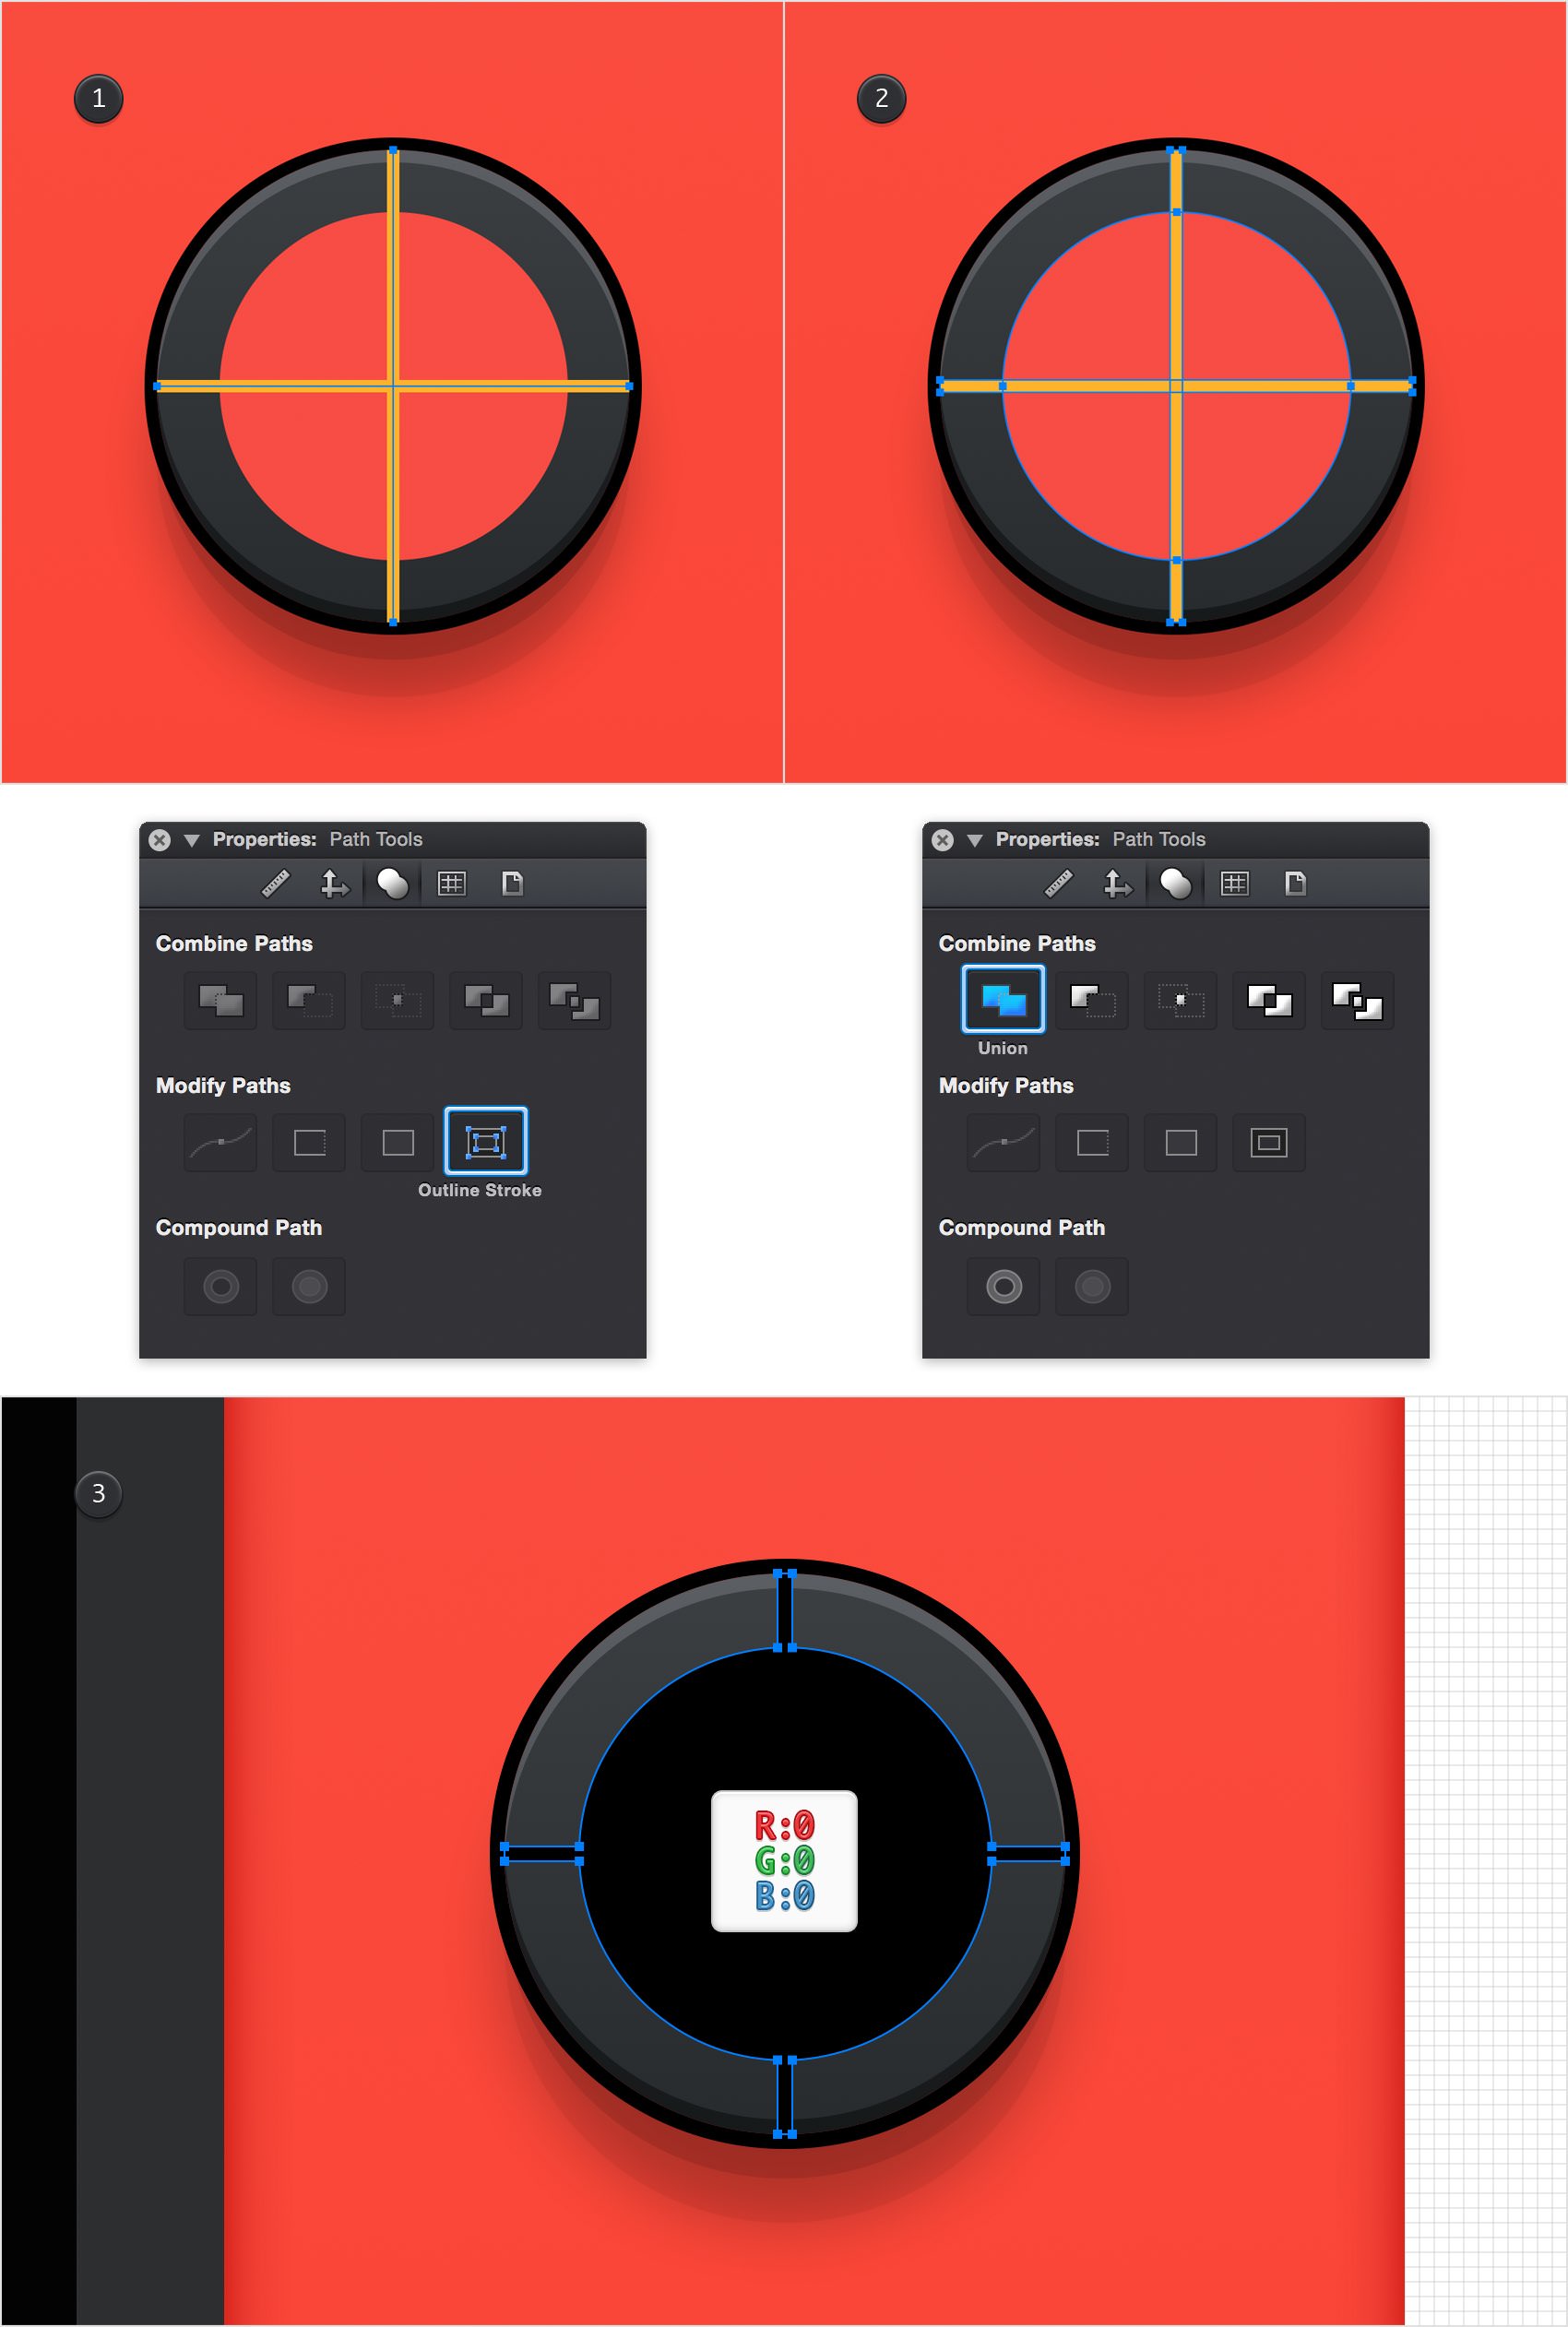
Select both yellow lines and click the Outline Stroke command from the Path Tools pane. Select the resulting yellow shapes along with the red circle and click the Union command from the same Path Tools pane. Fill the resulting shape with black (R=0 G=0 B=0).
Step 55
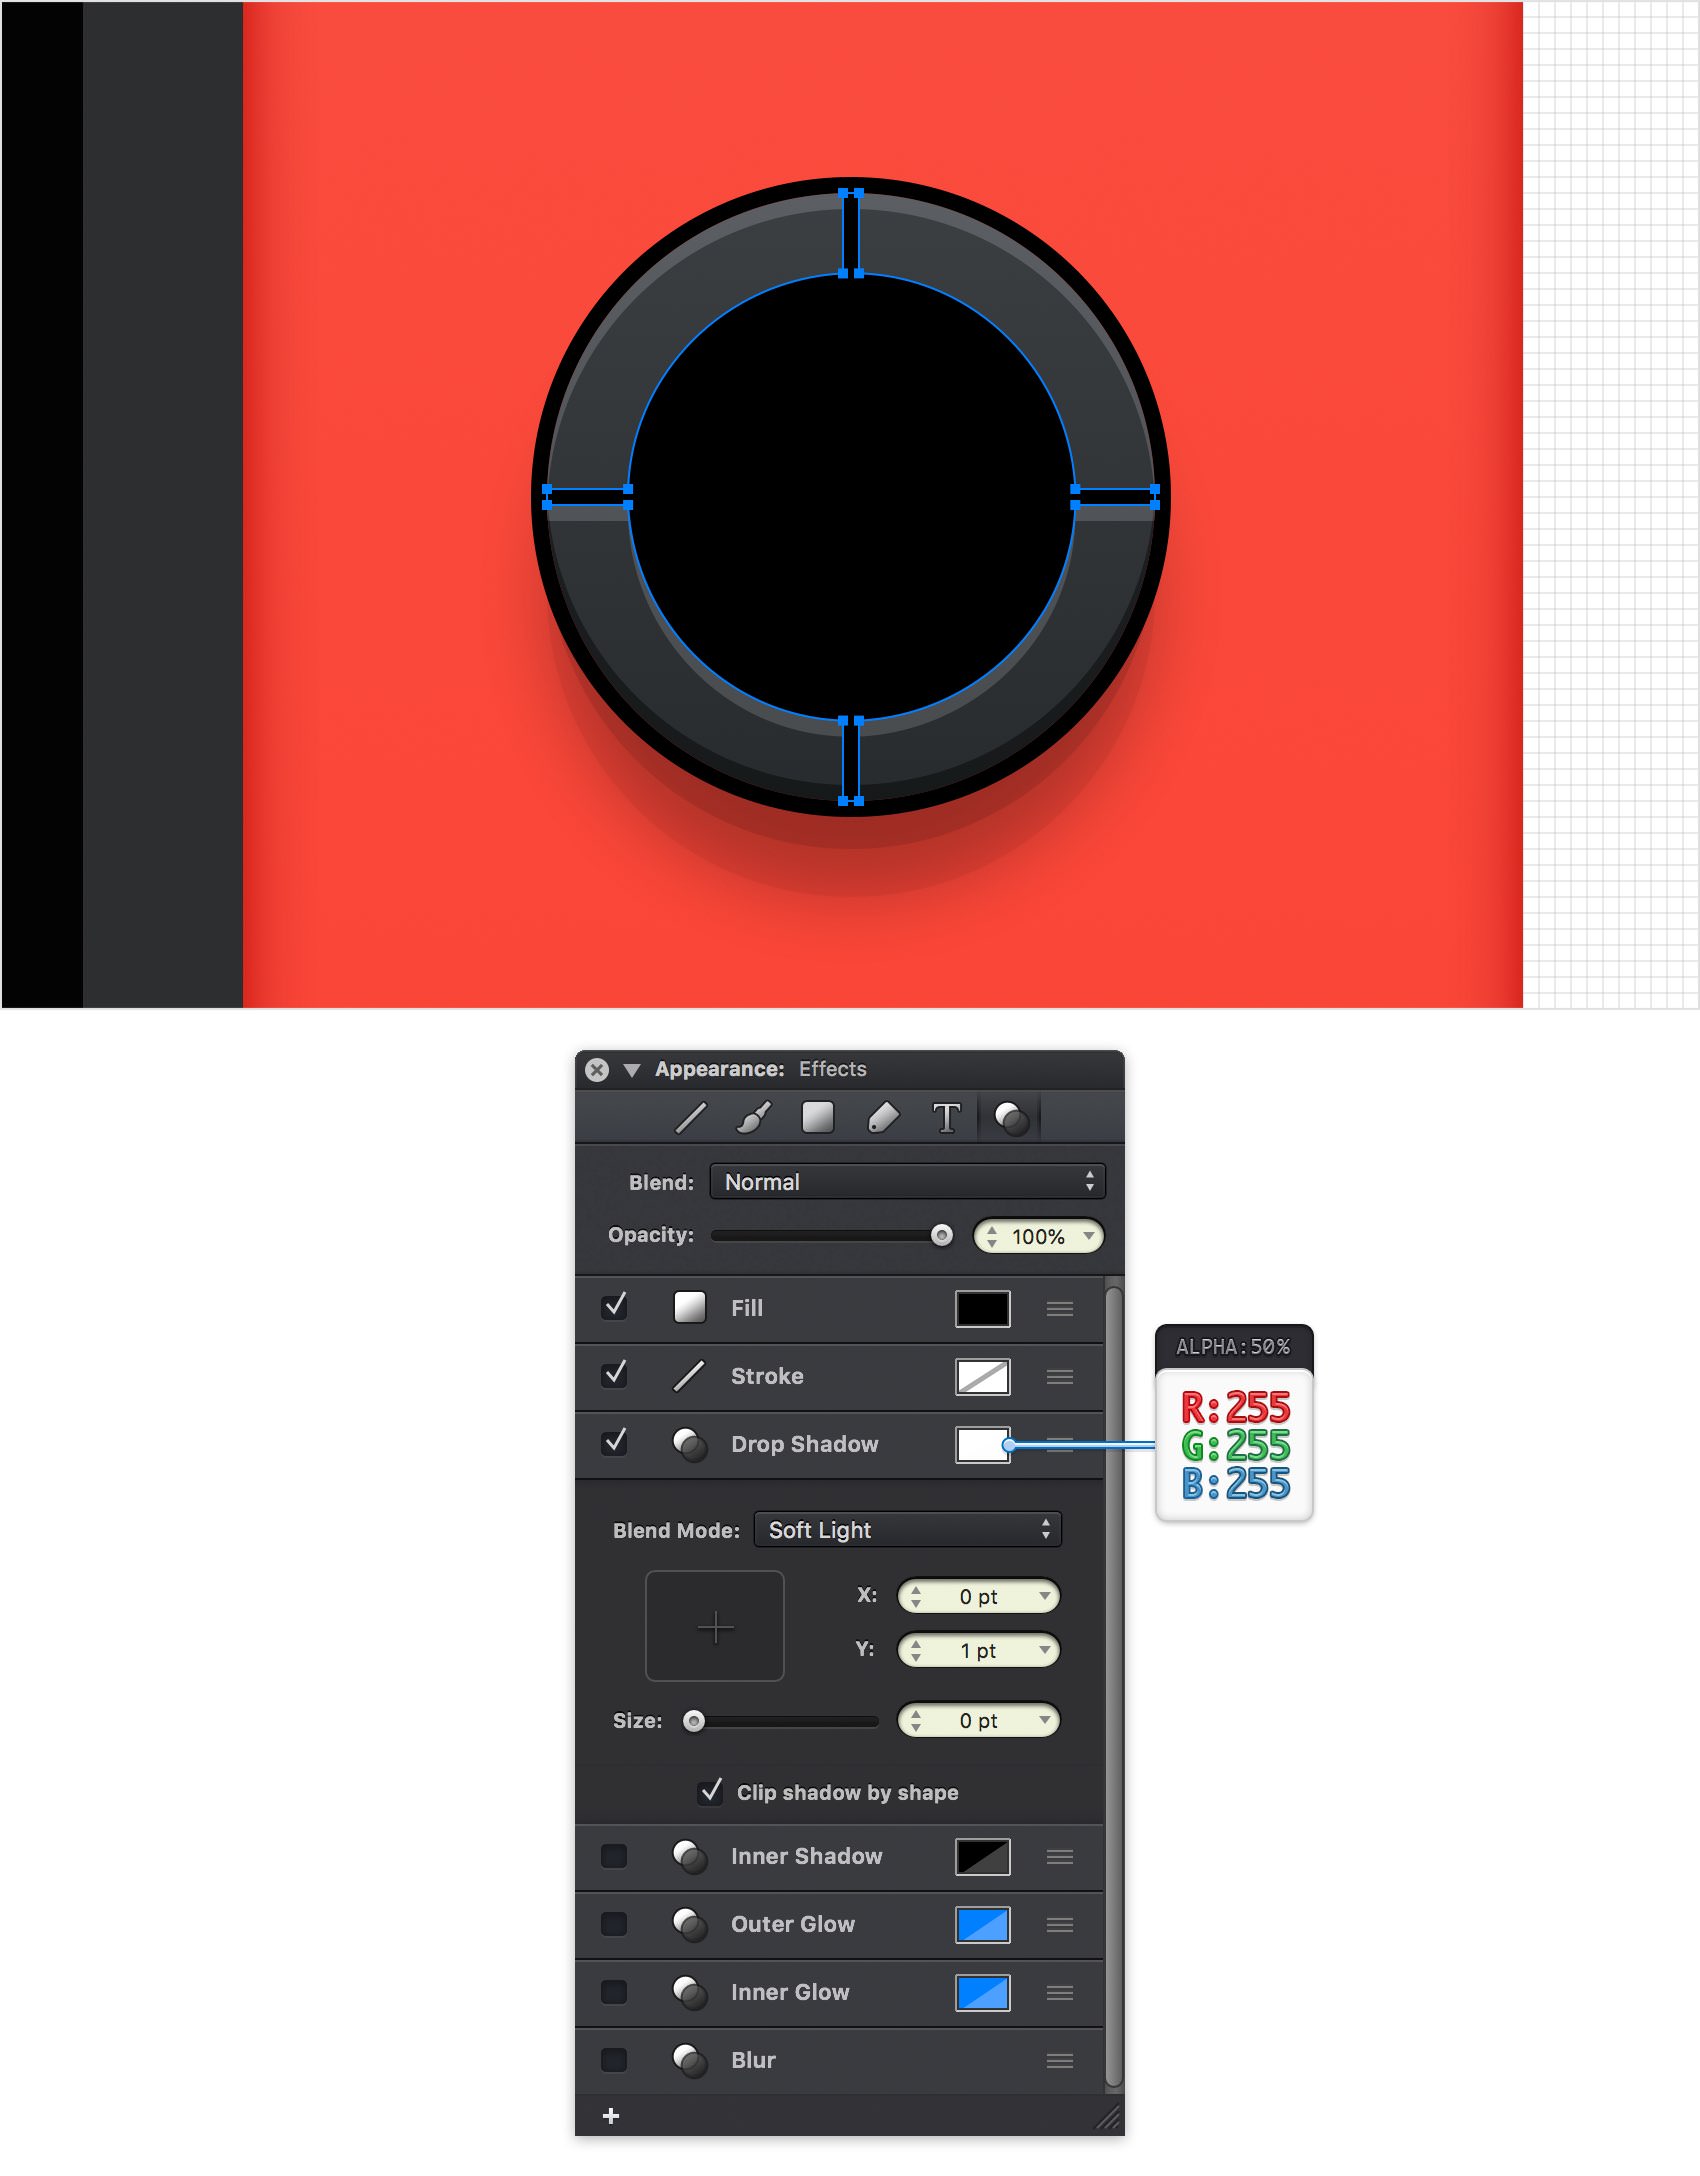
Make sure that your black shape is still selected and focus on the Effects pane. Activate the Drop Shadow effect and enter the attributes shown below.
Step 56
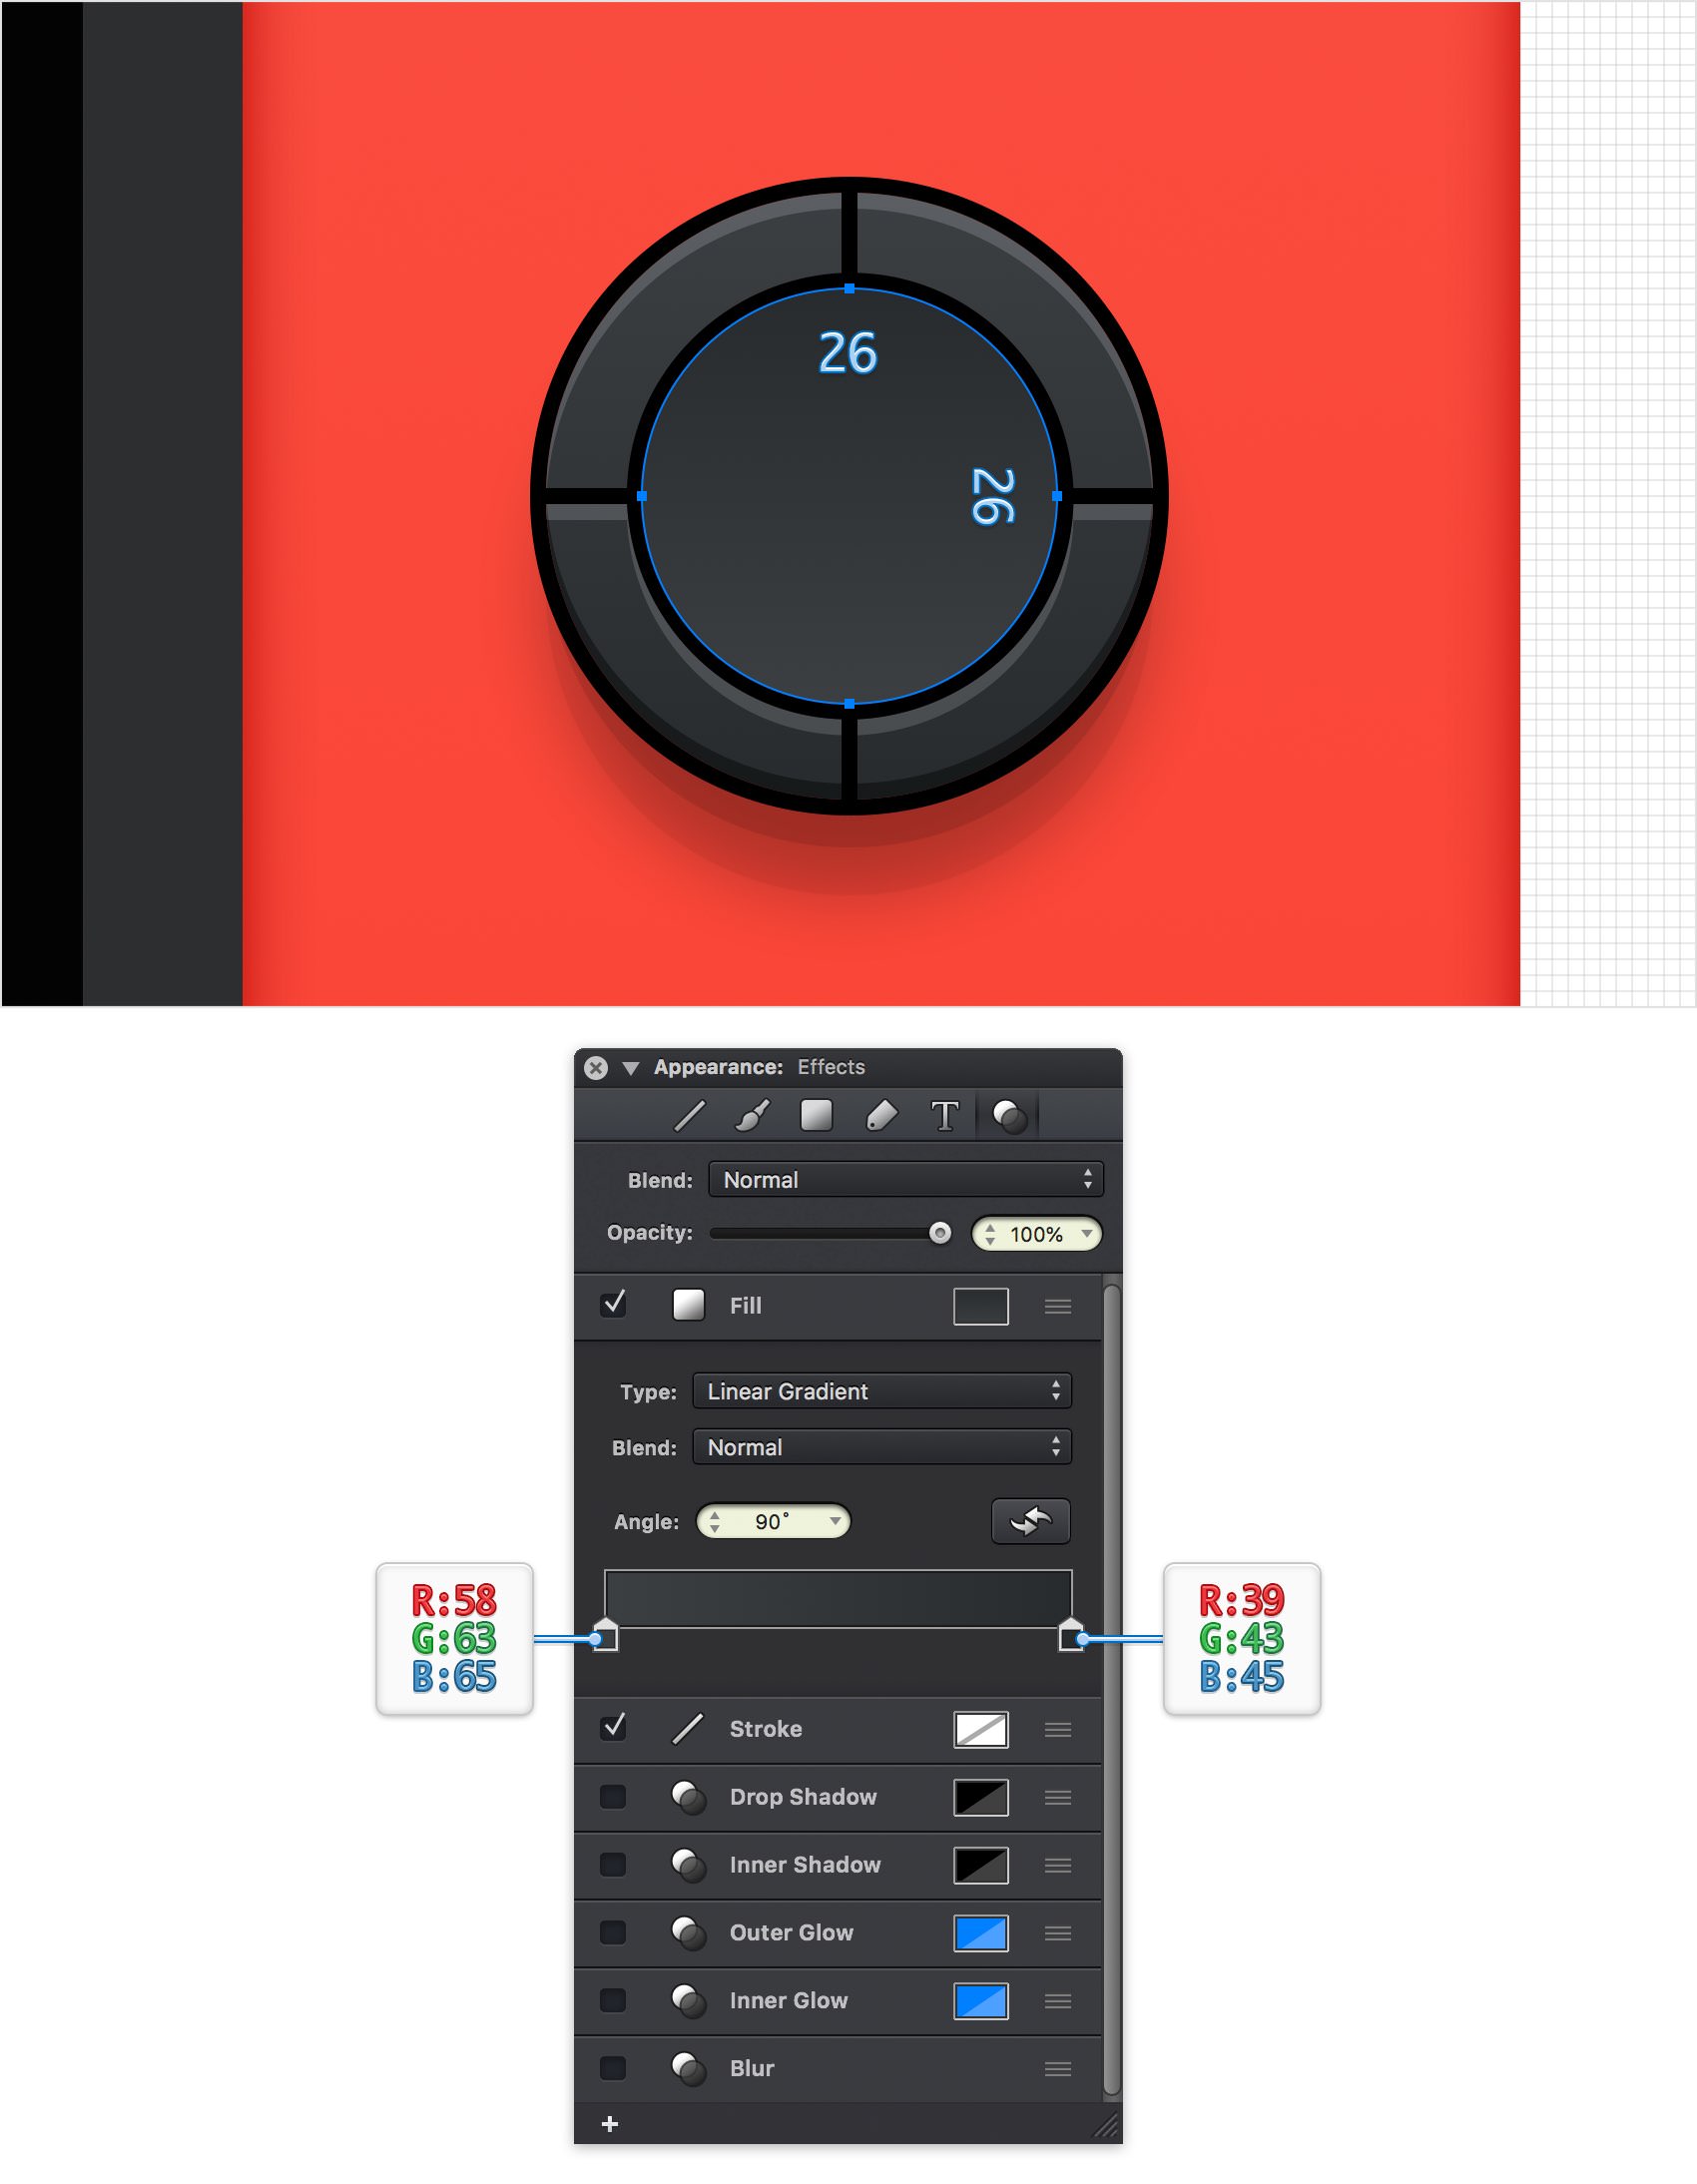
Pick the Ellipse Tool (O) and create a 26 px circle. Place it as shown in the following image and fill it with the linear gradient shown below.
Step 57
Make sure that your 26 px circle is still selected and focus on the Effects pane. Activate the Inner Shadow effect and enter the attributes shown below.
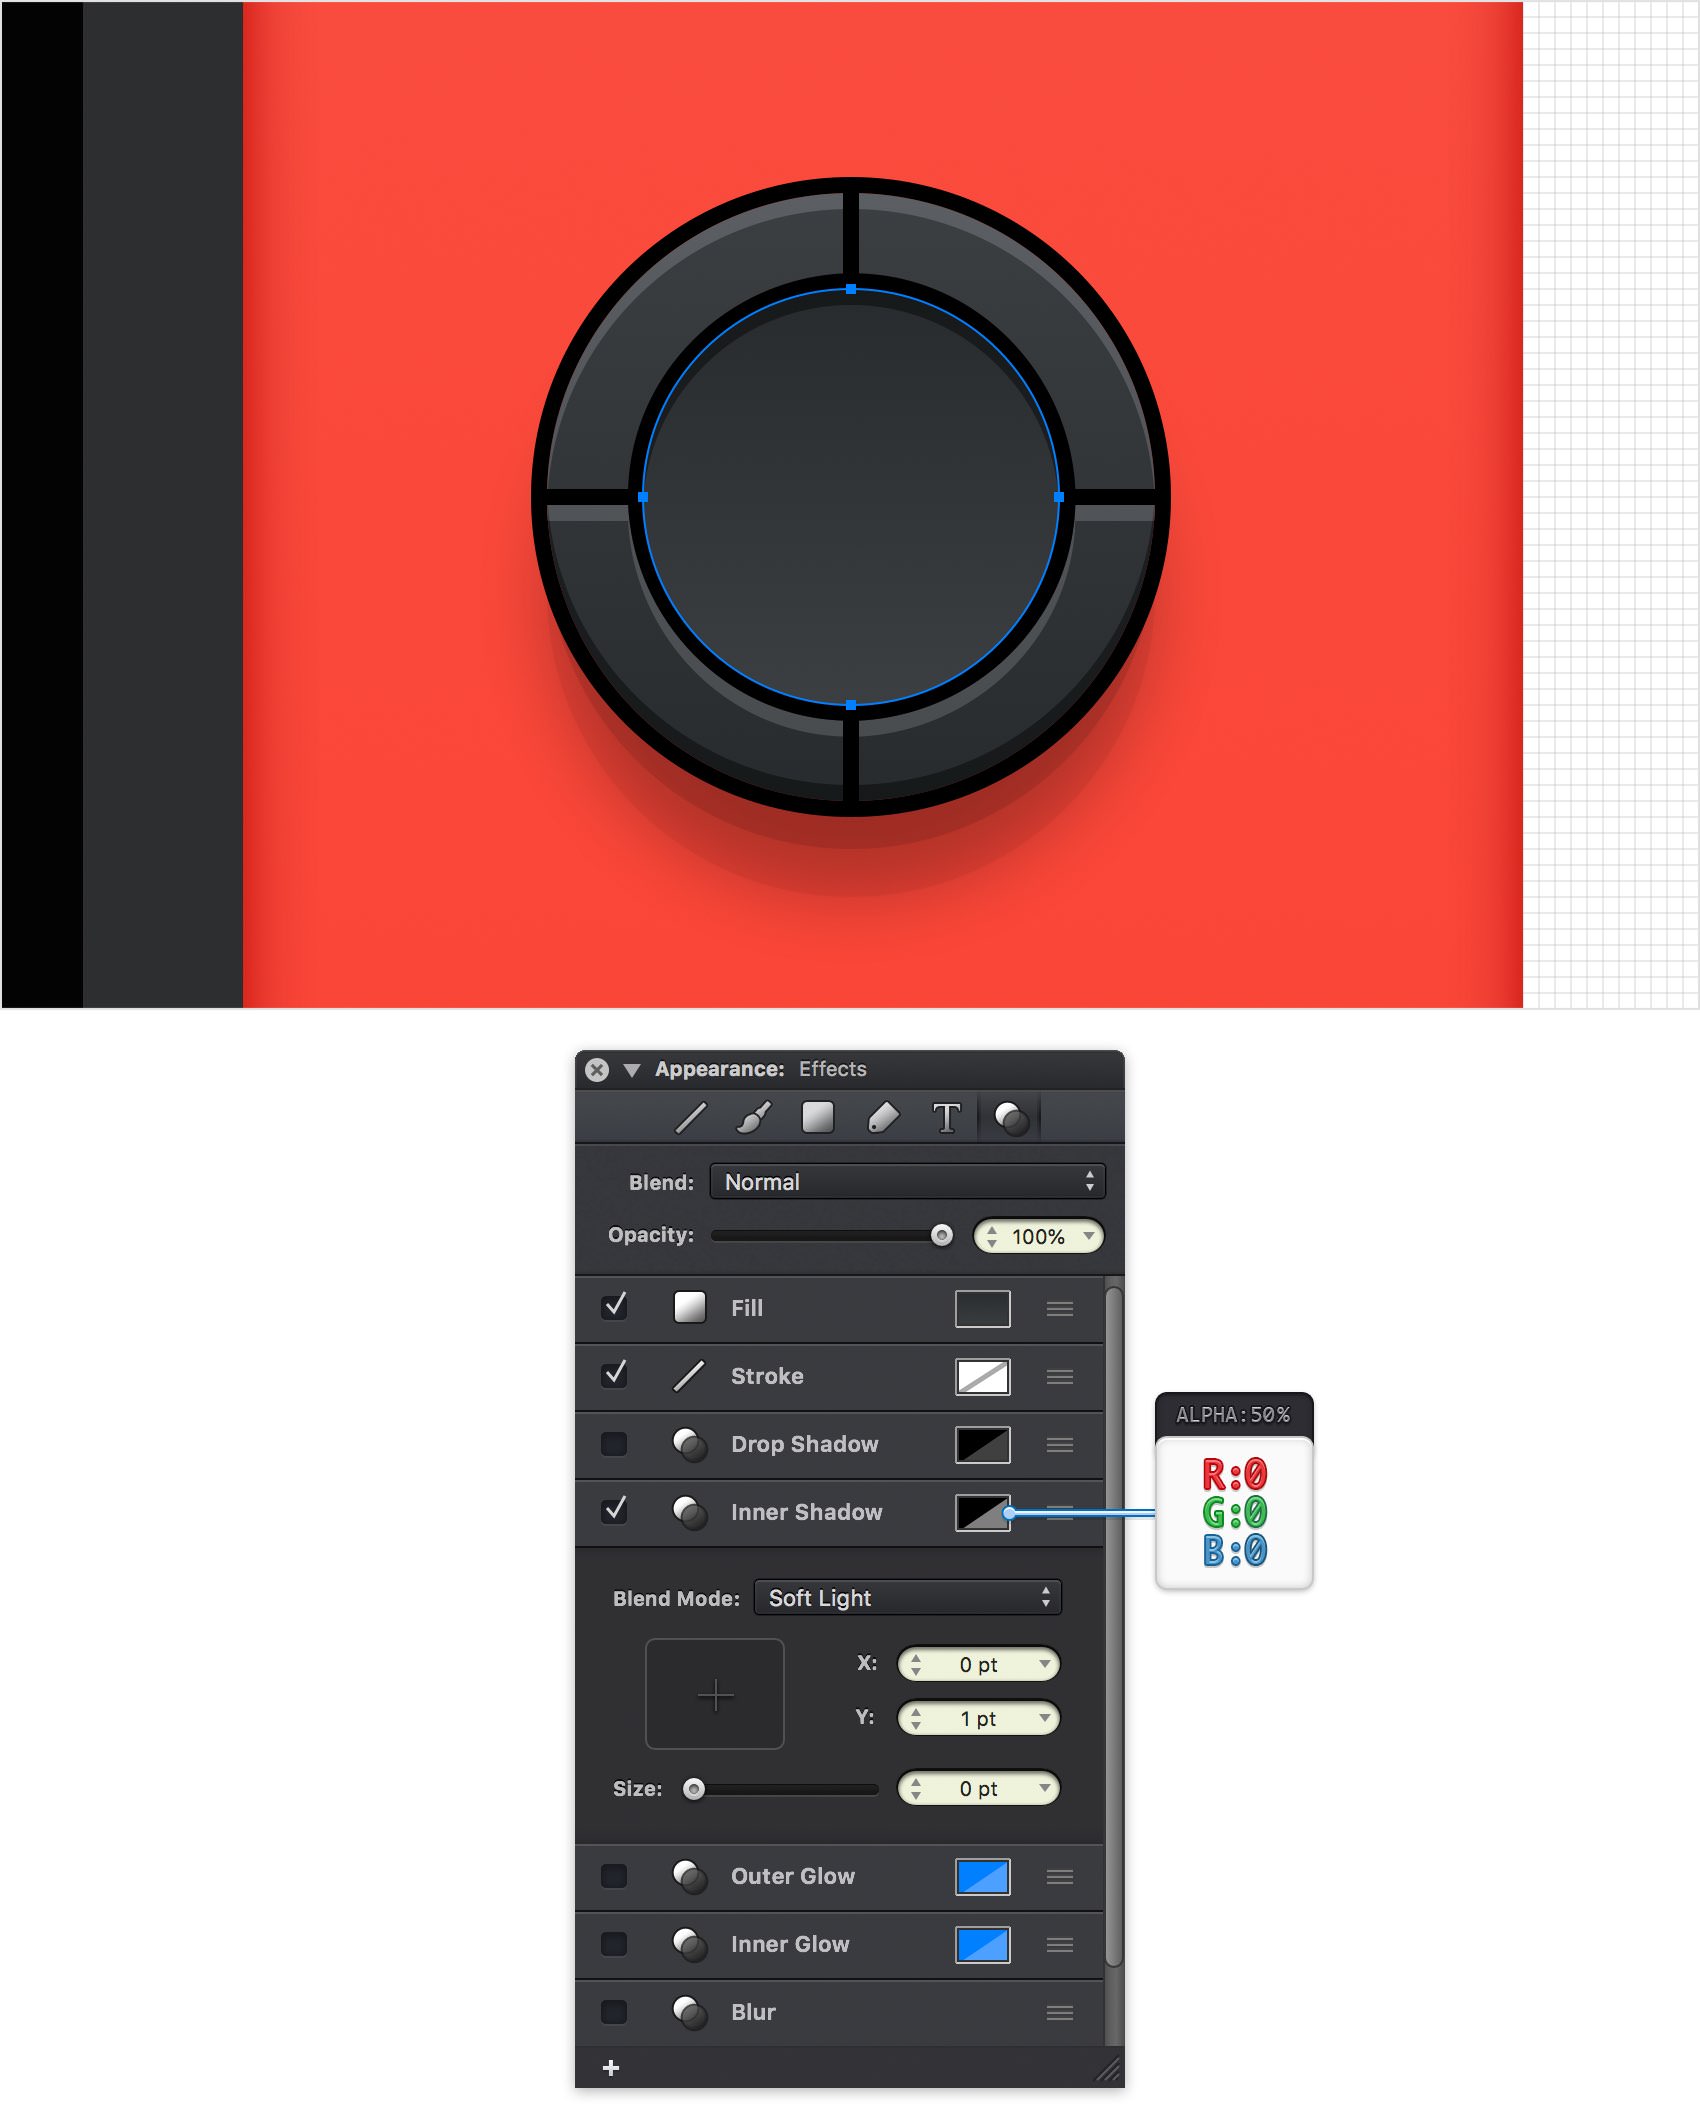
Step 58
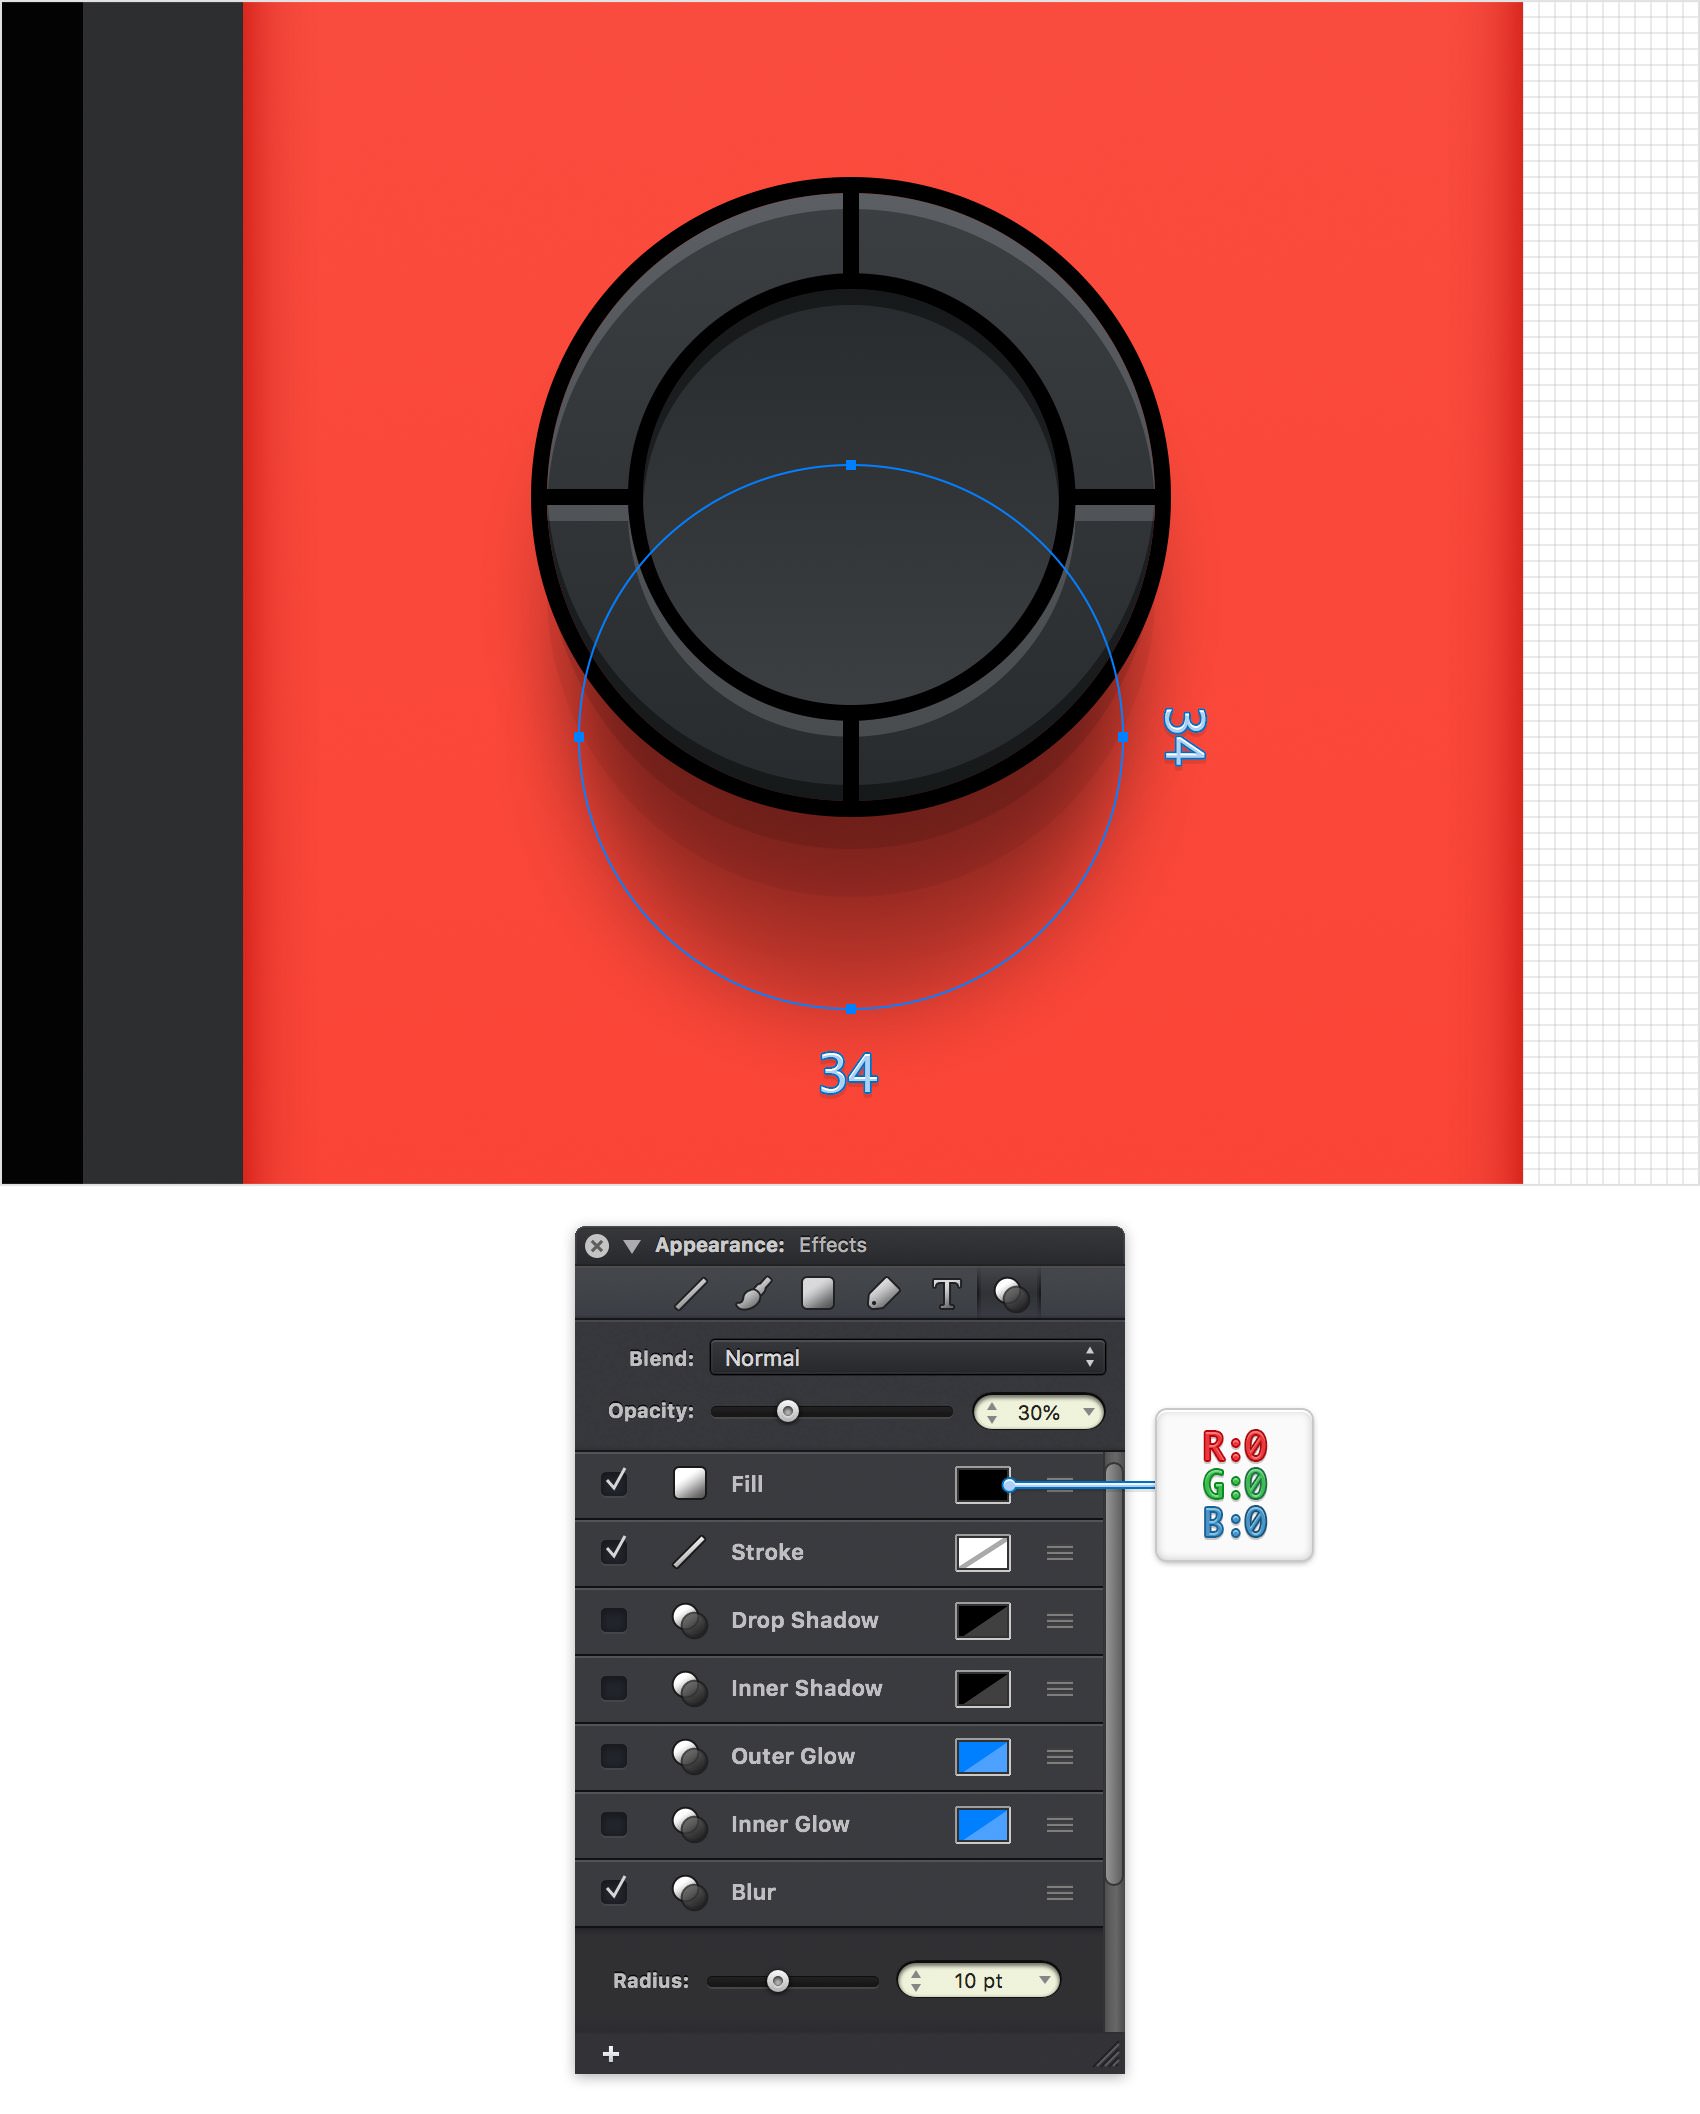
Pick the Ellipse Tool (O), create a 34 px circle and place it as shown in the following image (X: 616 px Y: 230 px). Fill this new shape with black and focus on the Effects pane. First, drag the Opacity slider to 30%, and then activate the Blur effect and drag that Radius slider to 10 pt. Once you're done, send this new shape to back (Shift + Command + [).
Step 59
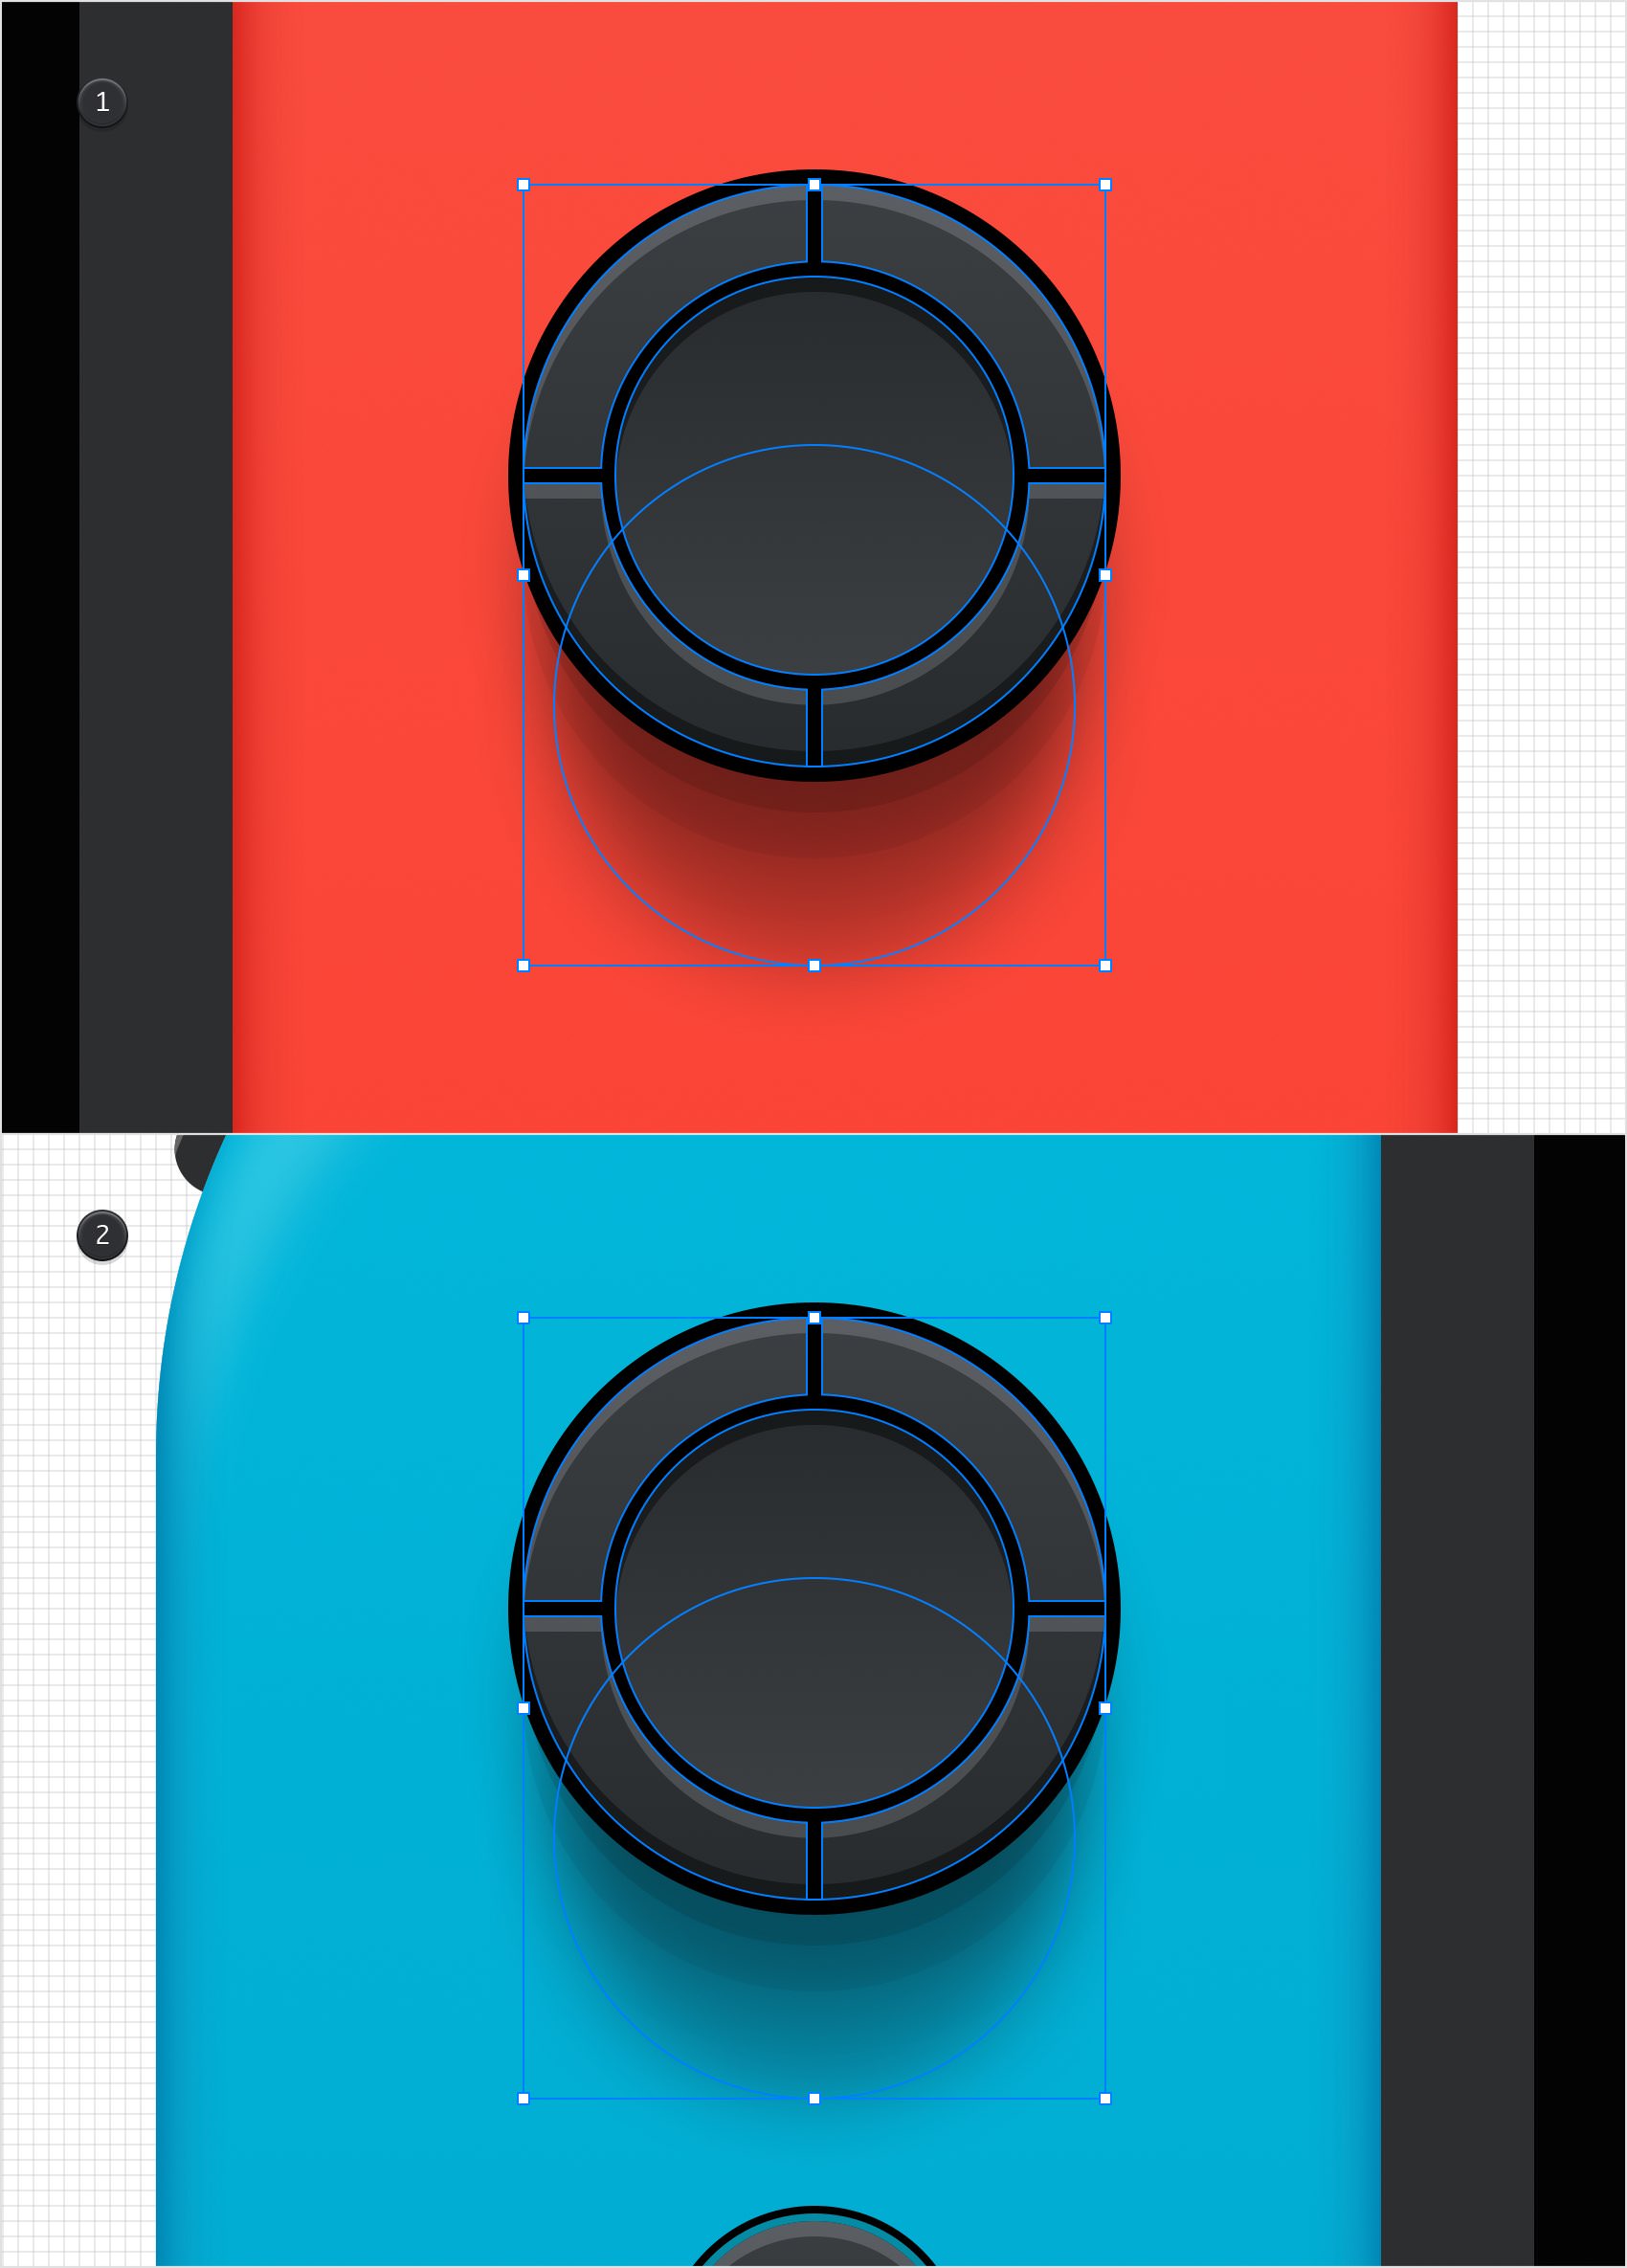
Select the four shape highlighted in the following image and Group them (Command + G). Make a copy of this group (Command + C > Command + V) and place it as shown in the second image (X: 129 px Y: 146 px).
Step 60
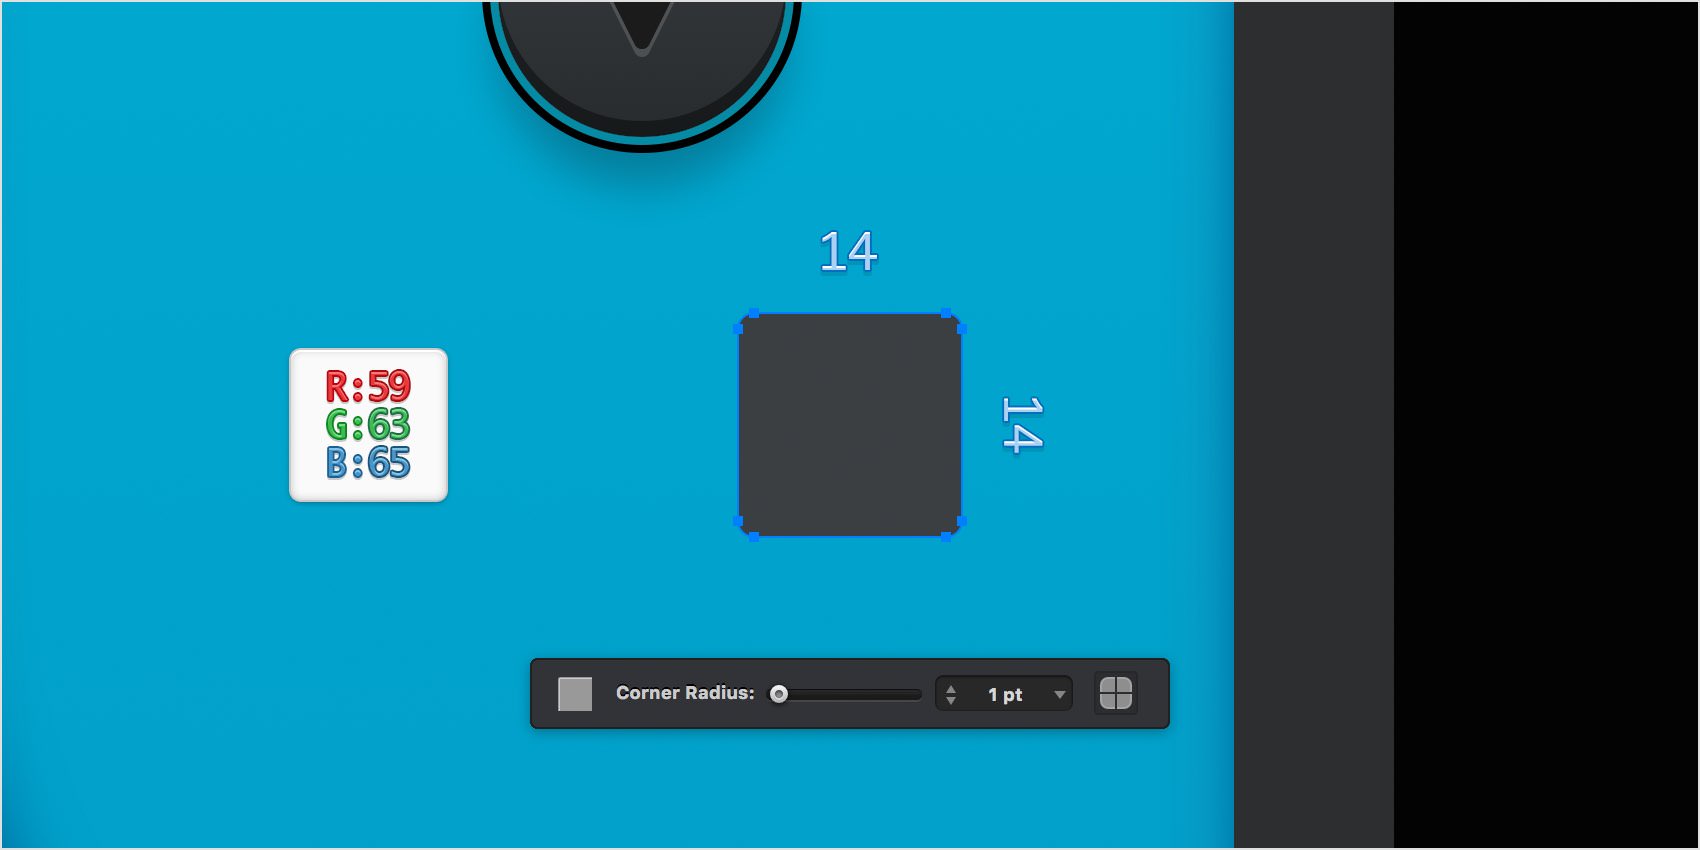
Open the Layers panel and add a fifth layer. Name it "Small Buttons" and make sure that it stays selected.
Pick the Rounded Rectangle Tool (Shift + M) and set the Corner Radius to 1 pt. Create a 14 px rounded square, fill it with R=59 G=63 B=65 and place it as shown in the following image (X: 146 px Y: 211 px).
Step 61
Make sure that your new rounded square stays selected and focus on the Effects pane. Select the Stroke and enter the attributes shown below.
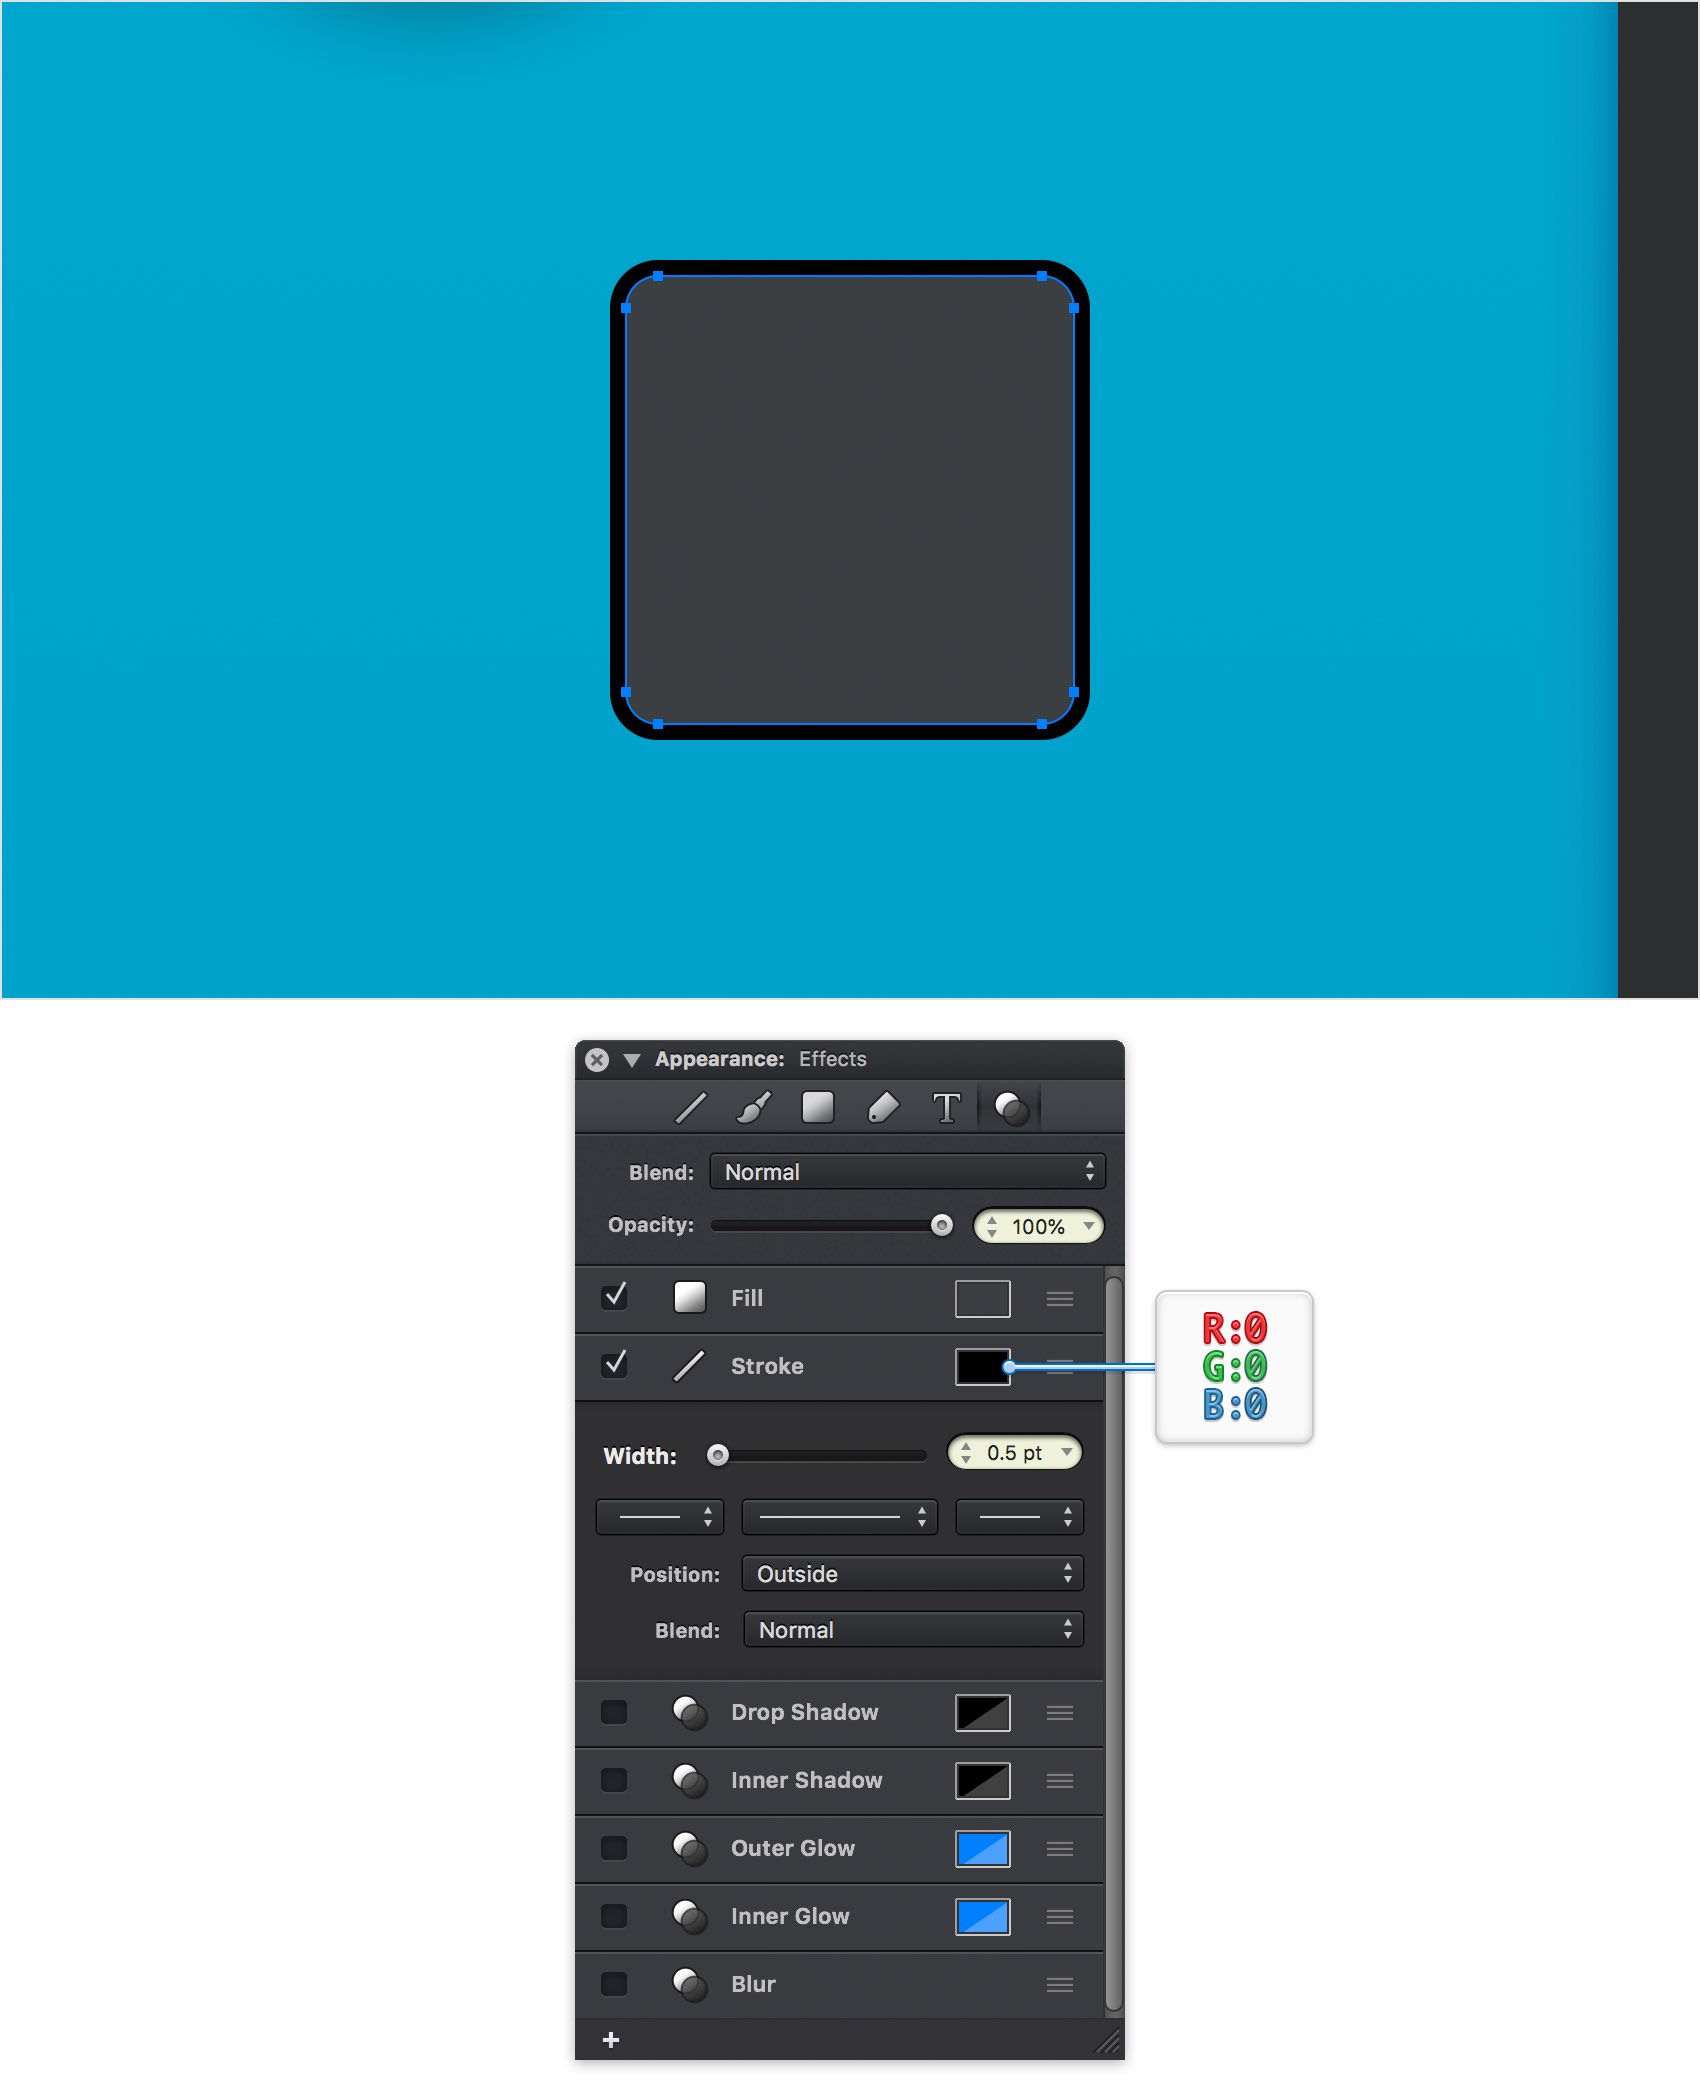
Step 62
Make sure that your rounded square stays selected and focus on the Effects pane. Activate the Drop Shadow effect and enter the attributes shown below.
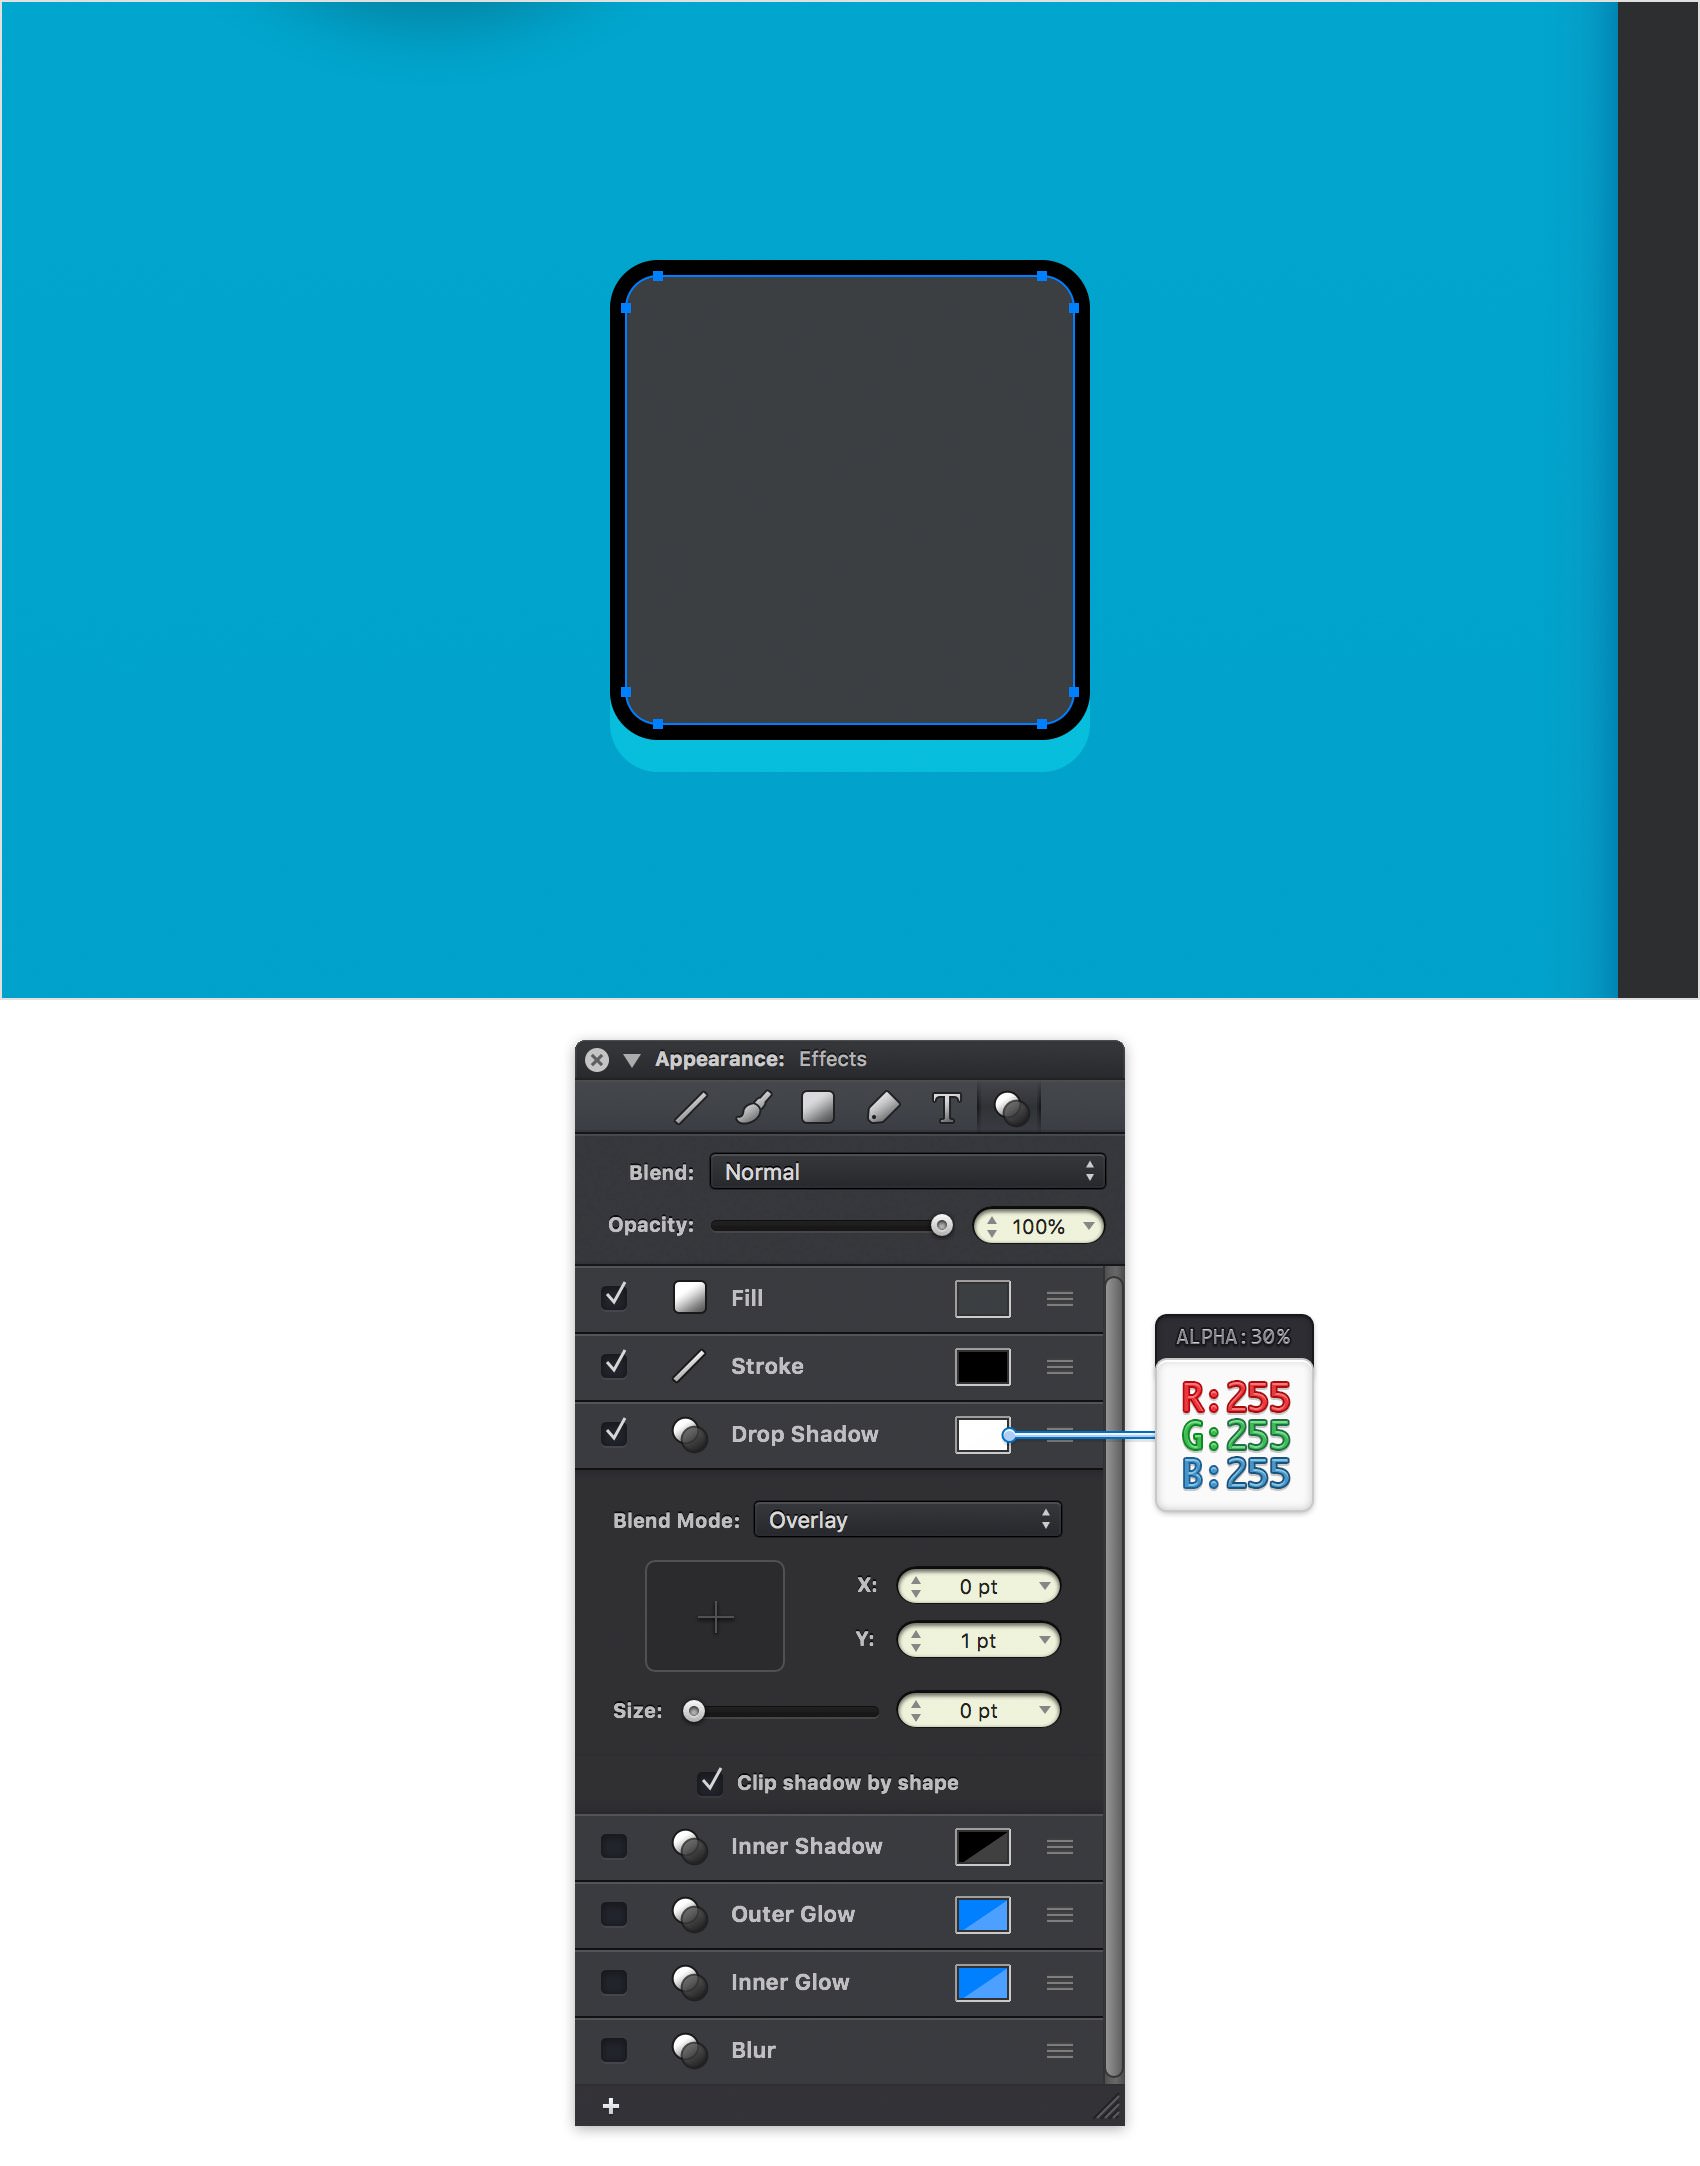
Step 63
Make sure that your rounded square stays selected and focus on the Effects pane. Activate the Inner Shadow effect, drag it below the Fill and enter the attributes shown below.
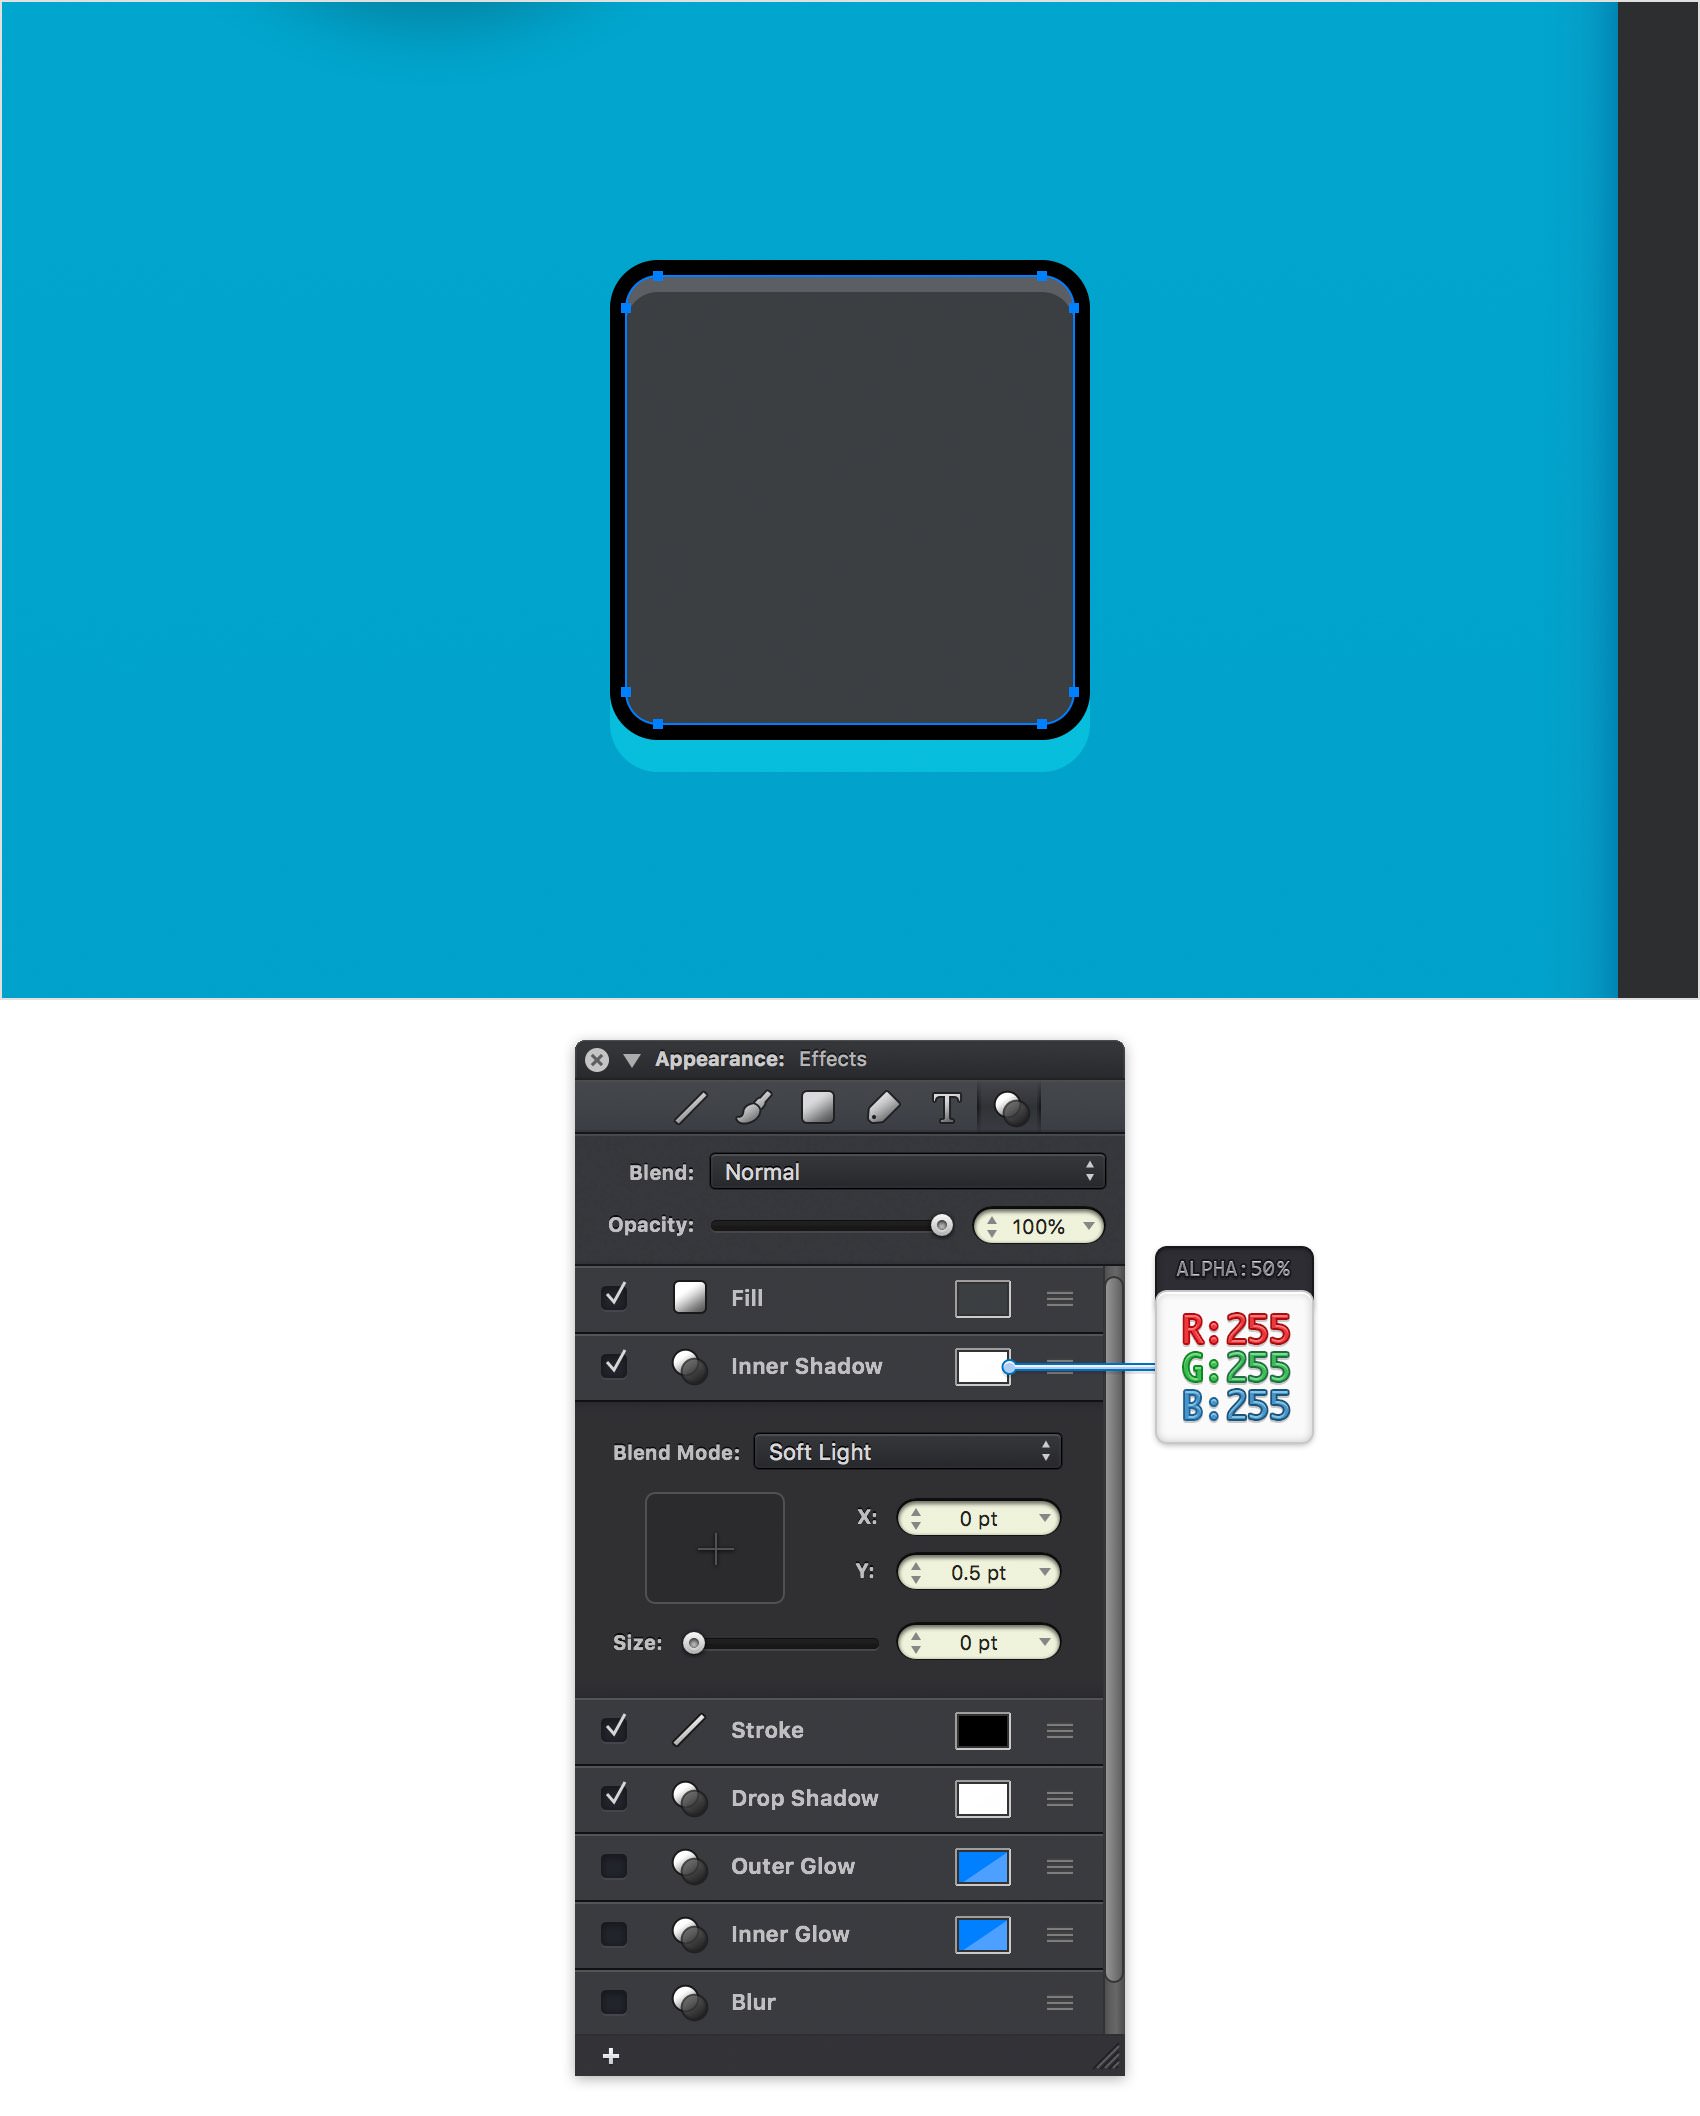
Step 64
Make sure that your rounded square stays selected and keep focusing on the Effects pane. Add a second Inner Shadow effect, drag it below the first one, and then enter the attributes shown below.
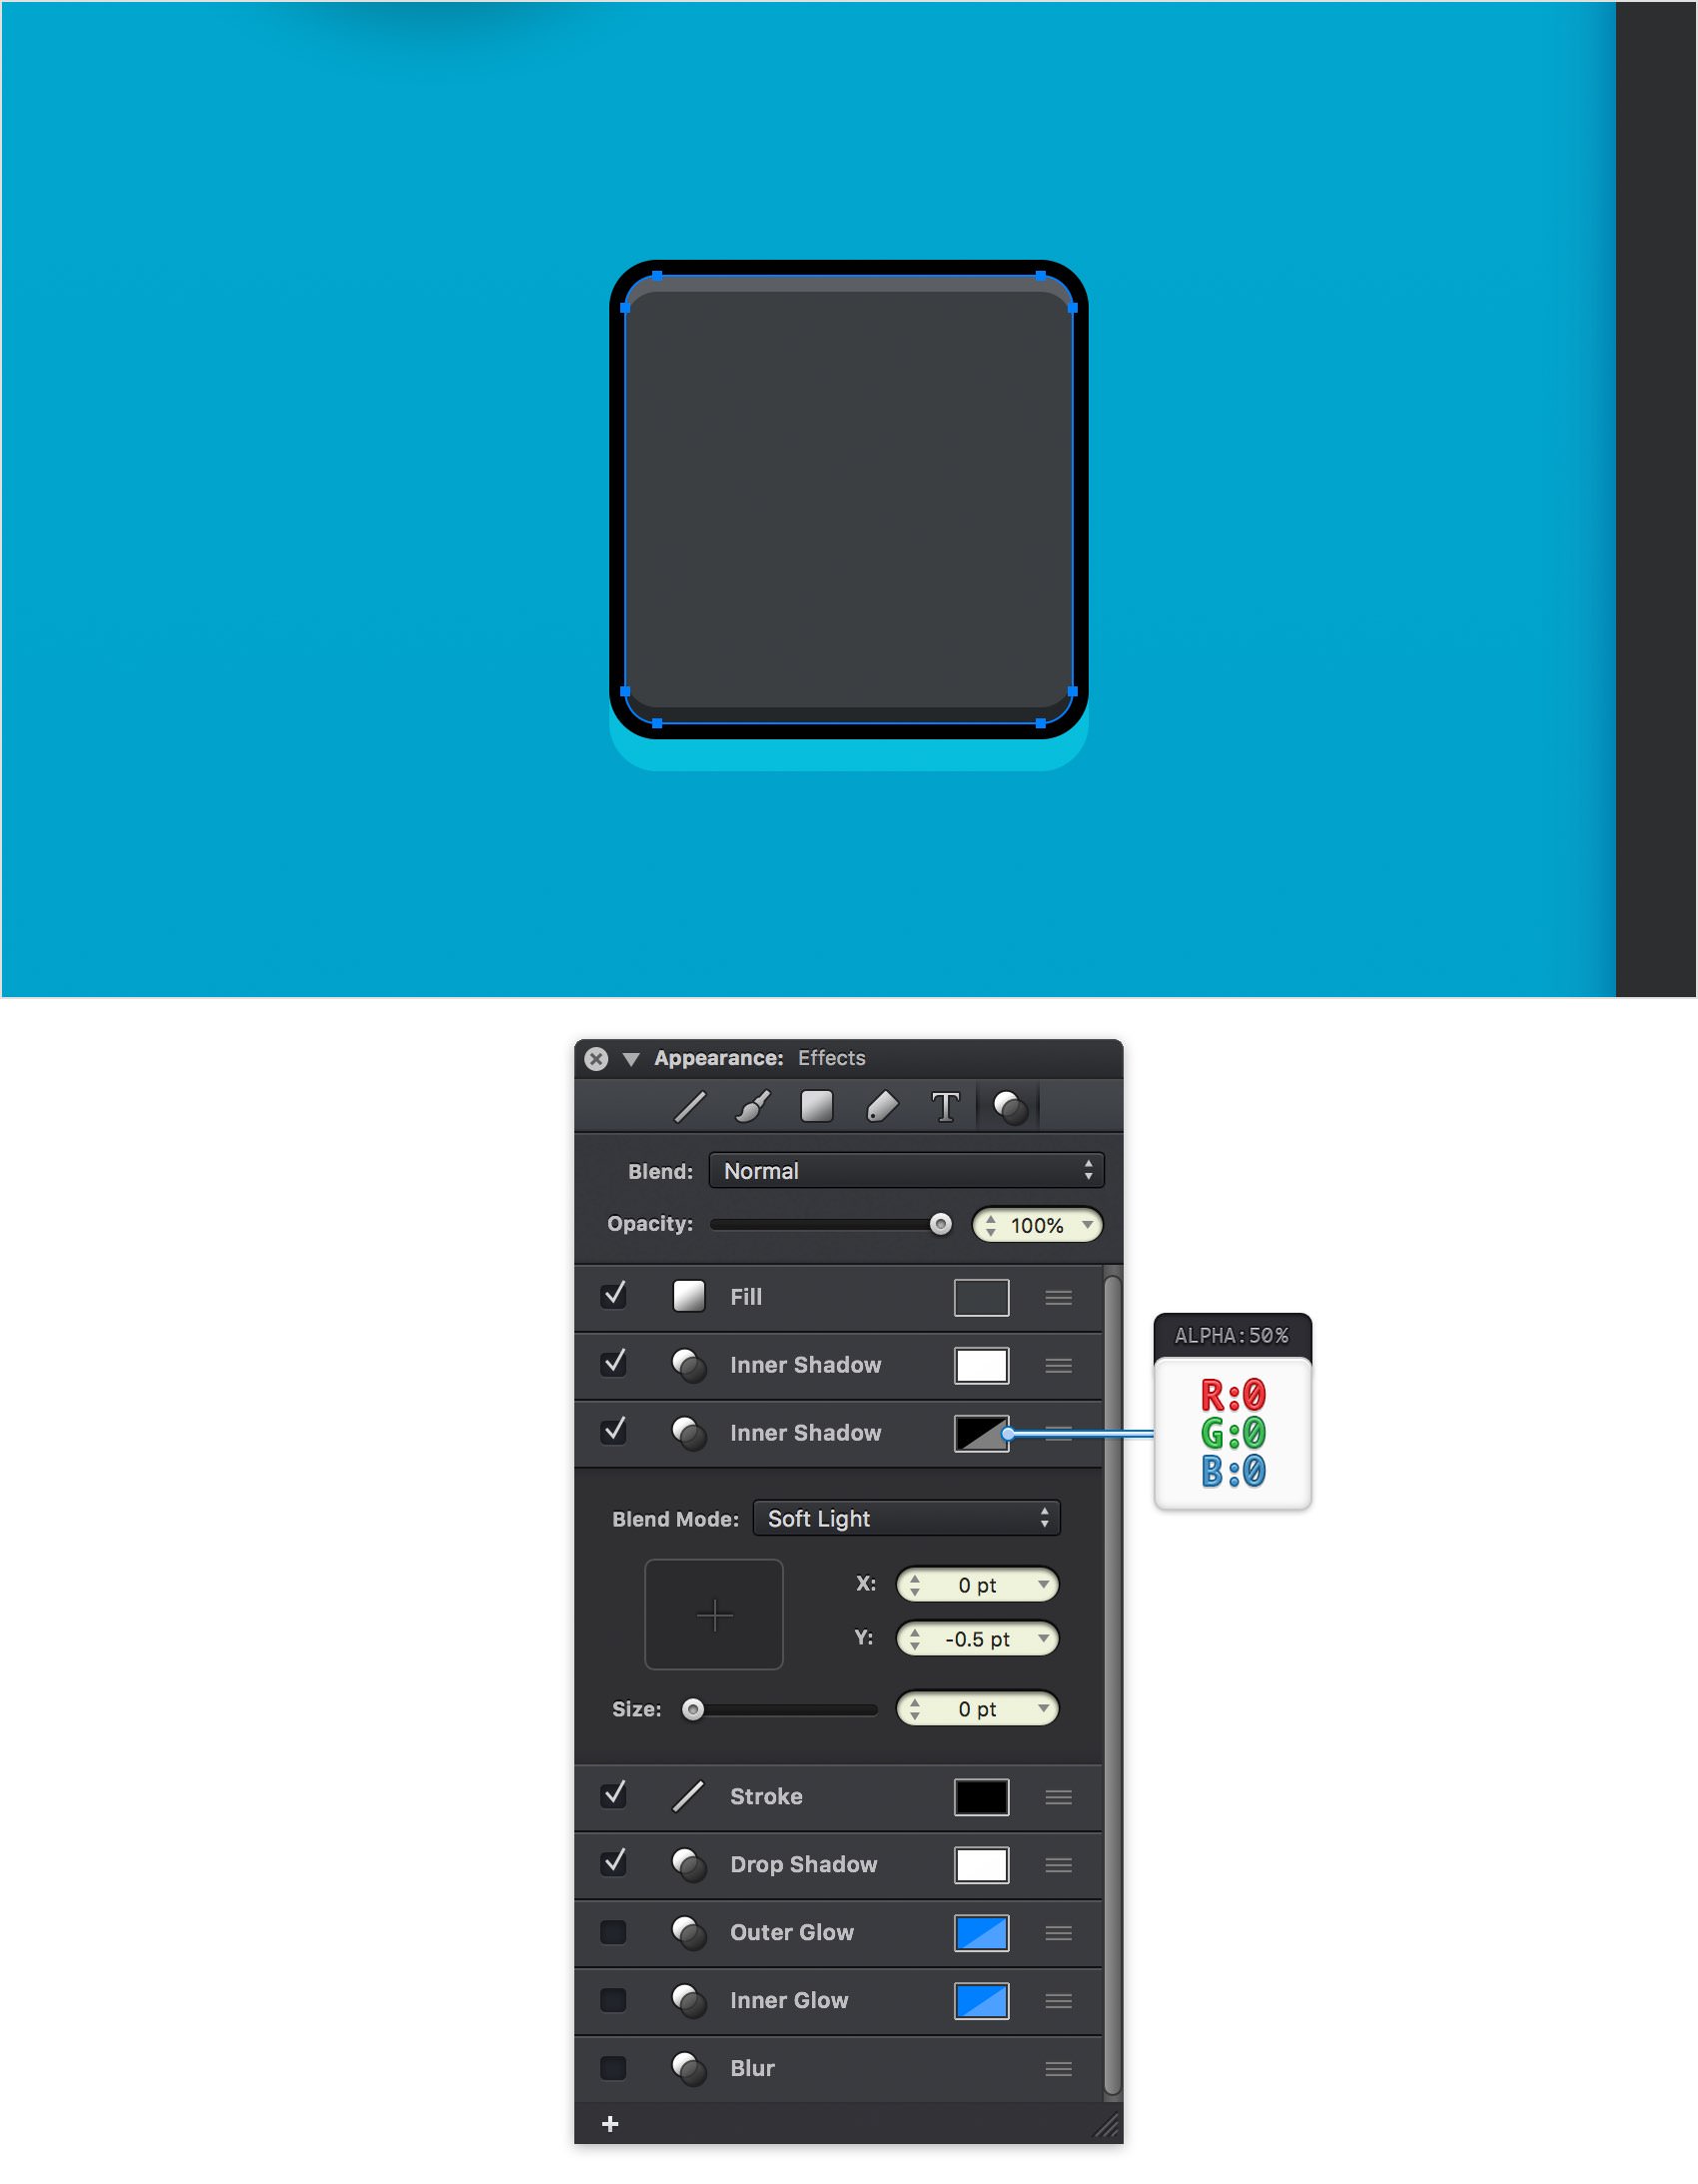
Step 65
Pick the Ellipse Tool (O) and create a 10 px circle. Fill this new shape with R=48 G=49 B=53 and place it as shown in the following image (X: 156 px Y: 272 px).
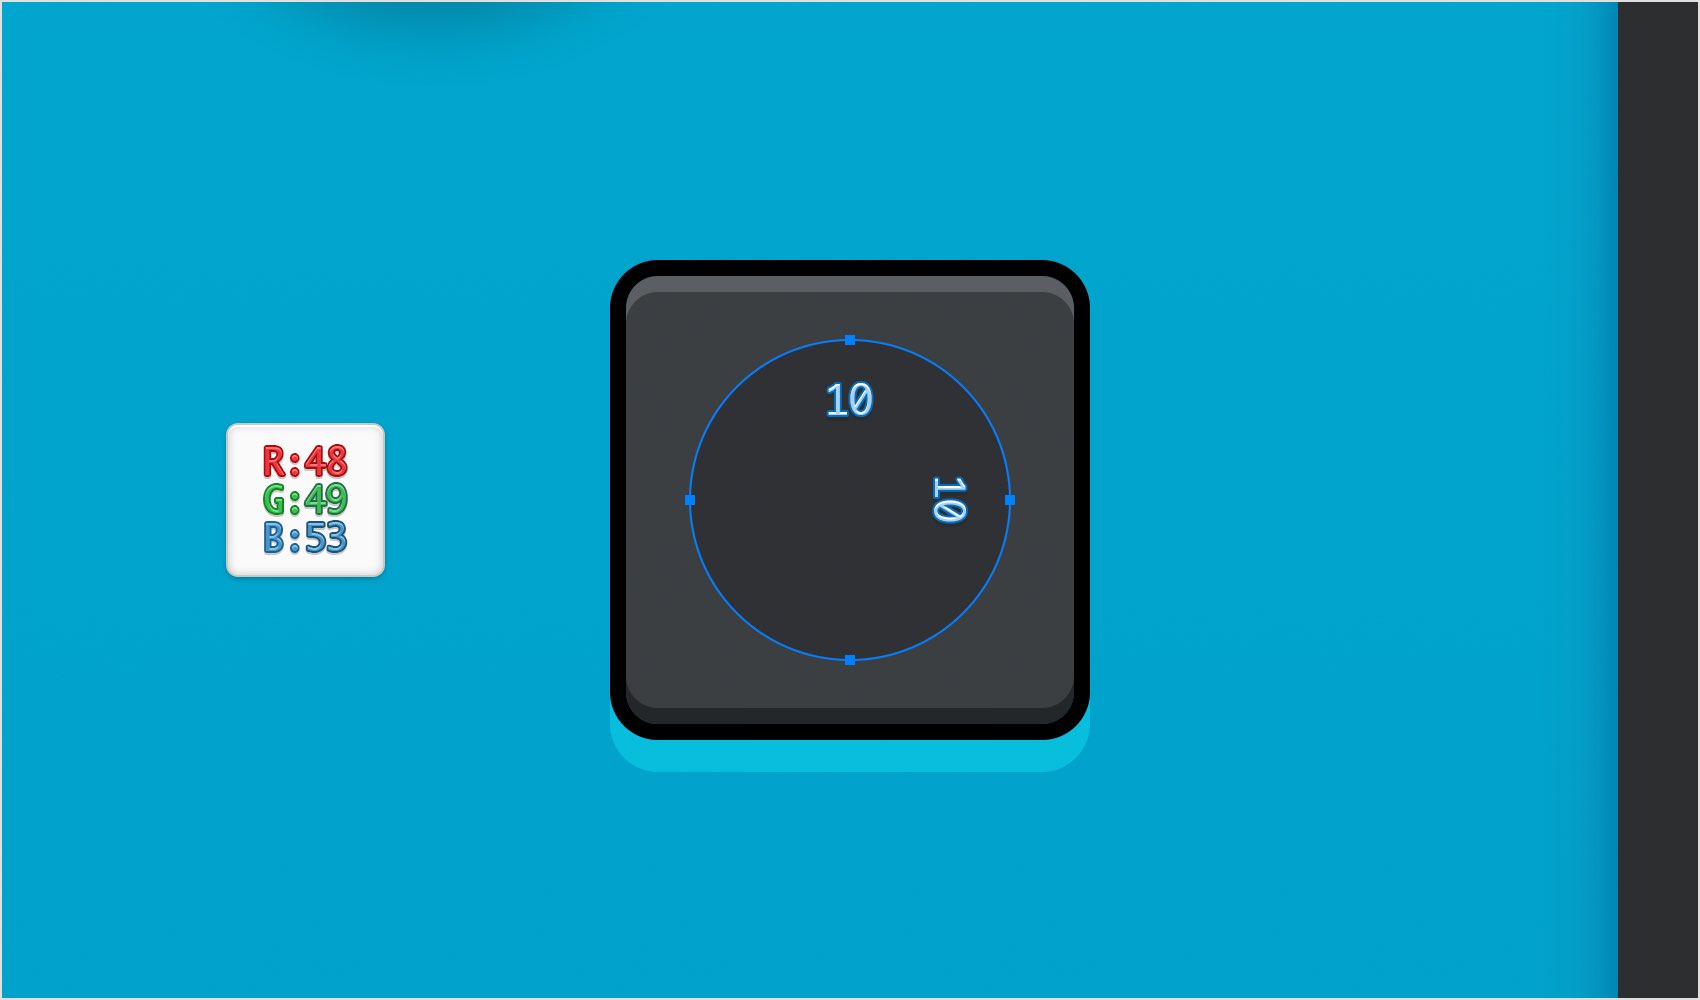
Step 66
Make sure that your new circle stays selected and focus on the Effects pane. Activate the Drop Shadow effect and enter the attributes shown below.
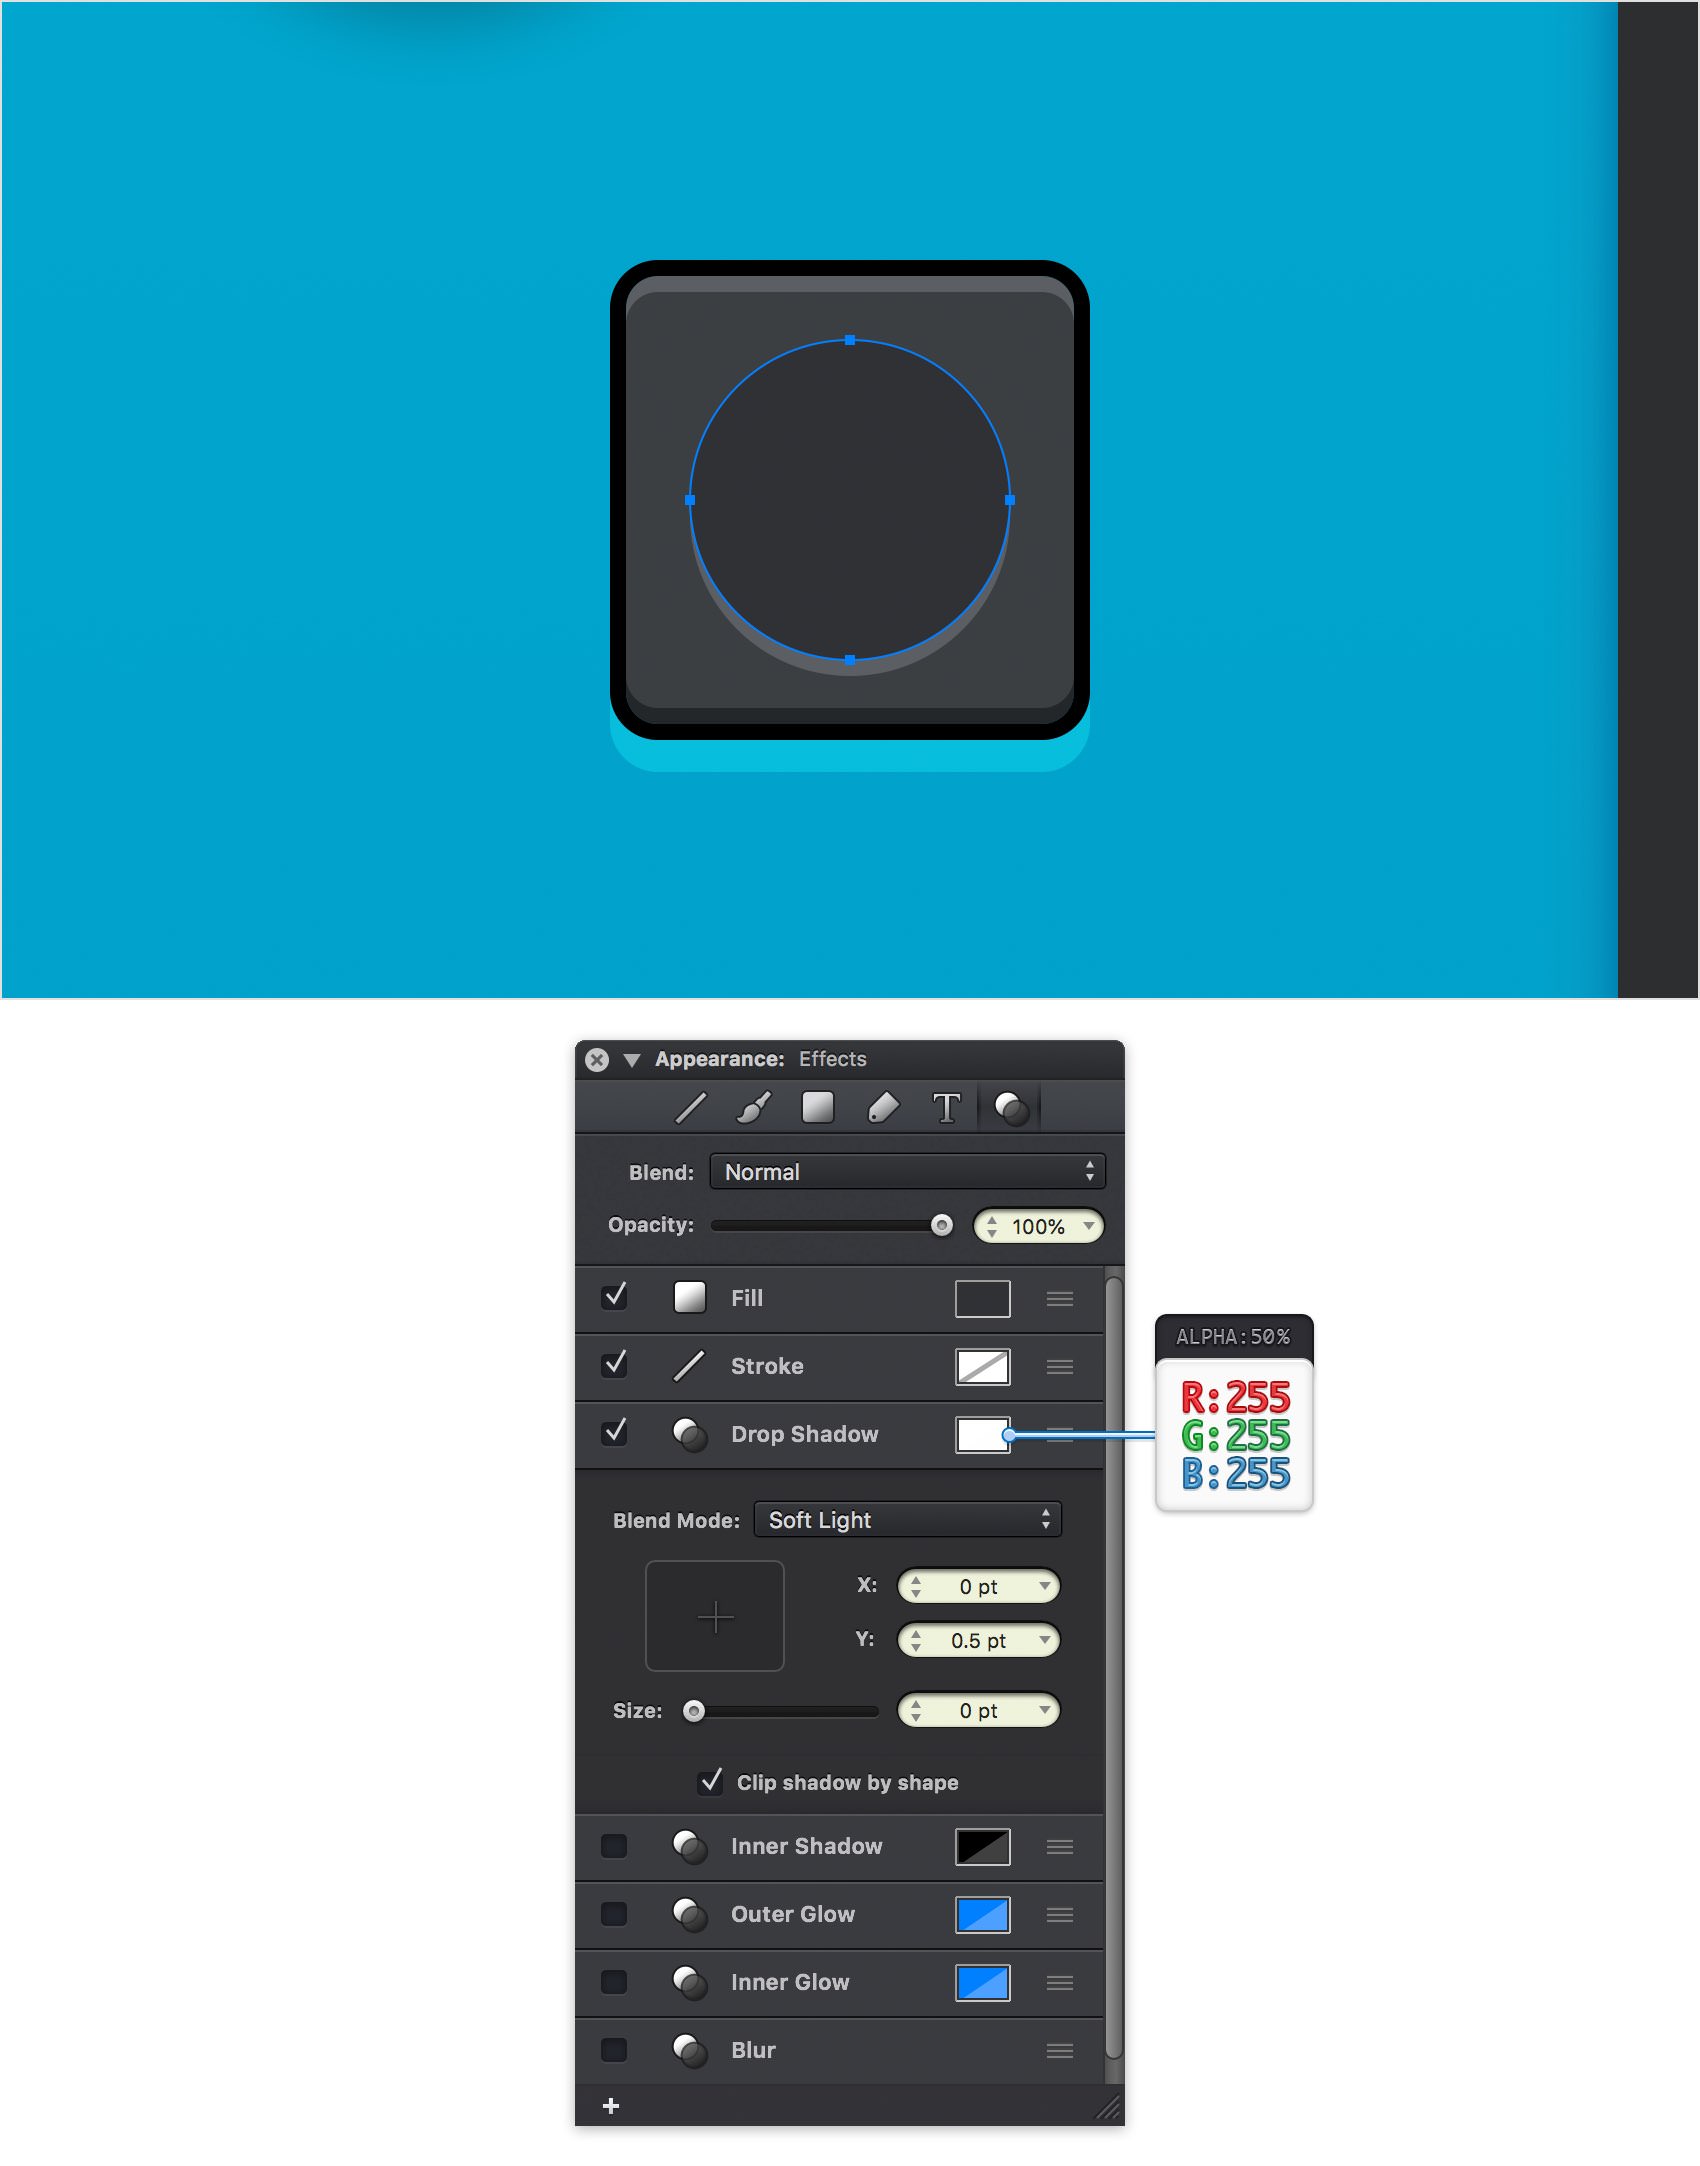
Step 67
Make sure that your circle stays selected and keep focusing on the Effects pane. Activate the Inner Shadow effect and enter the attributes shown below.
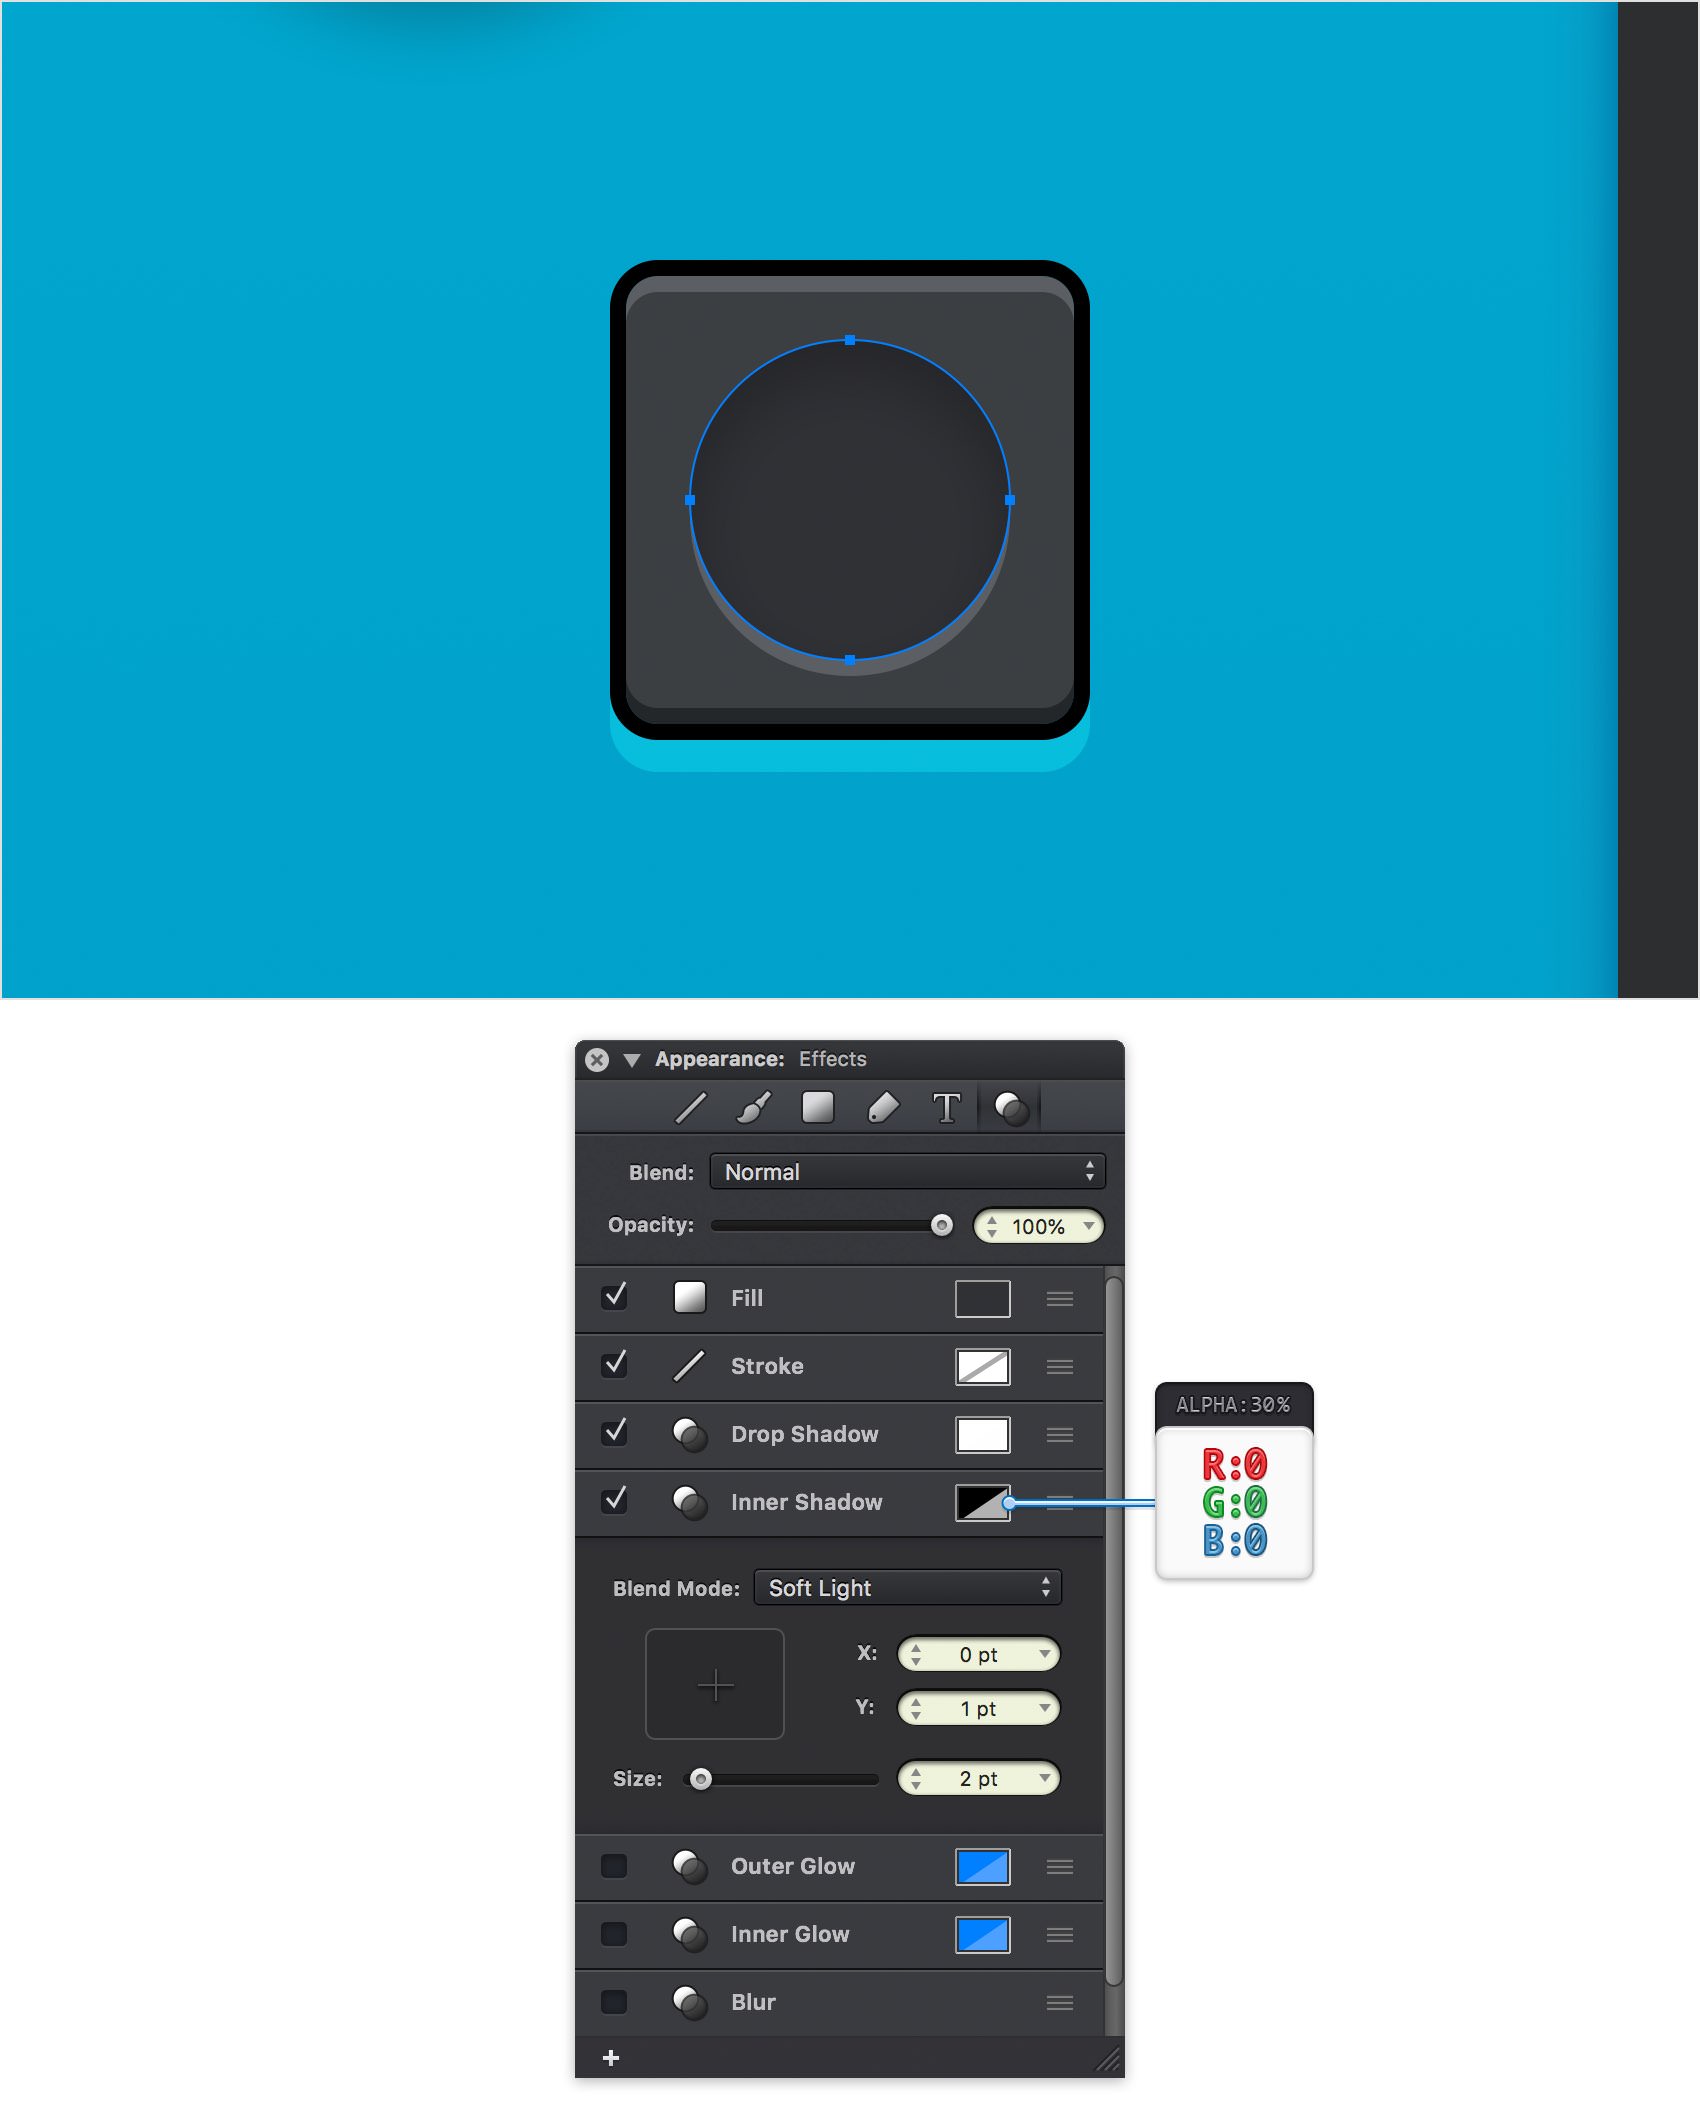
Step 68
Pick the Ellipse Tool (O) and create a 20 px circle. Place this new shape as shown in the following image (X: 609 px Y: 267 px) and fill it with the linear gradient shown below.
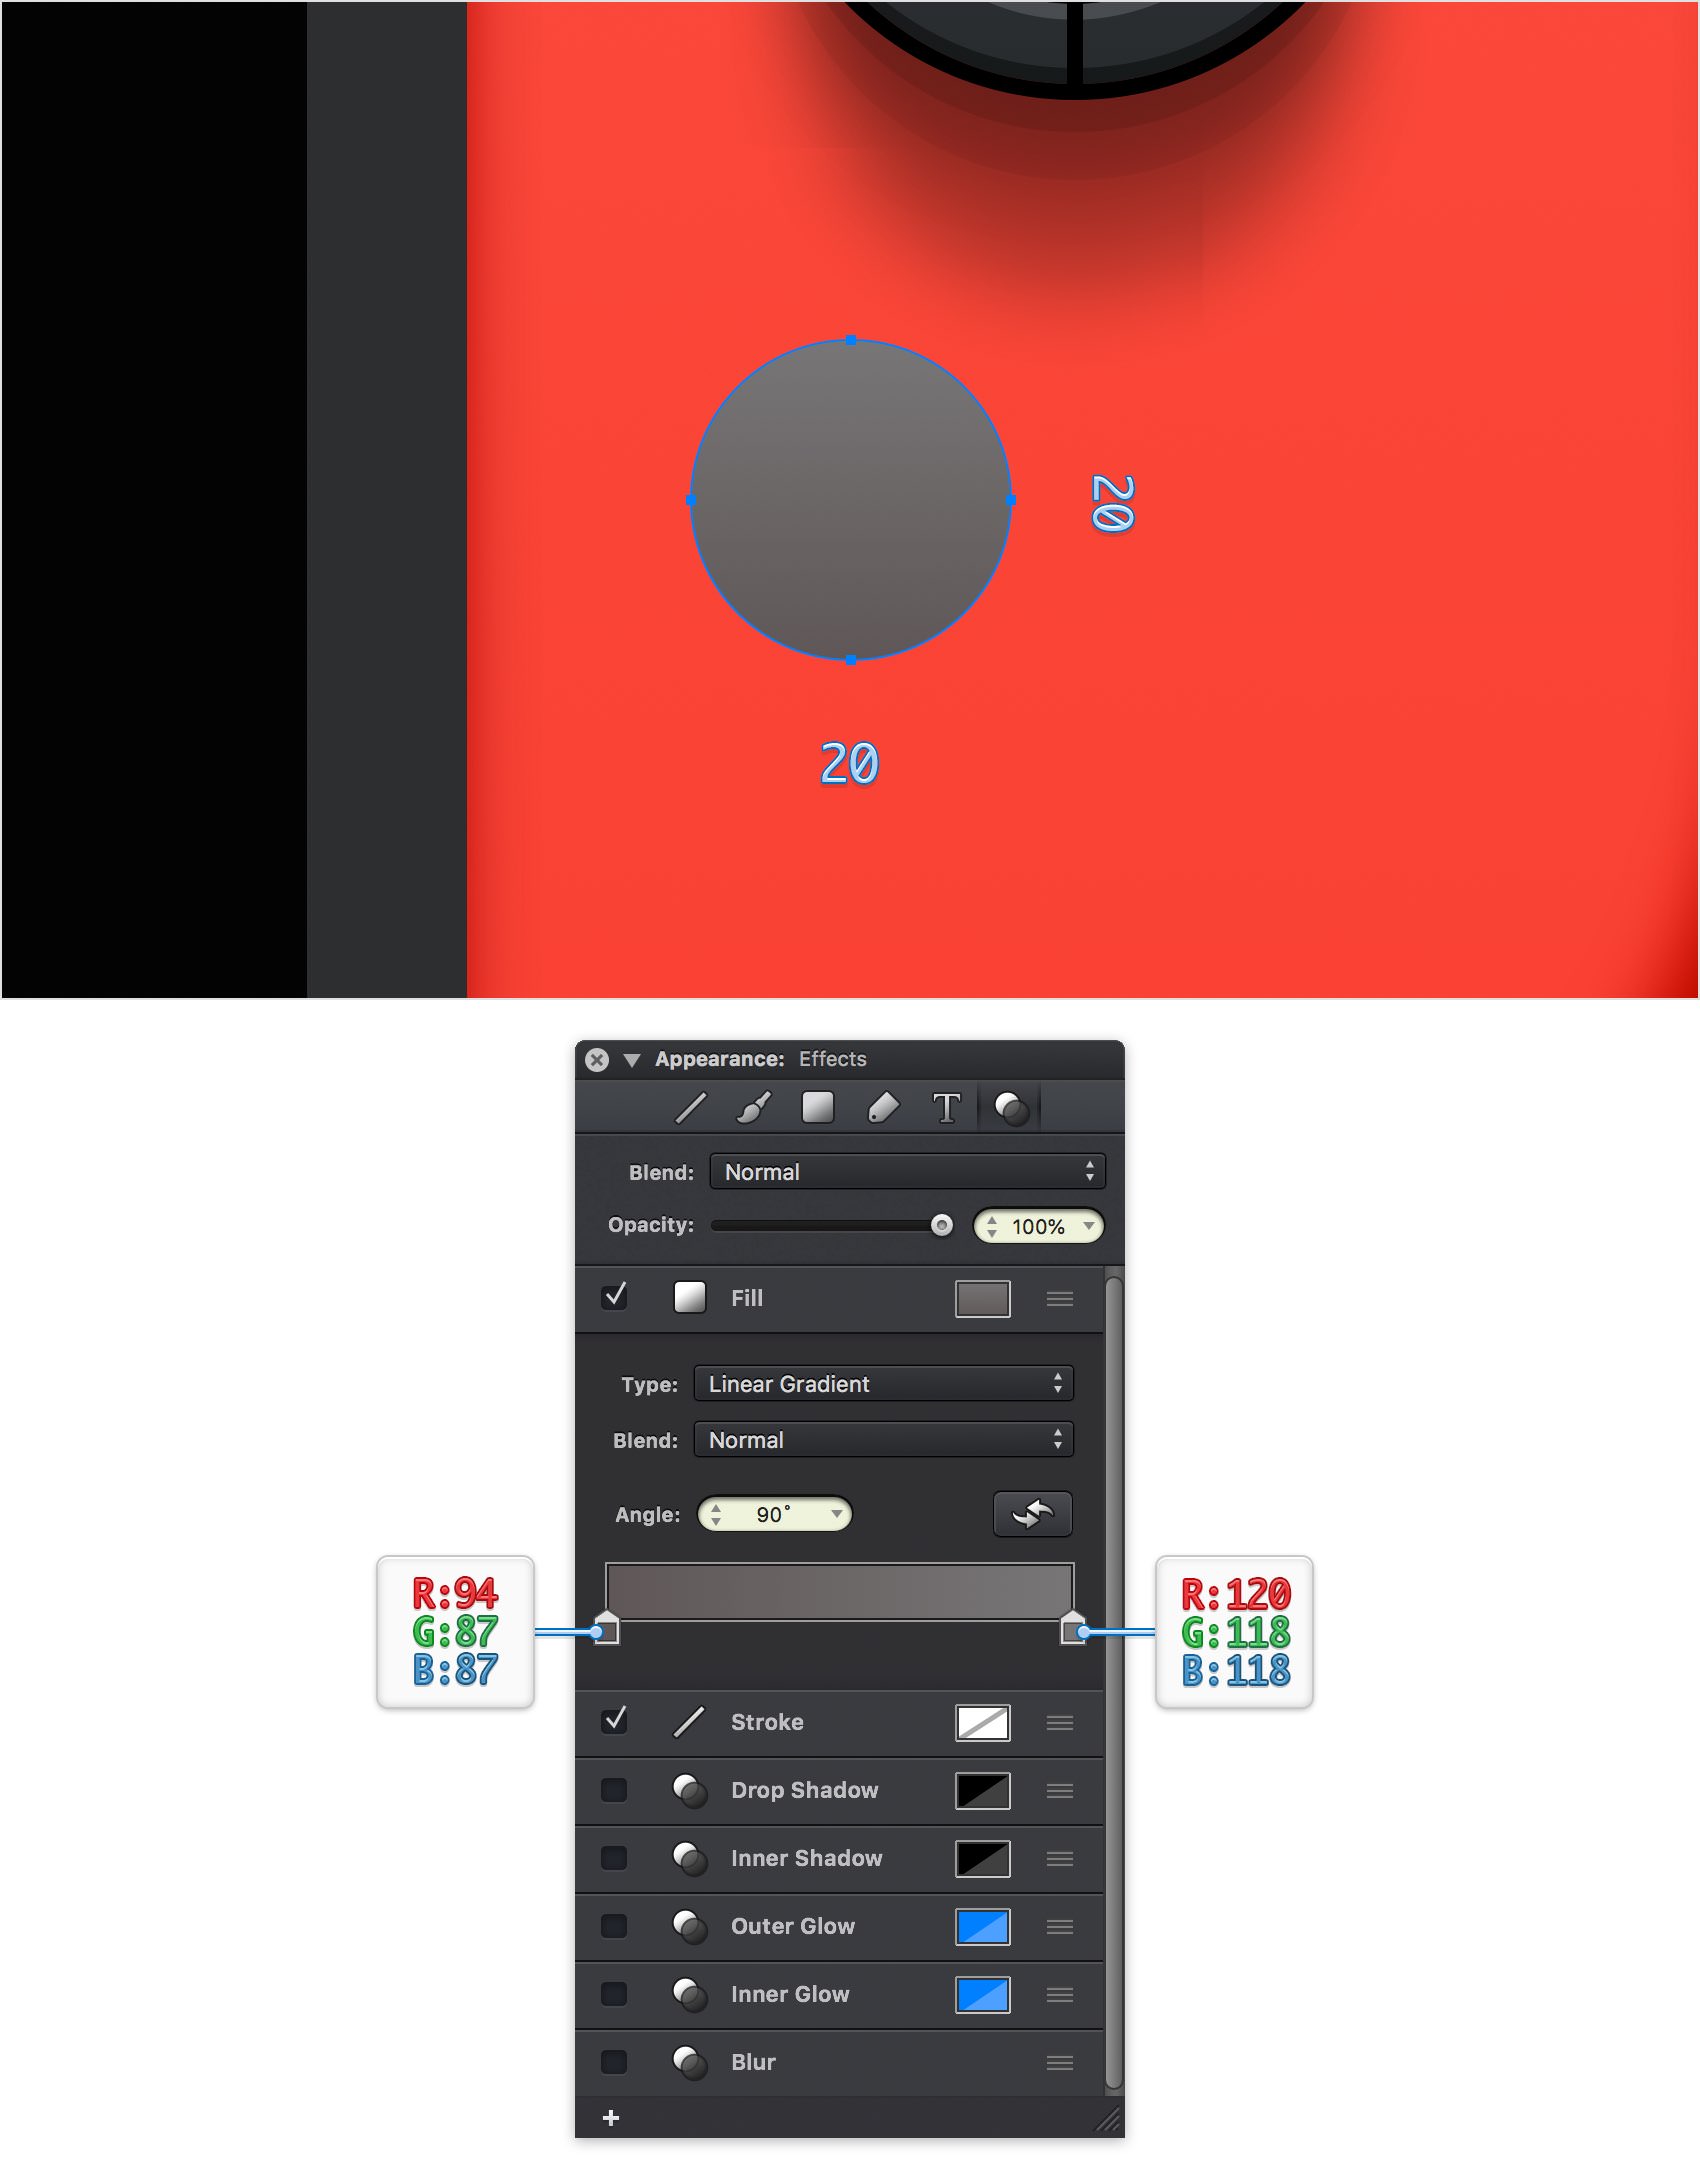
Step 69
Make sure that your new circle stays selected and focus on the Effects pane. Select the Stroke and enter the attributes shown below.
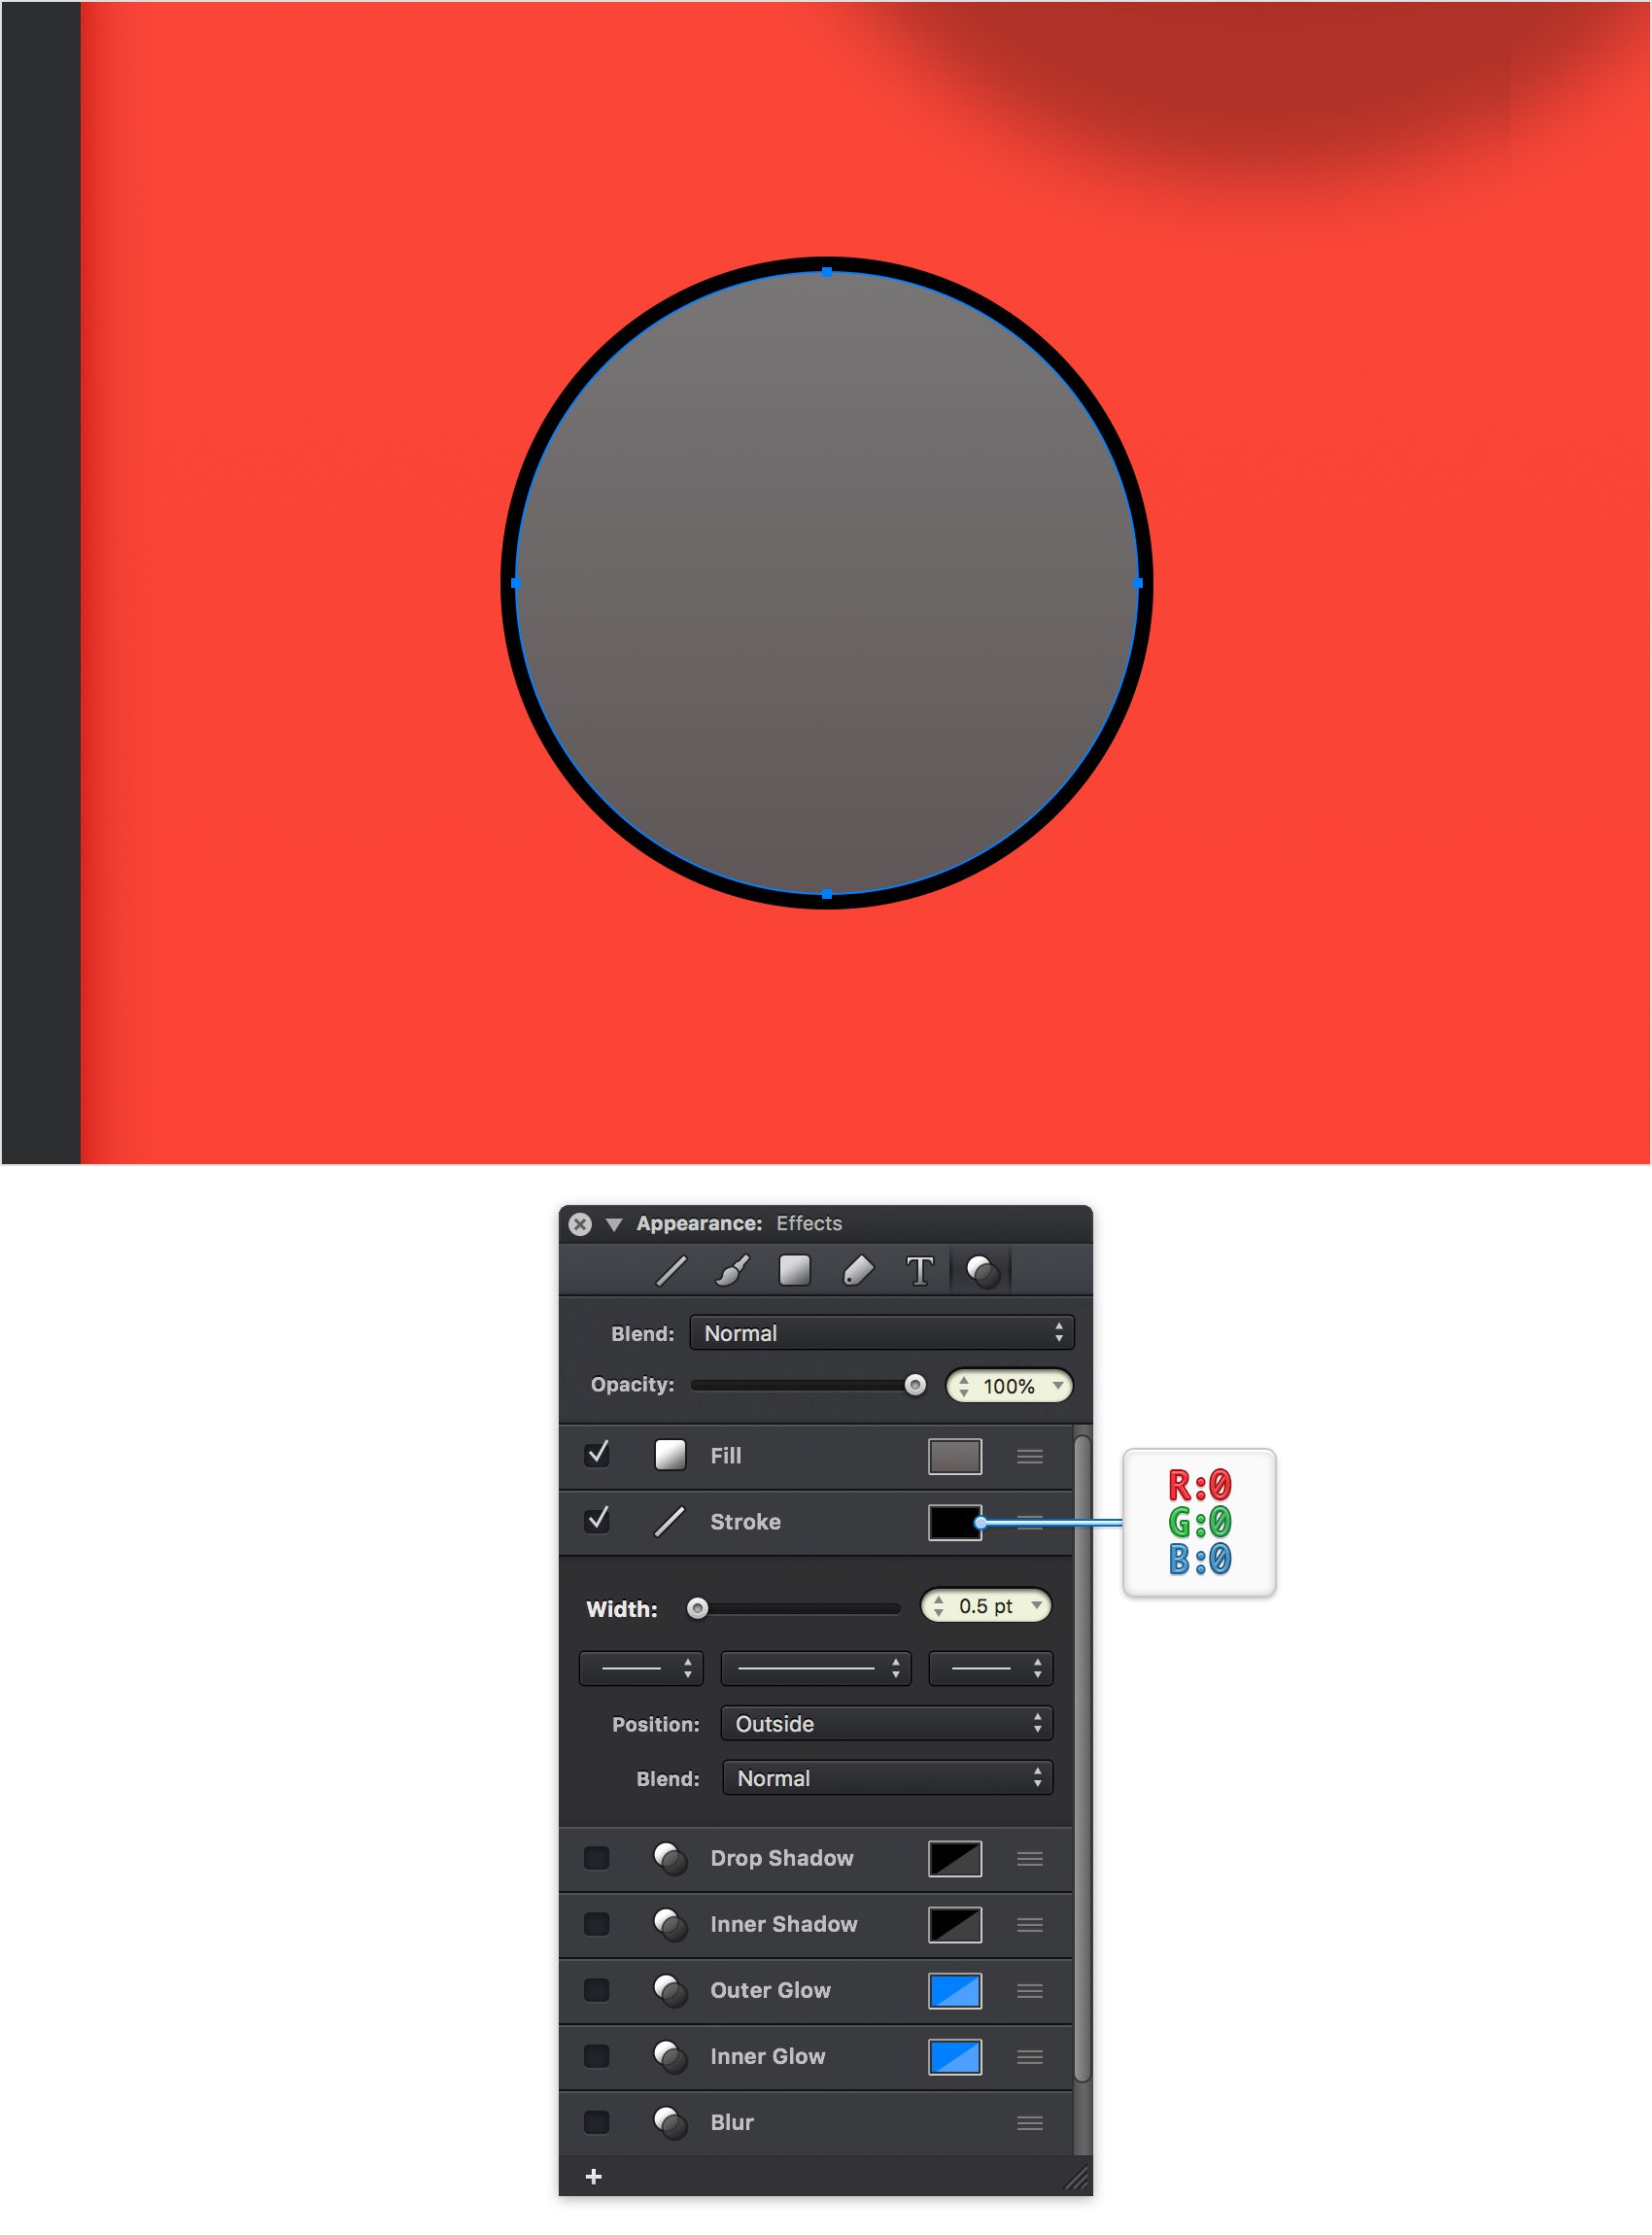
Step 70
Make sure that your circle stays selected and keep focusing on the Effects pane. Activate the Drop Shadow effect and enter the attributes shown below.
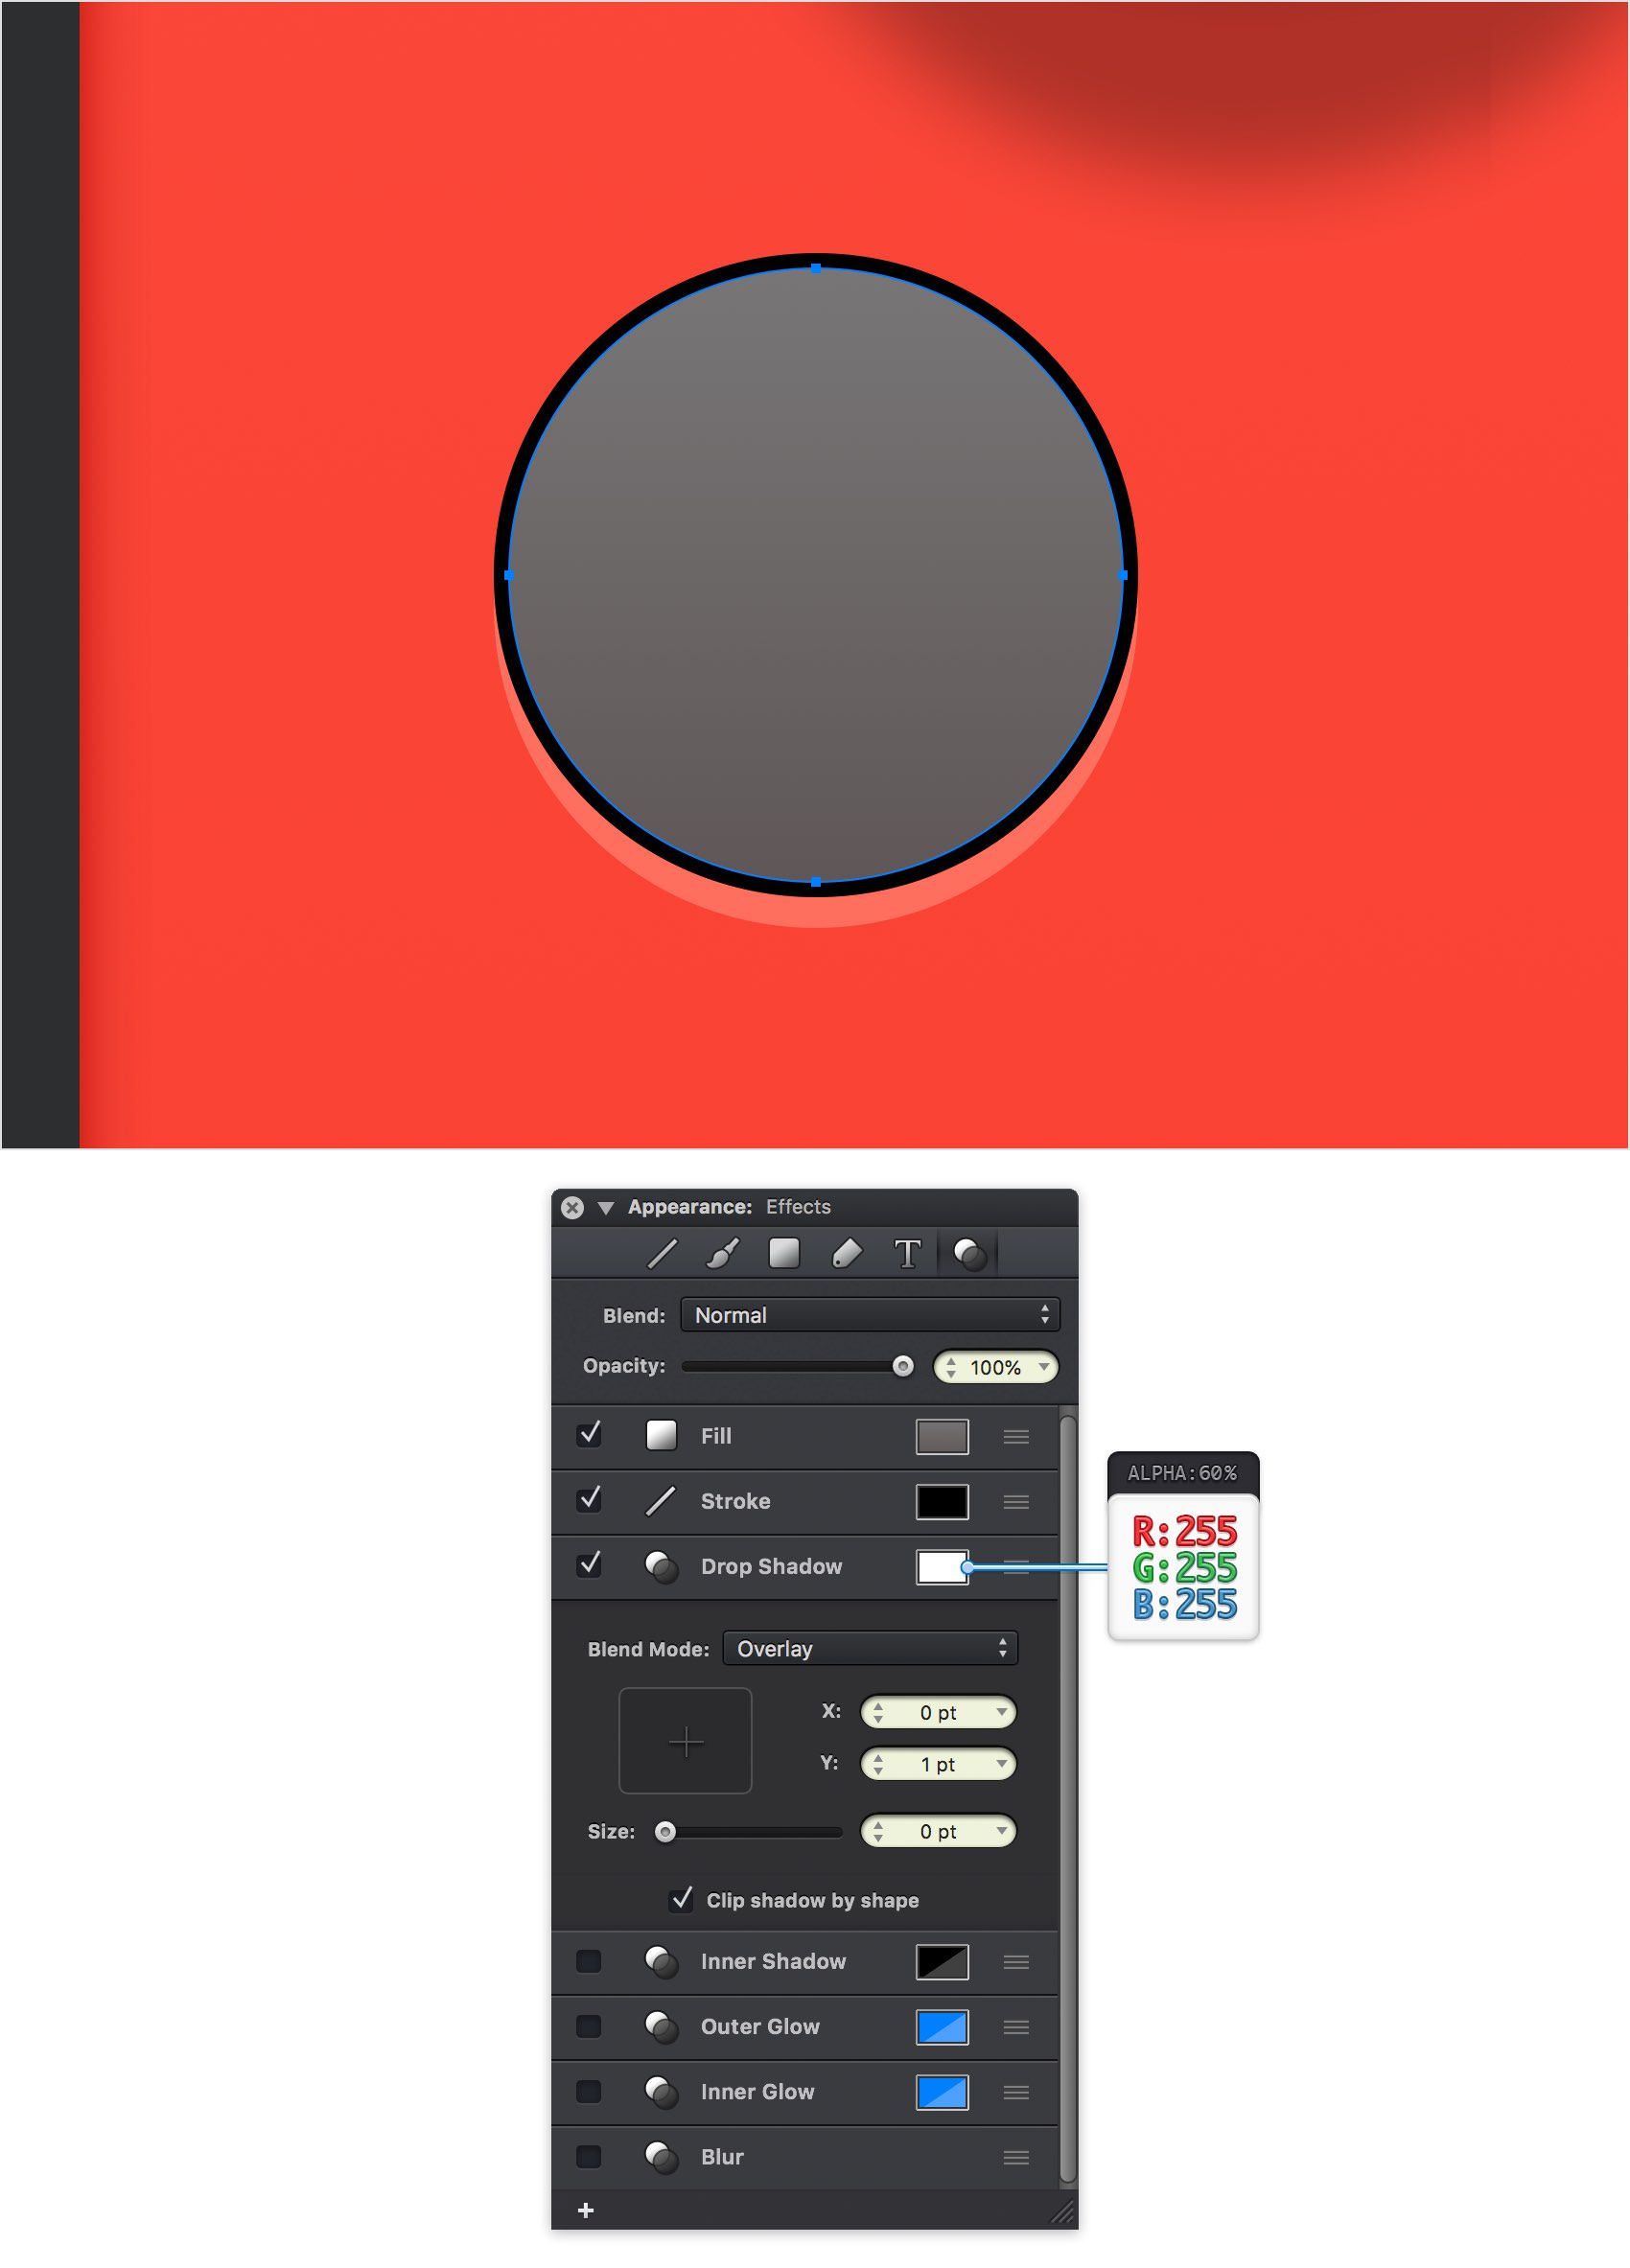
Step 71
Make sure that your circle stays selected and keep focusing on the Effects pane. Activate the Inner Shadow effect, drag it below the Fill and enter the attributes shown below.
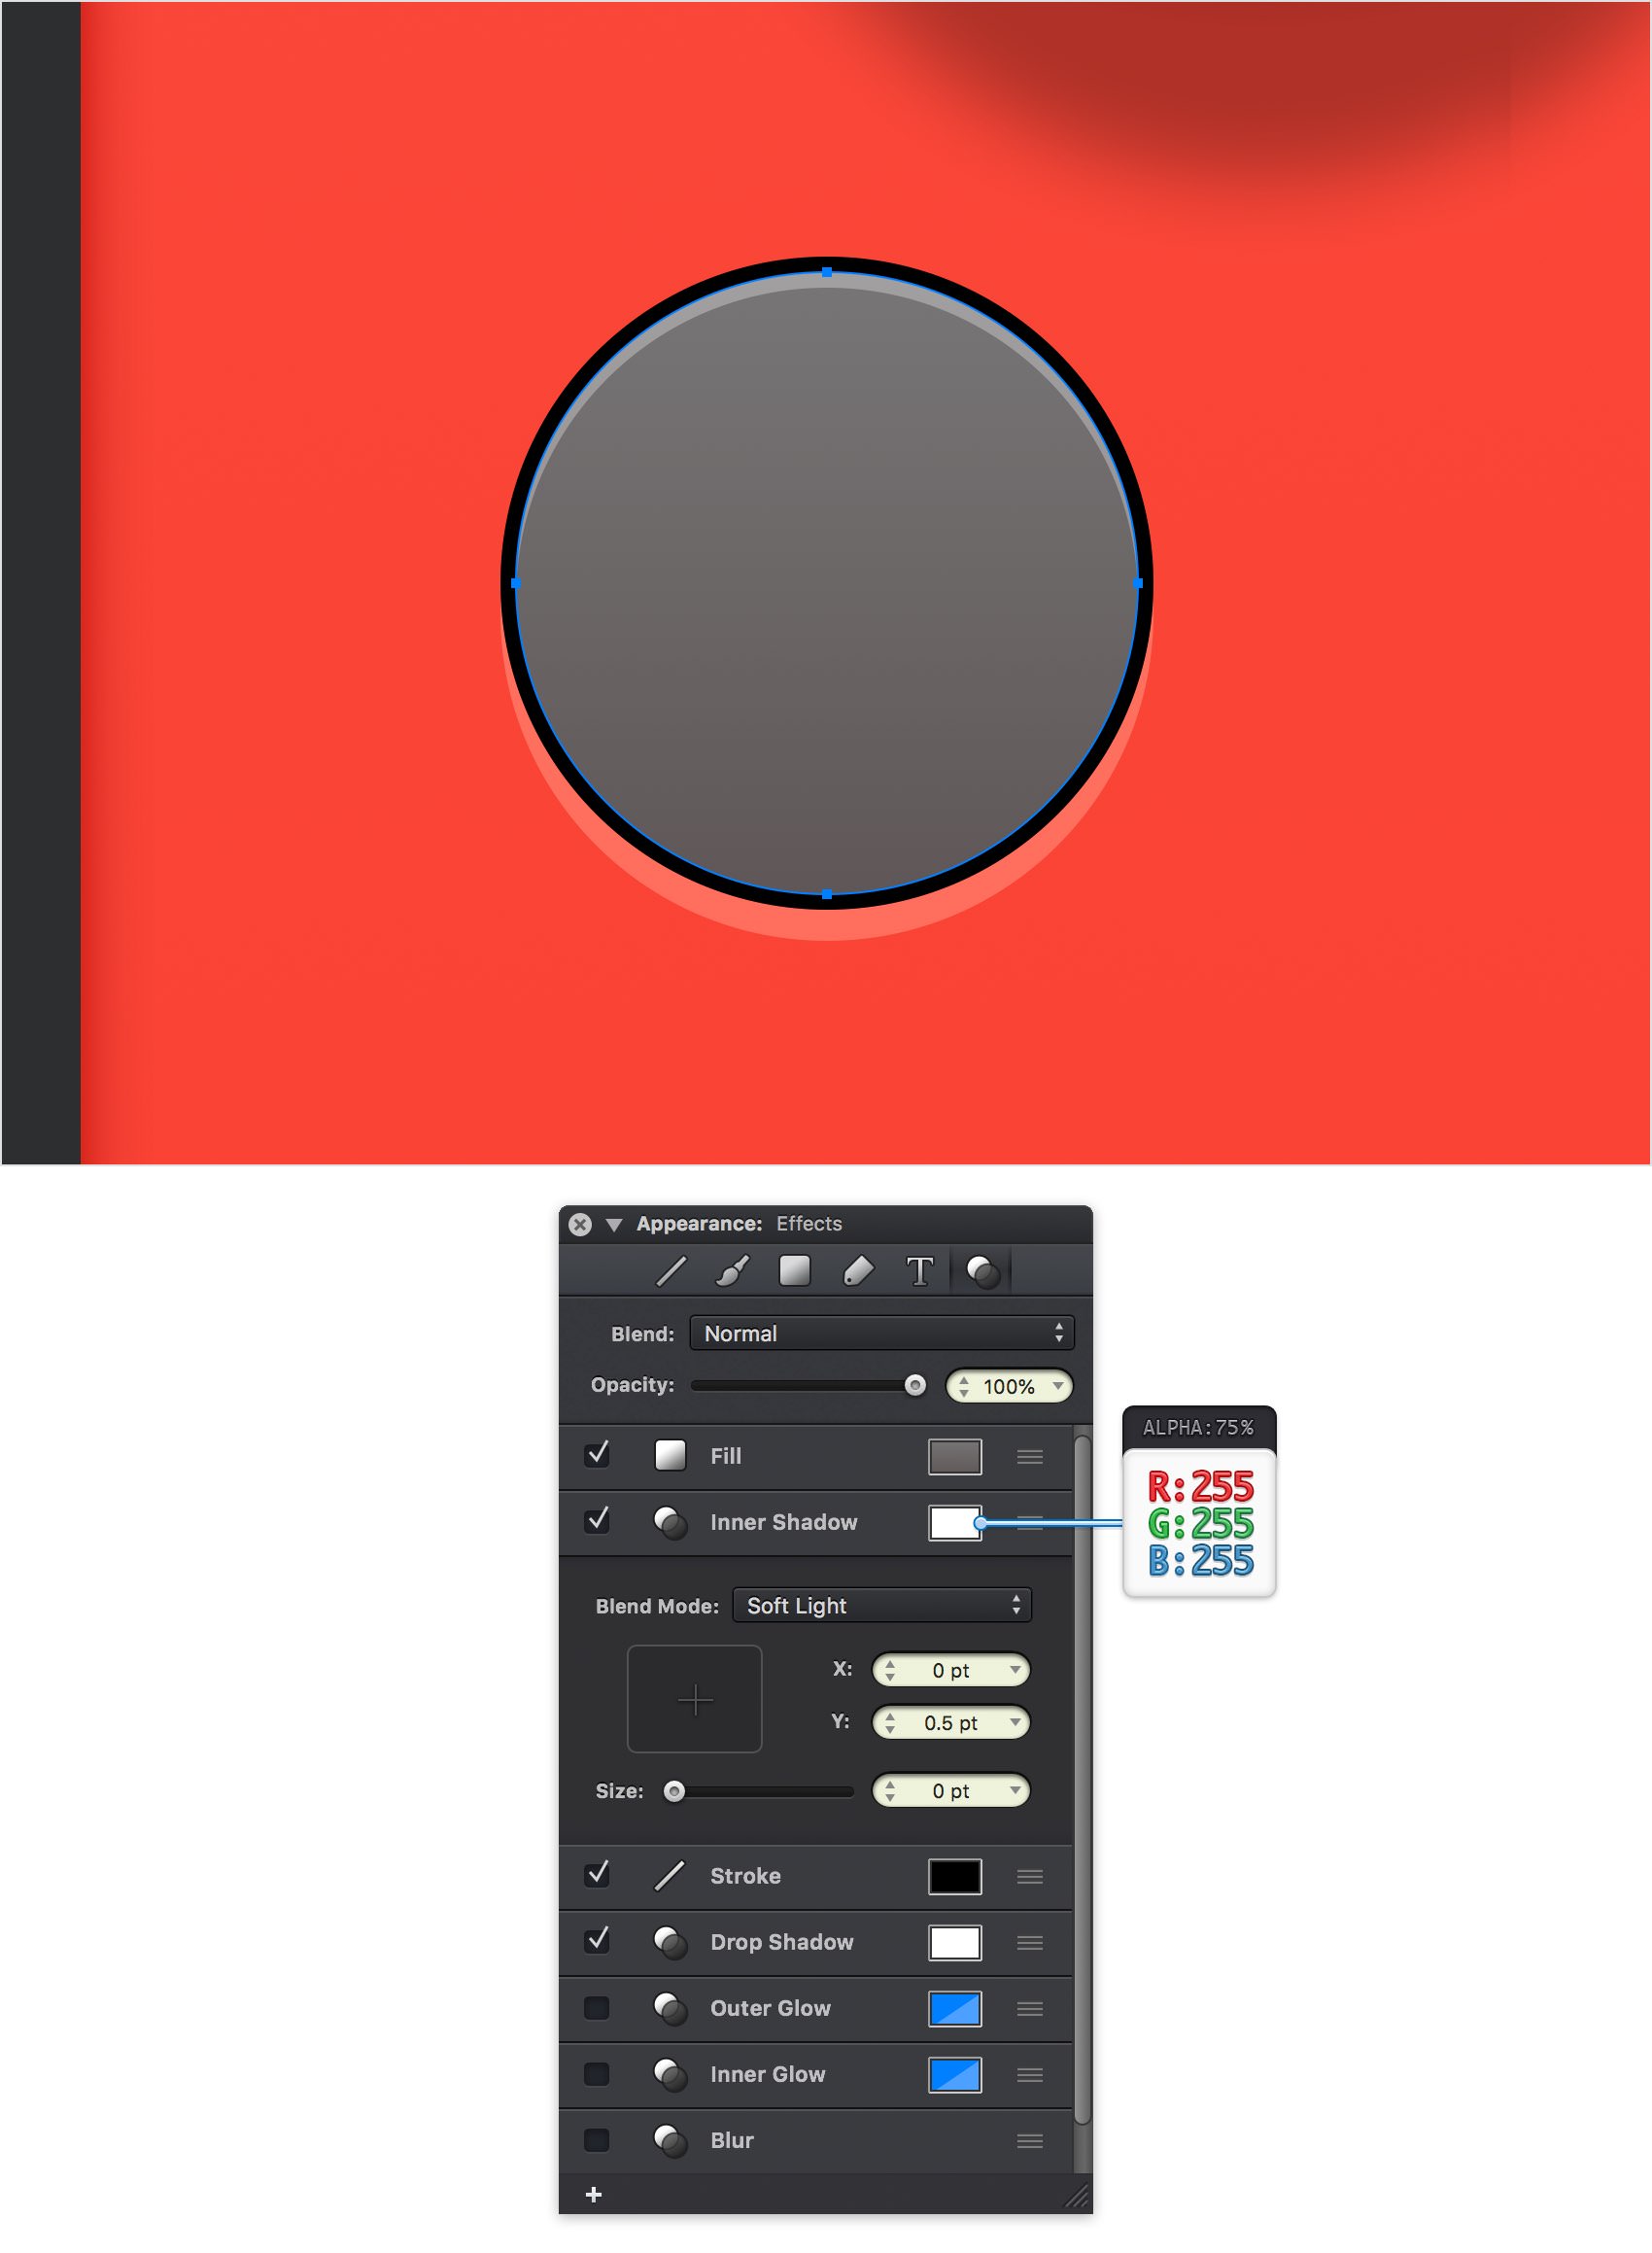
Step 72
Pick the Ellipse Tool (O) and create a 14 px circle. Fill this new shape with R=48 G=49 B=53 and place it as shown in the following image (X: 612 px Y: 270 px).
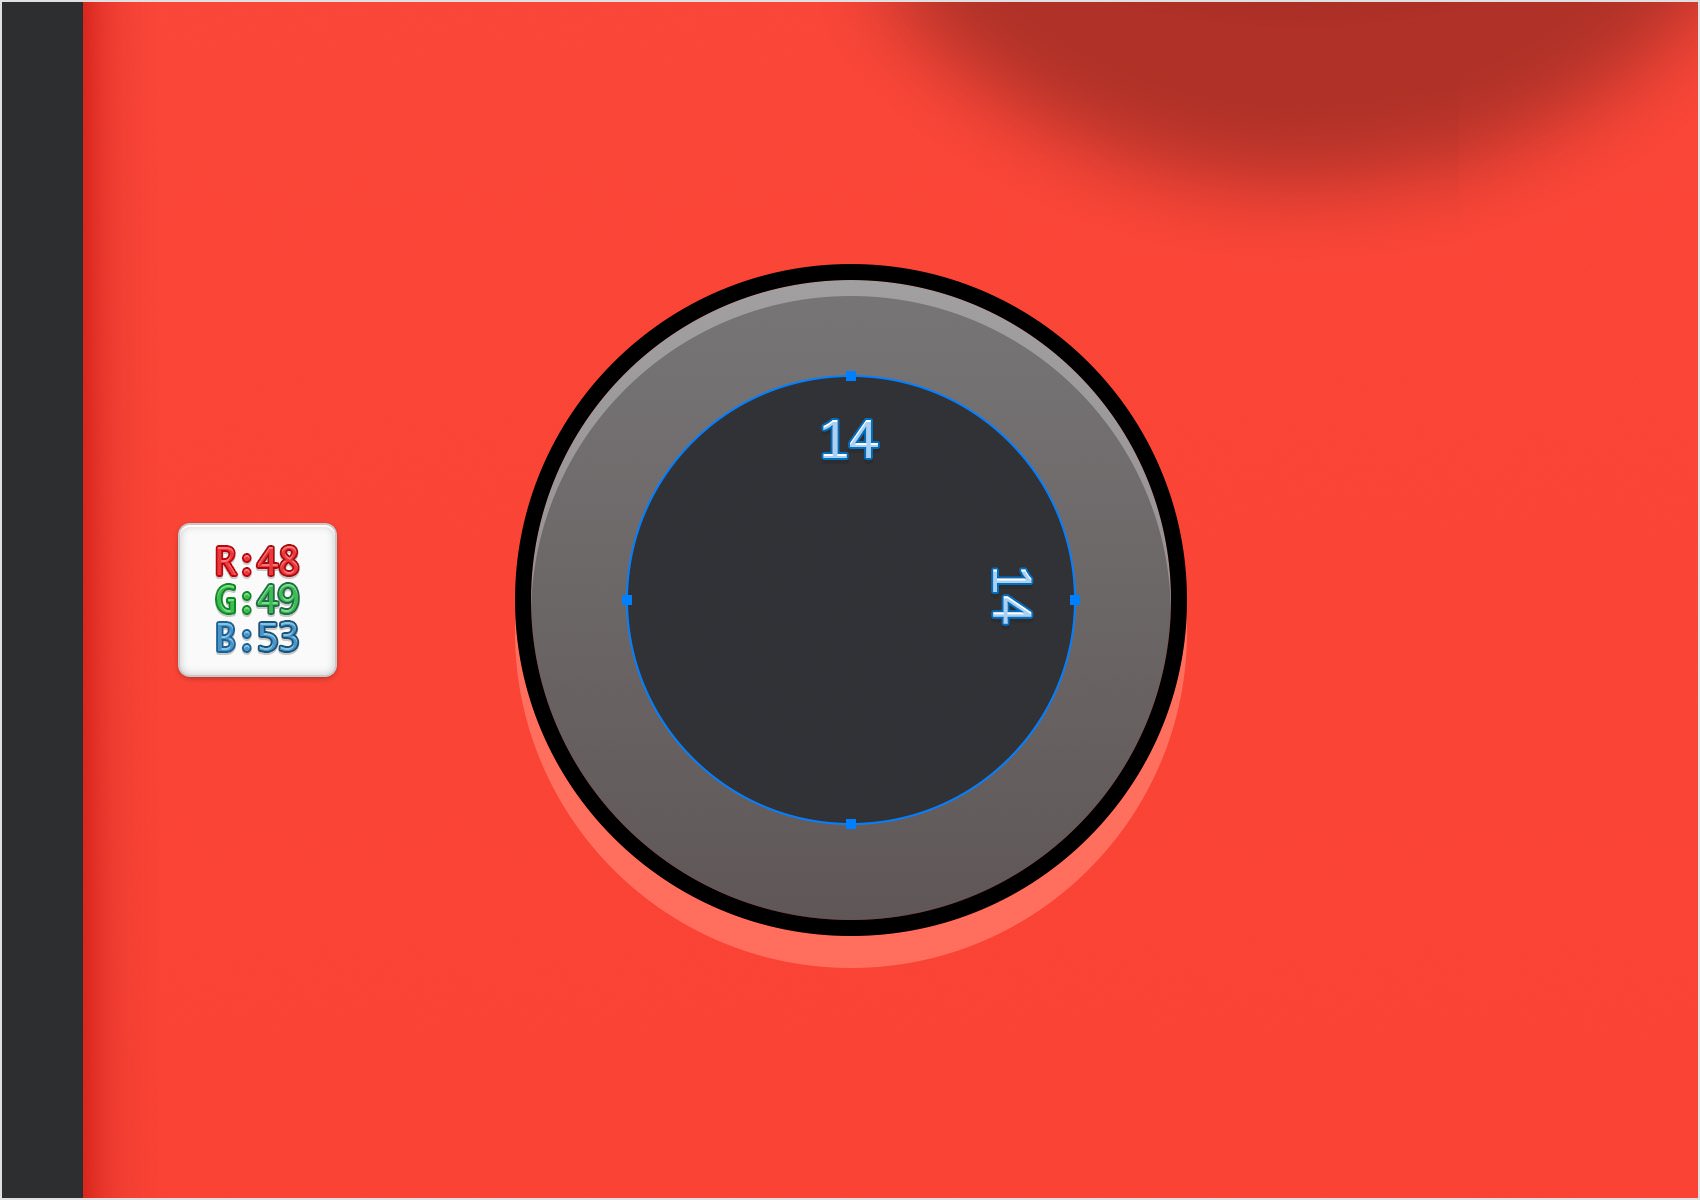
Step 73
Make sure that your new circle stays selected and focus on the Effects pane. Activate the Drop Shadow effect and enter the attributes shown below.
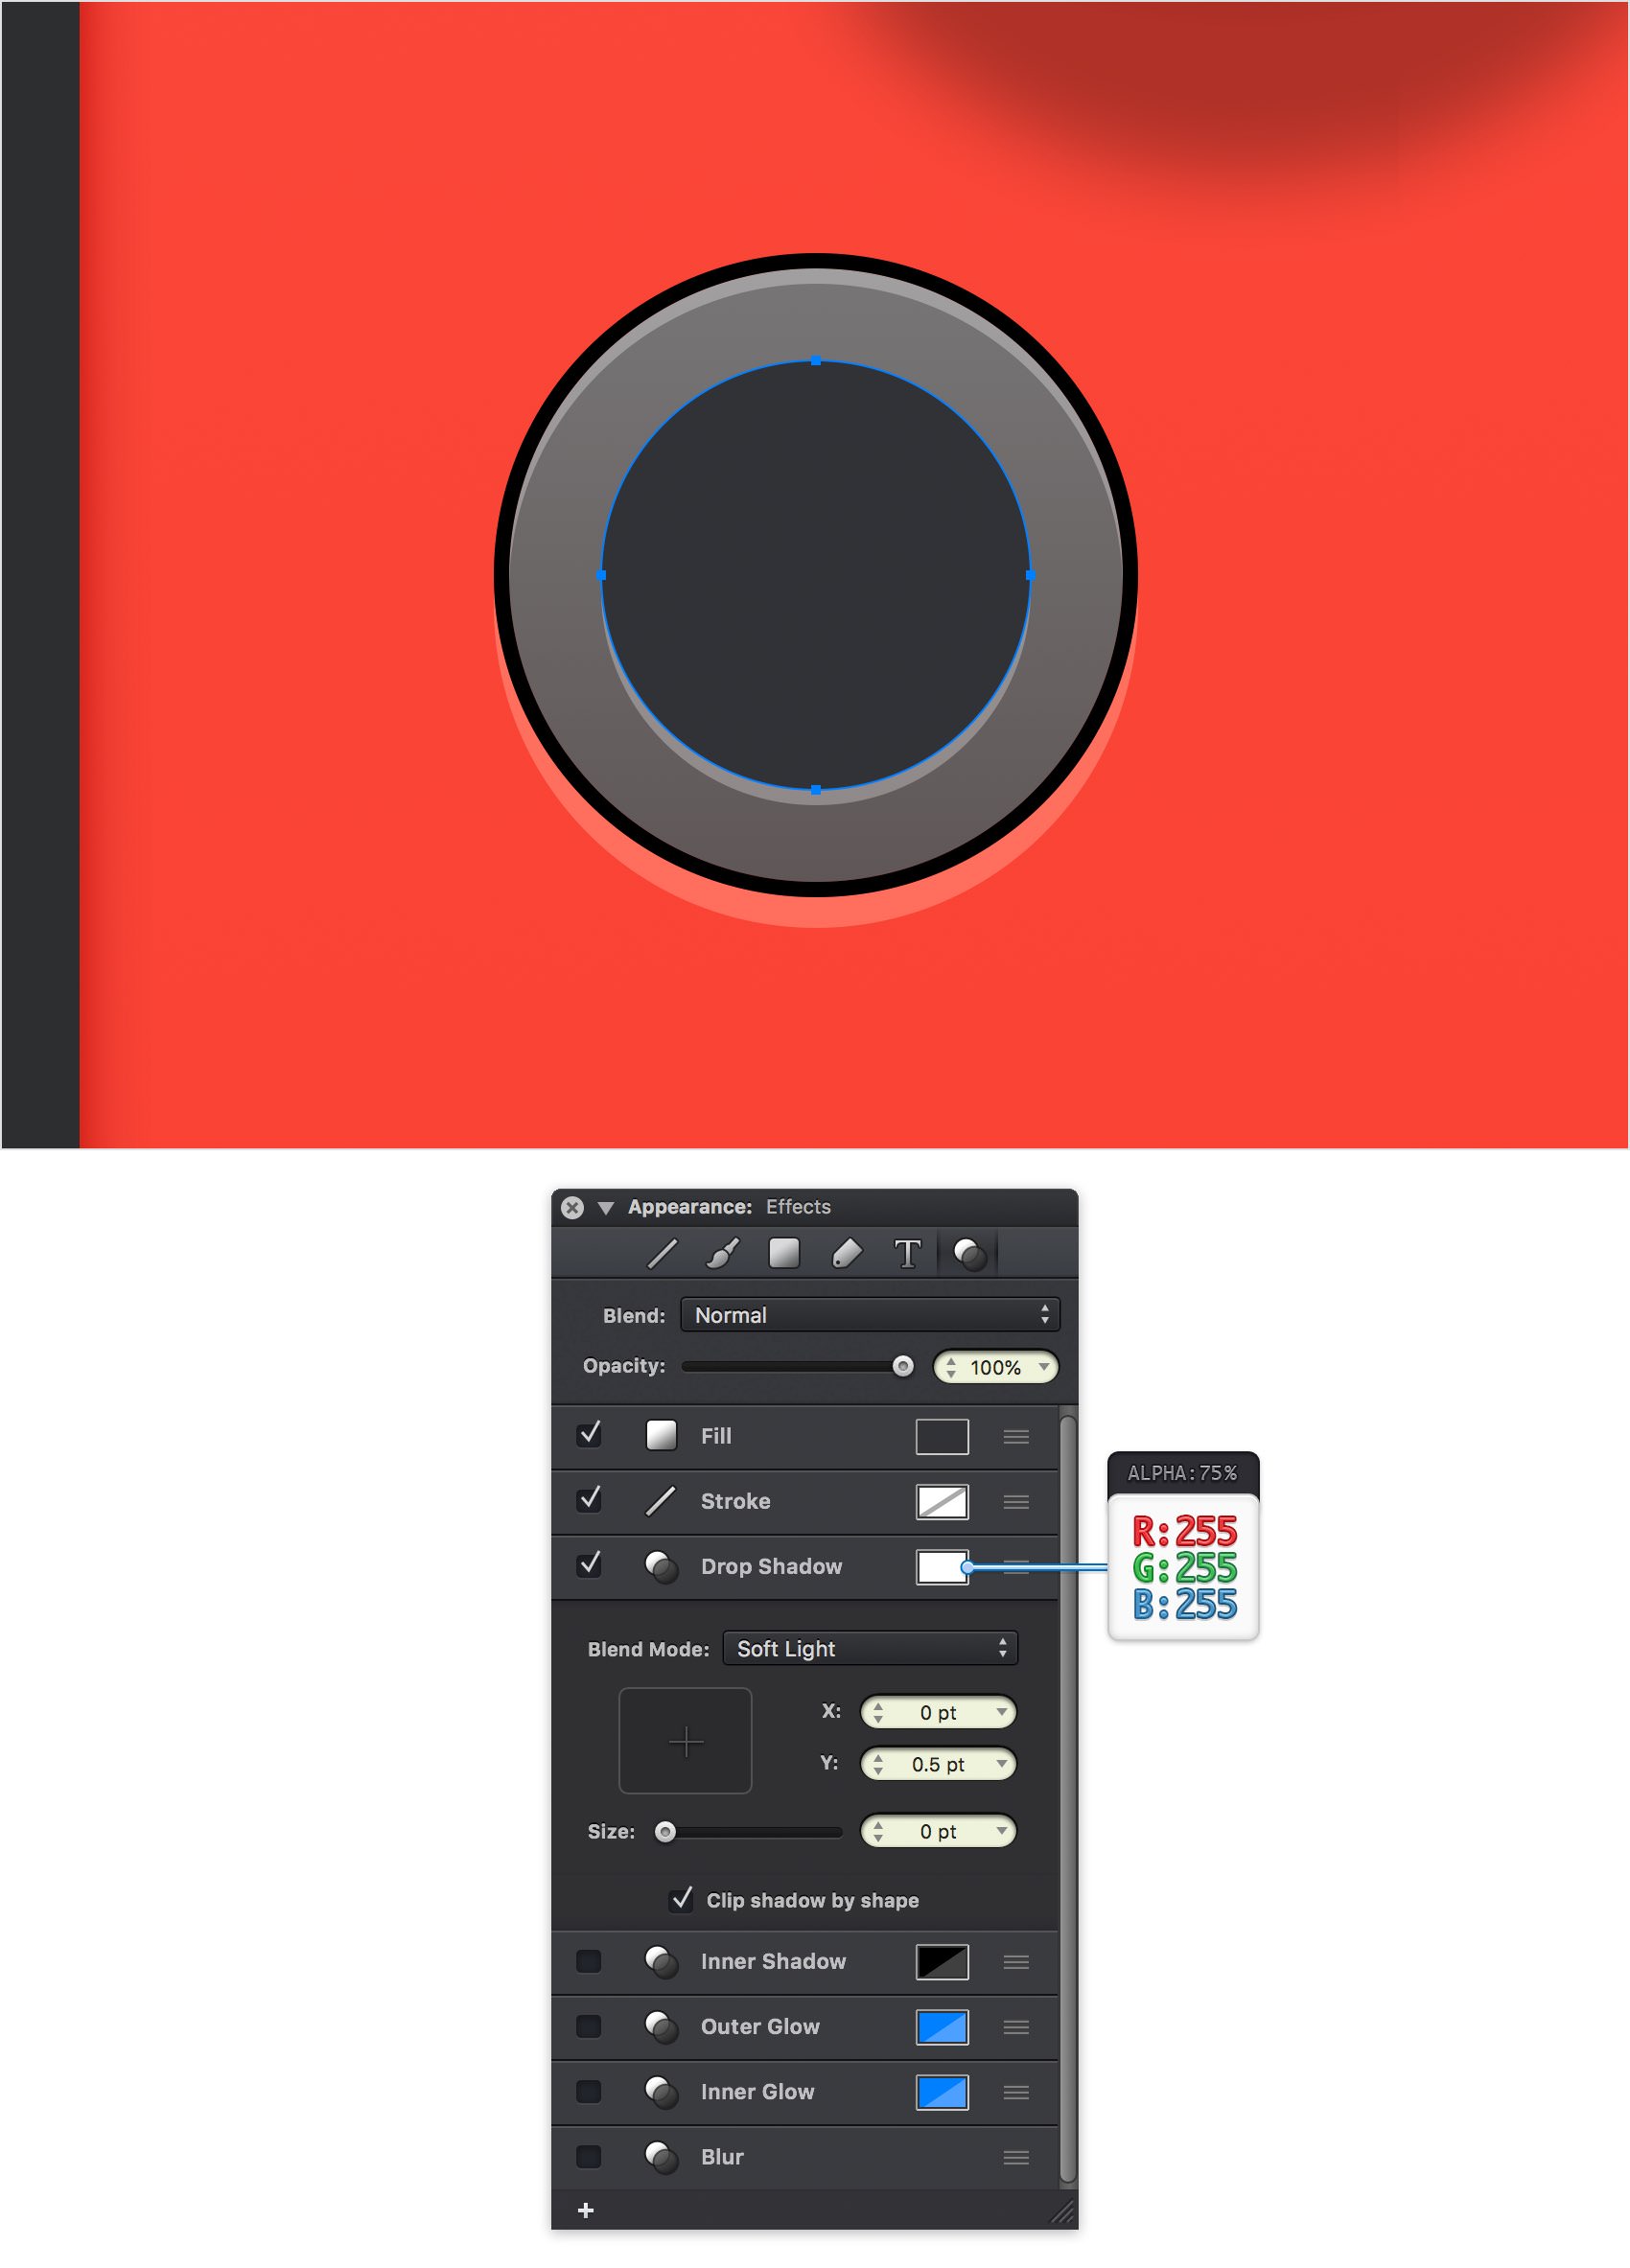
Step 74
Make sure that your circle stays selected and keep focusing on the Effects pane. Activate the Inner Shadow effect and enter the attributes shown below.
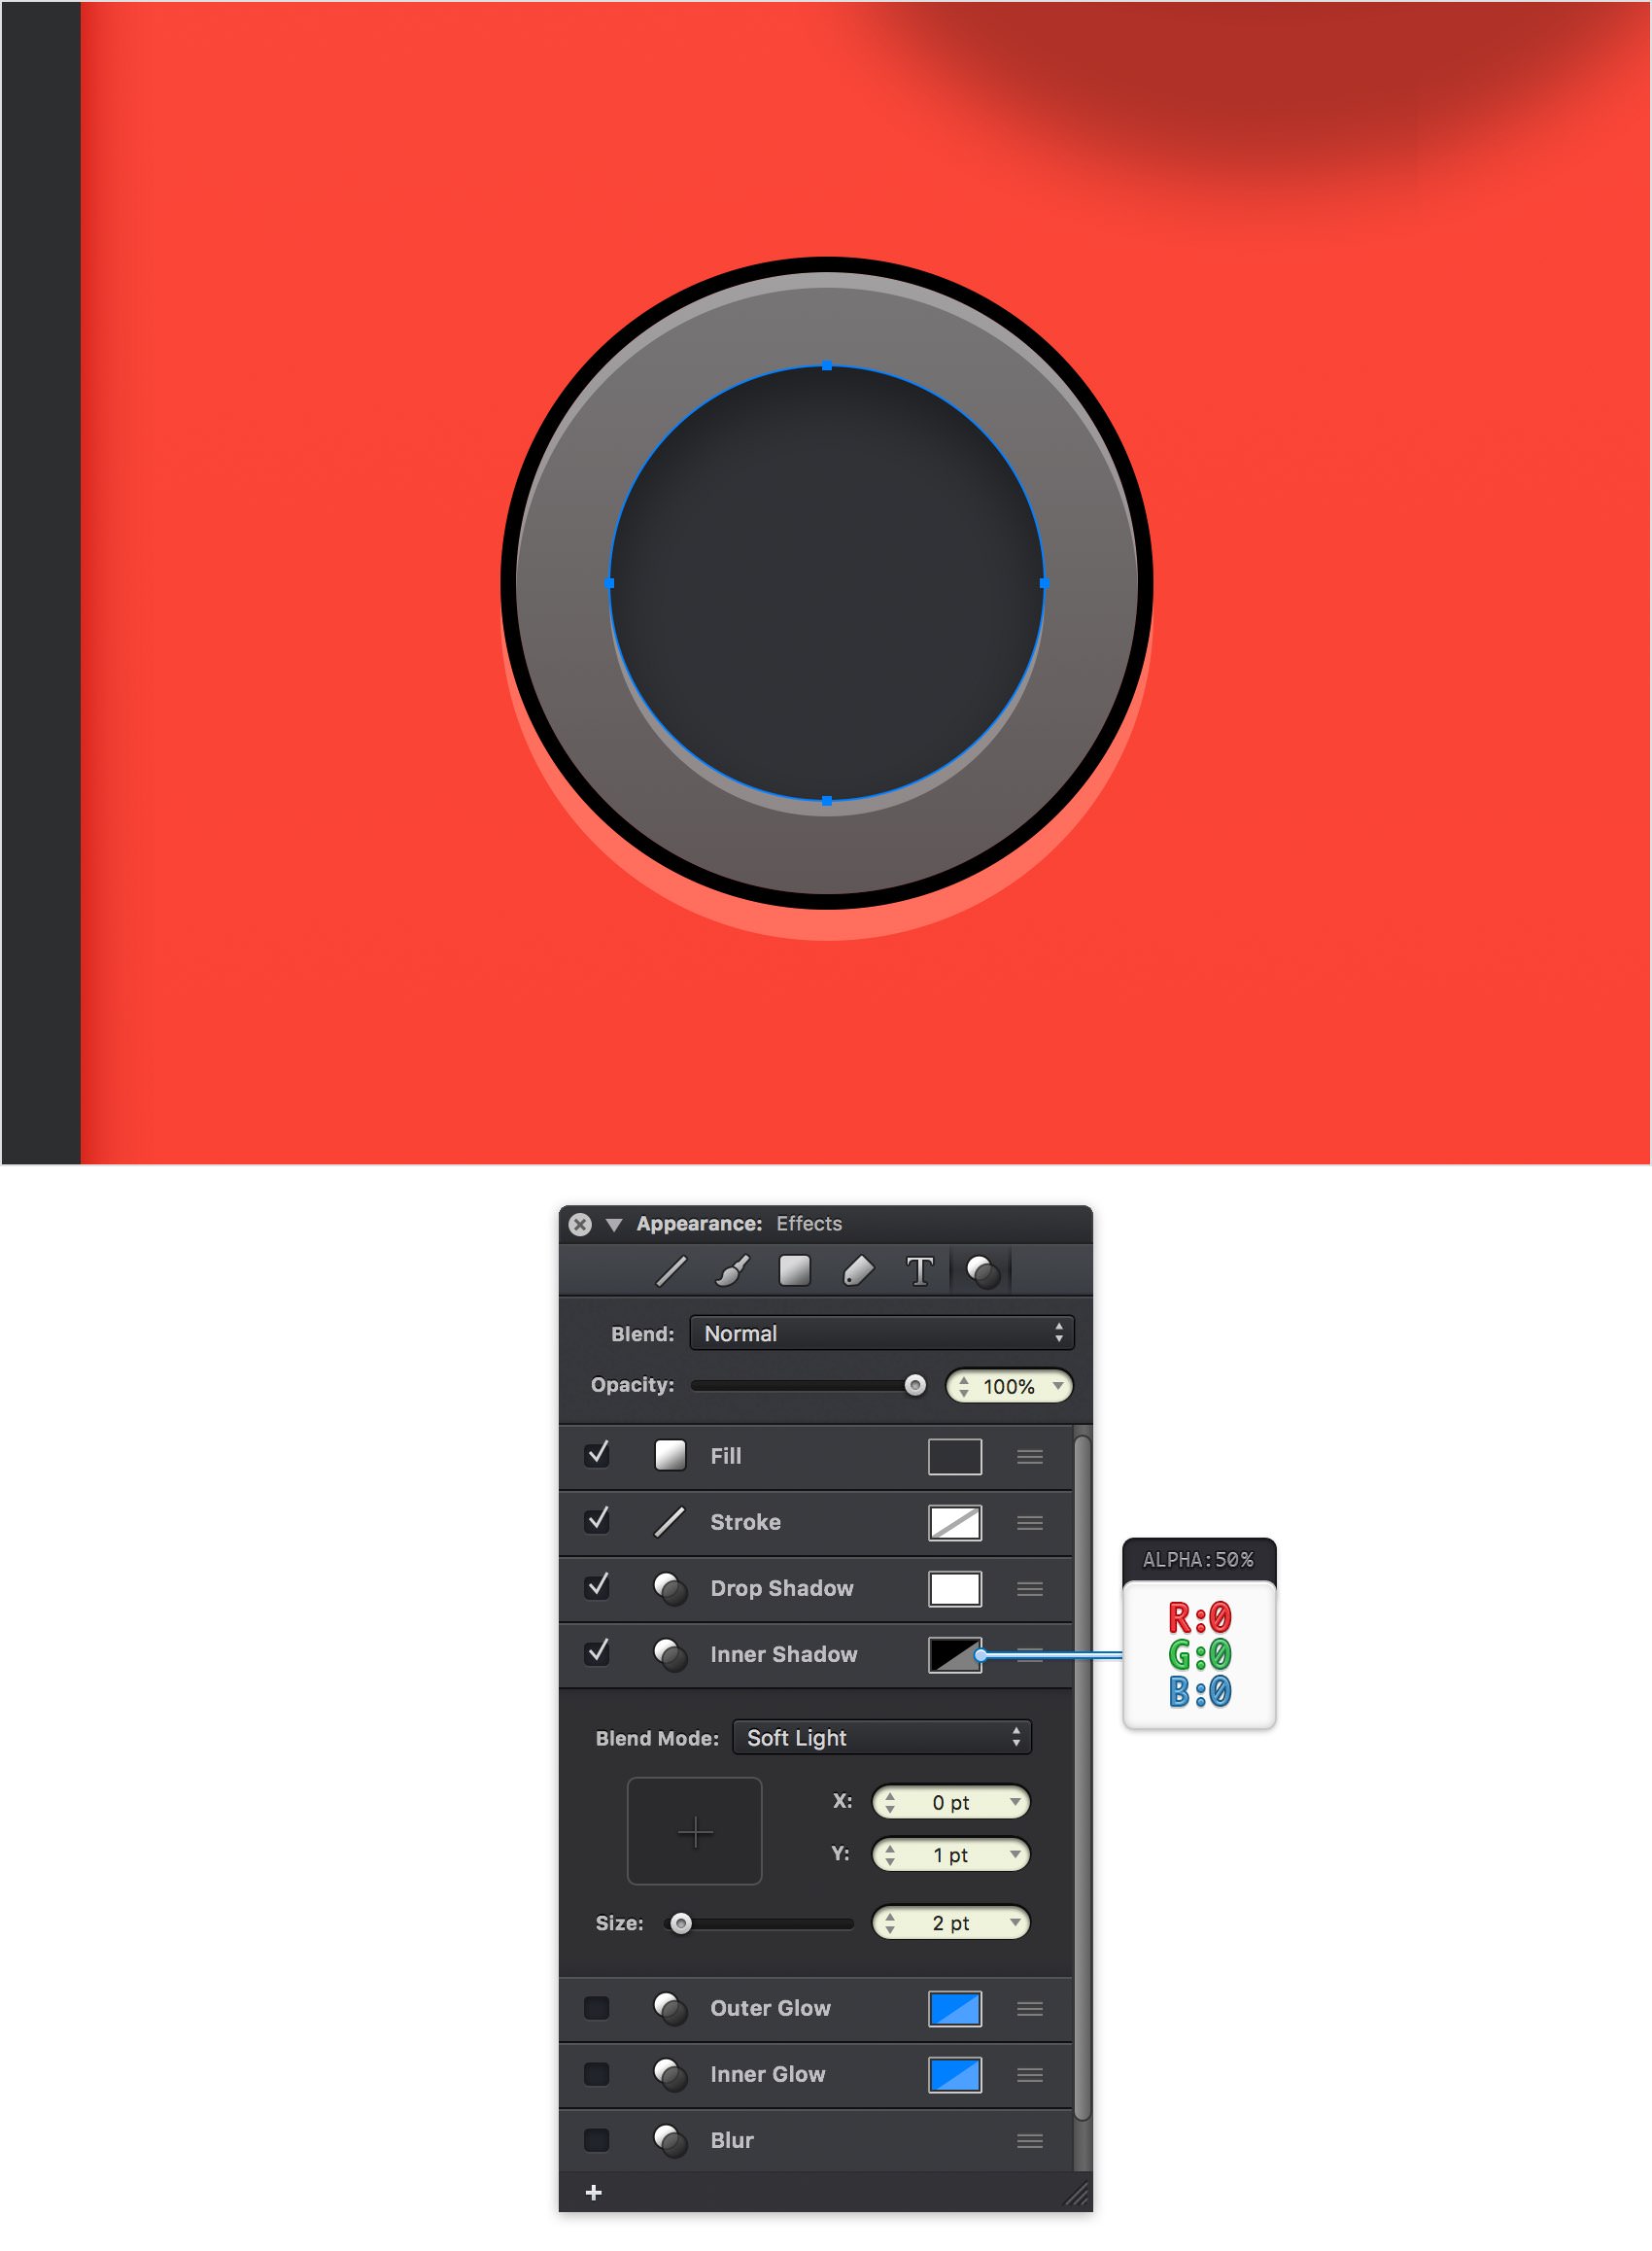
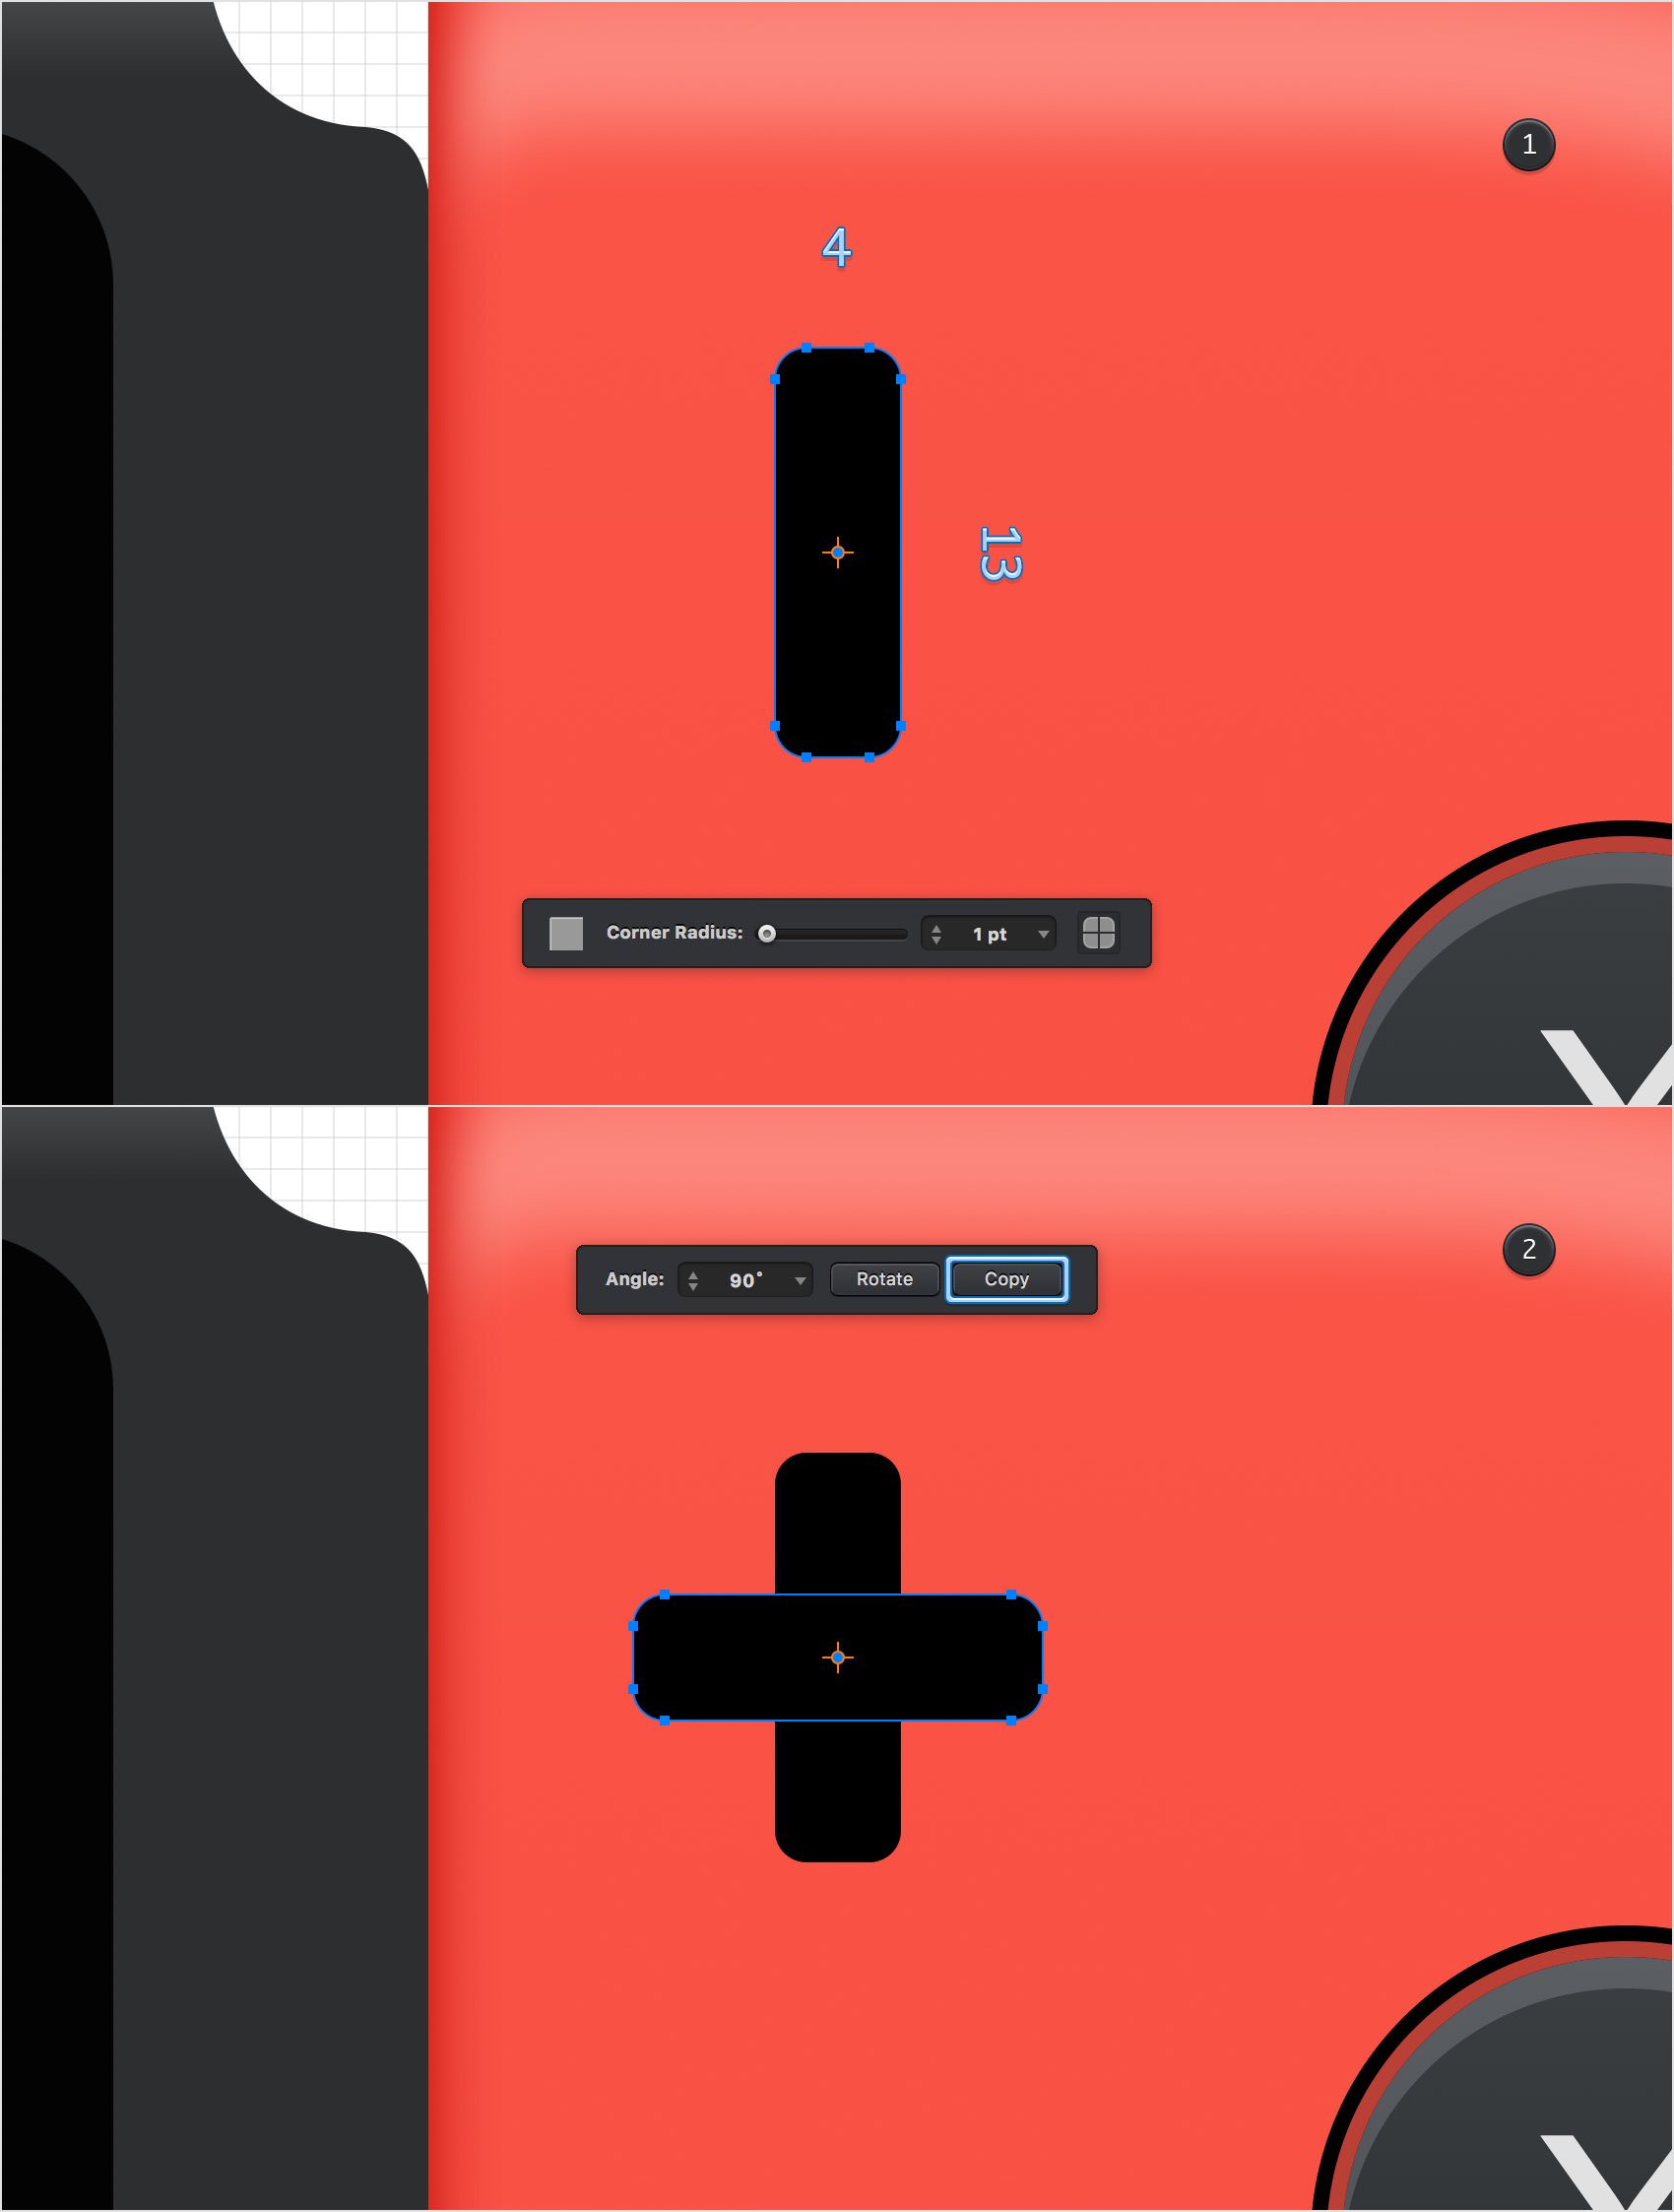
Step 75
Pick the Rounded Rectangle Tool (Shift + M) and set the Corner Radius to 1 pt. Create a 4 x 13 px shape, fill it with black and place it as shown in the following image (X: 606 px Y: 122 px). Make sure that this new shape stays selected and switch to the Rotate Tool (R). Focus on the Tool Options bar, set the Angle to 90 degrees and click that Copy button.
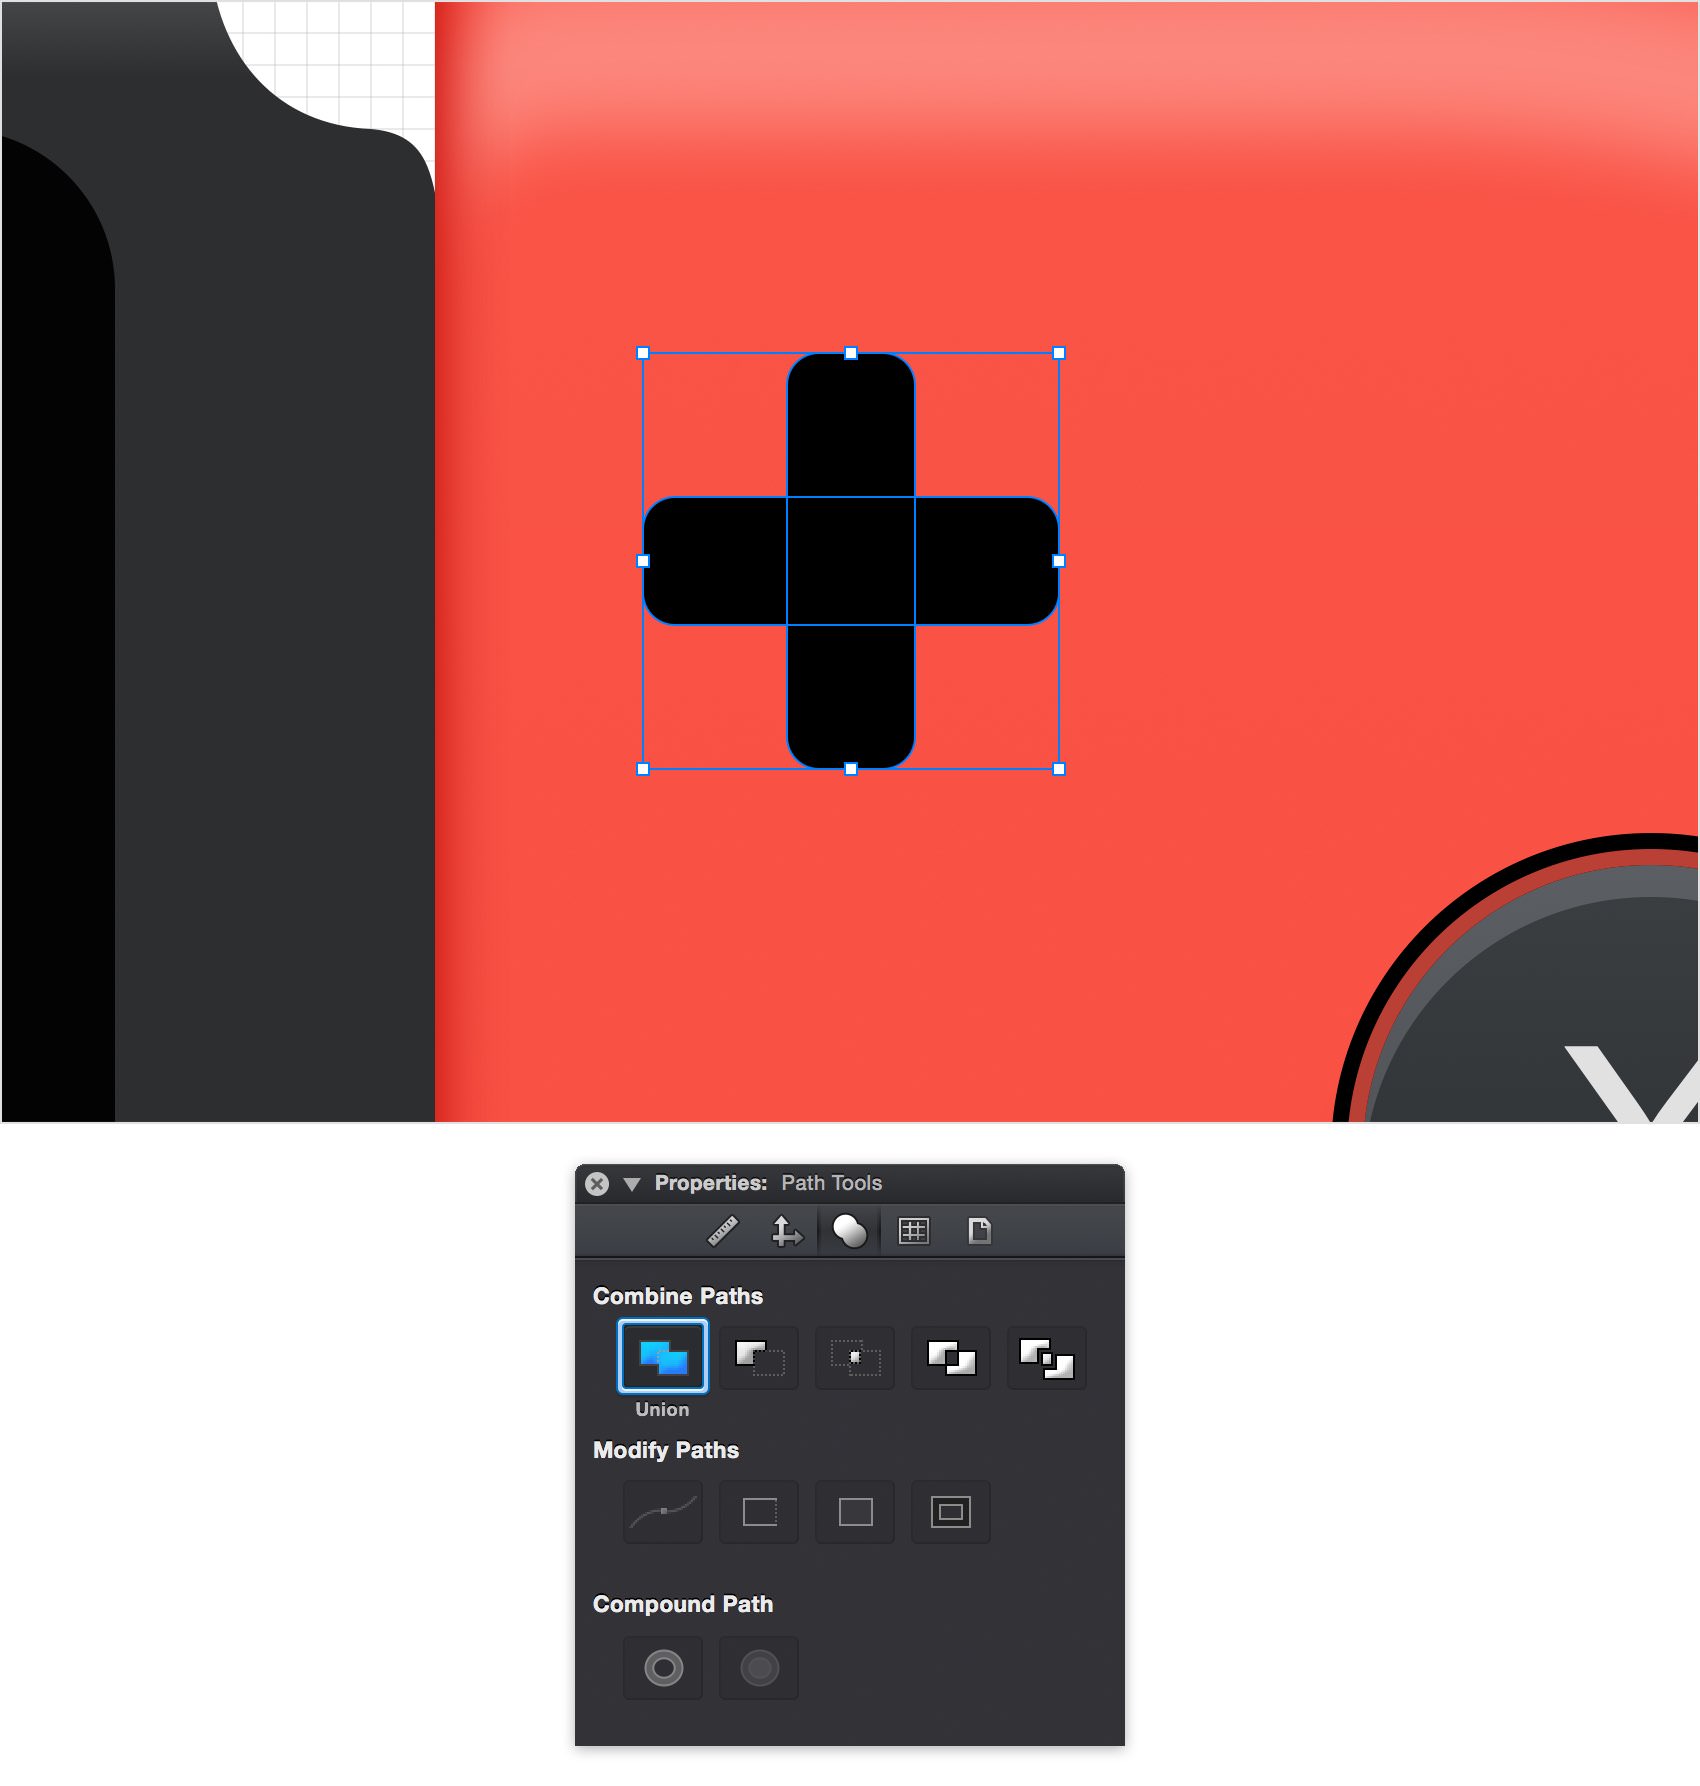
Step 76
Select both rounded rectangles made in the previous step and click the Union command from the Path Tools pane.
Step 77
Make sure that your plus shape is selected, focus on the Effects pane and replace the Fill color with the linear gradient shown below.
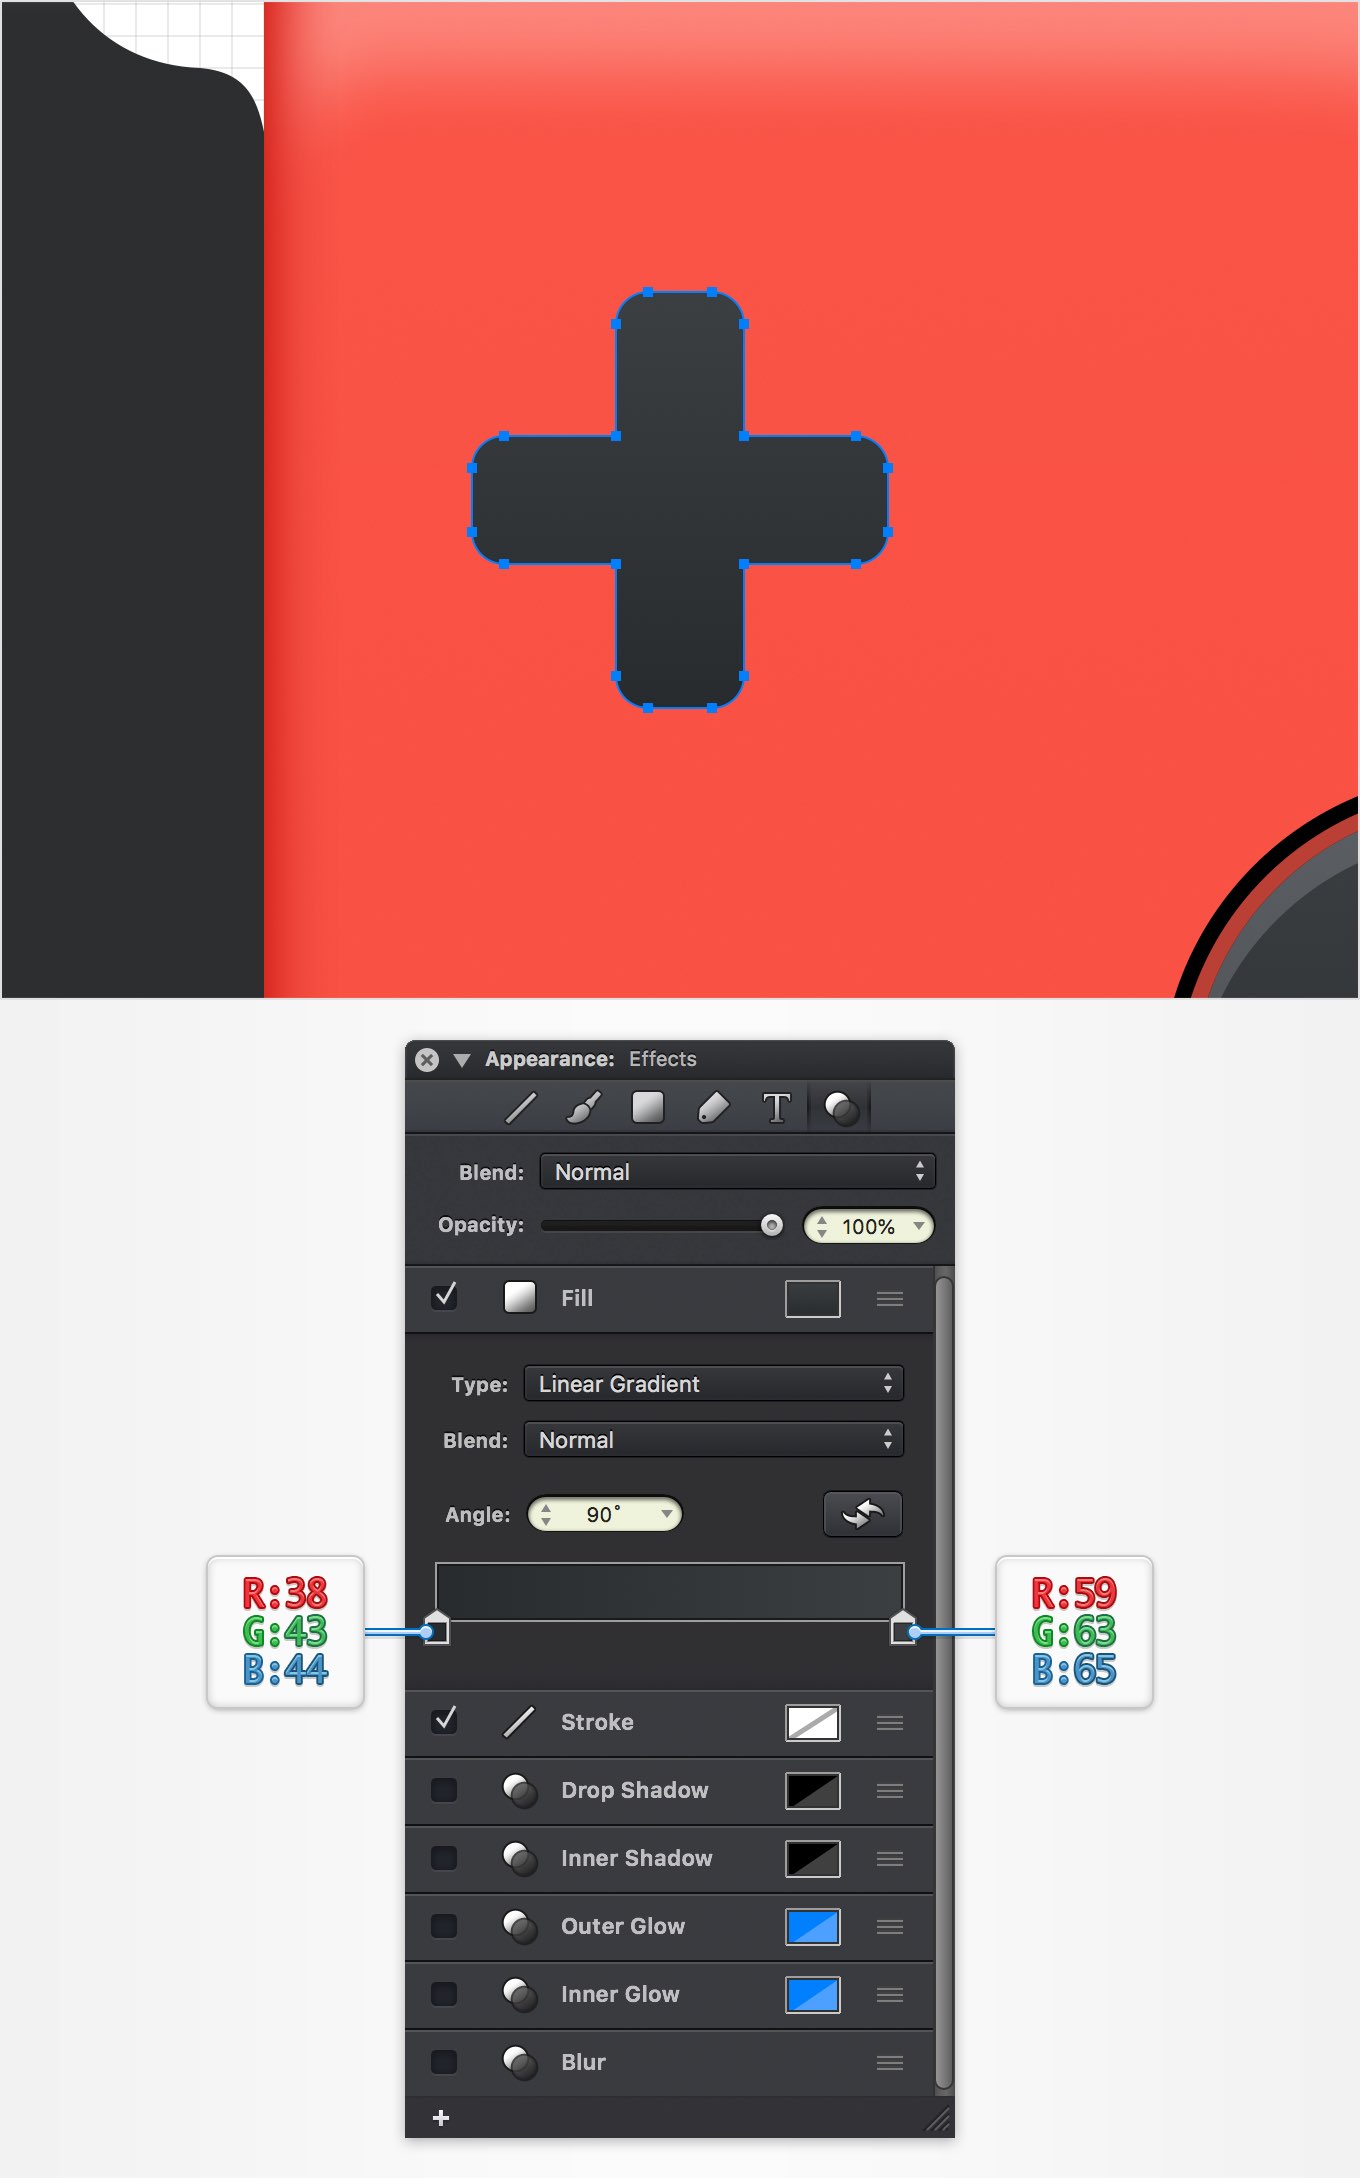
Step 78
Make sure that your plus shape stays selected and keep focusing on the Effects pane. Select the Stroke and enter the attributes shown below.
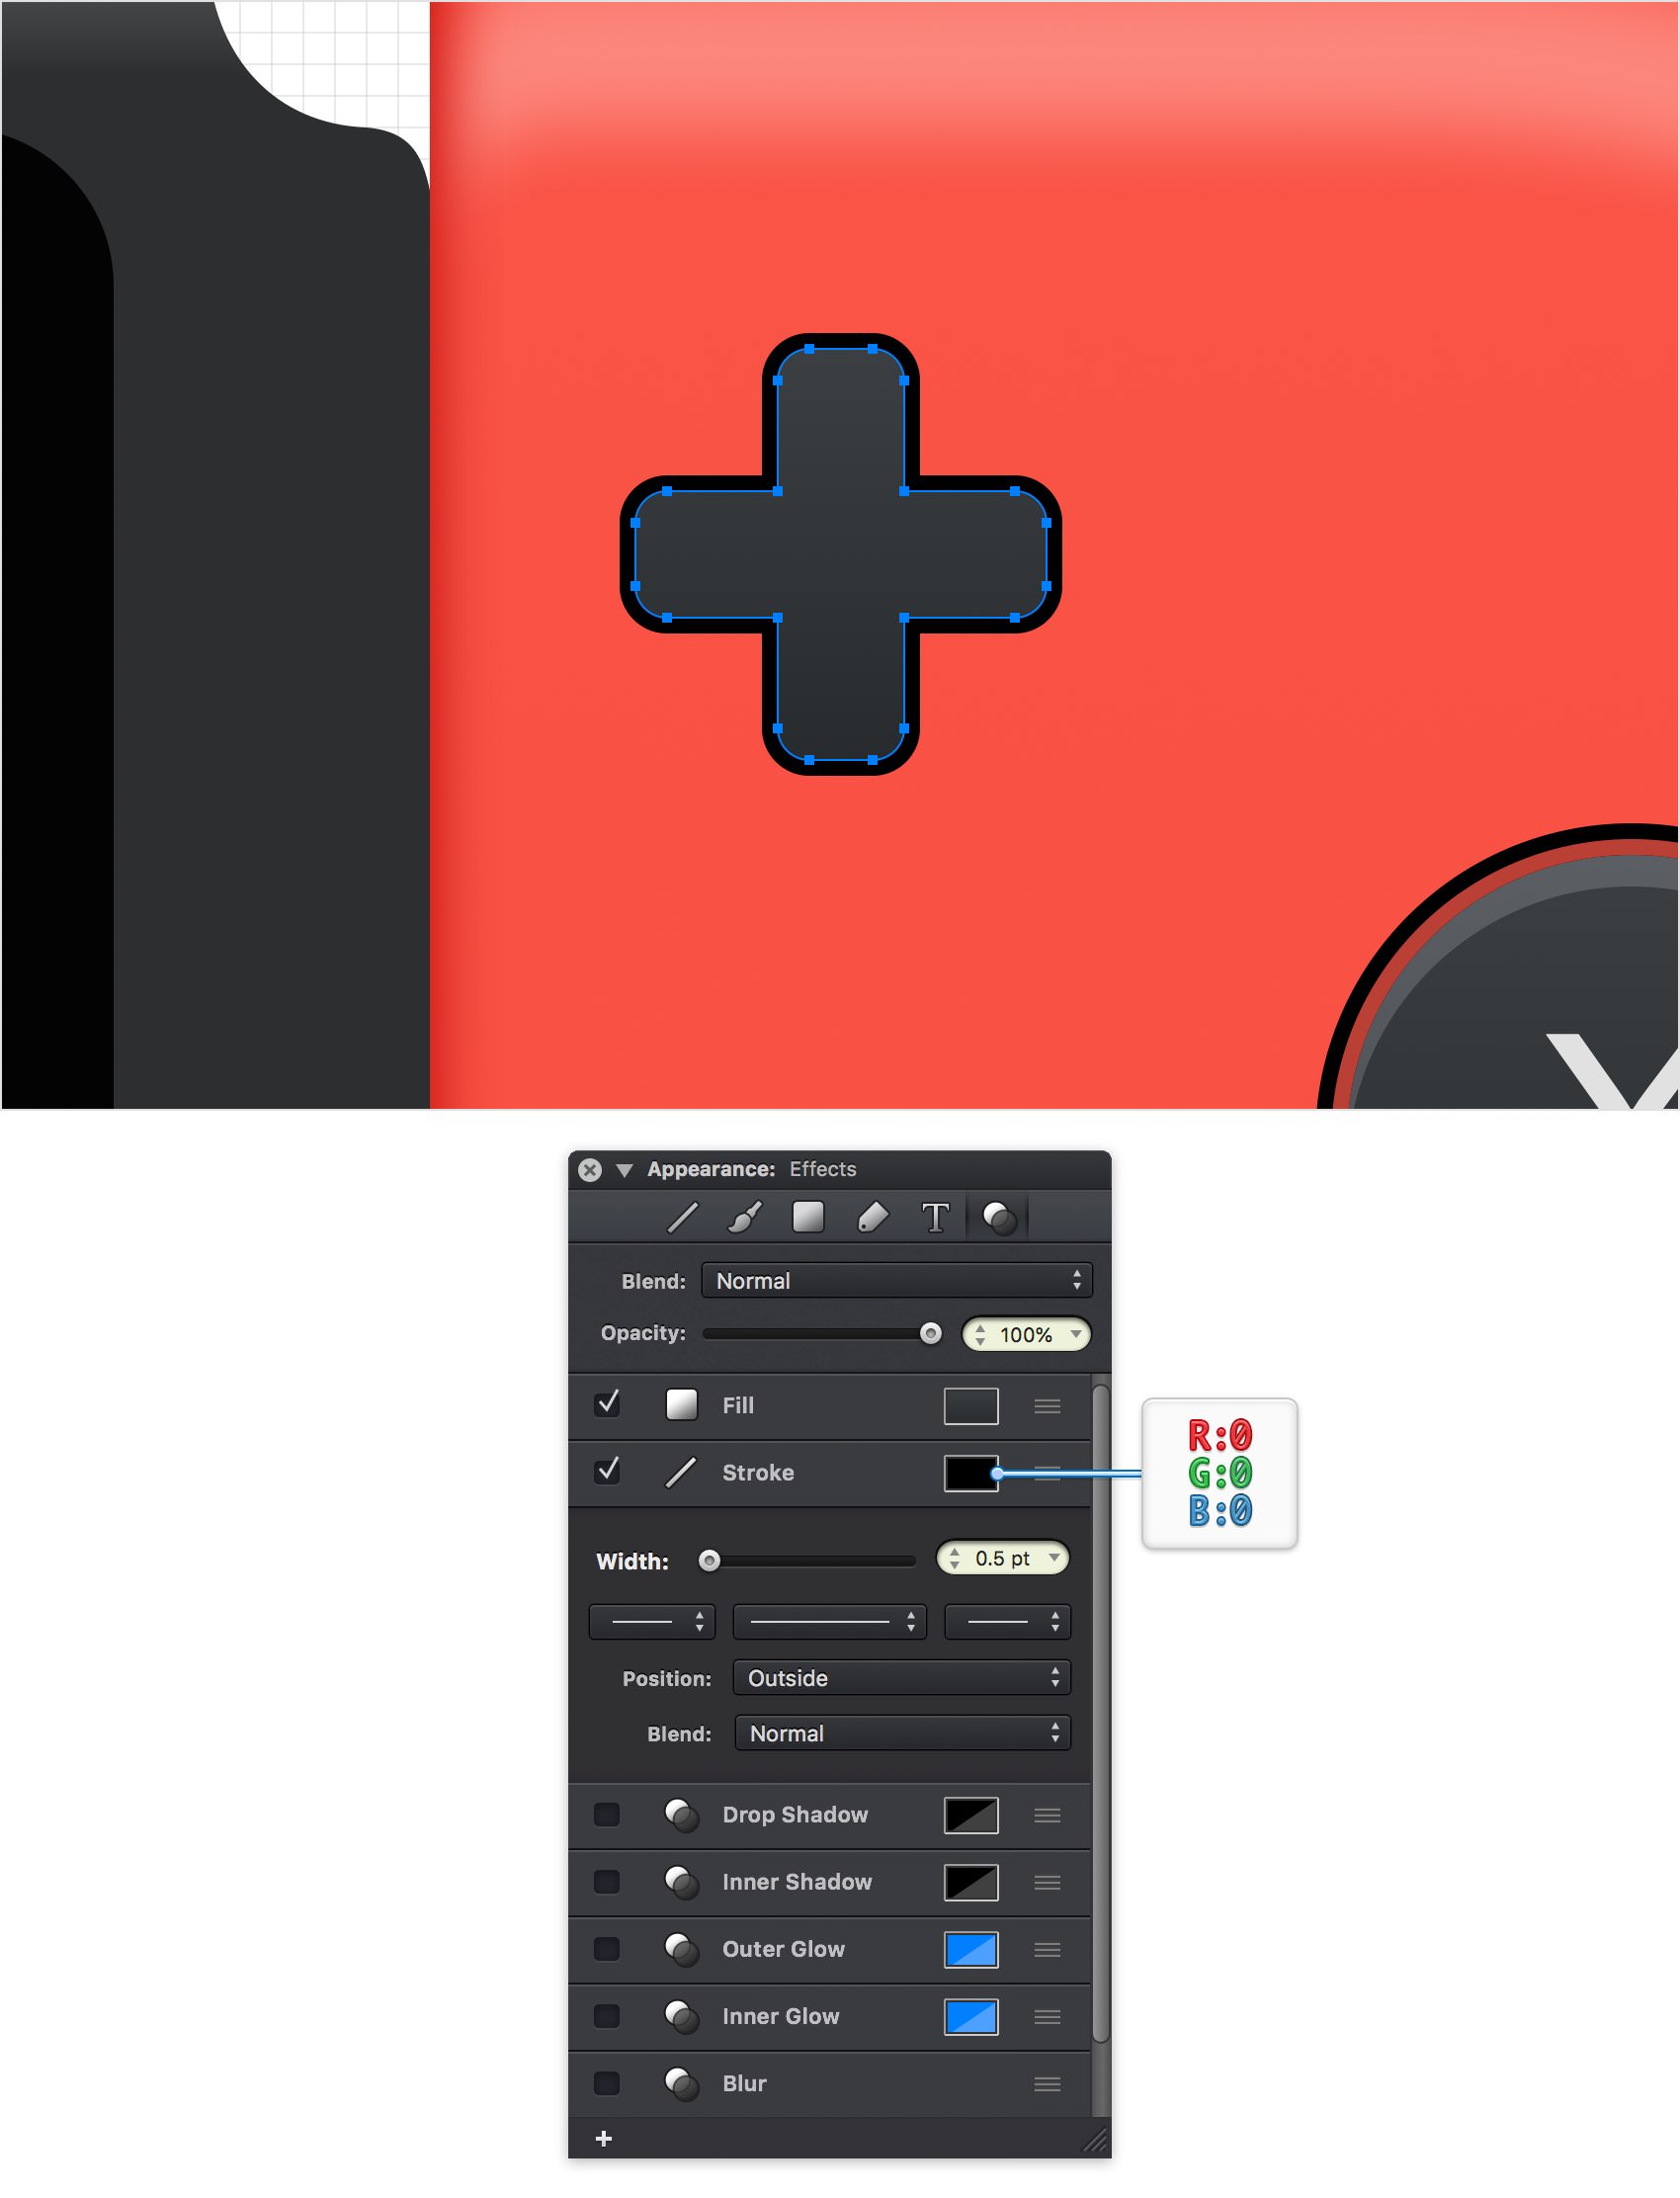
Step 79
Make sure that your plus shape stays selected and keep focusing on the Effects pane. Activate the Drop Shadow effect and enter the attributes shown below.
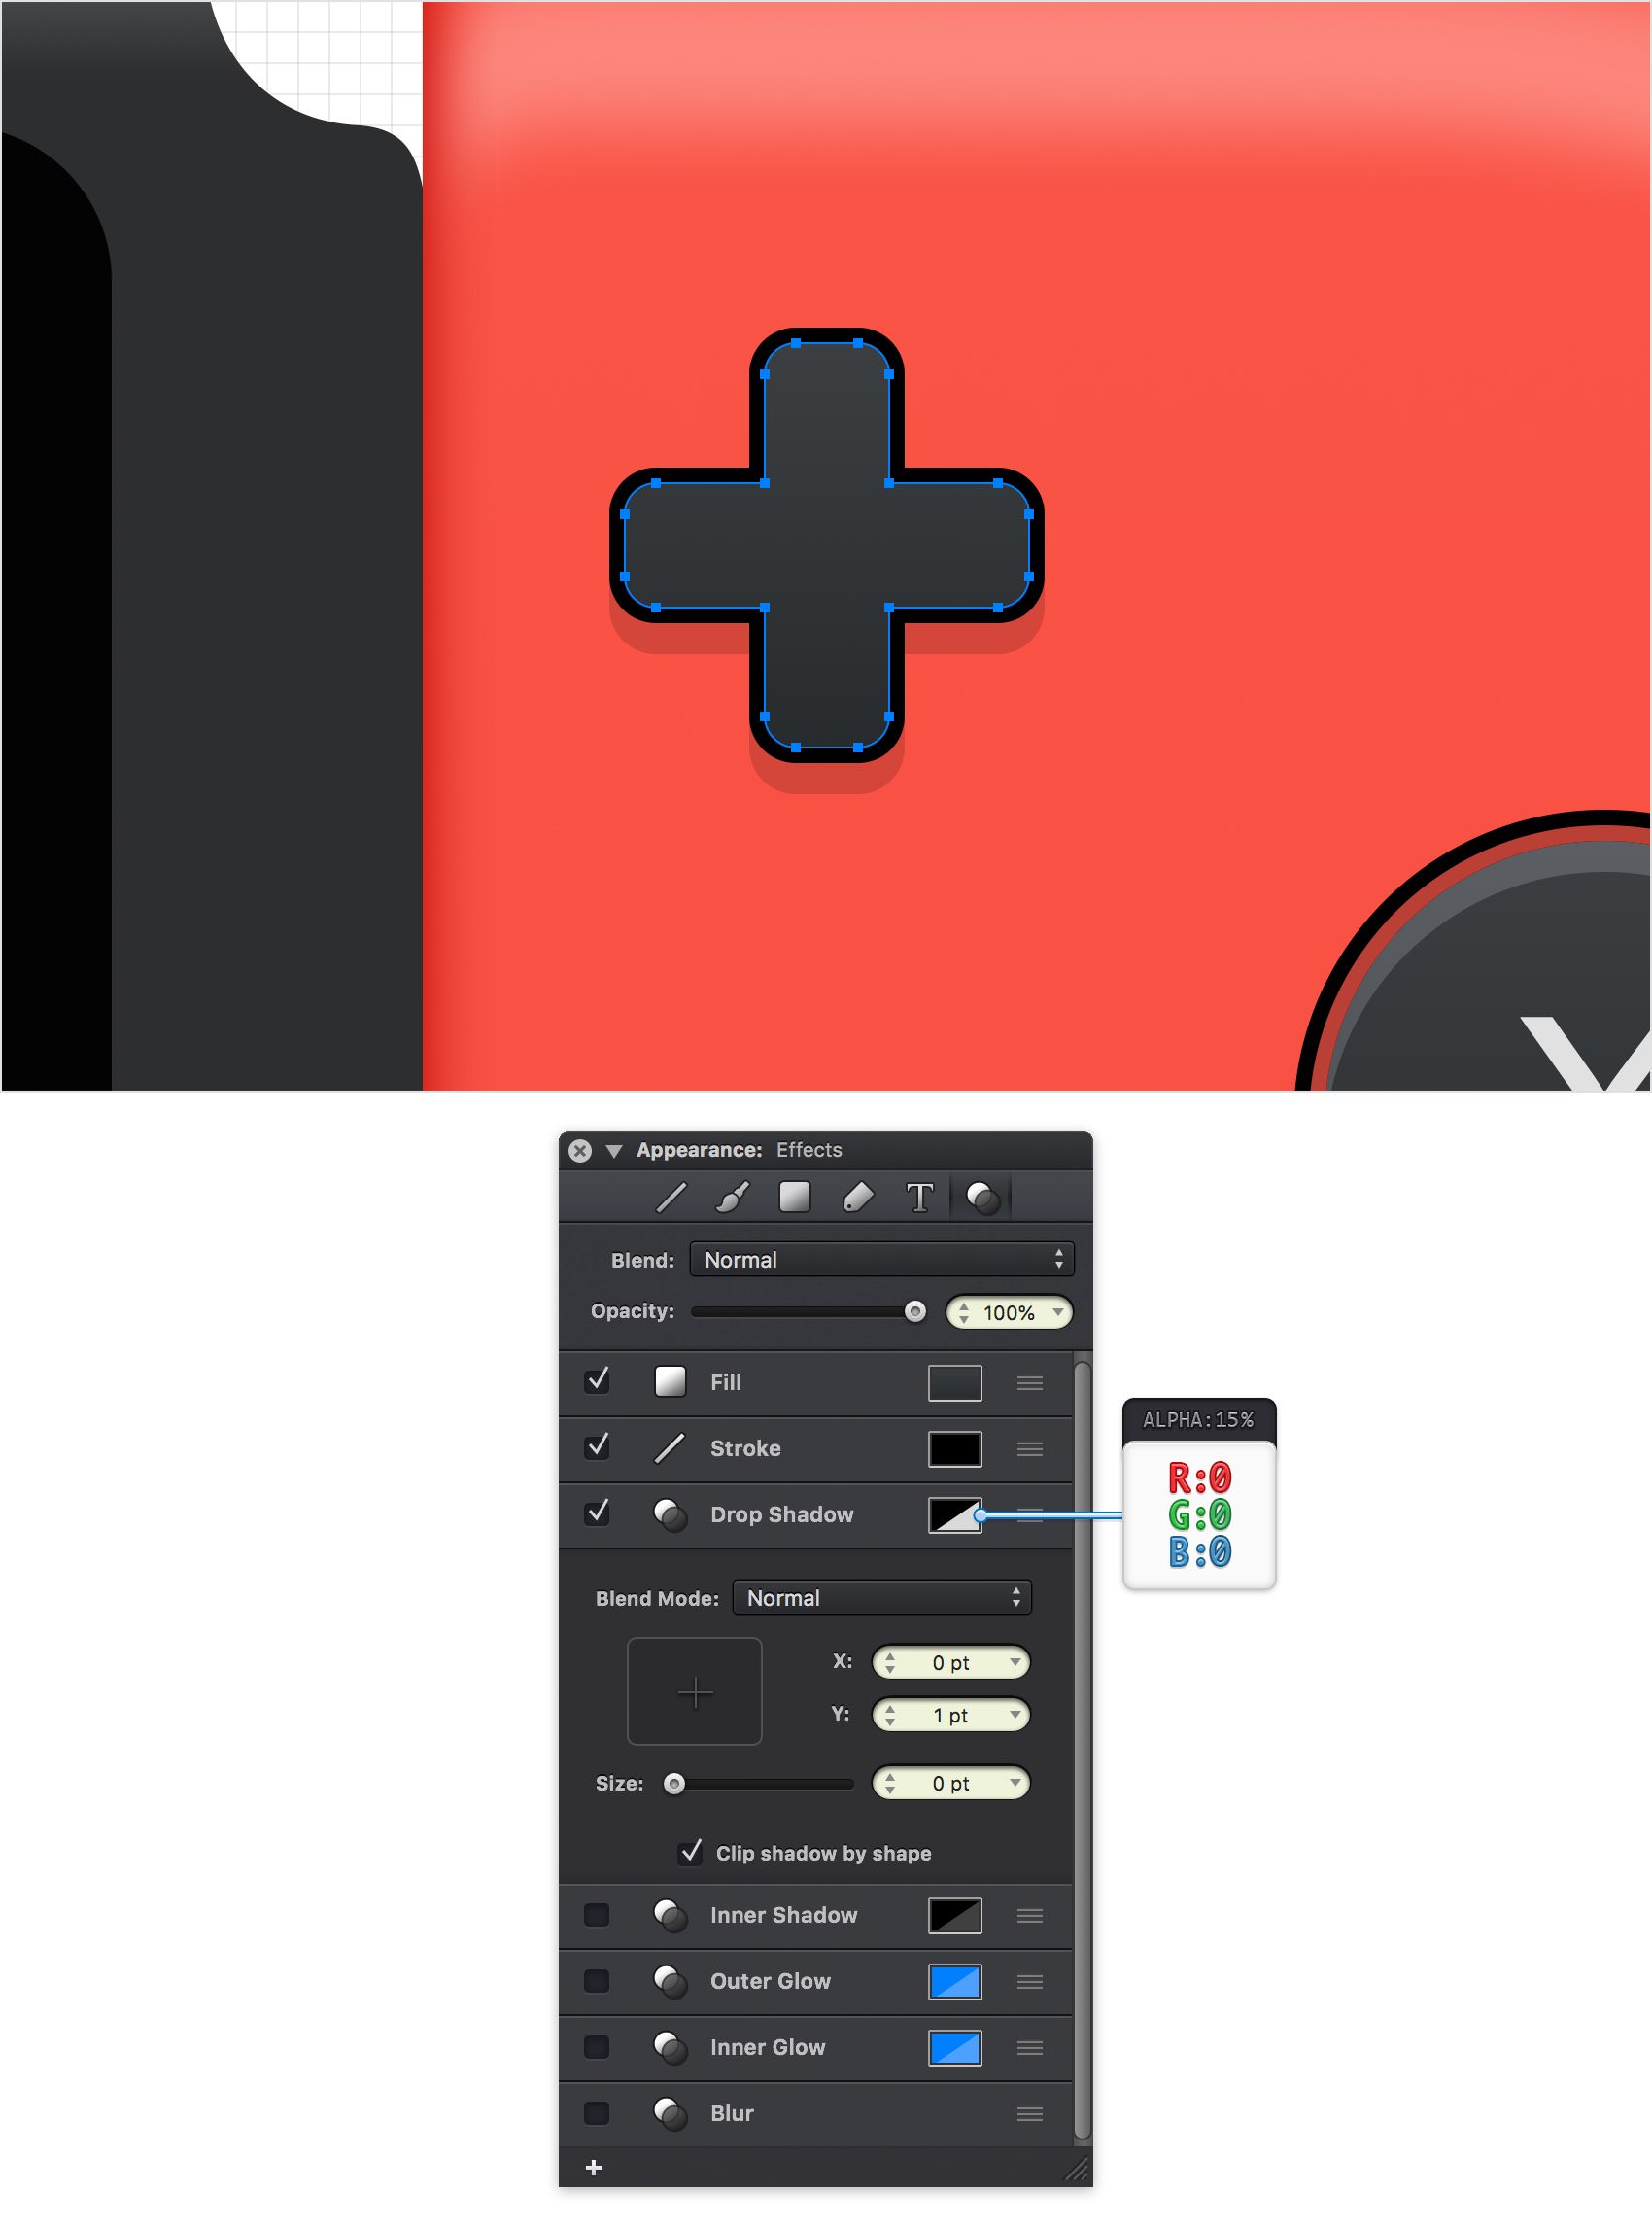
Step 80
Make sure that your plus shape stays selected and keep focusing on the Effects pane. Add a second Drop Shadow and enter the attributes shown below.
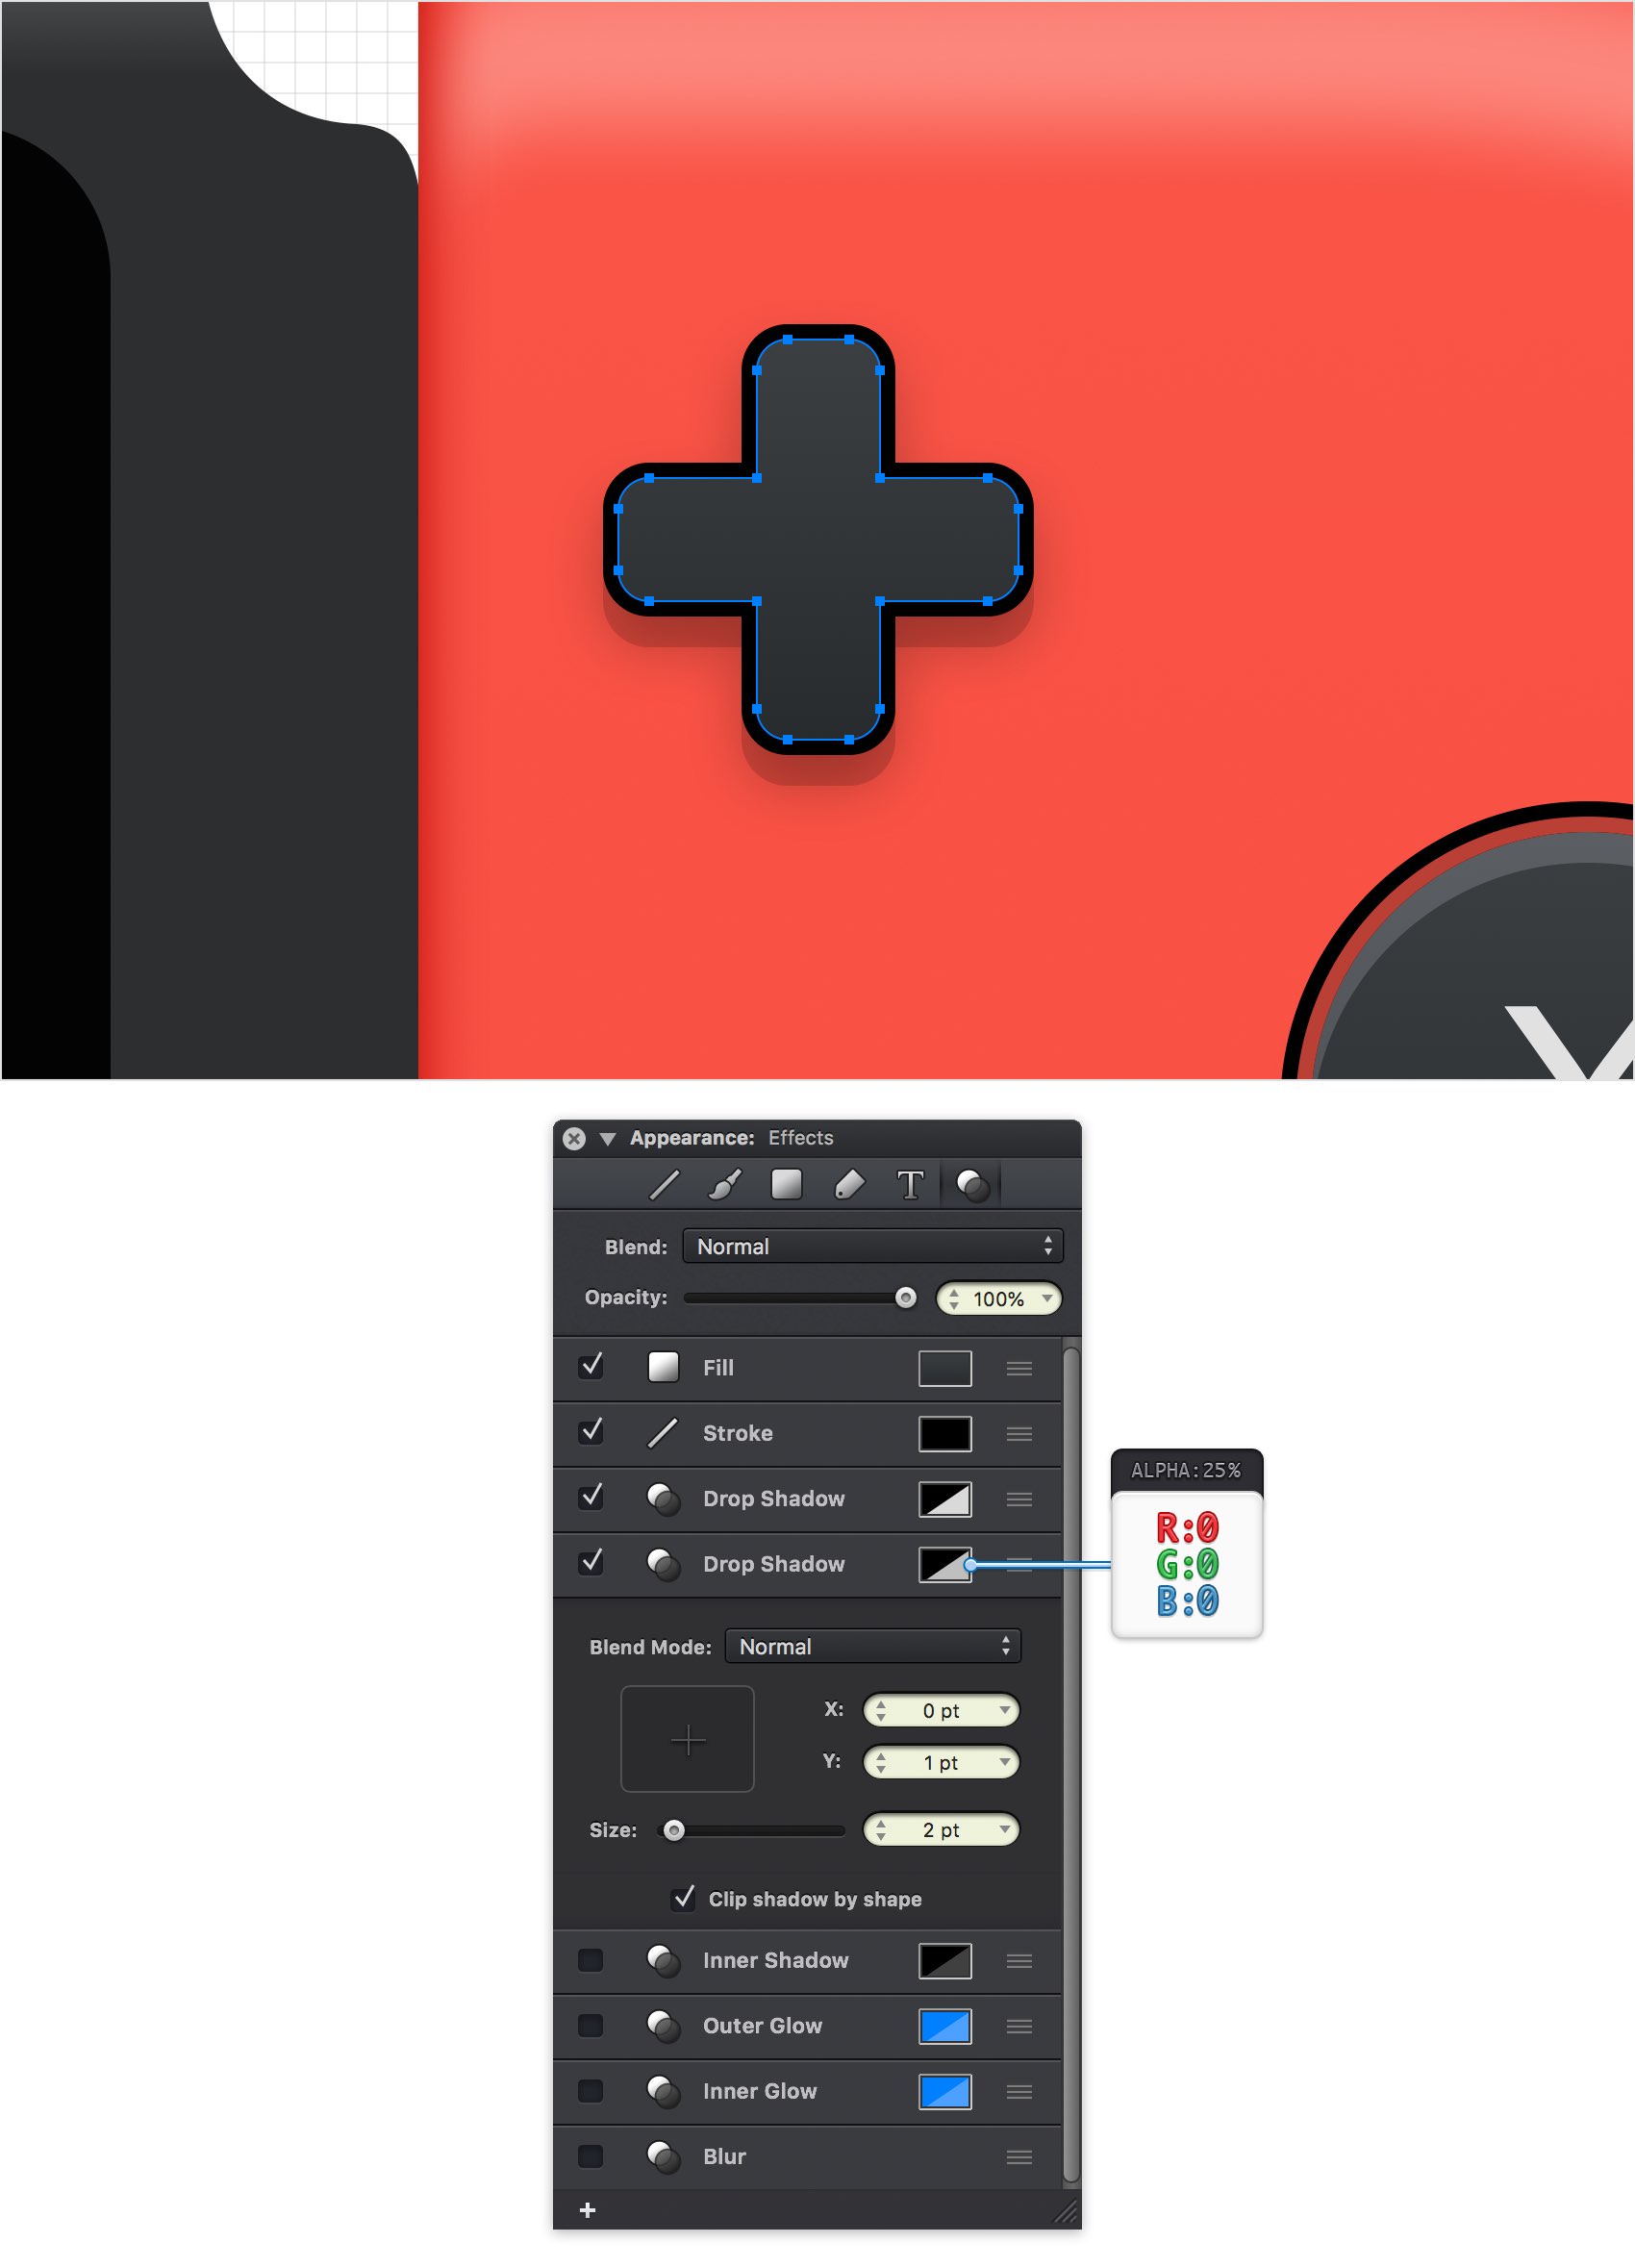
Step 81
Make sure that your plus shape stays selected and keep focusing on the Effects pane. Activate the Inner Shadow effect, drag it below the Fill and enter the attributes shown below.
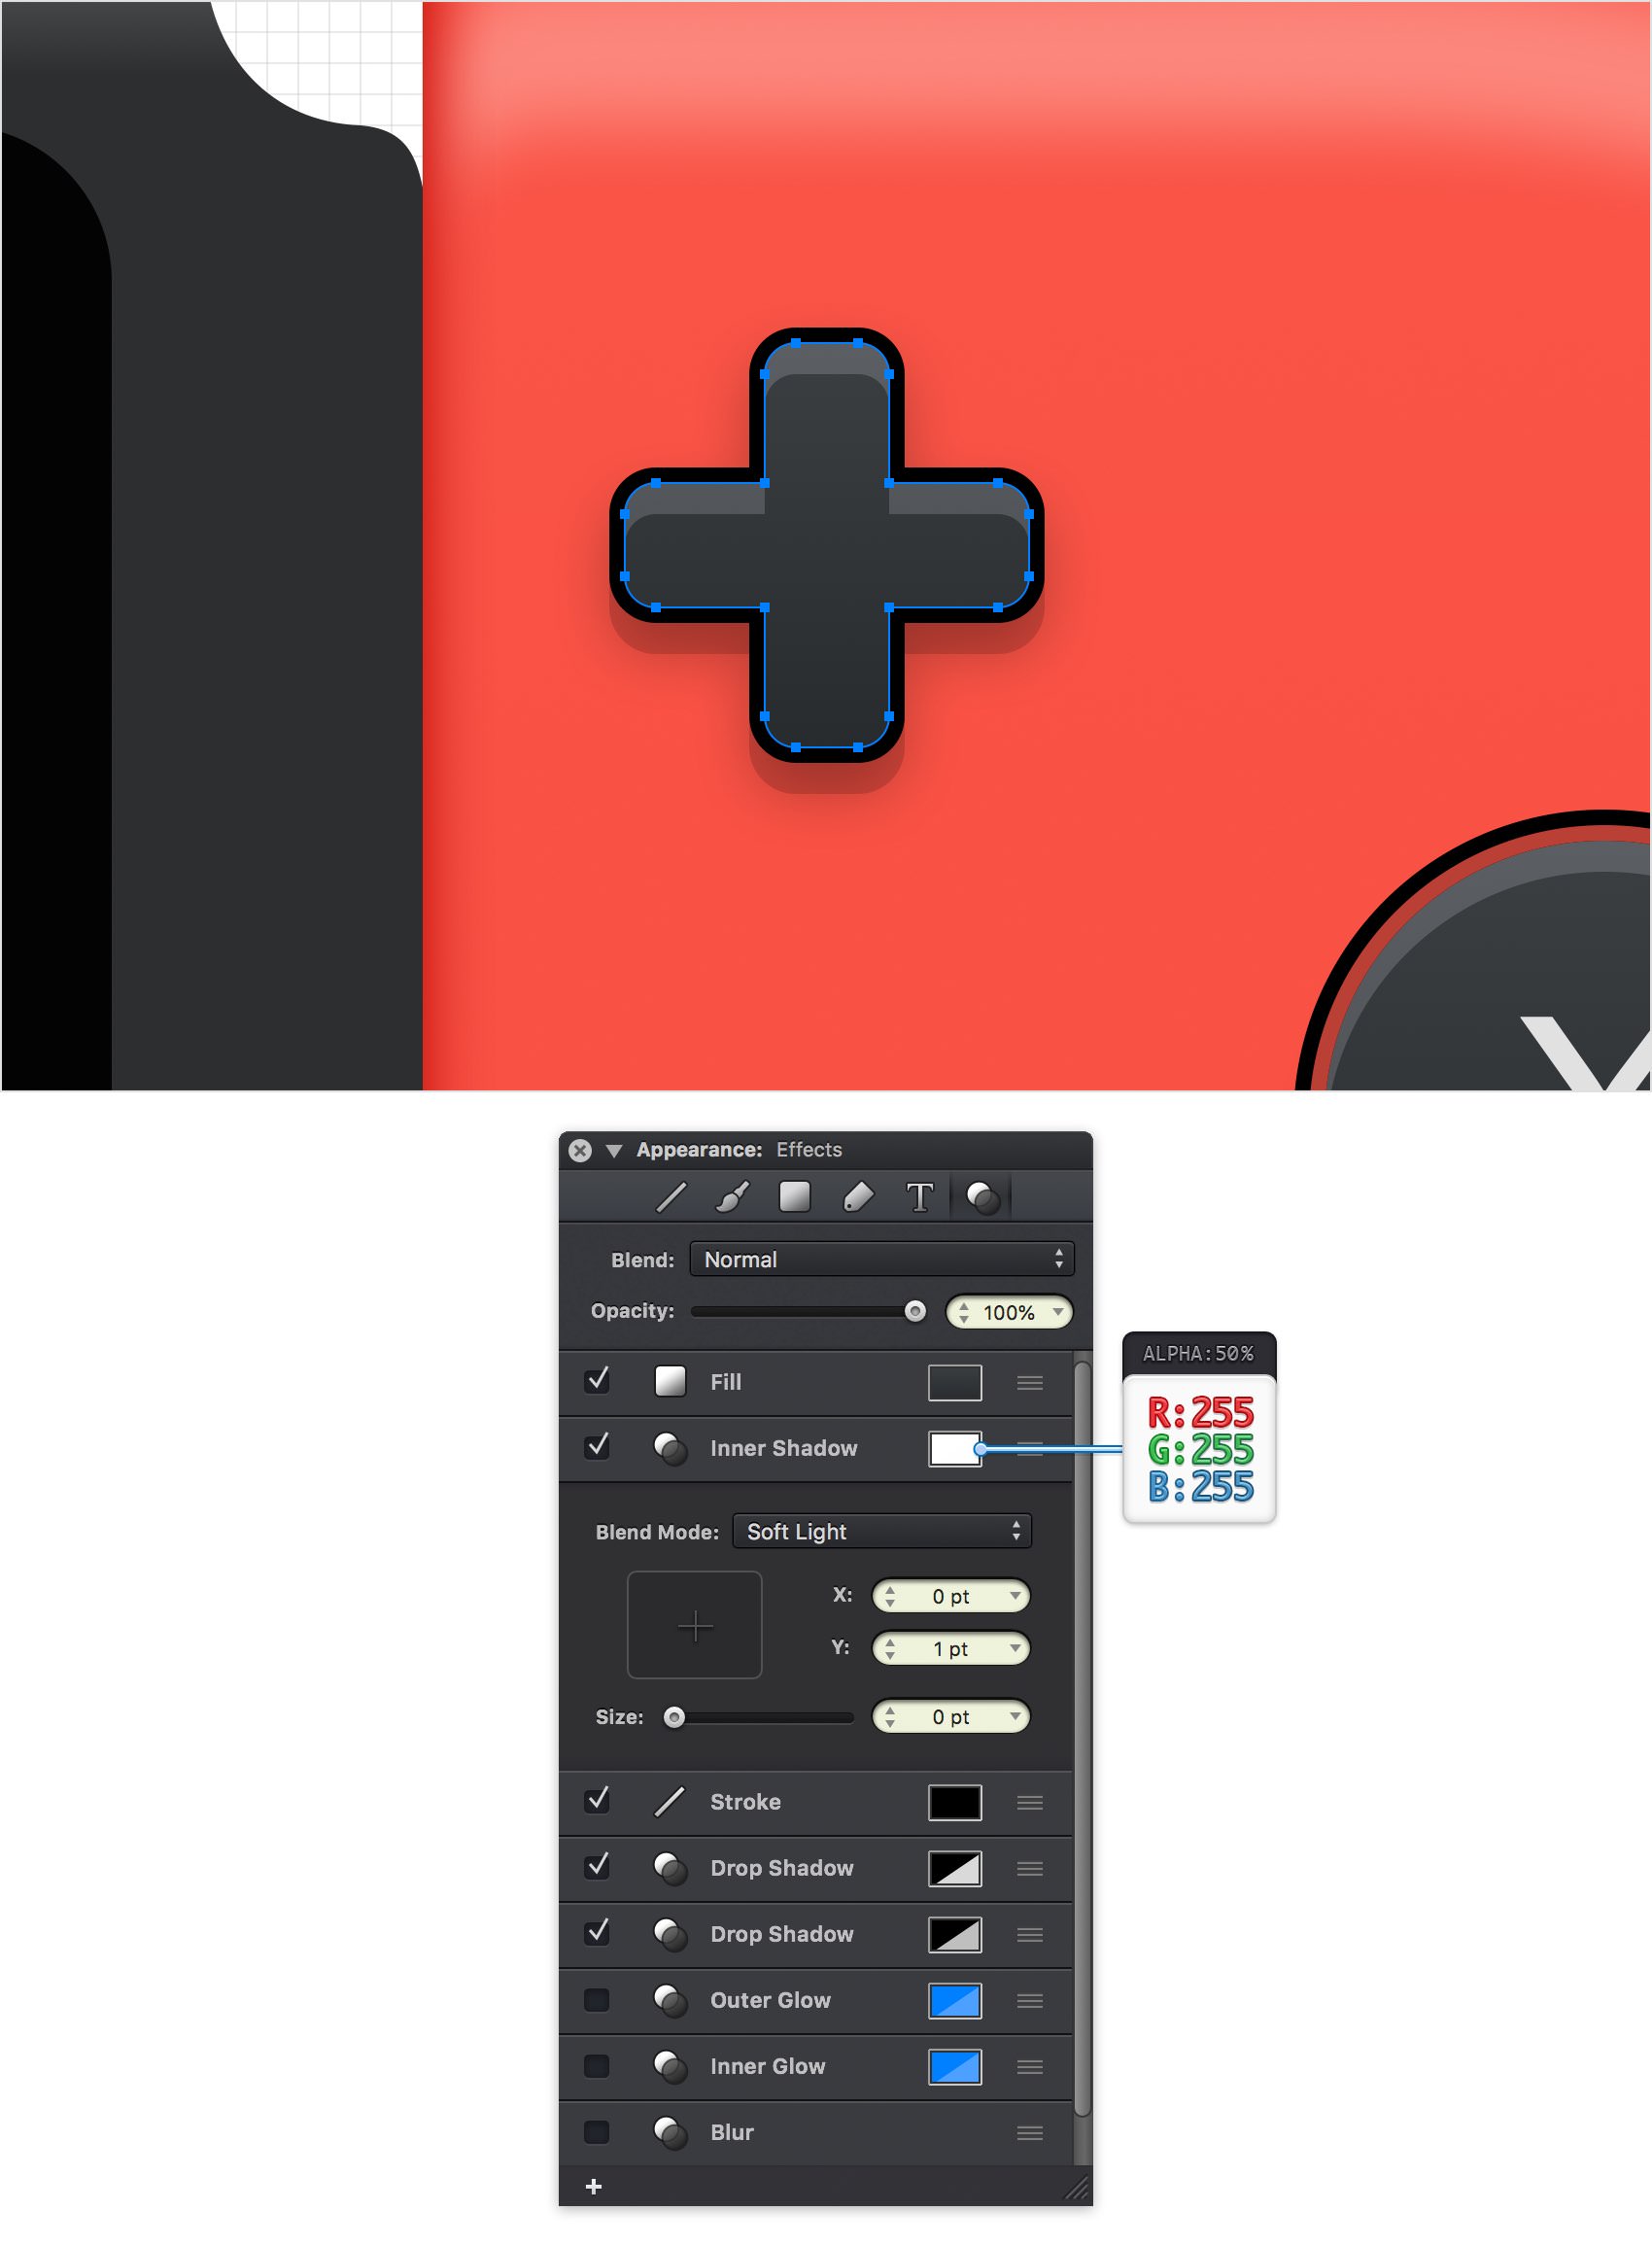
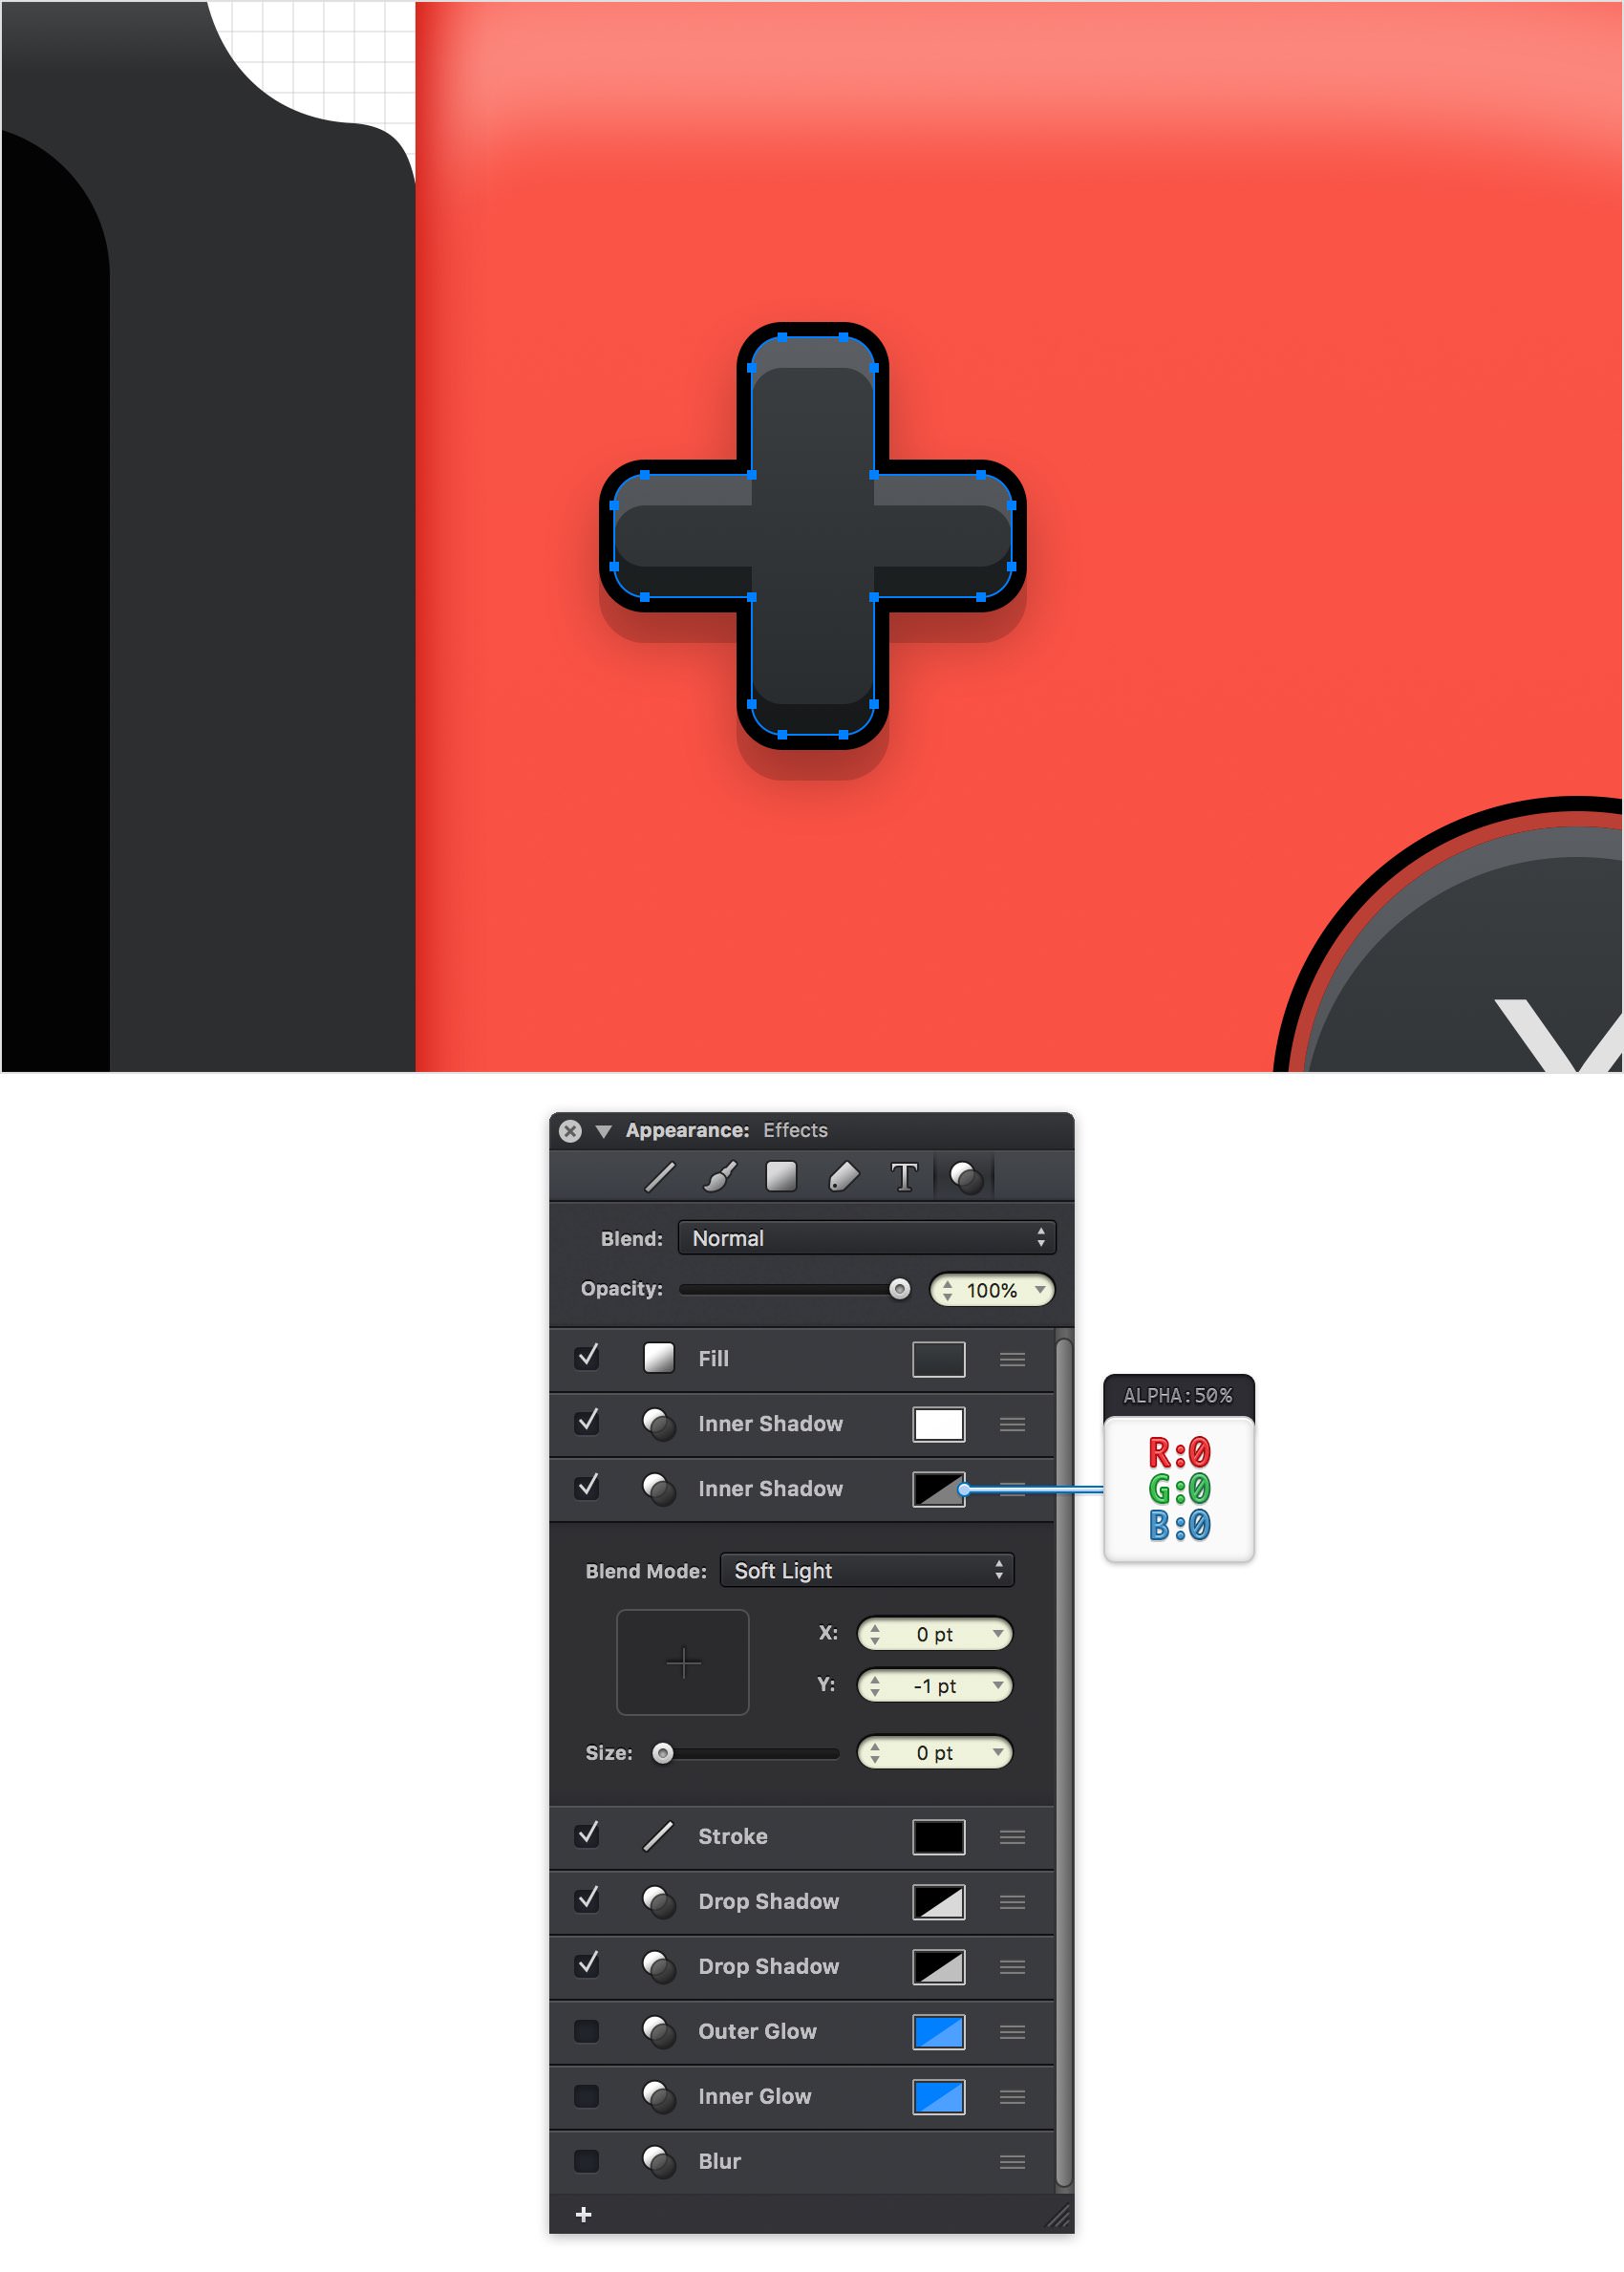
Step 82
Make sure that your plus shape stays selected and keep focusing on the Effects pane. Add a second Inner Shadow effect, drag it below the first one, and then enter the attributes shown below.
Step 83
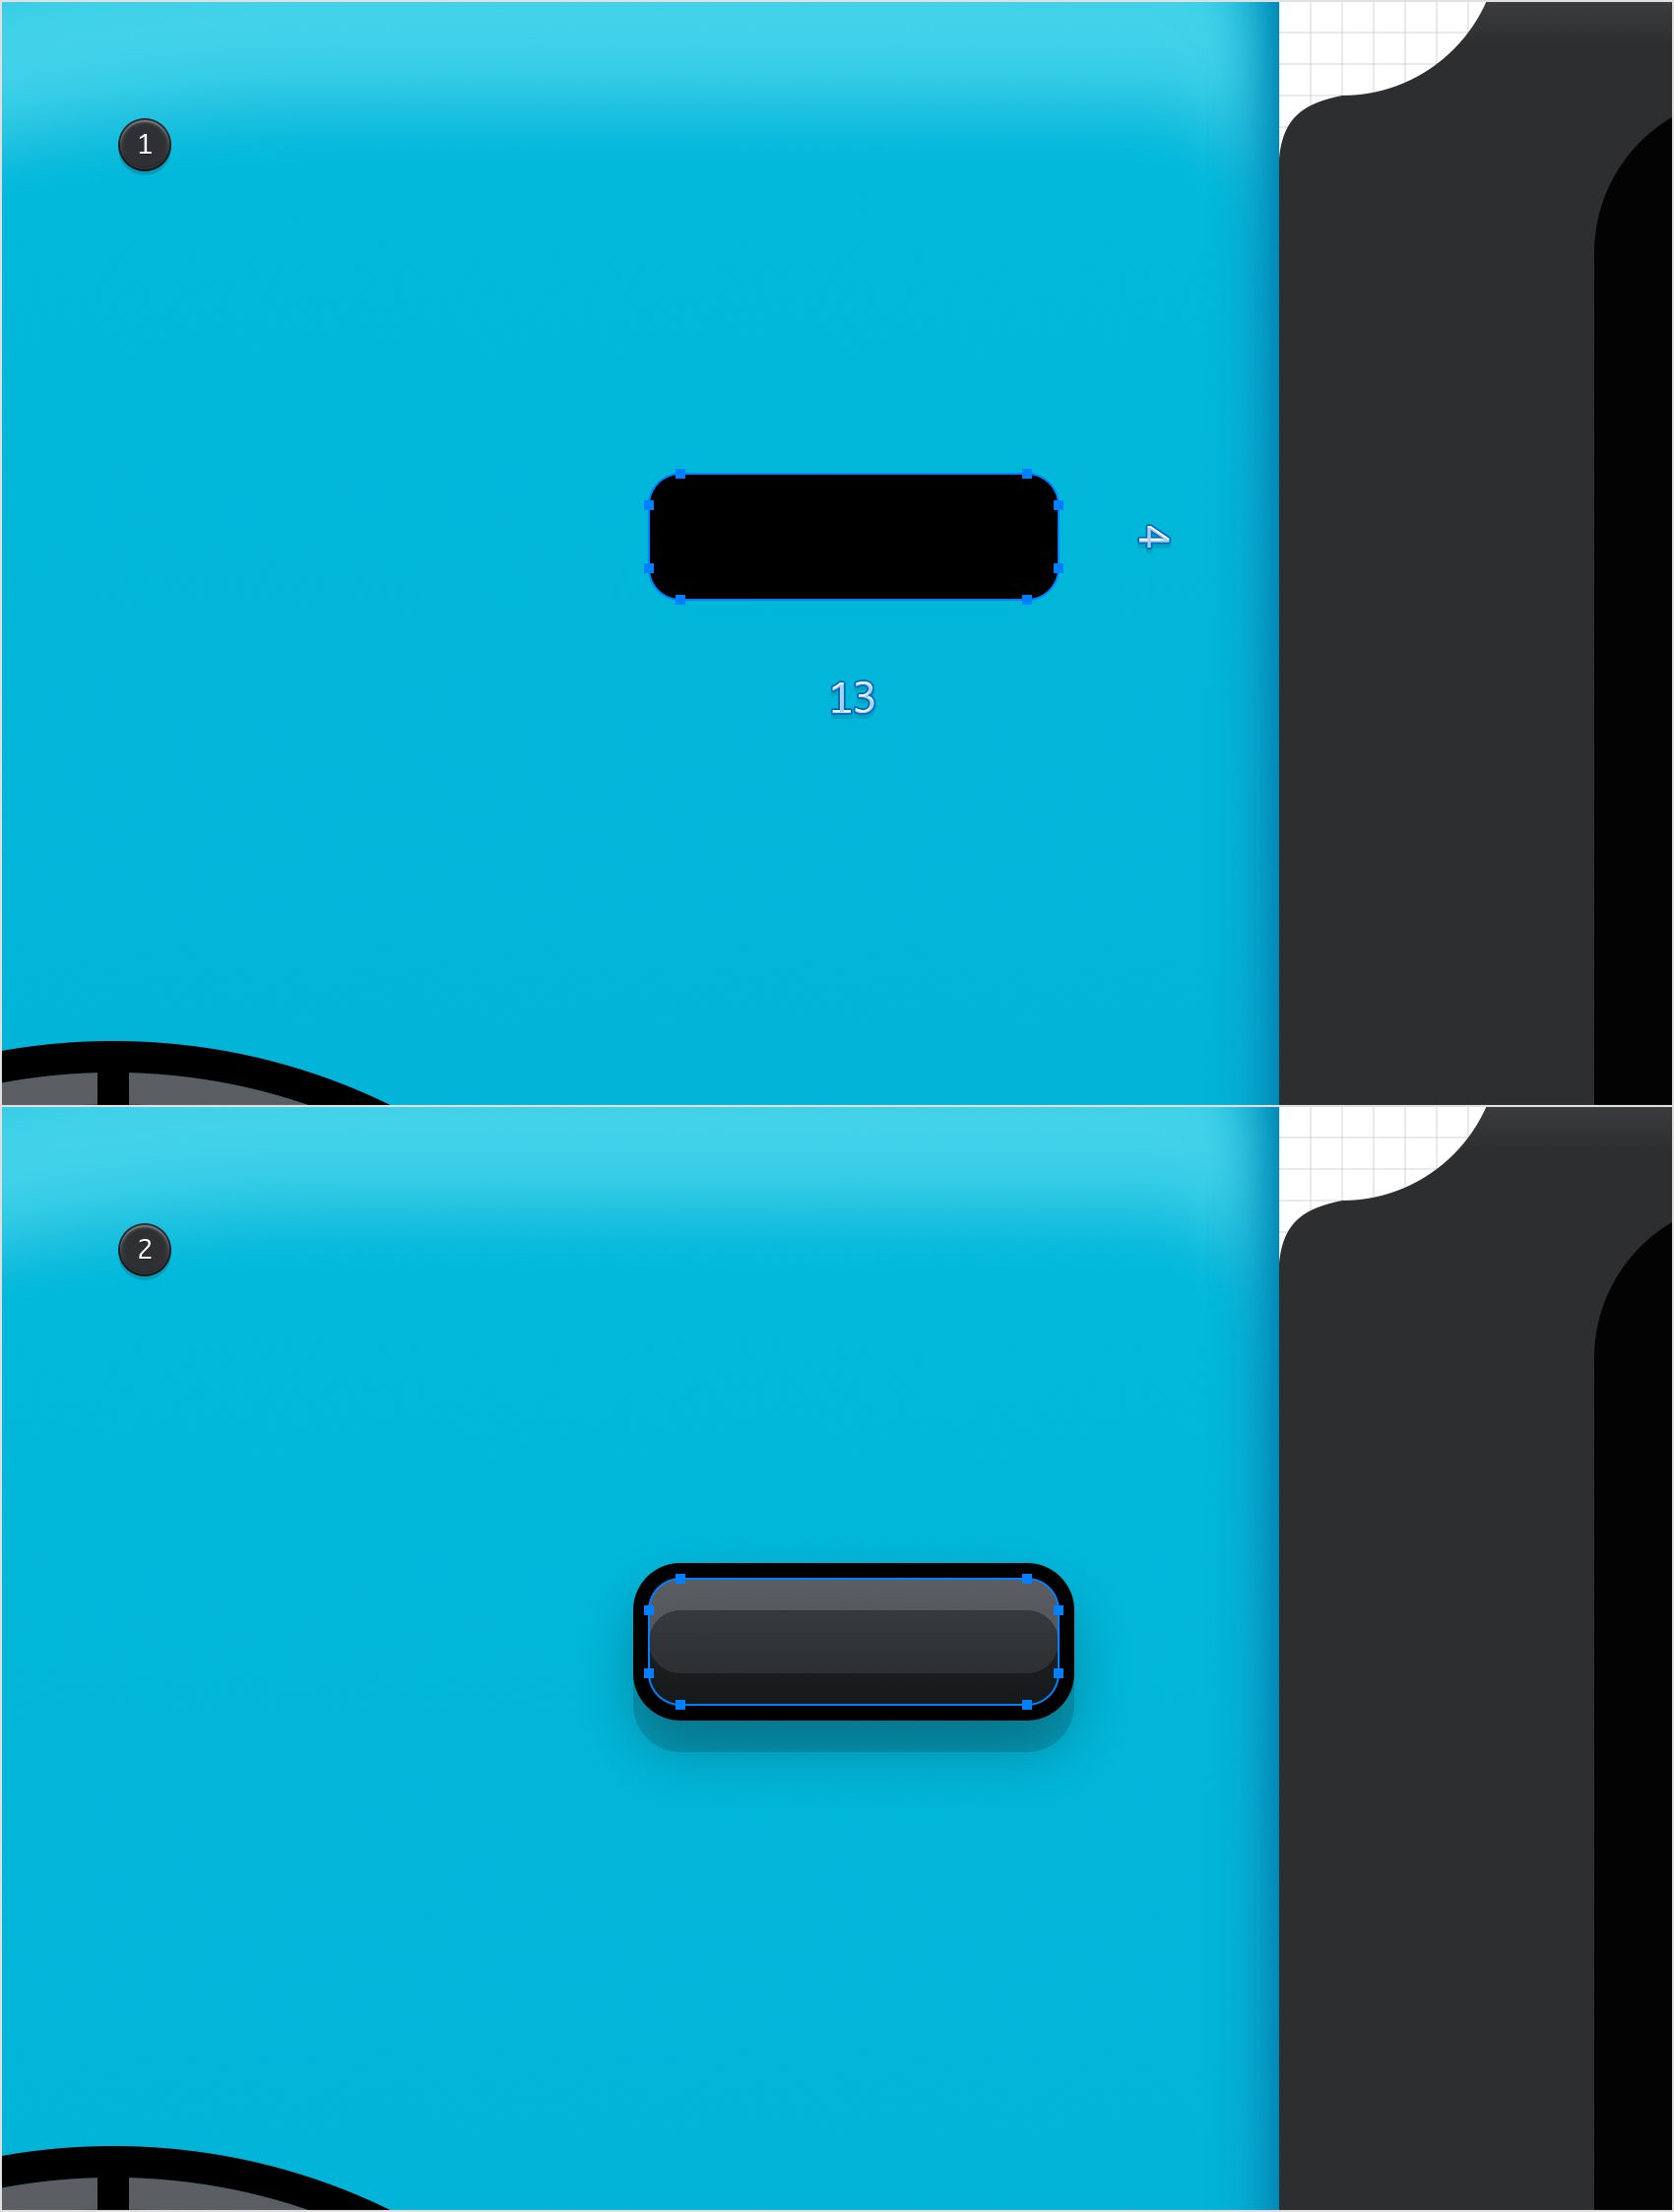
Pick the Rounded Rectangle Tool (Shift + M) and make sure that the Corner Radius is still set to 1 pt. Create a 13 x 4 px shape, fill it with black and place it as shown in the following image (X: 165 px Y: 127 px).
Sselect that plus shape and go to Copy Style, and then select the shape made in this step and go to Paste Style. In the end things should look like in the second image.
Step 84
Open the Layers panel and add a sixth layer. Name it "BG" and make sure that it stays selected.
For the final steps you will need a grid every 5 px. Return to the Grid pane from the Properties panel and enter 5 px in both Spacing boxes.
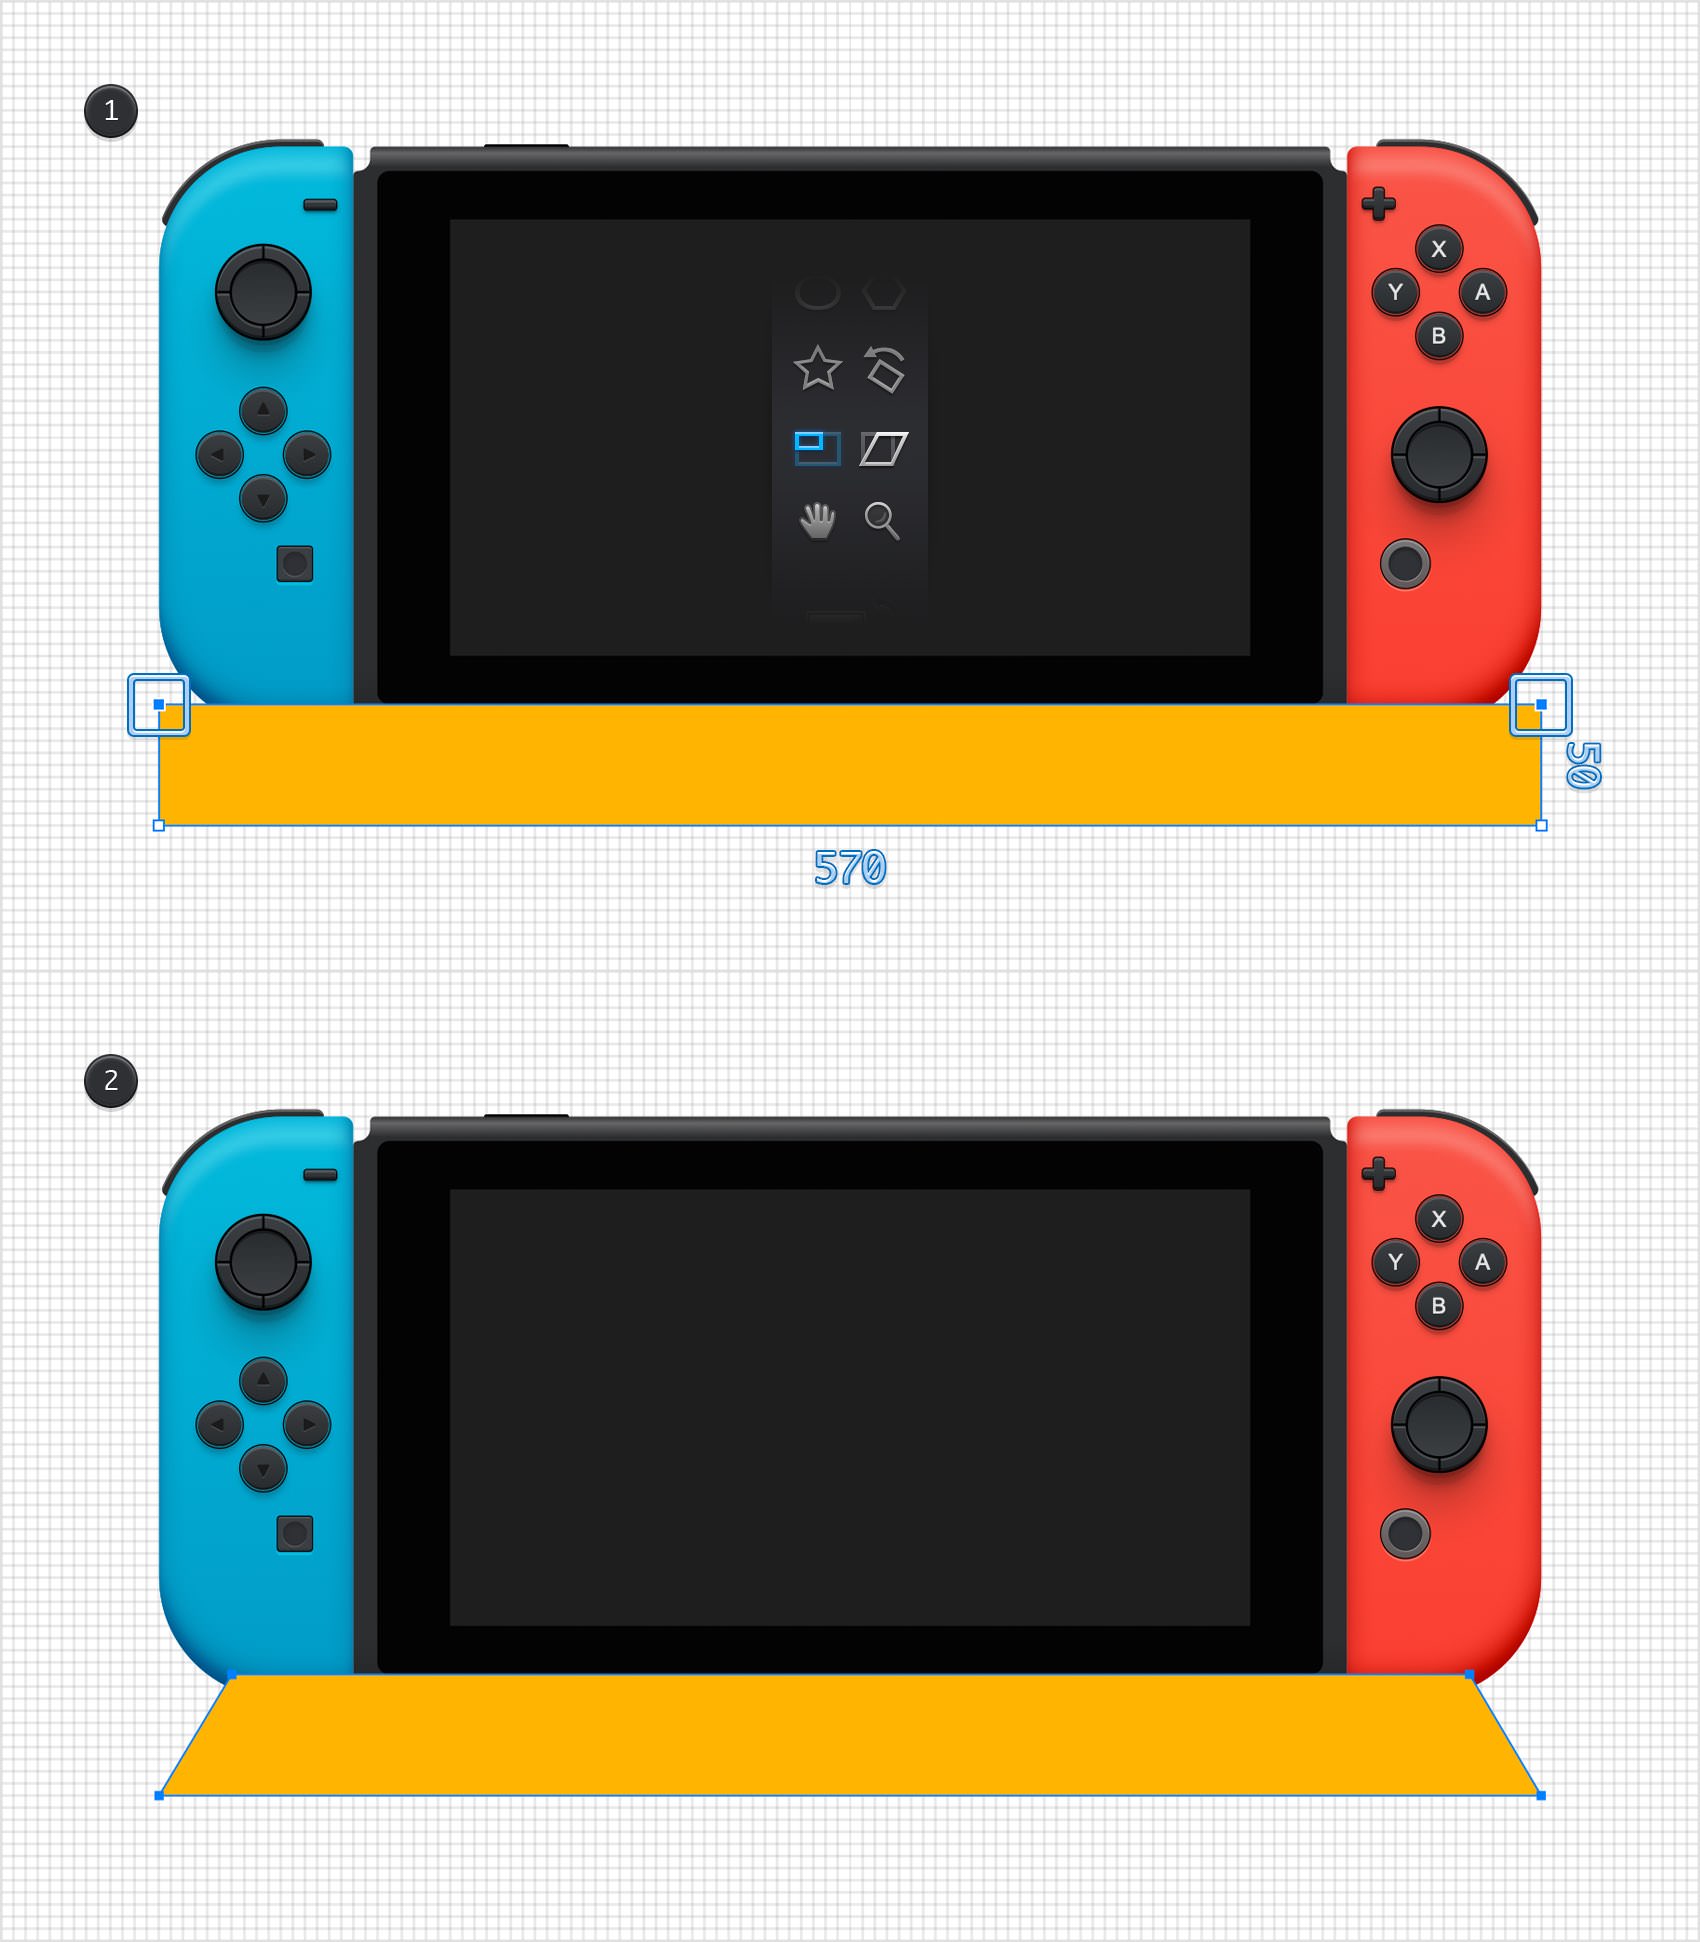
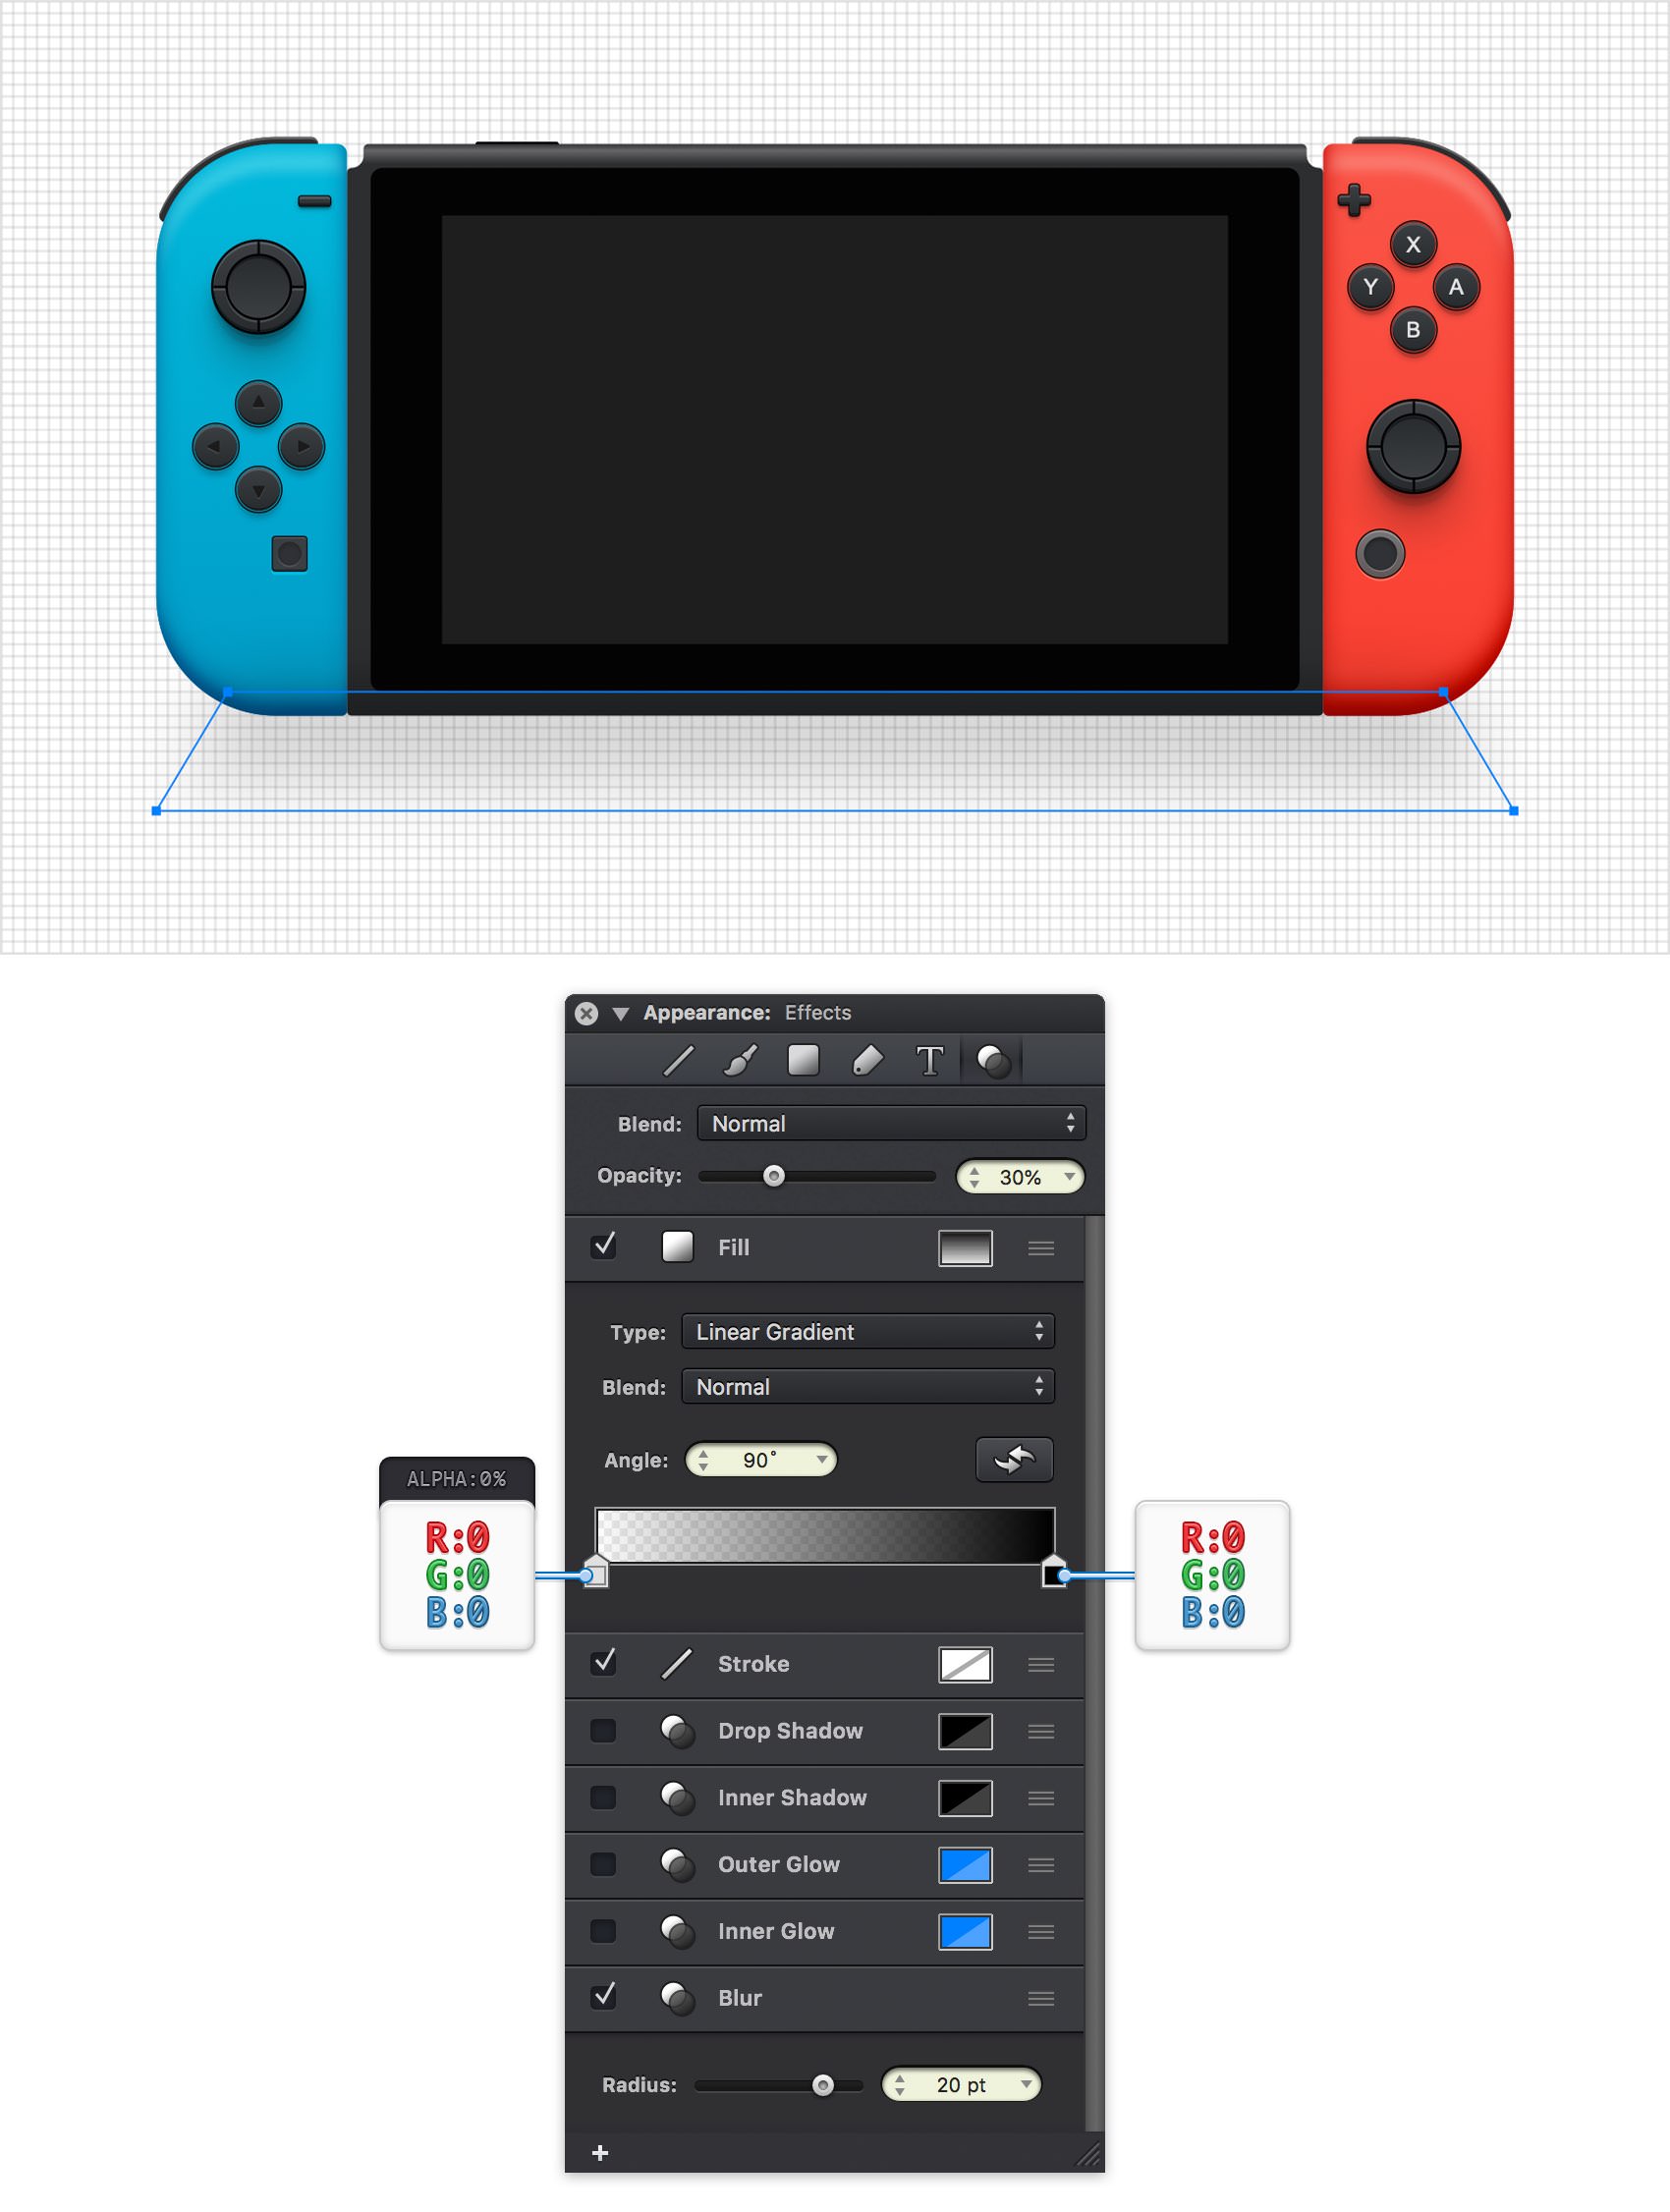
Using the Rectangle Tool (M), create a 570 x 50 px shape and place it as shown in the first image (X: 105 px Y: 335 px). Focus on the top side of this new rectangle and pick the Path Selection Tool (A). Select both anchor points and switch to the Scale Tool (S). Hold the Shift key and drag these anchor points 30 px to the inside, as shown in the second image.
Step 85
Make sure that your trapezoid shape is still selected and focus on the Effects pane. Lower the Opacity to 30% and then replace the Fill color with the linear gradient shown below. Also, activate the Blur effect and drag the Radius slider to 20 pt.
Step 86
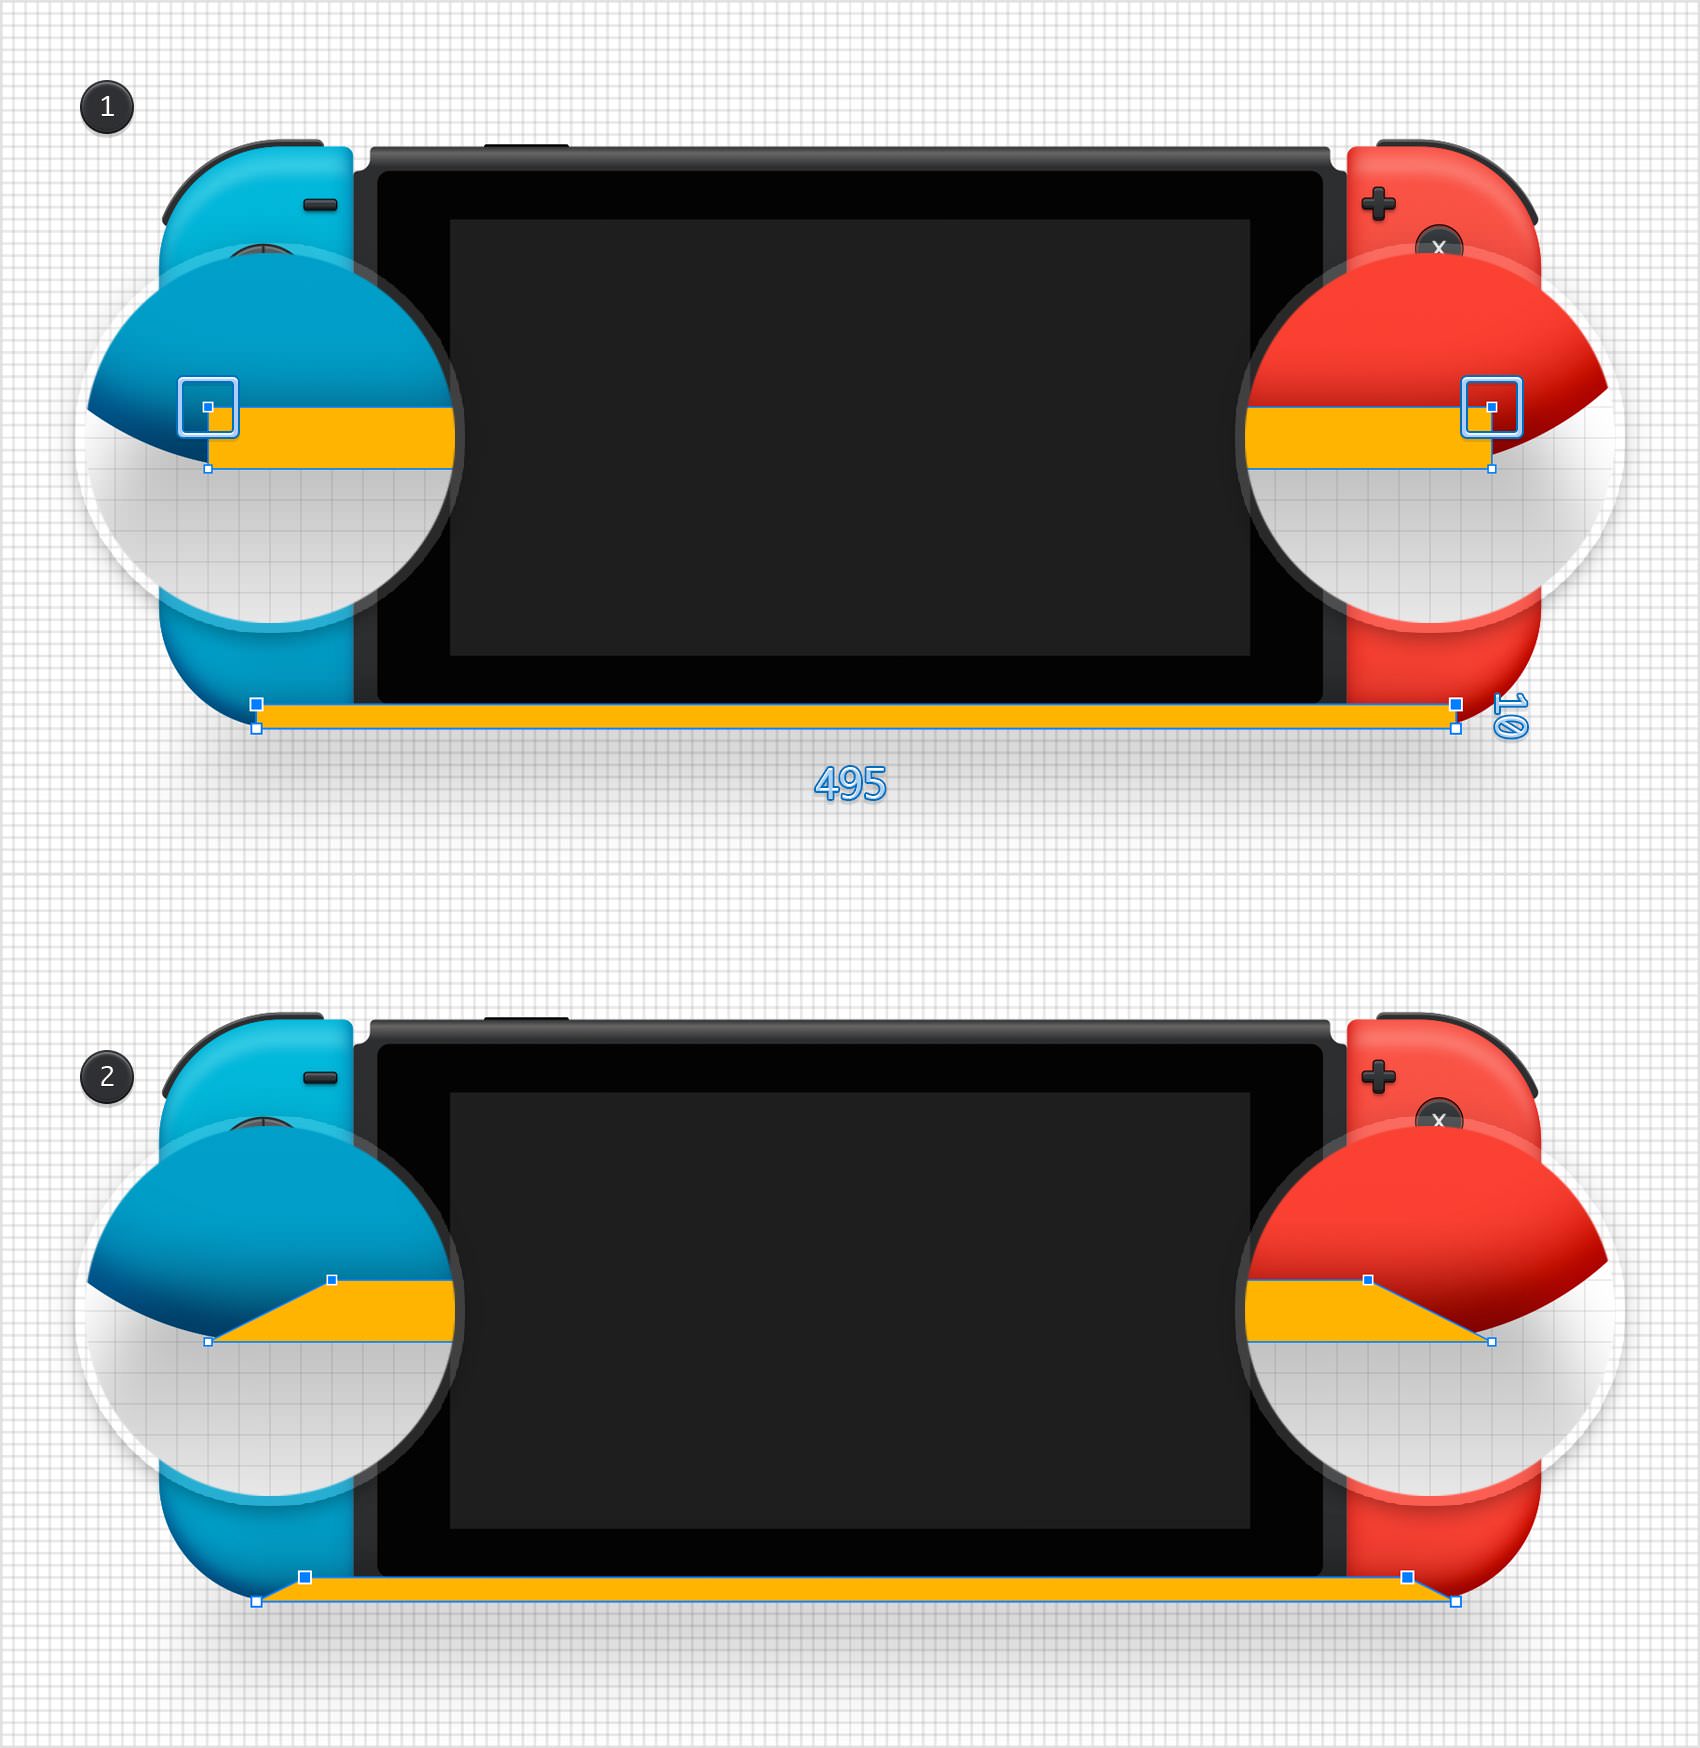
Using the Rectangle Tool (M), create a 495 x 10 px shape and place it as shown in the first image (X: 145 px Y: 335 px). Focus on the top side of this new rectangle and pick the Path Selection Tool (A). Select both anchor points and switch to the Scale Tool (S). Hold the Shift key and drag the selected anchor points 20 px to the inside, as shown in the second image.
Step 87
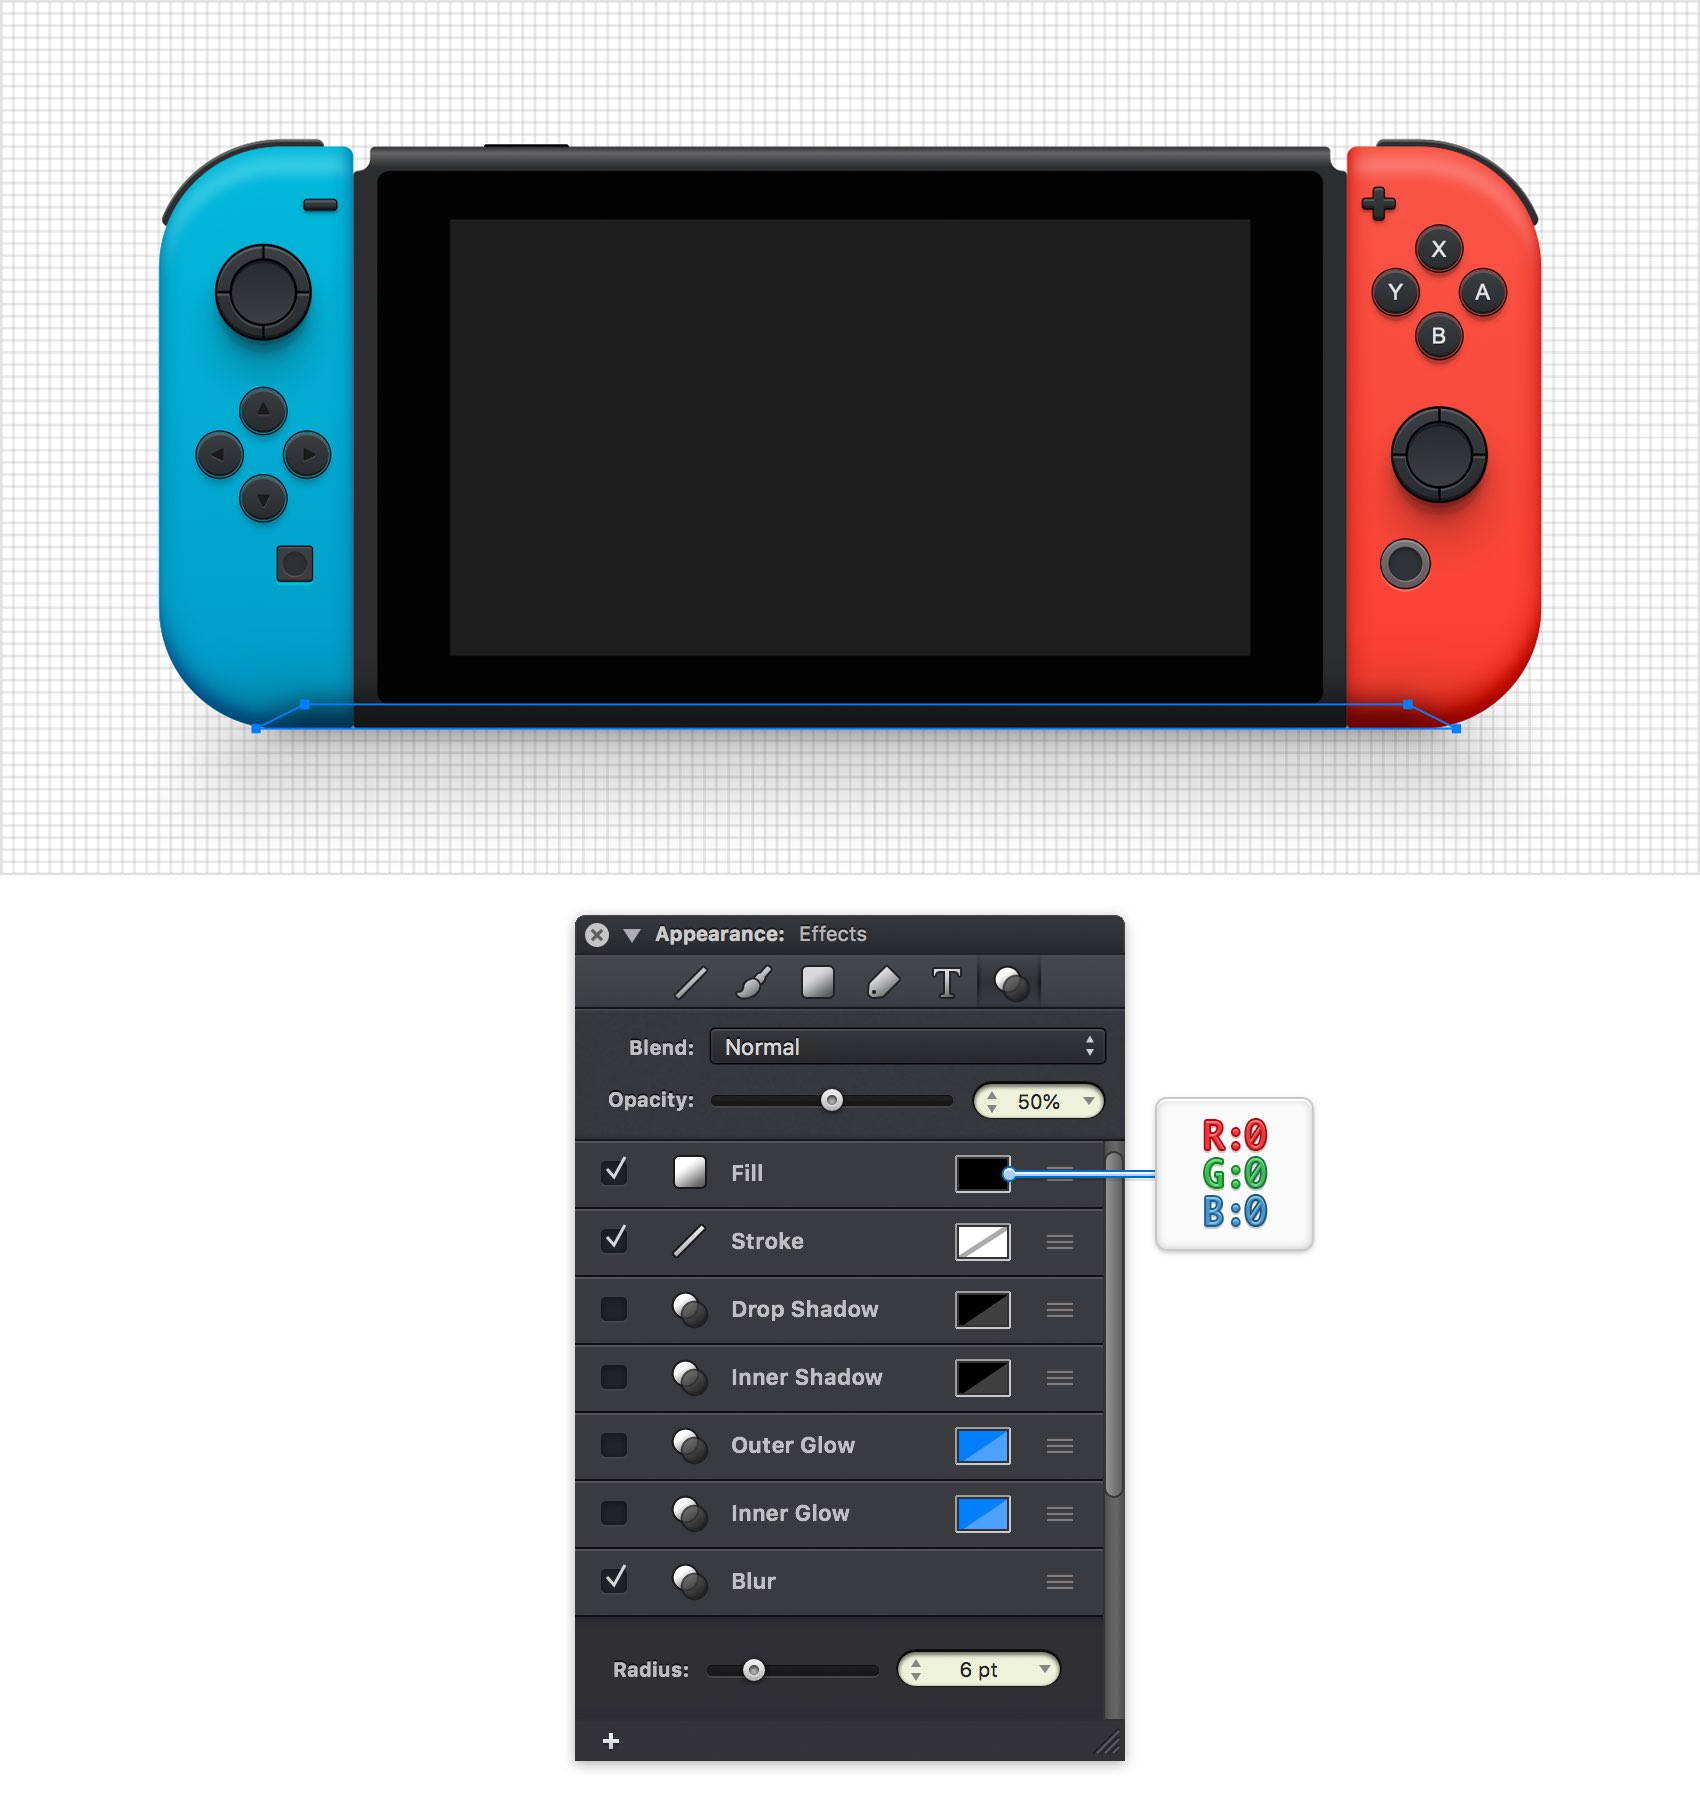
Make sure that your new trapezoid shape is still selected and focus on the Effects pane. Lower the Opacity to 50% and then activate the Blur effect and drag that Radius slider to 6 pt.
Step 88
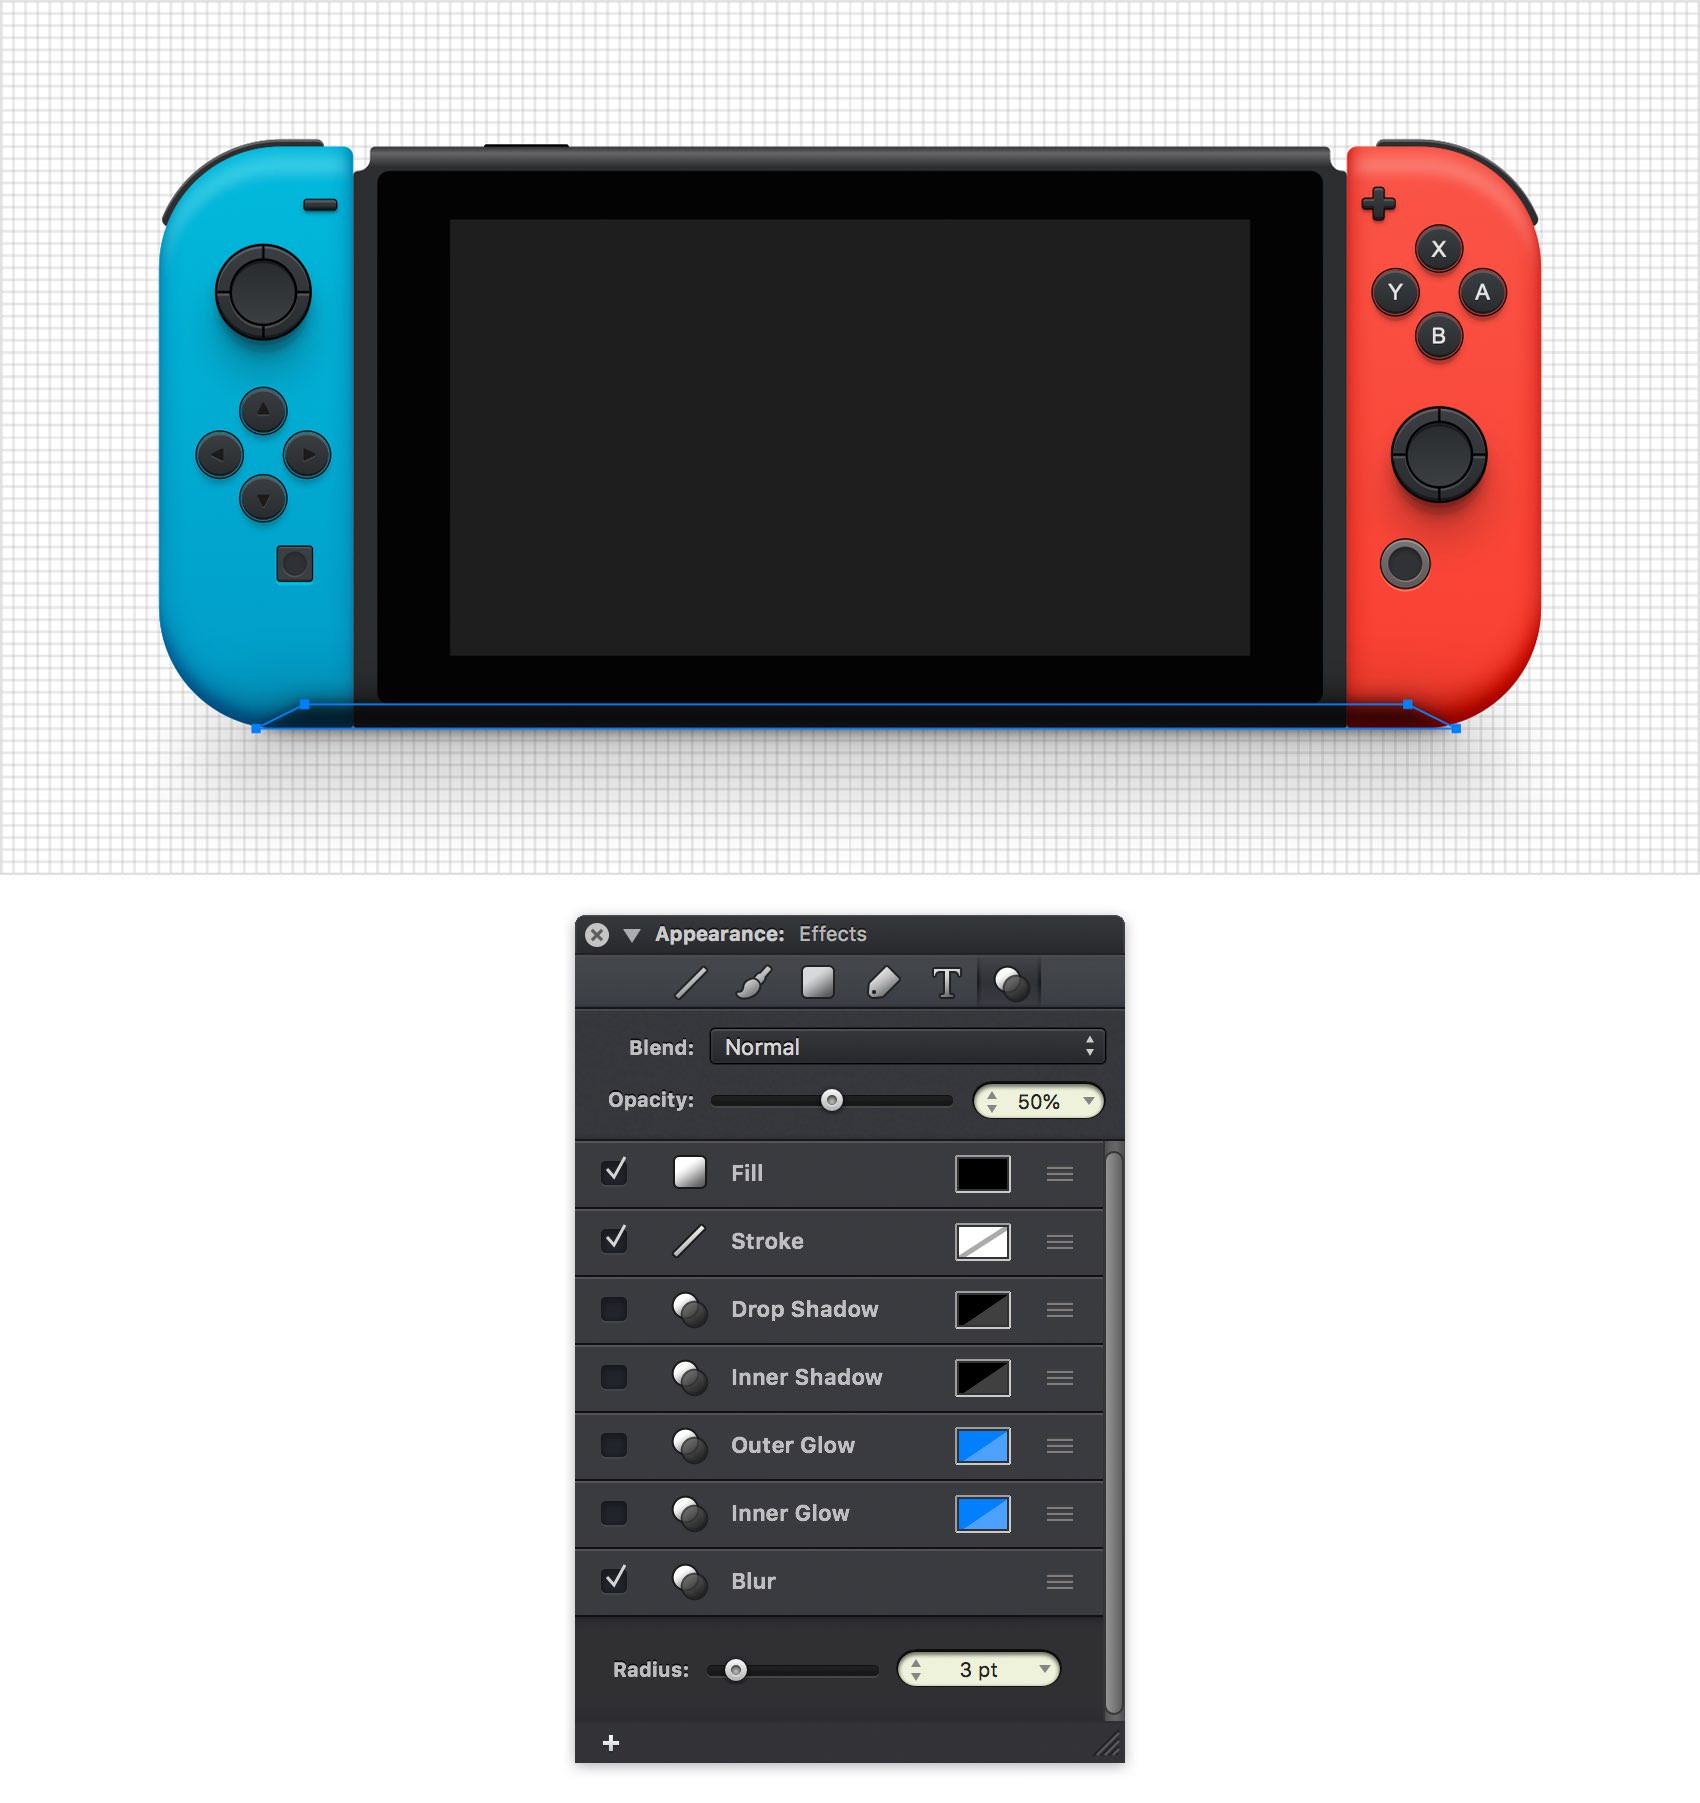
Add a copy of the smaller trapezoid shape in the same place (Command + C > Shift + Command + V). Select it and focus on the Effects pane. Select the existing Blur effect and drag the Radius slider to 3 pt.
Step 89
Focus on the Layers panel and click & drag your "BG" layer in the bottom of the panel.
Step 90
Pick the Rectangle Tool (M) and create a 780 x 450 px shape. Fill this new shape with white, make sure that it covers your entire canvas and don't forget to send it to back (Shift + Command + [).
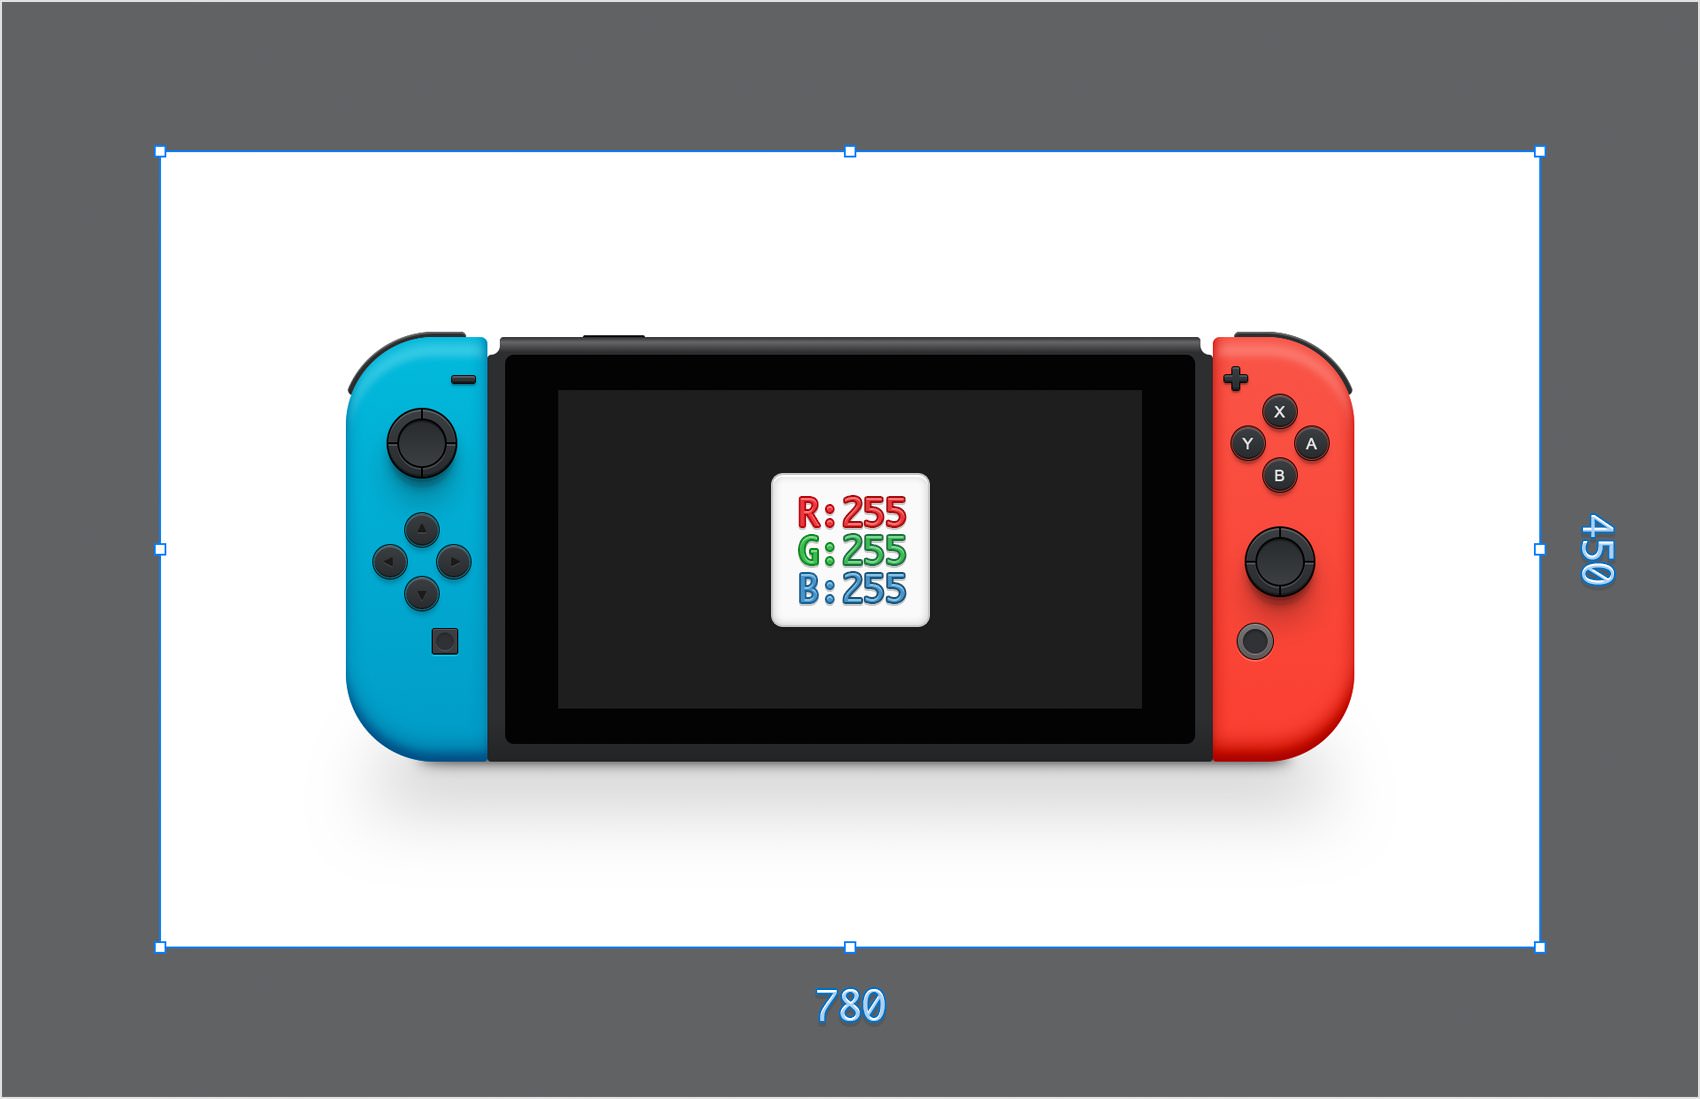
Finished Design
Congratulations, you've finished the tutorial!
Hope you've enjoyed learning some of the techniques and processes presented in these steps. As always, feel free to adjust the final design and make it your own.

Download Graphic File:
nintendoswitch.idraw