

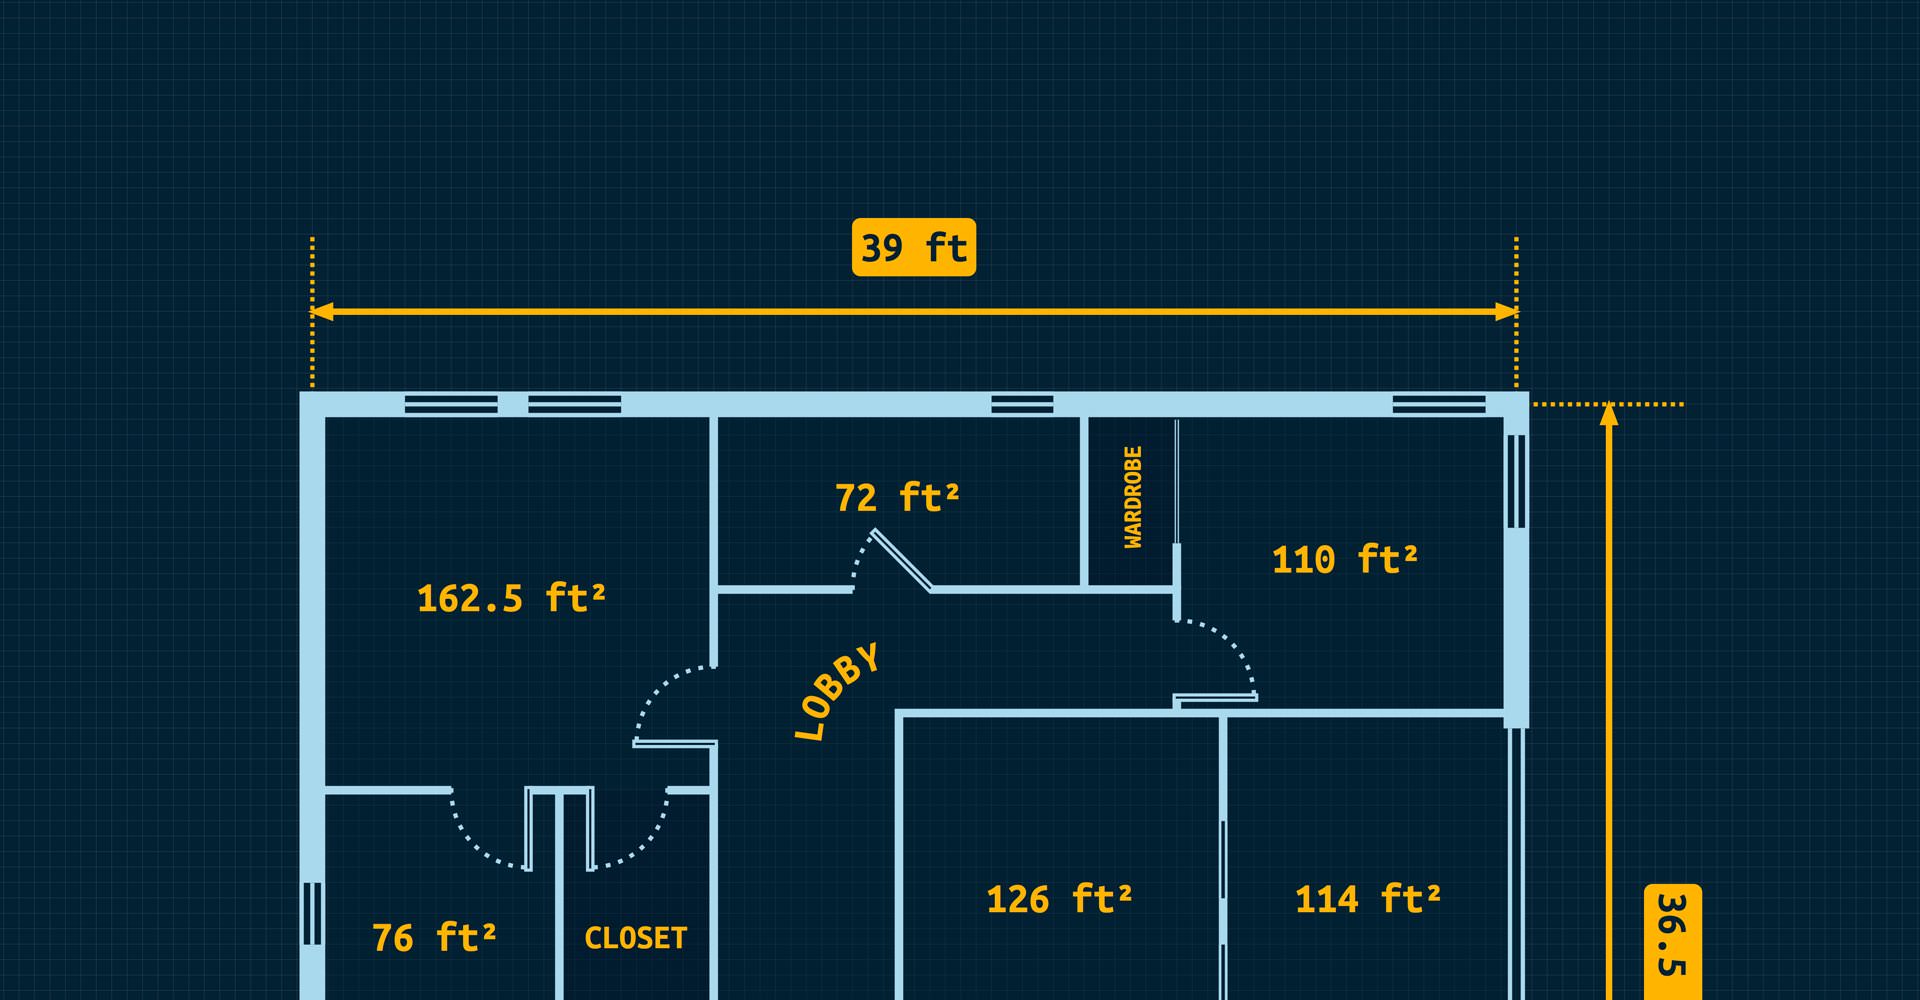
Create a Floor Plan Design
In the following tutorial you will learn how to create a sleek floor plan design in Graphic for iPad. For starters you will learn how to setup a simple grid and how to create a set of simple shapes using the Rectangle Tool and basic vector shape building techniques.
Using the Pen Tool and simple strokes you'll create the wall outlines and you'll learn how to work with multiple layers or how to save colors. Moving on, you will learn how to add various types of labels and how to easily transfer them from one object to another.
Taking full advantage of the Effects pane, you will learn how to add multiple strokes for a single shape and how to save and use styles. You'll learn how to create arrowed, dashed or dimension lines and how to quickly edit them.
Finally, you'll learn how to add text on a path and how to easily export your grid and canvas color along with the entire design.
Step 1
For starters you will need to import the Ubuntu Mono font. Tap the Import button from the Documents Browser to quickly import your font from the Dropbox/iCloud folder.
Near that Import button you will find the New Document button. Tap it to create a new document, choose the Grid document style and then tap the Create button.
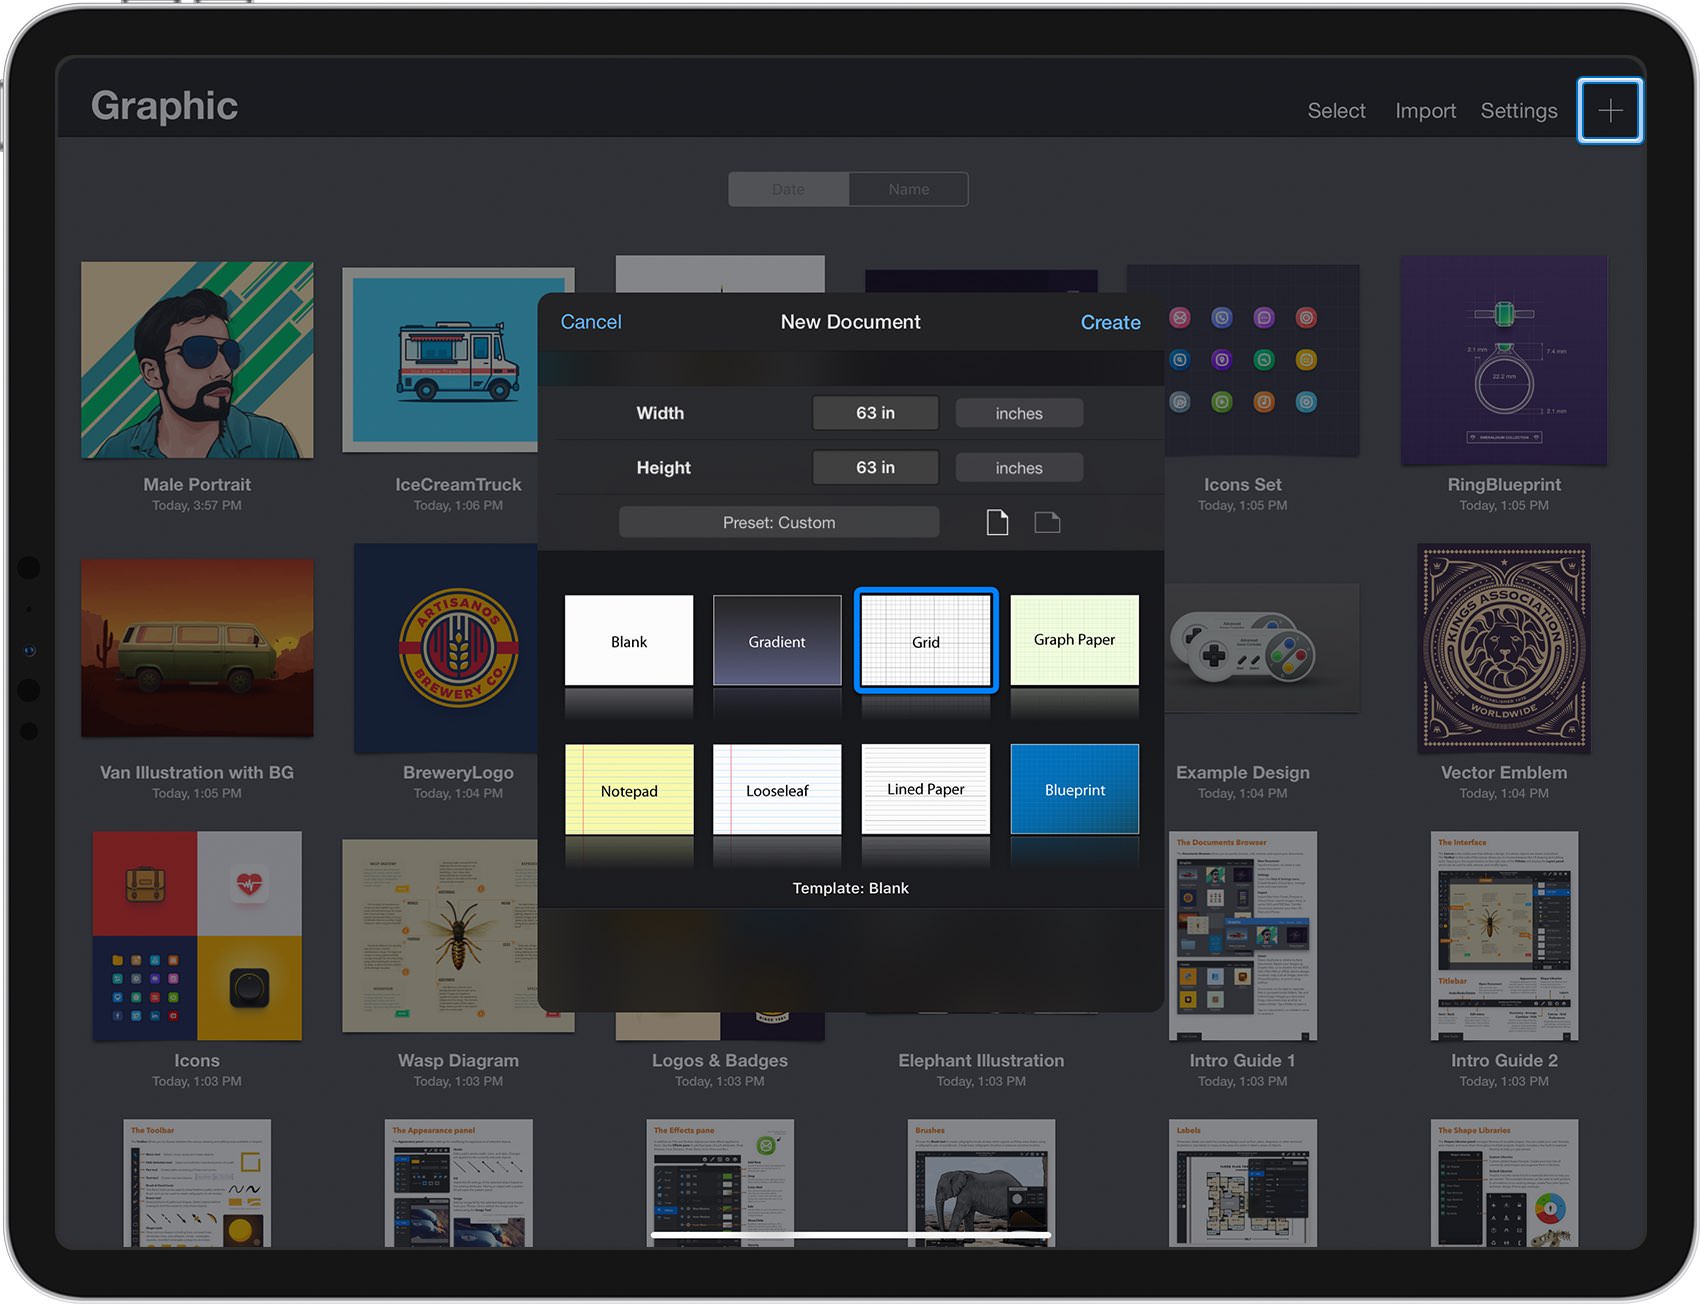
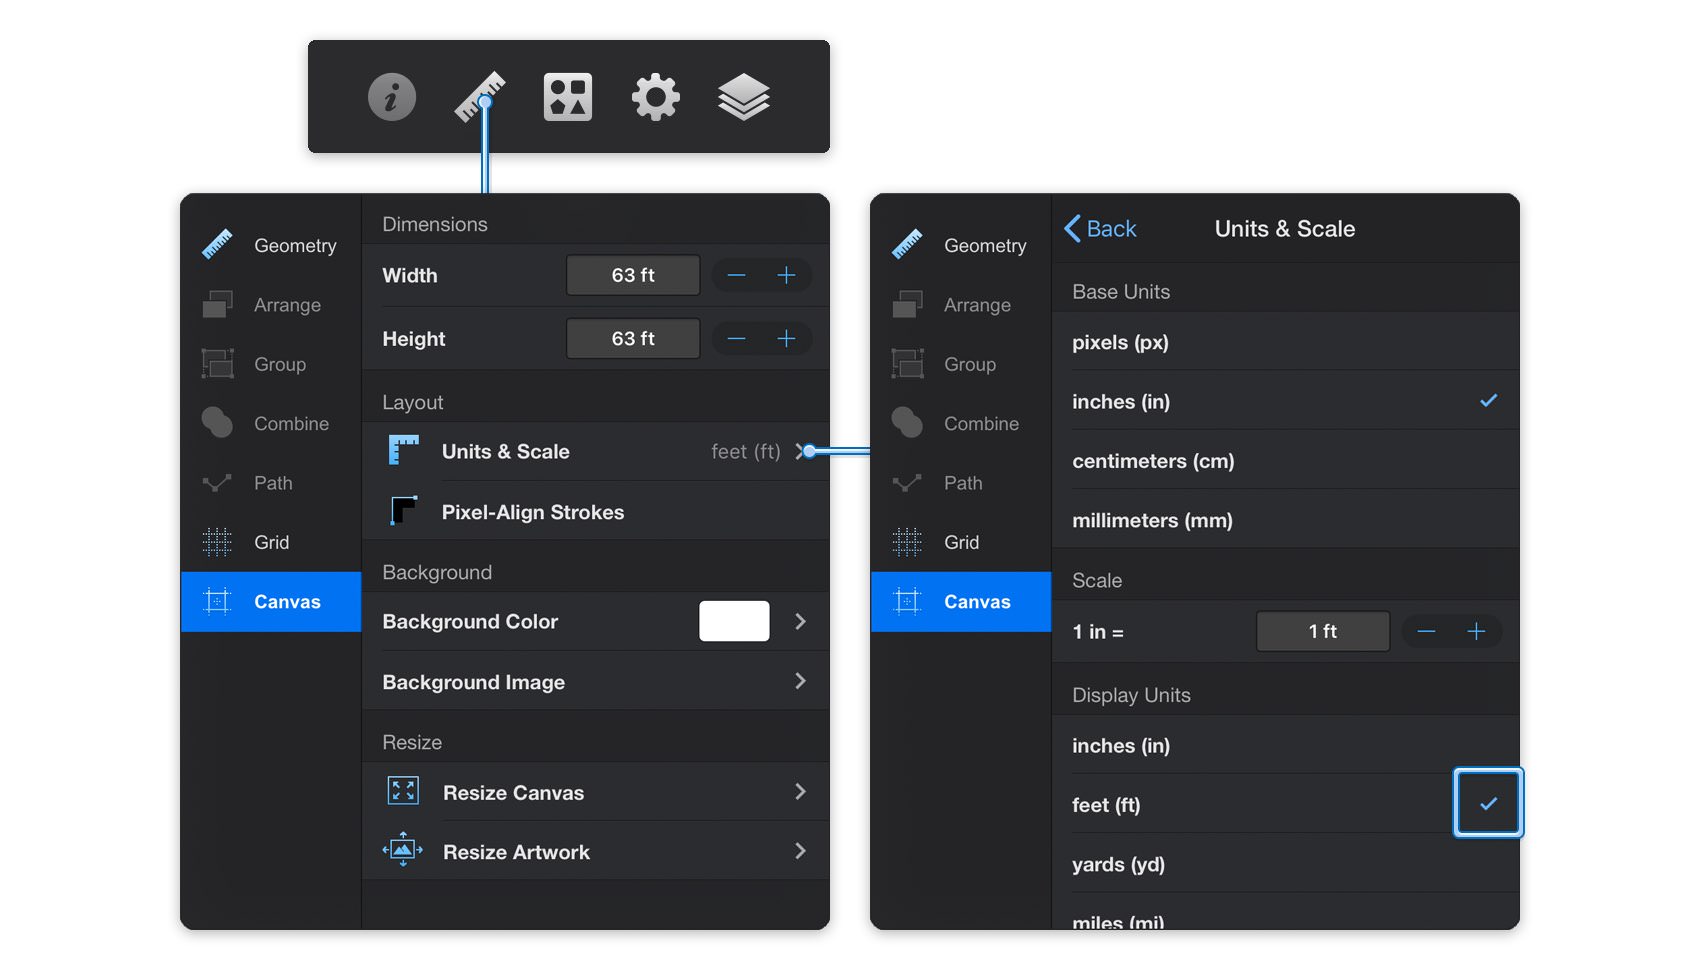
Focus on the right side of the Titlebar and tap the ruler icon to open the Properties panel. Go to the Canvas pane, make sure that the Pixel-Align Strokes feature is enabled and then tap the Units & Scale button to open the Units & Scale pane.
We're about to create a ‘to-scale’ technical design using the canvas scale settings. First, make sure that the Base Unit is set to inches and then move to the bottom of the pane and change the Display Unit from inches to feet. The actual paper size of the document will not change, only the displayed values and units are adjusted by this setting.
Once you're done return to the Canvas panel and set the Width and Height to 63 ft.
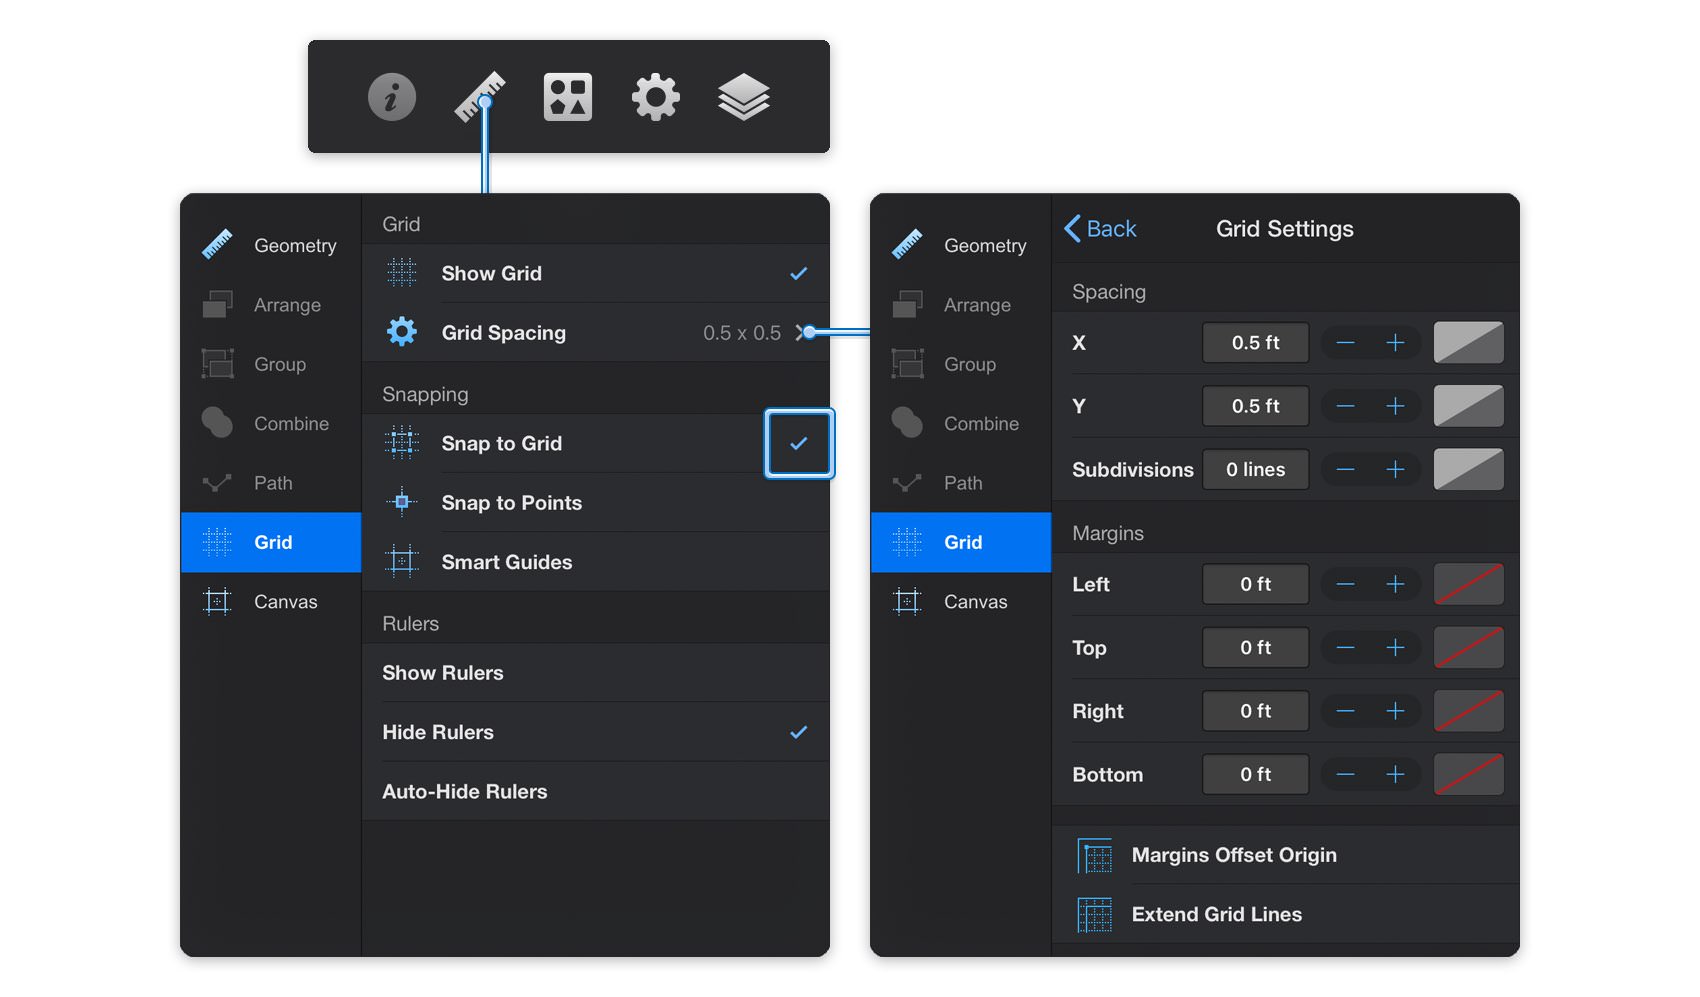
Next, you need to adjust your document's grid. Tap again that ruler icon and open the Grid pane.
Make sure that the Snap to Grid feature is enabled and keep in mind that this is where you should come whenever you wish to enable or disable the grid or the Snap to Grid.
Open the Grid Settings pane, enter 0.5 ft in both Spacing boxes and 0 lines in that one Subdivisions box.
Step 2
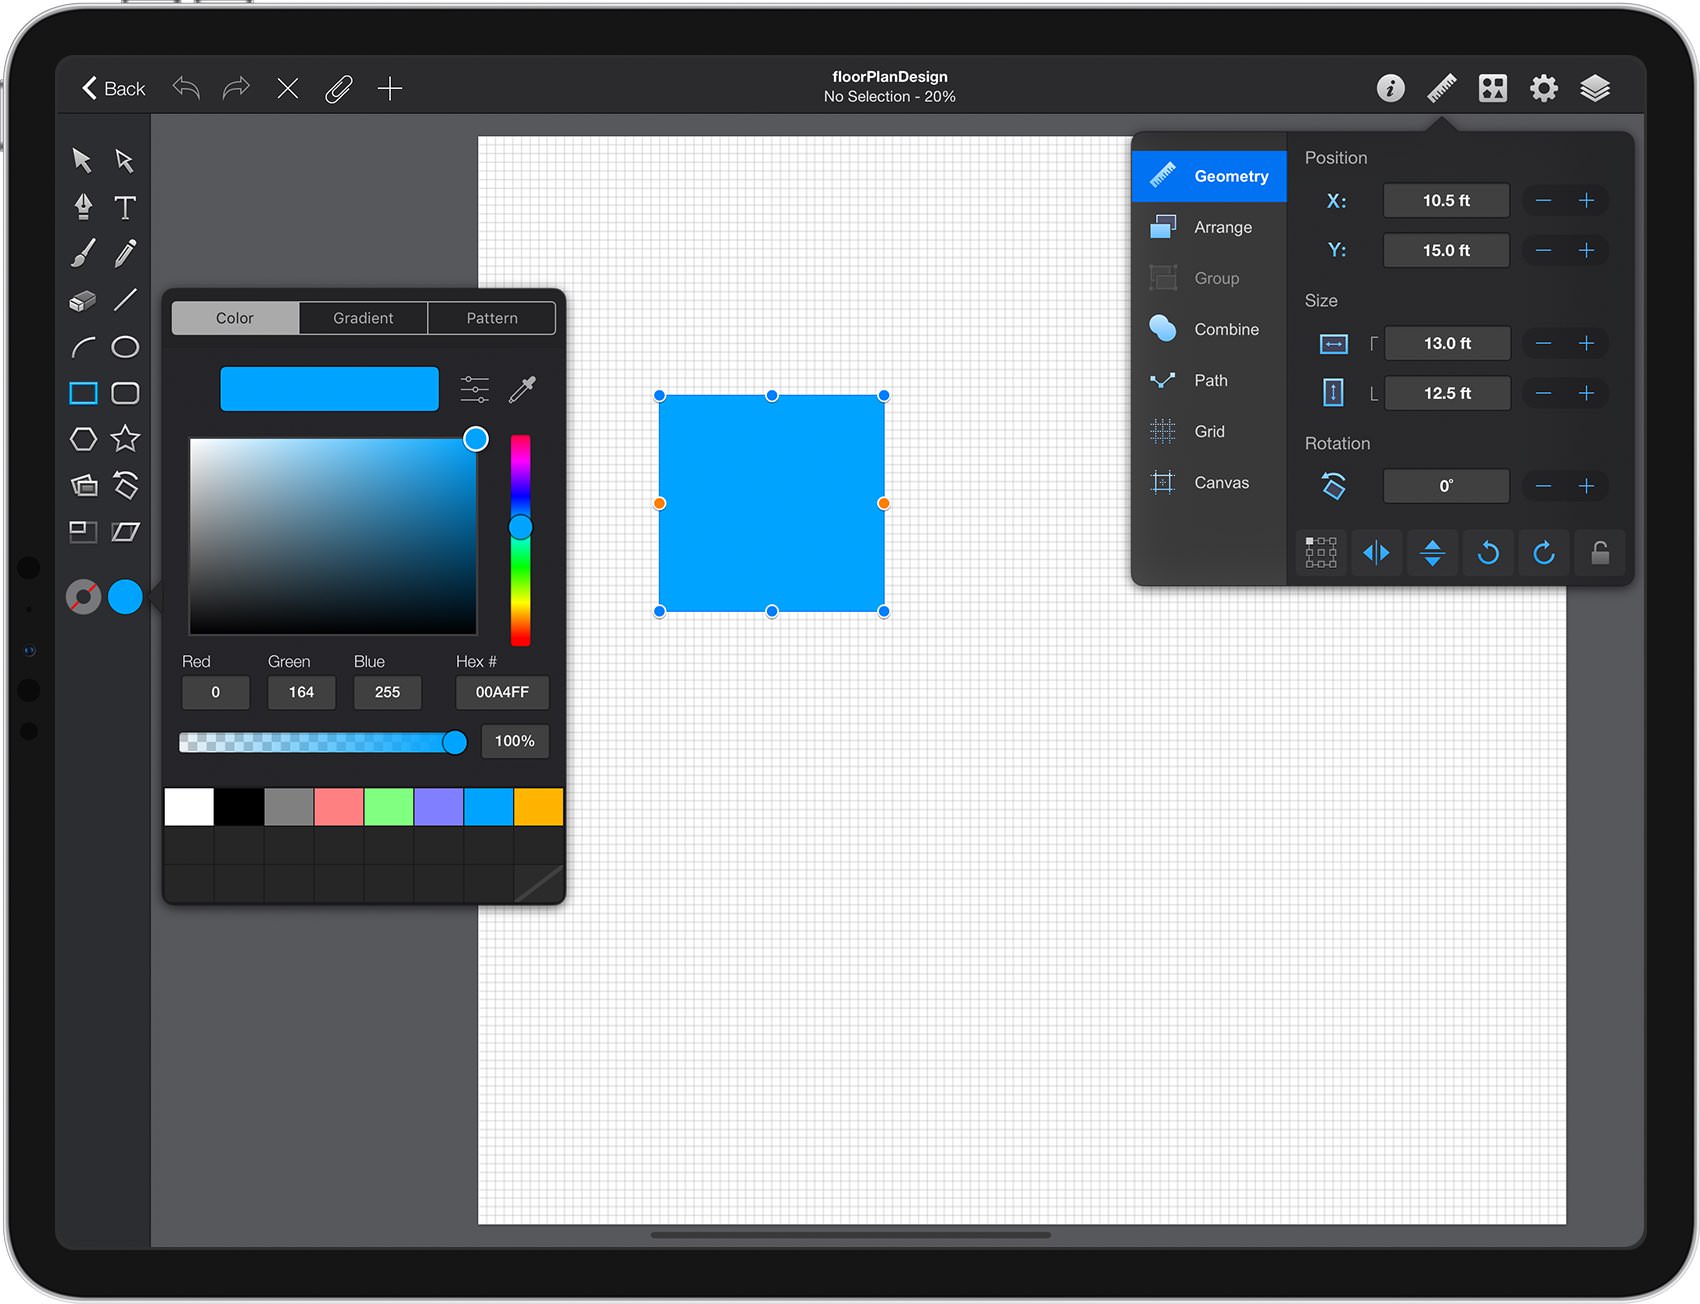
Focus on the Toolbar and you will notice that by default the fill color is set to white while the stroke color is set to black. Tap the fill color well and replace the existing color with R=0 G=164 B=255 and then tap the line color well and drag the Alpha slider to 0%, which will make the line invisible.
Pick the Rectangle Tool, focus on your canvas and create a 13 x 12.5 ft shape — the grid and the Snap to Grid feature will ease your work. Make sure that this blue rectangle stays selected, tap the ruler icon and open the Geometry pane. Focus on the Position attributes and enter the numbers mentioned in the following image to easily place your selected shape in the desired location.
Step 3
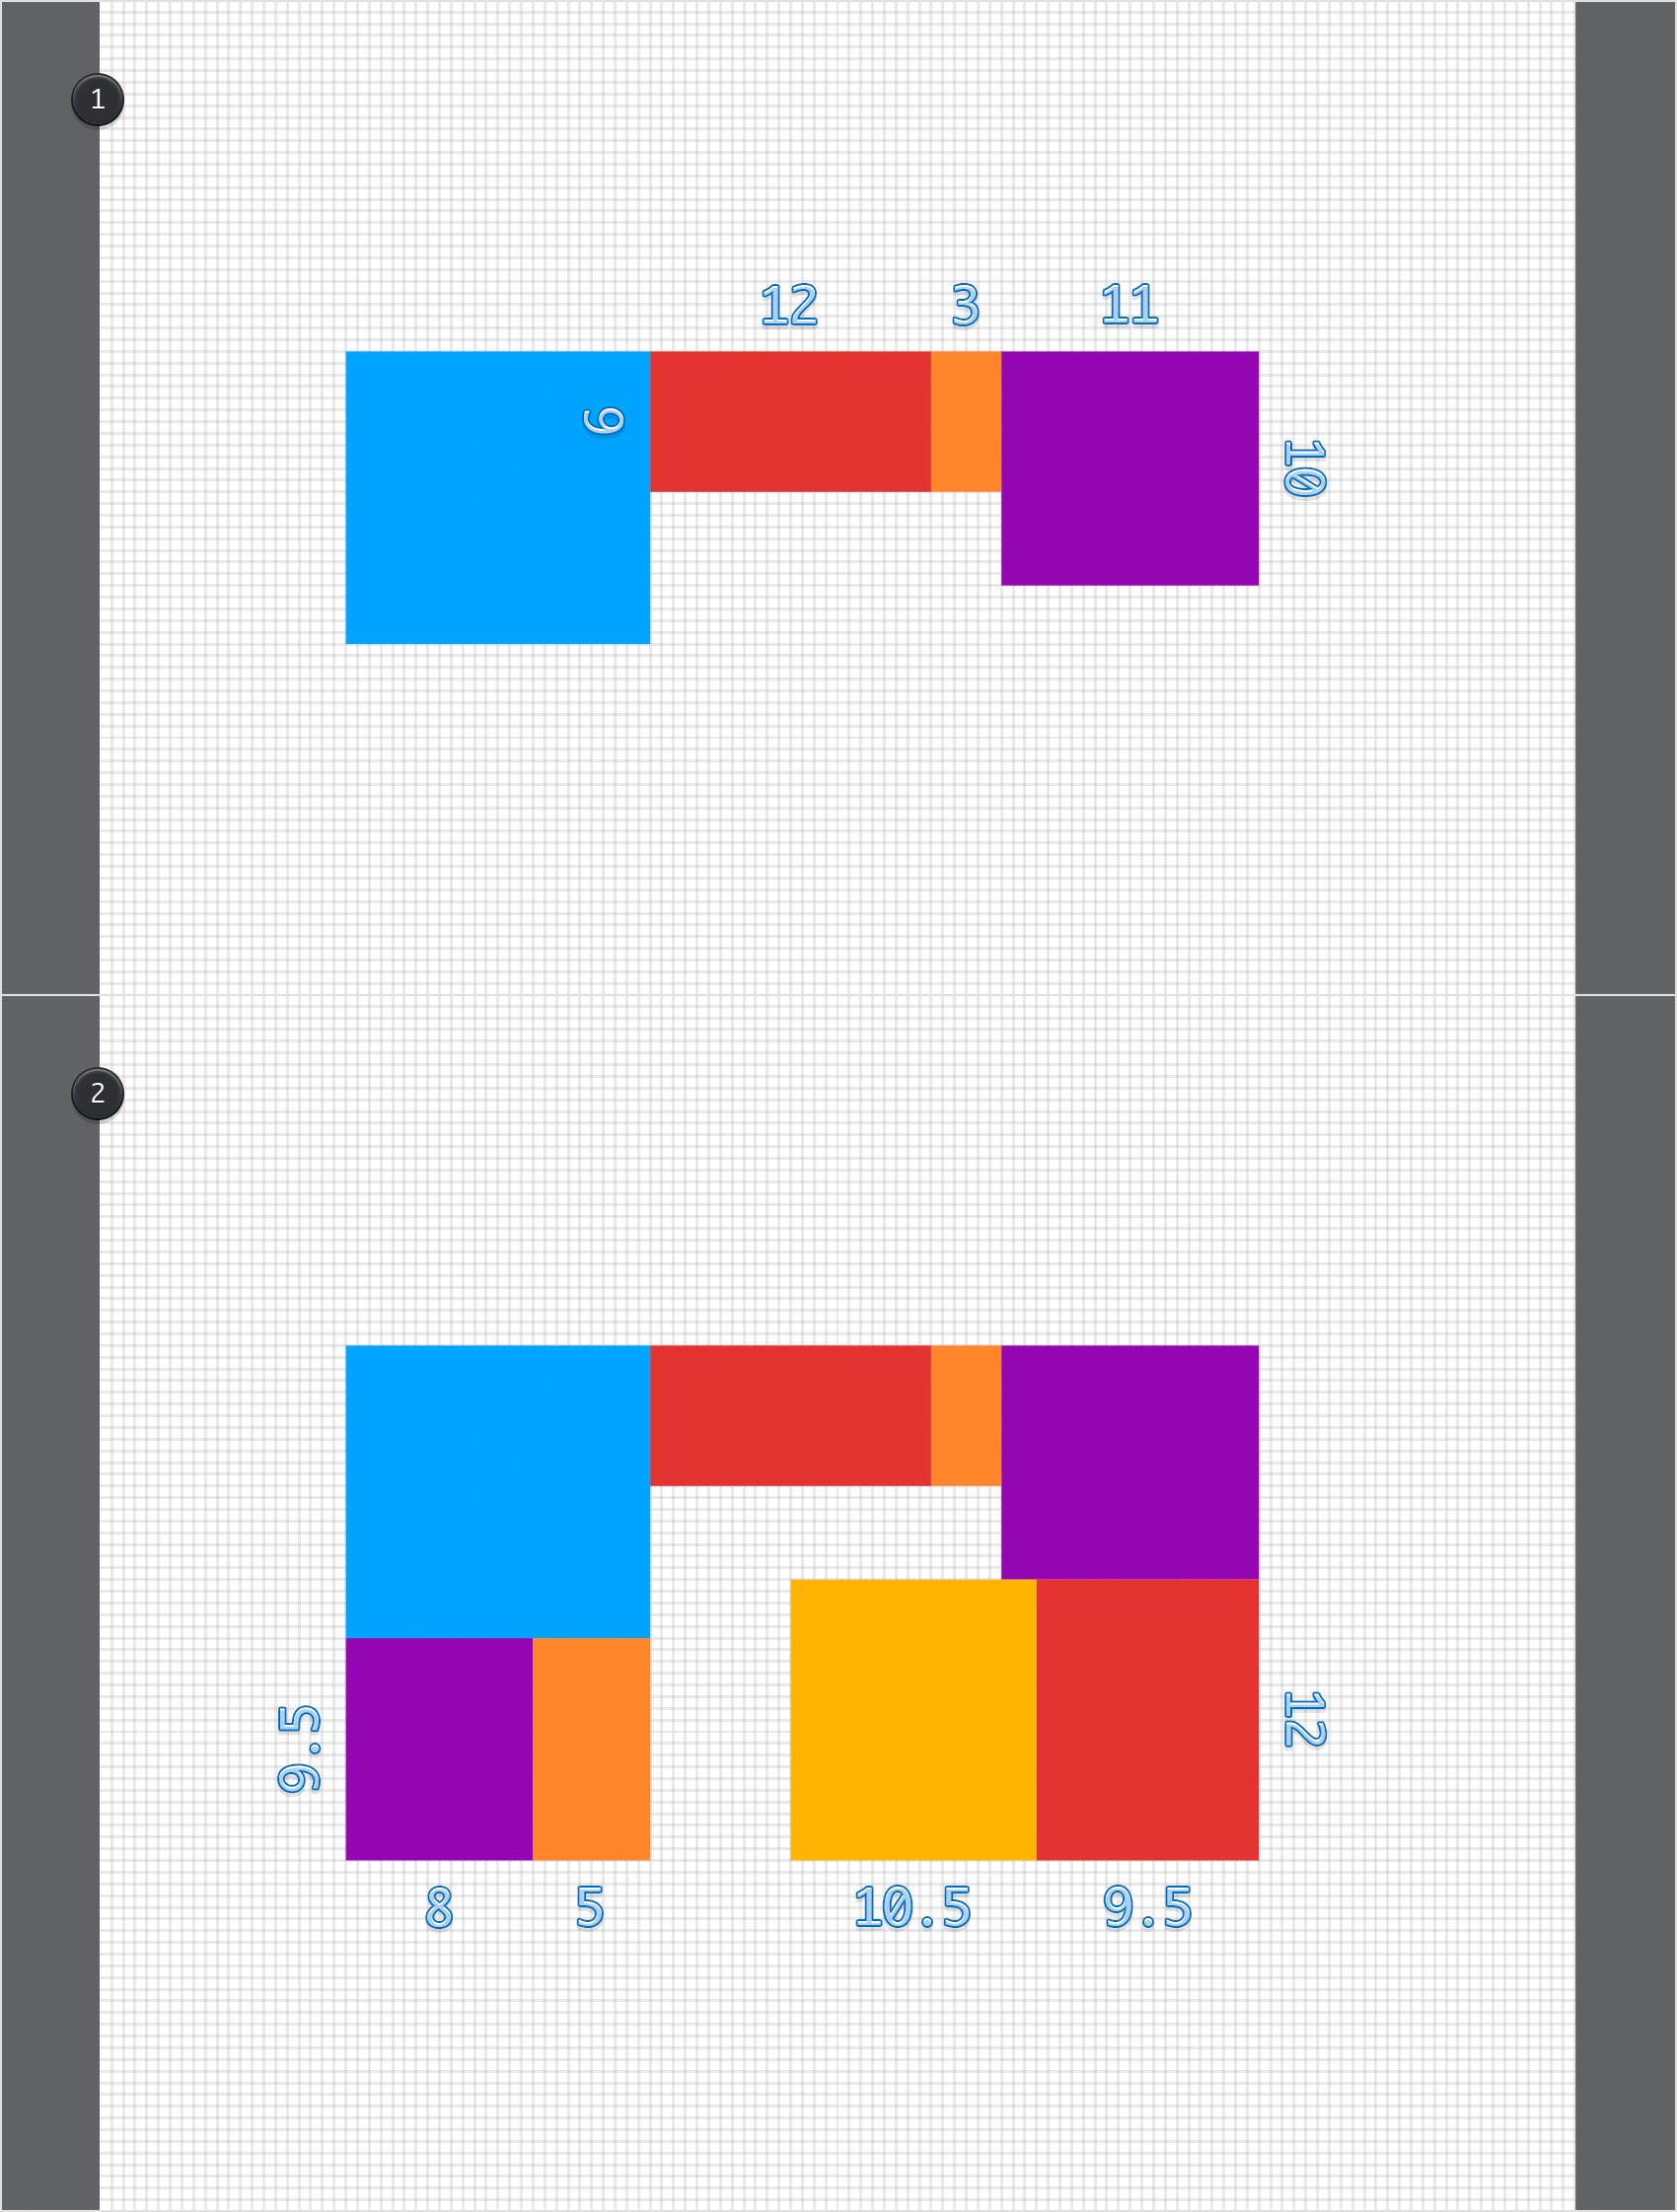
Using the Rectangle Tool, create the series of rectangles shown in the following image and use the size attributes indicated below. Try to use somewhat similar fill colors, but don't struggle to get the exact tint.
Step 4
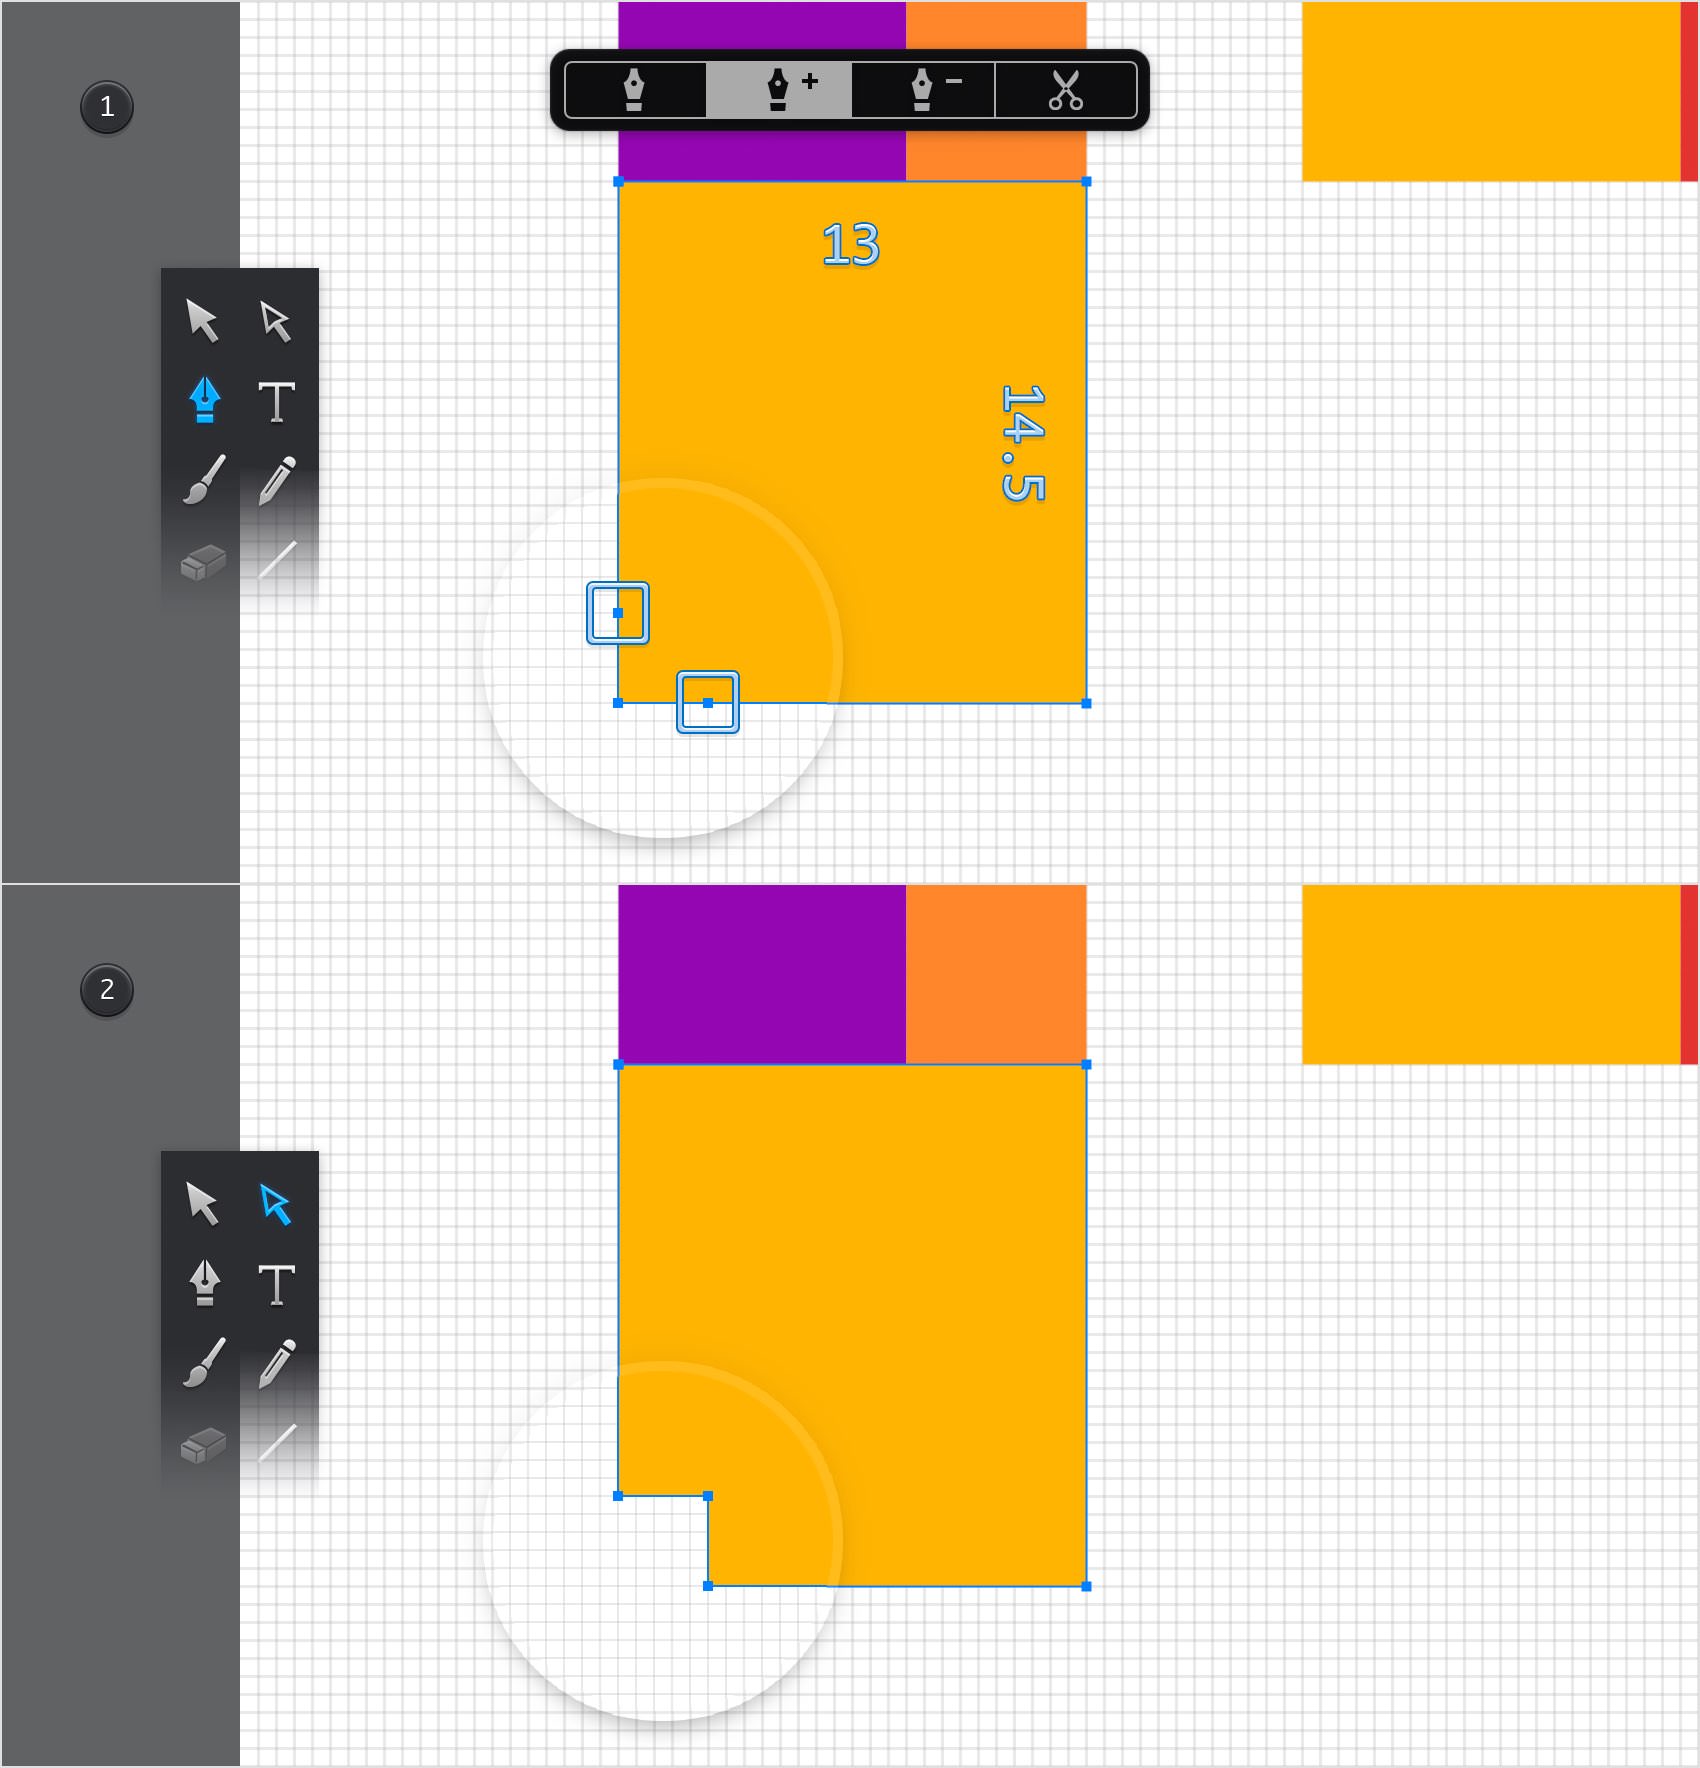
Using the Rectangle Tool, create a 13 x 14.5 ft shape, fill it with a random yellow and place it as shown in the first image.
Pick the Pen Tool, move to the newly opened tool pane and activate the Add Point mode. Focus on the bottom, left corner of your yellow rectangle and add two anchors points as shown in the first image.
Switch to the Path Selection Tool, select the bottom, left anchor point and drag it 2.5 ft up and 2.5 ft to the right. In the end the shape made in this step should look like in the second image.
Step 5
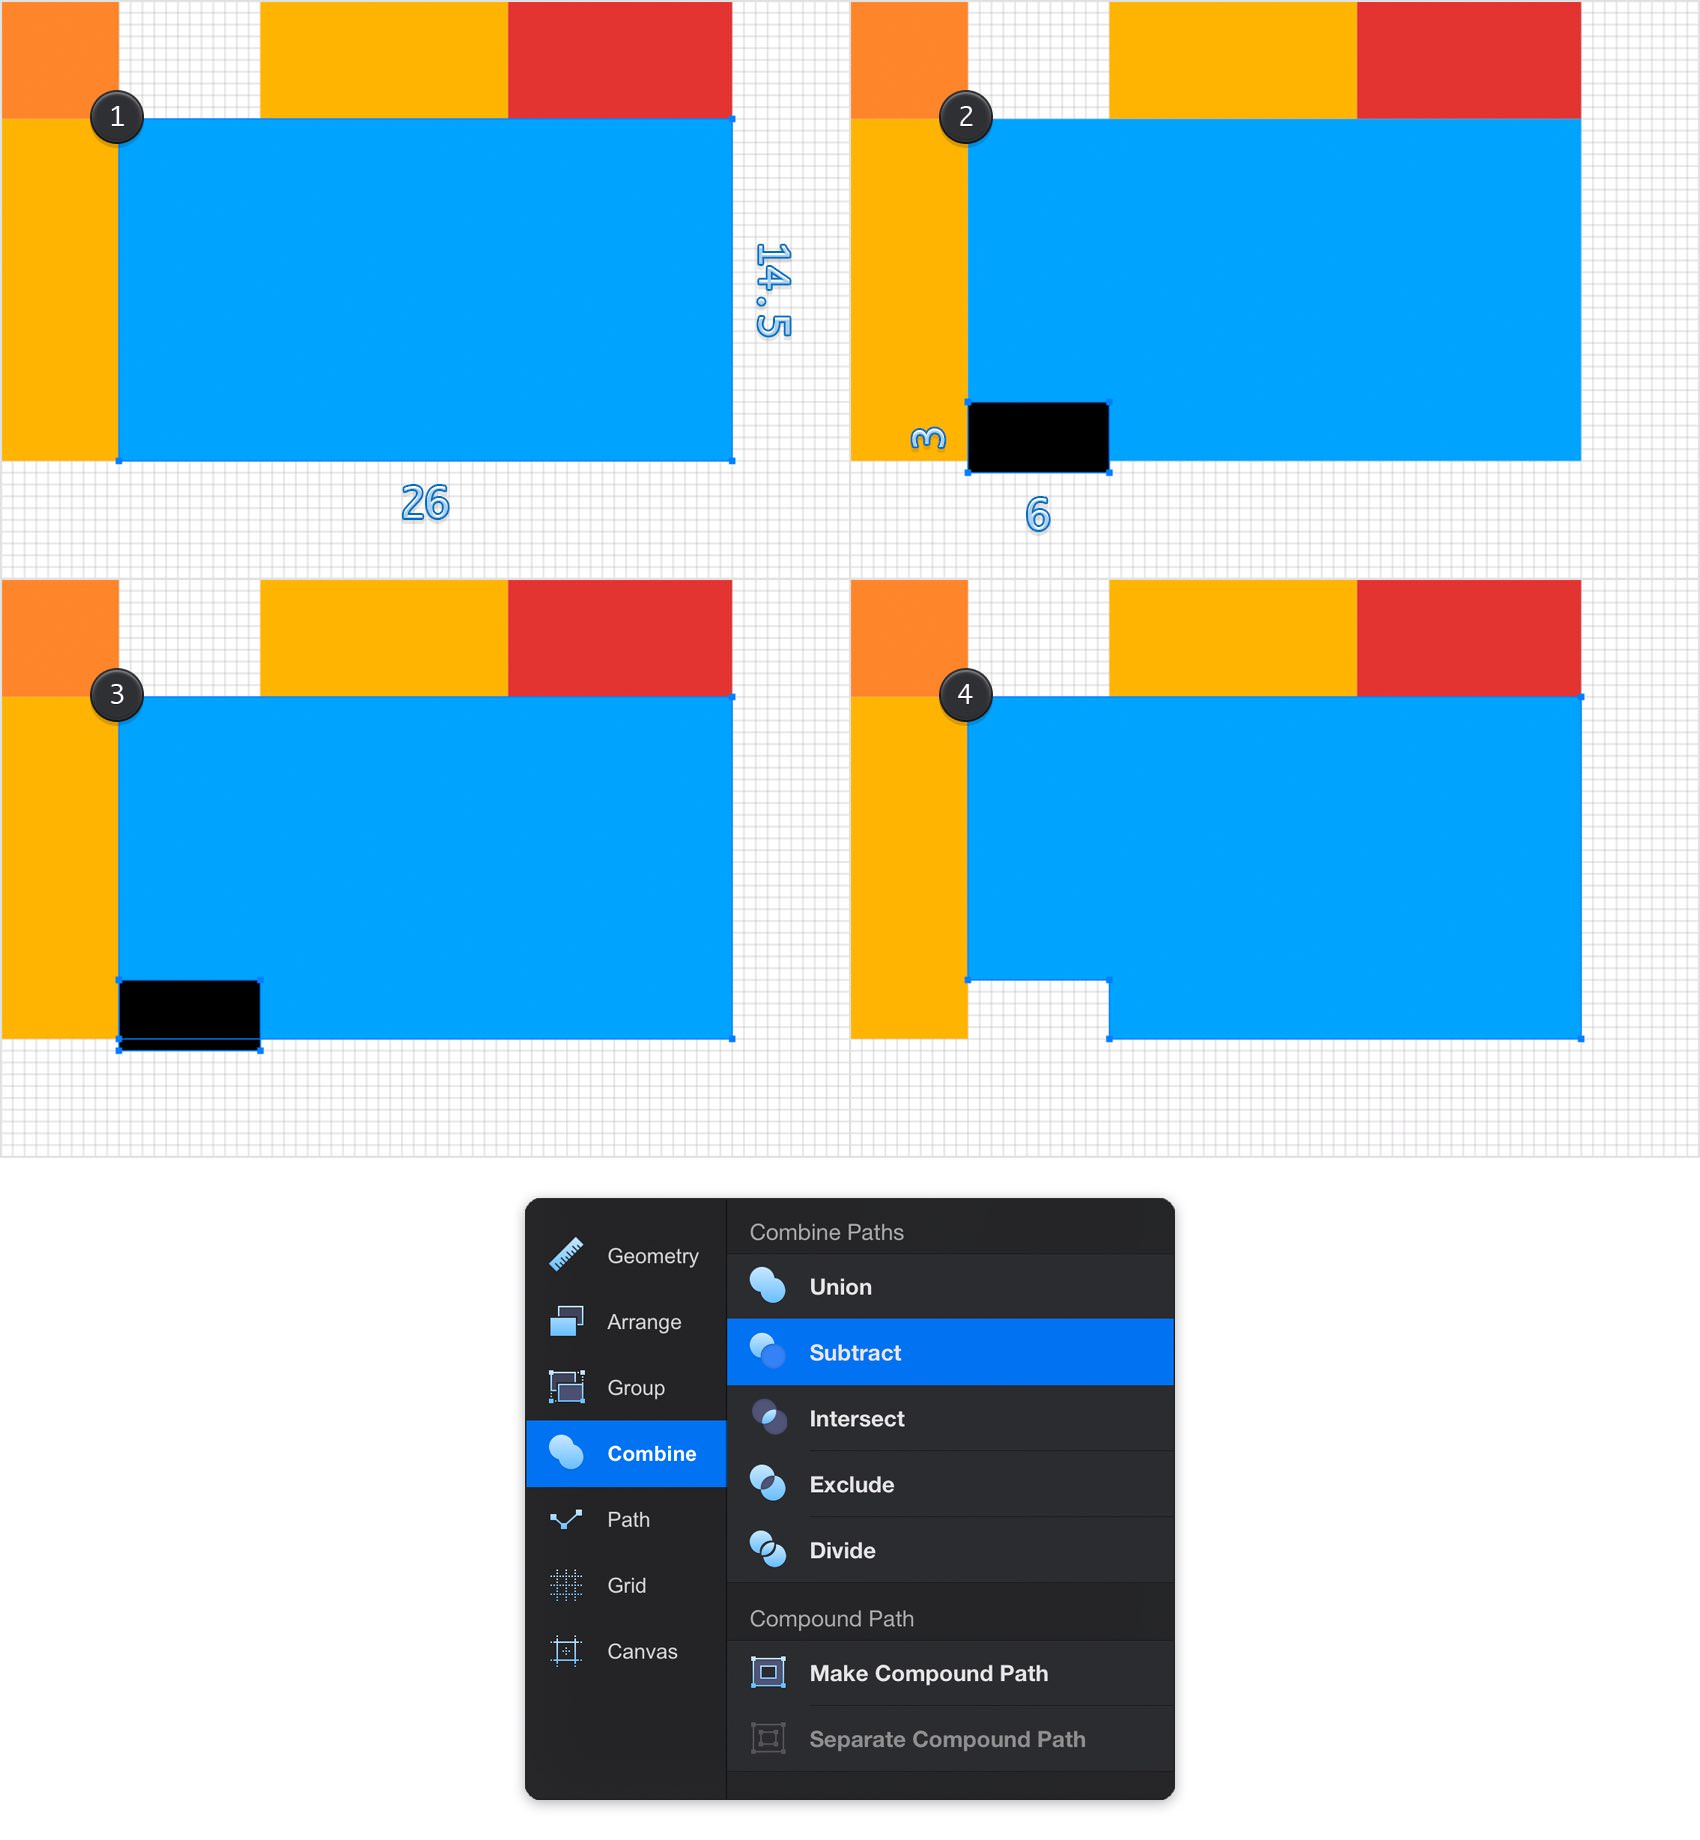
Using the Rectangle Tool, create a 26 x 14.5 ft shape, fill it with a random blue and place it as shown in the first image. Using the same tool, create a 6 x 3 ft shape, and place it as shown in the second image.
Switch to the Move Tool and select both shapes made in this step. Open the Combine pane from the Properties panel and then tap the Subtract button. In the end your blue shape should look like in the fourth image.
Step 6
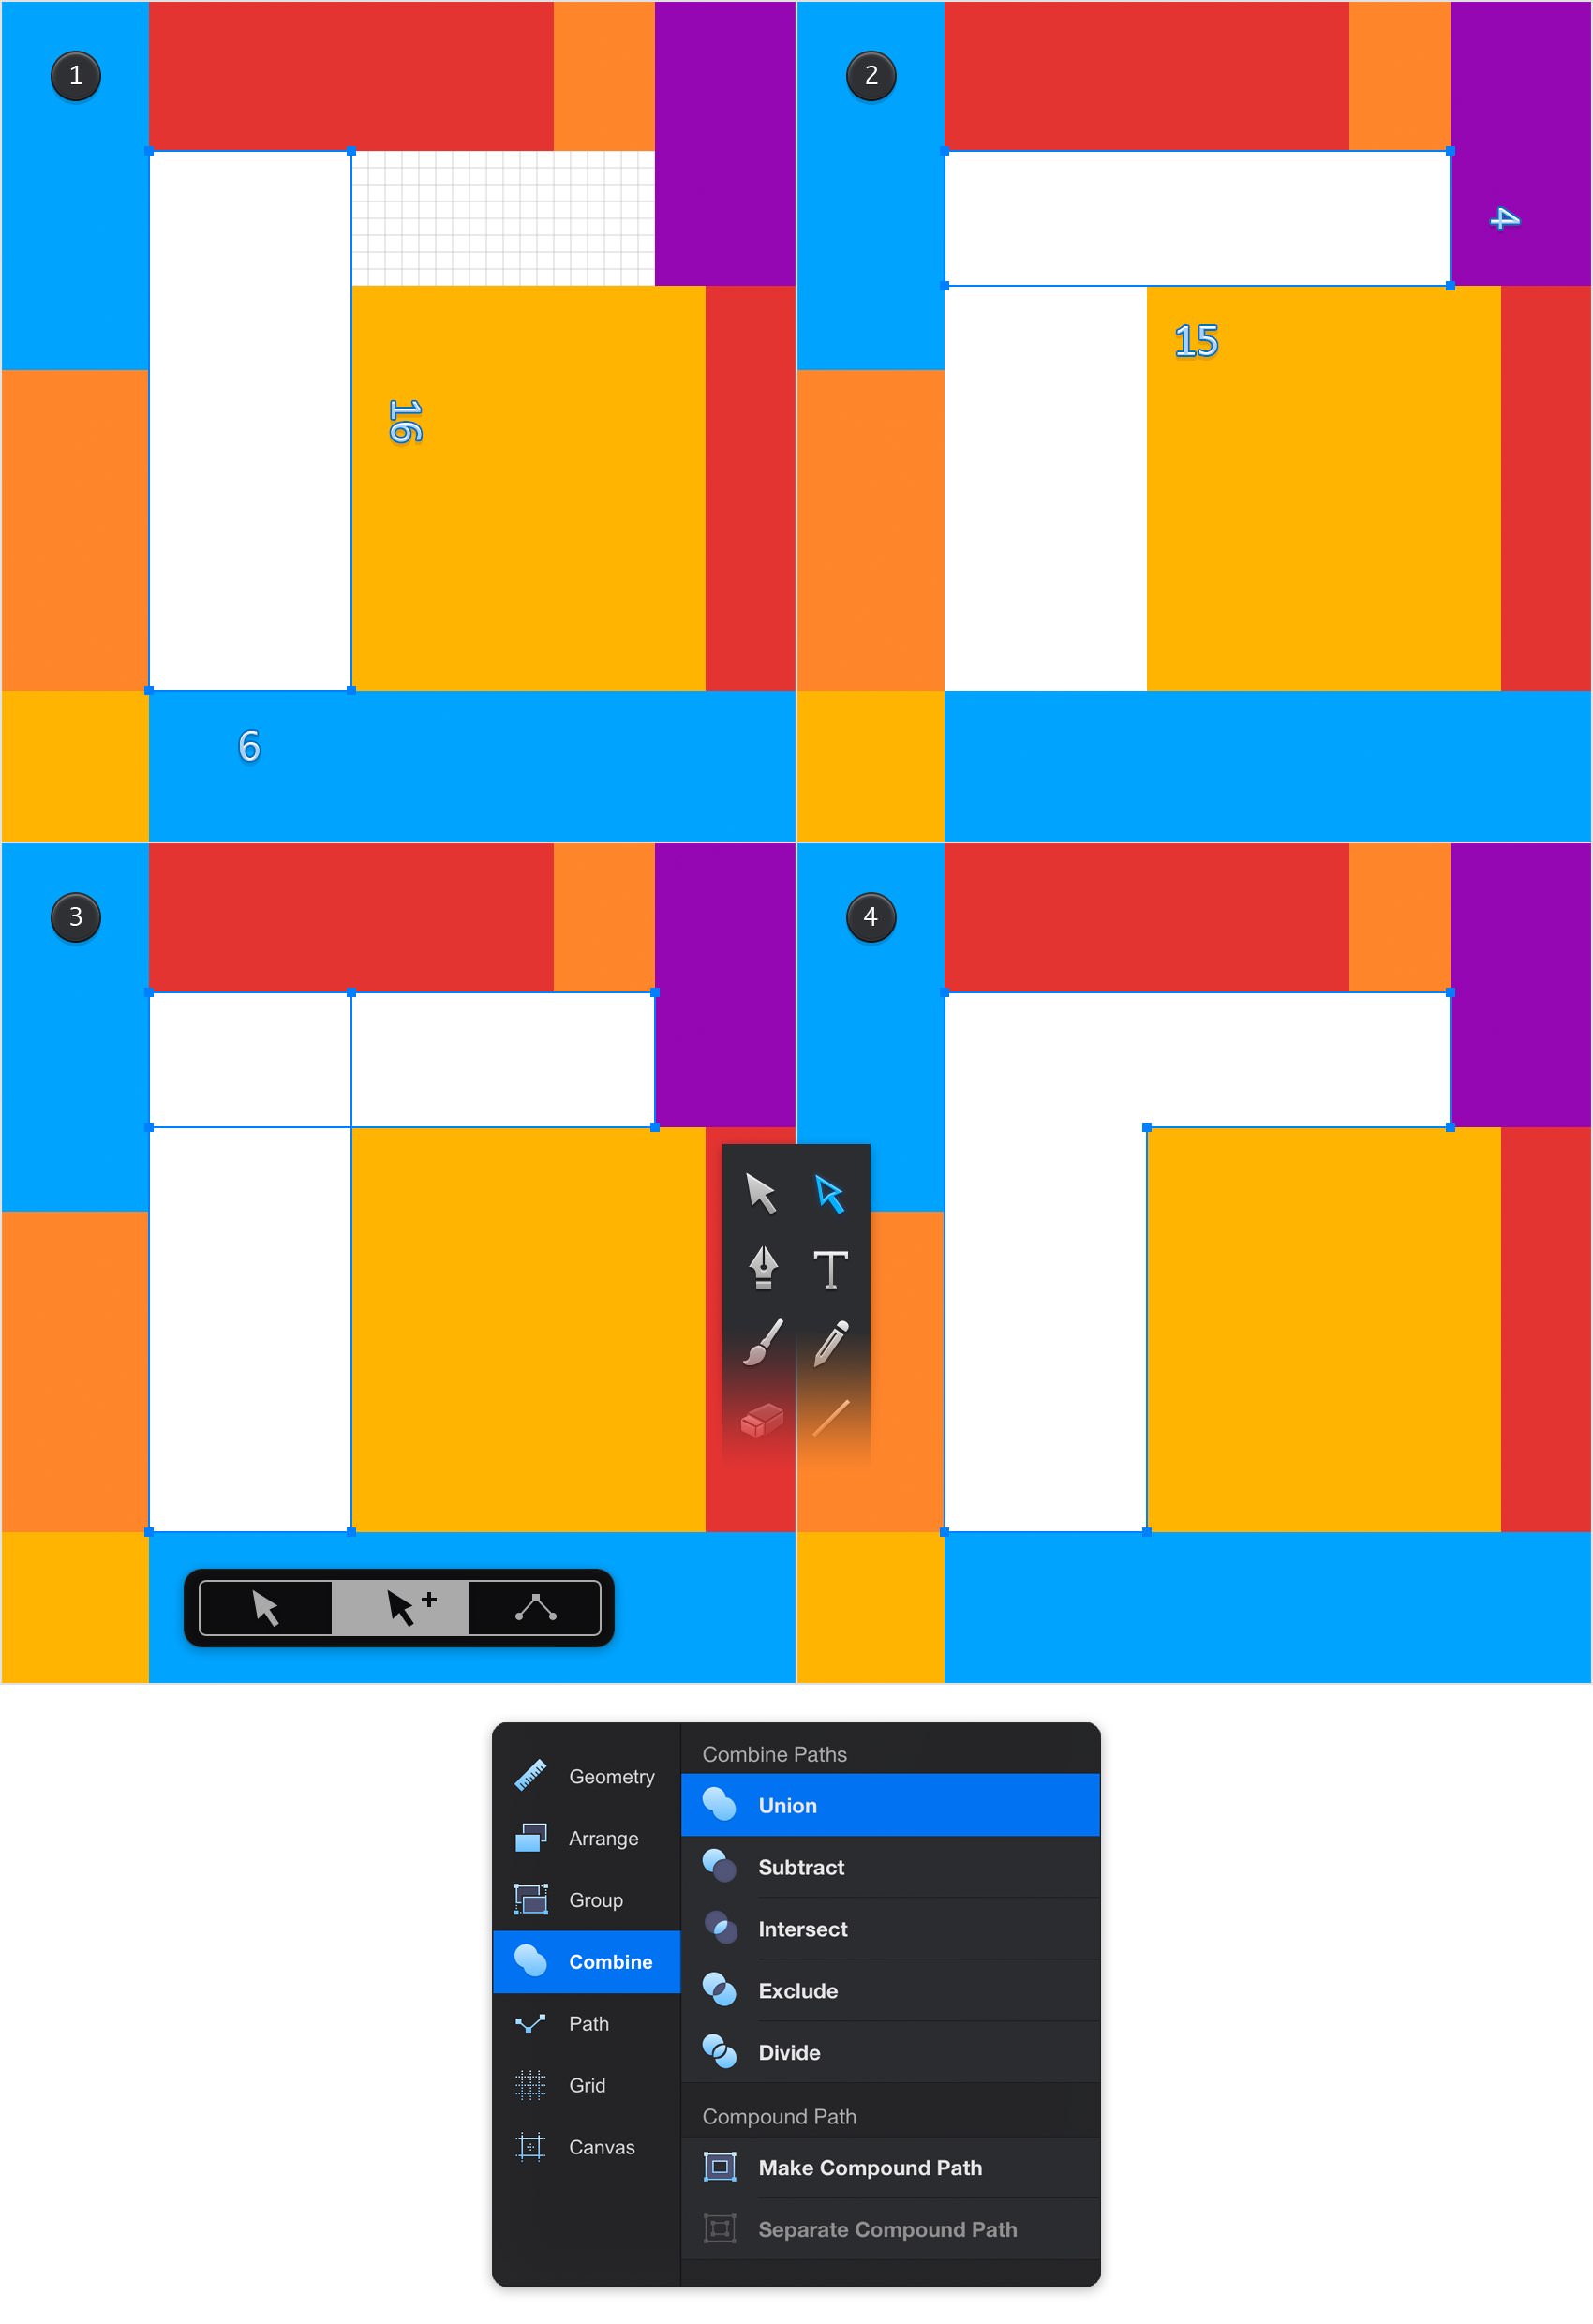
Using the Rectangle Tool, create a 6 x 16 ft shape, fill it with white and place it as shown in the first image. Create a second white rectangle, make it 15 ft wide and 4 ft tall and then place it as shown in the second image.
Switch to the Path Selection Tool, focus on the newly opened tool pane and activate the Add to Selection mode. Tap the two white shapes made in this step to select them and then tap the Union command from the Combine pane.
Step 7
Focus on the right side of your Titlebar and tap the rightmost icon to open the Layers panel. First, double tap the existing layer and rename it "rooms". Next, use the plus button located in the top, right corner of your panel to add a second layer. Select this new layer to make sure that the new objects that you are about to create will go here. Also, rename this new layer "walls" and make sure that it lies above the other layer. Tap and hold on the layer you’d like to move and then drag it to a new position. While dragging, a blue indicator line will show the destination of the dragged layer.
Move to your Toolbar, make the fill invisible and then tap the line color well. Replace the existing color with R=169 G=217 B=237 and make sure that the Alpha slider is set to 100%. Pick the Pen Tool and create the two paths that go around your existing set of shapes as shown in the following image. That bottom, 2.5 ft gap between the paths will be the entry door.
Make sure that your two paths remain selected, get back to the right side of your Titlebar and tap the leftmost icon to open the Appearance panel. Open the Stroke pane and set the Width to 60 pt. In the end your two, blue paths should look like in the following image.
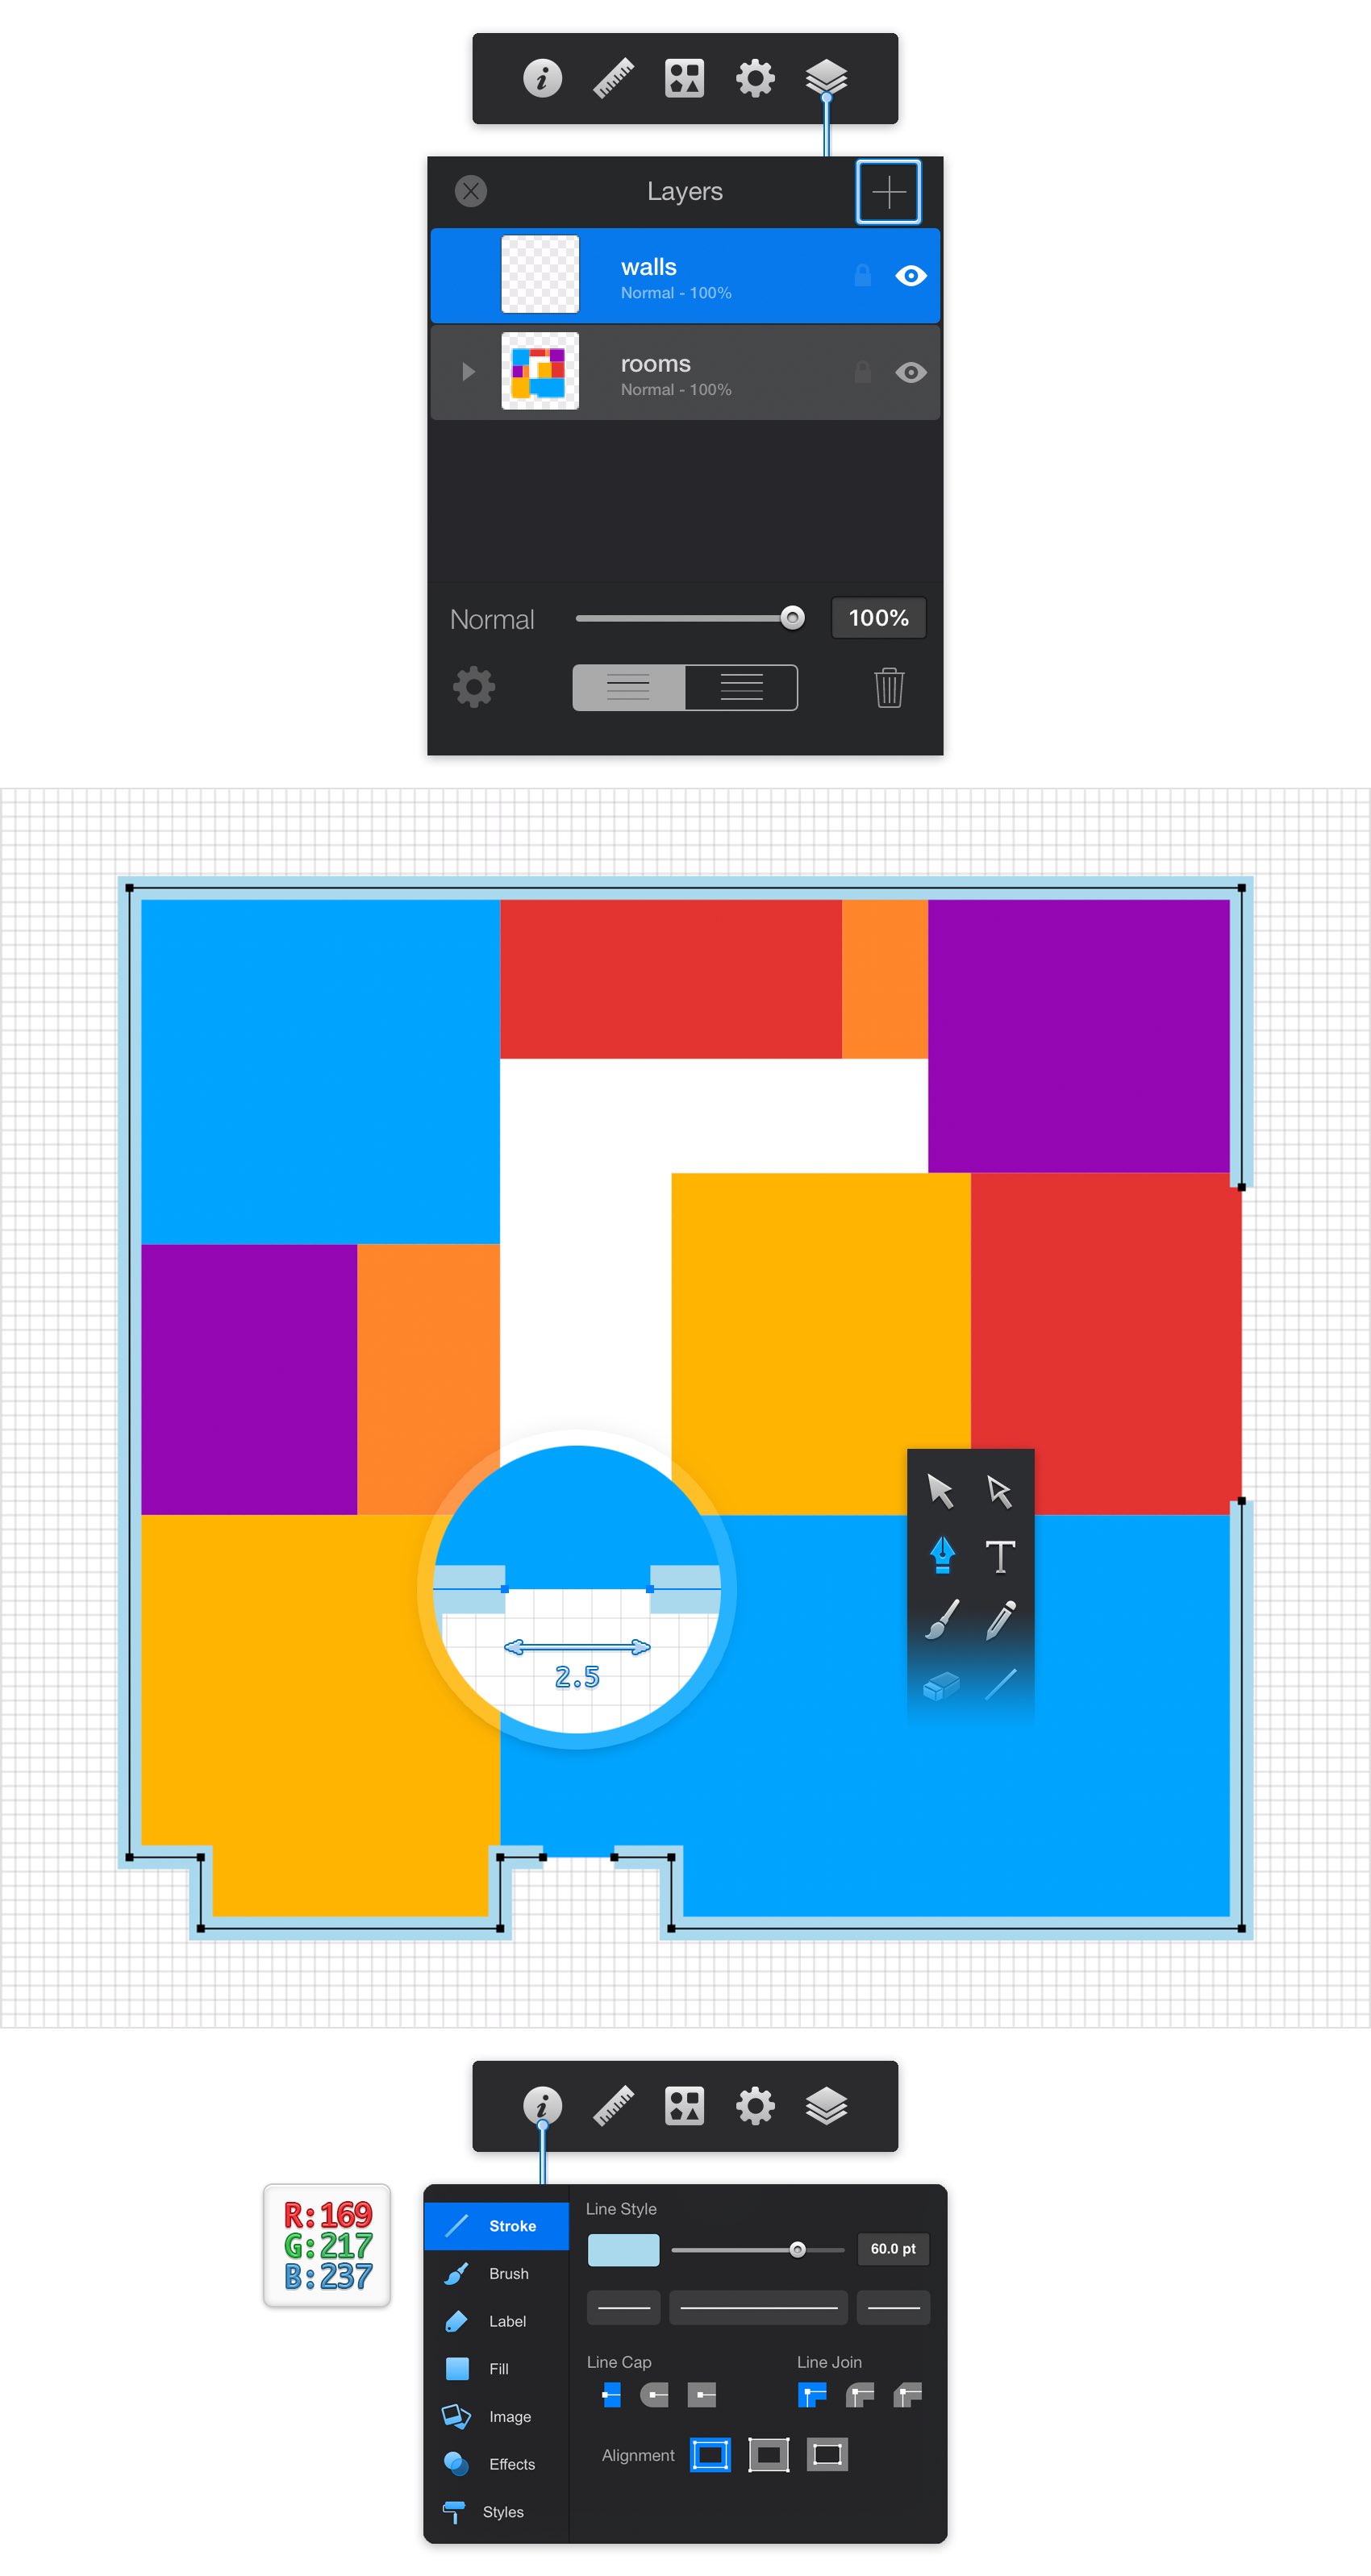
You're going to use that light blue color numerous times throughout the tutorial. To ease your work you should save this particular color inside your Color Palette. Tap the color well from the Stroke panel or the one from your Toolbar and then drag the active color to one of the palette slots.
Step 8
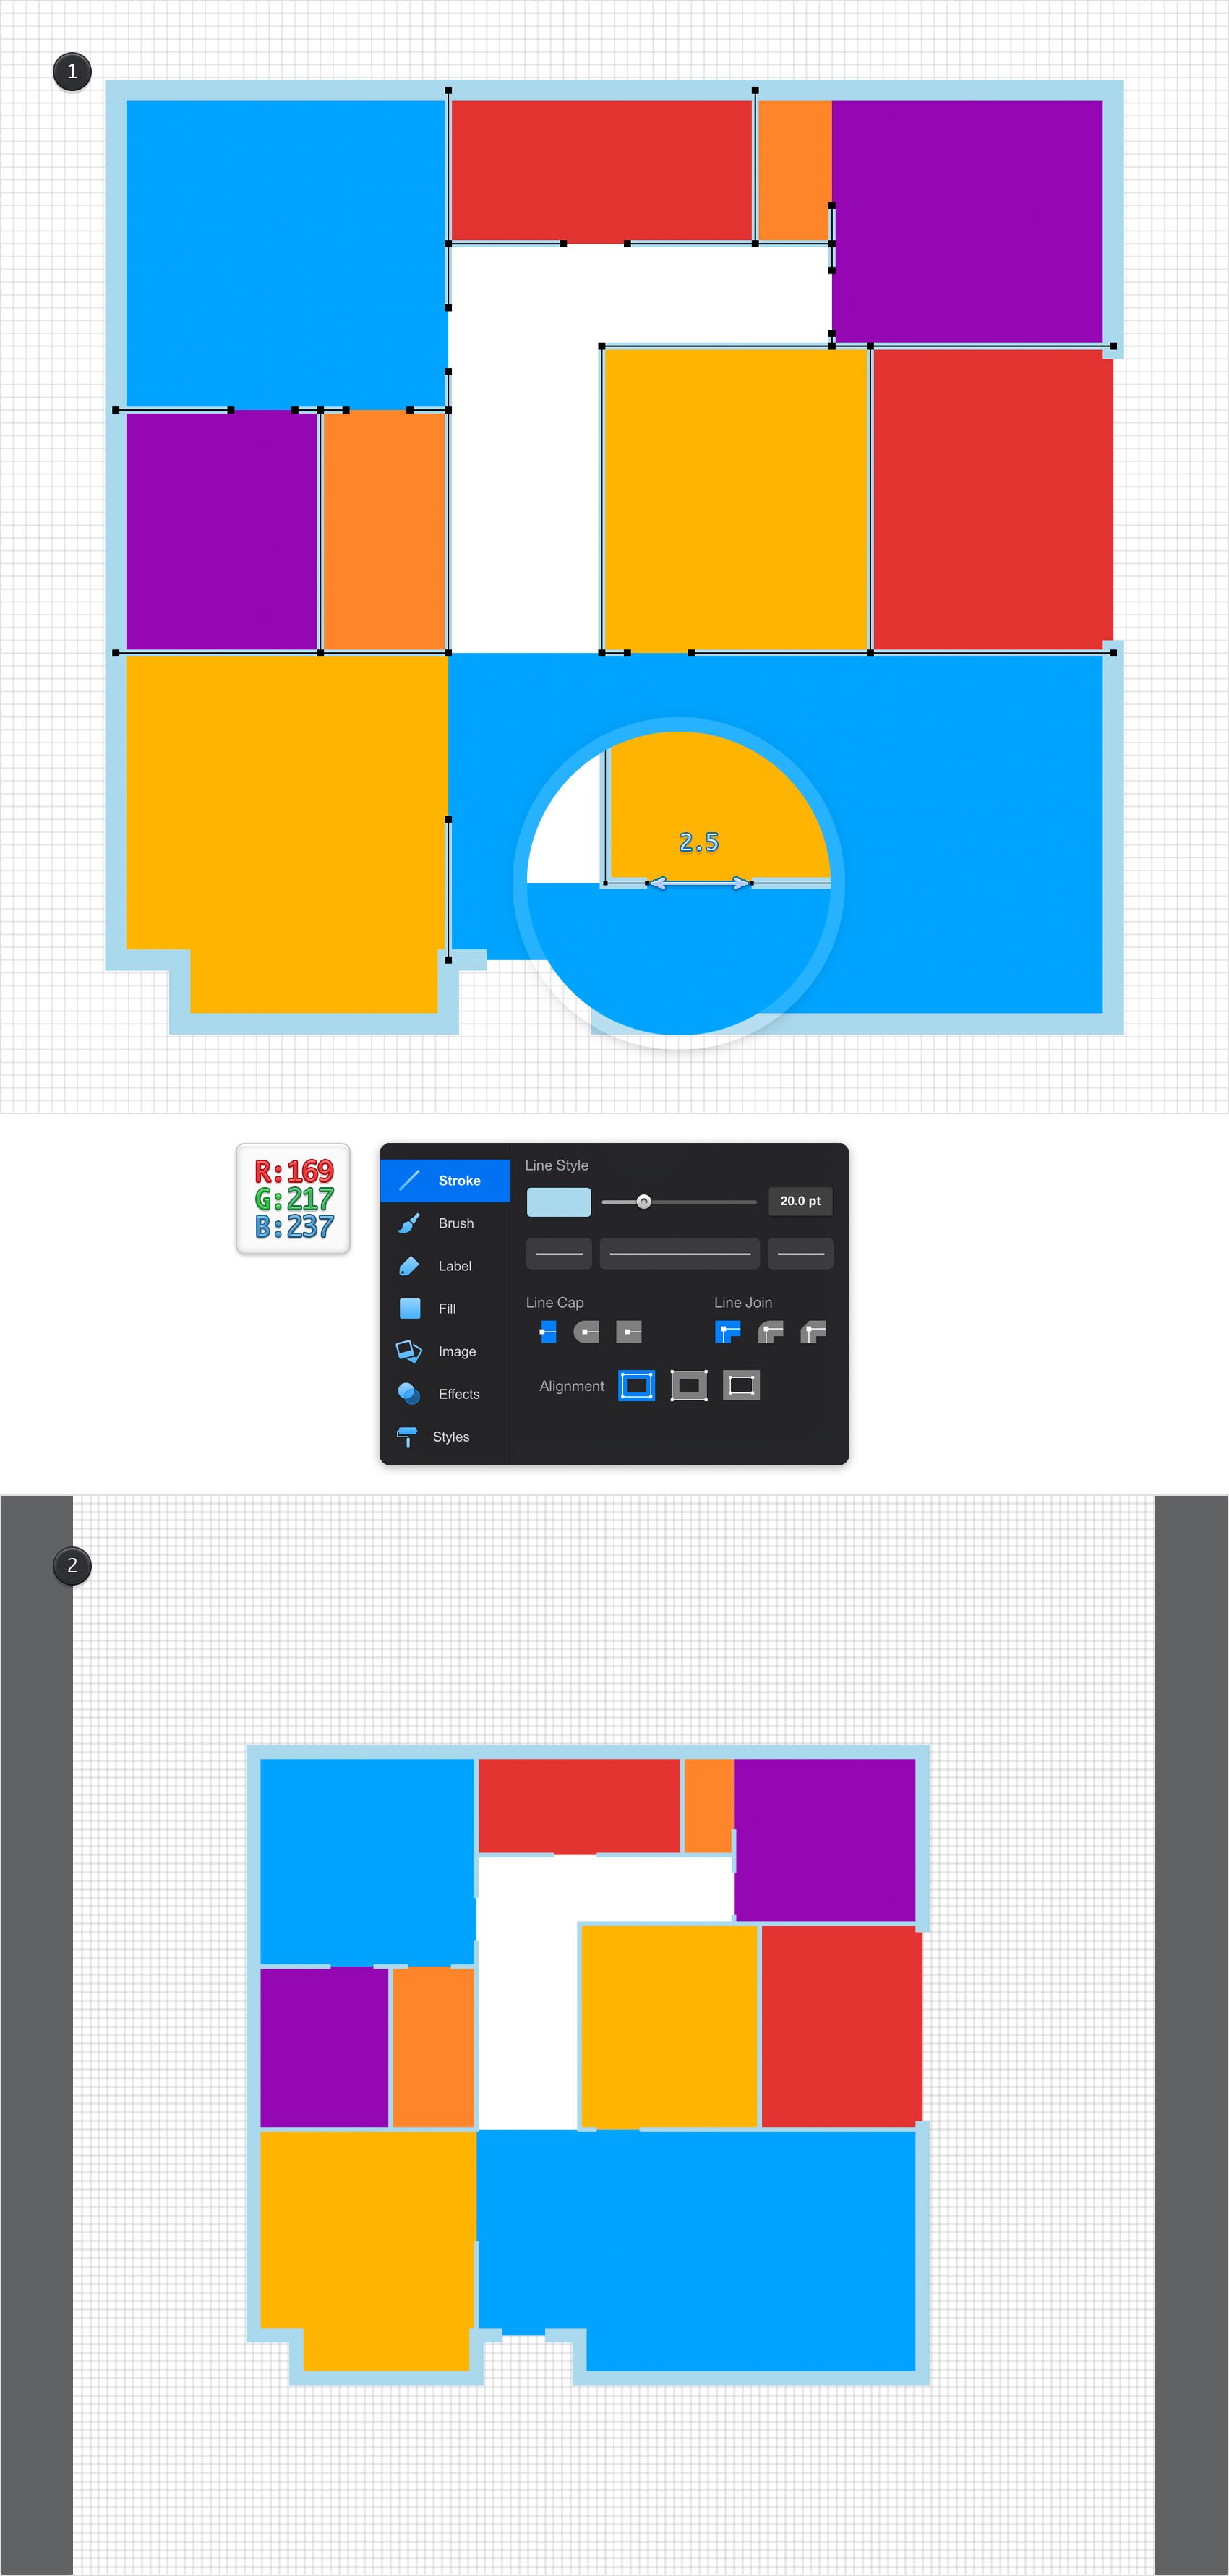
Using that same Pen Tool, create the straight paths that will make up the interior walls. Add a 20 pt stroke for these paths and use your saved, light blue color from the Color Palette. Remember to leave a 2.5 ft gap for each door.
Step 9
Return to the Layers panel and select the "room" layer as we are about to edit the shapes that lie inside this layer.
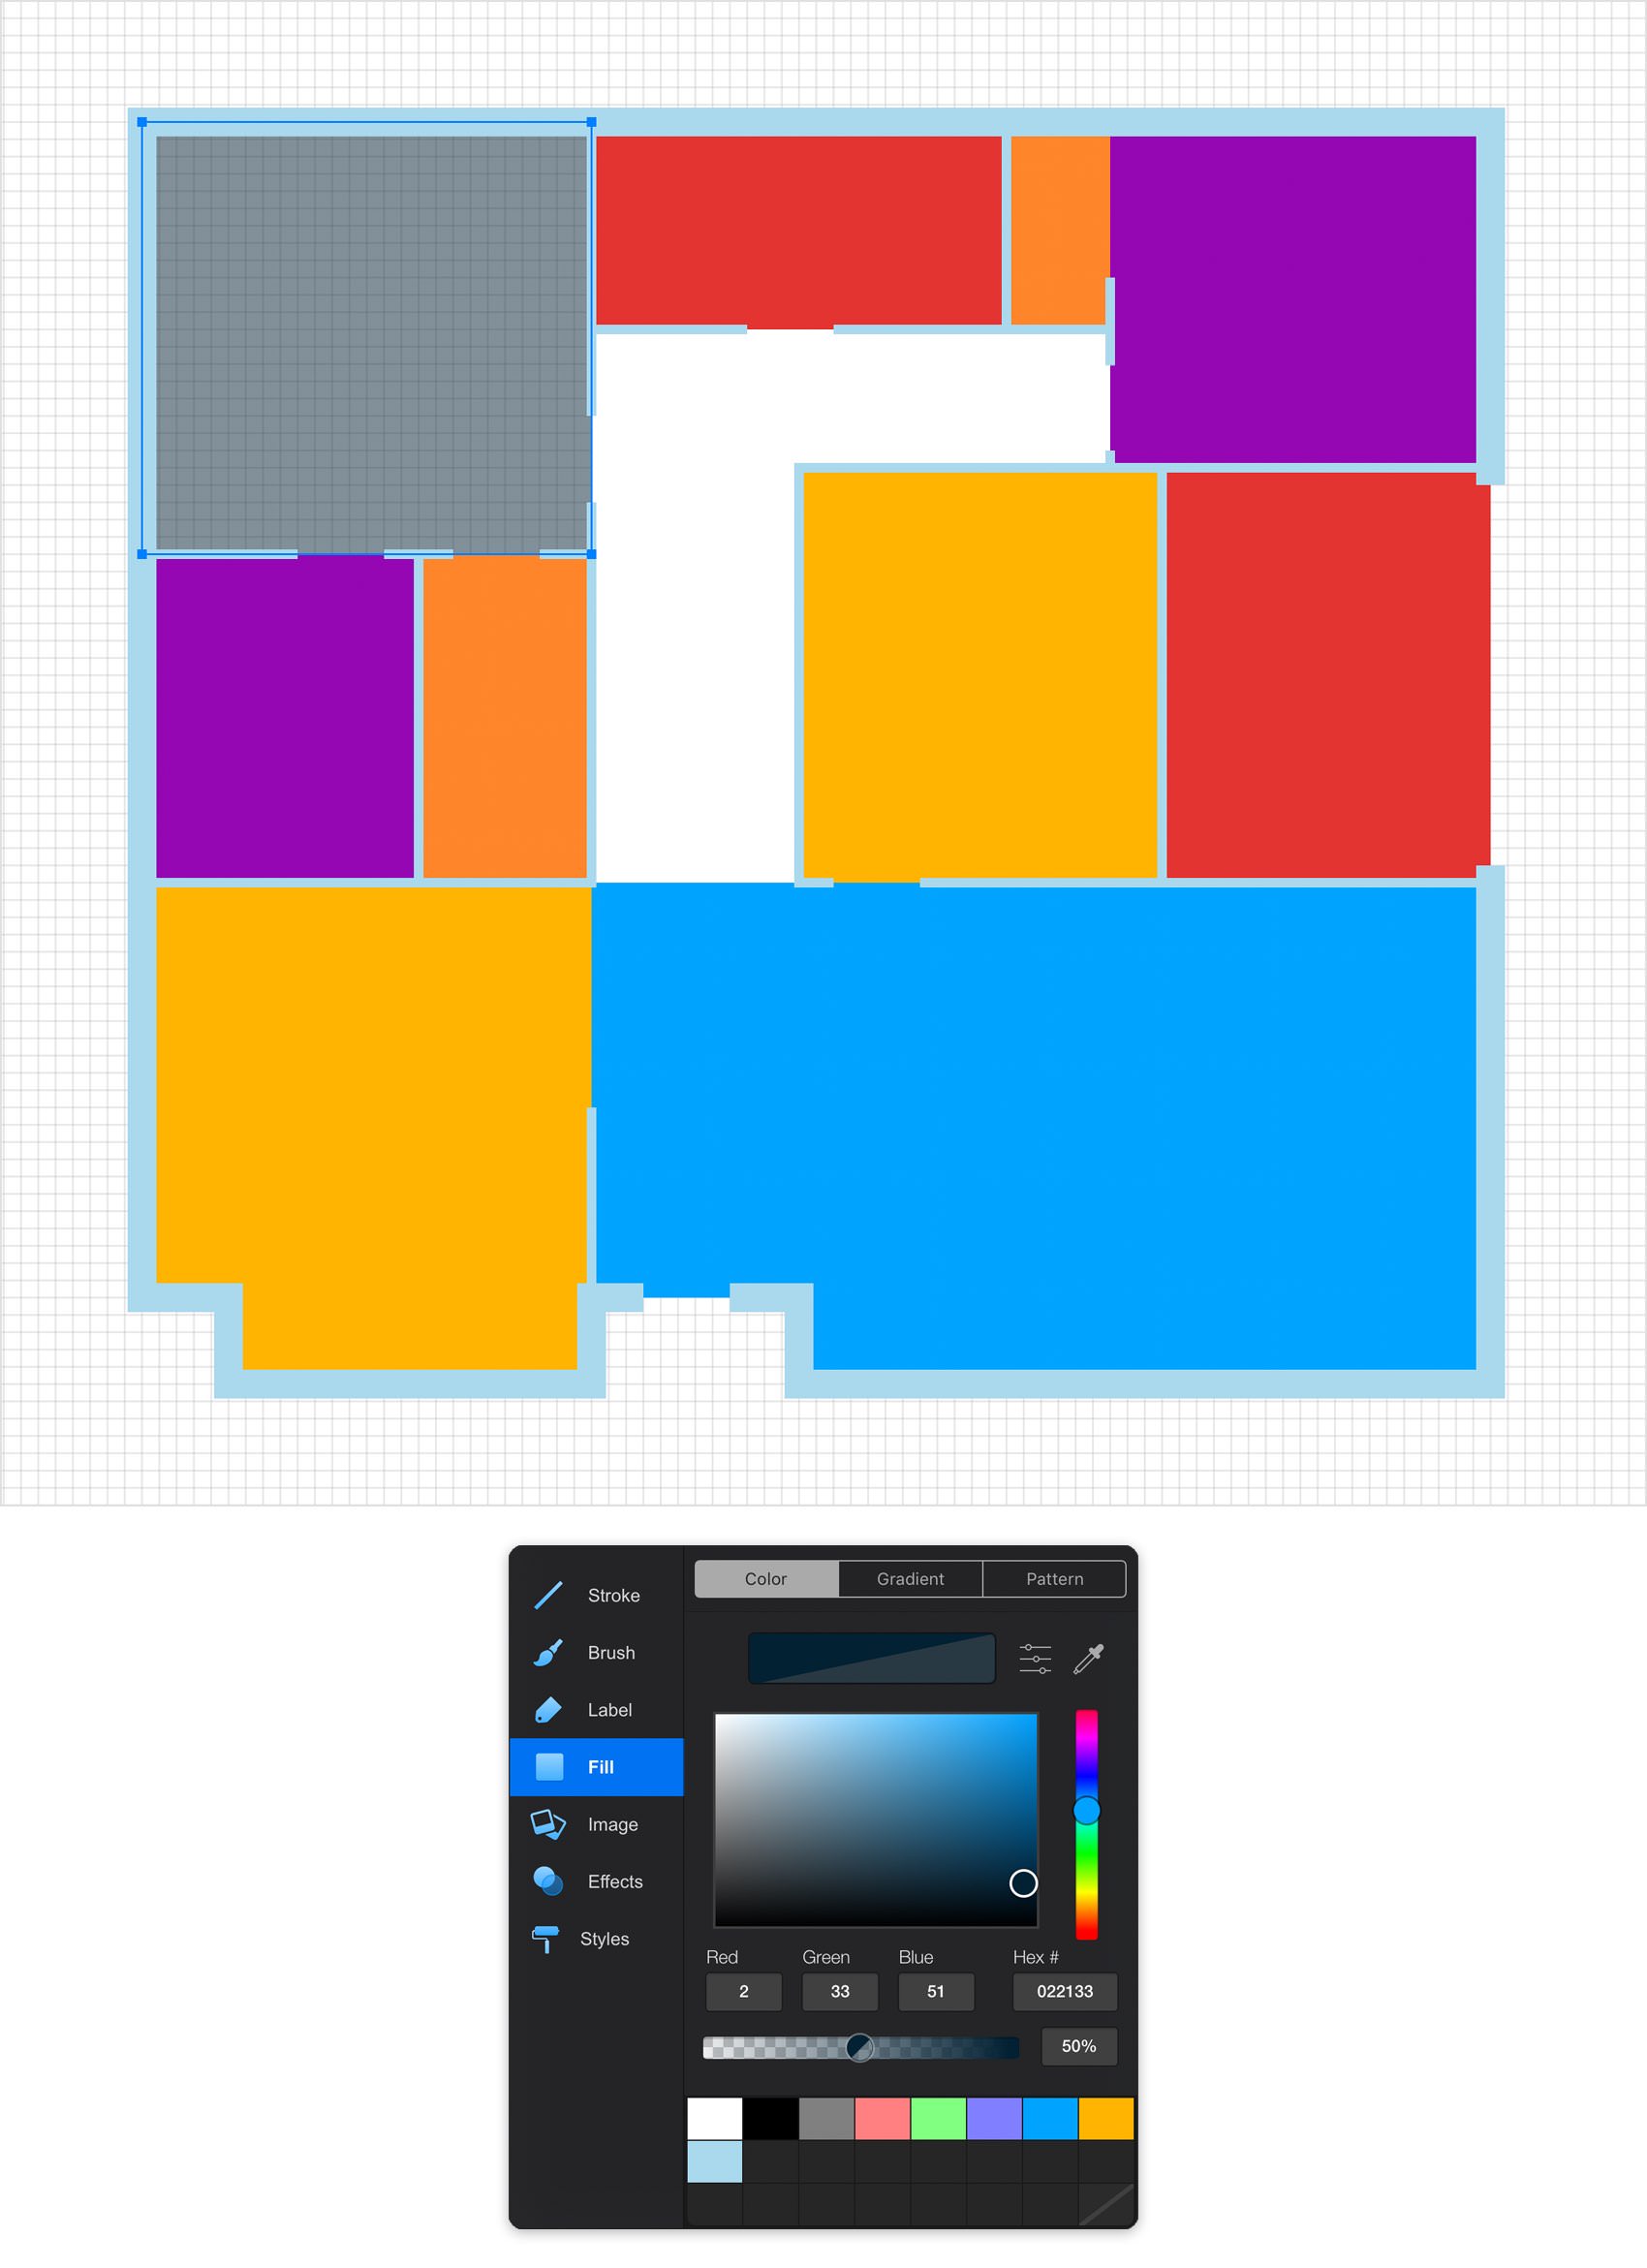
Start with the top, left rectangle. Select it and focus on the Appearance panel. tap the Fill color well, replace the existing color with R=2 G=33 B=51 and drag the Alpha slider to 50%.
Step 10
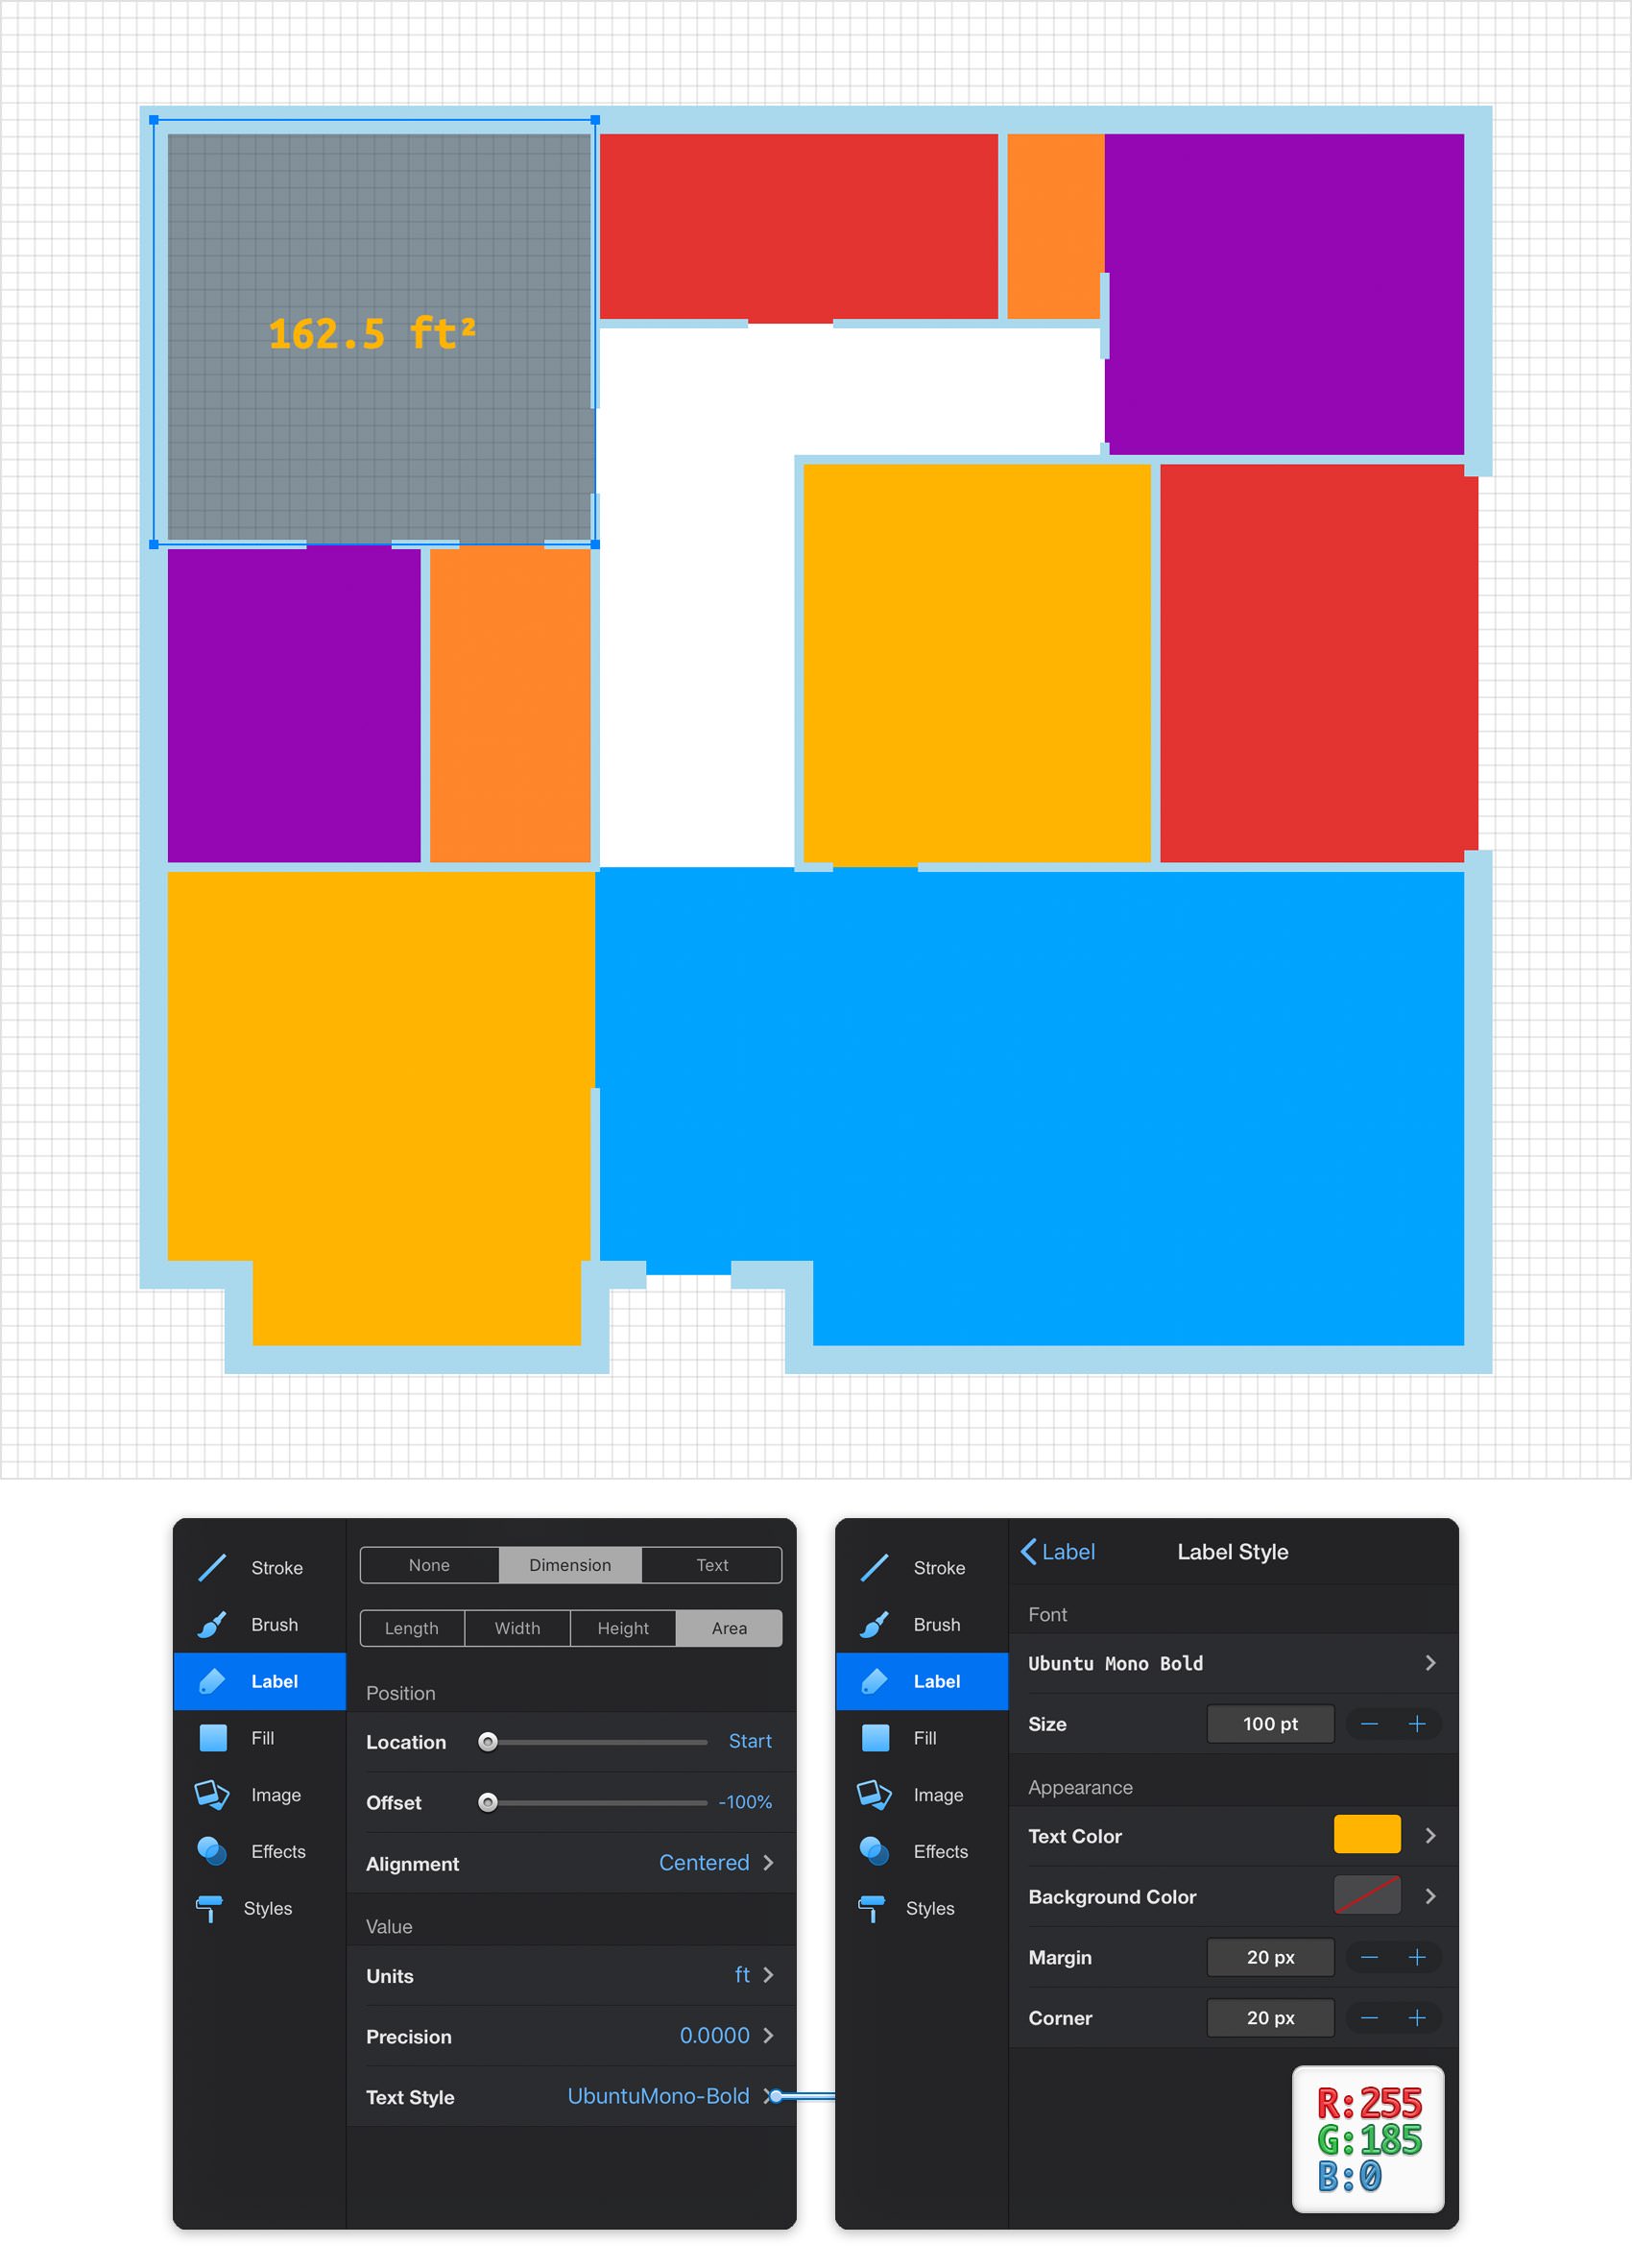
Make sure that your top, left rectangle is selected and open the Label pane from the Appearance panel. First, select the Dimension label and then check the Area button which will automatically add a label that points the area of your selected object. Center this label using the Centered Alignment button or use the Location and Offset sliders to position your label in a different spot.
With your shape still selected, tap the Text Style button to open the Label Style pane. First, select the Ubuntu Mono Bold font and set the size to 100 pt. Tap the Text Color color well and replace the existing color with R=255 G=180 B=0. Again, you'll need this yellow plenty of times throughout the tutorial so make sure that you're saving it inside the Color Palette. Return to the Label Style pane, make sure that there's no color set for the Background Color and skip the other attributes.
Step 11
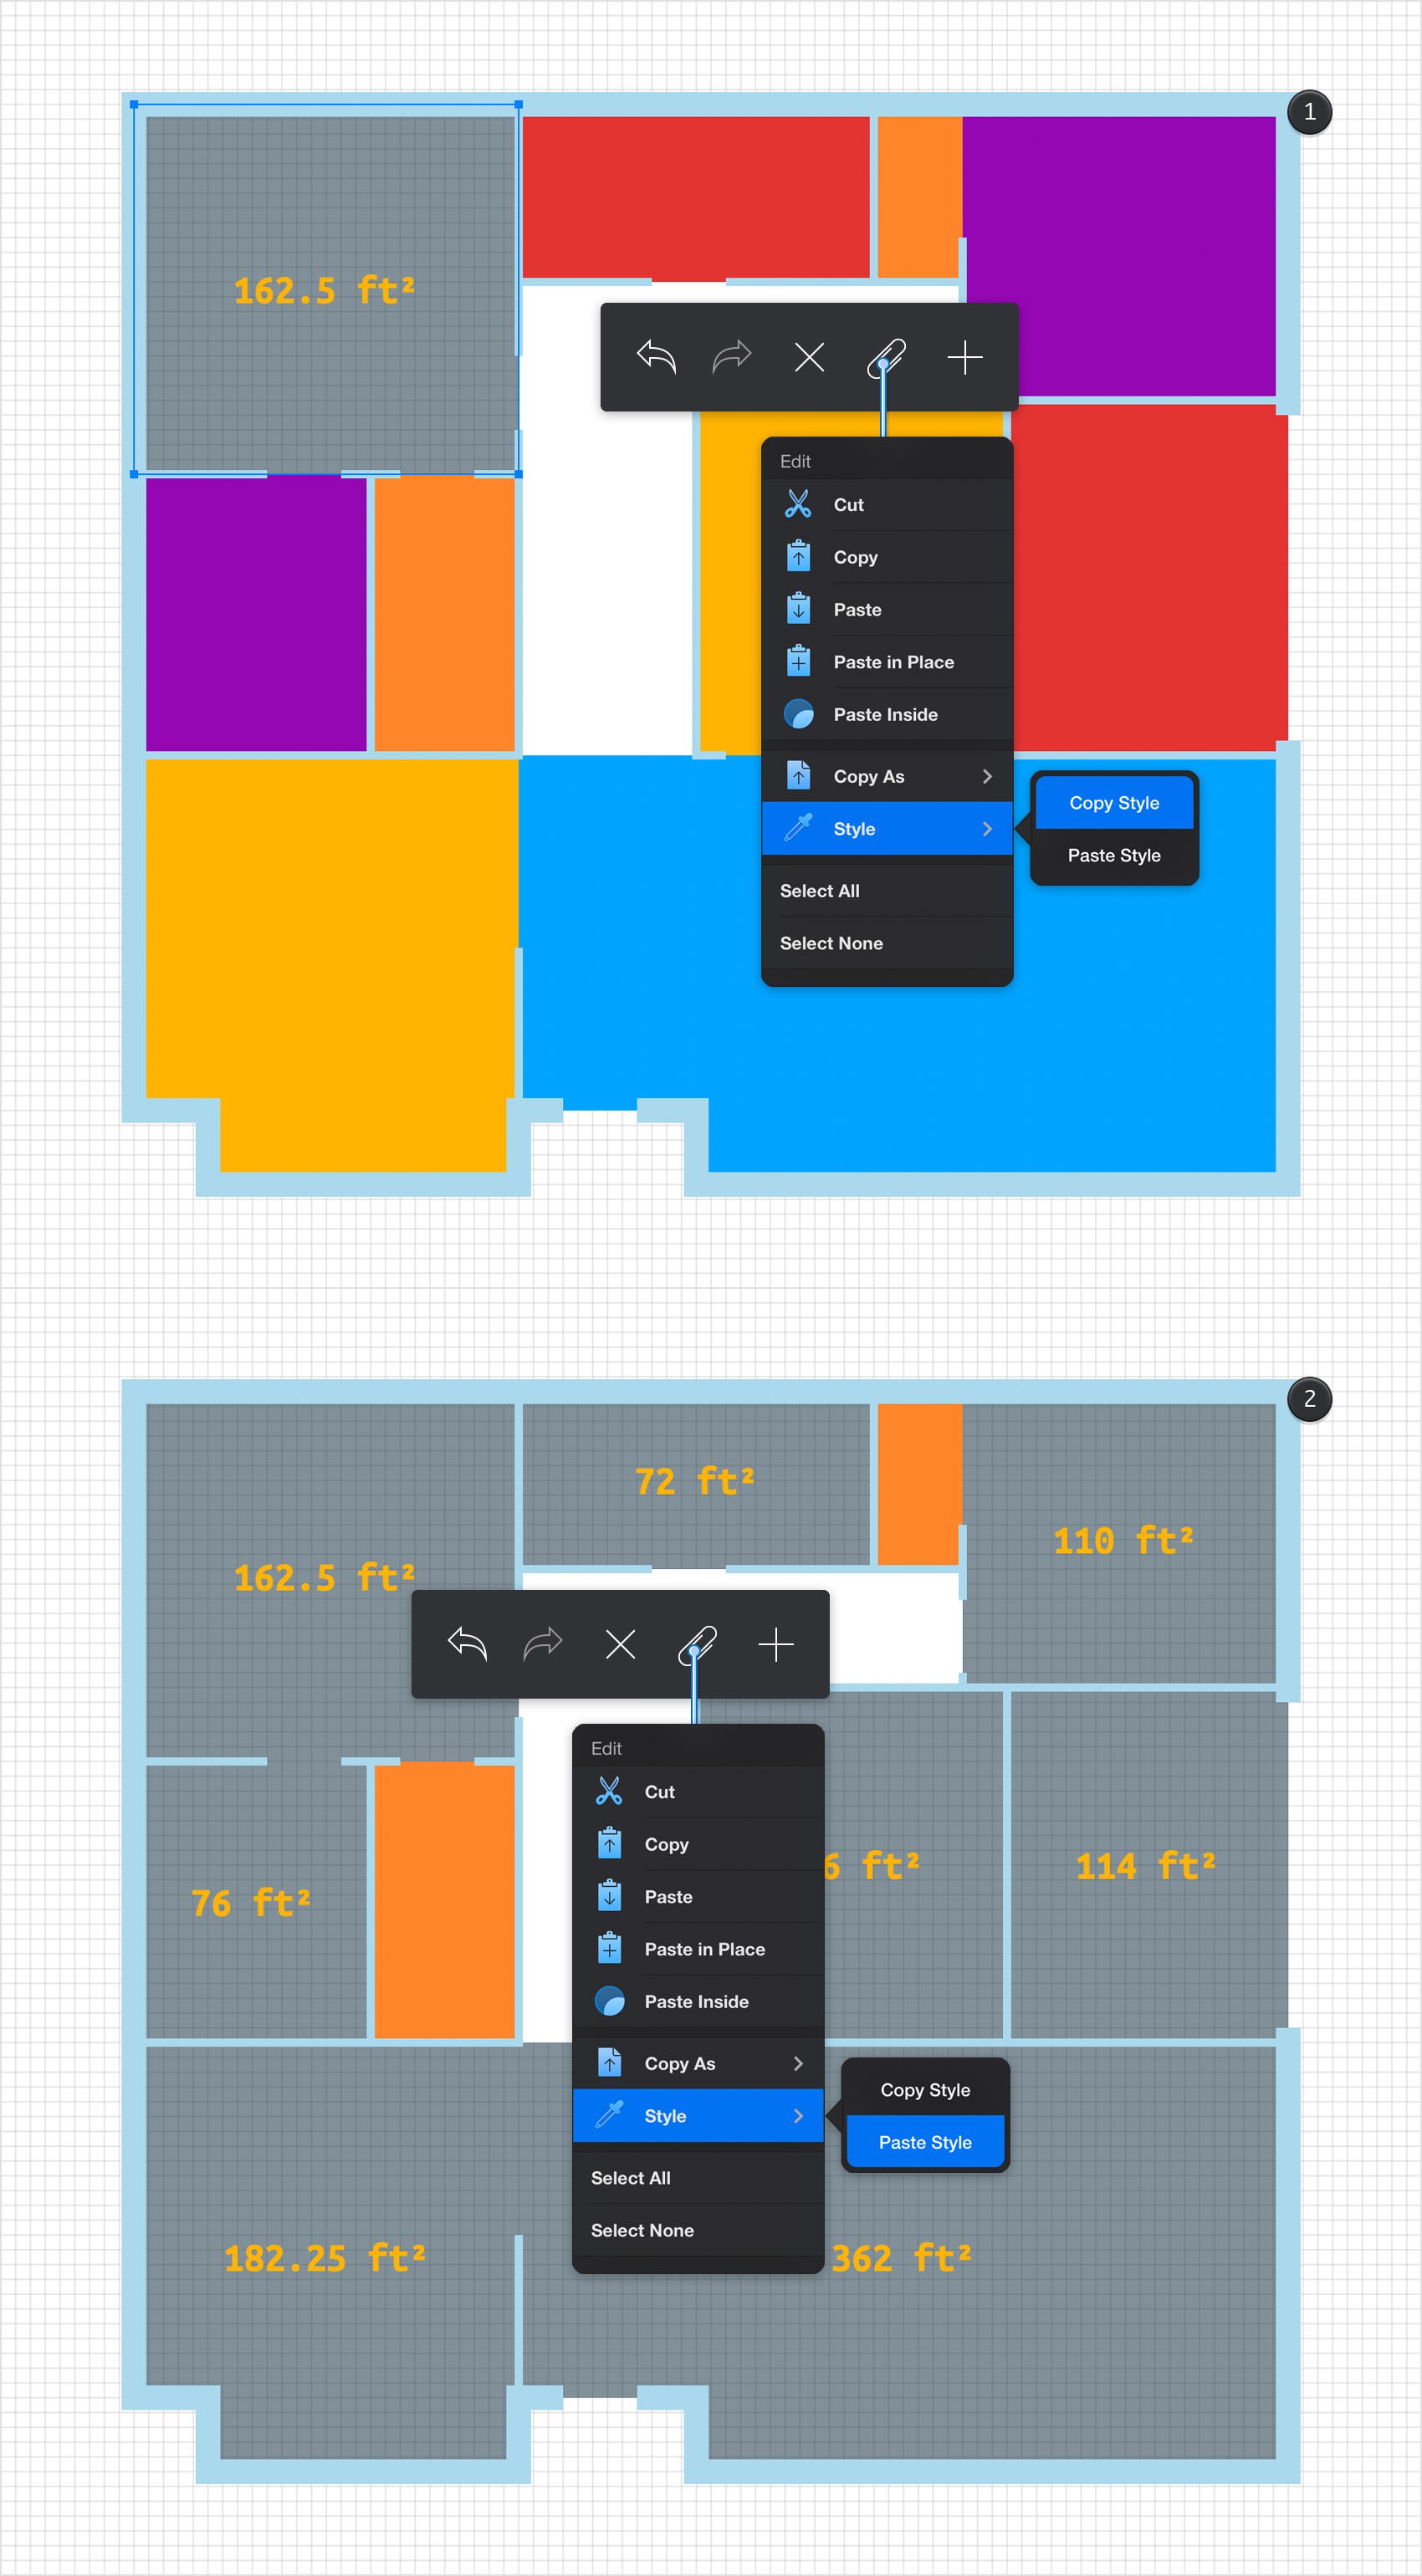
Make sure that your labeled rectangle is still selected, focus on the left side of the Titlebar and tap that paperclip icon to open the Edit pane. Tap the Style > Copy Style button and then return to your canvas. Select the yellow, blue, purple and red shapes, re-open that Edit pane and this time tap the Style > Paste Style button.
Step 12
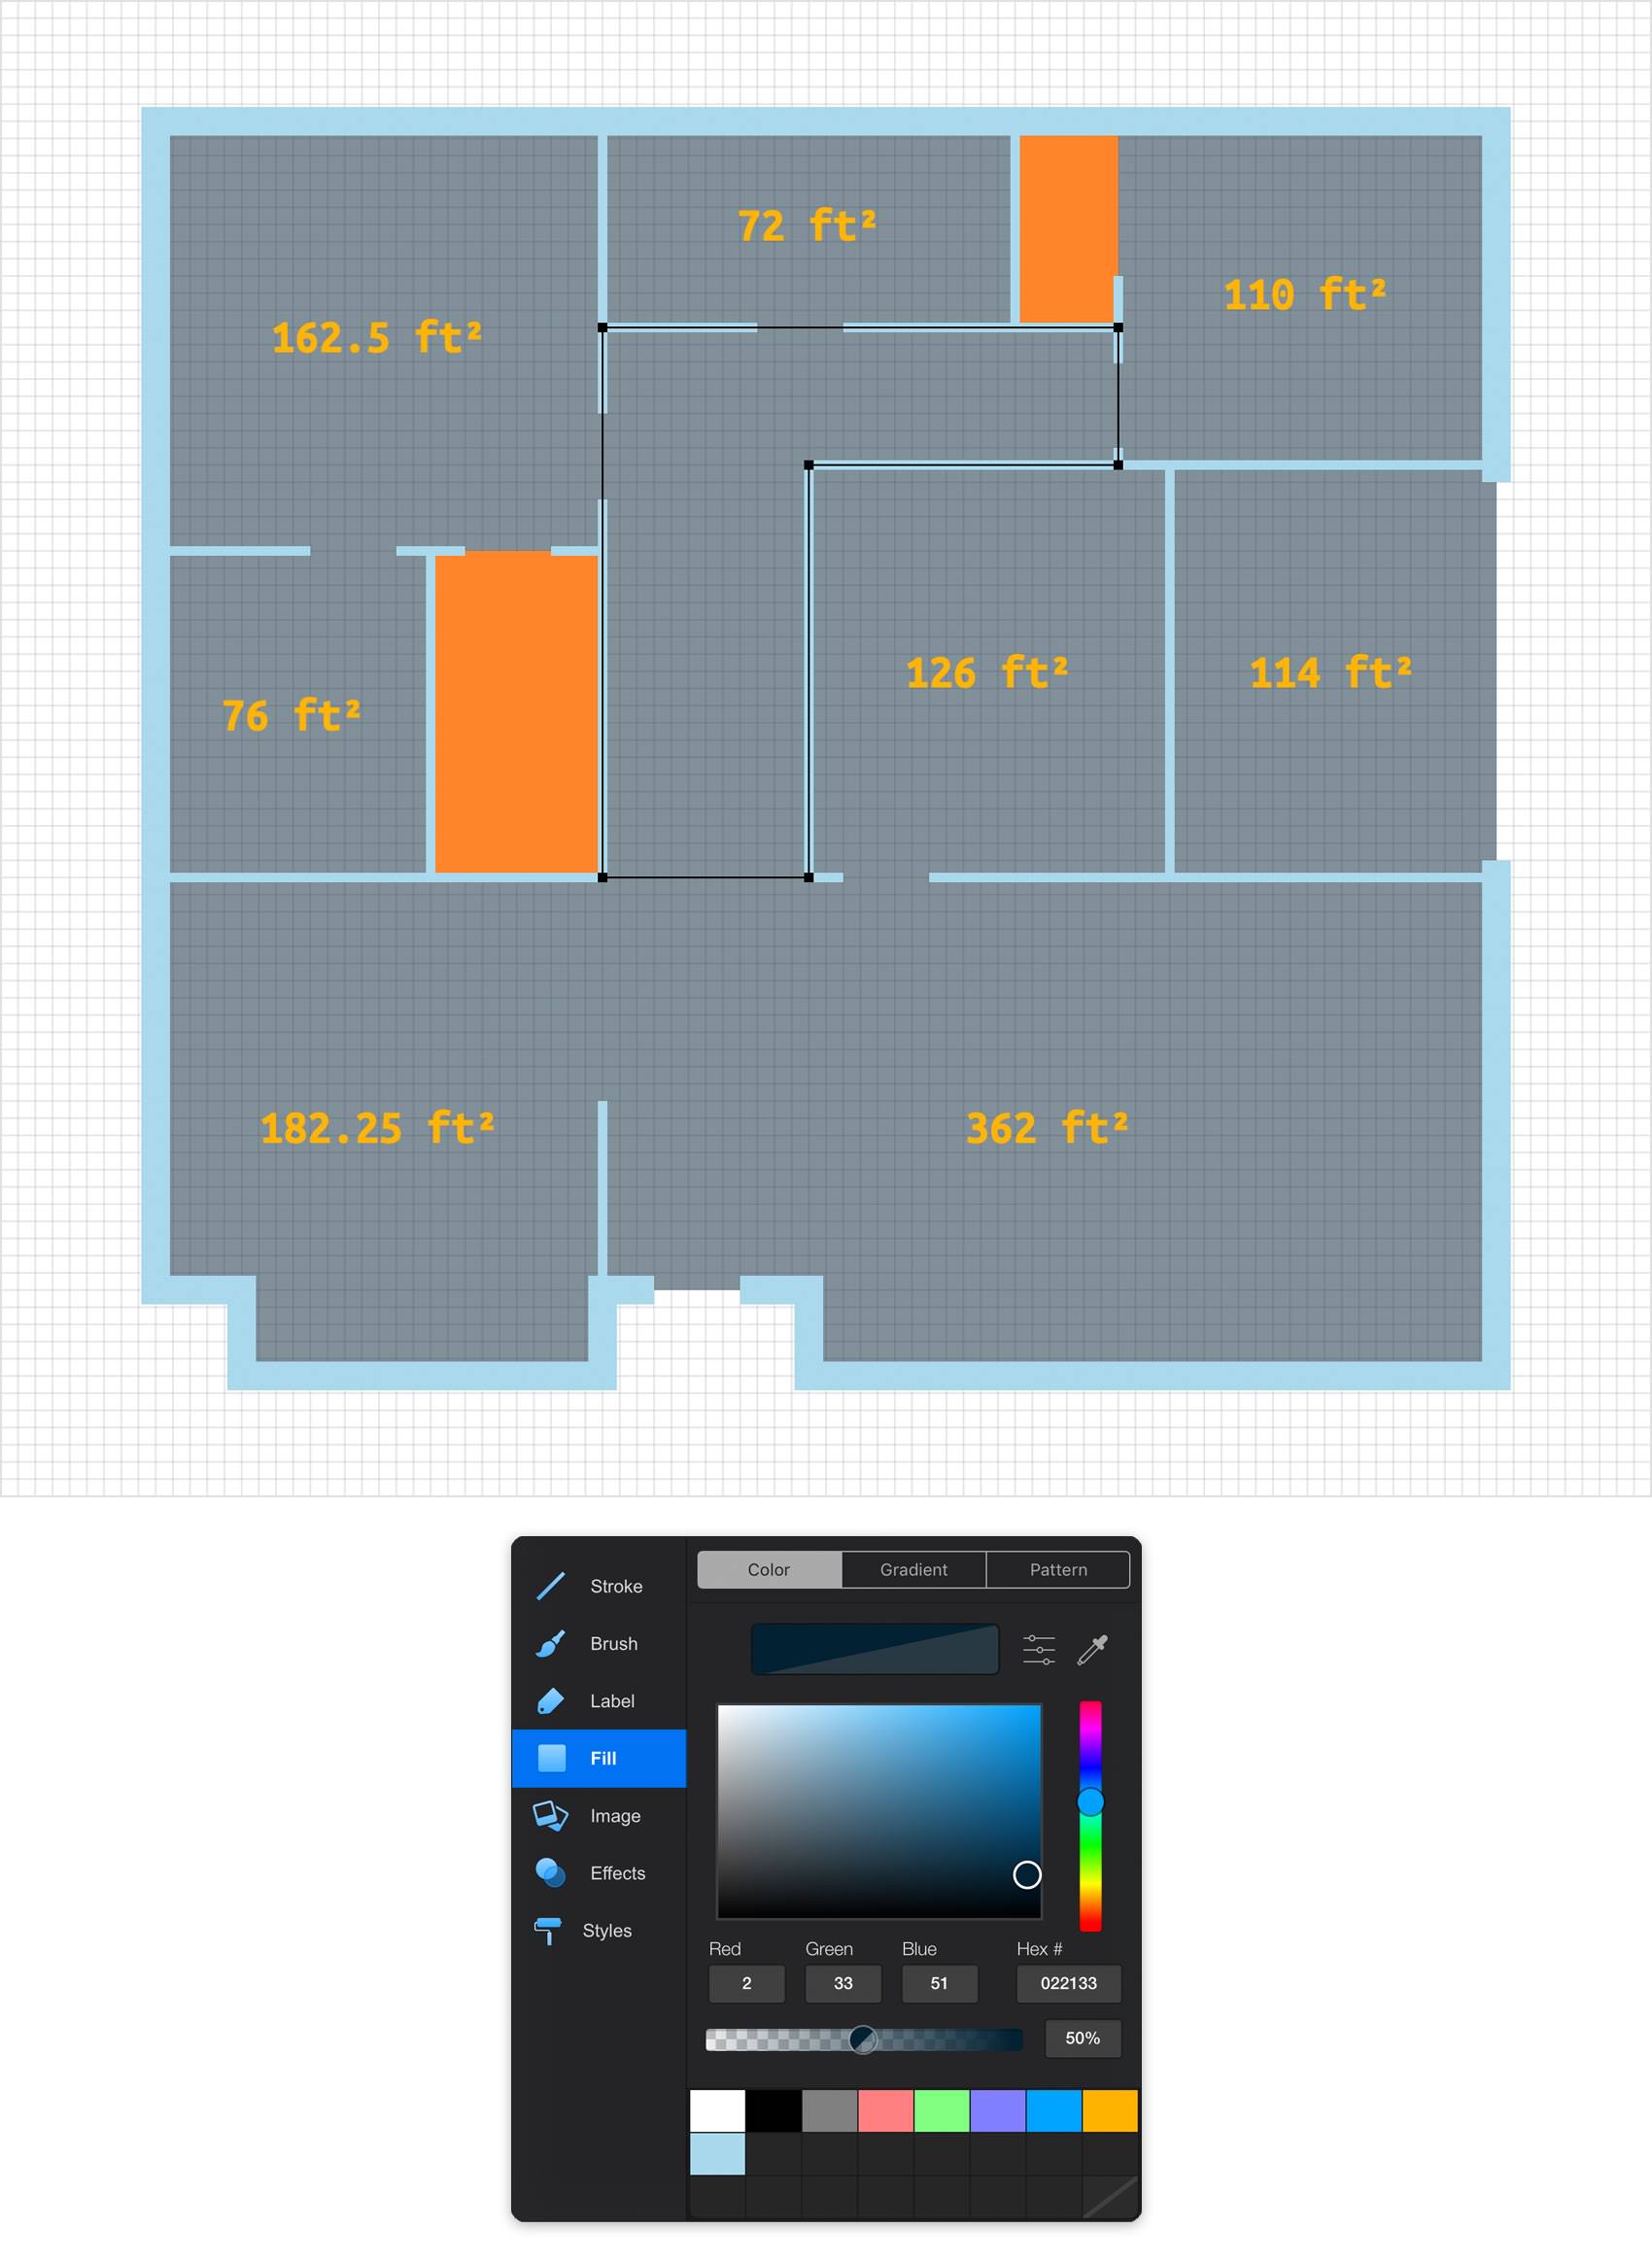
Select the white shape and focus on the Appearance panel. Tap the Fill color well, replace the existing color with R=2 G=33 B=51 and drag the Alpha slider to 50%.
Step 13
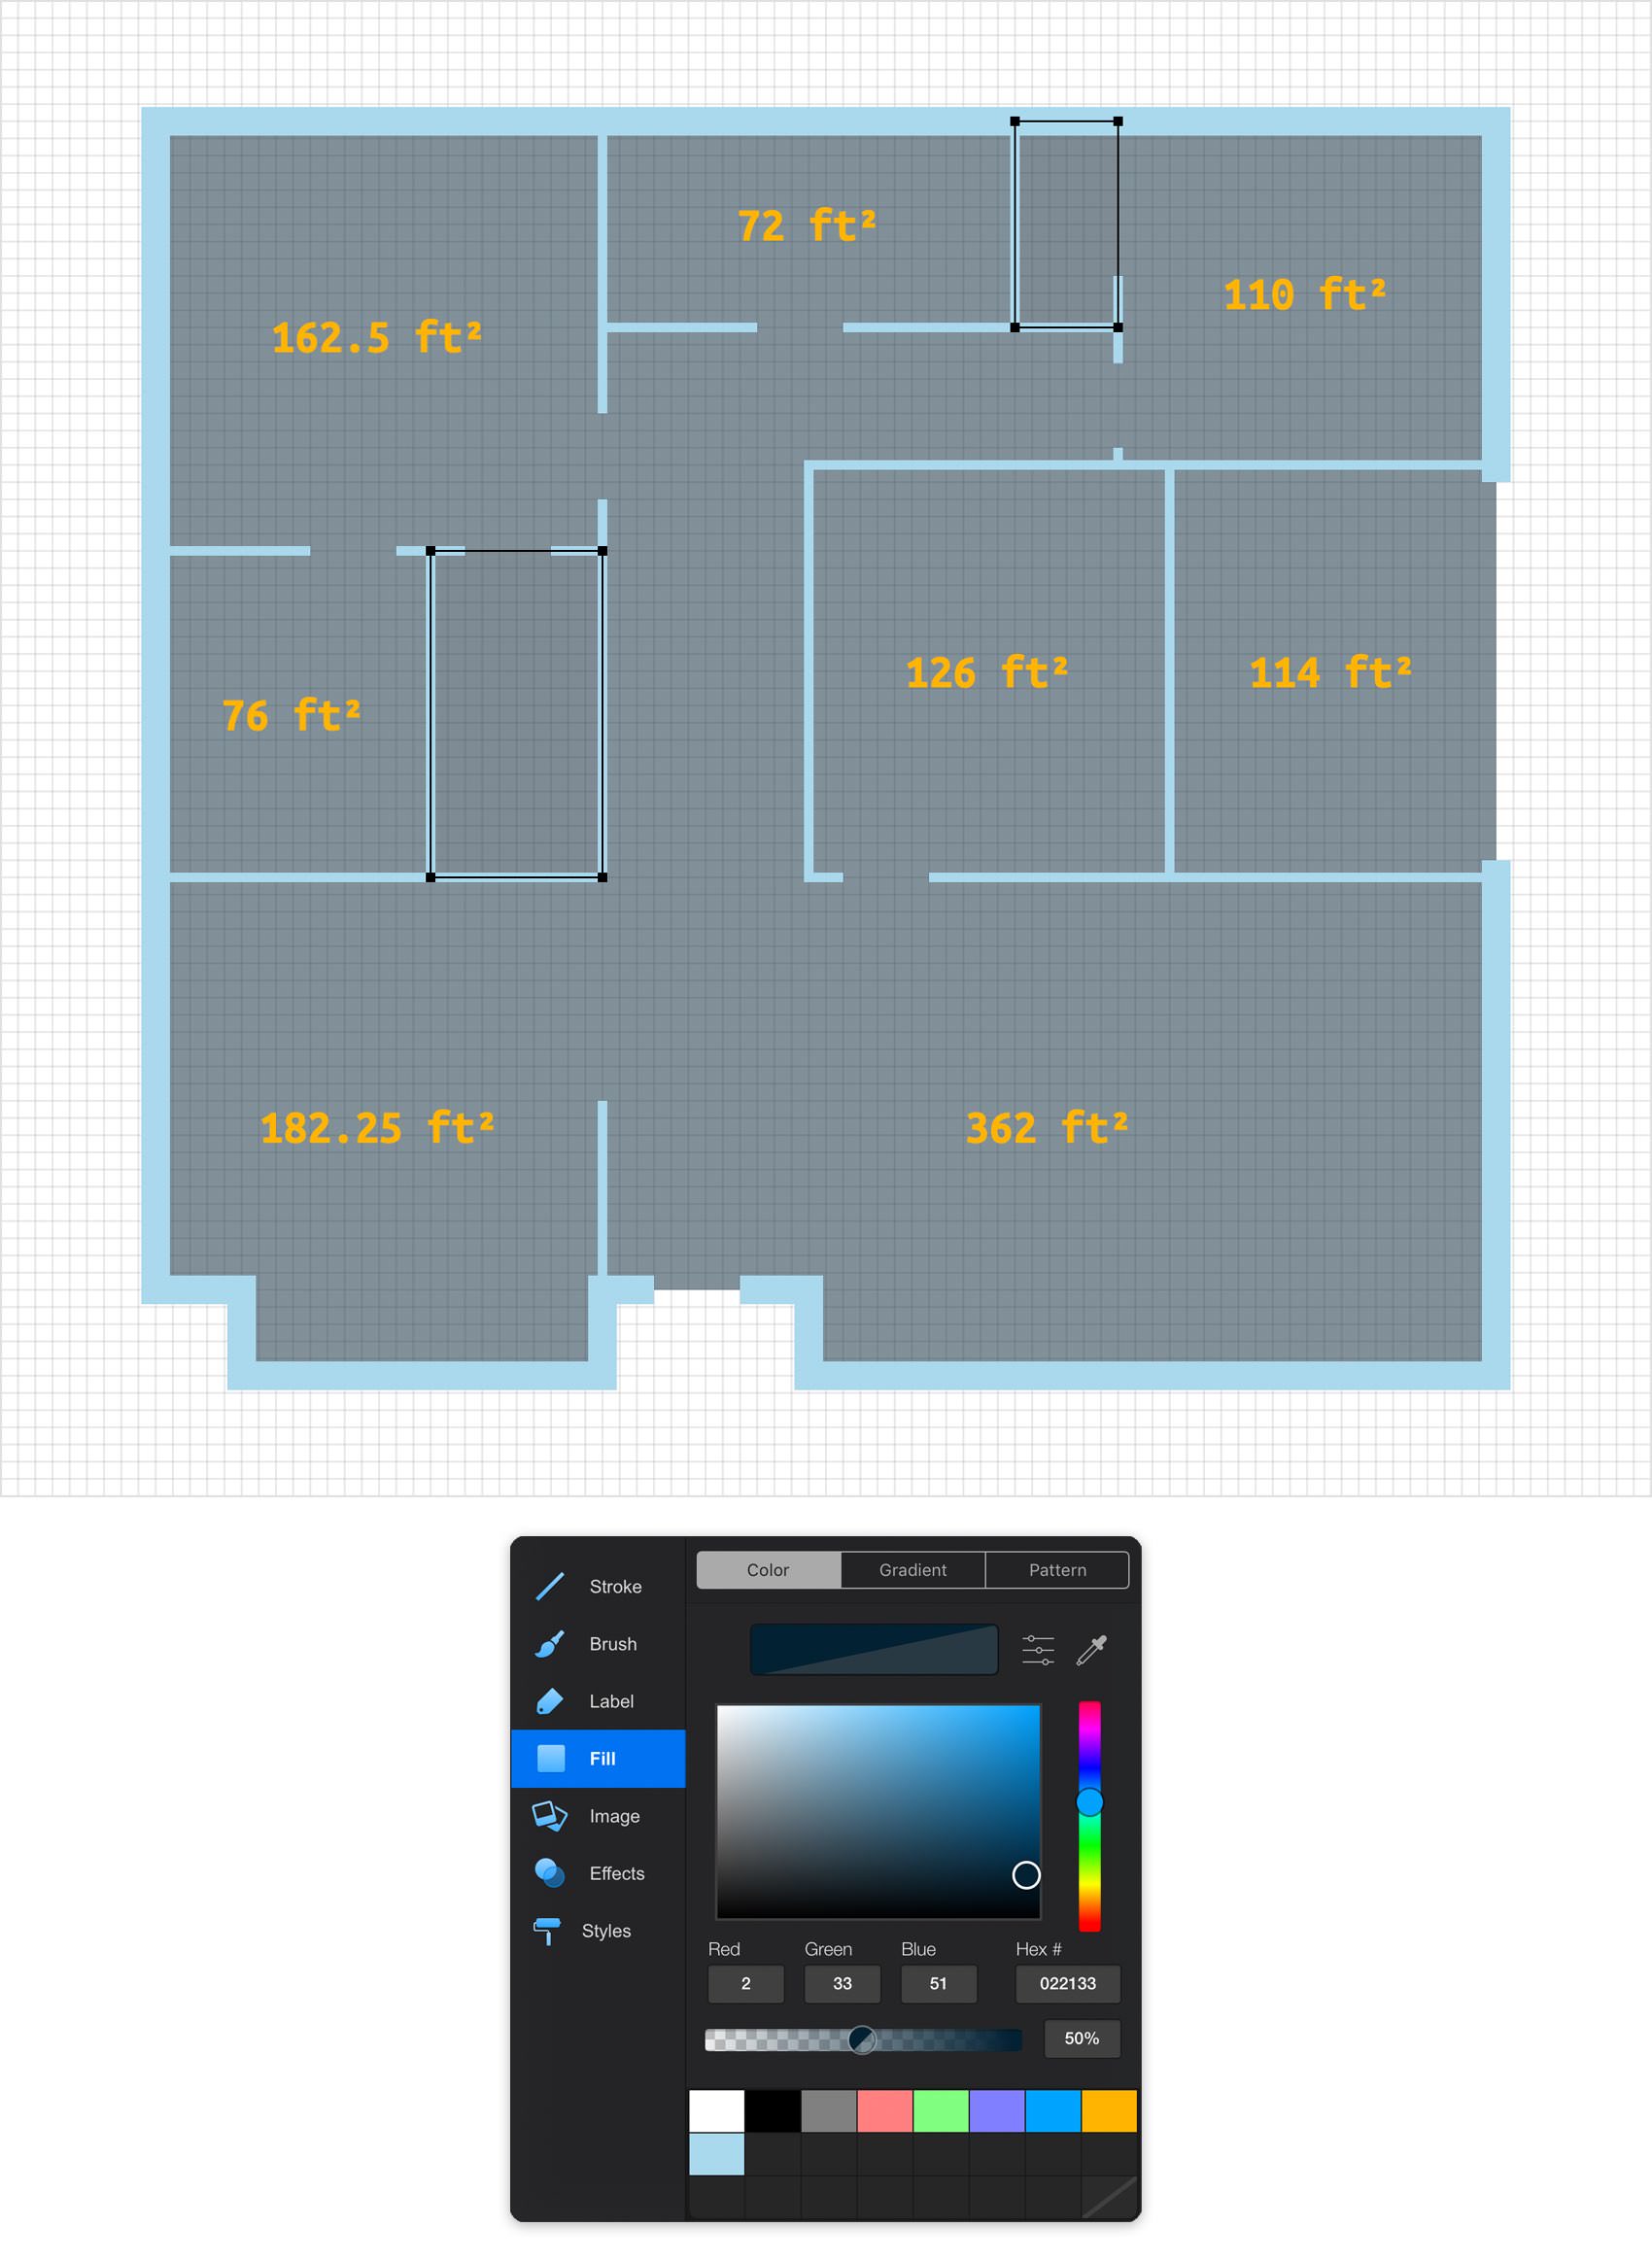
Select the two, orange shapes and focus on that same Appearance panel. Again, tap the Fill color well, replace the existing color with R=0 G=23 B=41 and drag the Alpha slider to 50%.
Step 14
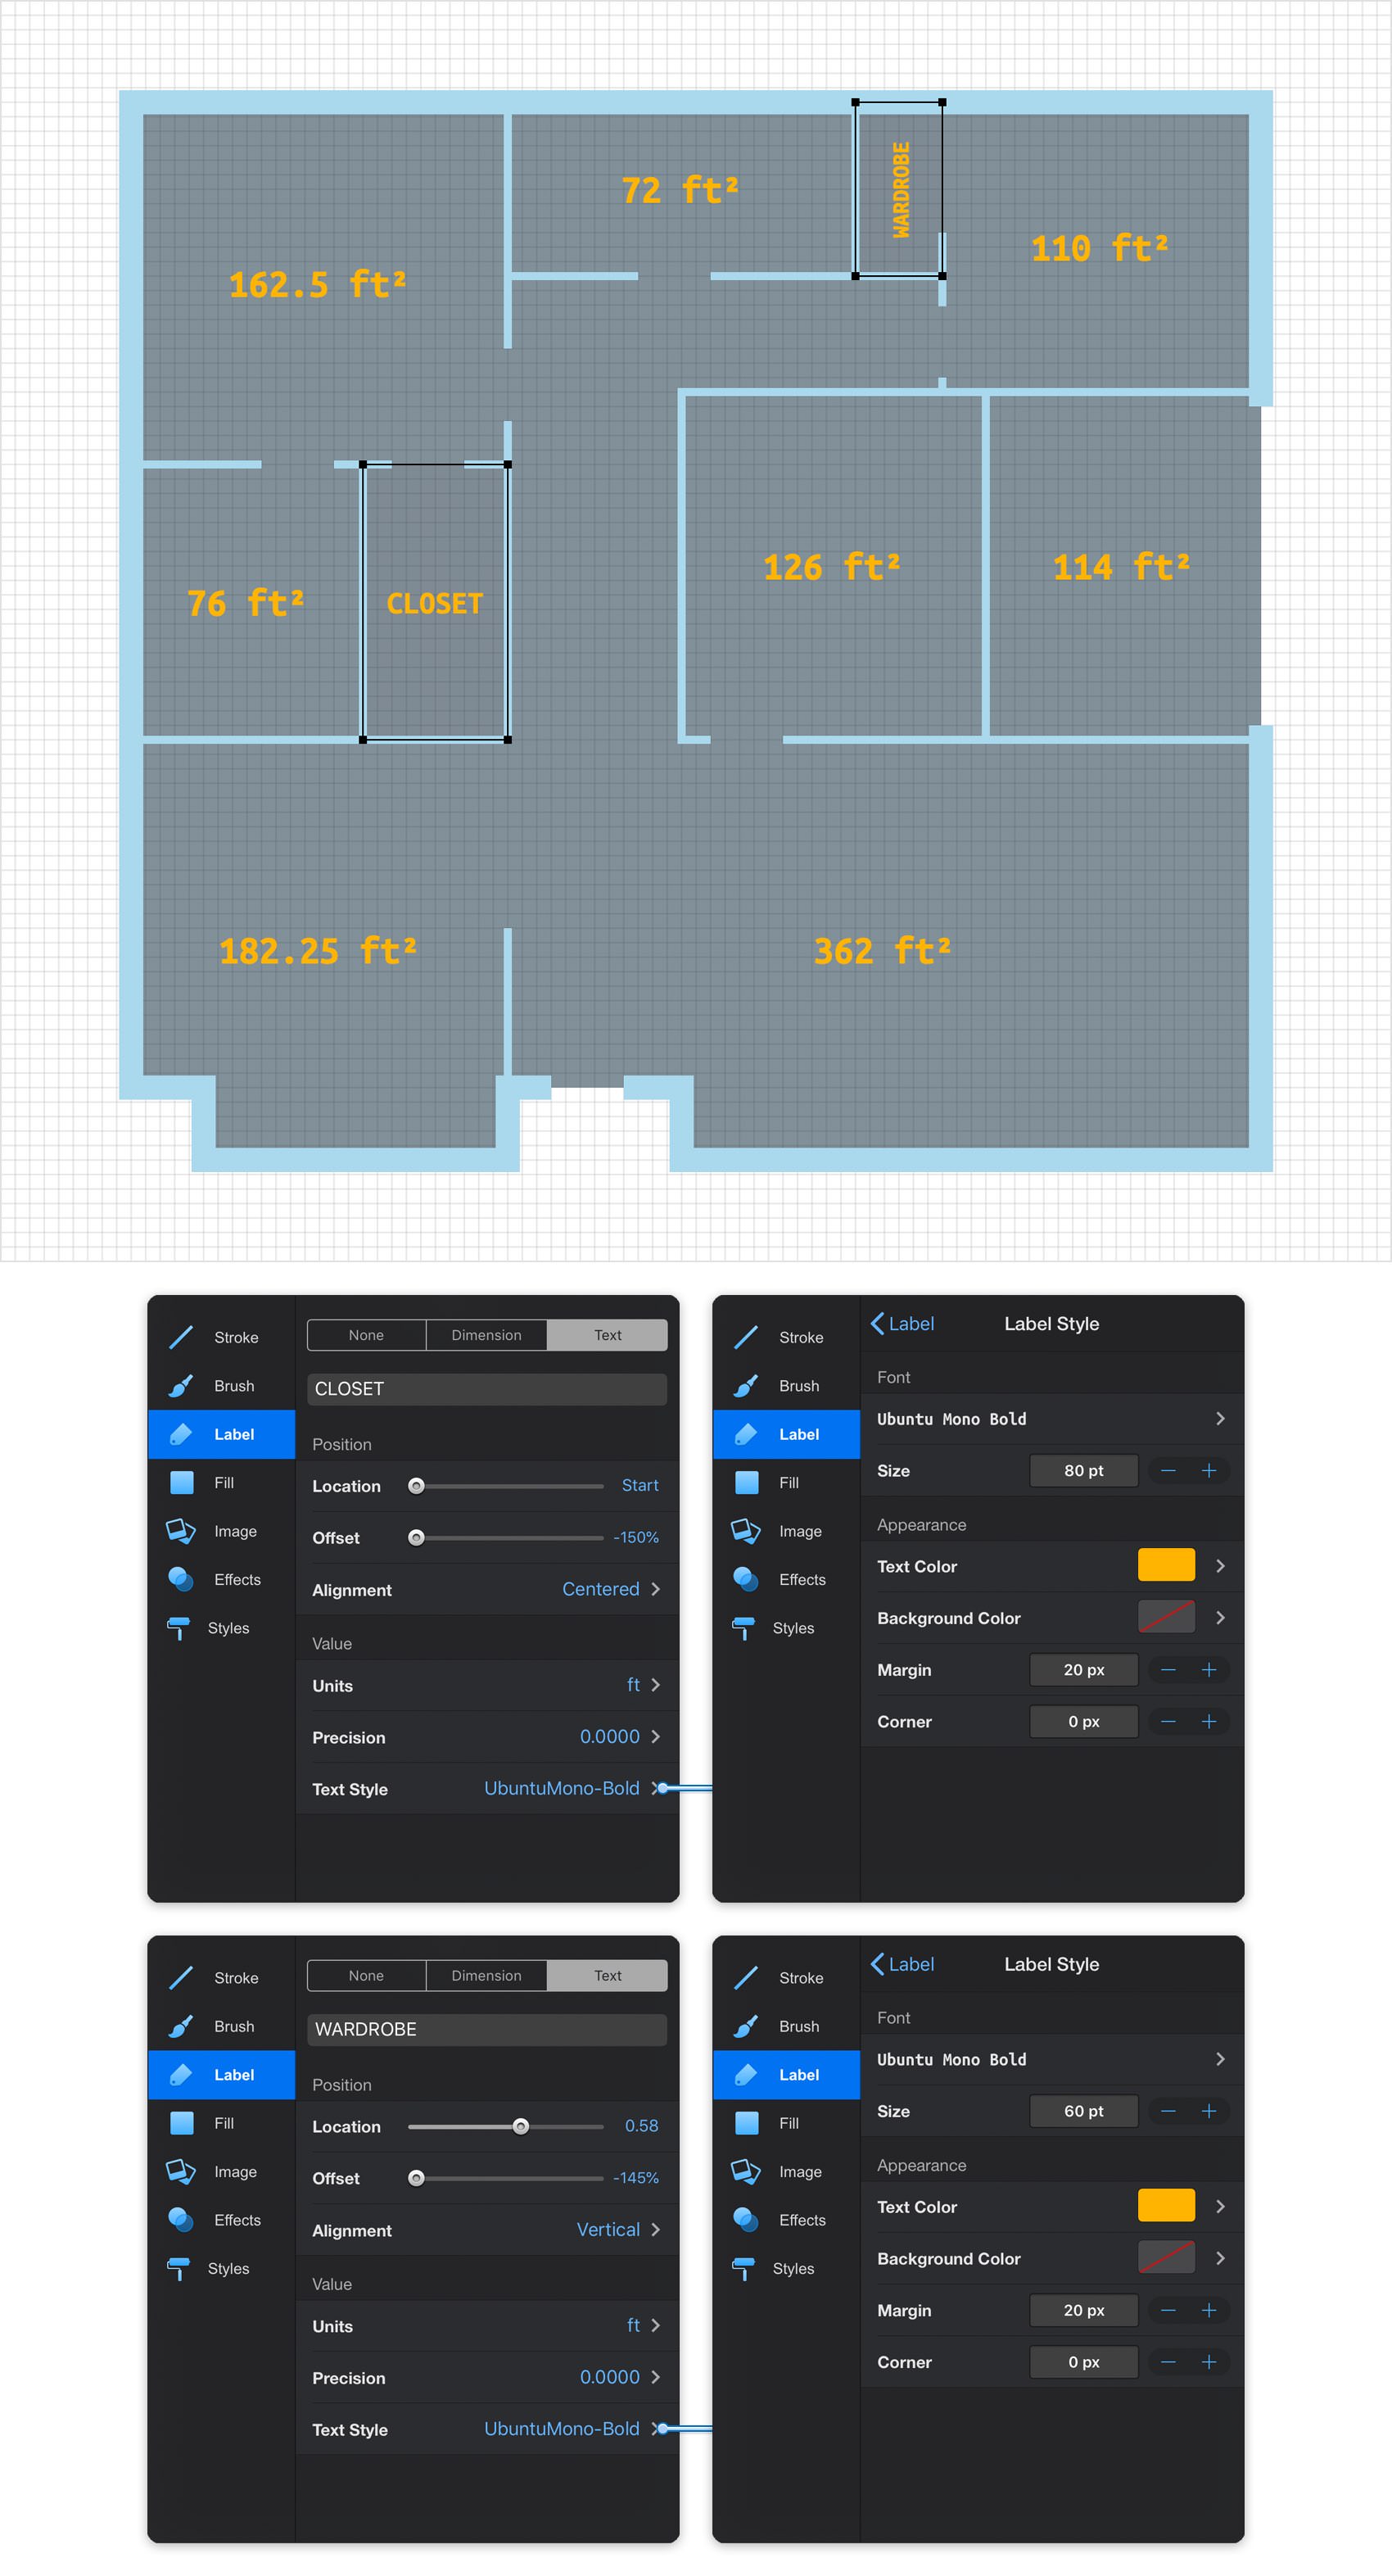
Keep focusing on the two rectangles edited in the previous step. First, select the left one and go to the Label pane from the Appearance panel. This time set the Label to Text which will allow you to add any piece of text as a label. For this shape use the "CLOSET" text and then enter the rest of the attributes indicated in the following image. Don't forget to also move to the Label Style pane and adjust the properties as shown below.
Move to right rectangle and add a somewhat similar text label. This time add the "WARDROBE" piece of text and then enter all the attributes shown in the following image.
Step 15
Return to the Layers panel and add a new layer using that same plus button. Select this new layer, rename it "windows" and drag in the the top of the panel.
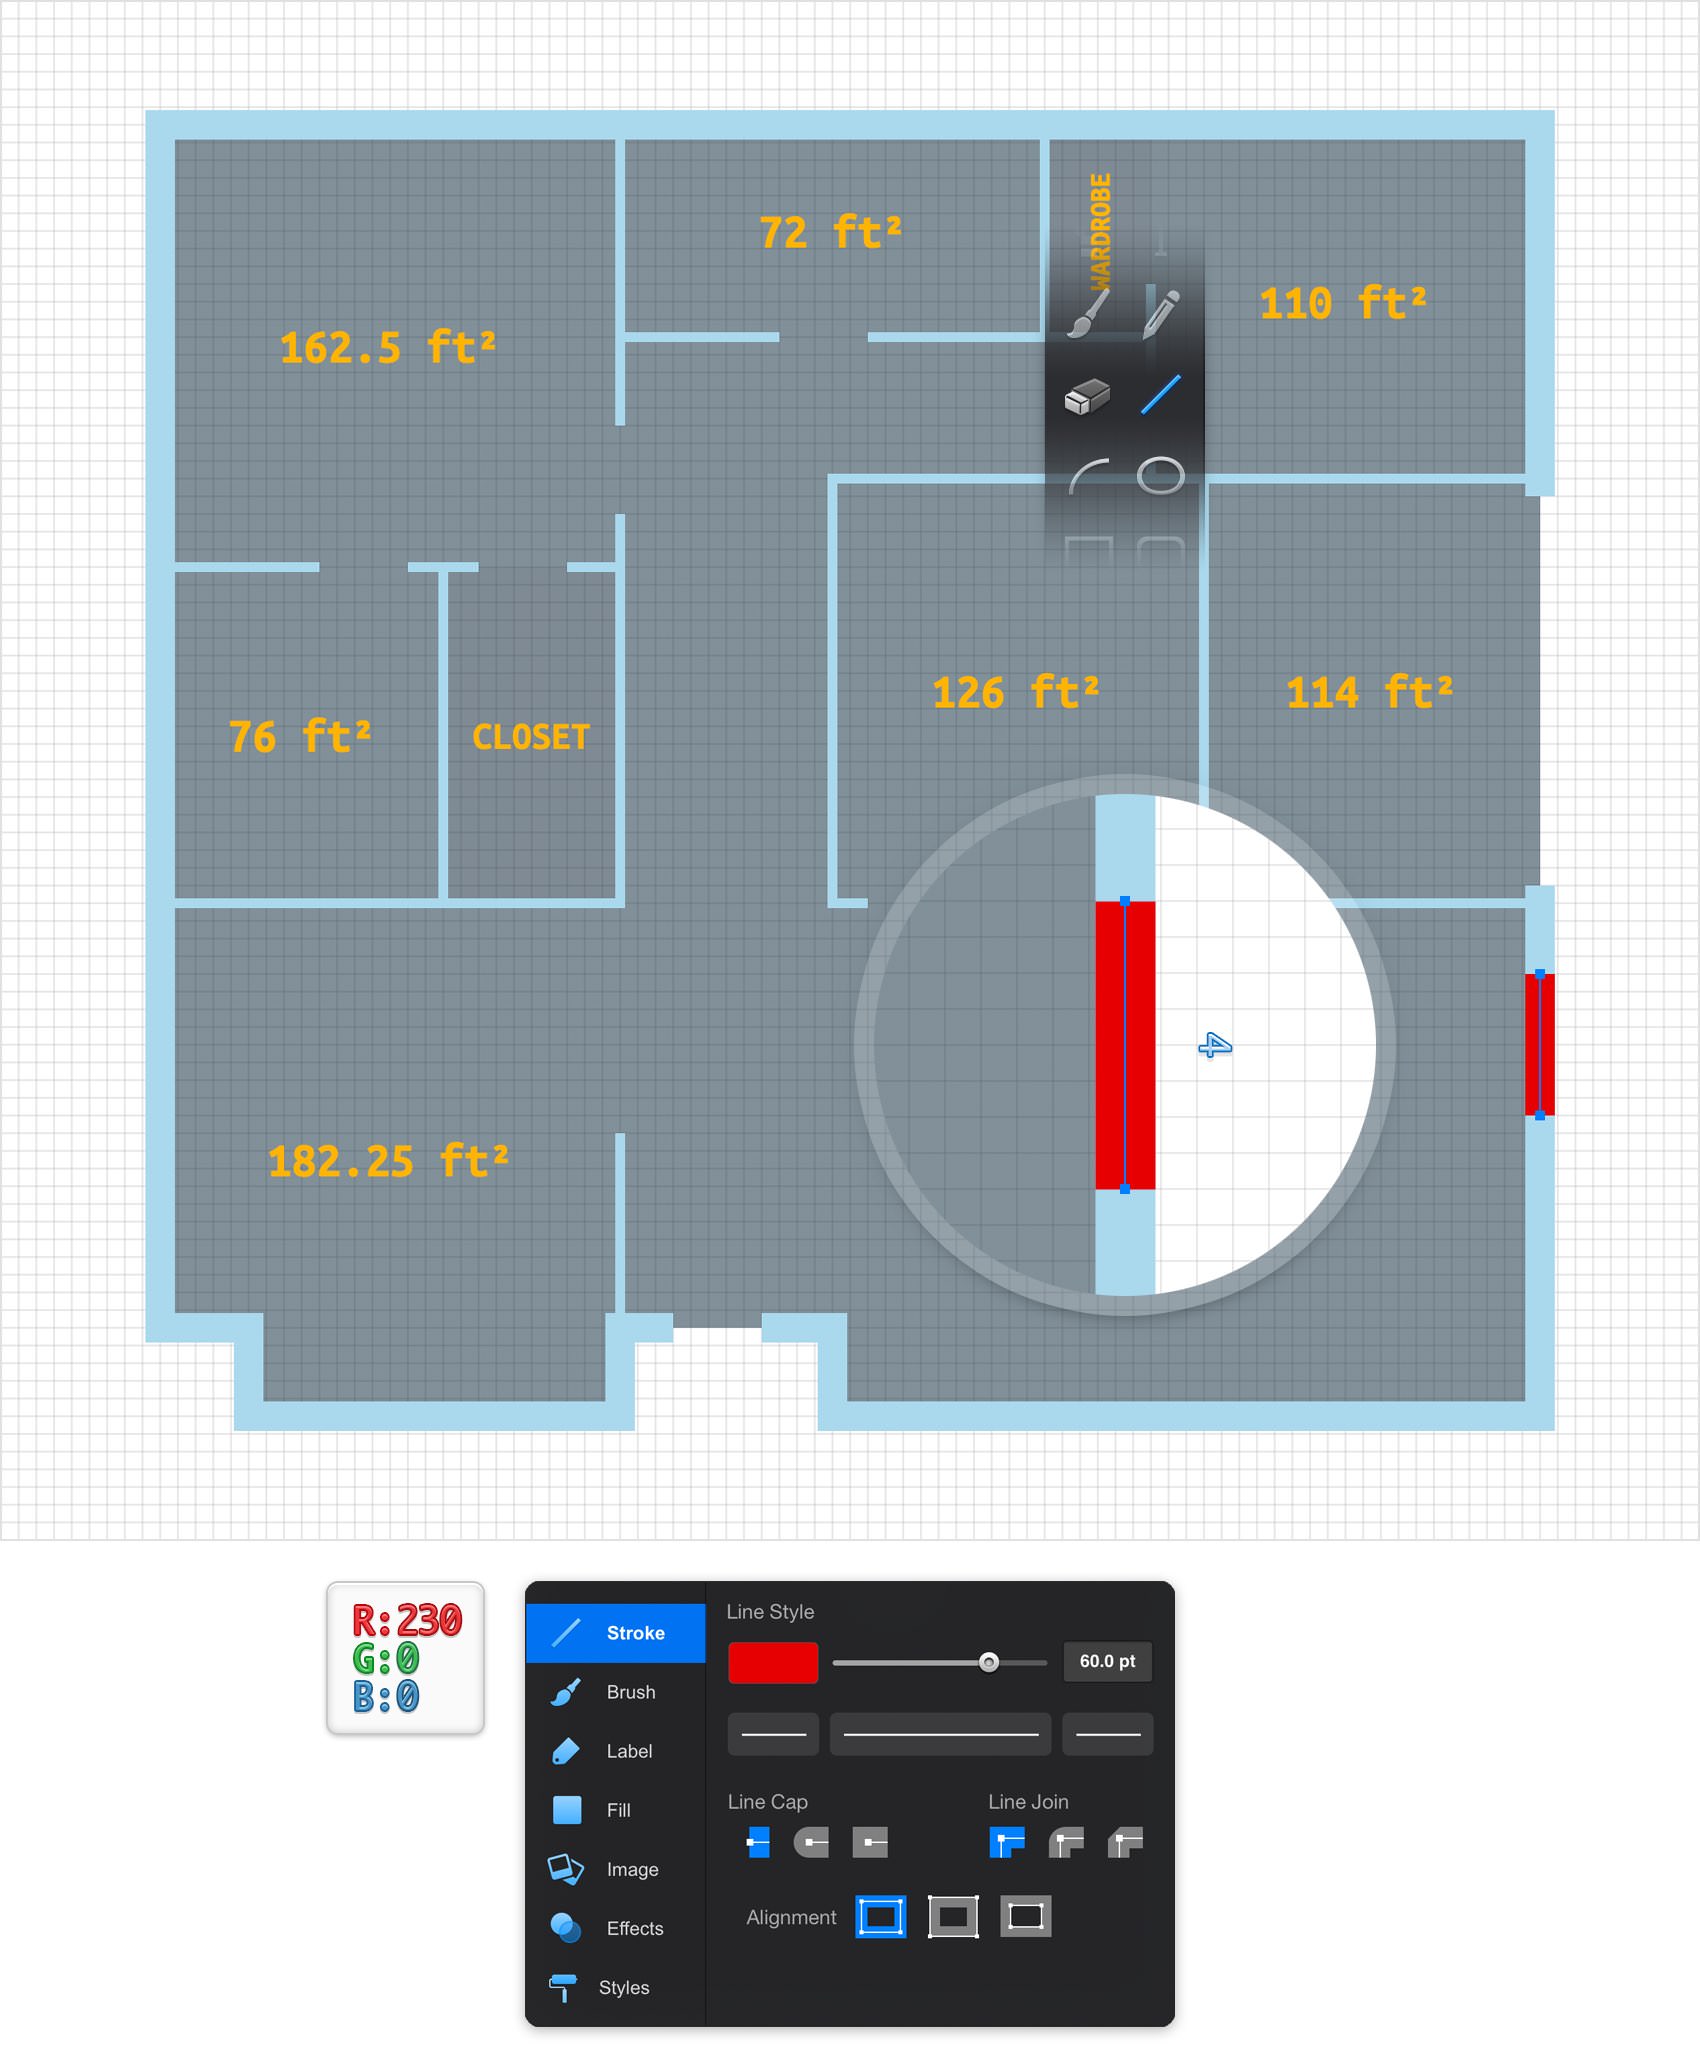
Using the Line Tool, create 4 ft, vertical path and place it roughly as shown in the following image. Make sure that this new path stays selected and focus on the Appearance panel. Set the Width to 60 pt and then tap the color well that stands for this stroke and pick a random red.
Step 16
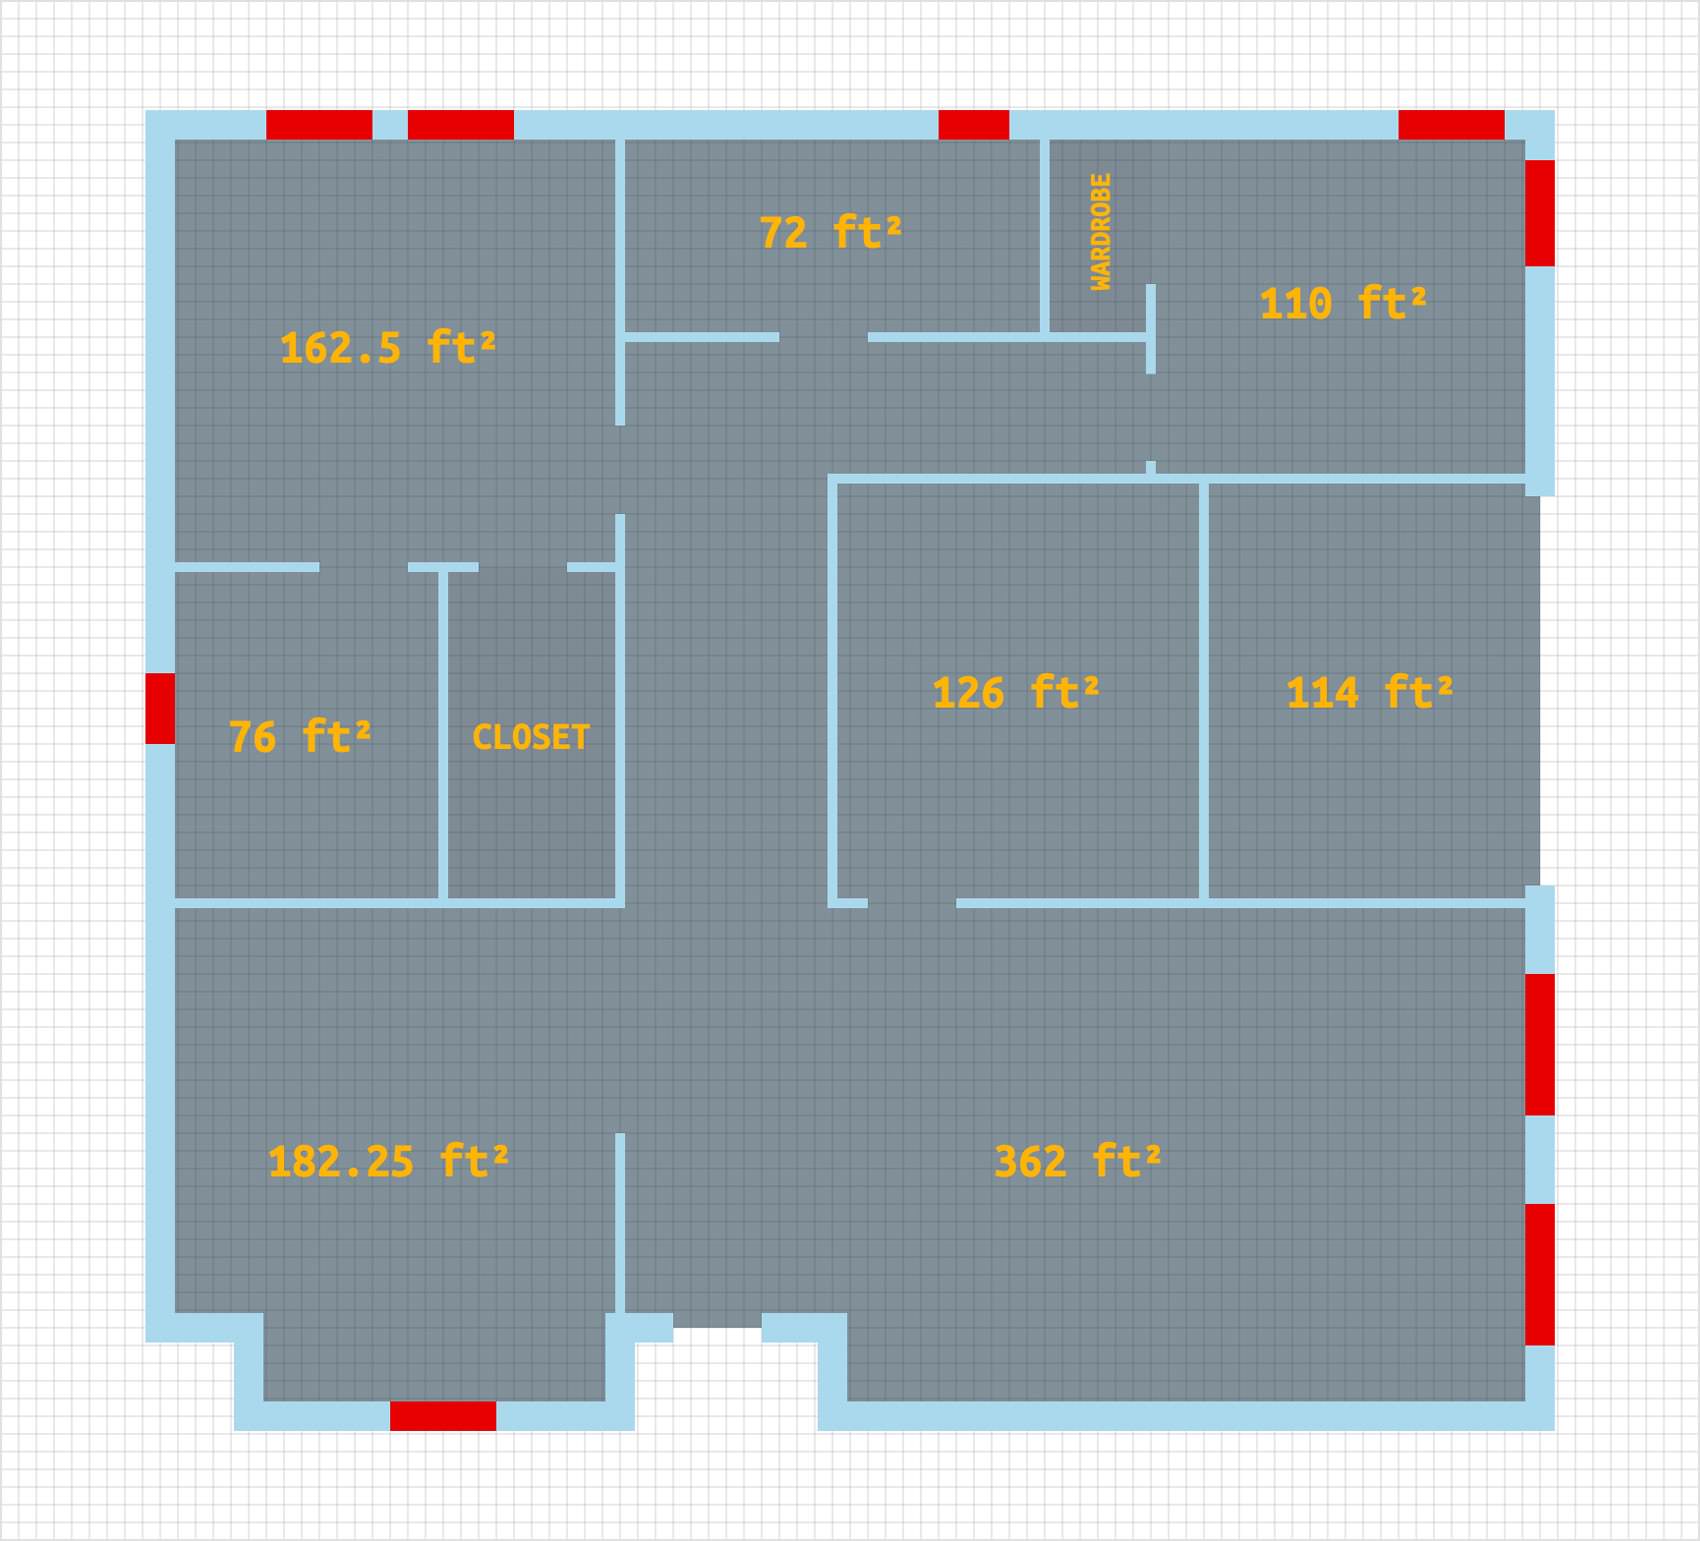
Use that same Line Tool to add a bunch of new, straight lines roughly as shown in the following image.
Step 17
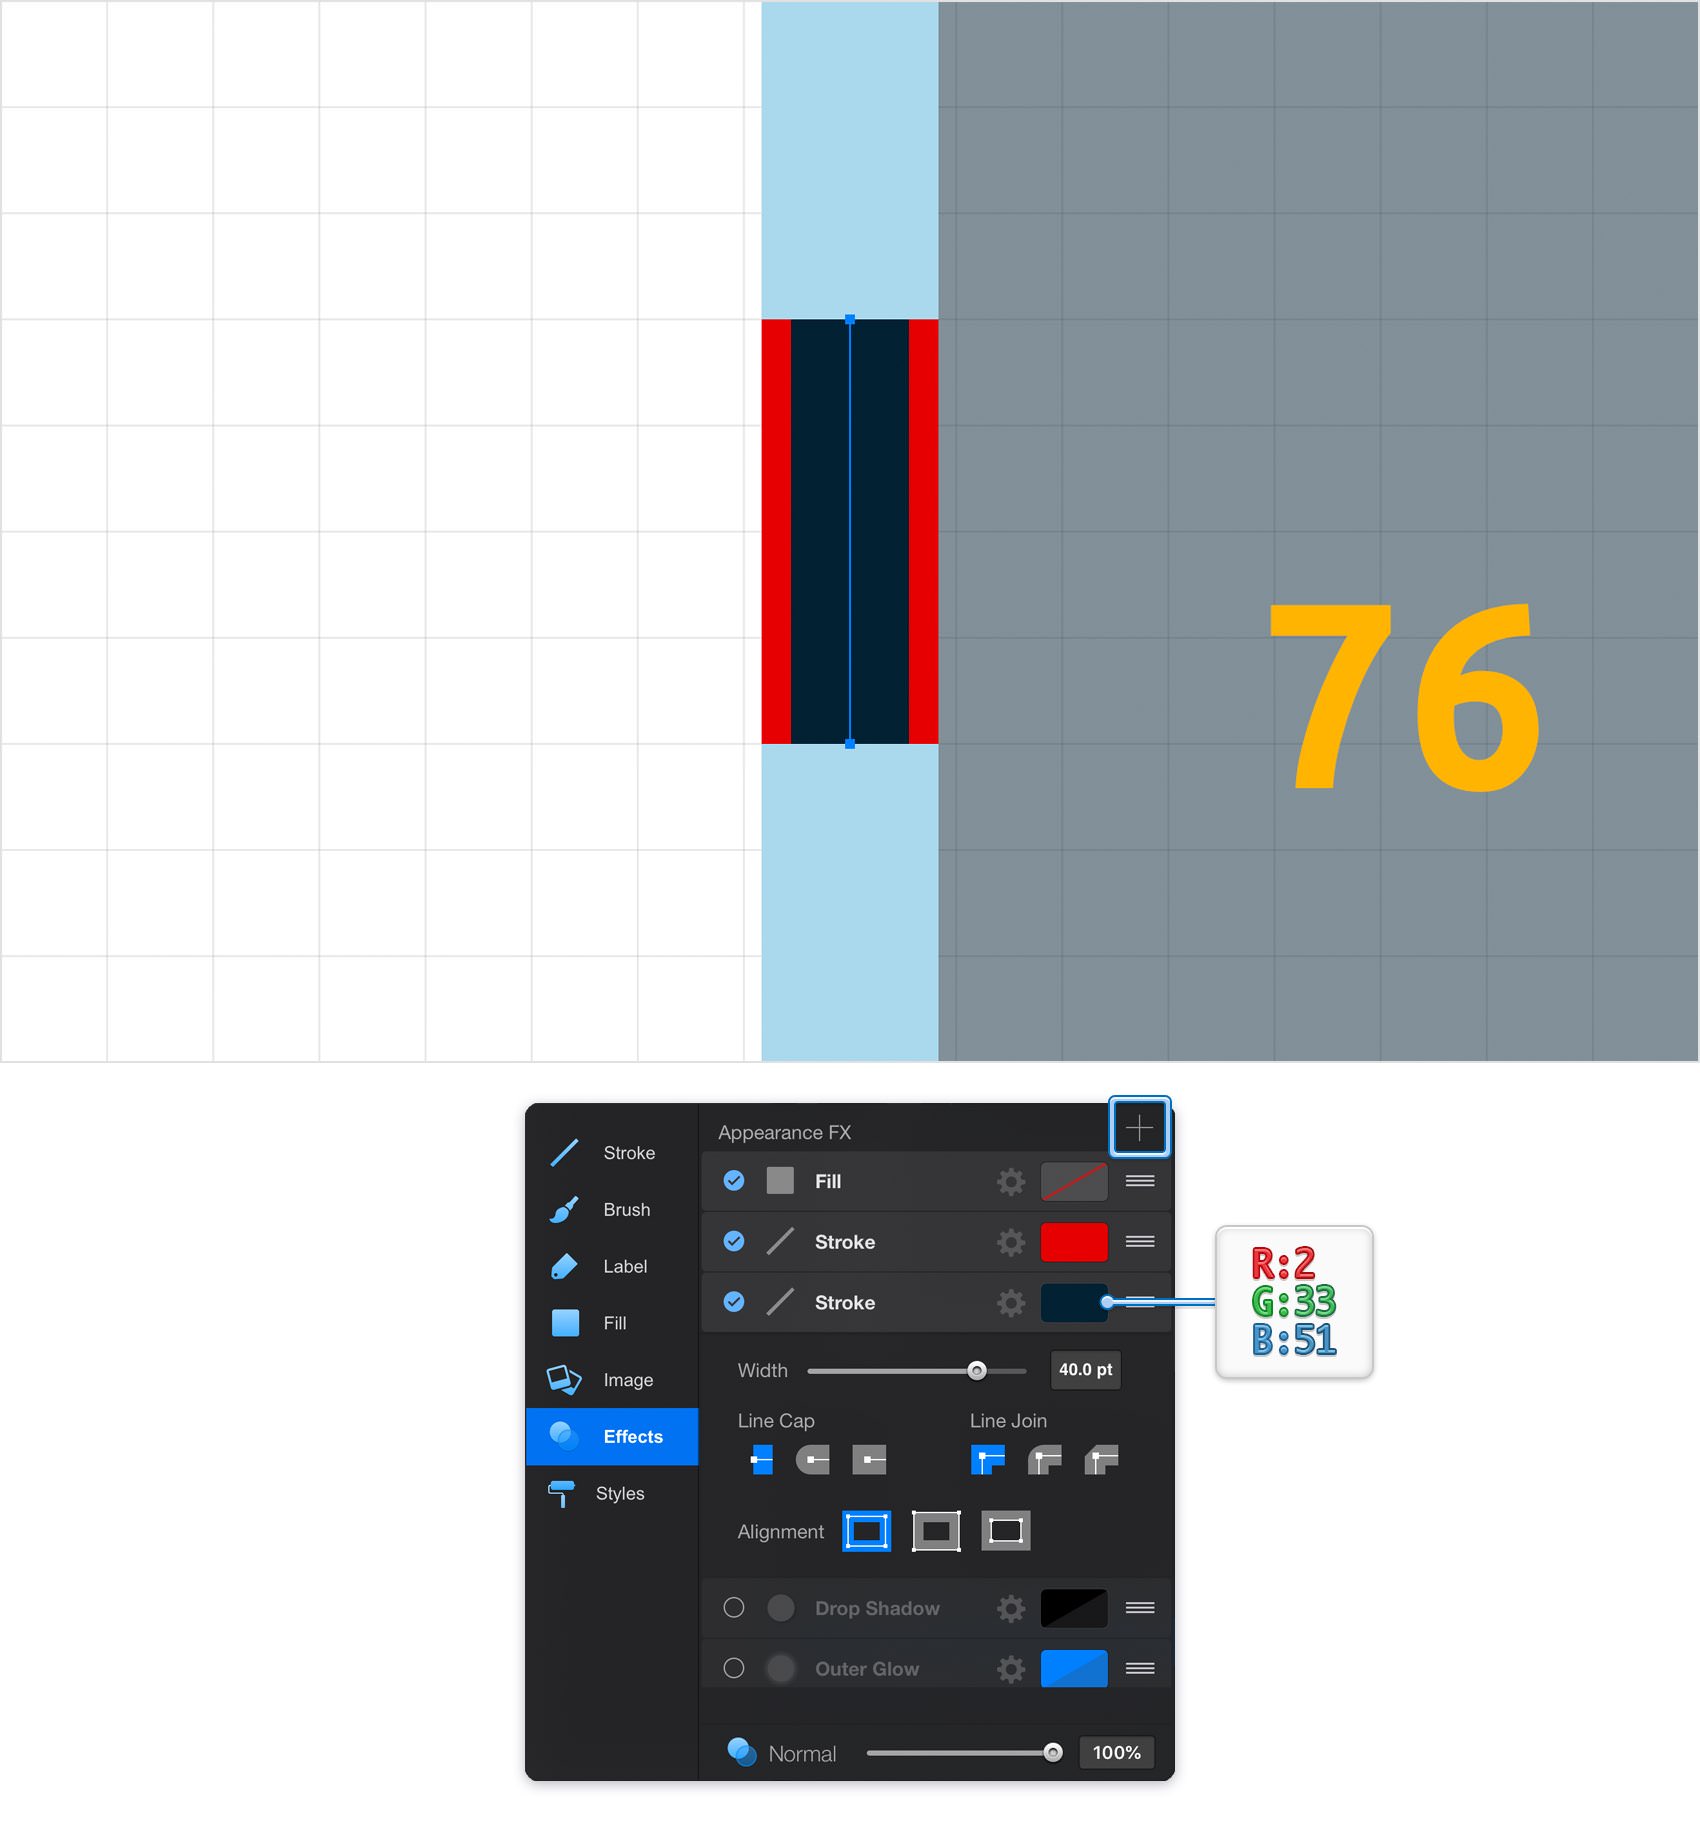
Focus on one of your red lines and select it. Go to the Effects pane and add a second stroke using the plus button located in the bottom, right corner of the panel.
Select this new stroke and for starters make sure that it lies below the other stroke. Keep in mind that you can easily move attributes inside the Effects pane using the drag bars from the right-hand side. Now, drag the Width slider to 40 pt and then tap the color well that stands for this new stroke. Make sure that the Alpha slider is set to 100% and then replace the existing color with R=2 G=33 B=51. You'll need again this dark blue color so don't forget to quickly save it.
Step 18
Make sure that the red line edited in the previous step is still selected and keep focusing on the Effects pane. Add a new Stroke using that same plus button and make sure that it goes below the existing strokes. Focus on this new stroke, set the Width to 10 pt and for the color add your light blue from the Color Palette.
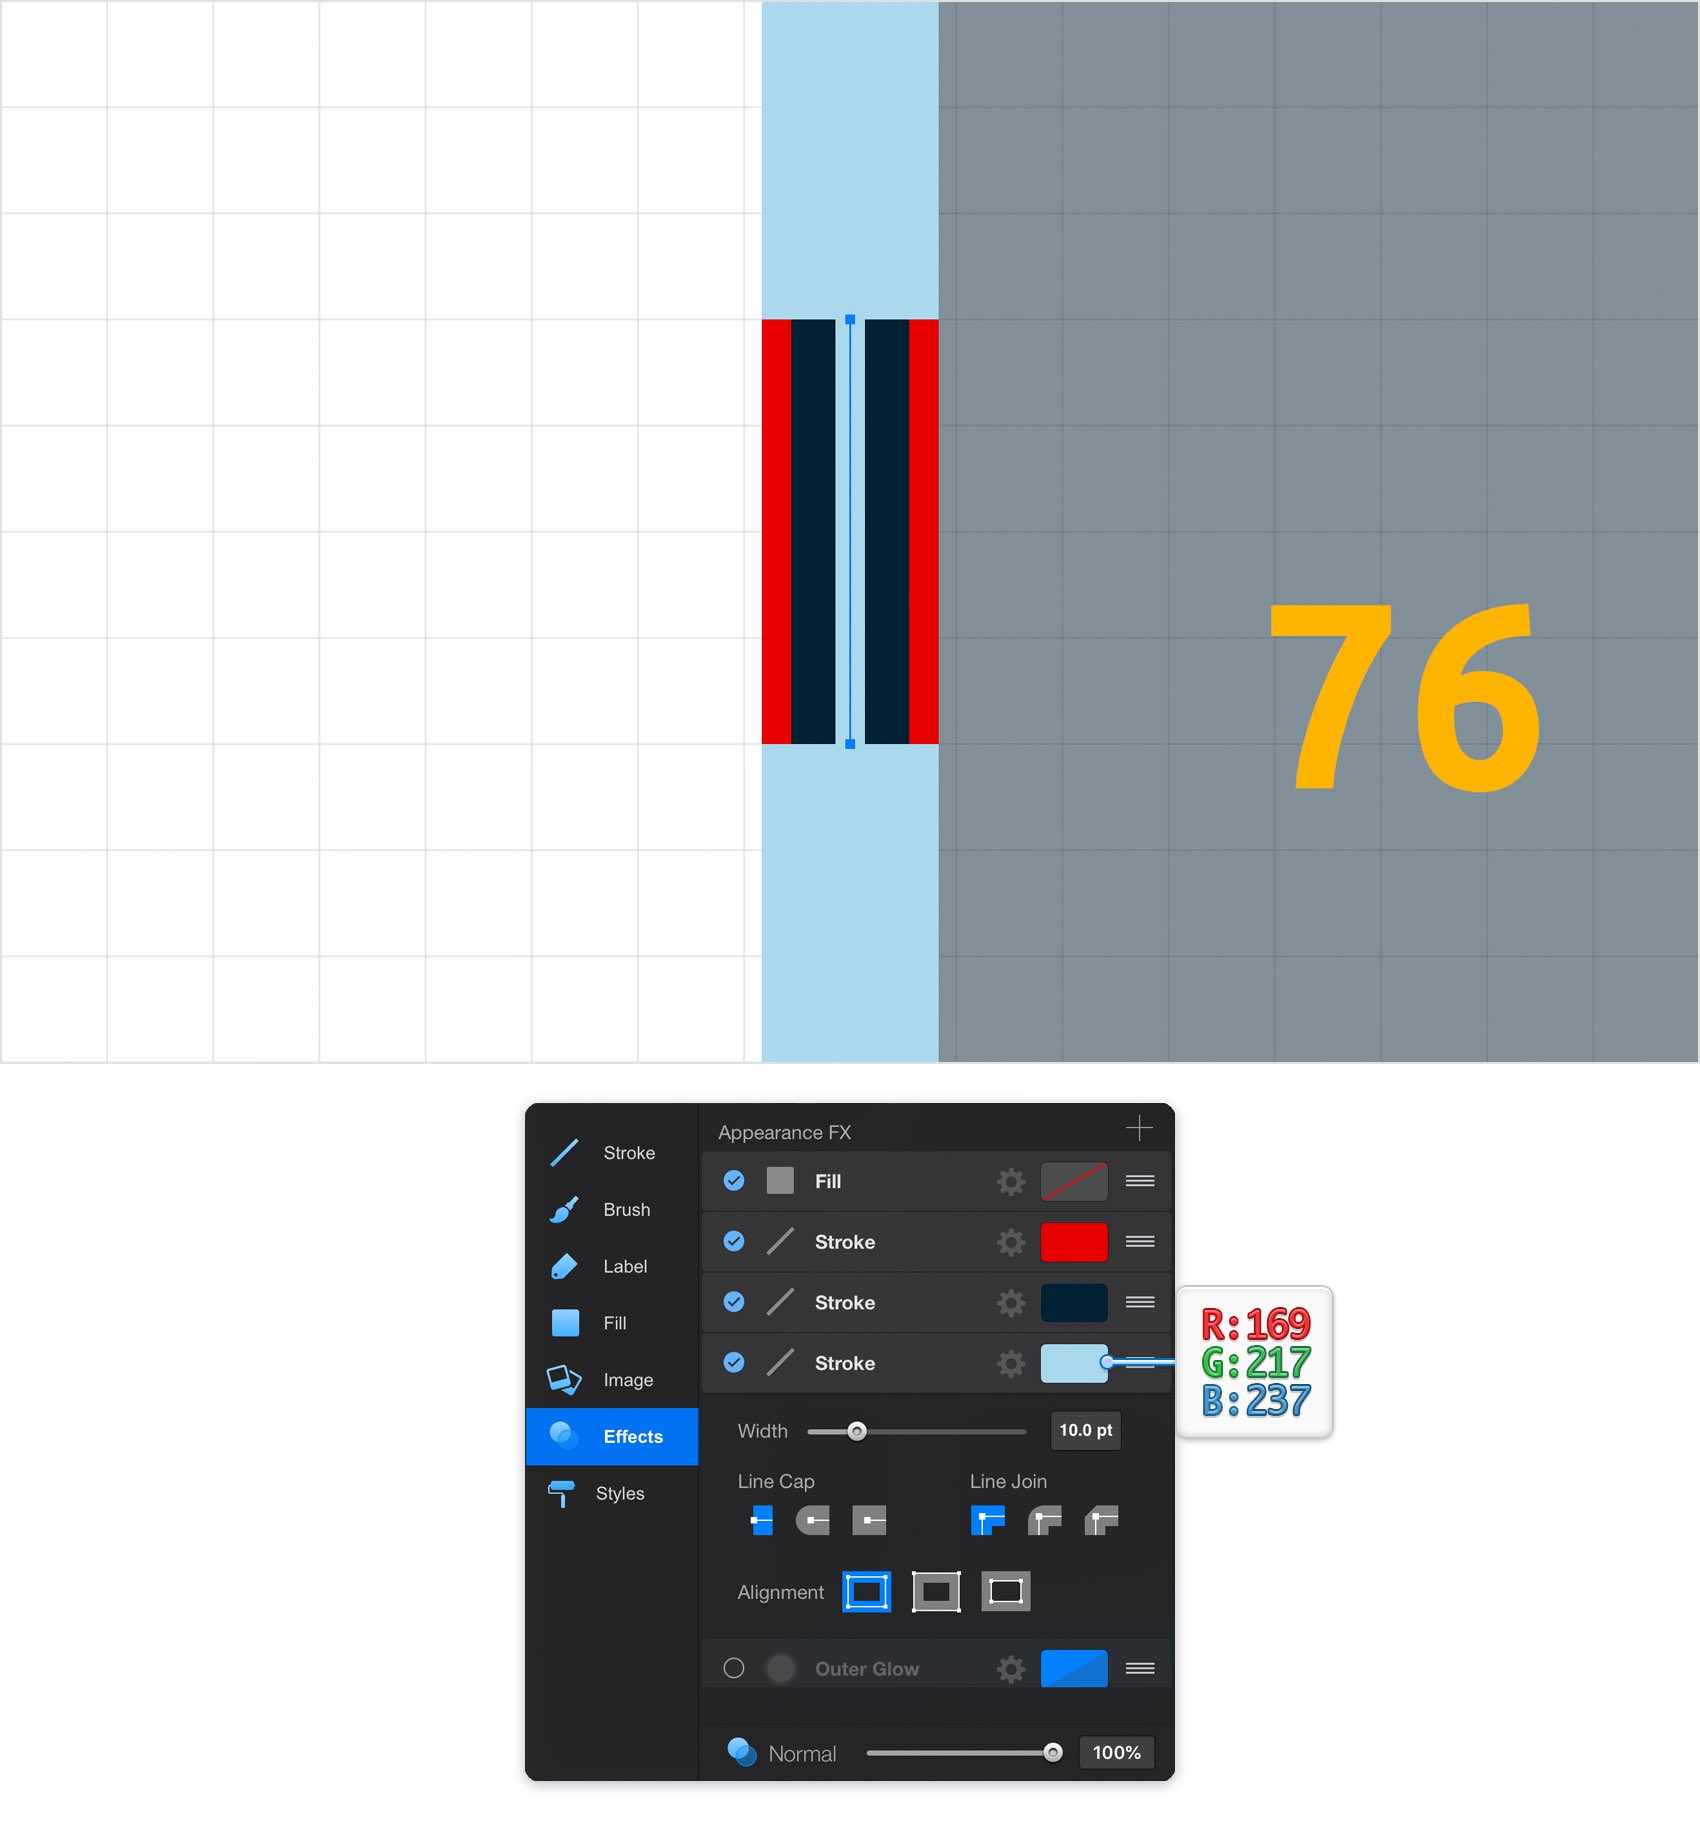
Step 19
Make sure that the red line edited in the previous step is still selected and keep focusing on the Effects pane. Tap the color well that stands for the red stroke and replace that red with your light blue from the Color Palette.
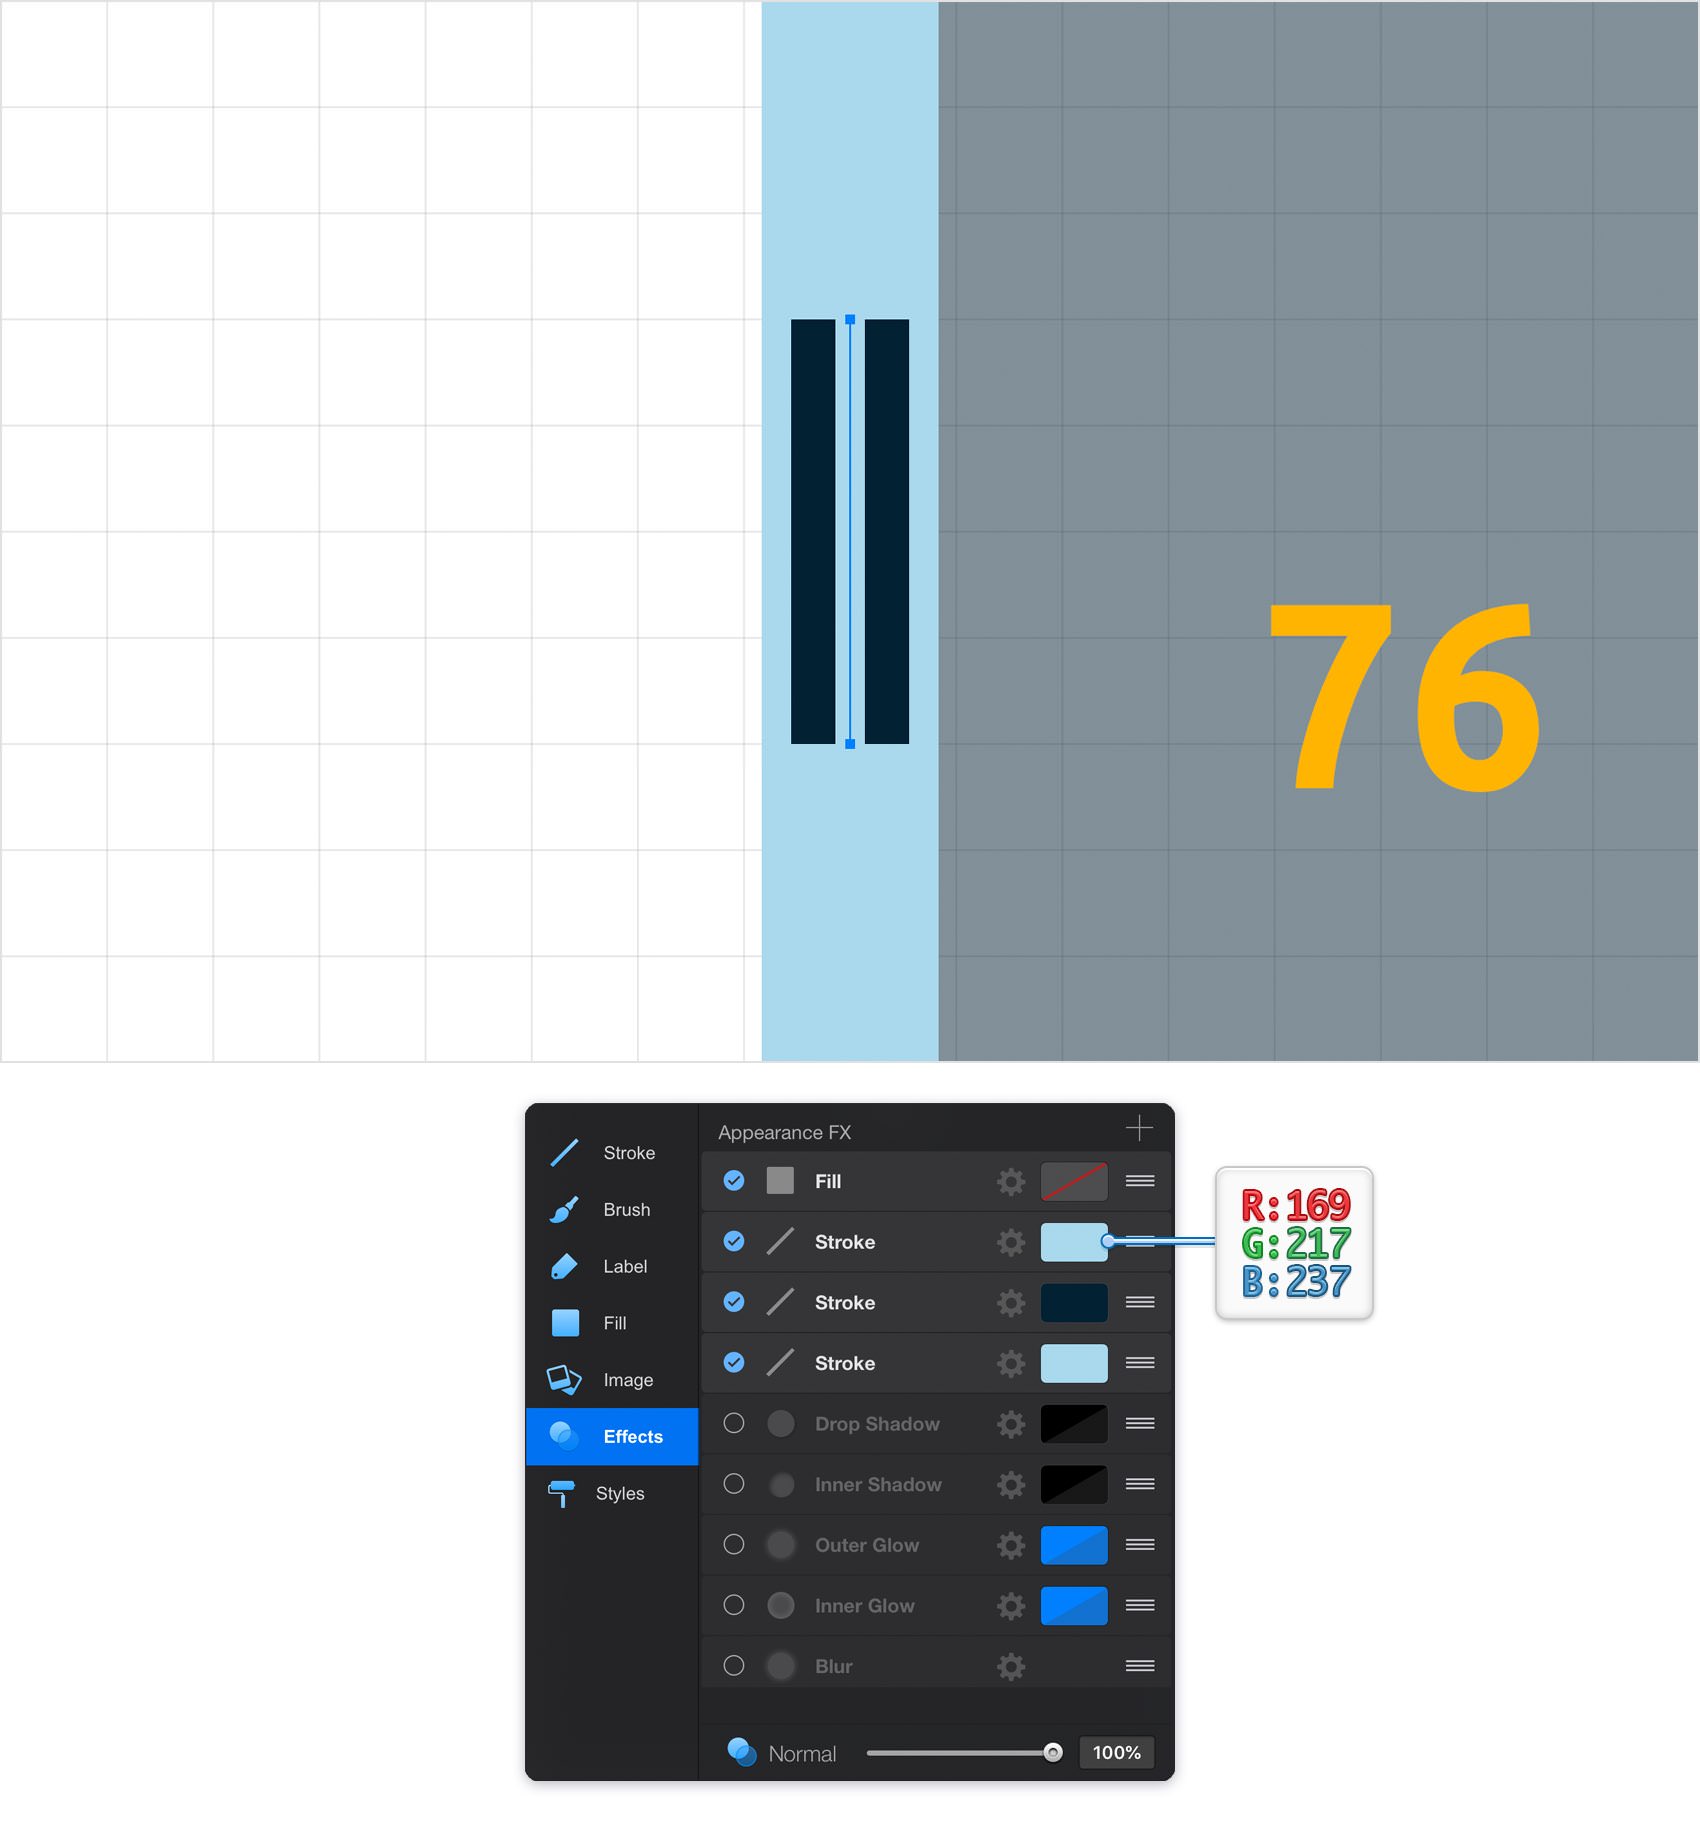
Step 20
Make sure that the line edited in the previous step is still selected and go to Styles pane. tap the plus button that lies in the bottom, right corner of the Styles pane to save the style of your selected, straight line.
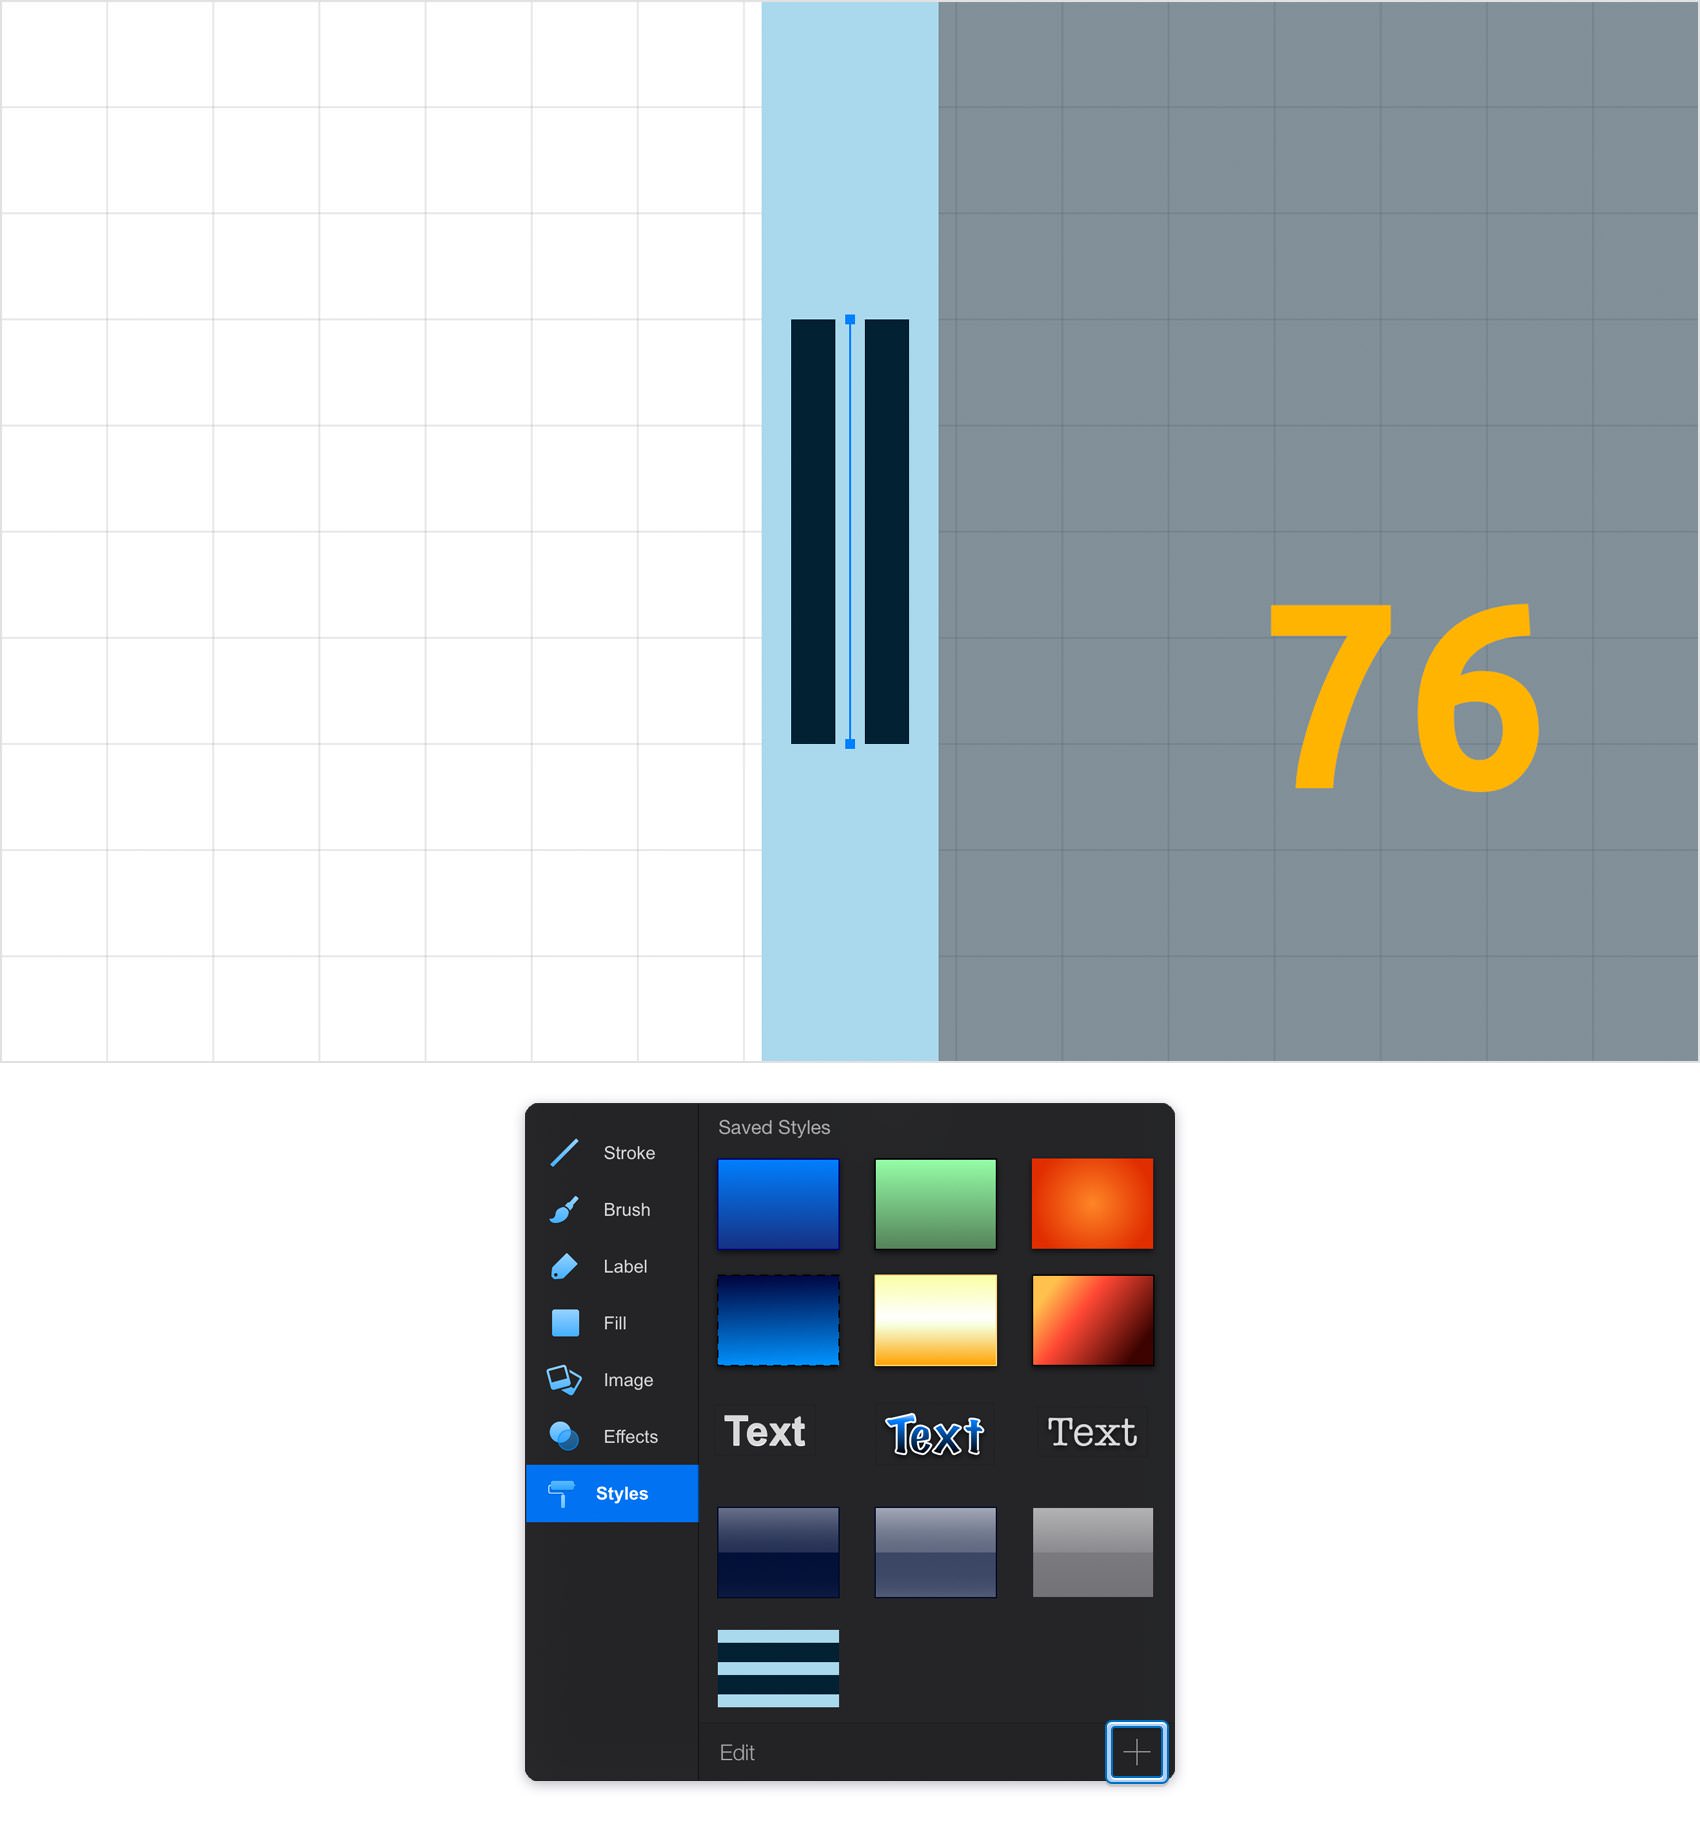
Step 21
Select the remaining red lines and add your style from the Styles pane.
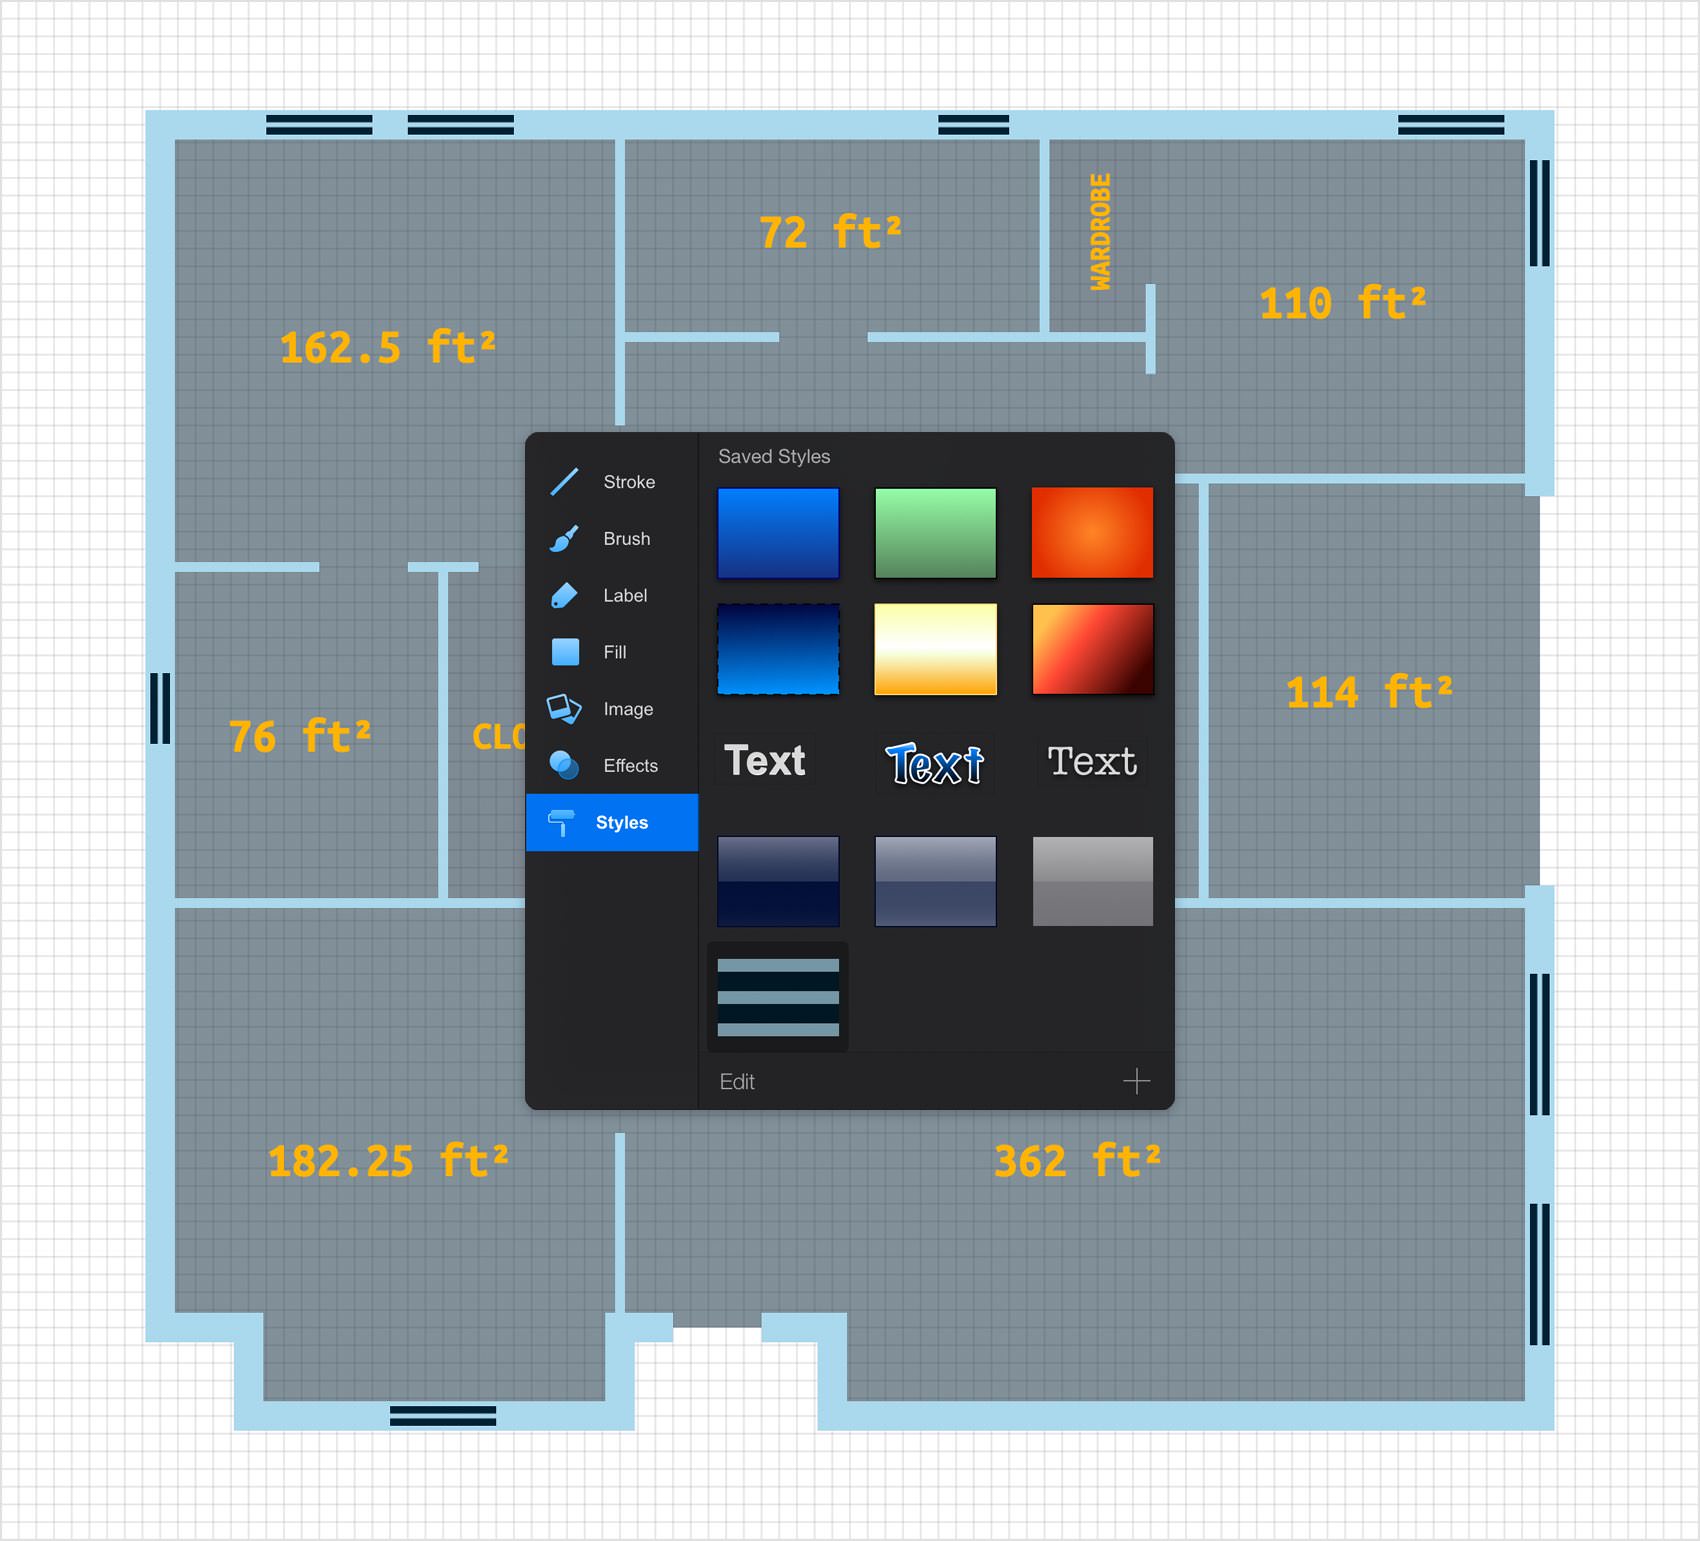
Step 22
Using the Line Tool, create a 6 ft, horizontal path and two, 2.5 ft, vertical paths and then place them as shown in the following image. Add a 20 pt stroke for these new paths and pick a random red for the stroke color.
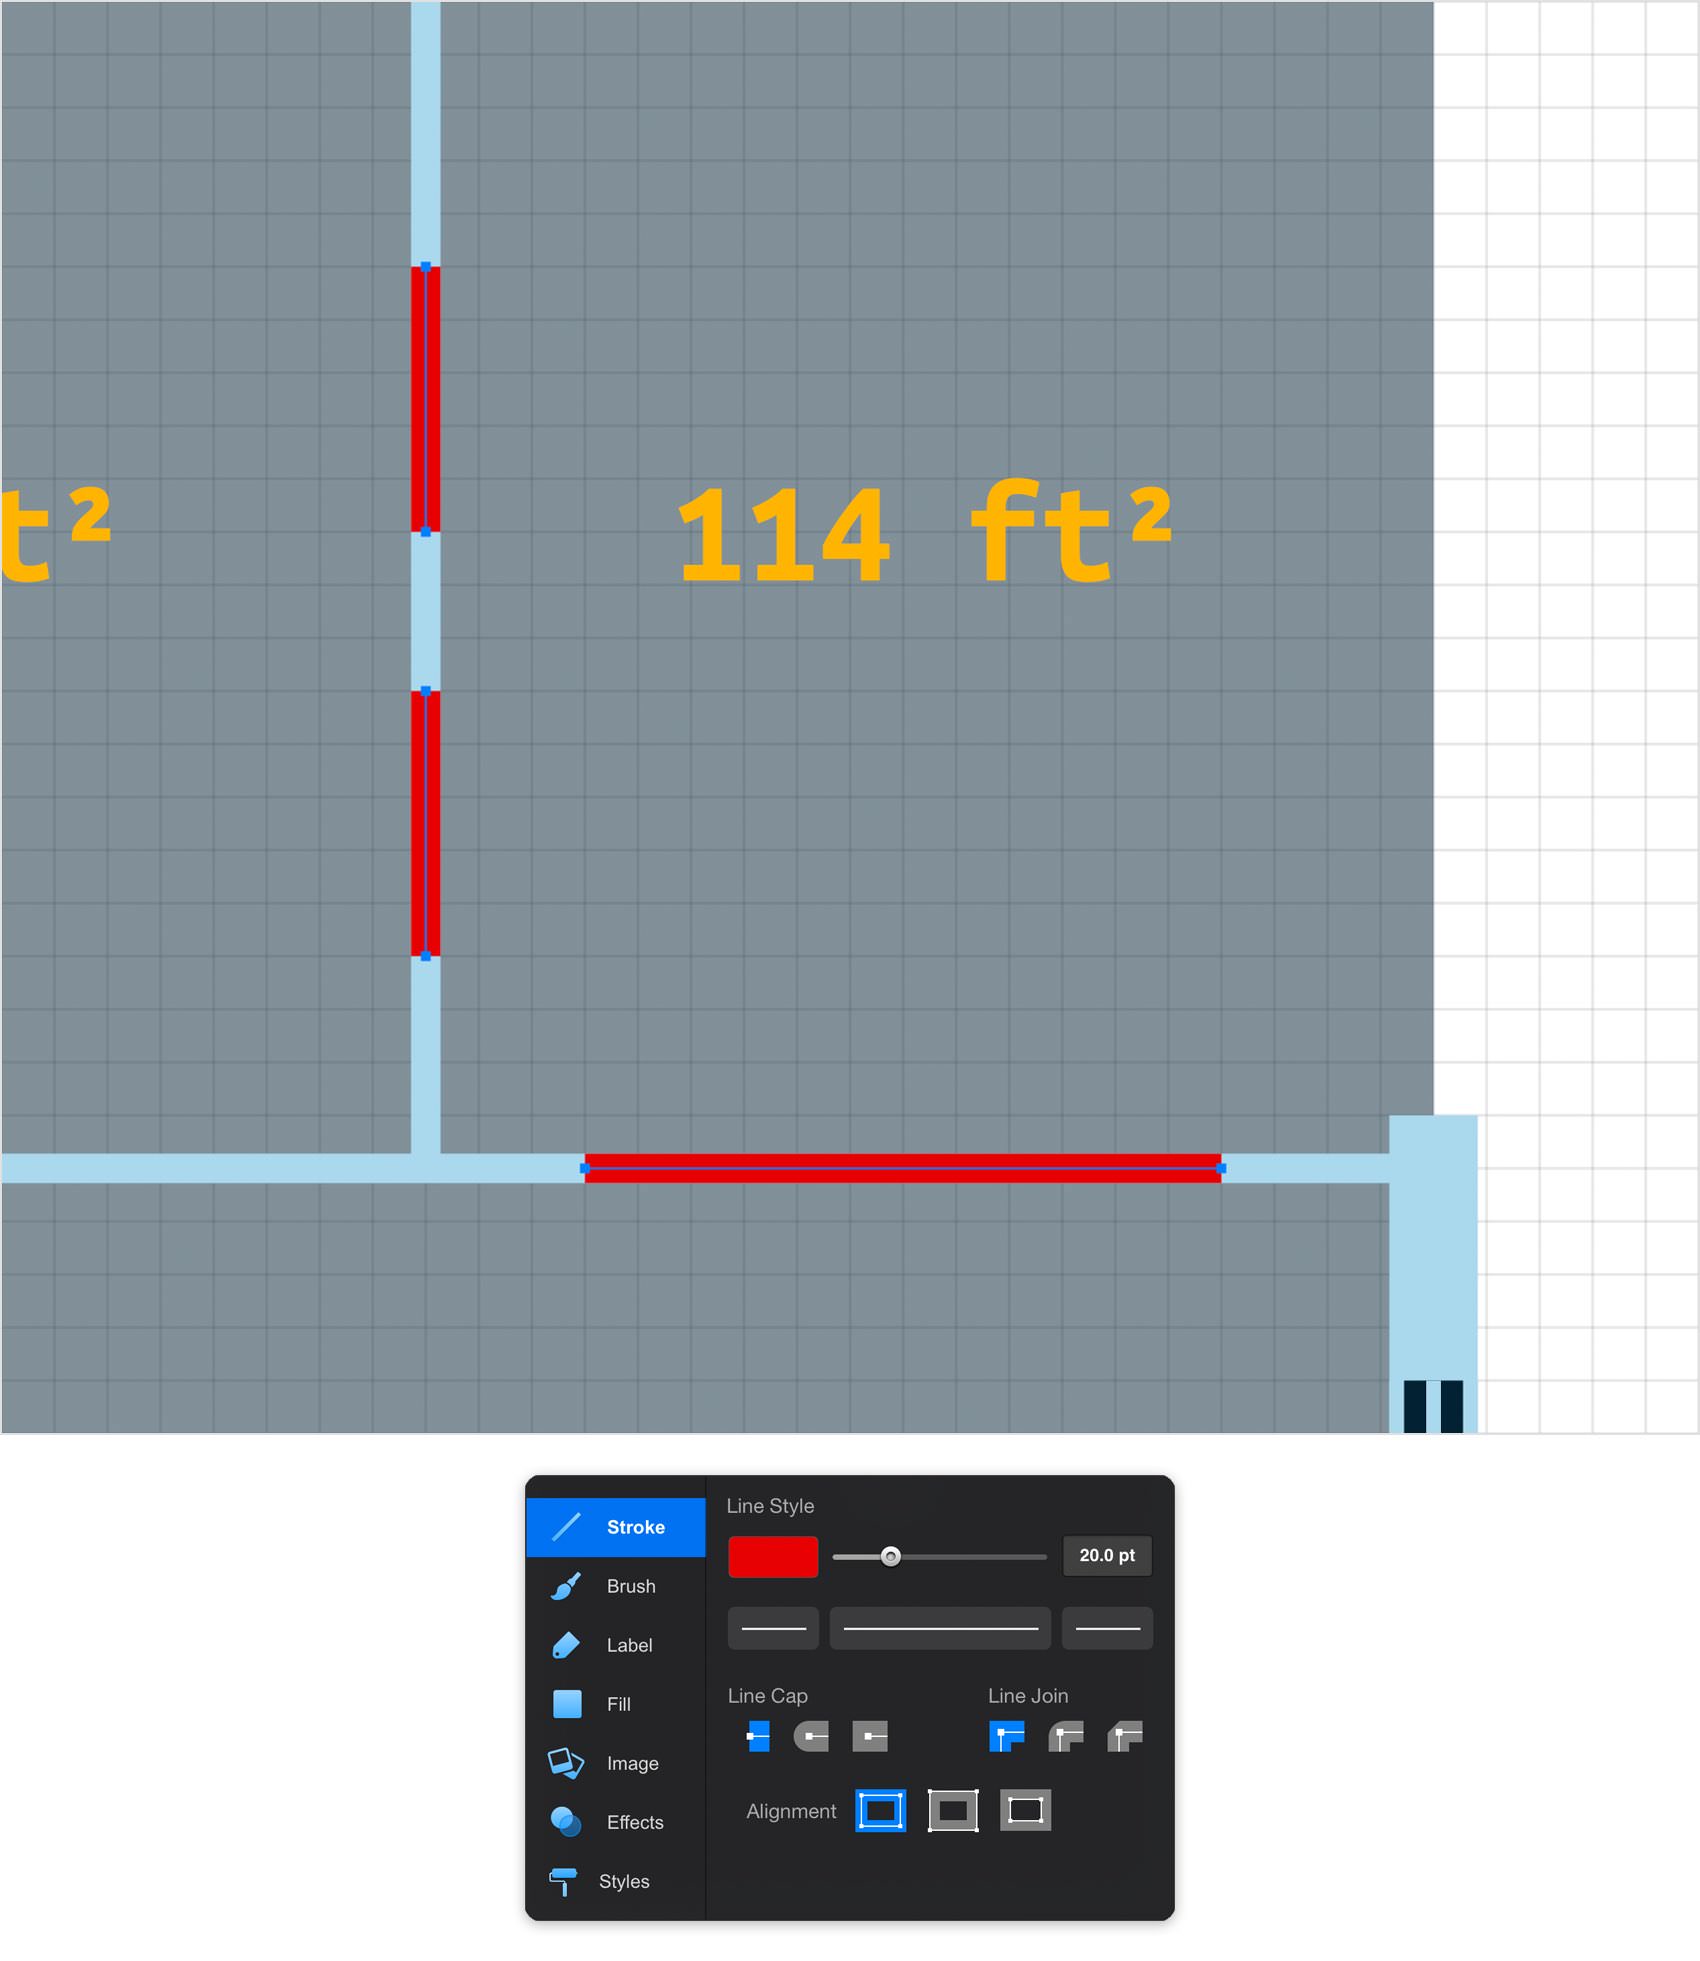
Step 23
Make sure that the three lines made in the previous step are still selected and focus on the Effects pane. First, select the existing stroke and replace that red with your light blue from the Color Palette. Next, add a second stroke and drag it below the existing one. Set the Width for this new stroke to 8 pt and replace the existing color with your dark blue from the Color Palette.
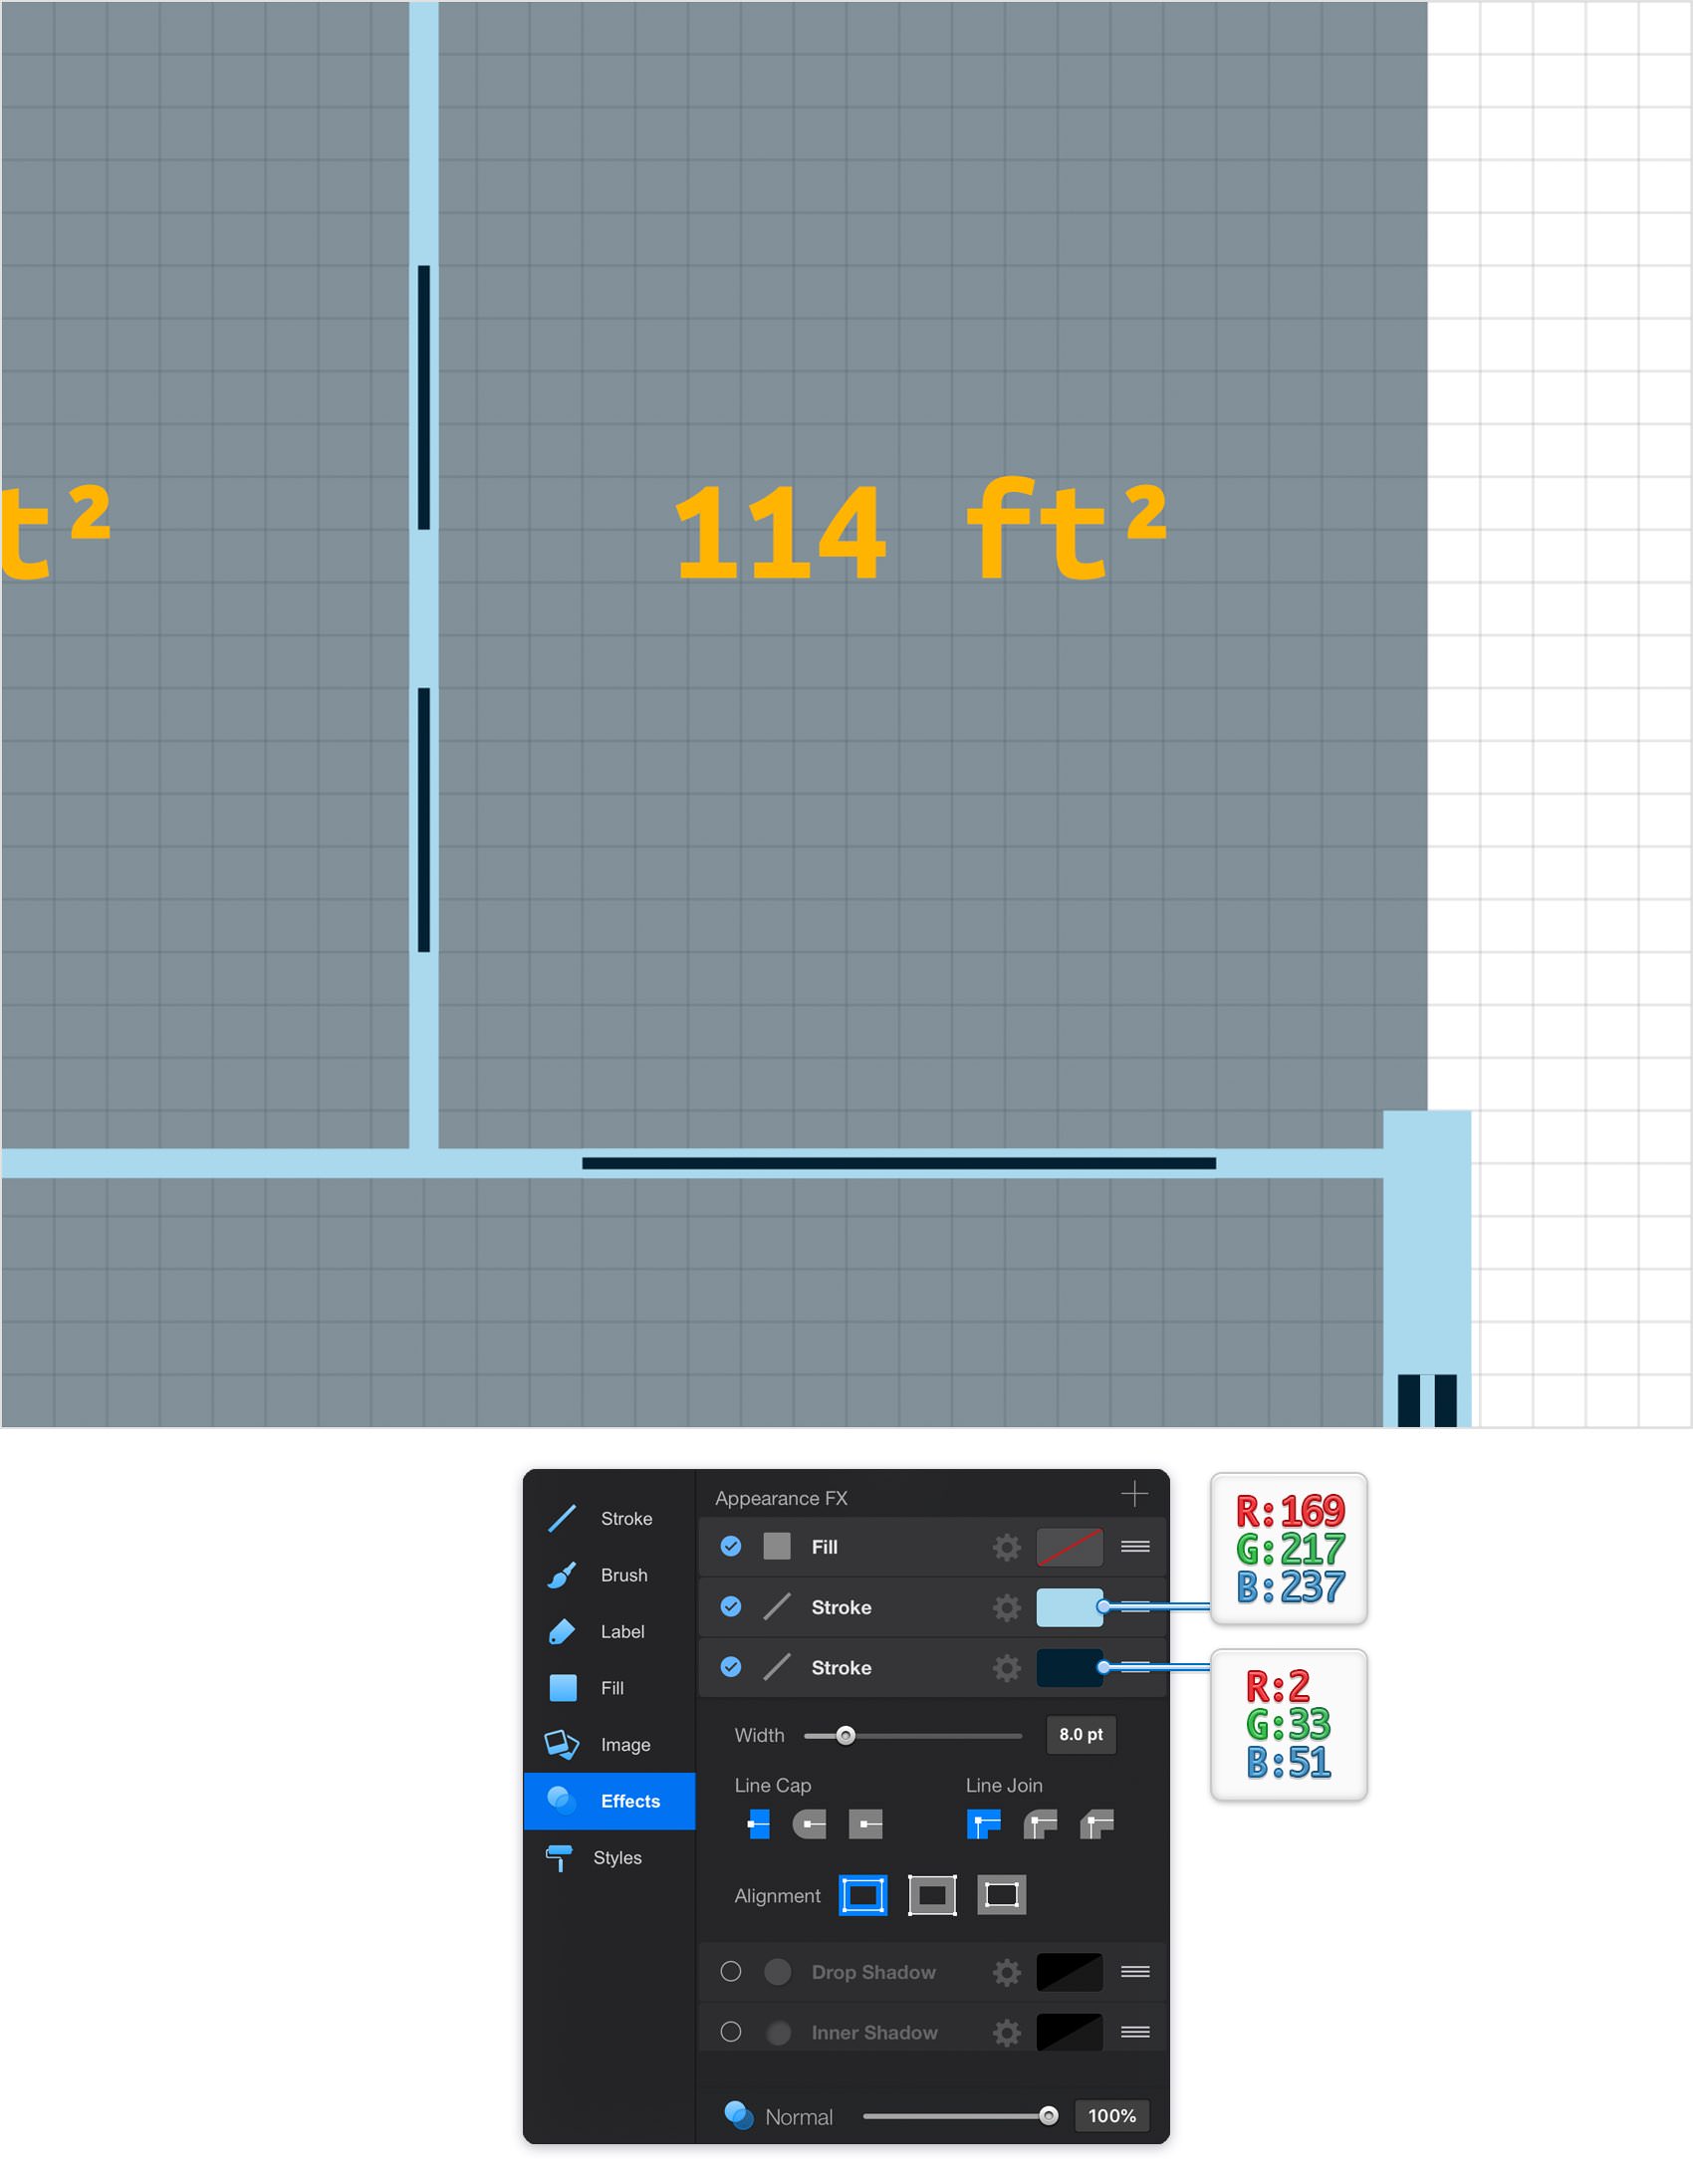
Step 24
Using the Line Tool, create an 11 ft, vertical path and place it as shown in the following image. Add a 40 pt stroke for this path and for the color use your light blue from the Color Palette. Make sure that this new path stays selected and keep focusing on the Effects pane. Add a second stroke, drag it below the existing one, set the Width to 20 pt and for the color use your dark blue from the Color Palette.
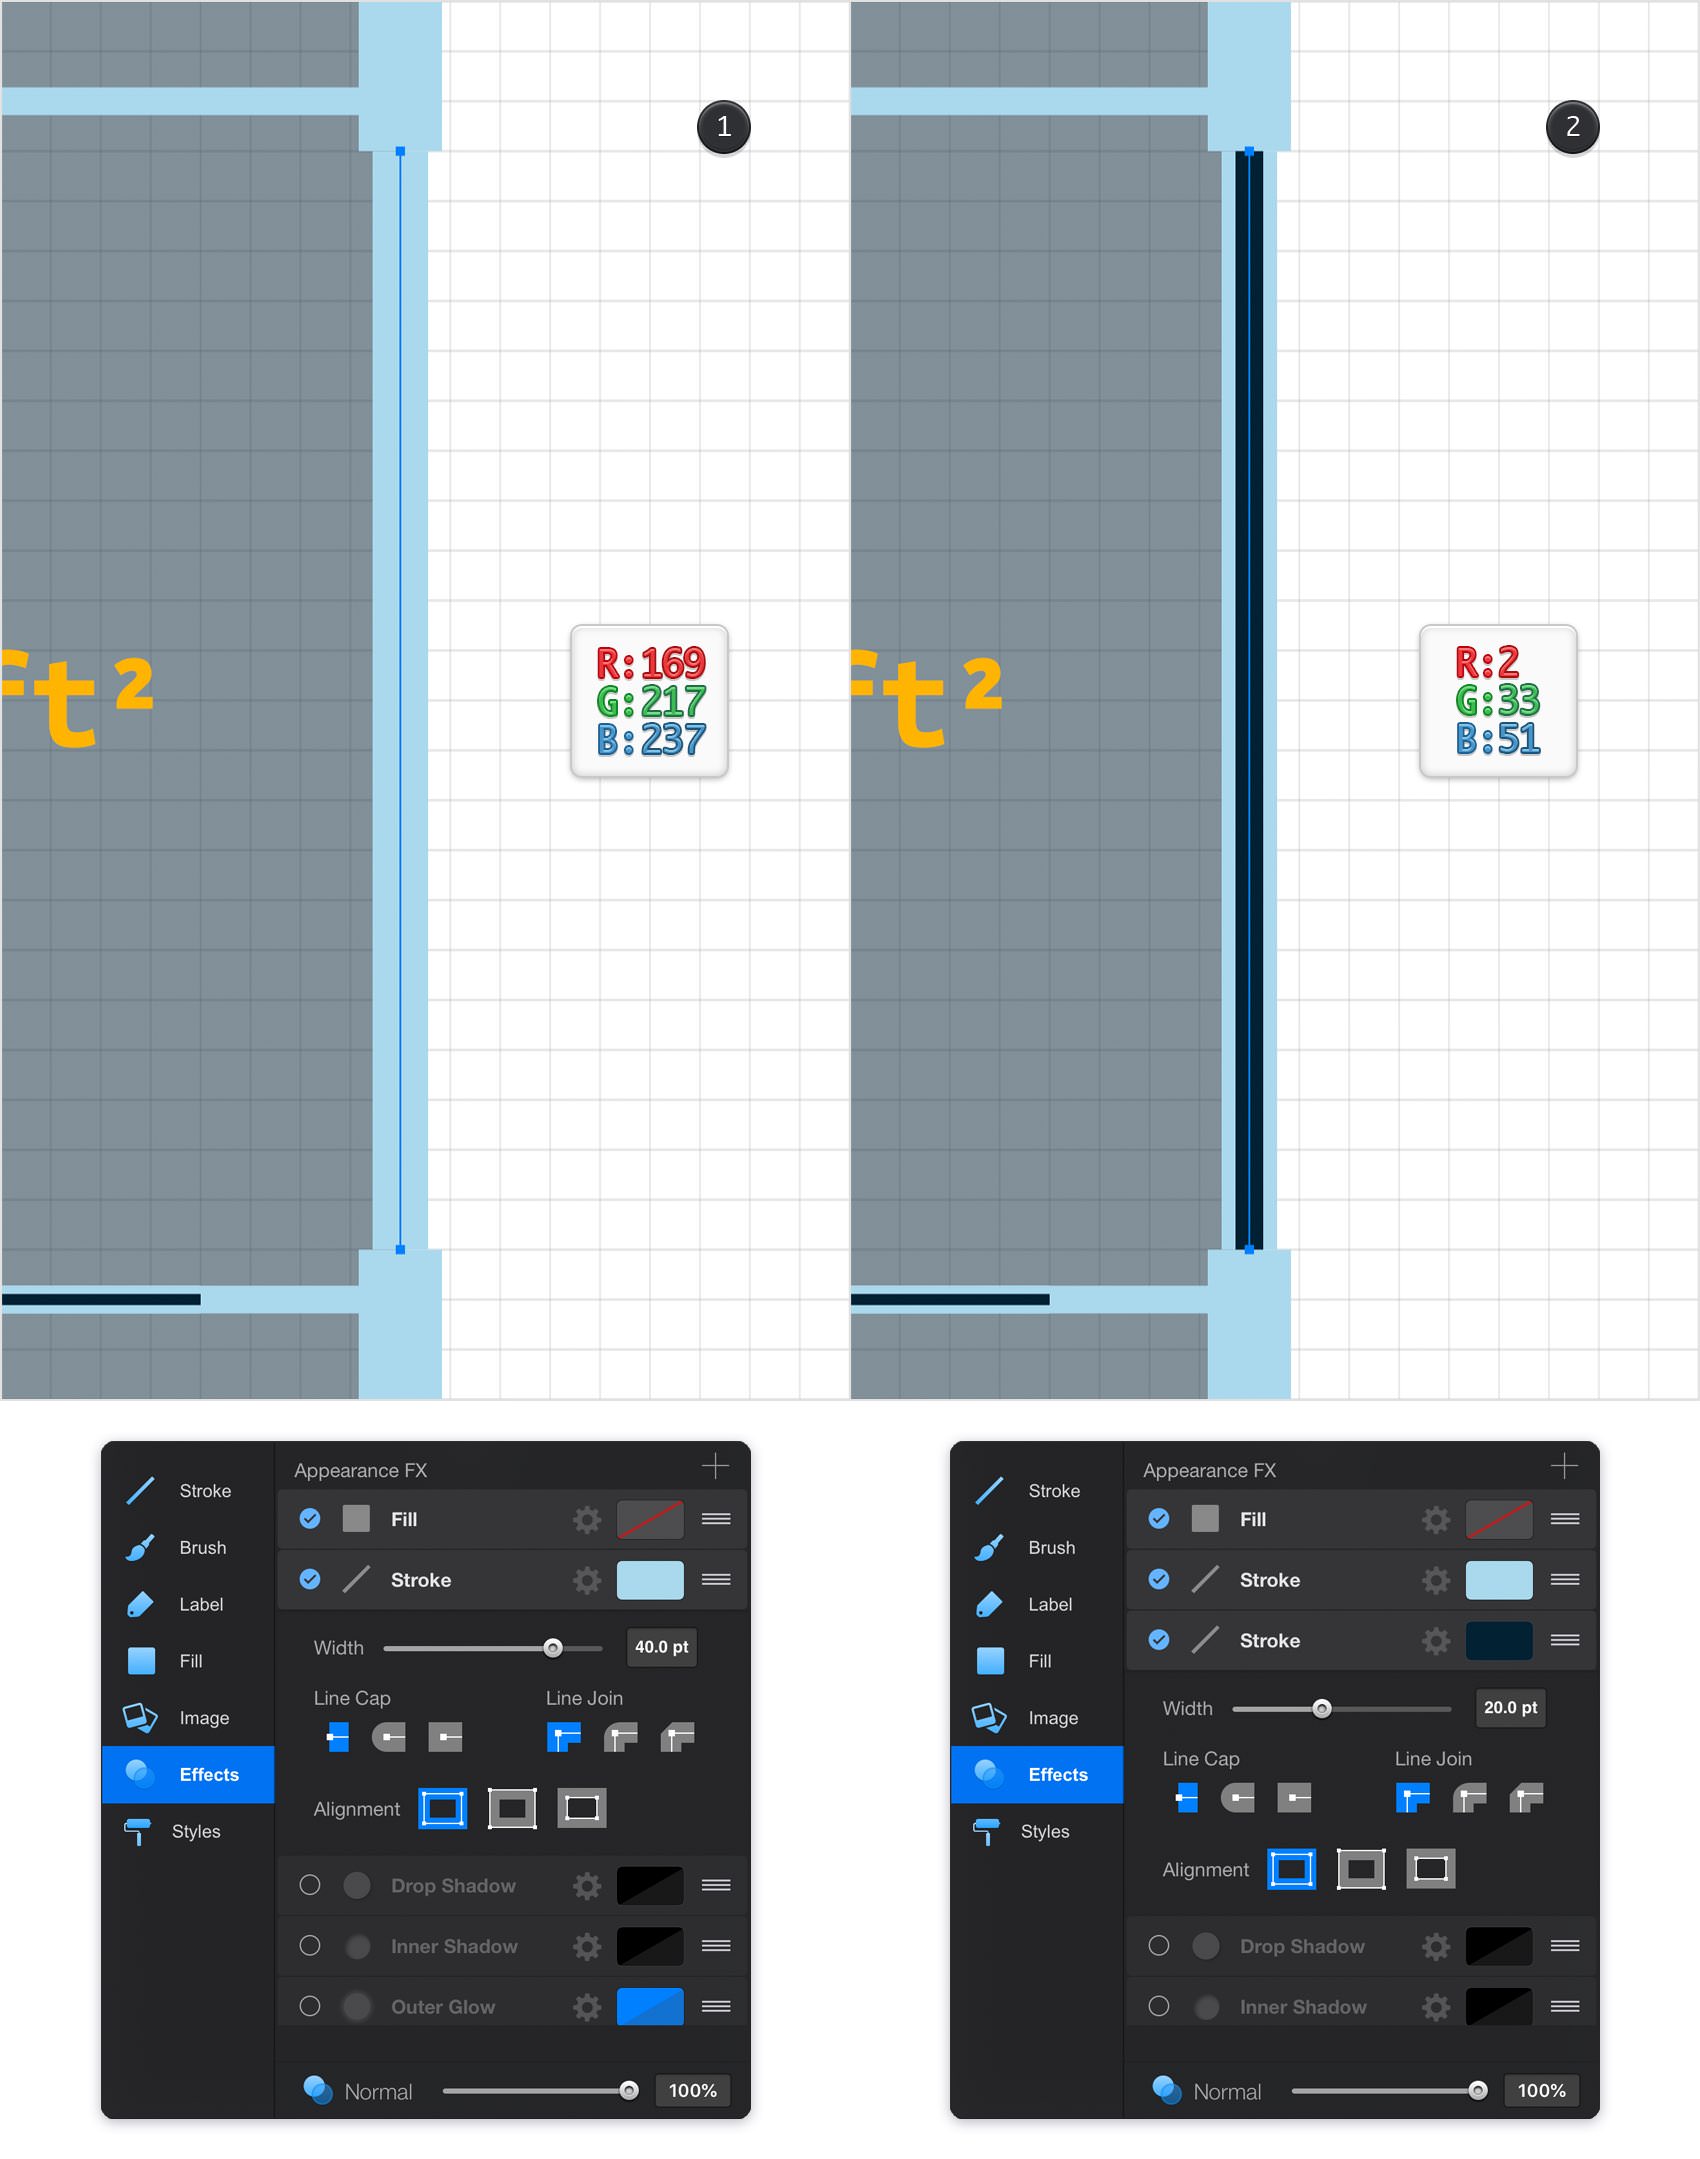
Step 25
Using the Line Tool, create an 4 ft, vertical and place it as shown in the following image. Add a 10 pt stroke for this path and for the color use your light blue from the Color Palette. Make sure that this new path stays selected and keep focusing on the Effects pane. Add a second stroke, drag it below the existing one, set the Width to 4 pt and for the color use your dark blue from the Color Palette.
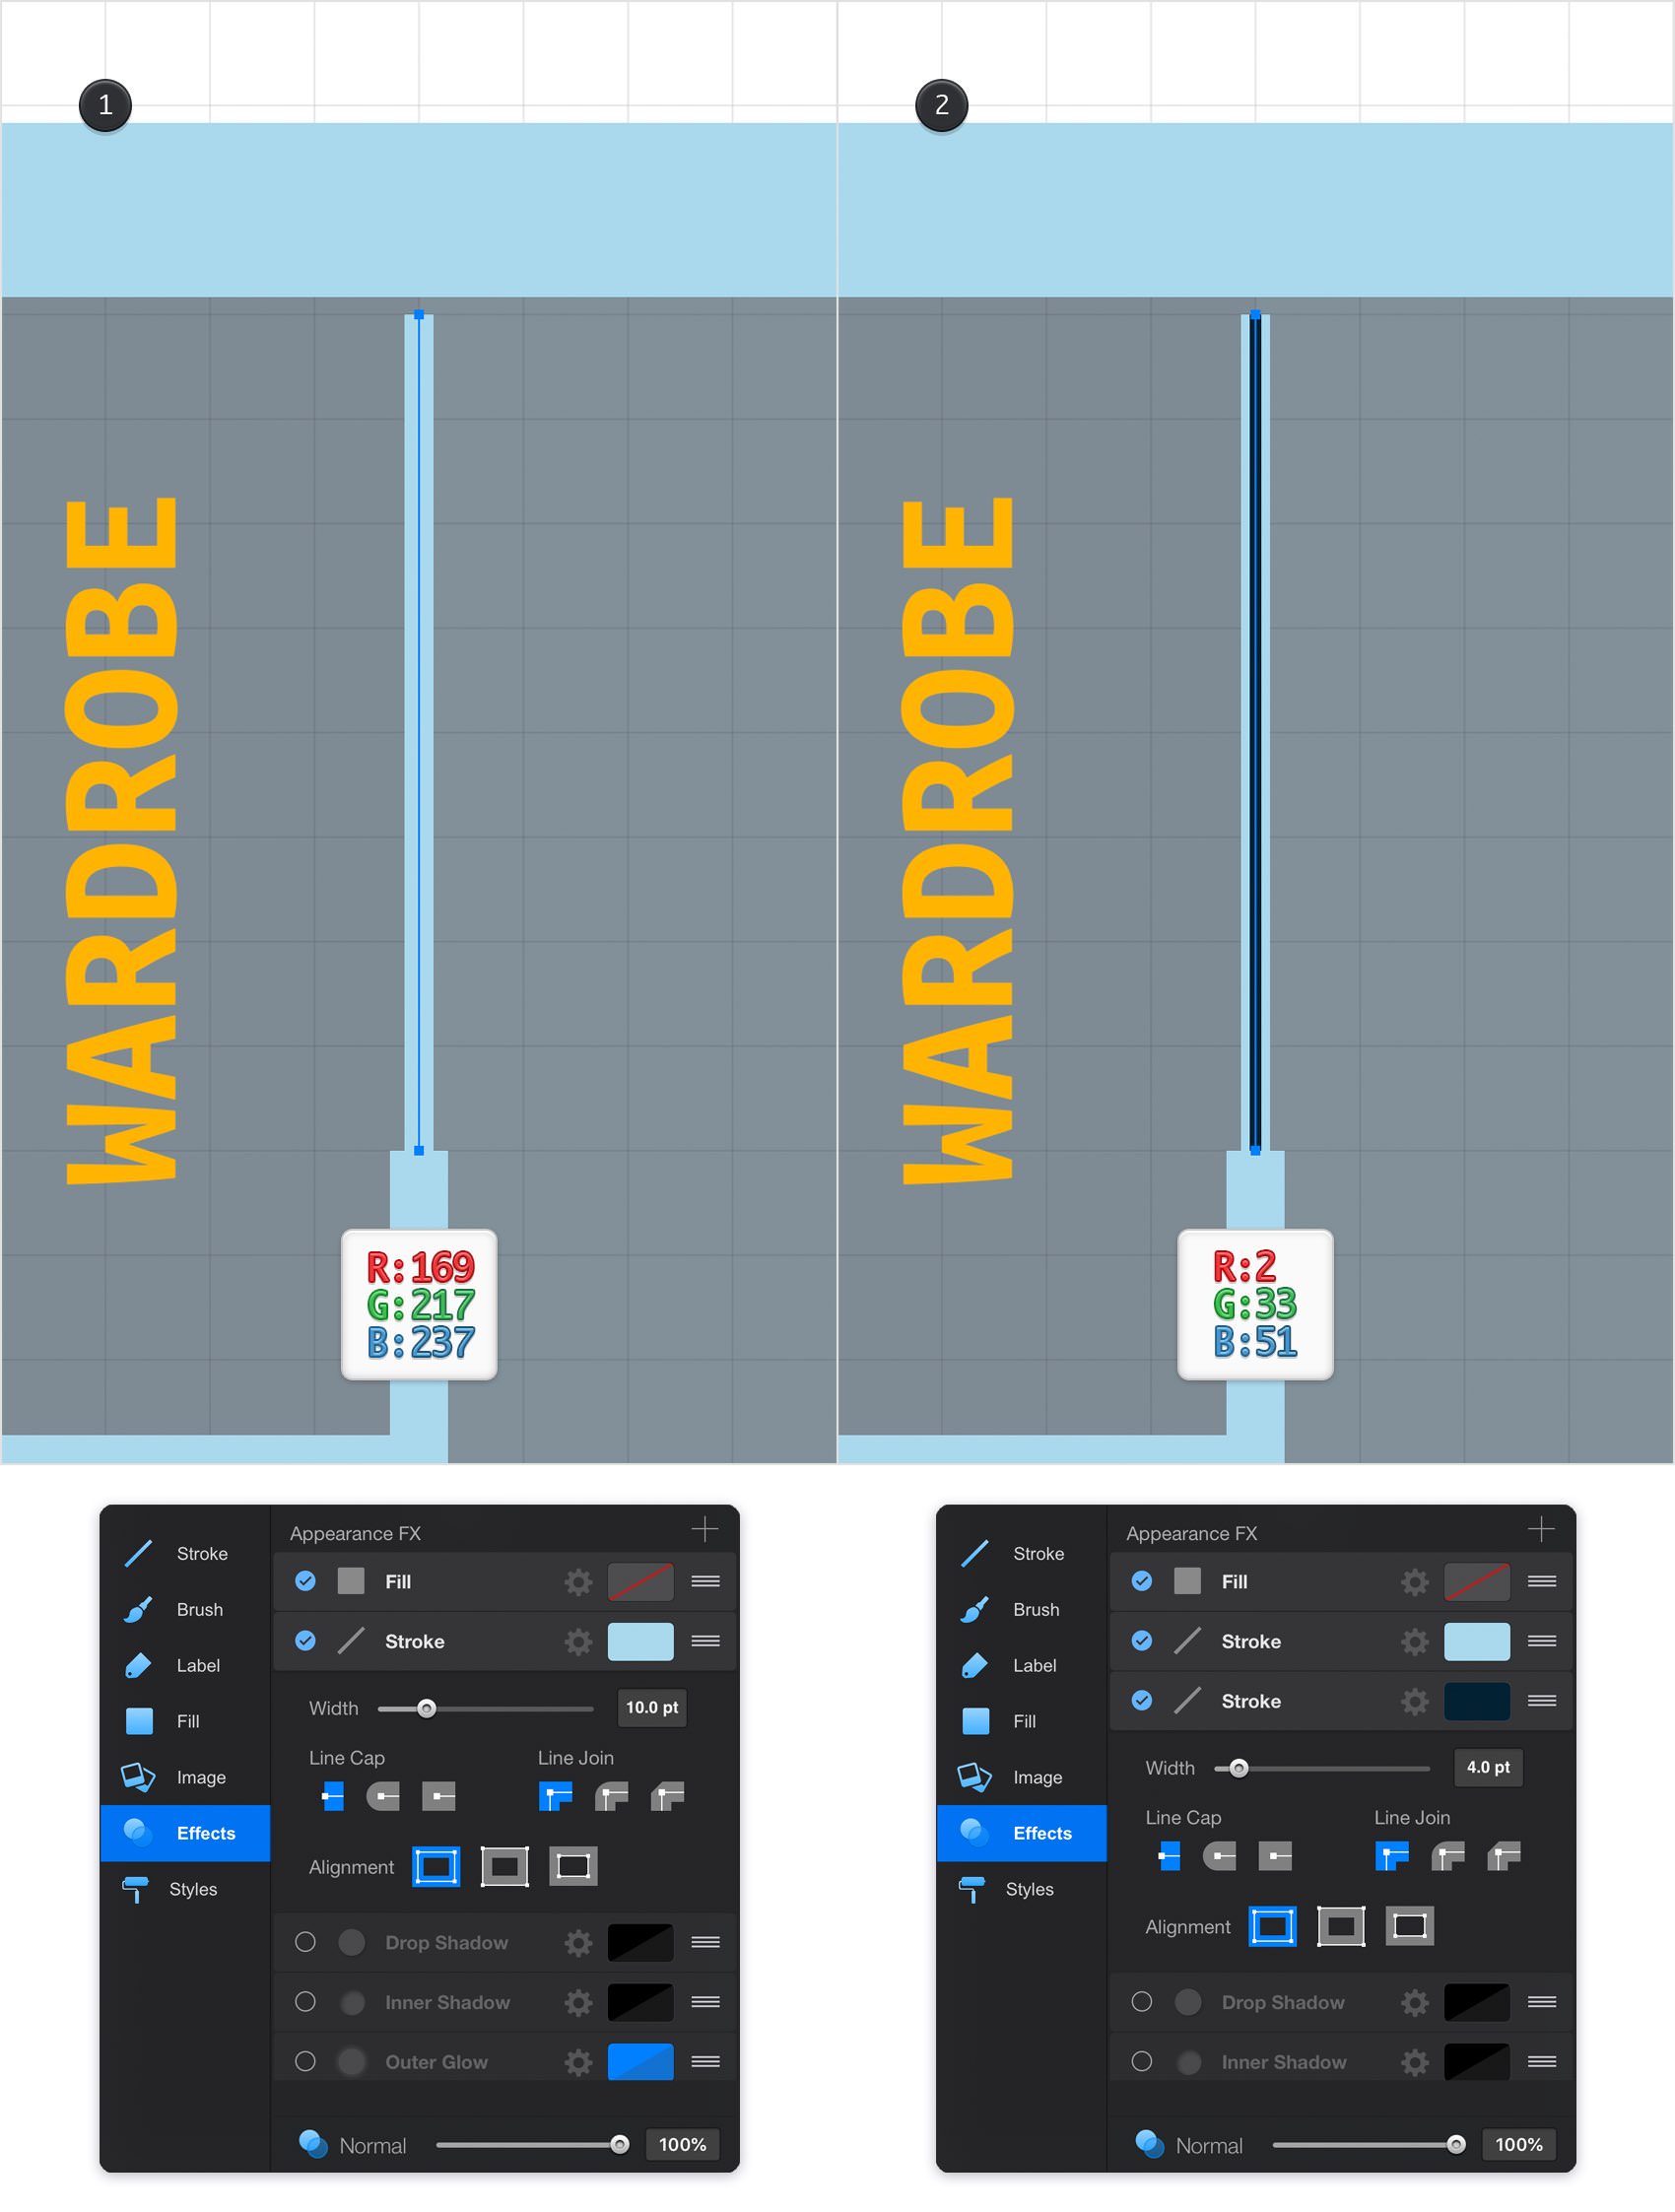
Step 26
Return to the Layers panel and add a new layer using that same plus button. Select this new layer, rename it "doors" and drag in the the top of the panel.
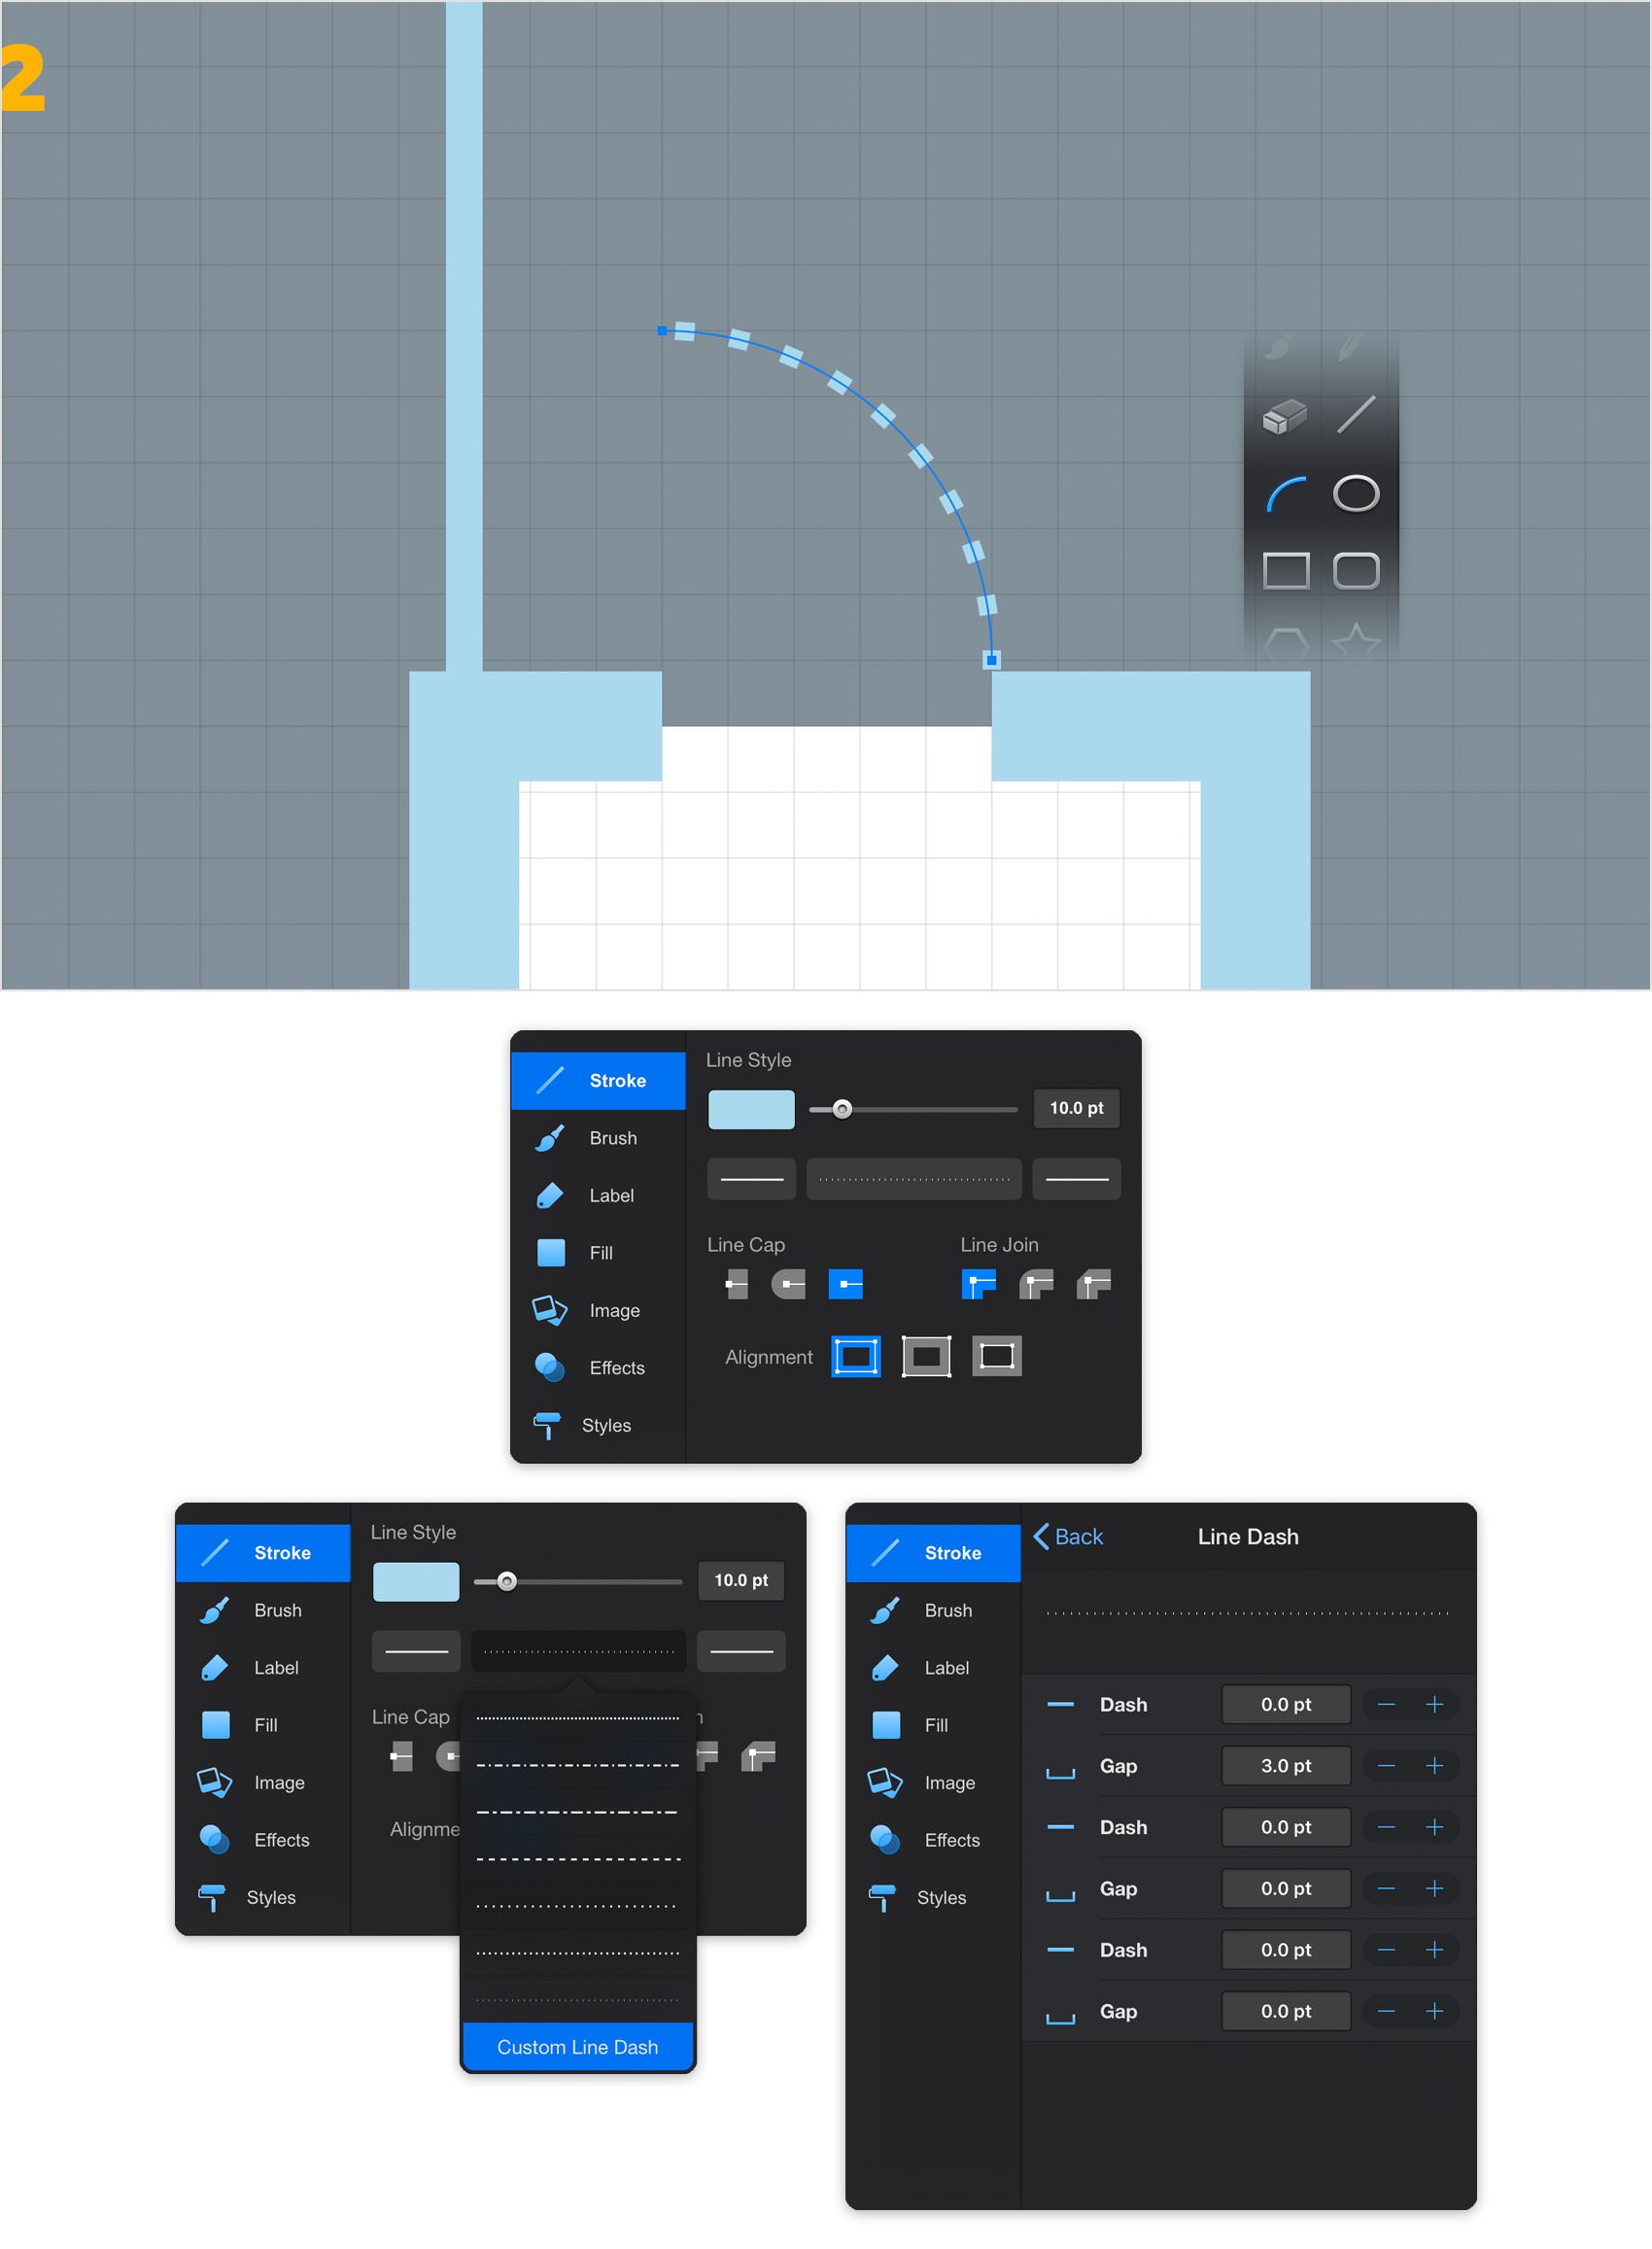
Pick the Arc Tool, move to your canvas and focus on the entry door. Tap and hold with a second finger while dragging to create a perfect, 25 ft arc as shown in the following image. Make sure that this path remains selected and move to the Stroke pane.
Set the stroke Width to 10 pt and use your light blue for the stroke color. Open the Line Dash pane to create a custom line dash style. Enter 1 pt in the top Dash box and 2 pt in the top Gap box and you will end up with a nice, dashed path as shown in the following image.
Step 27
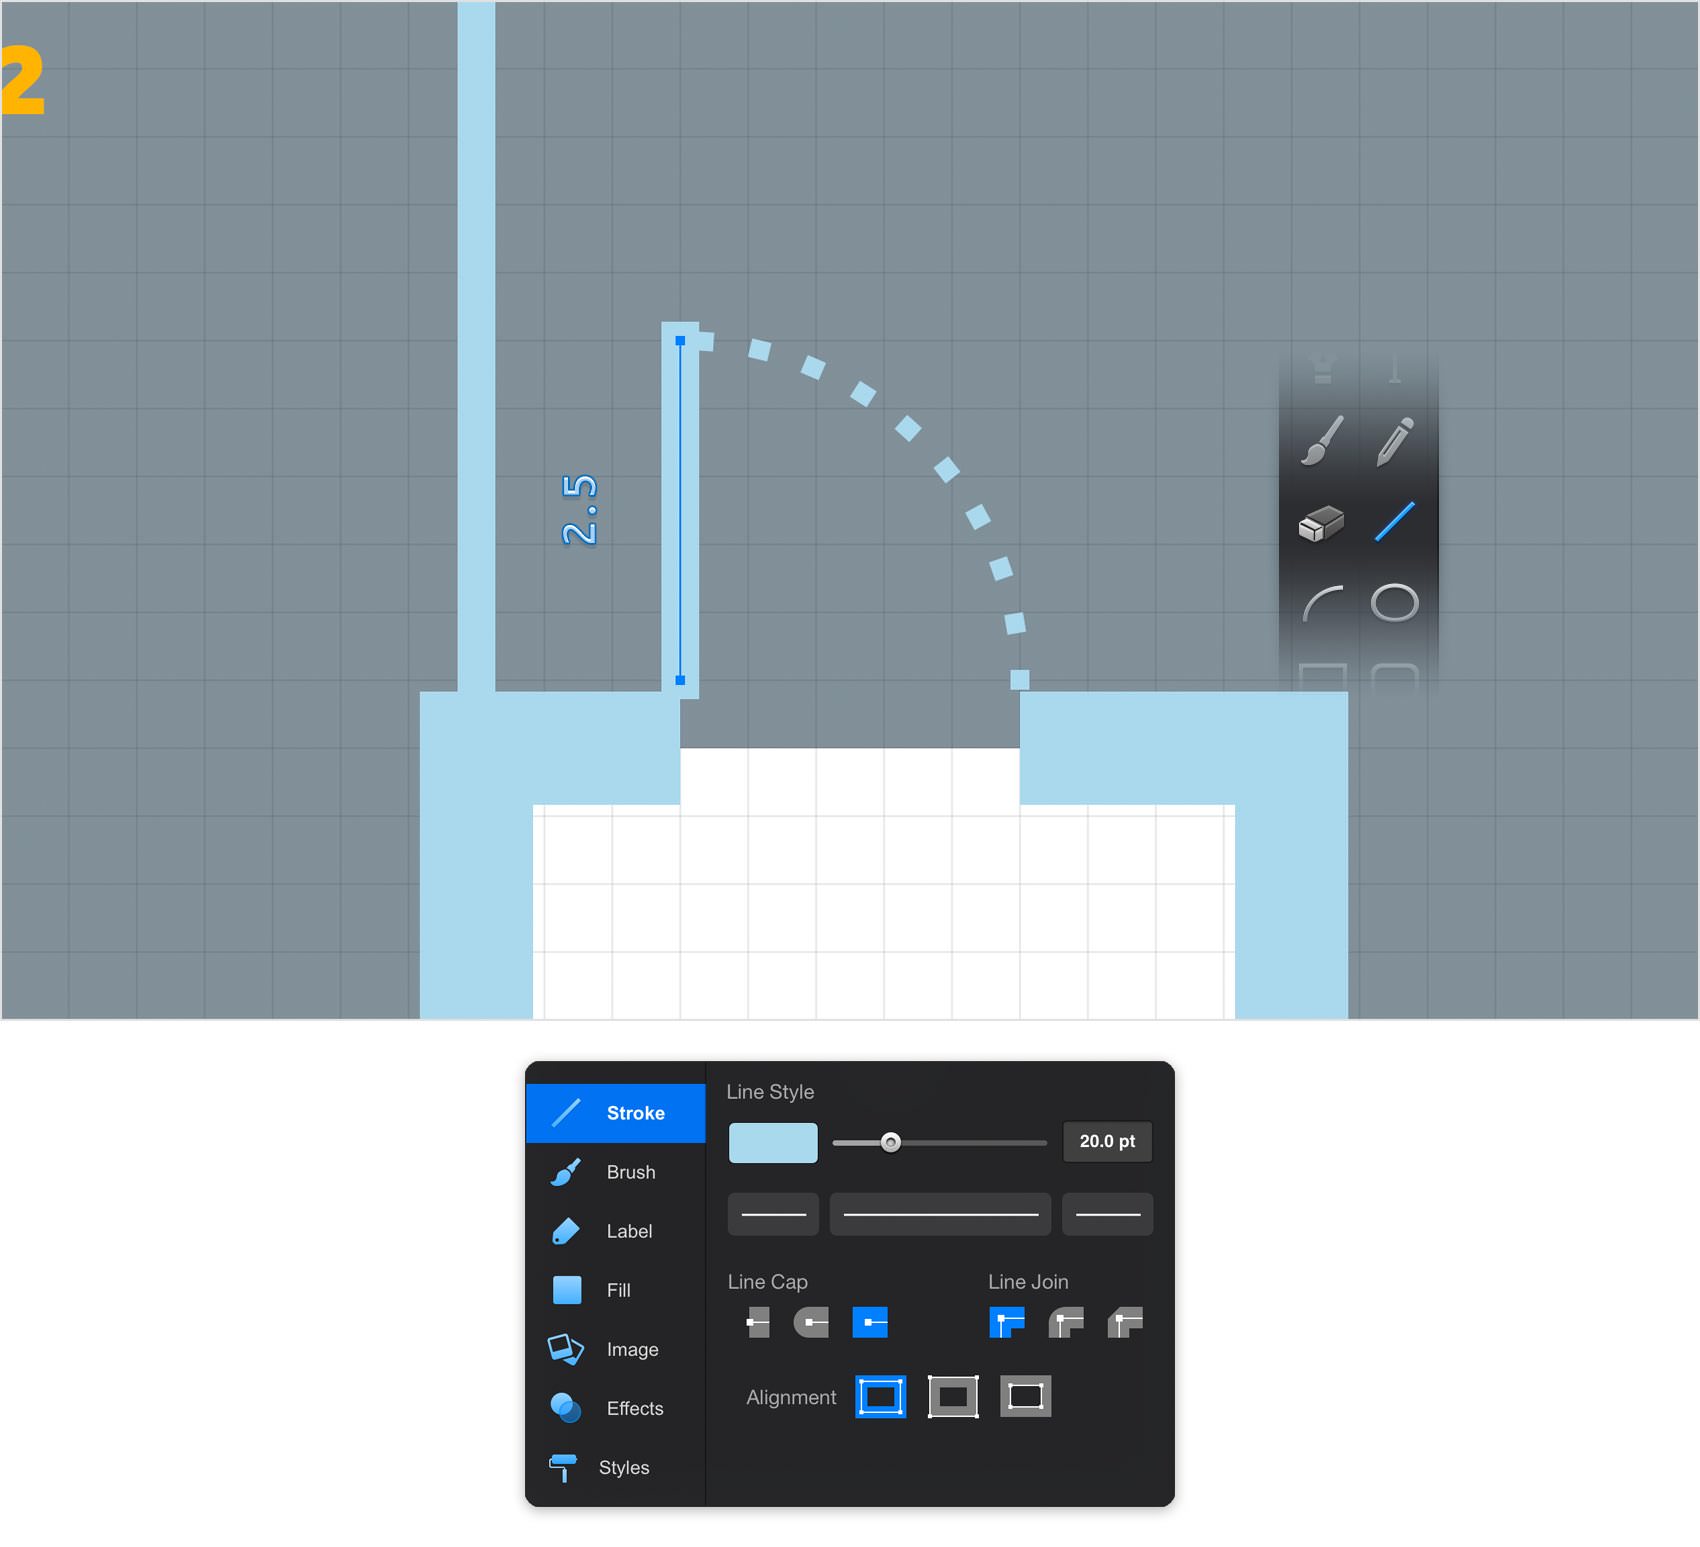
Using the Line Tool , create a 2.5 ft path and place it exactly as shown in the following image. Make sure that it stays selected and move to the Effects pane. Add your light blue for the color, drag the Width slider to 20 pt and don't forget to check that Projecting Cap button.
Step 28
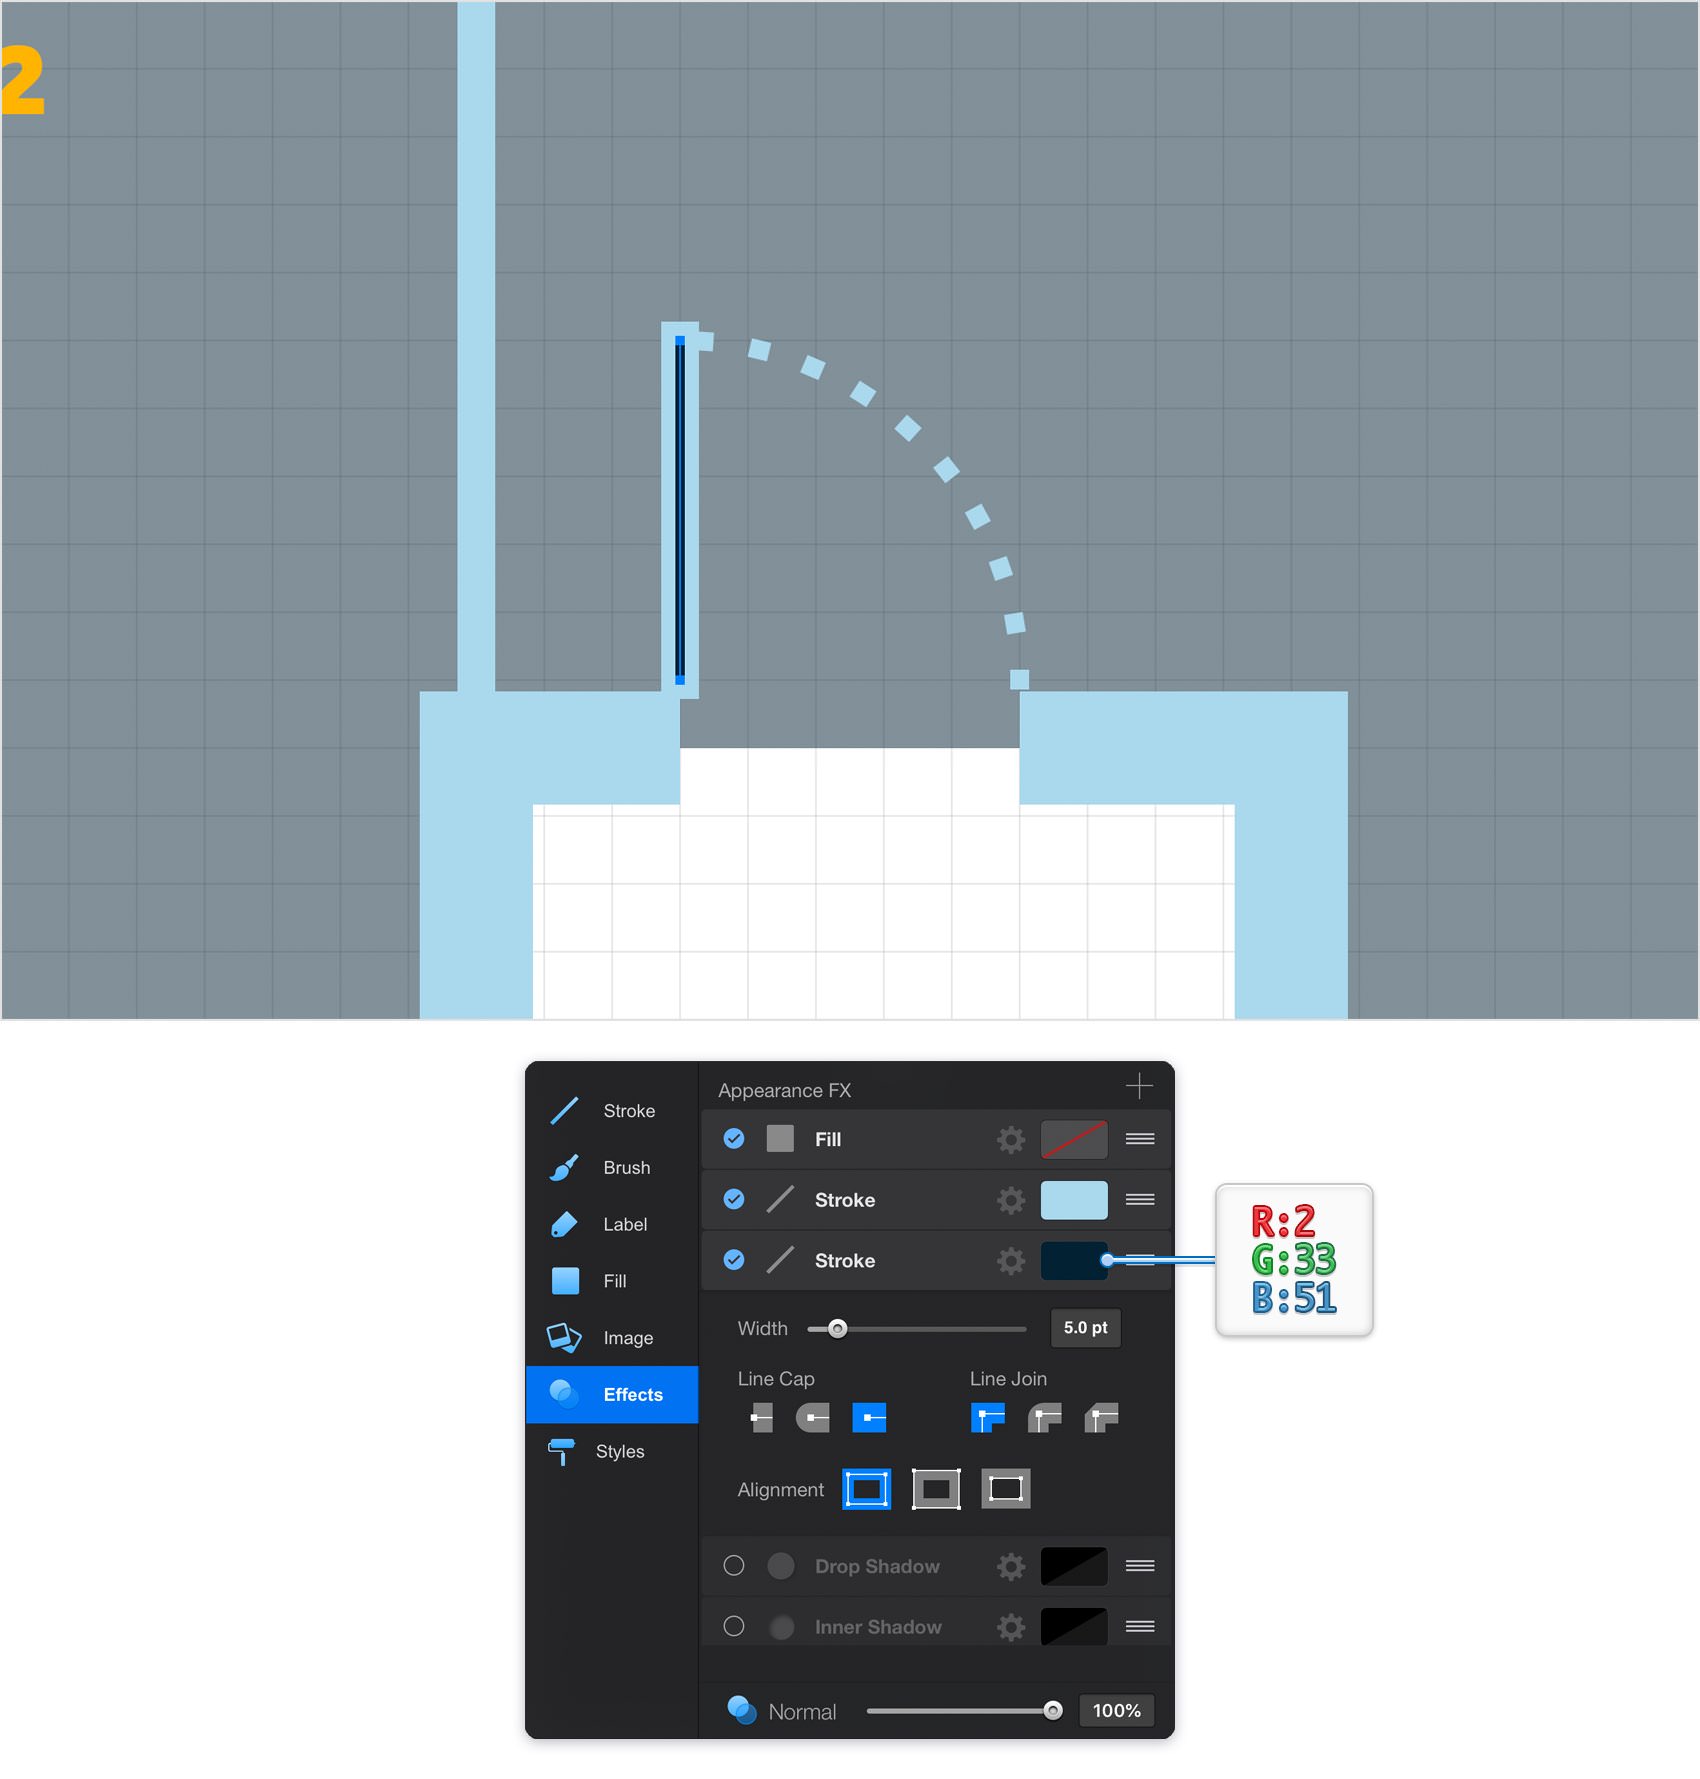
Make sure that the vertical path made in the previous step is still selected and keep focusing on the Effects pane. Tap the settings icon that stands for the existing stroke and then tap the Duplicate command to easily duplicate that particular attribute. Select the newly added stroke and make sure that it lies below the existing one. Lower its Width to 5 pt and replace the existing color with your dark blue.
Step 29
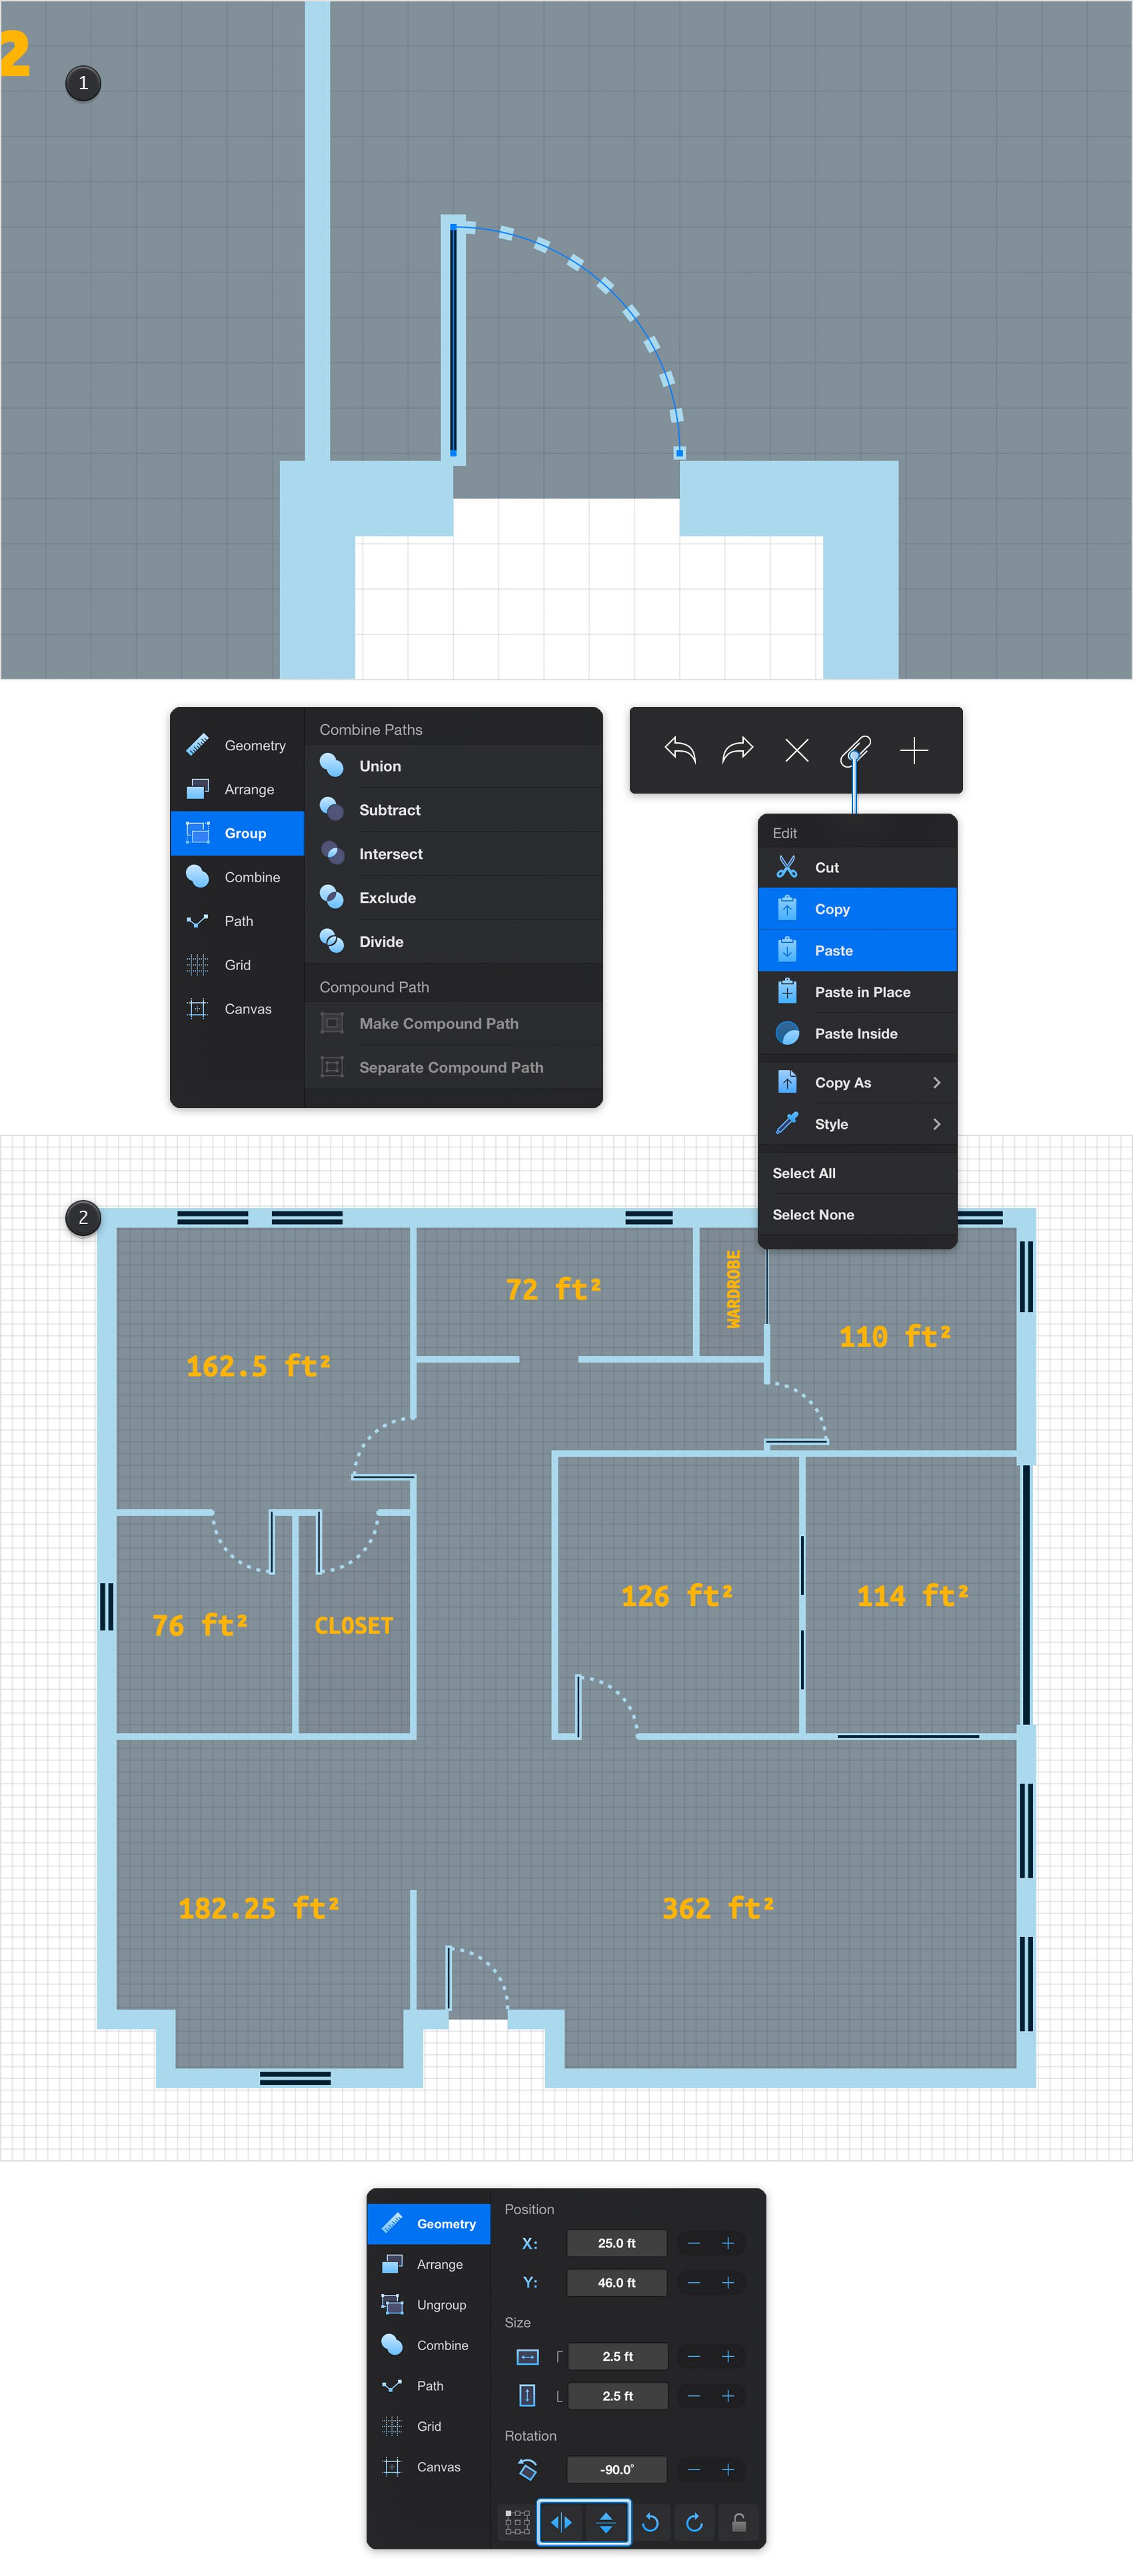
Select the arc and the vertical path that make up your door and group then using the Group command from the Properties panel. Grouping these objects will make it easier for you to manipulate them together as a single object.
Now, multiply your group and spread the copies as shown in the following image. You can duplicate duplicate your group using the Copy and Paste buttons from the Edit pane. In some case you will need to flip your door group. This can be easily done using the flip buttons from the Geometry panel.
Step 30
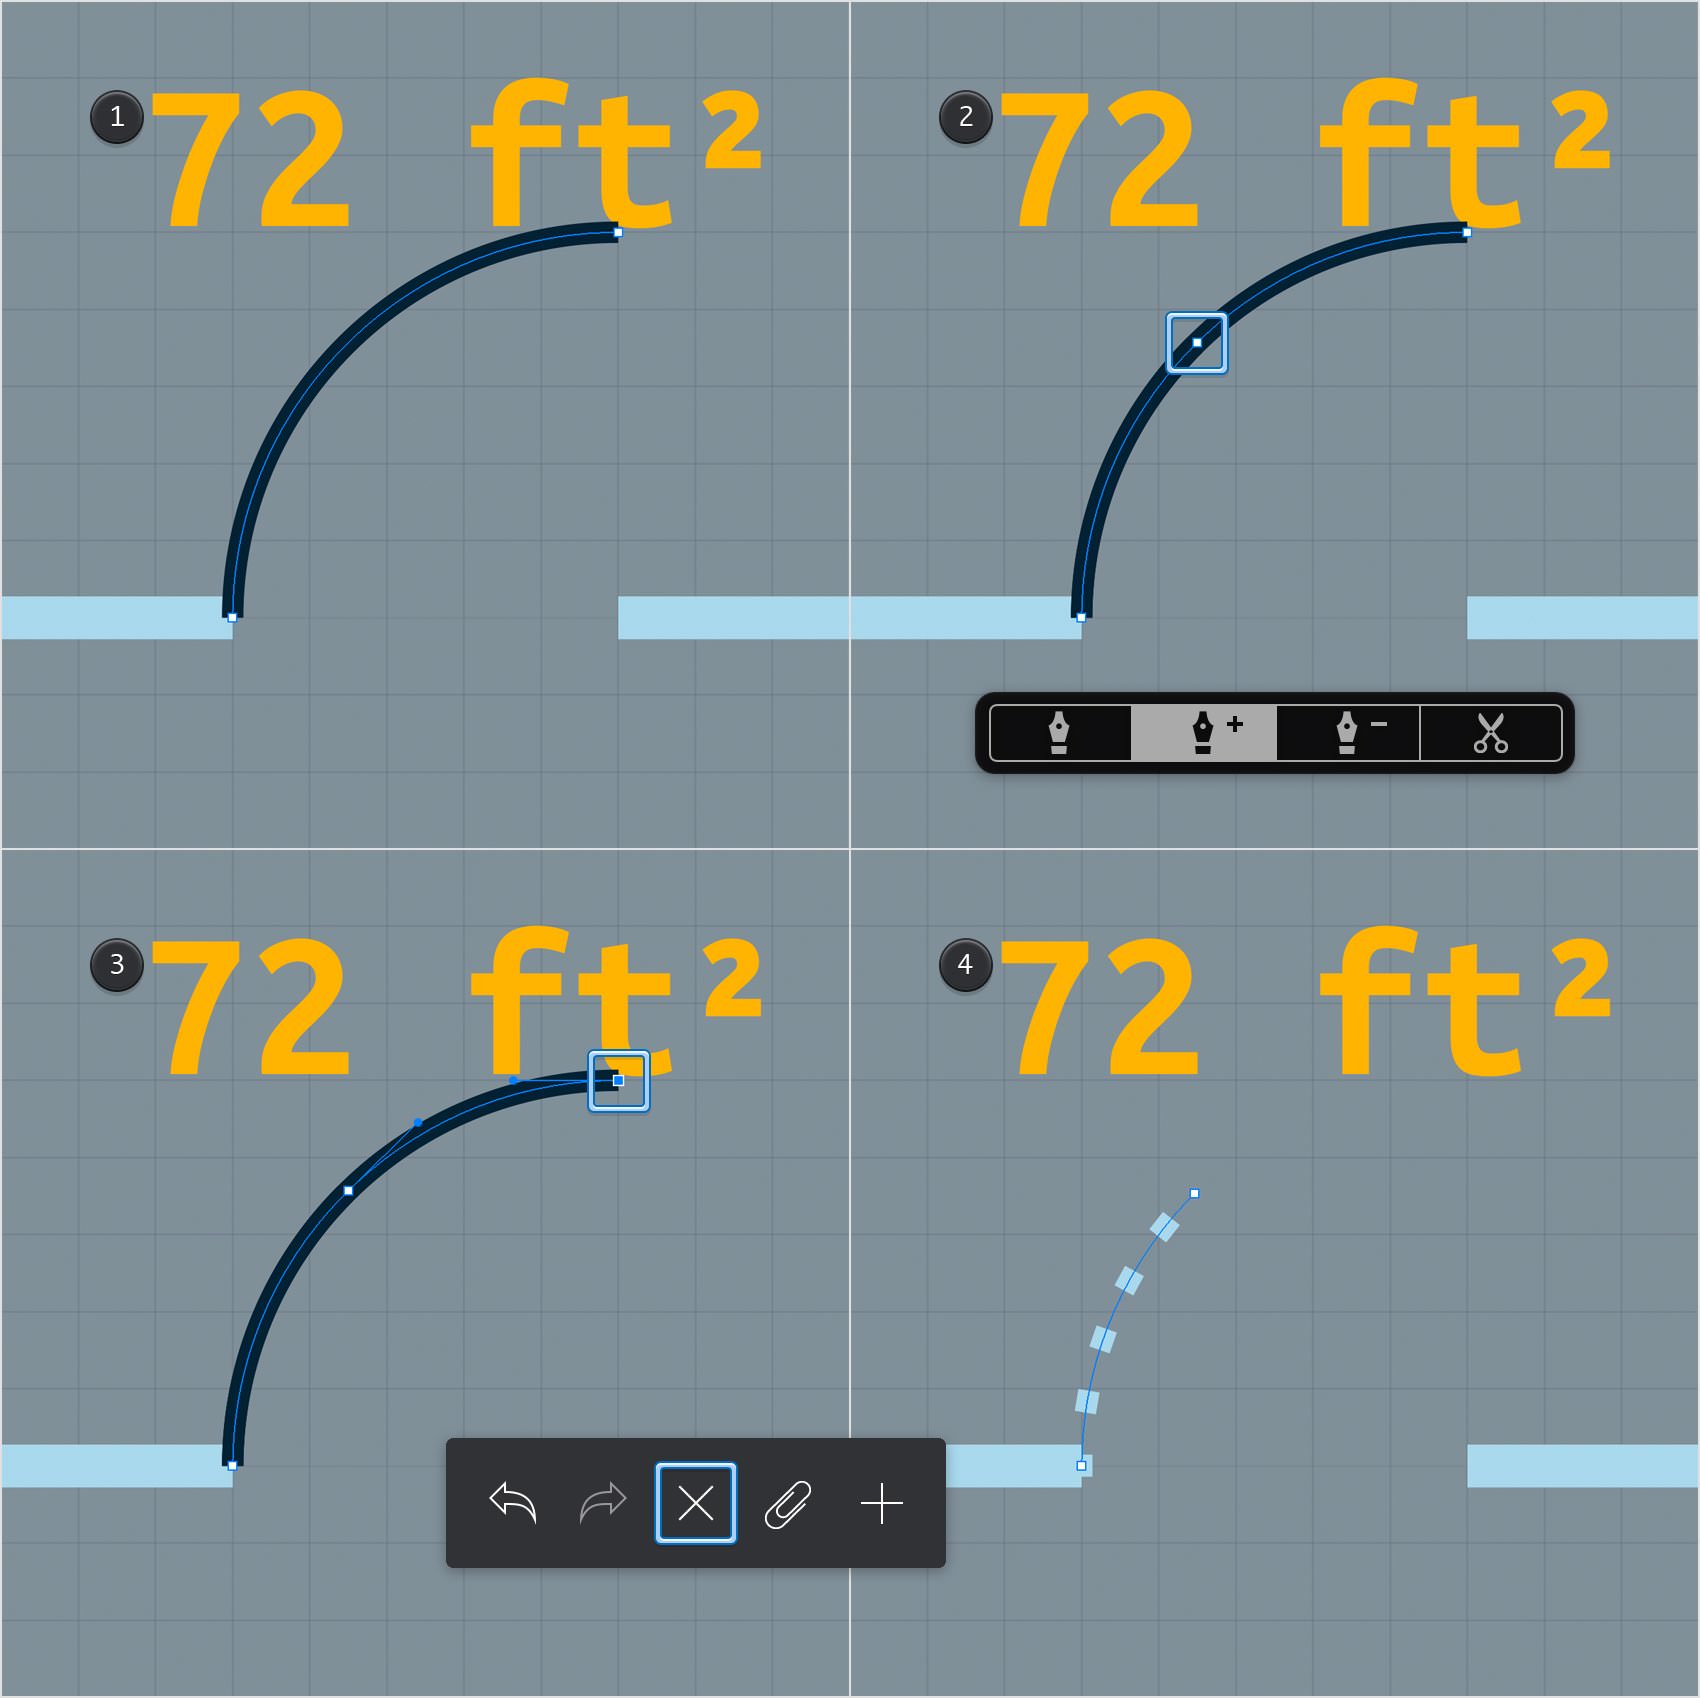
Alternatively, you can create a half opened door using that same Arc Tool. Create a new, 25 px arc, make sure that its perfect and add a random stroke color.
Switch to the Pen Tool, activate the Add Point mode and then tap in the middle of your arc to add a new anchor point as show in the second image.
Pick the Path Selection Tool and select the right anchor point that makes up your new arc. Move to the right side of your Titlebar and tap the Delete button to get rid of that selected point.
Use the Copy Style and Paste Style buttons from the Edit pane to copy the style used for one of the other arcs and paste it unto the arc created in this step.
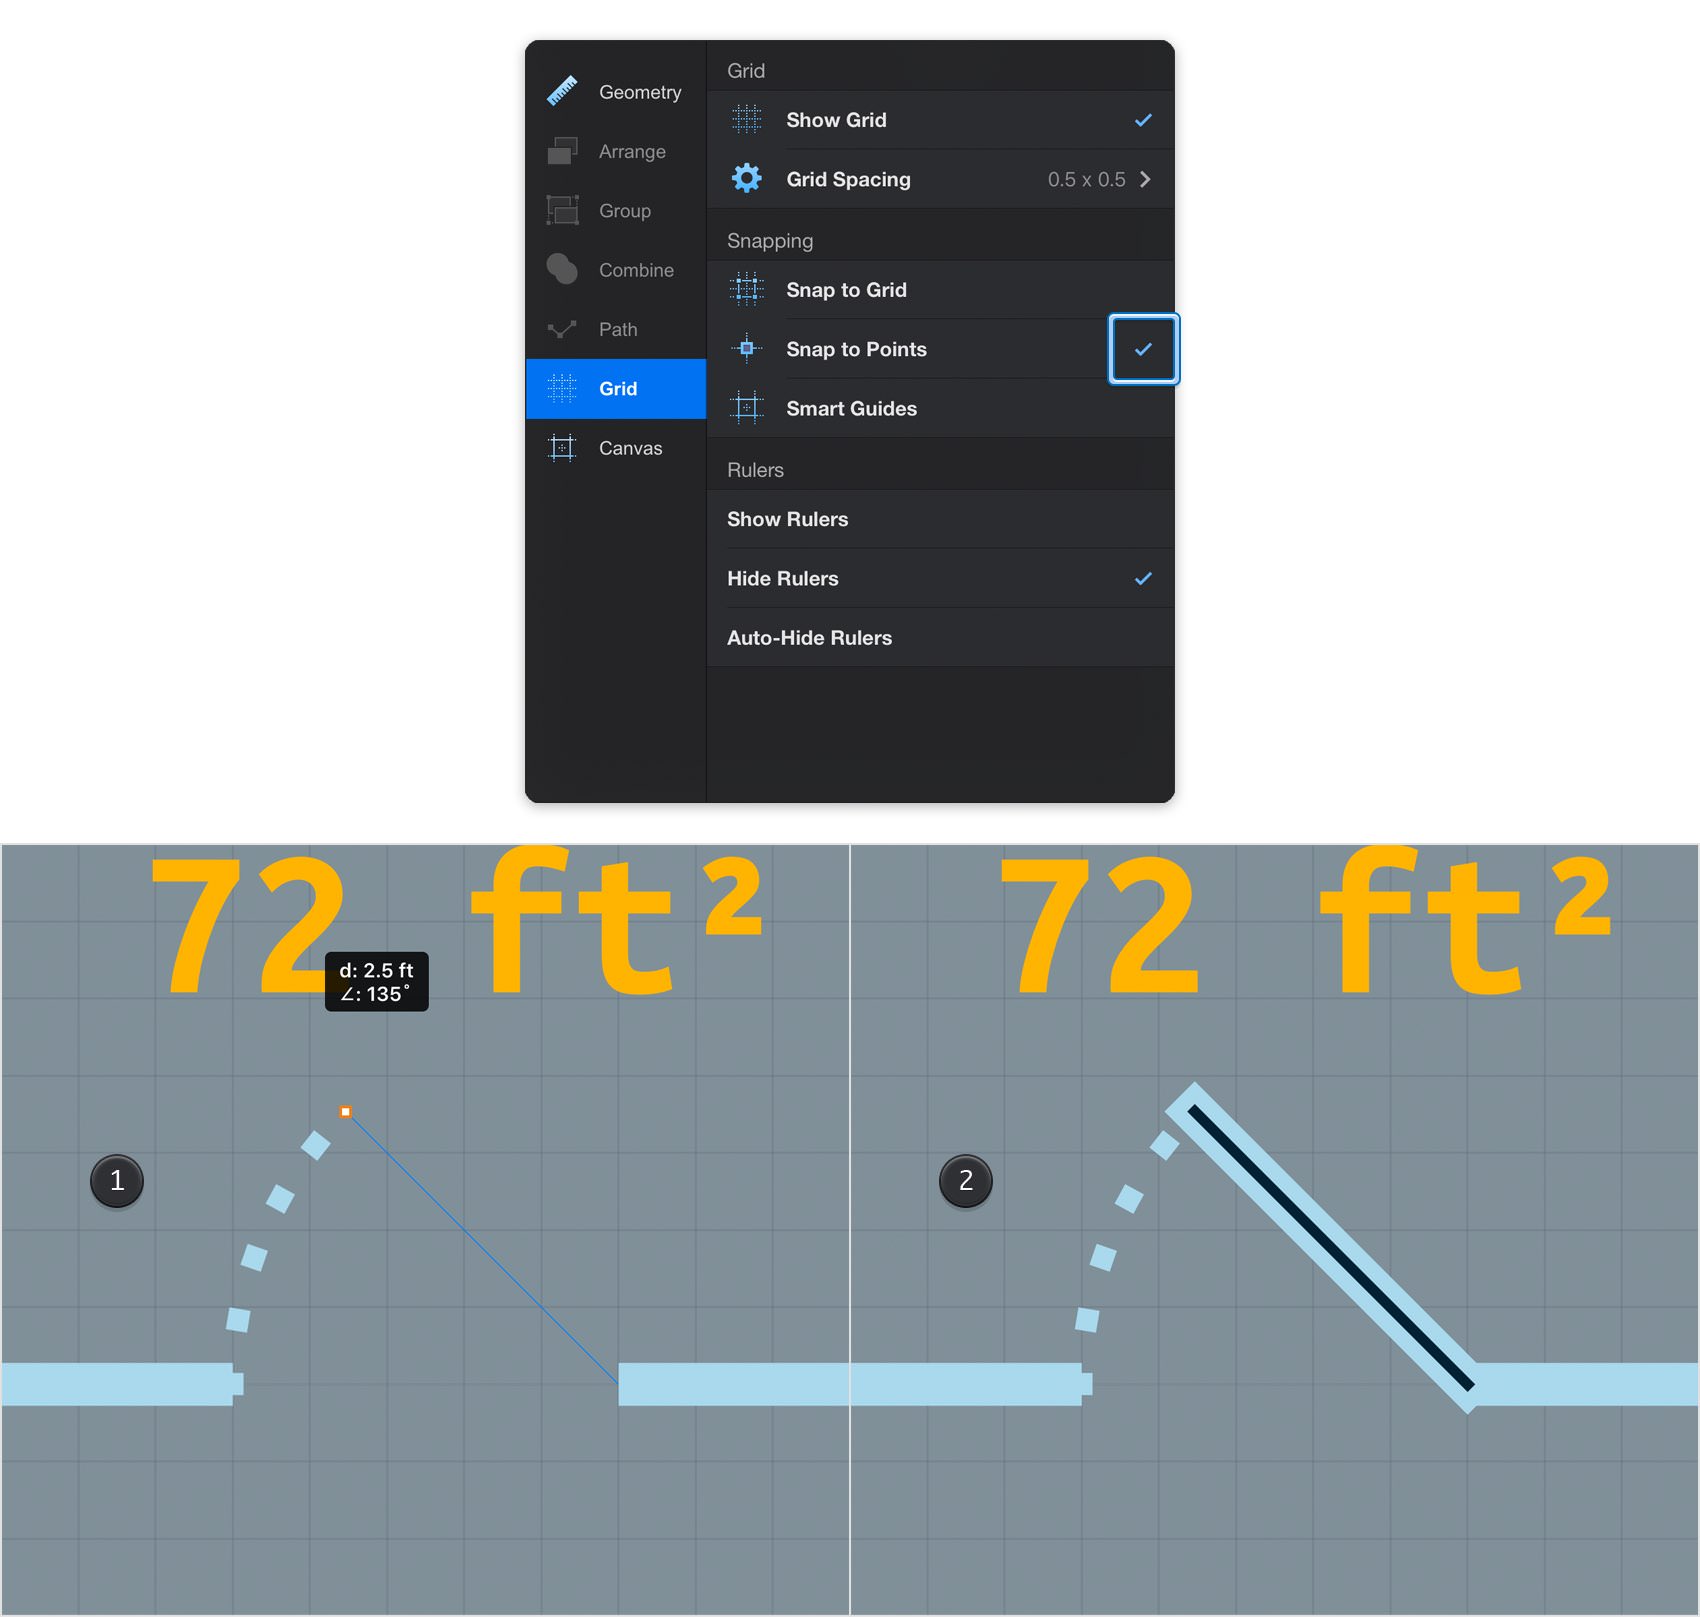
Open the Grid pane, disable the Snap to Grid and enable the Snap to Points feature.
Using the Line Tool, create a simple oblique path that will connect your newest arc with the path that makes up the wall. Again, copy the style used for one of the straight paths that make up your opened doors and paste it into this oblique path.
Step 31
Enable the Snap to Grid. Return to the Layers panel and add a new layer using that same plus button. Make sure that this new layer stays selected, rename it "dimension" and drag in the the bottom of the panel.
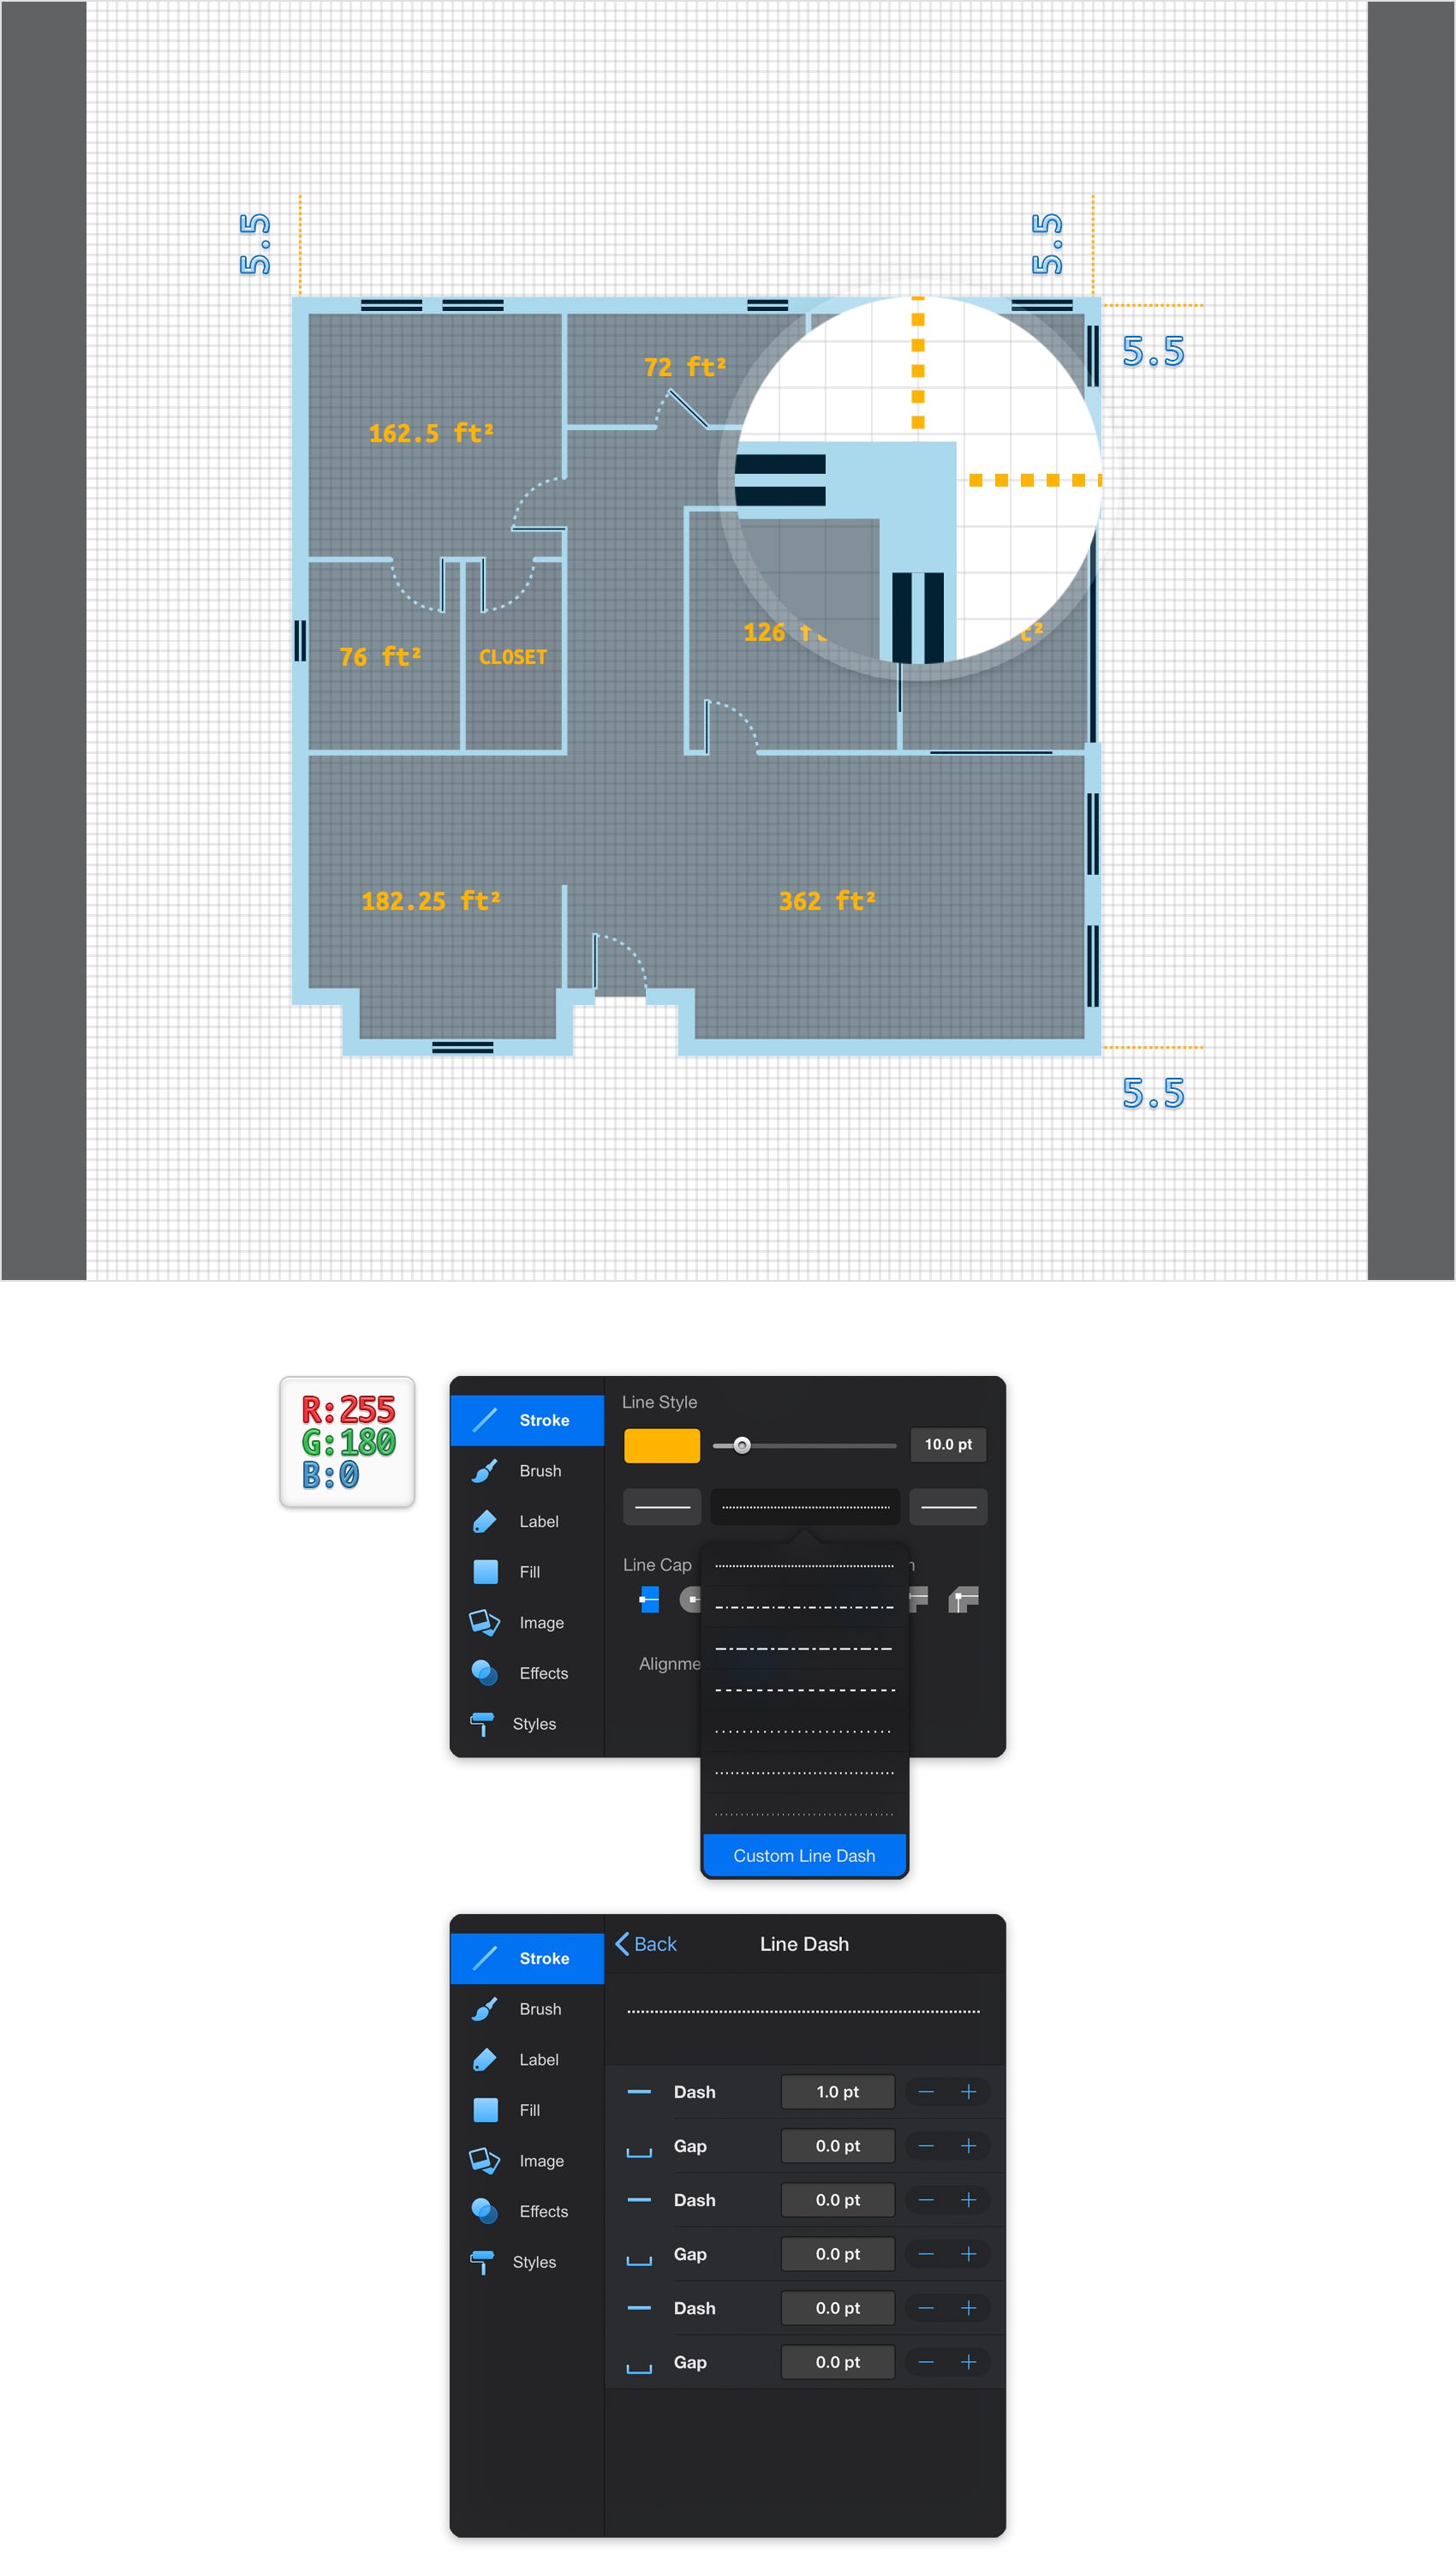
Using the Line Tool, create four, 5.5 ft lines (two vertical and two horizontal) and place them as shown in the following image. Make sure that all these lines remain selected and go to the Stroke pane. Tap the Stroke color well and add your yellow from the Color Palette, set the Width to 10 pt and then move to the Line Dash pane and add the dash style checked in the following image.
Step 32
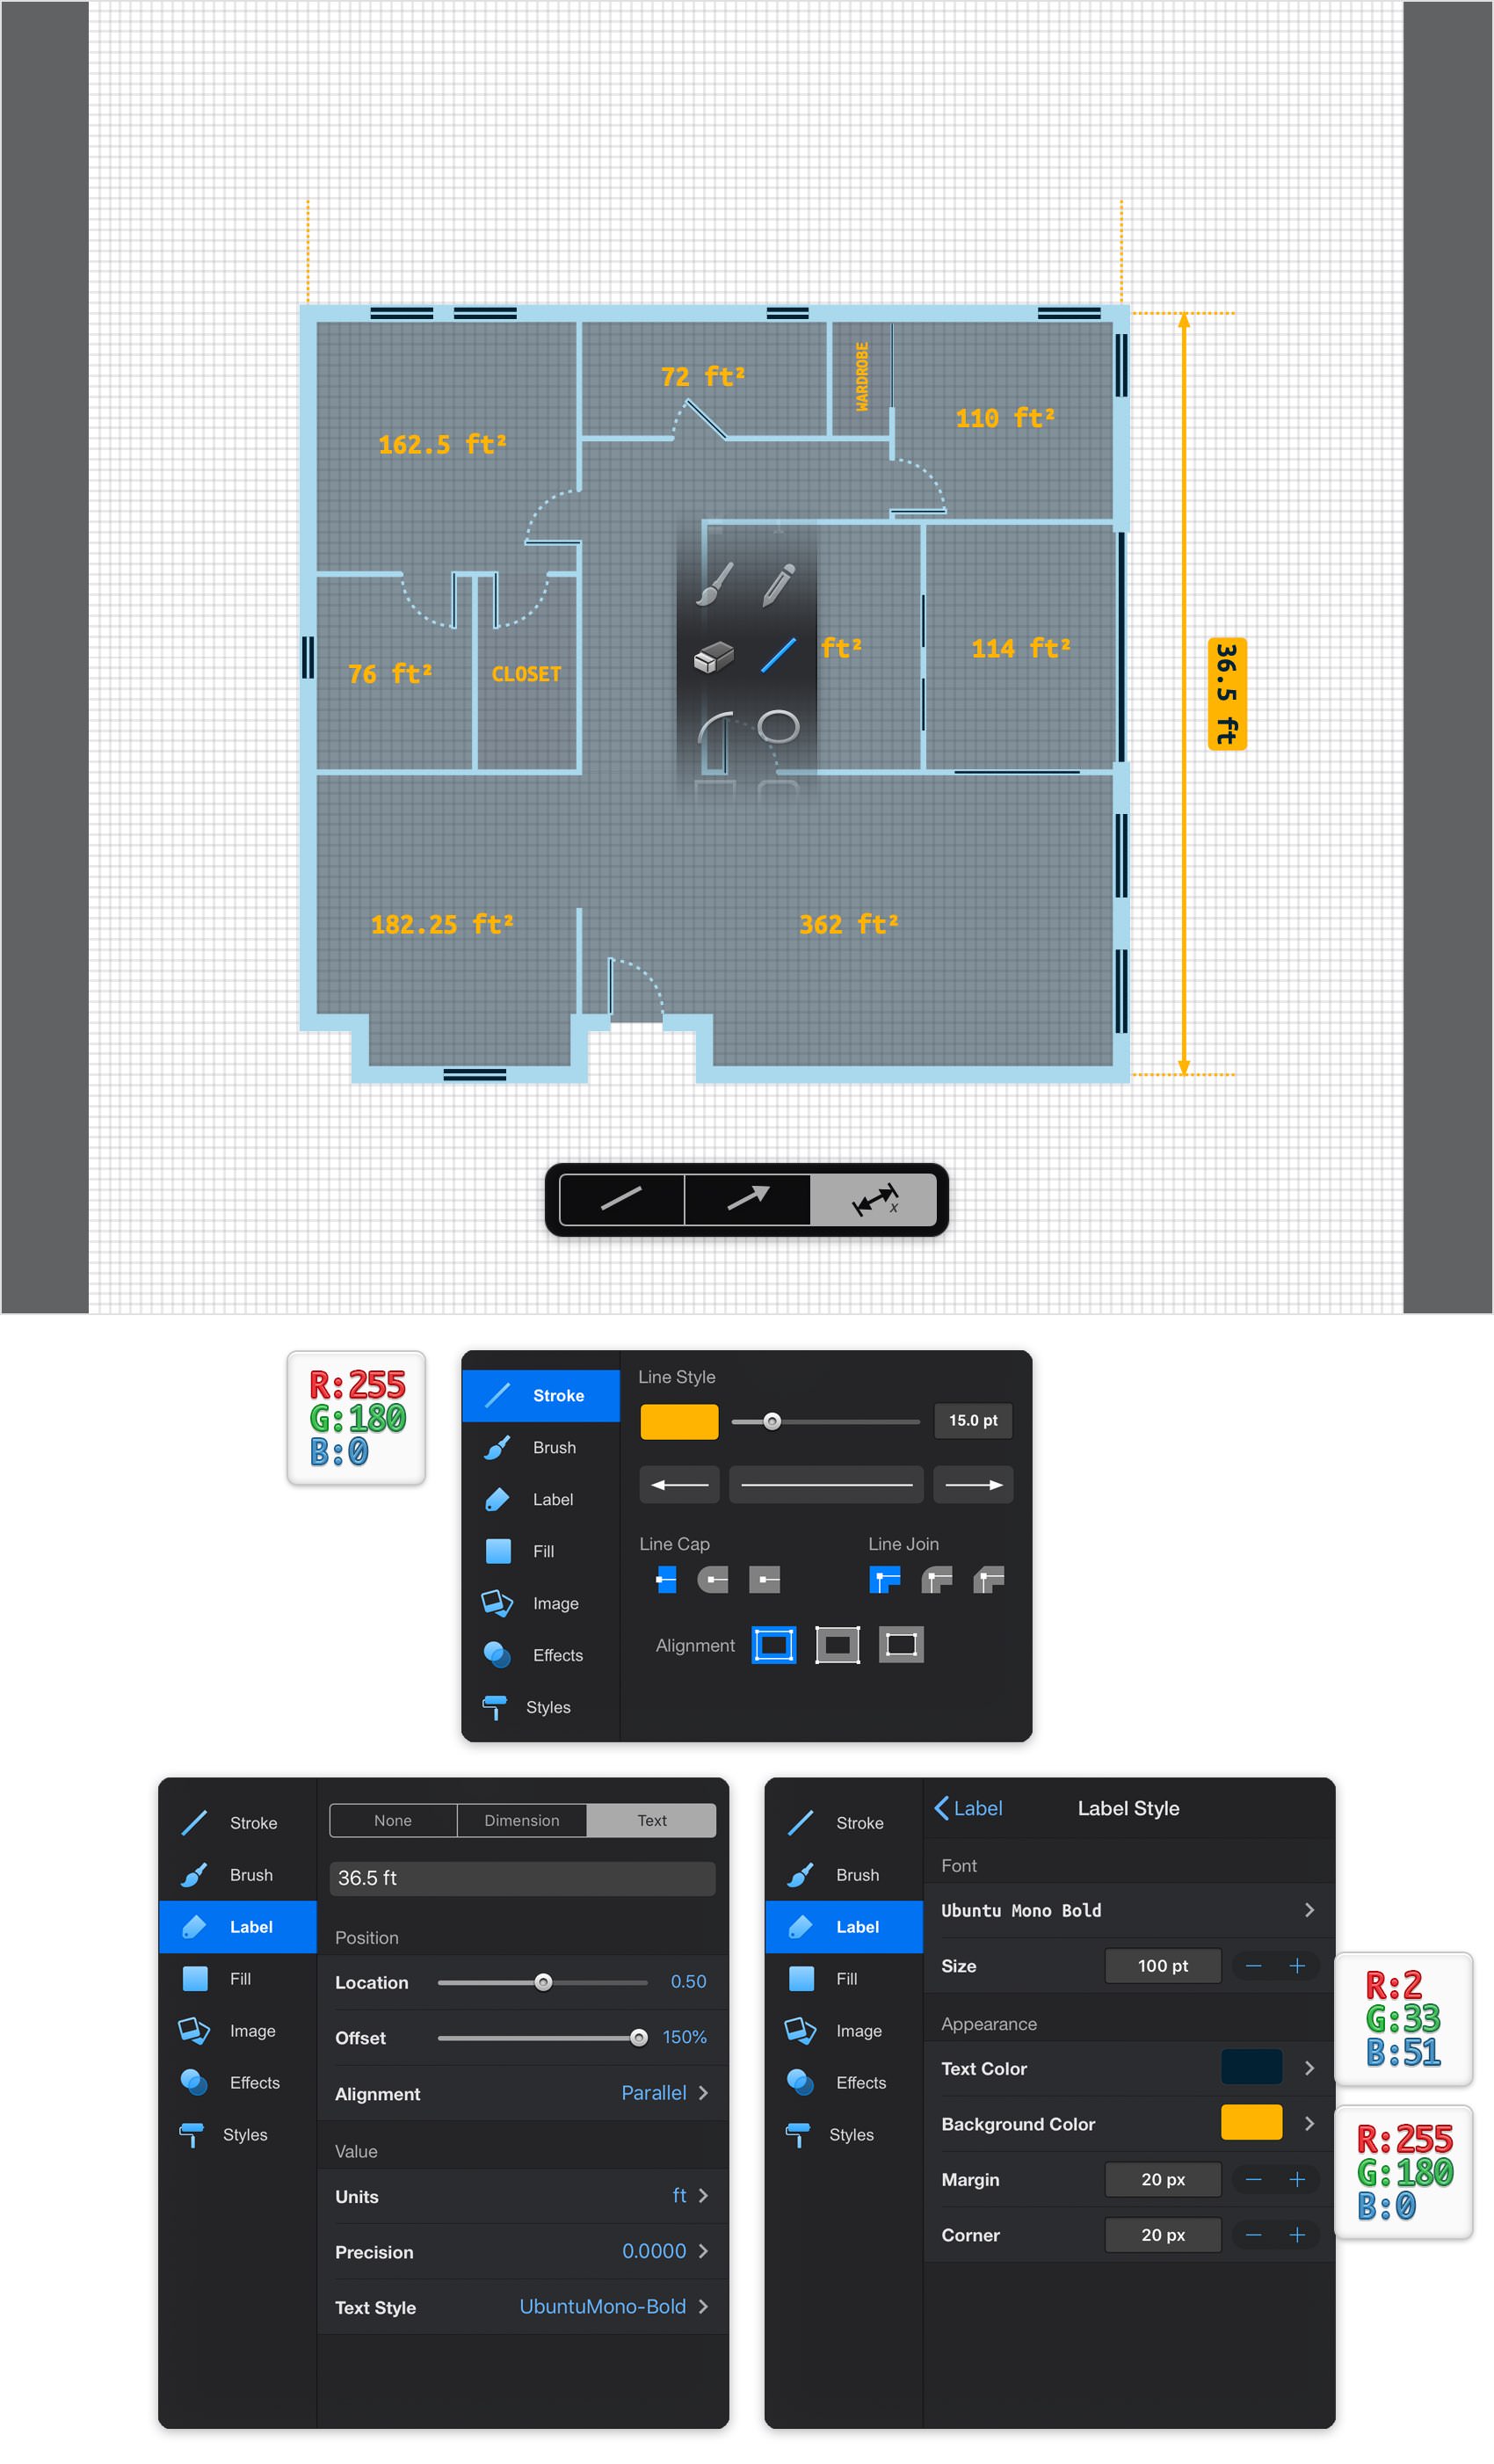
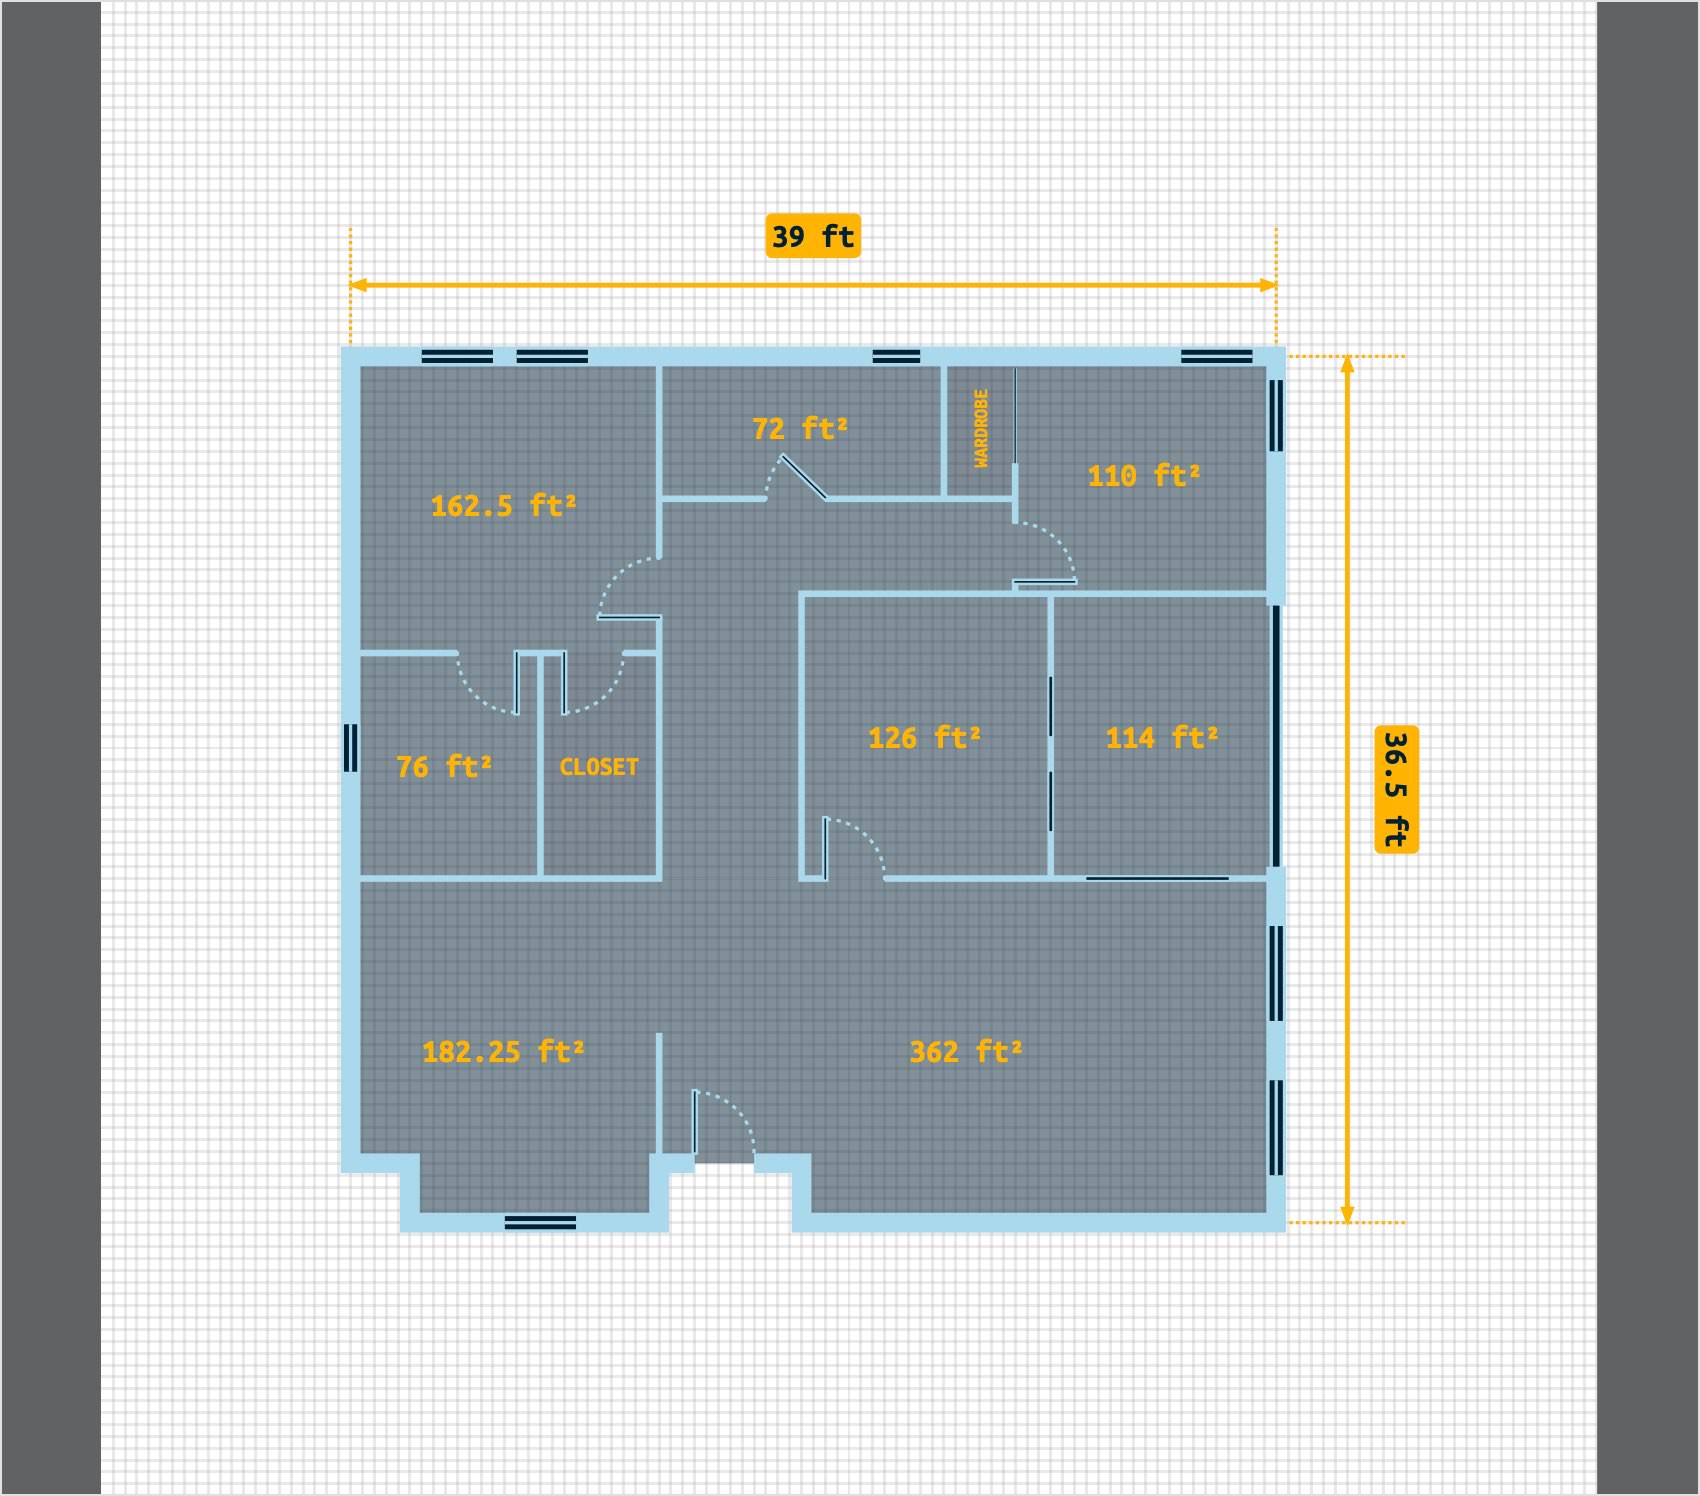
Pick the Line Tool, focus on the tool pane and check the Dimension Line mode. Create a 36.5 ft, vertical path and place it as shown in the following image.
Make sure that your new path remains selected and go to the Stroke pane. Tap that Stroke color well and replace the existing color with your yellow, set the Width to 15 pt and then move to the Label pane. By default your label should be set to Dimension and Length. Select Parallel for the Alignment attribute and then adjust the Location and Offset properties about as shown below.
Once you're done move to the Text Style pane to adjust the aspect of that label. Select that same Ubuntu Mono font, make it Bold and set the size to 100 pt. Tap the Text Color color well and replace the existing color with your dark blue and then tap the Background Color color well and add your yellow from the Color Palette. Finally, set both Margin and Corners attributes to 20 pt. In the end your yellow, dimension line should look like in the following image.
Step 33
Using that same Dimension Line mode from the Line Tool, create a 39 ft, horizontal path and place it as shown in the following image. Add the same stroke and label attributes used for the vertical dimension line. The only attributes that you will probably want to adjust will be the Offset from the Label pane. add a minus for the existing value and your label will move above the arrow as shown below.
Step 34
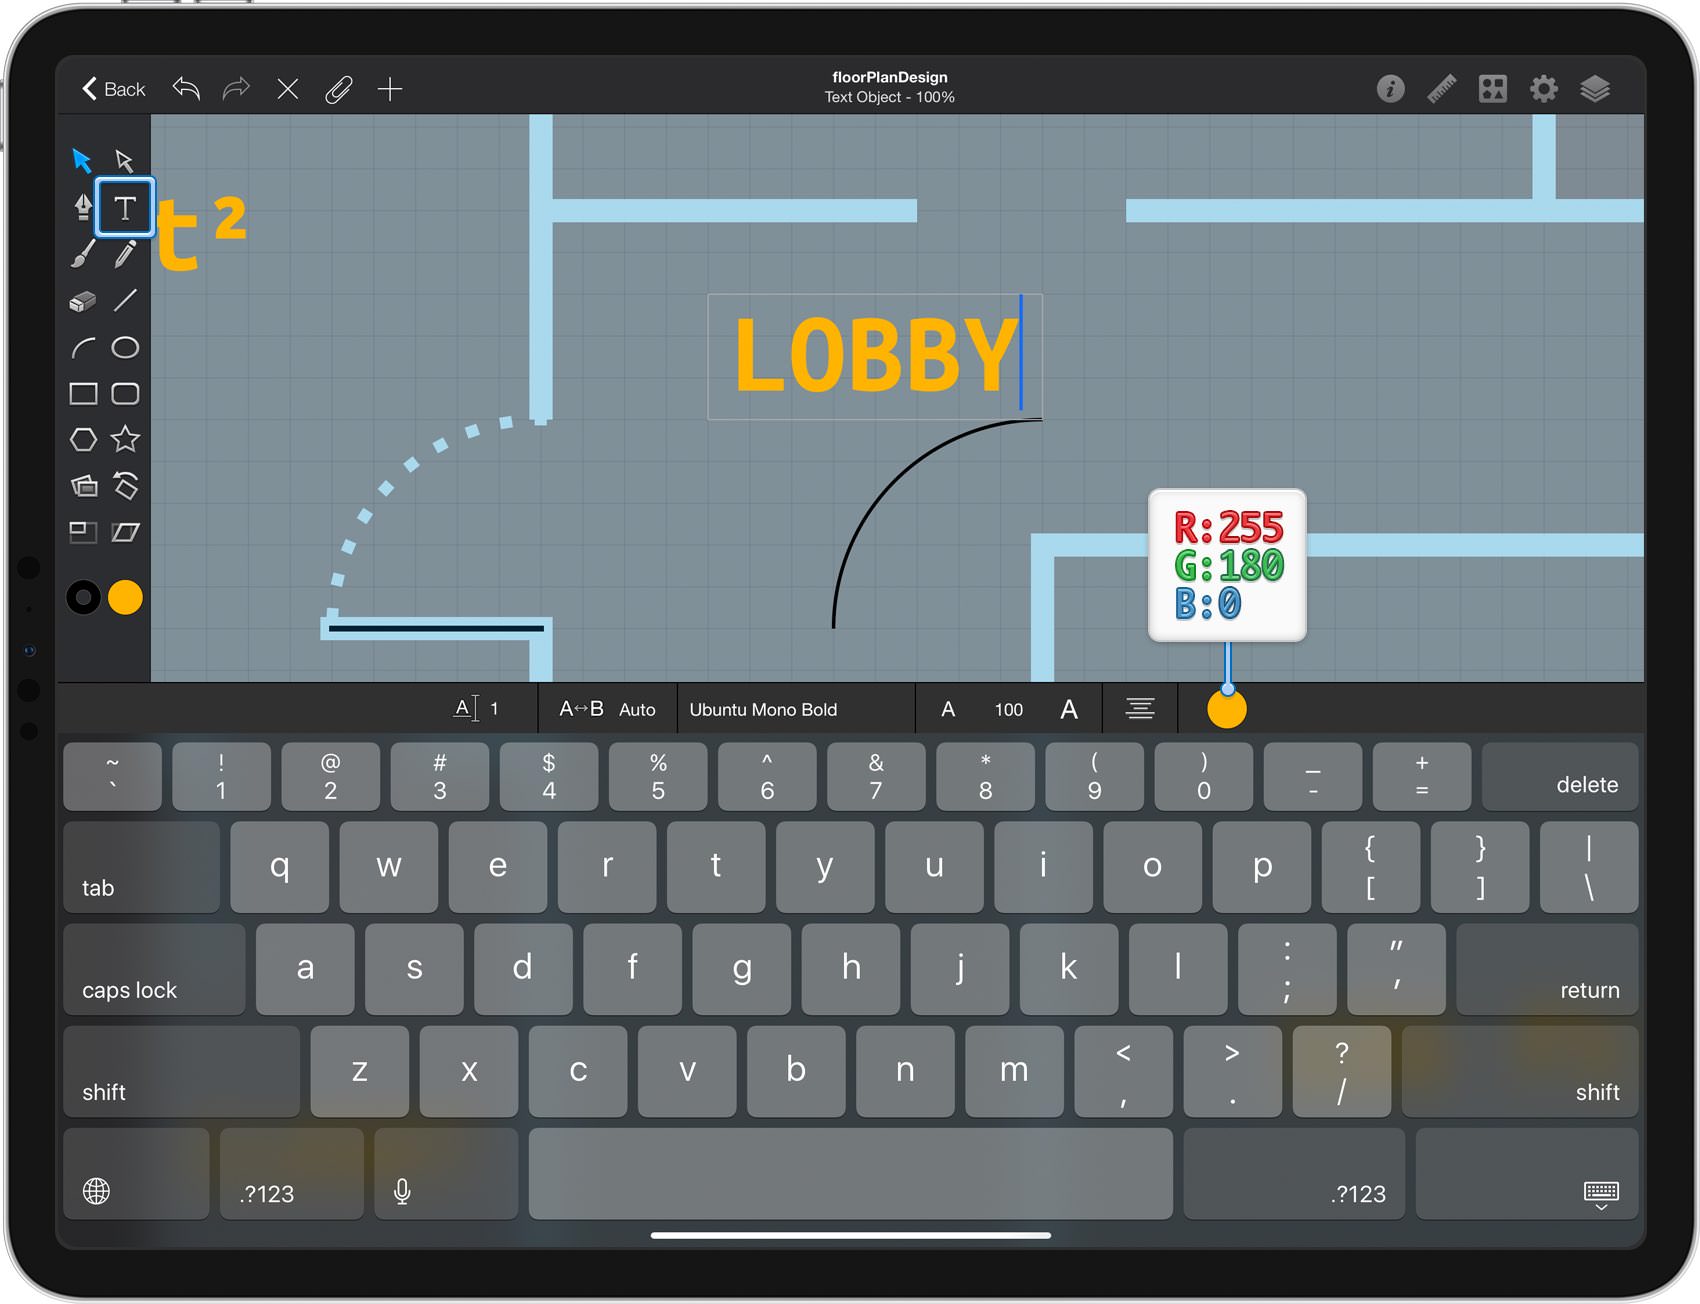
Using the Arc Tool create a 25 ft, perfect arc as shown in the first image. Don't bother to adjust its attributes.
Pick the Type Tool, double tap inside the newly made text field to open the keyboard. First, select the Ubunto Mono font, make it Bold, set the size to 100 pt and replace the existing color with your yellow. Once you're done type the "LOBBY" piece of text.
Step 35
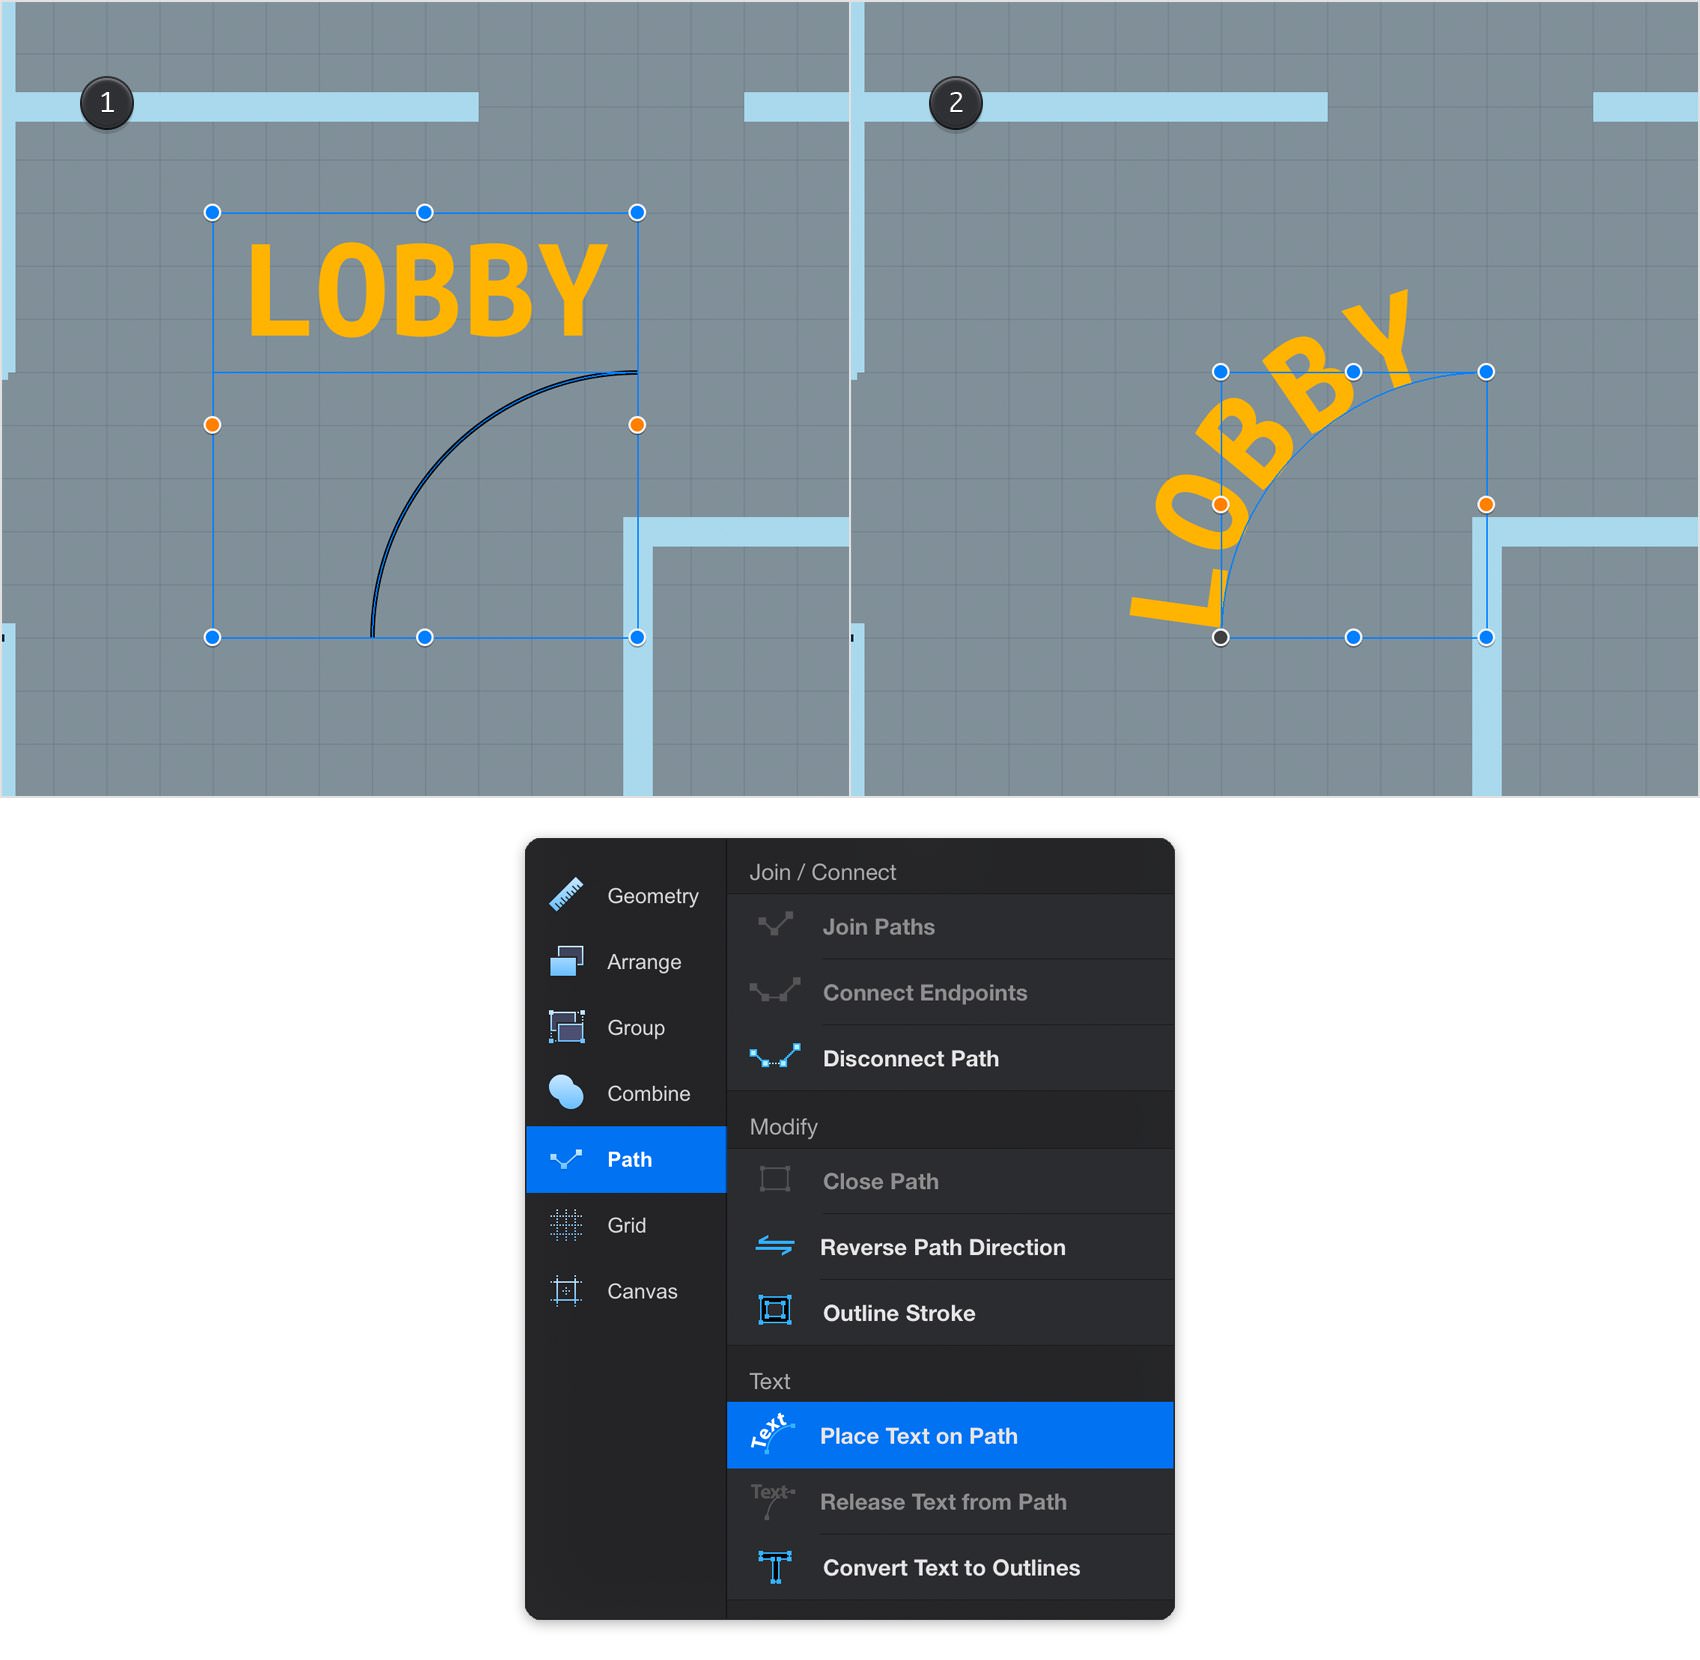
Select the yellow piece of text and the arc made in the previous step and go to the Path pane. tap the Place Text on Path button and your text will go along the selected path.
Step 36
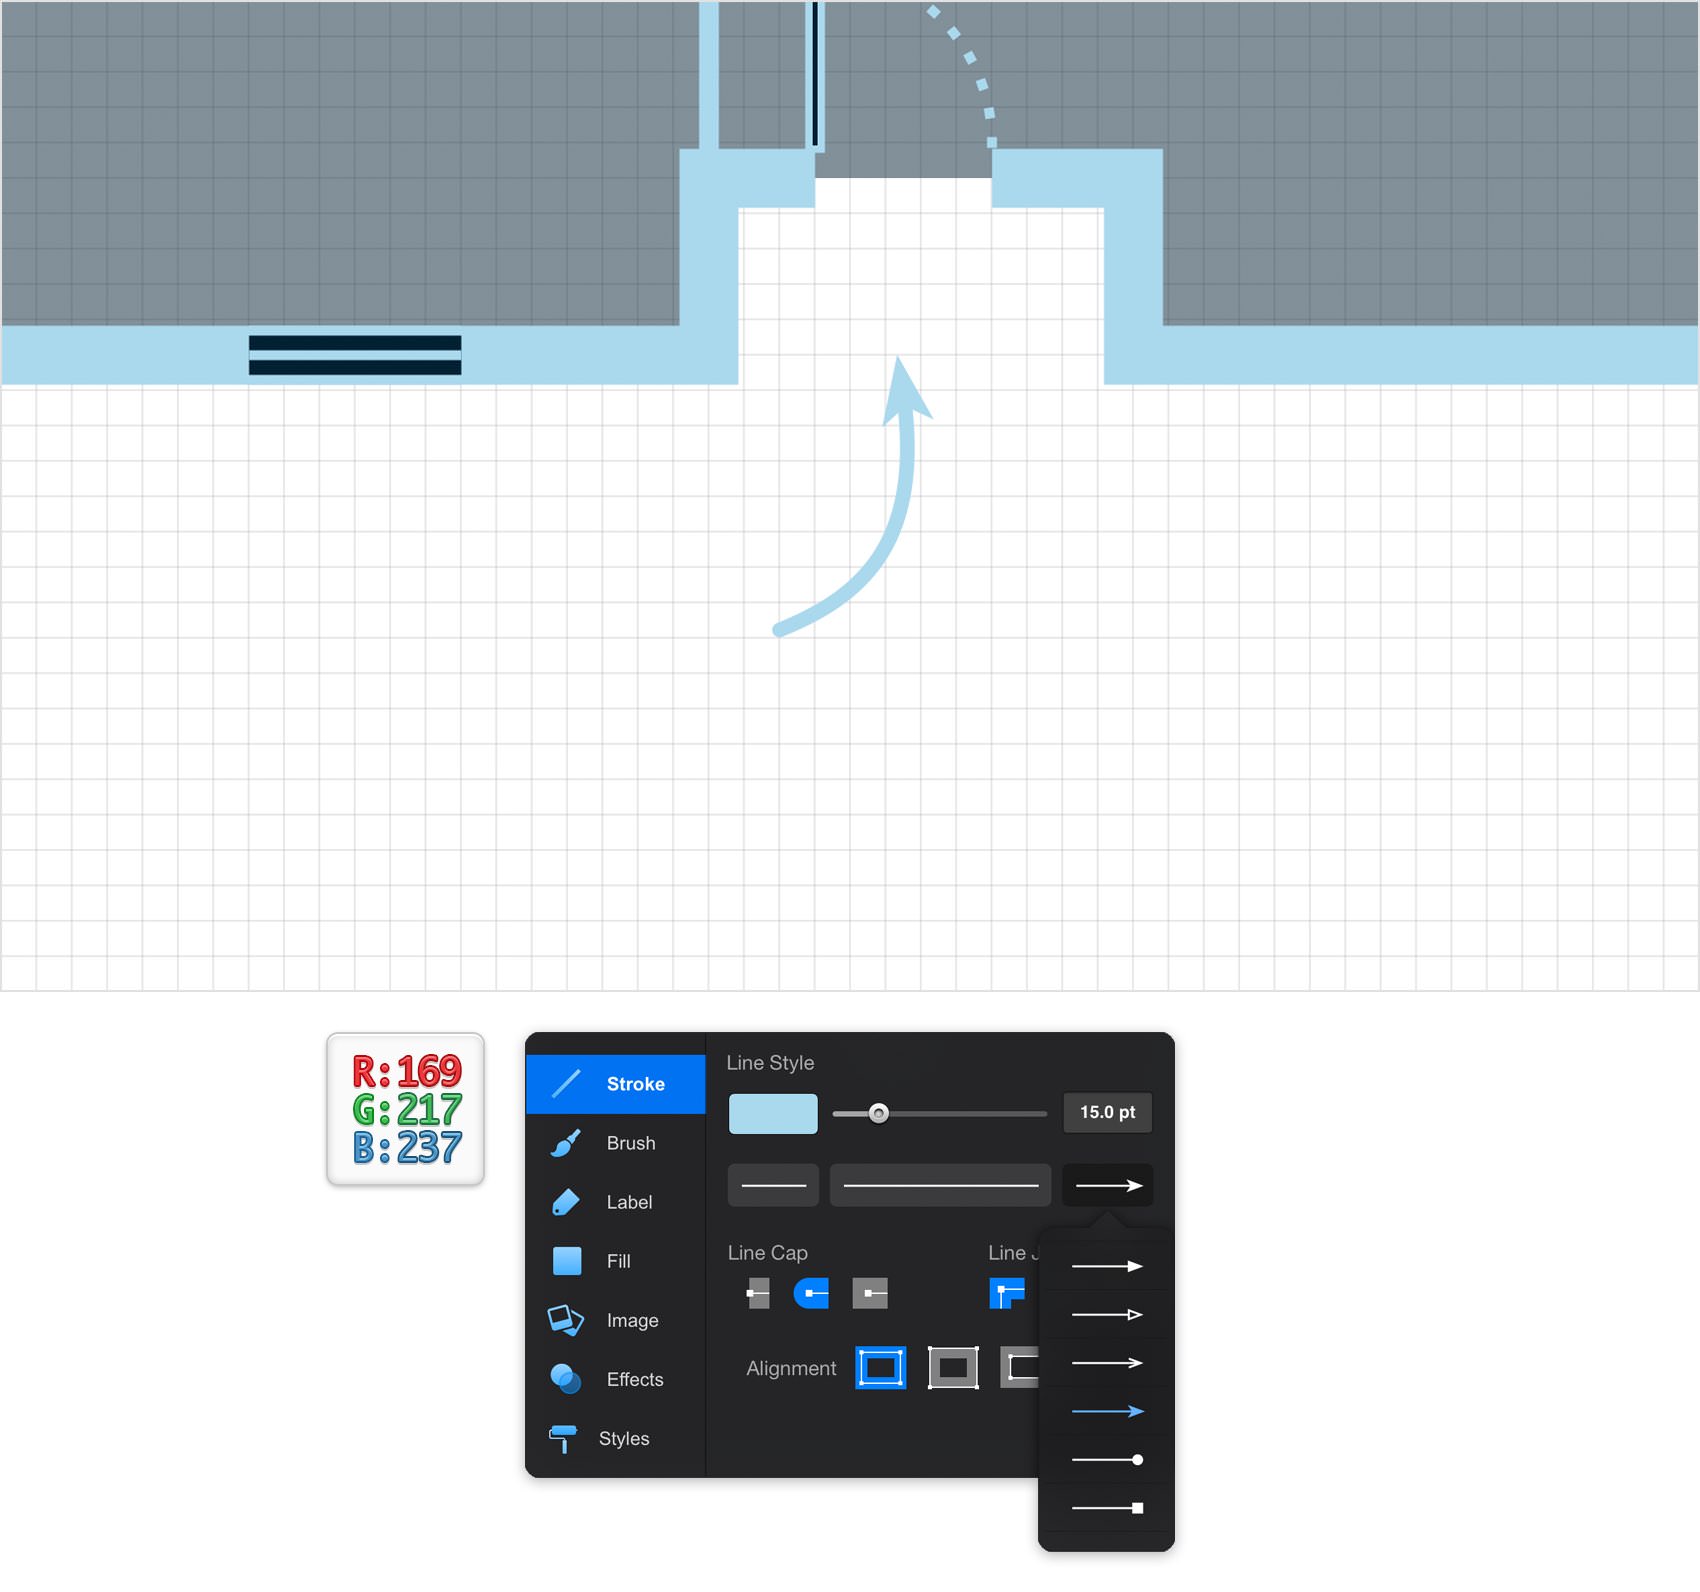
Disable the Snap to Grid. Using the Pen Tool, draw a curved path roughly as shown in the following image.
Make sure that this new path stays selected and go to the Stroke pane. First, replace the existing stroke color with your light blue and then drag the Width slider to 15 pt. Open the Arrows pane, select the arrow styles checked below and check the Round Cap button. If the arrowed end lies in the wrong spot you can easily change its location by tapping the Reverse Path Direction button from the Path pane.
Step 37
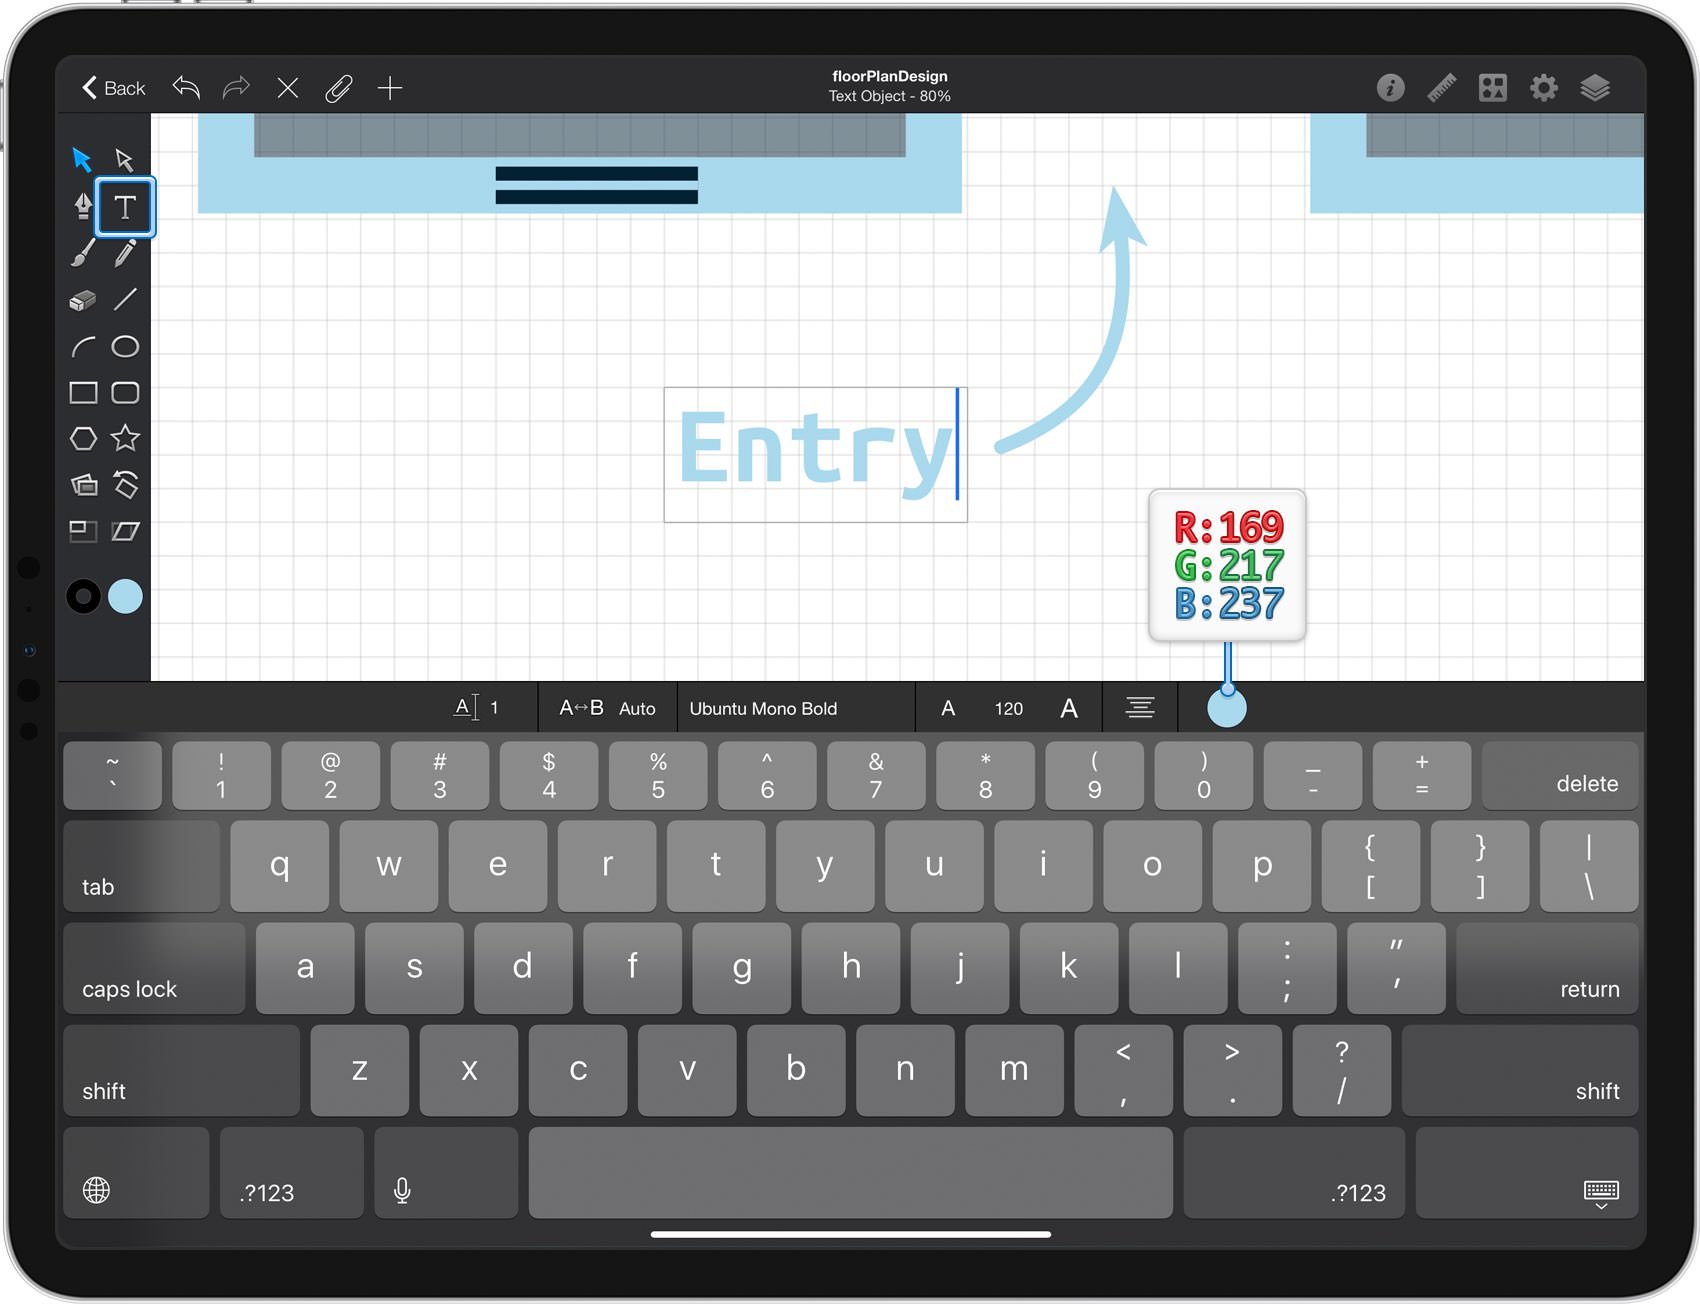
Pick the Type Tool and again double tap inside the newly added text field. Make sure that the Ubuntu Mono font is still active, make it Bold, set the size to 120 pt and replace the existing color with your light blue. Once you're done type the "Entry" piece of text.
Step 38
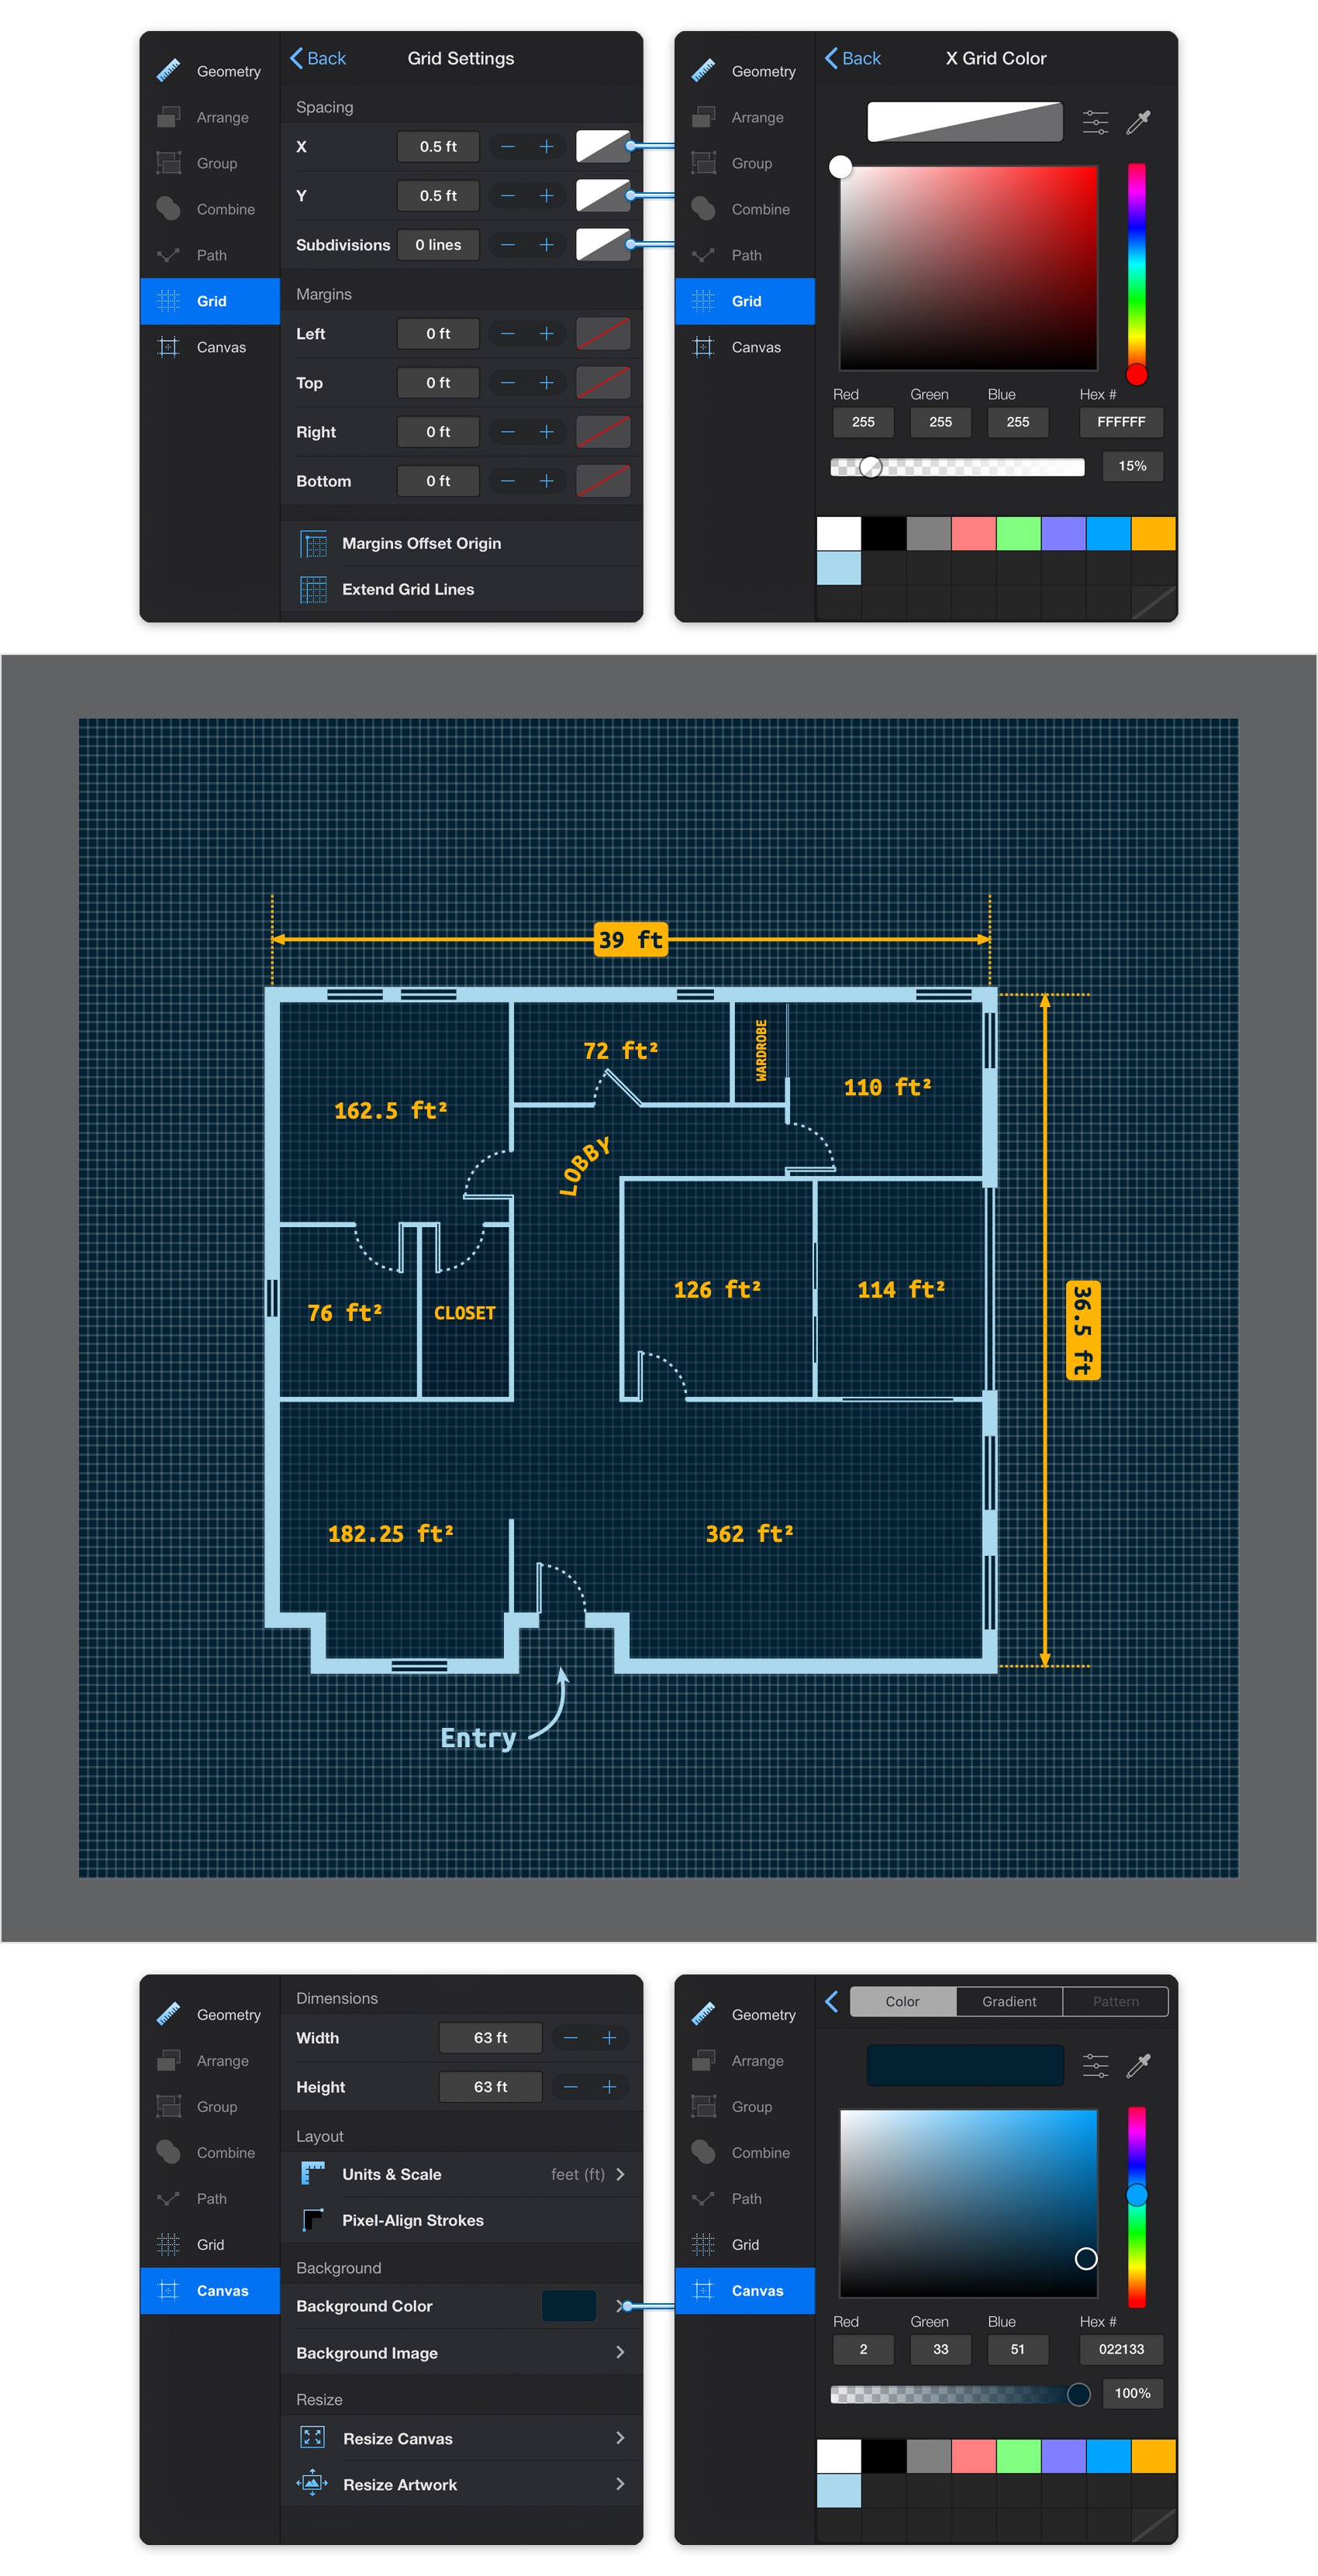
Get back to the Grid Settings pane from the Grid pane and tap the color wells that stand for the two Spacing attributes. Replace the existing color with white and don't forget to drag the Alpha slider to 15%.
Move to the Canvas pane panel, tap the color well that stands for the Background Color and replace the existing color with R=2 G=33 B=51.
Step 39
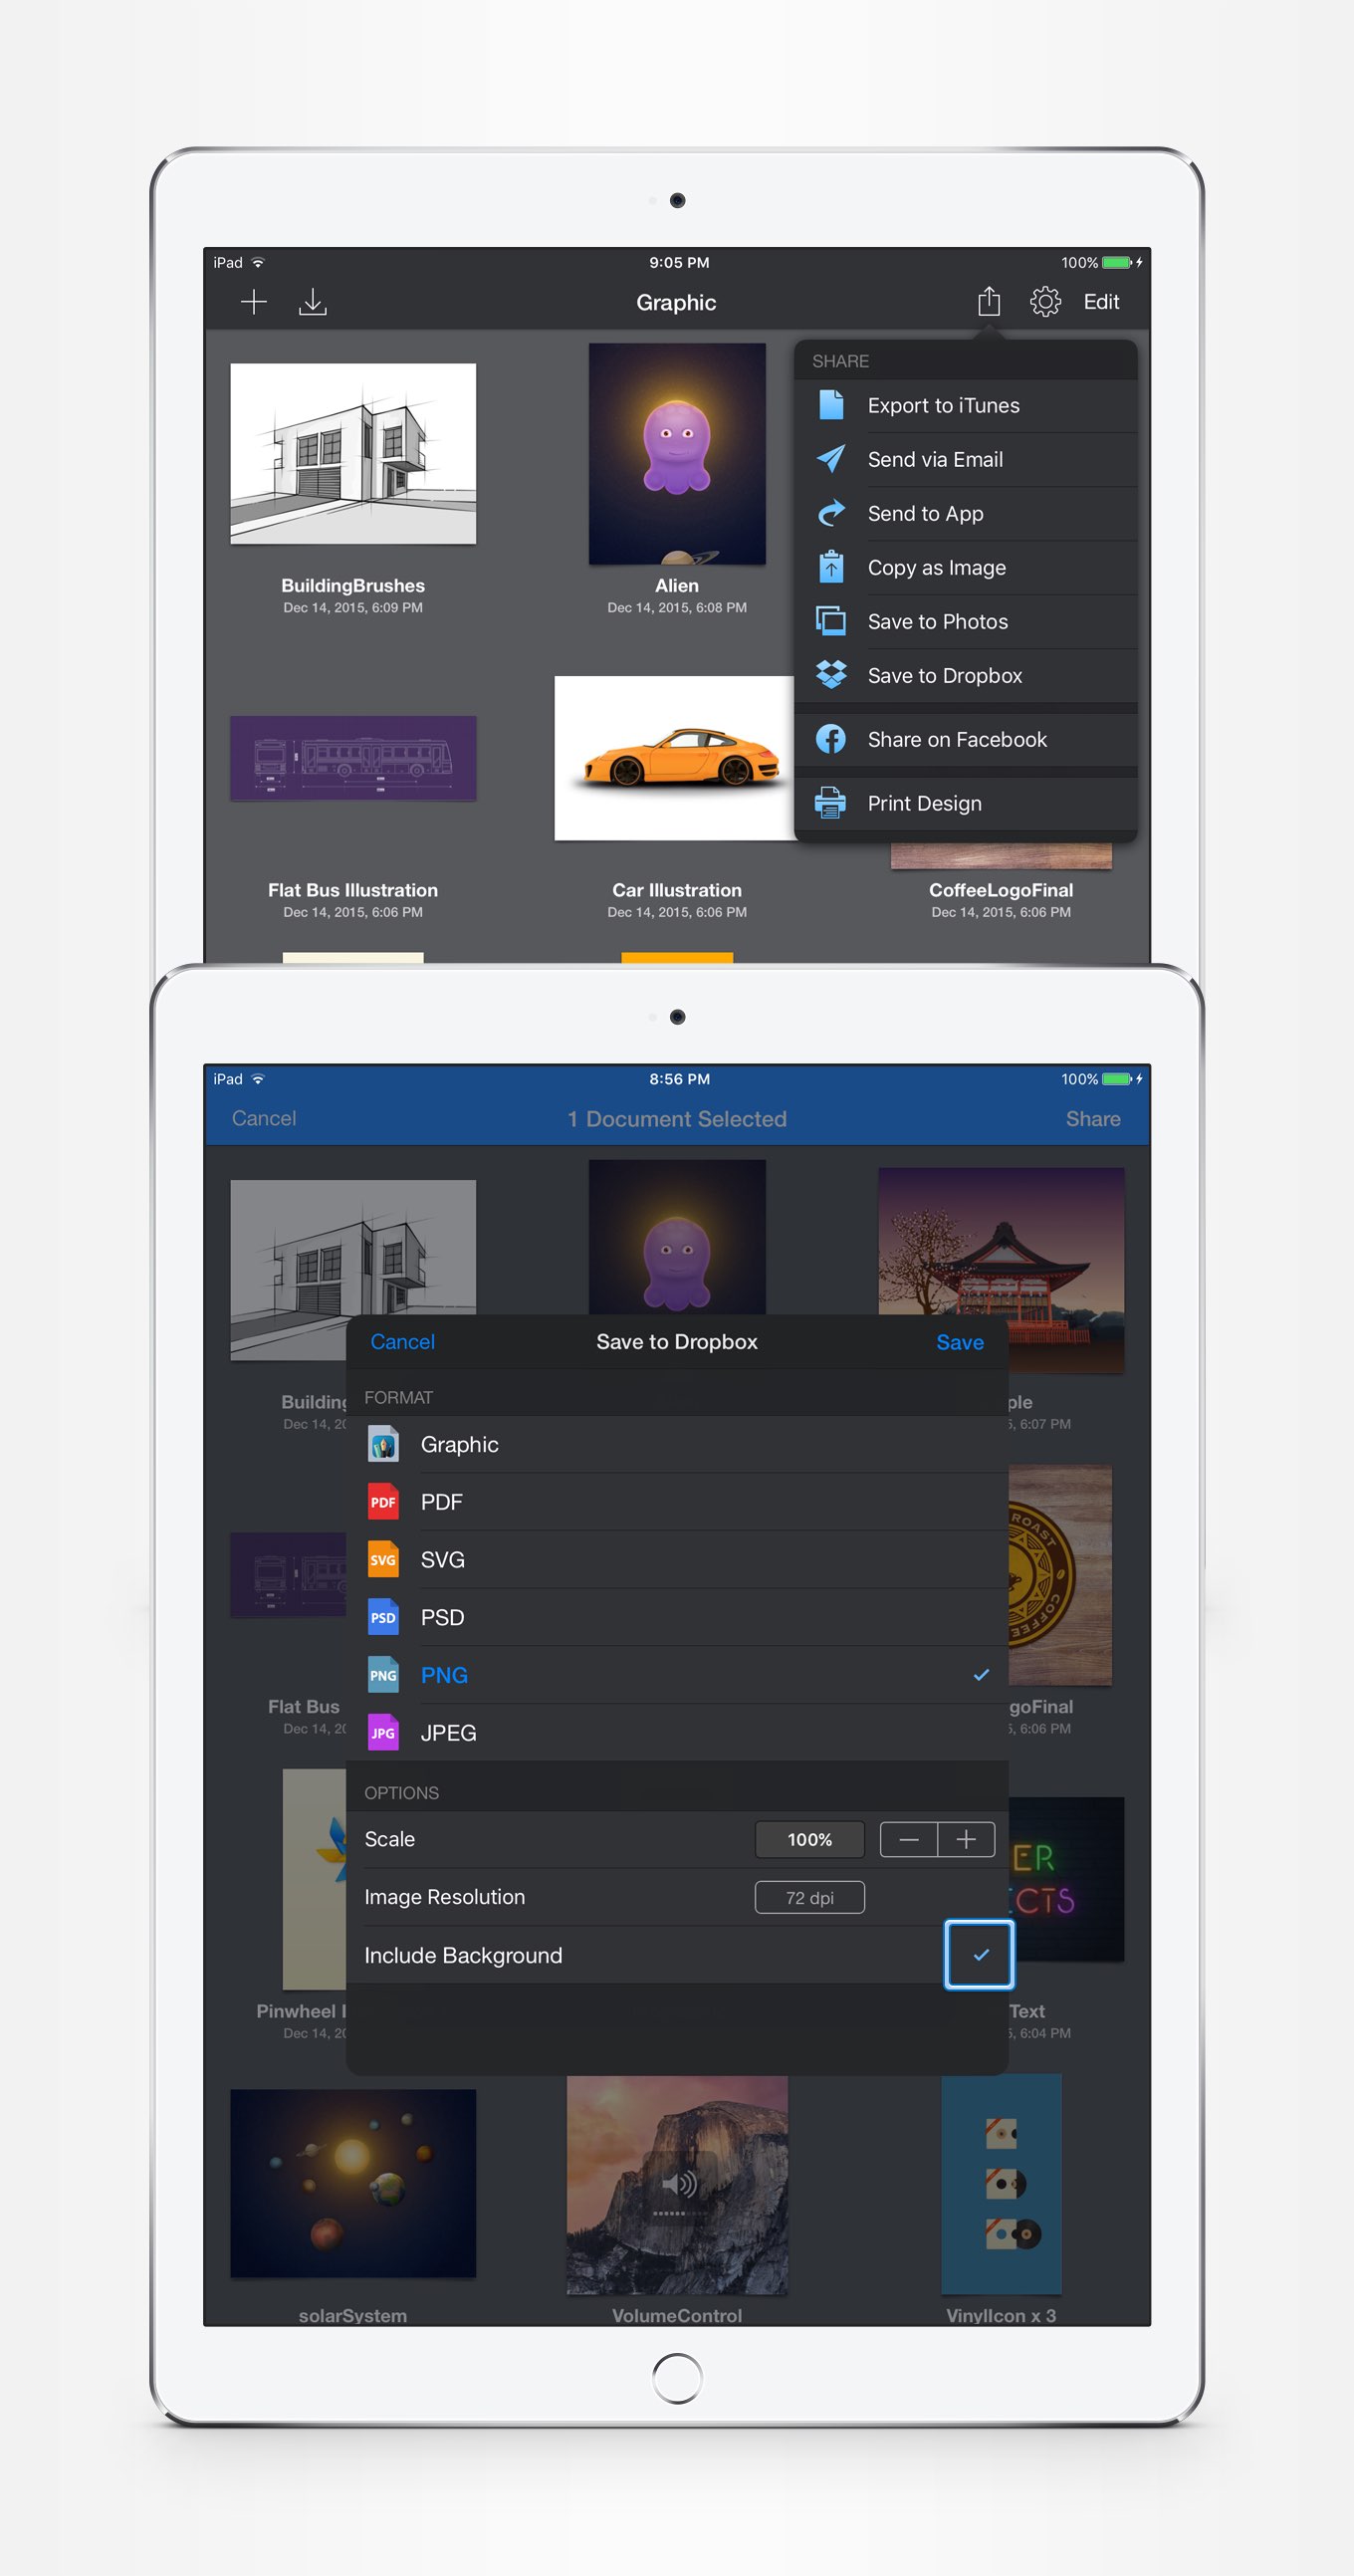
Finally, here's how you can easily export your entire design along with the grid and the canvas color. First, save your document and return to the Documents Browser.
Next, return to the Documents Browser and ttap the Seelct button from the Titlebar. Tap the document (or documents) that you want to save and then tap the Share button. Select the location where you want to export your document, enable the Include Background property, pick a file format, adjust the other attributes as you wish and then tap the Save button.
Finished Design
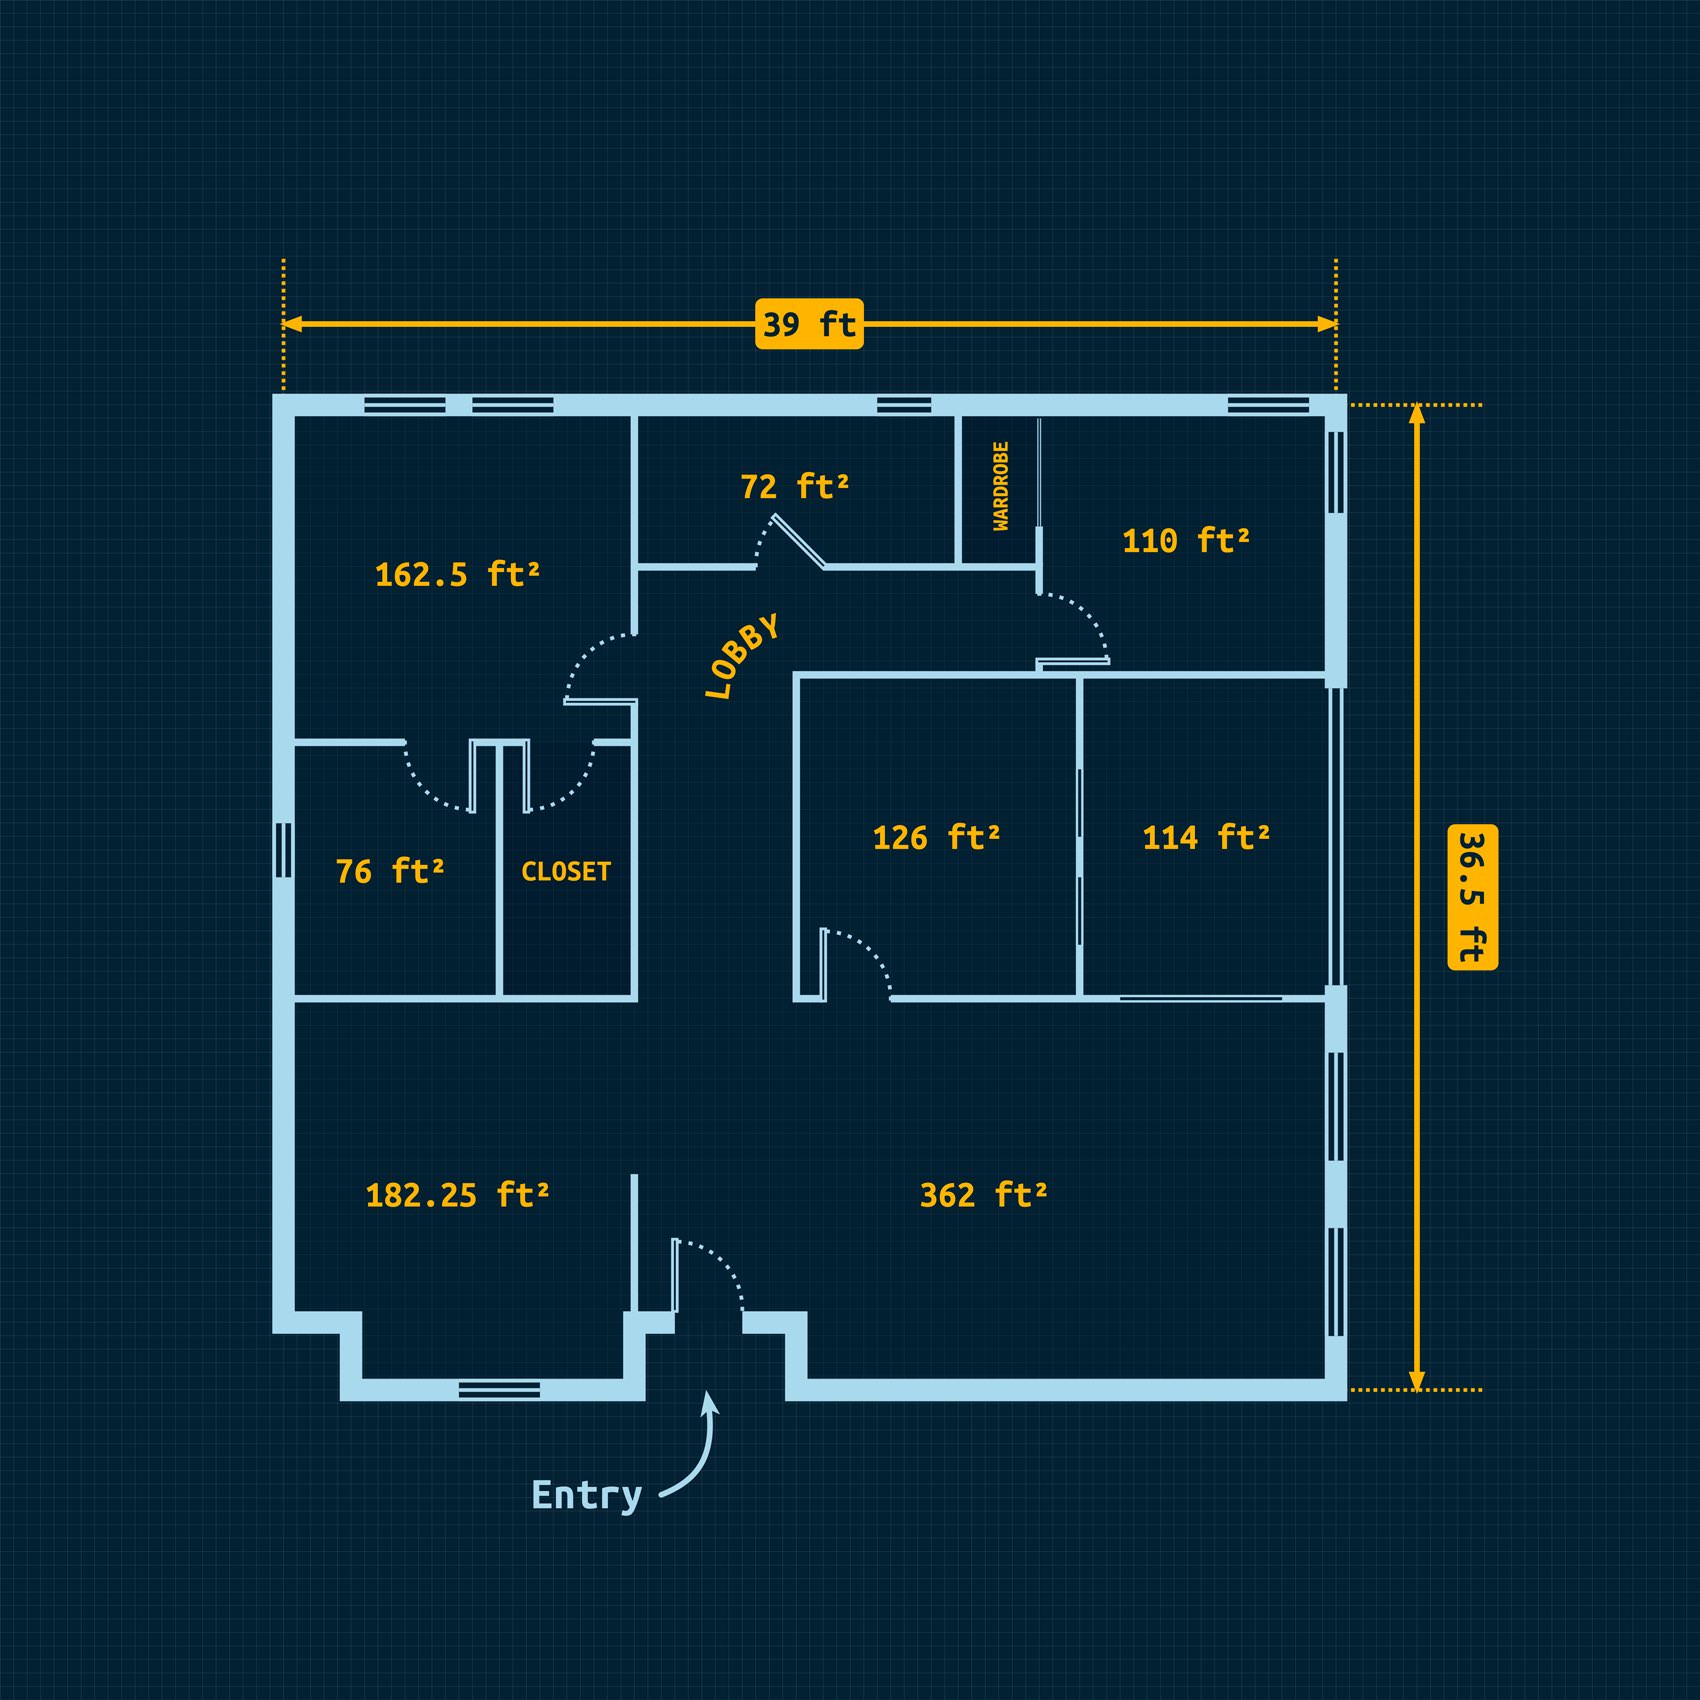
Congratulations, you've finished the tutorial!
Hope you've enjoyed learning some of the techniques and processes presented in these steps. As always, feel free to adjust the final design and make it your own.
Download Graphic File:
floor-plan-design.idraw